UG Calidus TCM User Guide
![]()
Aptean
Calidus Terminal Container Management User Guide
Calidus TCM - 2.0
18/07/2025 - 4.00
Reference: USER GUIDE
Introduction
This document is designed to be a basic system user guide for Terminal Container Management functionality.
The Terminal Container Management system enables the tracking of container movements in, around, and out of a container storage facility.
The administration application provides tools for adding and tracking movements, whilst the PDA application provides tools to complete the movements.
Note that this document contains reference to multiple seals and hazardous type maintenance changes forthcoming to the system.
System Configuration
TCM is configured with Calidus WMS.
Owner Rules
Note that the Owner under which you are configuring the user must be configure for Container Yard Management, through Owner Rules (CTMG). This is set up in teh Owner Maintenance screen STS1000.
Users
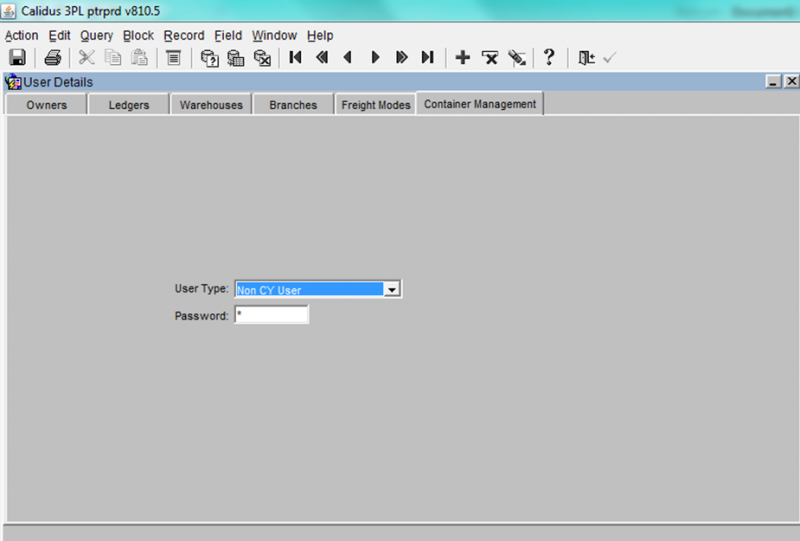
Users are setup via the WMS system via the “Container Management” Tab within the WMS user maintenance screen, FXMUSER
Note that the Owner under which you are configuring the user must be configure for Container Yard Management, through Owner Rules (CTMG).
Users are of a specific type
- Non Container management user (no access at all)
- Admin (access to all container management functions)
- PDA (access to device screens only)
- Customer (access to customer screens only)
System Access
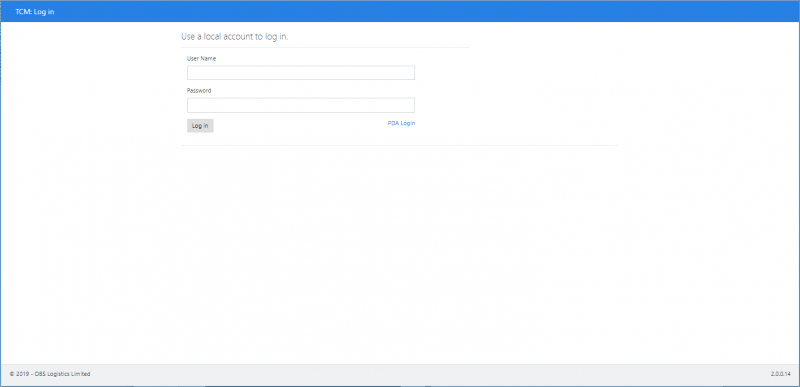
Select the application from the appropriate folder to launch the system to display the Logon page.
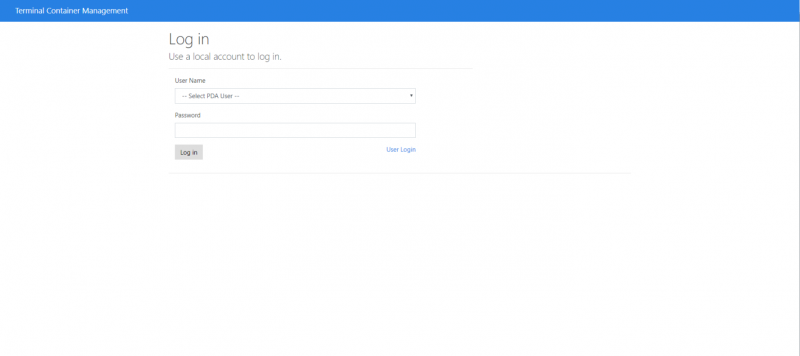
You can choose the type of login here using the link to the right of the Log In button:
- User Login - access to the TCM Admin console.
- PDA Login - access to the mobile application. See section PDA Login for more information.
Depending on the last type of login page visited this will either be the PDA login or the Admin login
For Admin login, you enter the User Name here, then input your Password.
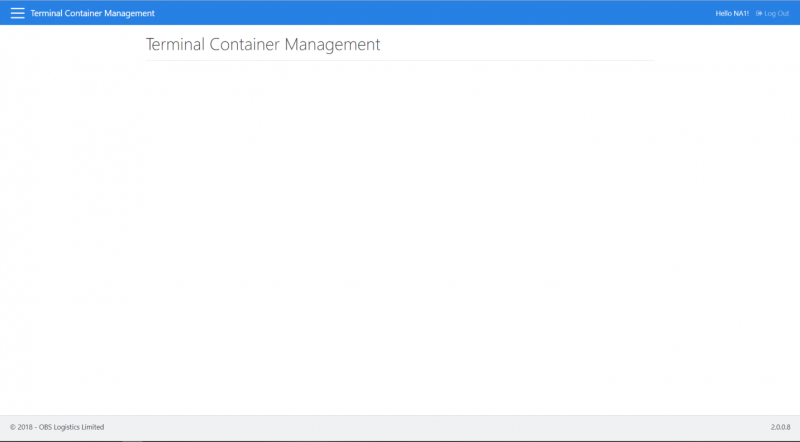
When you click the Log In button, you will be taken to the Admin home screen with the Main Menu - see here: Main Menu.
General
Screen Layout
Log Out
Logs the user out
Main Menu
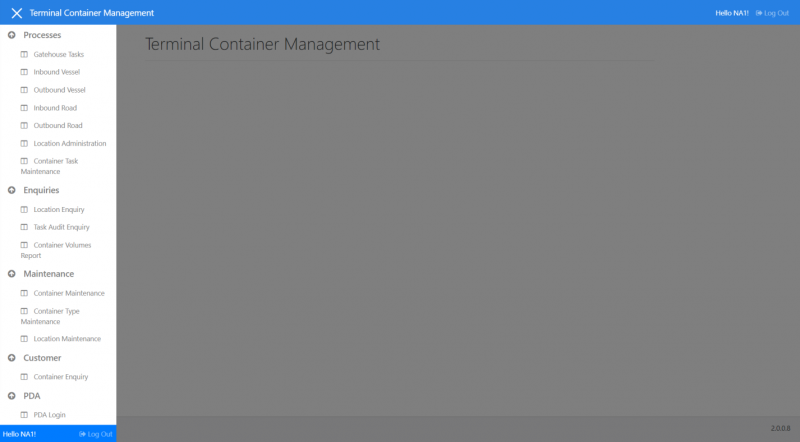
Access to system functions is provided through the main menu.
The Container Yard Admin screens all have the same options as the home screen, seen on first login:
- Menu (upper left) - this pop-out allows access to all the screens, dependent on the login type. There is also a Log Out button on this menu.
- Log Out (Top Right) - log out of the system and return to the login screen.
- Footer - shows the system version.
Data Filtering
In various screens, data can be retrieved using filter fields
Filter Fields
Various filter fields are available to narrow down container, container move and location selections. On some screens there are autocomplete functionality on certain filter fields.
- Date / Date Range - Filter data by a date or date range.
- Account - Users can select a specific customer account to filter data by
- Movement Type - The type of transaction to filter by. E.g. Inbound Rail, Outbound Gate.
- Registration - The vehicle registration or voyage reference
- Location - A location in the yard. E.g. BAY001, TRAIN001
- Container ID - A specific container ID to filter data by.
- Complete Tasks - Determines if complete tasks should be included in search results.
Filter Buttons
- Reset - This will clear all field entries.
- Search - This will display the results of the filter entered.
Data Sorting
Data is displayed in tabular format in various screens. Some screens allow for the sorting of data by clicking on the column headings.
Data Export
Data is displayed in tabular format in various screens. Some screens allow for the exporting of data to Excel, CSV or PDF where the Export icons appears
Container List
The Container List displays container details in a tabular format. A Search filter field can be used to filter through all records displayed in the table.
Selecting a Container
Clicking on the container row will enter an edit container details mode.
Columns
A number of different columns are displayed. Not all columns are displayed on all screens as it depends on the functionality of the screen in question. Clicking on a column heading will sort the table by the data contained within the column.
- Onsite Date - Date and time the container arrived on site
- Account ID / Account Name - The client account id and name.
- Container ID - The ID of the container
- Container Type - The type of container. E.g. 20ft container.
- Weight - Weight of the stock in the container (if any). This is not a required field in some cases and is defaulted to 0.
- Seal - Seal of the container. This is not a required field in some cases and is defaulted to blank.
Job Header
The Task Header is shown on various screens and allows the definition on container yard tasks.
Job Header Fields
Date/Time - Date and time. For Vessel based tasks this relates to the due date. For Gate and Road based tasks this relates to the time that a lorry arrives at the gate. For gate based tasks these fields are defaulted to the current date and time.
- Registration - The registration of the vehicle at the gate.
- Voyage Reference (Vessel Tasks Only) - A dropdown list of Voyage References
- Linked Voyage Reference (Outbound Vessel Tasks Only) - A dropdown list of Voyage References. This field represents a Linked Inbound Voyage.
- Reference (Road Tasks Only) - Job Reference that is used to identify the job on Work In Progress mode. This field is automatically generated depending on Haulier, date and time. This field can be manually edited.
- Account - The account that the order(s) relate to. E.g. MED01
- Haulier (Gate and Road) - The Haulier used. Only available for entry for Gate based tasks
- Carrier - The carrier used. Only available for Vessel based tasks .
- Service - The service used. Only available for Vessel based tasks.
Job Header Buttons
Action (OK) - The action button will initiate the next step in whatever process is being performed in the screen being used if all fields are valid.
Task/Movement List
The task/movement list is used to display outstanding tasks or completed tasks / container movements
Columns
A number of different columns are displayed. Not all columns are displayed on all screens as it depends on the functionality of the screen in question. Clicking on a column heading will sort the table by the data contained within the column.
- Date/Time - The date/time relating to the task or movement
- Movement Type - The type of movement/Task - e.g. Inbound Gate, Outbound Vessel etc
- Location - The location the container was removed from / deposited into
- To Location - The location the container is scheduled to be deposited into
- Account Name - The account name associated with the task
- Order # - The order number associated with the task
- Reference - Job Reference that is associated with the task
- Booking Reference - Reference from Bay Diary
- Haulier - The haulier associated with the tasks
- Container ID - The container to be moved, taken out of or deposited into the yard
- Type - The type of container
- Container Status - The status of the container
- Hazardous - Indicates if the container contains a hazardous substance or material
- UN # - If the container is flagged as hazardous, this will show the relevant UN number
- Weight - Weight of the container
- Seal - Seal of the container
Admin Screen Functionality
Gatehouse
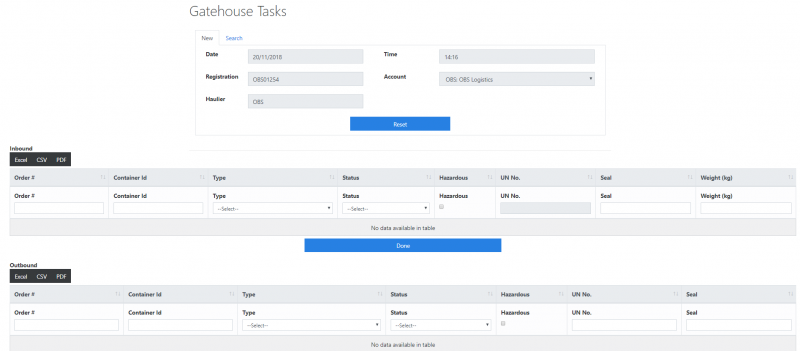
This screen is used to enter a new task, a combination of Inbound and/or outbound gate tasks.
This screen allows the user at the gate to:
- Define details of inbound gate tasks (maximum of 2)
- Define details of outbound gate tasks (maximum of 2)
- Search for confirmed, unconfirmed or all gatehouse tasks related to a job.
- Amend existing unconfirmed gate tasks
- Confirm details of existing gatehouse tasks so that they can be actioned by drivers
Once the details have been entered, saved and confirmed, the tasks are created and are immediately available for drivers to action.
Header Fields
The following fields are prompted for before entry of task details can begin:
- Date – Date Selector. Defaulted to the current date. Required Entry.
- Time – Time Selector. Defaulted to the current time. Required Entry.
- Registration – Textbox. The vehicle registration; Required Entry.
- Account – Drop-down List. Defaulted to the user's default account. Required Entry.
- Haulier - Auto-complete. If the Haulier does not exist, it will be automatically added when saving the data. Required Entry.
Inbound Fields
These will be displayed in a grid. There can be up to 2 containers entered here.
- Order # - Textbox. This is not validated by the system. Required Entry.
- Container ID - Textbox. Required Entry; Validated to the standard Container pattern with Mod 11 Check Digit calculation. Entered containers cannot already be in the terminal. Entered containers cannot already exist on an outstanding task.
- Type - Drop-down List; Defaulted if the Container ID has already been known in the system.
- Status - Drop-down List; Container Status. Values from E/F/ED/FD. Defaulted if the Container ID has already been known in the system.
- Hazardous - Checkbox; Defaults to unchecked. Defaulted if the Container ID has already been known in the system.
- UN No - Auto-complete; Values are taken from the preloaded UN Numbers within the WMS system; Entered and required entry only if the Container is marked as Hazardous. Defaulted if the Container ID has already been known in the system.
- Weight – Textbox. A weight in Kilogrammes. Only displayed if the container is known to be planned Outbound on Vessel (or Export). Required Entry. Must be greater than zero and less than 999999.
- Seal – Textbox. Required Entry if the container is known to be planned Outbound on Vessel (or Export).
![]() Note: Seals are subject to internal confirmation of the business case and the raising of a new change request with Aptean. When confirmed, this is expected to prompt for up to 3 seals per container.
Note: Seals are subject to internal confirmation of the business case and the raising of a new change request with Aptean. When confirmed, this is expected to prompt for up to 3 seals per container.
![]() Note: Hazardous is subject to internal confirmation of the business case and the raising of a new change request with Aptean. When confirmed, this is expected to allow a drop-down list of all Hazardous Types defined in the WMS.
Note: Hazardous is subject to internal confirmation of the business case and the raising of a new change request with Aptean. When confirmed, this is expected to allow a drop-down list of all Hazardous Types defined in the WMS.
If an item in the grid is clicked, the user is allowed to edit it (if the task is unconfirmed).
Export buttons are available to export the rows of this table to CSV, Excel and PDF formats, so the user can print these details if required.
Outbound Fields
These will be displayed in a grid. There can be up to 2 containers entered here.
- Order # - Textbox. This is not validated by the system. Required Entry.
- Container ID - Textbox. Required Entry; Validated to the standard Container pattern with Mod 11 Check Digit calculation. Entered containers must already exist in the system and be associated with the entered “Account ID”. Entered containers must already be in the terminal. Entered containers cannot already exist on an outstanding task.
- Type - Drop-down List; Defaulted if the Container ID has already been known in the system.
- Status - Drop-down List; Container Status. Values from E/F/ED/FD. Defaulted if the Container ID has already been known in the system.
- Hazardous - Checkbox; Defaults to unchecked. Defaulted if the Container ID has already been known in the system.
- UN No - Auto-complete; Values are taken from the preloaded UN Numbers within the WMS system; Entered and required entry only if the Container is marked as Hazardous. Defaulted if the Container ID has already been known in the system.
- Seal – Textbox. Optional Entry
![]() Note: Seals are subject to internal confirmation of the business case and the raising of a new change request with Aptean. When confirmed, this is expected to prompt for up to 3 seals per container.
Note: Seals are subject to internal confirmation of the business case and the raising of a new change request with Aptean. When confirmed, this is expected to prompt for up to 3 seals per container.
![]() Note: Hazardous is subject to internal confirmation of the business case and the raising of a new change request with Aptean. When confirmed, this is expected to allow a drop-down list of all Hazardous Types defined in the WMS.
Note: Hazardous is subject to internal confirmation of the business case and the raising of a new change request with Aptean. When confirmed, this is expected to allow a drop-down list of all Hazardous Types defined in the WMS.
Outbound task entry allows anonymous containers to be specified (exact container to be chosen during task execution). To do this the user simply enters a reference beginning with EMPTY in the container id field and selects the required Type and Container status.
Export buttons are available to export the rows of this table to CSV, Excel and PDF formats, so the user can print these details if required.
Task Creation
As data is entered it is saved by either clicking the appropriate button, pressing ENTER or TABbing onto the next row.
On saving the entry the data will be validated and the user prompted to confirm the entry or correct problems. If everything passes validation, the system will:
- Create records on the Task table at unconfirmed status.
- Create Containers if they were previously unknown.
- Update Containers if they were previously known.
- Create a Haulier if it was previously unknown.
Once entry has been completed a Confirm button is present to send tasks out for execution. Tasks can be amended at any point prior to confirmation.
Task Amendments
A Search tab is available for users to search by Registration (auto-complete) for a saved Inbound Gate task, choosing whether to look for confirmed, un-confirmed or all details (defaulted to un-confirmed). Un-confirmed tasks can be amended as required.
Inbound Vessel
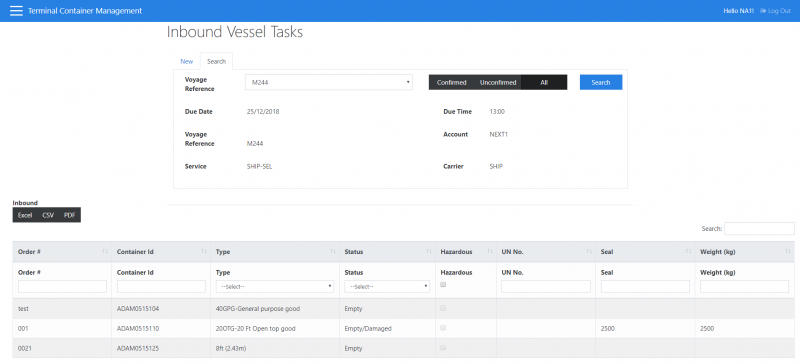
The inbound vessel screen allows the user to set up the pre-advice of tasks arriving by ship. If these tasks have already been pre-created in the WMS as goods receipts this screen will display that data.
This screen allows users to:
- Define details of new inbound vessel tasks (unlimited)
- Search for confirmed, unconfirmed or all inbound vessel tasks related to a voyage
- Amend existing unconfirmed inbound vessel tasks
- Confirm details of existing inbound vessel tasks so that they can be actioned by drivers
Once the details have been entered, saved and confirmed, the tasks are created and are immediately available for drivers to action.
Header Fields
On entry to the screen, the system will prompt for the following data.
- Account - Drop-down List; defaulted to the user's default account
- Due Date – Date Selector; Validated as a date; not defaulted.
- Due Time – Time Selector; Validated as a time; not defaulted.
- Voyage Reference – Drop-down List; Current voyages looked up from the VOYAGES table – Required.
- Service – Textbox; Optional free text entry field.
- Carrier - Textbox; Optional free text entry field.
Task Fields
These will be displayed in a grid. There is no limit to the number of records that can be entered. Entering a row of data will automatically show the data above and extend the grid by another line.
- Order # - Textbox. This is not validated by the system. Required Entry.
- Container ID – lookup on Planned WMS Containers. Required Entry; Validated to the standard Container pattern with Mod 11 Check Digit calculation. Entered containers cannot already be in the terminal. Entered containers cannot already exist on an outstanding task.
- Type - Drop-down List; Defaulted if the Container ID has already been known in the system.
- Status - Drop-down List; Container Status. Values from Empty/Full/Empty (Damaged)/Full (Damaged). Defaulted if the Container ID has already been known in the system.
- Hazardous - Checkbox; Defaults to unchecked. Defaulted if the Container ID has already been known in the system.
- UN No - Auto-complete; Values are taken from the preloaded UN Numbers within the WMS tables; Entered only if the Container is marked as Hazardous. Defaulted if the Container ID has already been known in the system.
- Seal - Textbox. Optional entry.
- Weight - Textbox (Numeric Only). Optional Entry.
![]() Note: Seals are subject to internal confirmation of the business case and the raising of a new change request with Aptean. When confirmed, this is expected to prompt for up to 3 seals per container.
Note: Seals are subject to internal confirmation of the business case and the raising of a new change request with Aptean. When confirmed, this is expected to prompt for up to 3 seals per container.
![]() Note: Hazardous is subject to internal confirmation of the business case and the raising of a new change request with Aptean. When confirmed, this is expected to allow a drop-down list of all Hazardous Types defined in the WMS.
Note: Hazardous is subject to internal confirmation of the business case and the raising of a new change request with Aptean. When confirmed, this is expected to allow a drop-down list of all Hazardous Types defined in the WMS.
If an item in the grid is clicked, the user is allowed to edit it (if the task is un-confirmed).
Export buttons are available to export the rows of this table to CSV, Excel and PDF formats, so the user can print these details if required.
Task Creation
As data is entered it is saved by either clicking the appropriate button, pressing ENTER or TABbing onto the next row.
On saving the entry the data will be validated and the user prompted to confirm the entry or correct problems. If everything passes validation, the system will:
- Create records on the Task table at unconfirmed status.
- Create Containers if they were previously unknown.
- Amend Containers if they were previously known.
Once entry has been completed a Confirm button is present to send tasks out for execution. Tasks can be amended at any point prior to confirmation.
Task Amendments
A Search tab is available for users to search by Voyage Reference (auto-complete) for a saved Inbound Vessel Advice, choosing whether to look for confirmed, unconfirmed or all details (defaulted to un-confirmed). Un-confirmed tasks can be amended as required.
Outbound Vessel
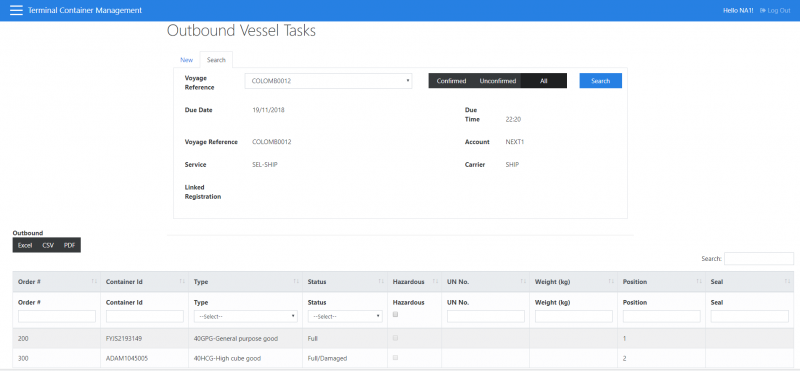
This screen is extremely similar to the Inbound Vessel screen, except for:
- The user can optionally link an Outbound Vessel advice to an Inbound Vessel advice.
- The user will use the position field to indicate the order of loading the containers onto the vessel
This screen allows users to:
- Define details of new outbound vessel tasks (unlimited)
- Search for confirmed, unconfirmed or all outbound vessel tasks related to a voyage
- Amend existing unconfirmed outbound vessel tasks
- Confirm details of existing outbound vessel tasks so that they can be actioned by drivers
Once the details have been entered, saved and confirmed, the tasks are created and are immediately available for drivers to action.
Header Fields
On entry to the screen, the system will prompt for the following data.
- Account - Drop-down List; defaulted to the user's default account
- Date – Date Selector; Validated as a date; not defaulted.
- Time – Time Selector; Validated as a time; not defaulted.
- Voyage Reference – Drop-down List; Current voyages looked up from the VOYAGES table – Required.
- Service – Textbox; Optional free text entry field.
- Carrier - Textbox; Optional free text entry field.
- Linked Voyage Reference - Optional Entry; Drop-down List of unconfirmed inbound voyages on the same day up to day -3.
Task Fields
These will be displayed in a grid. There is no limit to the number of records that can be entered. Entering a row of data will automatically show the data above and extend the grid by another line.
- Order # - Textbox. This is not validated by the system. Required Entry.
- Container ID - Textbox. Required Entry; Validated to the standard Container pattern with Mod 11 Check Digit calculation. Entered containers must already exist in the system and be associated with the entered “Account ID”. Entered containers must already be in the terminal. Entered containers cannot already exist on an outstanding task.
- Type - Drop-down List; Defaulted if the Container ID has already been known in the system.
- Status - Drop-down List; Container Status. Values from E/F/ED/FD. Defaulted if the Container ID has already been known in the system.
- Hazardous - Checkbox; Defaults to unchecked. Defaulted if the Container ID has already been known in the system.
- UN No - Auto-complete; Values are taken from the preloaded UN Numbers within the WMS tables; Entered only if the Container is marked as Hazardous. Defaulted if the Container ID has already been known in the system.
- Weight - Textbox (Numeric Only). A weight in Kilogrammes. Required Entry. Must be greater than zero and less than 999999.
- Position – Textbox. A numeric position. Must be between 1 and 9999. Required Entry. Position must be unique for the registration (i.e. can’t enter a position of 2 twice)
- Seal - Textbox. Optional entry
Export buttons are available to export the rows of this table to CSV, Excel and PDF formats, so the user can print these details if required.
Outbound task entry allows anonymous containers to be specified (exact container to be chosen during task execution). To do this the user simply enters a reference beginning with EMPTY in the container id field and selects the required Type and Container status.
Task Creation
As data is entered it is saved by either clicking the appropriate button, pressing ENTER or TABbing onto the next row.
On saving the entry the data will be validated and the user prompted to confirm the entry or correct problems. If everything passes validation, the system will:
- Create records on the Task table at unconfirmed status.
- Create Containers if they were previously unknown.
Once entry has been completed a Confirm button is present to send tasks out for execution. Tasks can be amended at any point prior to confirmation. Tasks may also be “confirmed” via the Bay Diary system if the systems are linked for the purposes of executing full container picks.
Task Amendments
A Search tab is available for users to search by Voyage Reference (auto-complete) for a saved Outbound Vessel Advice, choosing whether to look for confirmed, unconfirmed or all details (defaulted to un-confirmed). Un-confirmed tasks can be amended as required.
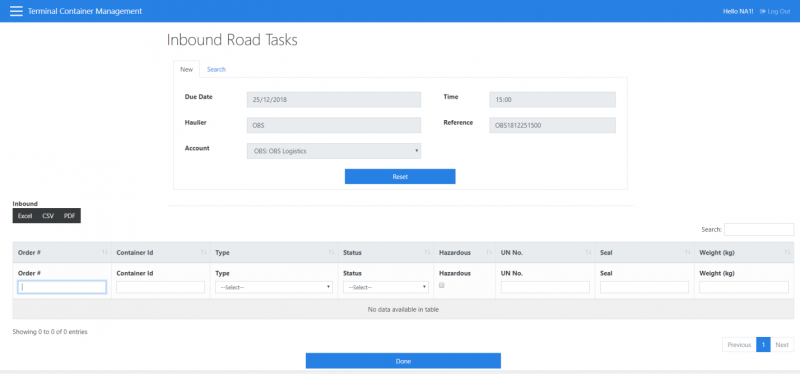
Inbound Road
The inbound road screen allows the user to set up the pre-advice of tasks arriving through the road network.
This screen allows users to:
- Define details of new inbound road tasks (unlimited)
- Search for confirmed, unconfirmed or all inbound road tasks related to a job
- Amend existing unconfirmed inbound road tasks
- Confirm details of existing inbound road tasks so that they can be actioned by drivers
Once the details have been entered, saved and confirmed, the tasks are created and are immediately available for drivers to action.
Header Fields
On entry to the screen, the system will prompt for the following data.
- Account - Drop-down List; defaulted to the user's default account
- Date – Date Selector; Validated as a date; not defaulted.
- Time – Time Selector; Validated as a time; not defaulted.
- Haulier - Auto-complete. If the Haulier does not exist, it will be automatically added when saving the data. Required Entry.
- Registration - Will be generated from the Haulier. This can be overtyped with a registration or other reference as required.
Task Fields
These will be displayed in a grid. There is no limit to the number of records that can be entered. Entering a row of data will automatically show the data above and extend the grid by another line.
- Order # - Textbox. This is not validated by the system. Required Entry.
- Container ID - Textbox. Required Entry; Validated to the standard Container pattern with Mod 11 Check Digit calculation. Entered containers cannot already be in the terminal. Entered containers cannot already exist on an outstanding task.
- Type - Drop-down List; Defaulted if the Container ID has already been known in the system.
- Status - Drop-down List; Container Status. Values from Empty/Full/Empty (Damaged)/Full (Damaged). Defaulted if the Container ID has already been known in the system.
- Hazardous - Checkbox; Defaults to unchecked. Defaulted if the Container ID has already been known in the system.
- UN No - Auto-complete; Values are taken from the preloaded UN Numbers within the WMS tables; Entered only if the Container is marked as Hazardous. Defaulted if the Container ID has already been known in the system.
- Seal – Textbox. Required Entry the container is known to be planned Outbound on Vessel (or Export).
- Weight – Textbox (numeric only). Only displayed if the container is known to be planned Outbound on Vessel (or Export). Required Entry.
![]() Note: Seals are subject to internal confirmation of the business case and the raising of a new change request with Aptean. When confirmed, this is expected to prompt for up to 3 seals per container.
Note: Seals are subject to internal confirmation of the business case and the raising of a new change request with Aptean. When confirmed, this is expected to prompt for up to 3 seals per container.
![]() Note: Hazardous is subject to internal confirmation of the business case and the raising of a new change request with Aptean. When confirmed, this is expected to allow a drop-down list of all Hazardous Types defined in the WMS.
Note: Hazardous is subject to internal confirmation of the business case and the raising of a new change request with Aptean. When confirmed, this is expected to allow a drop-down list of all Hazardous Types defined in the WMS.
If an item in the grid is clicked, the user is allowed to edit it (if the task is unconfirmed).
Export buttons are available to export the rows of this table to CSV, Excel and PDF formats, so the user can print these details if required.
Task Creation
As data is entered it is saved by either clicking the appropriate button, pressing ENTER or TABbing onto the next row.
On saving the entry the data will be validated and the user prompted to confirm the entry or correct problems. If everything passes validation, the system will:
- Create records on the Task table at unconfirmed status.
- Create Containers if they were previously unknown.
- Update Containers if they were previously known.
Once entry has been completed a Confirm button is present to send tasks out for execution. Tasks can be amended at any point prior to confirmation.
Task Amendments
A Search tab is available for users to search by Registration (auto-complete) for a saved Inbound Road Advice, choosing whether to look for confirmed, unconfirmed or all details (defaulted to un-confirmed). Unconfirmed tasks can be amended as required.
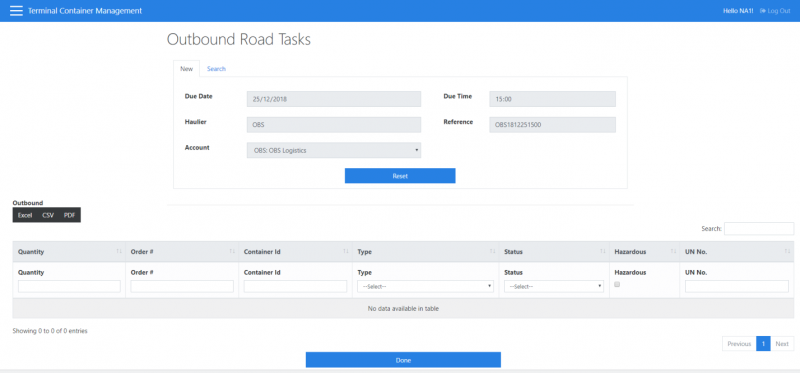
Outbound Road
This screen is extremely similar to the Inbound Road screen, except for:
- Registration is defaulted to the same as Inbound but prefixed with an “O” rather than an “I”
This screen allows users to:
- Define details of new outbound road tasks (unlimited)
- Search for confirmed, unconfirmed or all outbound road tasks related to a job
- Amend existing unconfirmed outbound road tasks
- Confirm details of existing outbound road tasks so that they can be actioned by drivers
Once the details have been entered, saved and confirmed, the tasks are created and are immediately available for drivers to action.
Header Fields
On entry to the screen, the system will prompt for the following data.
- Account - Drop-down List; defaulted to the user's default account
- Date – Date Selector; Validated as a date; not defaulted.
- Time – Time Selector; Validated as a time; not defaulted.
- Haulier - Auto-complete. If the Haulier does not exist, it will be automatically added when saving the data. Required Entry. On entry of Haulier the Registration will auto-populate with a generated reference of {HAULIER CODE}{YYMMDDHHMI}.
- Registration - This can be overtyped with a registration or other reference as required.
Task Fields
These will be displayed in a grid. There is no limit to the number of records that can be entered. Entering a row of data will automatically show the data above and extend the grid by another line.
- Quantity – Textbox. Optional Entry. Read-only if Container ID entered.
- Order # - Textbox. This is not validated by the system. Required Entry.
- Container ID - Textbox. Required Entry if Quantity not entered; Read-only if Quantity entered. Validated to the standard Container pattern with Mod 11 Check Digit calculation. Entered containers must already exist in the system and be associated with the entered “Account ID”. Entered containers must already be in the terminal. Entered containers cannot already exist on an outstanding task.
- Type - Drop-down List; Defaulted if the Container ID has already been known in the system.
- Status - Drop-down List; Container Status. Values from E/F/ED/FD. Defaulted if the Container ID has already been known in the system. If Quantity is entered then values should be restricted to E/ED
- Hazardous - Checkbox; Defaults to unchecked. Defaulted if the Container ID has already been known in the system. Read-only and unchecked if Quantity entered.
- UN No - Auto-complete; Values are taken from the preloaded UN Numbers within the WMS tables; Entered only if the Container is marked as Hazardous. Defaulted if the Container ID has already been known in the system.
![]() Note: Hazardous is subject to internal confirmation of the business case and the raising of a new change request with Aptean. When confirmed, this is expected to allow a drop-down list of all Hazardous Types defined in the WMS.
Note: Hazardous is subject to internal confirmation of the business case and the raising of a new change request with Aptean. When confirmed, this is expected to allow a drop-down list of all Hazardous Types defined in the WMS.
If an item in the grid is clicked, the user is allowed to edit it (if the task is unconfirmed).
Outbound Road allows anonymous containers to be collected by the incoming vehicle. To do this the user simply enters a reference beginning with EMPTY in the container id field and selects the required Type and Container status.
To ensure easier entry of anonymous containers coming in via road, this screen will allow the user to enter a quantity of empty containers to collect. If this is the case then the user will not specify a container id but just the type of container and if it is Empty or Empty/Damaged.
Items are created at an “unconfirmed” state and need to be confirmed for them to be made available for users to execute. This is done via the Confirm button.
If the bay diary system is integrated, the "Confirm" buttons for the tasks will not be shown. Tasks will be confirmed (and thus made “live”) by the Bay Diary system separately.
Export buttons are available to export the rows of this table to CSV, Excel and PDF formats, so the user can print these details if required.
Task Creation
As data is entered it is saved by either clicking the appropriate button, pressing ENTER or TABbing onto the next row.
On saving the entry the data will be validated and the user prompted to confirm the entry or correct problems. If everything passes validation, the system will:
- Create records on the Task table at unconfirmed status.
- Amend Containers if they were previously known.
Once entry has been completed a Confirm button is present to send tasks out for execution. Tasks can be amended at any point prior to confirmation.
Task Amendments
A Search tab is available for users to search by Registration (auto-complete) for a saved Outbound Road Advice, choosing whether to look for confirmed, unconfirmed or all details (defaulted to un-confirmed). Unconfirmed tasks can be amended as required.
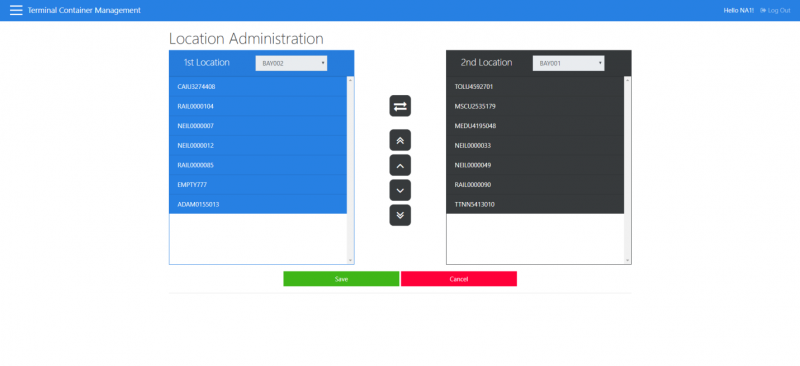
Location Administration
This screen allows the user to find a location and see all of the containers in FIFO sequence. The user will be able to change the sequence of containers in the location and save the results.
This screen allows users to:
- Alter the sequence of containers within a location
- Move containers from one location to another.
The user will also be able to select a second location and move containers into or out of that location by clicking buttons to move the top-most containers from one location to another.
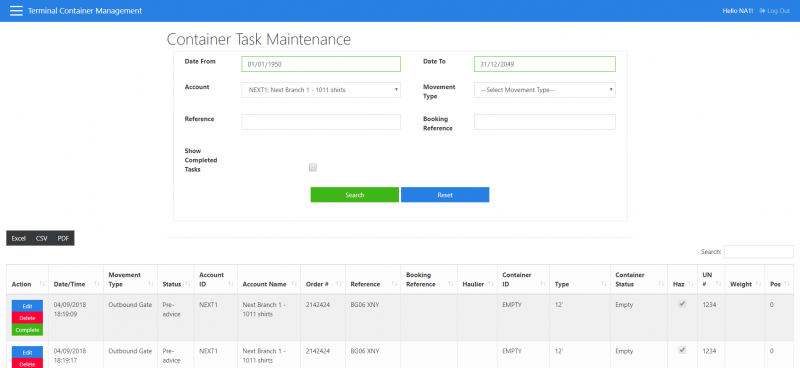
Container Task Maintenance
This screen allows the user to select tasks and
- Edit the details
- Cancel/delete the task
- Complete the task manually
This screen allows users to:
- View details of outstanding and/or complete tasks
- Amend open task details
- Delete open tasks
- Complete open tasks
Search Functionality and Results
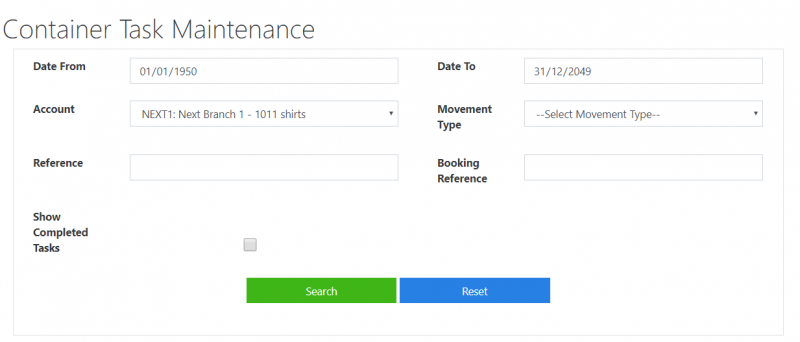
The screen allows users to find tasks using any or all of the following criteria:
- Date or Date Range
- Account
- Type:
- Inbound Gatehouse
- Outbound Gatehouse
- Inbound Road
- Outbound Road
- Inbound Vessel
- Outbound Vessel
- Move
- Registration
- Complete/Incomplete tasks
The search results will be displayed in a grid showing the following details:
- Date/Time
- Movement Type
- Task Status
- Account ID
- Account Name
- Order #
- Registration (Reference)
- Haulier
- Container ID
- Container Type
- Container Status
- Hazardous
- UN No
- Weight
- Position
![]() Note: Seals are subject to internal confirmation of the business case and the raising of a new change request with Aptean. When confirmed, this is expected to display up to 3 seals per container.
Note: Seals are subject to internal confirmation of the business case and the raising of a new change request with Aptean. When confirmed, this is expected to display up to 3 seals per container.
![]() Note: Hazardous is subject to internal confirmation of the business case and the raising of a new change request with Aptean. When confirmed, this is expected to display the Hazardous Type.
Note: Hazardous is subject to internal confirmation of the business case and the raising of a new change request with Aptean. When confirmed, this is expected to display the Hazardous Type.
Task Actions
Each row in the results grid includes an Action column with Edit, Delete, and Complete buttons. These buttons are all visible for incomplete tasks. For completed tasks, these buttons are generally not visible, with one exception: for Outbound Rail tasks, the Edit button is available to allow amendment of the Position.
Edit Functionality
The Edit button will open a popup showing:
- All the task’s details, allowing change of task details except for the Container ID and Task Date/Time.
- An Update button, to allow the user to save any changes to the details.
- A Cancel button to close the popup without saving any changes.
![]() Note: Seals are subject to internal confirmation of the business case and the raising of a new change request with Aptean. When confirmed, this is expected to prompt for up to 3 seals per container.
Note: Seals are subject to internal confirmation of the business case and the raising of a new change request with Aptean. When confirmed, this is expected to prompt for up to 3 seals per container.
![]() Note: Hazardous is subject to internal confirmation of the business case and the raising of a new change request with Aptean. When confirmed, this is expected to allow a drop-down list of all Hazardous Types defined in the WMS.
Note: Hazardous is subject to internal confirmation of the business case and the raising of a new change request with Aptean. When confirmed, this is expected to allow a drop-down list of all Hazardous Types defined in the WMS.
Delete Functionality
The Delete button will ask the user to confirm the request and, if confirmed, will remove the task.
Complete Functionality
The Complete button will allow the user to complete the task. Depending on the task type, the system will prompt for a location in which to place the container (Inbound) or just confirm the outbound.
Saving any changes will mark the task as complete by the user performing the action. Completed tasks can be amended but only for outbound rail where the position code can be modified as required.
After doing of any of these actions, the search results grid will be refreshed.
Location Enquiry
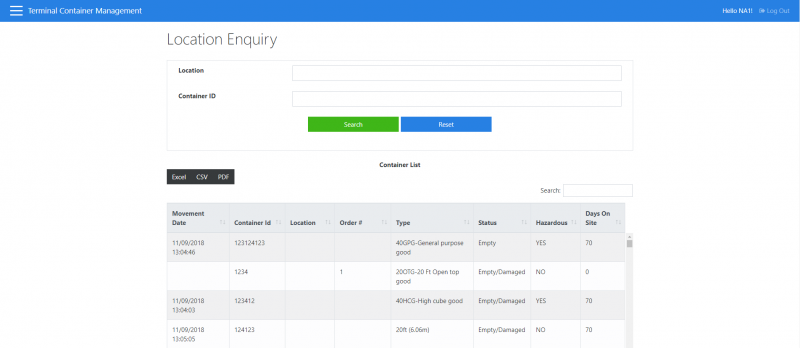
This screen allows the user to view container information through the entry of Location or Container.
This screen allows users to:
- Enquire on containers held within a specific location (or all locations)
- Enquire on specific containers
- Further drill down into the container details to see the movement history/associated signatures for the selected container
Understood. I've updated the text to ensure the word "buttons" is no longer bolded, only the names of the specific buttons themselves.
Filter and Results Display
The screen allows users to find tasks using any or all of the following criteria:
- Location Code
- Container ID
The search results will be displayed in a grid showing the following details:
- Date/Time
- Container ID
- Location
- Order #
- Type
- Container Status
- Hazardous
- # Days on Site
![]() Note: Hazardous is subject to internal confirmation of the business case and the raising of a new change request with Aptean. When confirmed, this is expected to display the Hazardous Type.
Note: Hazardous is subject to internal confirmation of the business case and the raising of a new change request with Aptean. When confirmed, this is expected to display the Hazardous Type.
The grid will be sorted by clicking on a column header, and can be exported to CSV, Excel, and PDF formats. Clicking on a container will show a screen displaying the container and all historical transactions for it.
Clicking on a container will show a screen showing the container and all historical transactions for the container.
Task Audit Enquiry
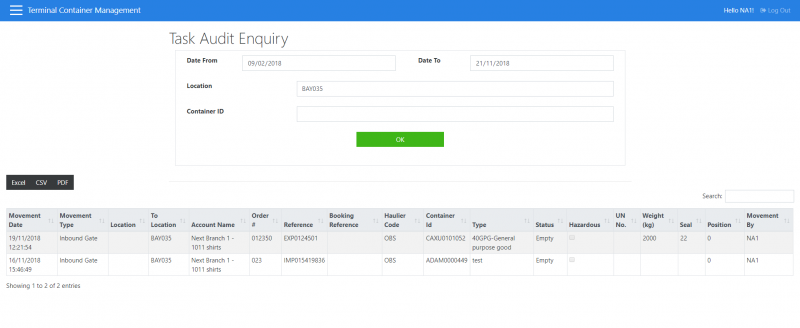
This screen allows the user to view the historical tasks that have happened to a container through the entry of Date Range, Location or Container
This screen allows users to:
- See the movement history of containers and its locations by date range
Filter and Results Display
The user will be able to filter data through:
- Date Range (required)
- Location code
- Container ID
The results will be displayed in a grid showing:
- Date/Time
- Movement Type
- From Location
- To Location
- Account
- Order #
- Haulier
- Container ID
- Type
- Container Status
- Hazardous
- UN Number
- Weight
- Seal
- Position
- Movement By
![]() Note: Seals are subject to internal confirmation of the business case and the raising of a new change request with Aptean. When confirmed, this is expected to display up to 3 seals per container.
Note: Seals are subject to internal confirmation of the business case and the raising of a new change request with Aptean. When confirmed, this is expected to display up to 3 seals per container.
![]() Note: Hazardous is subject to internal confirmation of the business case and the raising of a new change request with Aptean. When confirmed, this is expected to display the Hazardous Type.
Note: Hazardous is subject to internal confirmation of the business case and the raising of a new change request with Aptean. When confirmed, this is expected to display the Hazardous Type.
The grid will be sorted by clicking on a column header, and can be exported to CSV, Excel, and PDF.
Container Volumes Report
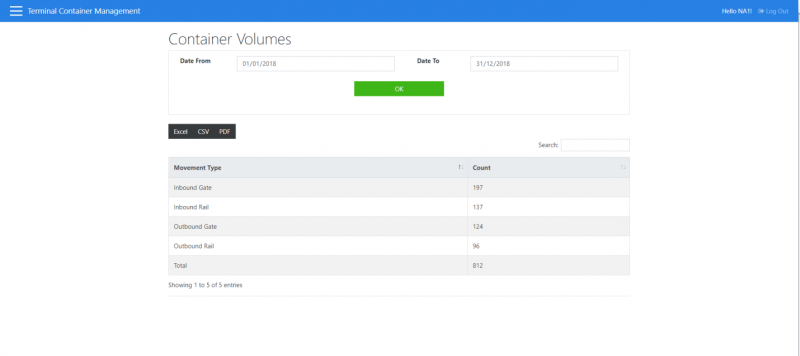
This screen reports on the number of containers in and out of the terminal by type
This screen allows users to:
- Report on the number of movements for a given date range. The results are shown by movement type.
The user will be able to filter data through:
- Date Range (required)
The date range defaults to the current year start/end.
Container Maintenance
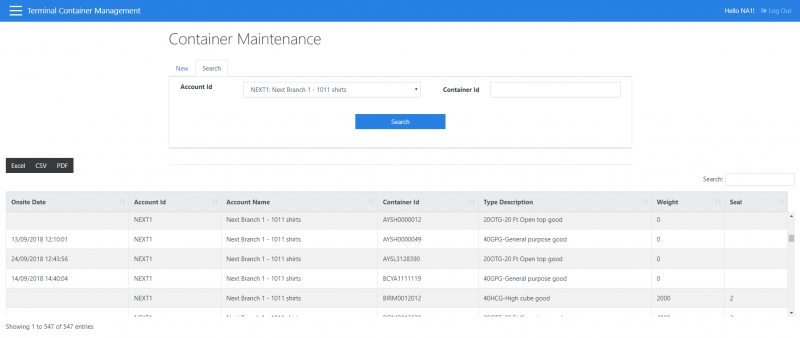
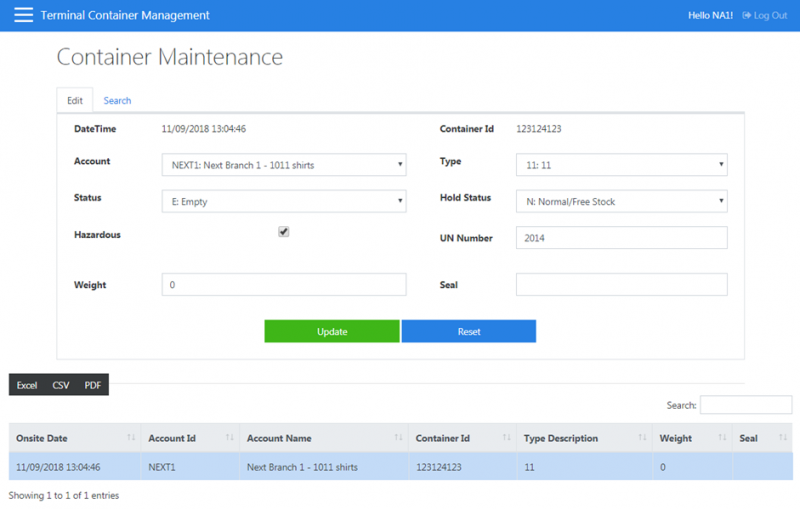
This screen allows the user to see the stored details of a container.
This screen allows users to:
- Search for container details by account or container id.
- Maintain details of containers held on the system
- Create new containers (i.e. enter details of containers not currently on the system)
Filter and Results Display
The user will be able to filter data through:
- Account
- Container ID
The results will be displayed in a grid showing:
- Onsite Date/Time
- Account ID
- Account Name
- Container ID
- Type
- Weight
- Seal
![]() Note: Seals are subject to internal confirmation of the business case and the raising of a new change request with Aptean. When confirmed, this is expected to display up to 3 seals per container.
Note: Seals are subject to internal confirmation of the business case and the raising of a new change request with Aptean. When confirmed, this is expected to display up to 3 seals per container.
Export buttons are available to export the rows of this table to CSV, Excel, and PDF formats, so the user can print these details if required.
Clicking on a container will display the full details of the container and allow the user to edit the details, saving the data with a Save button provided. A new container can be added through the use of a New button.
The following items may be edited:
- Account - Drop-down List.
- Type - Drop-down List.
- Status - Drop-down List; Container Status. Values from Empty/Full/Empty (Damaged)/Full (Damaged).
- Hold Status - Drop-down List.
- Hazardous - Checkbox;
- UN Number - Auto-complete; Values are taken from the preloaded UN Numbers within the WMS tables; Entered only if the Container is marked as Hazardous.
- Weight - Textbox (numeric only).
- Seal - Textbox.
![]() Note: Seals are subject to internal confirmation of the business case and the raising of a new change request with Aptean. When confirmed, this is expected to prompt for up to 3 seals per container.
Note: Seals are subject to internal confirmation of the business case and the raising of a new change request with Aptean. When confirmed, this is expected to prompt for up to 3 seals per container.
![]() Note: Hazardous is subject to internal confirmation of the business case and the raising of a new change request with Aptean. When confirmed, this is expected to allow a drop-down list of all Hazardous Types defined in the WMS.
Note: Hazardous is subject to internal confirmation of the business case and the raising of a new change request with Aptean. When confirmed, this is expected to allow a drop-down list of all Hazardous Types defined in the WMS.
Changes can be saved with the Update button and discarded with the Reset button.
Container Type Maintenance
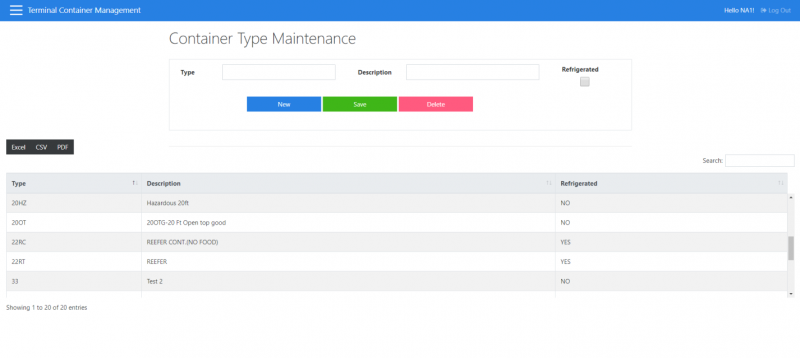
This screen allows the user to maintain container types used by the system.
This screen allows users to:
- View all of the container types held on the system
- Delete existing container types
- Amend the details of existing container types
- Add new container types
The screen will display all container types in a paginated grid immediately. The grid will show:
- Container Type
- Description
- Refrigerated
Clicking a row allows the user to Edit or Delete the container type (deleting requesting confirmation).
Export buttons are available to export the rows of this table to CSV, Excel, and PDF formats, so the user can print these details if required.
It is not possible to delete a record that is in use in the system either on an active or completed task or that is associated with an existing container.
It is only possible to edit the description and Refrigeration capability of the container.
The user can add a container type through the use of a New button.
There are no restrictions on creating new container type other than that the container type cannot already exist.
Location Maintenance
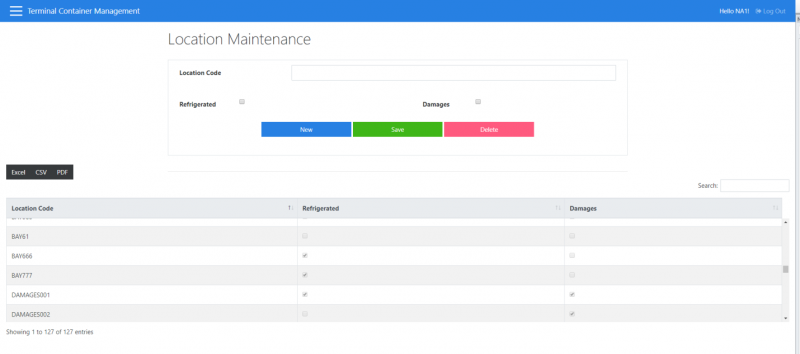
This screen allows the user to maintain the locations visible to the system.
This screen allows users to:
- Search for details of existing locations
- Amend existing locations
- Delete existing locations
- Add new locations
The user is allowed to filter data through:
- Location Code
The results will be displayed in a grid showing:
- Location Code
- Refrigerated
- Damages
Clicking on the Delete button will allow the selected location to be deleted.
It is not possible to delete a record that is in use in the system either on an active or completed task or that is associated with an existing container.
A new location can be added by clicking a New button.
There are no restrictions on creating new locations other than that the location code cannot already exist.
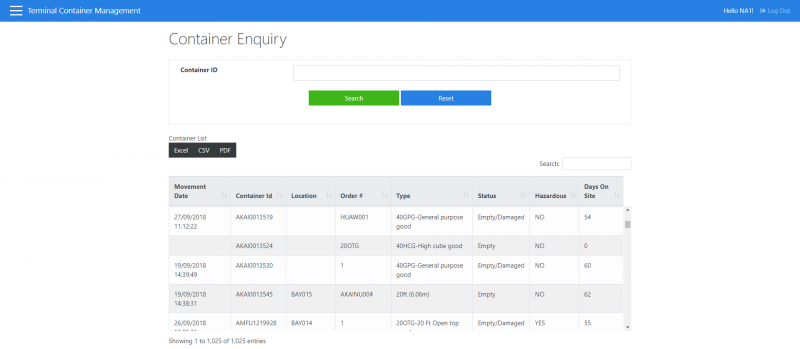
Container Enquiry
This screen allows users to:
- Search for specific containers and view movement history of those containers
This screen is linked to directly from a web-site page, for customers to view the status of their containers.
This screen displays a filter of Container code.
Under this will be the last 20 transactions for that customer (Account).
When a container is entered and the Search button is pressed, the screen will call the existing Container Enquiry Results screen, as shown above in the Location Enquiry screen.
PDA Functionality
![]() Note: Although the PDS screens are created for use on the mobile devices, they will also work and be accessible through the Admin system.
Note: Although the PDS screens are created for use on the mobile devices, they will also work and be accessible through the Admin system.
PDA Login
This screen allows drivers to:
- Login by selecting their User Name and entering their Password. They then click the Log In button.
They will be taken to the PDA home screen with menu - see PDA Menu
PDA Menu
This screen allows drivers to:
- Select an activity to perform
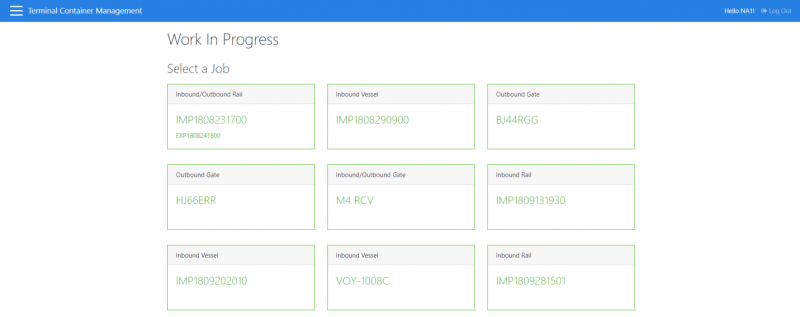
PDA Work in Progress
This is a series of screens to allow the drivers to move containers in and out of the yard. Initially, the process shows a Vehicle List. Note - although this screen is created for use on the mobile devices, this screen will also work and be accessible through the Admin system.
This screen allows drivers to:
- Select a job to complete
Work Selection
Each item shown is the Registration (or train/voyage) or a container to move, plus the type, e.g., AB123 BVC (IG/OG). Types are:
- IG - Inbound Gate
- OG - Outbound Gate
- IH – Inbound Road
- OH – Outbound Road
- IV – Inbound Vessel
- OV – Outbound Vessel
- MV – Move (De-stuffing)
If there are multiple tasks for a Gate task (Inbound and Outbound) they are shown here as IG / OG.
Move tasks will be shown as {Container ID} (MV).
Unlinked IV and OV Vessel tasks are always shown separately, e.g., 42352334 (IV), 4839423(OV).
Linked IV and OV Vessel tasks will be shown as the inbound voyage reference and showing the outbound voyage reference as part of the detail of the task. E.g.,
32028323 (IV/OV)
32928182
This screen shows all the outstanding tasks, with a date less-than or equal to today's date, with the eldest shown first. Move tasks will only be shown on or before the date and time they are due (shown earlier based on a system parameter CYMR which specifies a number of minutes that a task can be shown before it is actually due to start).
The user clicks the registration.
If the type is IH or OH continue to Registration Entry.
If the type is MV:
- If the task has a “Location To” then skip to Move to Bay Door.
- If the task does not have a “Location To” then skip to Location Selection.
Otherwise continue to Container Selection.
Registration Entry
The screen will prompt for a registration; this will default to the registration of the task. The user can overtype with the actual registration of the vehicle that has arrived. Once confirmed the process moves to Container Selection.
Container Selection
If the type is IG / OG, IG, OG, IH, OH:
- The unit shows the containers associated to the registration, with an indication of Full or Empty, e.g., ALCU1234567 (F), ALCU1234567 (ED).
- All Inbound types will be shown first, followed by all Outbound types.
If the type is IR, IR / OR, IV, IV / OV:
- The unit shows the containers associated to the registration, with an indication of Full or Empty e.g., ALCU1234567 (F), ALCU1234567 (ED).
- All IR/IV containers are shown if they exist, in Container ID sequence.
- A Switch button on the top will allow the user to switch to the linked OR/OV type, if there is one.
If the type is OR, IR / OR, OV, IV / OV:
- All outbound containers are shown in Position sequence, with an indication of the position e.g., ALCU1234567 (Pos 1), ALCU1234567 (Pos 49).
- A Switch button on the top will allow the user to switch to the linked inbound type, if there is one.
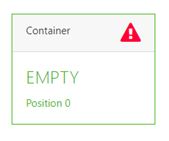
A Container marked as Hazardous is identified with a red warning icon in the top right hand corner.
The user clicks a container to continue with this task.
Clicking on an Inbound container will take the user to Weight and Seals Entry, if this container is for Export (i.e., planned on an outbound vessel), otherwise the user will be taken to Location Selection.
Clicking on an Outbound type task that has a container id other than one beginning with “EMPTY” will take the user to Outbound and Known Container.
Clicking on an Outbound type task that has a container id beginning with “EMPTY” or is blank will take the user to Outbound and Unknown Container.
Weight and Seals Entry
The device will prompt for the weight of the container and the seal.
Completing this stage will take the user to Location Selection.
Location Selection
The device shows the container details and a suggestion of where to take container.
Location is suggested by listing all locations available. They are ordered as:
- Suitability
- If damaged status then a DAMAGES Location.
- Contains the same Container Type already or is Empty.
- Contains a different Container Type.
- Partially Full
- Already has containers of that type (Green Tick).
- Empty (Orange Tick).
- Else (No formatting).
The user then clicks the chosen location, and then clicks the Confirm button. The user is taken to the Confirmation page.
Outbound and Container Unknown (Empty Collection)
The device shows the container details required, and the locations that contain that type.
The user clicks a location to see the containers available in the location (sorted in LIFO sequence), indicating which containers are empty.
At this point the user has the option to click Relocate and a container to be offered a list of locations in which to relocate the container specified.
Once the container is found, the user clicks Confirm. The user is taken to the Confirmation page.
Move to Bay Door
The device shows the container details and shown the location to get the container and where to take the container to.
Confirm and Back buttons will be present. If the user clicks Confirm they are taken to the Confirmation page.
Outbound and Known Container
The device shows the container details and shown the location to get the container.
At this point the user has the option to click Relocate and a container to be offered a list of locations in which to relocate the container specified.
Once the container is found, the user clicks Confirm. The user is taken to the Confirmation page.
Confirmation
The user is informed of the action they are about to take and are presented with Confirm and Back buttons.
If this is Inbound Road (IH) or Outbound Road (OH) a Signature button will also be present if this is not the last task for the registration (if the system is configured to prompt for signatures for the given task type).
On clicking Confirm:
- If this is a road task (IH, IG, OH, OG) and this is the final task for the registration then go to the Signature page.
- Otherwise the Task is marked as completed (see Task Completion Updates below).
- If this was the last task or a MV task then the user is taken back to the Work Selection page otherwise the user is taken to Container Selection.
On clicking Signature:
- The user is taken to the Signature page.
Signature Capture
The driver is required to enter their signature.
The screen will show the tasks completed related to the recorded registration.
A Confirm and Back button will be present.
On clicking Confirm the task is marked as completed (see Task Completion Updates below).
The Driver Signature is saved, stamped with the Date and Time and a unique ID. The Task is marked as completed (see Task Completion Updates below).
The Signature ID is marked against the completed tasks.
If this was the last task then the user is taken back to the Vehicle Selection page otherwise the user is taken to Container Selection.
Task Completion Updates
If the task has a quantity greater than zero then:
- A new moves record is created with the details of the container selected. The move is marked as completed in the system, marked with the current date and time, and the user that completed it.
- The new task quantity is calculated as being one less than current.
- If the task’s new quantity has reached zero then the task is deleted, otherwise the task is updated with the new quantity.
If the task has a quantity of zero then the task is marked as completed in the system, marked with the current date and time, and the user that completed it.
If the task is Inbound or Outbound road, then related bookings within the Bay Diary system will be marked as processed.
If the task is Outbound Haulier and the container is Full or Full/Damaged:
- If WMS and Bay Diary systems are both integrated:
- On completing the last task of a multi task registration the order number should be stored against the booking in the bay diary (more information needed).
- If WMS system is integrated:
- On completing the last task for a registration the order associated to the task should be marked as despatched (more information needed).
- If WMS system is not integrated but the bay diary system is integrated:
- On completing the last task for a registration the bay diary booking associated to the task should be marked as processed (more information needed).
If the task is an MV task which originally had a location to then:
- Any associated Bay Diary tasks will be updated to status of “Arrived”.
- If the YBW1 rule within the WMS is set to “Y” and the Warehouse system is integrated then the Goods Receipt pre-advice associated to the bay diary booking should be released to WCS.
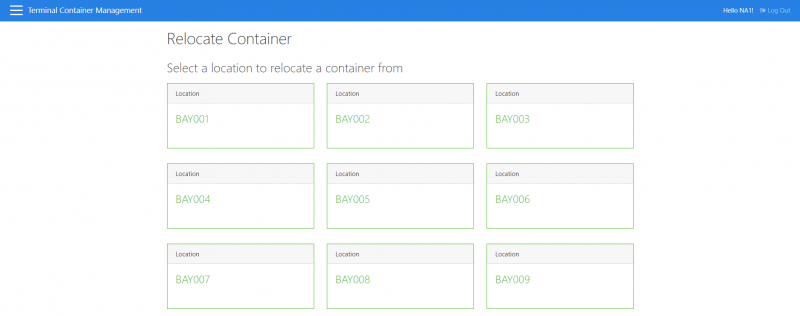
PDA Relocate Container
This screen allows the user to manually relocate containers.
This screen allows drivers to:
- Change the location of a container
Process
The user is shown a list of locations.
The user selects one.
The device then displays a list of the containers in this location. The user can then click one of the containers in the list.
The device displays the container information and lists a series of new locations. The user can click a new location (or a Back button).
Once a new location is chosen, the user can click a Confirm button to confirm the changes and start another relocation.
![]() Note: Although this screen is created for use on the mobile devices, this screen will also work and be accessible through the Admin system.
Note: Although this screen is created for use on the mobile devices, this screen will also work and be accessible through the Admin system.
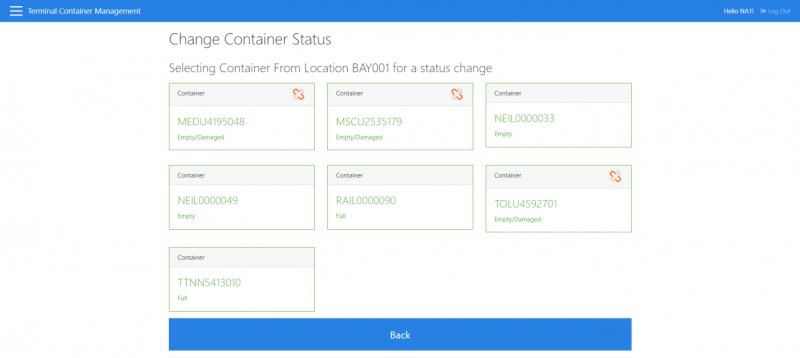
PDA Change Container Status
This screen allows drivers to:
- Change the status of a container
Process
This screen allows the user to change the status of a specific container. The user is shown a list of locations.
The user selects one.
The device then displays a list of the containers in this location. The user can then click one of the containers in the list.
The device displays the current status of the container and buttons for each of the available statuses to change to.
The user can then hit the Confirm button to confirm the changes and start another change of container status.
![]() Note: Although this screen is created for use on the mobile devices, this screen will also work and be accessible through the Admin system.
Note: Although this screen is created for use on the mobile devices, this screen will also work and be accessible through the Admin system.
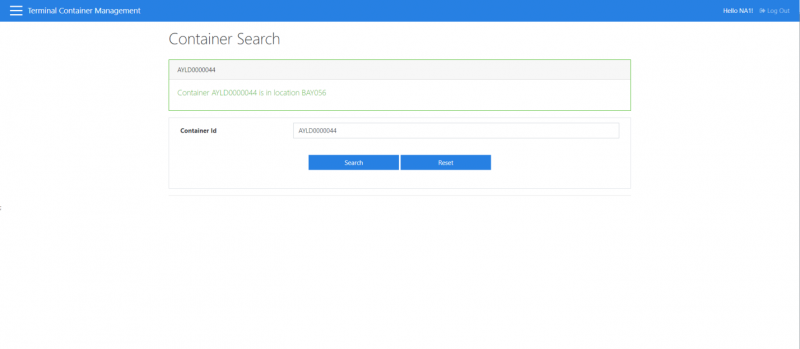
PDA Container Search
This screen allows drivers to:
- Display the system held location of a given container.
Appendix A Document History
References
| Ref No | Document Title & ID | Version | Date |
|---|---|---|---|
| - | - | - | - |
| - | - | - | - |
| - | - | - | - |
| - | - | - | - |
| - | - | - | - |
Glossary
| Term or Acronym | Meaning |
|---|---|
| WMS | Warehouse Management System, controlling all of the actions within a warehouse, like goods in/out, relocation, stock management, etc. The Aptean WMS is CALIDUS 3PL WMS (C-WMS). |
| WCS | Warehouse Control System, executing all of the actions within a warehouse, like goods in/out, relocation, stock management, etc, usually though mobile devices. The Aptean WCS is CALIDUS WCS (C-WCS). |
| TCM | Terminal Container Management, a system for managing container yards and the tasks inbound and outbound from it. The Aptean container yard management system is CALIDUS TCM. |
| ToC | Transfer of Custody; Traffic Control; The action of controlling vehicles arriving and departing into warehouse bays. The Aptean traffic control system is CALIDUS ToC. |
| Bay Diary | The use of timed slots into or out of bays within a warehouse is called a Bay Diary. A Bay Diary system also controls booking slots, arrival and departure statuses, labelling, etc. The Aptean Bay Diary system is called CALIDUS Bay Diary. |
| Container Yard; Container Storage | Where containers are stored. |
| Seals | Containers are sealed at source and whenever they are opened in transit, to ensure that the contents are not tampered with. |
| Container | A container consists of an ID, Type and Status. |
| Container ID | The unique ID of the container. This defines many properties of the container, such as which tasks (in the container yard and in the warehouse) are associated with it. |
| Container Type | The type of container. E.g. 20ft container. Refrigerated Container |
| Container Status | A quick guide to where the container is up to. Values from E(Empty)/F(Full)/ED(Empty/Damaged)/FD(Full/Damaged). |
| Vessel | Ship. |
| Voyage | A specific journey of a vessel. |
| Voyage Reference | (Vessel Tasks Only) The unique reference of the voyage of a vessel. |
| Registration | The vehicle registration (road) or voyage reference (voyage). |
| Location | A location in the yard. E.g. BAY001, TRAIN001. Locations may be stacked, and therefore the sequence of the container in a location is important. |
| Position; Sequence | Referring to locations, it is specifically the position in which the container is located in a location. For example, the lower sequence container in a stack may not typically be moved without first moving any higher-sequenced containers first. |
| Reference | (Road Tasks Only) Job Reference that is used to identify the job on Work In Progress mode. This field is automatically generated depending on Haulier, date and time. This field can be manually edited. |
| Account ID; Account Name | The client account id and name. The account that the order(s) relate to. |
| Haulier | The Haulier used to bring to goods to/from the container yard. Only available for entry for Gate- and Road-based tasks |
| Carrier | The carrier used. Only available for Vessel based tasks. |
| Service | The service used. Only available for Vessel based tasks. |
| Movement; Movement Type; Task | A movement of a container to a location, between locations, onto or off a vessel or from the road. The type of movement/Task - e.g. Inbound Gate, Outbound Vessel etc. |
| Hazardous; Hazardous Type | Indicates if the container contains a hazardous substance or material. The hazardous types indicate what category of hazardous material is stored, which aids in determining compatibility with other containers of the same hazardous type. |
| UN # | If the container is flagged as hazardous, this will show the relevant UN number |
| Order # | The order number associated with the task |
| GRN | Goods Received Number. A unique identifier for a goods receipt. In Container Yard terms, this will be the action of taking goods off a vessel or out of a container and storing them in the warehouse. |
| Reference | Job Reference that is associated with the task |
| Booking Reference | Reference from Bay Diary |
| Outbound Vessel; Inbound Vessel | The direction of the vessel's voyage. In other words, are items being loaded onto the vessel, or taken off the vessel. In many cases, there can be a planned inbound and outbound vessel task for any vessel's voyage. |
| Inbound/Outbound Road | Tasks arriving or departing through the road network |
| Inbound/Outbound Rail | Tasks arriving or departing through the Rail network |
| Inbound/Outbound Gatehouse | Tasks arriving or departing at the gatehouse |
| Task Status; Unconfirmed; Confirmed | Items are created at an "unconfirmed" state and need to be confirmed for them to be made available for users to execute. |
| General System Terms | |
| EDI | Electronic Data Interchange, a mechanism for sending information between computer system, such as receiving orders, voyages, etc. |
| RDT; PDA; Mobile Device | Radio Data Terminal; Personal Digital Assistant. Essentially, any kind of mobile, wireless device. Used for mobile users when accessing the system, for example, with WCS when controlling the movements of pallets in the warehouse, and outside container movement tasks. |
| SCR | Software change request |
| App Terms | |
| Auto-Complete | When typing into a textbox, matching selections will be shown in a drop-down list below, as you type. |
| Drop-down List; DDL | Clicking on the entry box will show all applicable values below. |
| Checkbox | A simple yes/no, enabled/disabled indicator. If it is checked, this means yes/enabled, else no/disabled. You can change the state by clicking on it. |
| Textbox | Any field in the system which is designed to allow you to type into it, rather than click, select or other kind of action. These can be specific types (numeric, text, and other types of pattered entry. Text boxes can also be auto-complete. |
| Tab | A Tab is a kind of button that hides more things to enter. When you click it, the extra fields on the tab are shown, typically hiding others in the same tab group. In these guides, tabs are denoted by their label, in italics. |
| Button | Any pressable or clickable button that instigates an Action. In these guides, buttons are denoted by their label in Bold |
| Field | A Field is a place to see or enter data. This can be a textbox, checkbox, drop-down list, cell, etc. Typically they will be associated with a label that shows what this field is for. In these guides, fields are denoted by their label, in italics. |
| Table; Grid | Results represented in a tabular notation, Consisting of Rows and Columns. Typically with a Header row. Individual data is in a Cell. |
| Keys | Keyboard presses. In these guides, keys are denoted by their key in fixed formatting e.g. ENTER.
|
| Menu | The menu of the system is typically situated on the left of the screen, and is typically activated by clicking the menu button. Again, typically this is denoted by 3 horizontal lines stacked on top of each other. Clicking the button will show the menu. Clicking again will hide the menu. Each menu contains menu items, or menu groups, which can also contain menu items. A menu item will take you to the screen it describes. |
| Find; Filter; Search | Associated with finding data, and the matching results being shown in a results table or screen. Typically, Find/Search means finding the data initially, whereas filter means getting the results, and then narrowing them down, typically through the use of a filter or search text box, either filtering the whole result set and all columns, or specific filters per column. Usually, typing in the filter will immediately filter the results as you type. |
| Export | Usually associated with a results table or data on a screen, if allowed, there will be buttons to export the data shown from the system to your local PC, typically as a Spreadsheet (XLS), PDF or CSV. |
| Sort | Usually associated with tables, this is the action of sorting the data Ascending or Descending (smallest to biggest , lowest to highest, earliest to latest, or vice versa). Usually, this involves clicking on the table row column header, each click cycling between Ascending or Descending. |
| Action | An action is a general term showing something you as a user want to do. Typically this is associated with a button to press (Confirm, Next, OK, etc). Clicking or pressing this button will usually take you to the next step. |
| Step | A step is a stage in a process. For example, a simple movement of a container from one location to another might consist of the following steps:
|
Authorised By
| Tony Walker | Aptean Principal PS Consultant |
| Matt Tipping | Aptean Senior Manager |

