Drivers
This screen allows you to maintain the vehicles in the system. Vehicles are used to define the specific parameters of a vehicle. You resource trips with vehicles.
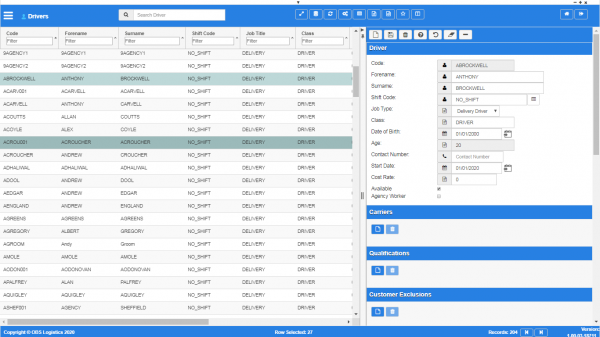
Drivers

You can query data by and/or choose to display data as follows:
- Code.
- Forename.
- Surname.
- Shift Code.
- Job Title.
- Class.
- Date of Birth.
- Contact Number.
- Start Date.
- Available.
- Agency Worker.
- Carriers.
- Active.
- Created By.
- Created Date.
- Last Updated By.
- Last Updated Date.
- Last Active Change By.
- Last Active Change Date.
- Last Process Id.
- Update Counter.
The following actions are available on the Details panel:
 New - create a new record.
 Save - save a new record or changes to an existing record.
 Delete - delete an existing record.
 Help - help on this screen.
 Undo - undo change made since last save.
 Clear - clear all fields.
 Toggle - toggle display of all accordion headers.
You can change or add the following information:
Driver Details section
- Code - the driver code.
- Forename - the driver's first name.
- Surname - the driver's last name.
- Shift Code - the driver's assigned shift. The screen validates this against the created shift codes in the system. You can look up the available shift codes using the
 Lookup button to the right of the value entry. A pop-up window will be displayed listing the available values. You can select a value from the list, or cancel the look up by closing the window.
 - Job Title - a drop-down list of all job titles configured in the system.
- Class - free-text.
- Date of Birth - the driver's date of birth. You can use the
 Calendar button to select the date from a pop-up calendar.
 - Contact Number - the driver's contact number.
- Start Date - the driver's start date. You can use the Calendar button to select the date from a pop-up calendar.
- Available - a check box indicating that the driver is available for work.
- Agency Worker - a check box indicating that this driver is an agency worker.
Carriers section
You can assign the resource to any number of carriers.
You can assign the resource to a carrier by clicking the ![]() New button in the section header. The screen will display a pop-up window to allow you to identify the carrier to which you want to assign the vehicle. You can enter a carrier code or click the
New button in the section header. The screen will display a pop-up window to allow you to identify the carrier to which you want to assign the vehicle. You can enter a carrier code or click the ![]() Lookup button to the right of the value entry to see a list of all carriers. You can select a carrier from this list to select it or close the window to cancel entry. Once you have selected or entered a carrier, you can save the resource to this carrier using the Save button. You can cancel adding the resource to the carrier by closing the window.
Lookup button to the right of the value entry to see a list of all carriers. You can select a carrier from this list to select it or close the window to cancel entry. Once you have selected or entered a carrier, you can save the resource to this carrier using the Save button. You can cancel adding the resource to the carrier by closing the window.
You can remove a resource from a carrier by selecting the carrier in the table and then clicking the ![]() Delete button in the section header.
Delete button in the section header.
Qualifications section
You can assign qualifications to the driver. You can maintain the qualifications that may be assigned to a driver in the Qualifications screen.
You can assign a qualification to the driver by clicking the ![]() New button in the section header. The screen will display a pop-up window to allow you to identify the qualification to which you want to assign the vehicle from a drop-down list. You must also enter a valid date range. You can use the
New button in the section header. The screen will display a pop-up window to allow you to identify the qualification to which you want to assign the vehicle from a drop-down list. You must also enter a valid date range. You can use the ![]() Calendar buttons to the right of the value entry to select the dates. Once you have selected a qualification and entered valid dates, you can save the driver's qualification using the Save button. You can cancel by closing the window.
Calendar buttons to the right of the value entry to select the dates. Once you have selected a qualification and entered valid dates, you can save the driver's qualification using the Save button. You can cancel by closing the window.
You can remove a qualification from a driver by selecting the qualification in the table and then clicking the ![]() Delete button in the section header.
Delete button in the section header.
Customer Exclusions
You can exclude the driver from being able to work for certain customers by adding the customers to the exclusion list. You can maintain the customers in the Customer screen.
You can exclude a customer by clicking the ![]() New button in the section header. The screen will display a pop-up window to allow you to identify the customer from which you want to exclude the driver. You can enter a customer code or click the
New button in the section header. The screen will display a pop-up window to allow you to identify the customer from which you want to exclude the driver. You can enter a customer code or click the ![]() Lookup button to the right of the value entry to see a list of all customers. You can select a customer from this list to select it or close the window to cancel entry. Once you have selected or entered a customer, you can save the excluded customer using the Save button. You can cancel excluding the customer by closing the window.
Lookup button to the right of the value entry to see a list of all customers. You can select a customer from this list to select it or close the window to cancel entry. Once you have selected or entered a customer, you can save the excluded customer using the Save button. You can cancel excluding the customer by closing the window.
You can remove an excluded customer from a driver by selecting the customer in the table and then clicking the ![]() Delete button in the section header.
Delete button in the section header.
Location Exclusions
You can exclude the driver from being able to at certain locations by adding the locations to the exclusion list. You can maintain the locations in the Locations screen.
You can exclude a location by clicking the ![]() New button in the section header. The screen will display a pop-up window to allow you to identify the location from which you want to exclude the driver. You can enter a location code or click the
New button in the section header. The screen will display a pop-up window to allow you to identify the location from which you want to exclude the driver. You can enter a location code or click the ![]() Lookup button to the right of the value entry to see a list of all locations. You can select a location from this list to select it or close the window to cancel entry. Once you have selected or entered a location, you can save the excluded location using the Save button. You can cancel excluding the location by closing the window.
Lookup button to the right of the value entry to see a list of all locations. You can select a location from this list to select it or close the window to cancel entry. Once you have selected or entered a location, you can save the excluded location using the Save button. You can cancel excluding the location by closing the window.
You can remove an excluded location from a driver by selecting the location in the table and then clicking the ![]() Delete button in the section header.
Delete button in the section header.
Parameters section
You can set parameters here to control additional functionality.
You can select a parameter to add using the provided Select Parameter drop-down list and clicking the ![]() Add button.
Add button.
The available parameters are configurable in the User Parameters screen.
Once you have selected the parameter, the screen will display it in this section. Parameters are displayed in the sequence which your system administrators have configured them to be displayed. Once the parameter is added, you can enter the value - in general, the screen will validate the value or will provide a list of values to select, depending on the parameter settings.
You can remove a parameter by clicking the ![]() Cancel button next to the parameter value.
Cancel button next to the parameter value.
The following parameters are currently available:
| Label | Description | Long Description | Type | Values |
|---|---|---|---|---|
| EPOD Password | EPOD Password | EPOD Password | TextBox | String |
| EPOD Username | EPOD Username | EPOD Username | TextBox | String |
Notes section
You can add notes through the Notes section.
You can click the ![]() New button in the Notes section to create a new note. This will be tagged with your user name and date/time.
New button in the Notes section to create a new note. This will be tagged with your user name and date/time.
Any notes may be removed by clicking the x in the corner of the note.
Contacts section
You can add any number of contacts here.
You can add a contact by clicking the ![]() New button in the section.
New button in the section.
You can edit an existing contact by selecting the contact row in the table and then clicking the ![]() Edit button in the section header.
Edit button in the section header.
The screen will display a pop-up window to enter the following:
- Title.
- Forename.
- Surname.
- Job Title.
- Contact Mediums - a list of all contact media for the customer.
- Primary Phone.
- Primary Email.
- Primary Mobile.
You can add additional contact media by selecting the media type from the drop-down list. The screen will add the medium to the Contact Mediums list above. Additional contact media:
- Email.
- Fax.
- Mobile.
- Skype.
- Facebook.
- Twitter.
You can delete an existing contact by selecting the contact row in the table and then clicking the ![]() Delete button in the section header.
Delete button in the section header.
Calendar section
You can control availability through the Calendar section.
Driver availability calendar

Here, you can determine the period (hours, days, weeks) where this resource is unavailable.
The section shows a calendar. You can choose to display this in a month, week, day or list format, using the buttons in the title.
- In the month view, the whole month is shown. Events are displayed as the time hours plus an "a" for AM or "p" for PM, followed by the title underneath.
- in the week view, the whole week is shown with all hours in each day. Events are displayed as a block on the days and hours booked, showing the range of times followed by the title underneath.
- in the day view, the whole day is shown with all hours in the day. Events are displayed as a block on the hours booked, showing the range of times followed by the title underneath.
- In the list view, all events in a month are shown. Headers are added to the list for those days with events, showing the full date and day. An entry is shown for each day of the event, showing the time range and the title.
You can move between days, weeks or months using the left and right buttons in the calendar header.
If you click on a day in month view, you will be taken to that day in the day view.
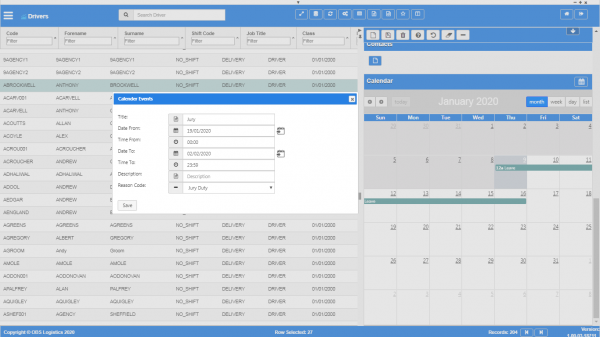
If you drag to select a range of days, the screen will display a Calendar Events pop-up for you to enter the details. The dates from and to will be set to the selected dates, the times from set from midnight to midnight.
If you click on an hour in week or day view, the screen will display a Calendar Events pop-up for you to enter the details. The dates will be set to the selected date, the time from set to the selected time, and the time to set as midnight.
You cannot add events from the event list directly.
The Calendar Events pop-up allows you to enter the following:
- Title - the title of the event. The screen will display this in the calendar.
- Date From - the range of the event. This can be multiple days or hours. You can use the Calendar look-up button to help selecting a date.
- Time From.
- Date To - you can use the Calendar look-up button to help selecting a date.
- Time To.
- Description - the description.
- Reason Code - a drop-down list of all of the configured resource reason codes. You can configure these codes in the Resource Reason Codes screen.
The pop-up will default the dates and times as you selected them from the calendar initially (for a new event) or the details of the event selected. Although the values are pre-set, you can change them here.
You can save a new event with the Save button.
You can update an existing event with the Update button, or delete the event with the Delete button.
You can entering or updating the event by closing the window.
Once saved, the event will be displayed in the main calendar.
![]() Note: If you need more room to edit the calendar, you can click the
Note: If you need more room to edit the calendar, you can click the ![]() Calendar button in the title. The system will open a new tab in your browser with a full-screen calendar view. This full-screen view operates in the same way as the embedded calendar.
Calendar button in the title. The system will open a new tab in your browser with a full-screen calendar view. This full-screen view operates in the same way as the embedded calendar.
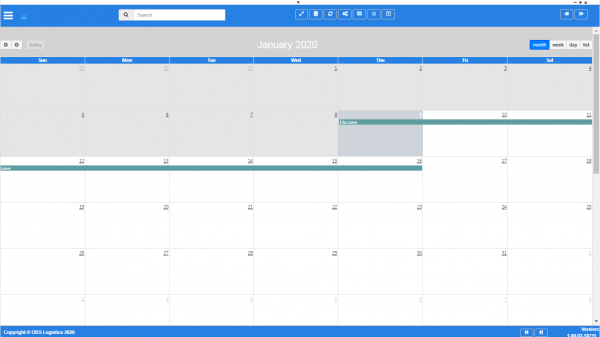
Full-screen calendar
