Organisation
This is the Organisation maintenance page. This is where the organisation or company is configured.
This page starts finding data - enter your query from your configured filter fields.
Results are displayed in a table and are automatically displayed if there are only a few details.
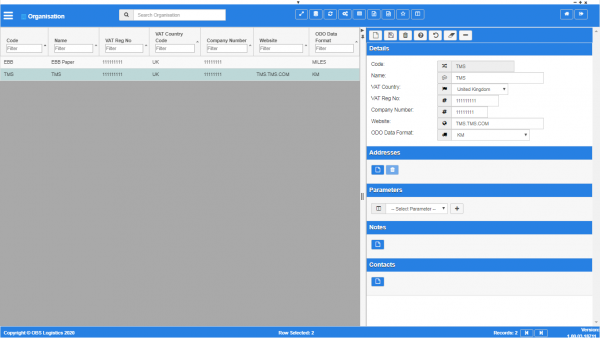
Organisation Screen

List of fields displayed:
- Code - the company code.
- Name - The display name of the company.
- VAT Reg No - registered VAT number.
- VAT Country Code.
- Company Number - the registered company number.
- Website - the company's website address.
- Data Format - ODO format, Kilometres (KM) or Miles.
Editing one of the records can be done by clicking on a row - the selected line data will be loaded into the details panel for editing.
Adding a new record can be done by opening the detail panel and clicking the ![]() New button - all fields are required.
New button - all fields are required.
Use the Save button to save the entered or edited details. ![]() Warning: If you do not save your work, your changes will be lost
Warning: If you do not save your work, your changes will be lost
When an organisation is edited after creation, more organisation data can be entered in the following sections.
Address Details section
- Code - the location code.
- Type Code - a drop-down list of all the location types in the system. You can configure location types in the Location Types screen.
- Name - the name.
- Alternate Name - an alternate name.
- Address.
- Address 2.
- Address 3.
- Town.
- County.
- Country Code - a drop-down list of all countries configured in the system. You can configure countries in the Countries screen.
- Postcode.
- Latitude - the GPS position of the address.
- Longitude - the GPS position of the address.
- Postal Region - a postal region for the address.
A map will be displayed showing the location.
Parameters section
You can set parameters here to control additional functionality.
You can select a parameter to add using the provided Select Parameter drop-down list and clicking the ![]() Add button.
Add button.
The available parameters are configurable in the Organisation Parameters screen.
Once you have selected the parameter, the screen will display it in this section. Parameters are displayed in the sequence which your system administrators have configured them to be displayed. Once the parameter is added, you can enter the value - in general, the screen will validate the value or will provide a list of values to select, depending on the parameter settings.
You can remove a parameter by clicking the ![]() Cancel button next to the parameter value.
Cancel button next to the parameter value.
The following parameters are currently available:
| Label | Description | Long Description | Type | Values |
|---|---|---|---|---|
| Asset Debrief | Epod Asset Debrief | Are permanent assets being tracked? If so, need to update the assets | DropDownList | Yes, No |
| Auto-plan Service Level | Auto-plan Service Level | Auto-plan Service Level | DropDownList | Yes, No |
| Auto-plan Time Ahead (hours) | Auto-plan Time Ahead (hours) | Auto-plan Time Ahead (hours) | DropDownList | Yes, No |
| Calendar Working Day | Defines which days of the week are being worked | Defines which days of the week are being worked in the organisation | DropDownList | Yes, No |
| IF Reprocess | Interface Reprocess | Interface Reprocess | TextBox | String |
| IF Sleep Time | Interface Sleep Time | Interface Sleep Time | TextBox | Integer |
| IF MSA Database | Interface MSA Database | Interface MSA Database | TextBox | String |
| Enroute Collections | Epod Enroute Collections | Controls updating the trip to EN_ROUTE if not already, when debriefing collections (i.e. loading at depot) | DropDownList | Yes, No |
| Epod WS Password | Epod WS Password | EPOD Web Service Login Password | TextBox | String |
| Epod WS Username | Epod WS Username | EPOD Web Service Login Username | TextBox | String |
Notes section
You can add notes through the Notes section.
You can click the ![]() New button in the Notes section to create a new note. This will be tagged with your user name and date/time.
New button in the Notes section to create a new note. This will be tagged with your user name and date/time.
Any notes may be removed by clicking the x in the corner of the note.
Contacts section
You can add any number of contacts here.
You can add a contact by clicking the ![]() New button in the section.
New button in the section.
You can edit an existing contact by selecting the contact row in the table and then clicking the ![]() Edit button in the section header.
Edit button in the section header.
The screen will display a pop-up window to enter the following:
- Title.
- Forename.
- Surname.
- Job Title.
- Contact Mediums - a list of all contact media for the customer.
- Primary Phone.
- Primary Email.
- Primary Mobile.
You can add additional contact media by selecting the media type from the drop-down list. The screen will add the medium to the Contact Mediums list above. Additional contact media:
- Email.
- Fax.
- Mobile.
- Skype.
- Facebook.
- Twitter.
You can delete an existing contact by selecting the contact row in the table and then clicking the ![]() Delete button in the section header.
Delete button in the section header.