Routes
This screen allows you to maintain the fixed route templates used when automatically planning orders onto trips.
Fixed route templates
Fixed route stops


You can query data by and/or choose to display data as follows:
- Code.
- Organisation Code.
- Description.
- Owning Depot Code.
- Carrier Code.
- Vehicle Type Code.
- Max Trips per Day.
- Monday.
- Tuesday.
- Wednesday.
- Thursday.
- Friday.
- Saturday.
- Sunday.
- Trunk Trip.
- Created By.
- Created Date.
- Last Updated By.
- Last Updated Date.
- Last Active Change By.
- Last Active Change Date.
- Last Process Id.
- Update Counter.
The following actions are available on the Details panel:
 New - create a new record.
 Save - save a new record or changes to an existing record.
 Delete - delete an existing record.
 Help - help on this screen.
 Undo - undo change made since last save.
 Clear - clear all fields.
 Toggle - toggle display of all accordion headers.
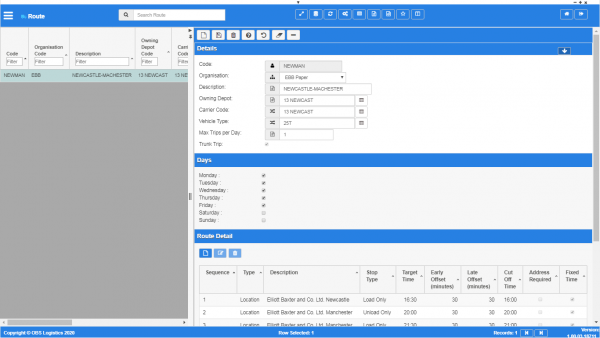
Details section
You can change or add the following:
- Code - the route code.
- Organisation - a drop-down list of all organisations in the system.
- Description - the route description.
- Owning Depot - the depot that owns the trips created from this route template. You can maintain these in the Locations screen. You can look up the available depot codes using the
 Lookup button to the right of the value entry. The screen will display a pop-up window listing the available values. You can filter the values on the list by typing in the provided filter box and clicking the Filter button. You can select a value from the list, or cancel the look up by closing the window.
 - Carrier Code - the default carrier of trips created from this route template. You can maintain these in the Carriers screen. You can look up the available carrier codes using the Lookup button to the right of the value entry. The screen will display a pop-up window listing the available values. You can filter the values on the list by typing in the provided filter box and clicking the Filter button. You can select a value from the list, or cancel the look up by closing the window.
- Vehicle Type - The default vehicle type of trips created from this route template, used for capacity restrictions. You can maintain these in the Vehicle Types screen. You can look up the available vehicle types using the Lookup button to the right of the value entry. The screen will display a pop-up window listing the available values. You can filter the values on the list by typing in the provided filter box and clicking the Filter button. You can select a value from the list, or cancel the look up by closing the window.
- Max Trips per Day - the maximum number of trips that can be created from this fixed route template per day.
- Trunk Trip - a check box to indicate that trips created from this template are considered trunk trips.
Days section
Here, you can click the provided check boxes to indicate which days of the week the route may run.
Route Detail section
You can enter each stop and the matching parameters for that stop by clicking the ![]() New button in the section.
New button in the section.
You can edit route stop by selecting the row in the table and then clicking the ![]() Edit button in the section header.
Edit button in the section header.
The screen will display a pop-up Route Detail window to enter the following:
- Sequence.
- Type - a drop-down list of: Location; Zone; Depot. Use this to select the stop type
- Stop, one of Location Code, Zone Code or Depot - you can select the details of the stop based on the stop type selected above. The screen provides a Lookup button to allow you to select the individual stop.
- Stop Type - the activity at this stop. The screen provides a drop-down list of the following selections:Both; Load Only; Unload Only.
- Target Time.
- Max. Loading Time (minutes).
- Early Offset (minutes).
- Late Offset (minutes).
- Cut Off Time.
You can save your changes with the Save button, or discard your changes with the Close button or by closing the pop-up window.
You can delete an existing route stop by selecting the row in the table and then clicking the ![]() Delete button in the section header.
Delete button in the section header.
Parameters section
You can set parameters here to control additional functionality.
You can select a parameter to add using the provided Select Parameter drop-down list and clicking the ![]() Add button.
Add button.
Once you have selected the parameter, the screen will display it in this section. Parameters are displayed in the sequence which your system administrators have configured them to be displayed. Once the parameter is added, you can enter the value - in general, the screen will validate the value or will provide a list of values to select, depending on the parameter settings.
You can remove a parameter by clicking the ![]() Cancel button next to the parameter value.
Cancel button next to the parameter value.
Notes section
You can add notes through the Notes section.
You can click the ![]() New button in the Notes section to create a new note. This will be tagged with your user name and date/time.
New button in the Notes section to create a new note. This will be tagged with your user name and date/time.
Any notes may be removed by clicking the x in the corner of the note.
Audit Trail section
Each time you make a change to any element of the data and save it, the system keep an audit trail of changes. The screen displays these in a table here. By default, the screen keeps this section closed.
The table displays:
- User - the user ID that made the change.
- Date - the date and time that the change was made.
- Description - a detailed description of what was changed.