Users
This is the User Maintenance page. You can maintain the users that are allowed to use the system here.
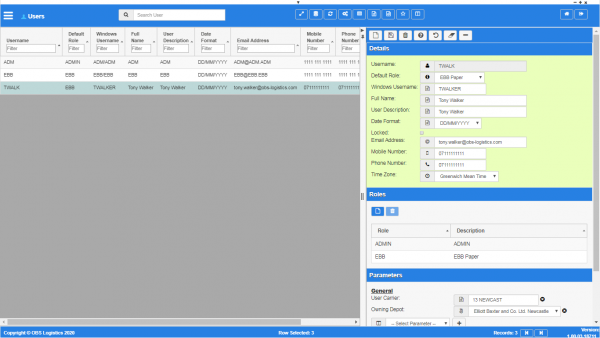
Users maintenance

This page starts finding data - enter your query from your configured filter fields.
You can query data by and/or choose to display data as follows:
- Username.
- Default Role.
- Windows Username.
- Full Name.
- User Description.
- Date Format.
- Email Address.
- Mobile Number.
- Phone Number.
- Time Zone.
- Locked.
- Active.
- Created By.
- Created Date.
- Last Updated By.
- Last Updated Date.
- Last Active Change By.
- Last Active Change Date.
- Last Process Id.
- Update Counter.
Results are displayed in a table and are automatically displayed if there are only a few details.
You can edit the records by clicking on a row - the screen will display the selected line data in the details panel for editing.
The following actions are available on the Details panel:
 New - create a new record.
 Save - save a new record or changes to an existing record.
 Delete - delete an existing record.
 Help - help on this screen.
 Undo - undo change made since last save.
 Clear - clear all fields.
 Toggle - toggle display of all accordion headers.
You can change or add the following information:
Details section
- Username - the user ID used for logging on.
- Default Role - a drop-down list of roles to be assigned to this user. You can maintain roles in the Roles screen.
- Windows Username - the Windows username.
- Full Name - the user's full name.
- User Description - a free-text description.
- Date Format a drop-down list of date formats used by the system. You can select a date format here, which will affect how the system displays dates for this user.
- Locked - a check box indicating that this user is locked and cannot be used.
- Email Address - an email address for the user, for contact purposes.
- Mobile Number - a mobile telephone number for the user, for contact purposes.
- Phone Number - a telephone number for the user, for contact purposes.
- Time Zone - a drop-down list of timezones configured in the system. You can maintain timezones in the Timezones screen.
Roles section
You can set the role against the user. This controls menus, accessible programs, etc.
You can add a role by clicking the ![]() New button in the section. The screen will display a pop-up window to enter the following:
New button in the section. The screen will display a pop-up window to enter the following:
- Role - a drop-down list of the roles configured in the system. You can configure roles in the Roles screen.
You can save your changes with the Save button, or discard your changes by closing the pop-up window.
You can delete an existing role by selecting the role row in the table and then clicking the ![]() Delete button in the section header.
Delete button in the section header.
Parameters section
You can set parameters here to control additional functionality.
You can select a parameter to add using the provided Select Parameter drop-down list and clicking the ![]() Add button.
Add button.
The available parameters are configurable in the User Parameters screen.
Once you have selected the parameter, the screen will display it in this section. Parameters are displayed in the sequence which your system administrators have configured them to be displayed. Once the parameter is added, you can enter the value - in general, the screen will validate the value or will provide a list of values to select, depending on the parameter settings.
You can remove a parameter by clicking the ![]() Cancel button next to the parameter value.
Cancel button next to the parameter value.
The following parameters are currently available:
| Label | Description | Long Description | Type | Values |
|---|---|---|---|---|
| User Carrier | Specifies a User Carrier | Specifies a User Carrier | TextBox | String |
| CTMS Password | Customer Service Password | Customer Service Password | TextBox | String |
| CTMS Username | Customer Service User Id | Customer Service User Id | TextBox | String |
| Default Schedule | Default Schedule | Default Schedule | DropDownList | Configured schedules |
| Owning Depot | Owning Depot | Owning Depot for user organisation | DropDownList | Configured organisations |
| Schedule Active | Schedule Active | Schedule Active | DropDownList | True, False |
| Access User Schedule | Access User Schedule | Access User Schedule | TextBox | String |
| View Only | View Only | View Only | DropDownList | Yes, No |
Notes section
You can add notes through the Notes section.
You can click the ![]() New button in the Notes section to create a new note. This will be tagged with your user name and date/time.
New button in the Notes section to create a new note. This will be tagged with your user name and date/time.
Any notes may be removed by clicking the x in the corner of the note.
Change Password section
You can change the user's password in this section. This section is closed by default and can be opened by clicking on it.
You must enter a new password, and confirm it before saving.
The password must conform to the system restrictions on passwords.