Customer: Difference between revisions
m (Added - v1.00.01.31778 - buttons) |
(v1.00.03 - Screenshots) |
||
| (4 intermediate revisions by the same user not shown) | |||
| Line 2: | Line 2: | ||
<gallery widths=600px heights= | <gallery widths=600px heights=340px perrow=1> | ||
Image: | Image:CTLTMS_Customers.png|''Customers'' | ||
</gallery> | </gallery> | ||
| Line 52: | Line 52: | ||
* ''Company Number'' | * ''Company Number'' | ||
* ''VAT Reg No''. | * ''VAT Reg No''. | ||
* ''Carrier'' - the carrier | * ''Carrier'' - the carrier that is used by the customer. You can maintain these in the [[Carriers]] screen. You can look up the available carrier codes using the {{Button|Lookup}} button to the right of the value entry. The screen will display a pop-up window listing the available values. You can filter the values on the list by typing in the provided filter box and clicking the Filter button. You can select a value from the list, or cancel the look up by closing the window. | ||
== Invoicing section == | == Invoicing section == | ||
* ''Accounting Code''. | * ''Accounting Code''. | ||
* ''VAT Code'' - the VAT code used by the customer. You can look up | * ''VAT Code'' - the VAT code used by the customer. You can maintain these in the [[VAT Codes]] screen. You can look up the available carrier codes using the {{Button|Lookup}} button to the right of the value entry. The screen will display a pop-up window listing the available values. You can filter the values on the list by typing in the provided filter box and clicking the Filter button. You can select a value from the list, or cancel the look up by closing the window. | ||
* ''Currency Code'' - the currency code used by the customer. You can look up | * ''Currency Code'' - the currency code used by the customer. You can maintain these in the [[Currencies]] screen. You can look up the available currency codes using the {{Button|Lookup}} button to the right of the value entry. The screen will display a pop-up window listing the available values. You can filter the values on the list by typing in the provided filter box and clicking the Filter button. You can select a value from the list, or cancel the look up by closing the window. | ||
* ''Invoice Frequency'' - a drop-down list used to determine the invoice interval, Values: Weekly; Monthly; Yearly. | * ''Invoice Frequency'' - a drop-down list used to determine the invoice interval, Values: Weekly; Monthly; Yearly. | ||
* ''Payment Term Days''. | * ''Payment Term Days''. | ||
| Line 76: | Line 76: | ||
|Consolidate with others ||Allow Consolidate with other companies orders ||Allow the consolidation of orders with orders placed by other companies ||DropDownList ||Yes,No | |Consolidate with others ||Allow Consolidate with other companies orders ||Allow the consolidation of orders with orders placed by other companies ||DropDownList ||Yes,No | ||
|- | |- | ||
|Fuel Base Price ||Fuel Base Price ||Fuel surcharge to be calculated and charged on variation of current price versus contract base price ||TextBox || | |Fuel Base Price ||Fuel Base Price ||Fuel surcharge to be calculated and charged on variation of current price versus contract base price ||TextBox || | ||
|- | |- | ||
|Order Delivery Confirm Req ||Order Delivery Confirmation Required ||Order Delivery Confirmation Required ||DropDownList ||Yes,No | |Order Delivery Confirm Req ||Order Delivery Confirmation Required ||Order Delivery Confirmation Required ||DropDownList ||Yes,No | ||
| Line 84: | Line 84: | ||
{{ | {{NotesSection}} | ||
{{ | {{ContactsSection}} | ||
[[Category:Maintenance]] | [[Category:Maintenance]] | ||
[[Category:Organisation Data]] | [[Category:Organisation Data]] | ||
[[Category:CTL-TMS Reference Guide| | [[Category:UG 331692 CTL-TMS Reference Guide|220-{{PAGENAME}}]] | ||
Latest revision as of 13:45, 16 January 2020
This screen allows you to maintain the customers in the system.
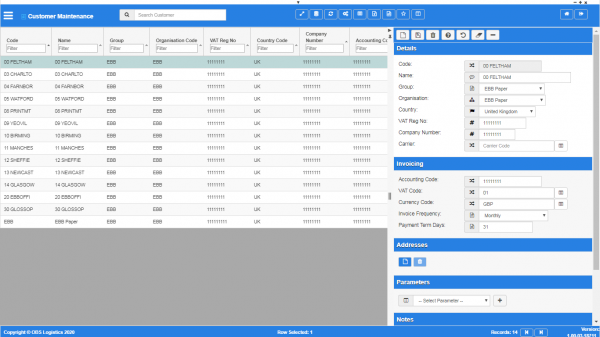
Customers

You can query data by and/or choose to display data as follows:
- Code.
- Name.
- Group.
- Organisation Code.
- VAT Reg No.
- Country Code.
- Company Number.
- Accounting Code.
- VAT Code.
- Currency Code.
- Invoice Frequency.
- Payment Term Days.
- Active.
- Created By.
- Created Date.
- Last Updated By.
- Last Updated Date.
- Last Active Change By.
- Last Active Change Date.
- Last Process Id.
- Update Counter.
The following actions are available on the Details panel:
 New - create a new record.
 Save - save a new record or changes to an existing record.
 Delete - delete an existing record.
 Help - help on this screen.
 Undo - undo change made since last save.
 Clear - clear all fields.
 Toggle - toggle display of all accordion headers.
You can change or add the following information:
Details section
- Code.
- Name.
- Group - a drop-down list of customer groups configured in the system. You can configure customer groups in the Customer Groups screen.
- Organisation Code - a drop-down list of organisations configured in the system. You can configure organisations in the Organisation screen.
- Country Code - a drop-down list of countries configured in the system. You can configure countries in the Countries screen...
- Company Number
- VAT Reg No.
- Carrier - the carrier that is used by the customer. You can maintain these in the Carriers screen. You can look up the available carrier codes using the
 Lookup button to the right of the value entry. The screen will display a pop-up window listing the available values. You can filter the values on the list by typing in the provided filter box and clicking the Filter button. You can select a value from the list, or cancel the look up by closing the window.
Invoicing section
- Accounting Code.
- VAT Code - the VAT code used by the customer. You can maintain these in the VAT Codes screen. You can look up the available carrier codes using the Lookup button to the right of the value entry. The screen will display a pop-up window listing the available values. You can filter the values on the list by typing in the provided filter box and clicking the Filter button. You can select a value from the list, or cancel the look up by closing the window.
- Currency Code - the currency code used by the customer. You can maintain these in the Currencies screen. You can look up the available currency codes using the Lookup button to the right of the value entry. The screen will display a pop-up window listing the available values. You can filter the values on the list by typing in the provided filter box and clicking the Filter button. You can select a value from the list, or cancel the look up by closing the window.
- Invoice Frequency - a drop-down list used to determine the invoice interval, Values: Weekly; Monthly; Yearly.
- Payment Term Days.
Addresses section
You can set the applicable addresses here.
You can add an address by clicking the ![]() New button in the section. The screen will display a pop-up window to enter the following:
New button in the section. The screen will display a pop-up window to enter the following:
- Location - the location code. You can enter the location code or select it from a list using the Lookup button to the right of the value entry. The screen will display a pop-up window showing all codes configured in the system. You can find codes by using the Filter box at the top of the pop-up and entering some characters of the code or name. You can enter a code by clicking the entry in the table or cancel by closing the window. You can configure locations in the Locations screen.
- Type - a drop-down list indicating the address type. Values: Billing Address; Collection Address; Delivery Address; Headquarters.
You can save your changes with the Save button, or discard your changes with the Close button.
You can remove an address by selecting it from the table and clicking the ![]() Delete button in the section header.
Delete button in the section header.
Parameters section
You can set parameters here to control additional functionality.
You can select a parameter to add using the provided Select Parameter drop-down list and clicking the ![]() Add button.
Add button.
The available parameters are configurable in the Customer Parameters screen.
Once you have selected the parameter, the screen will display it in this section. Parameters are displayed in the sequence which your system administrators have configured them to be displayed. Once the parameter is added, you can enter the value - in general, the screen will validate the value or will provide a list of values to select, depending on the parameter settings.
You can remove a parameter by clicking the ![]() Cancel button next to the parameter value.
Cancel button next to the parameter value.
The following parameters are currently available:
| Label | Description | Long Description | Type | Values |
|---|---|---|---|---|
| Consolidate with others | Allow Consolidate with other companies orders | Allow the consolidation of orders with orders placed by other companies | DropDownList | Yes,No |
| Fuel Base Price | Fuel Base Price | Fuel surcharge to be calculated and charged on variation of current price versus contract base price | TextBox | |
| Order Delivery Confirm Req | Order Delivery Confirmation Required | Order Delivery Confirmation Required | DropDownList | Yes,No |
| Order Received Confirm Req | Order Received Confirmation Required | Order Received Confirmation Required | DropDownList | Yes,No |
Notes section
You can add notes through the Notes section.
You can click the ![]() New button in the Notes section to create a new note. This will be tagged with your user name and date/time.
New button in the Notes section to create a new note. This will be tagged with your user name and date/time.
Any notes may be removed by clicking the x in the corner of the note.
Contacts section
You can add any number of contacts here.
You can add a contact by clicking the ![]() New button in the section.
New button in the section.
You can edit an existing contact by selecting the contact row in the table and then clicking the ![]() Edit button in the section header.
Edit button in the section header.
The screen will display a pop-up window to enter the following:
- Title.
- Forename.
- Surname.
- Job Title.
- Contact Mediums - a list of all contact media for the customer.
- Primary Phone.
- Primary Email.
- Primary Mobile.
You can add additional contact media by selecting the media type from the drop-down list. The screen will add the medium to the Contact Mediums list above. Additional contact media:
- Email.
- Fax.
- Mobile.
- Skype.
- Facebook.
- Twitter.
You can delete an existing contact by selecting the contact row in the table and then clicking the ![]() Delete button in the section header.
Delete button in the section header.