Customer: Difference between revisions
(Added - v0.00.01.25) |
(Added - v0.00.01.25) |
||
| Line 53: | Line 53: | ||
* ''VAT Reg No''. | * ''VAT Reg No''. | ||
* ''Carrier'' - the carrier code used by the customer. You can look up a list of carrier codes configured in the system using the look-up button to the right of the entry field. The screen will pop-up a window to select a carrier code. You can configure carriers in the [[Carrier]] screen. | * ''Carrier'' - the carrier code used by the customer. You can look up a list of carrier codes configured in the system using the look-up button to the right of the entry field. The screen will pop-up a window to select a carrier code. You can configure carriers in the [[Carrier]] screen. | ||
== Invoicing section == | == Invoicing section == | ||
| Line 62: | Line 63: | ||
{{AddressDetailsSection}} | |||
{{ParametersSection|Customer Parameters}} | |||
The following parameters are currently available: | |||
The following parameters are available: | |||
{| class="wikitable" border="1" | {| class="wikitable" border="1" | ||
|- bgcolor="silver" | |- bgcolor="silver" | ||
| Line 86: | Line 82: | ||
|Order Received Confirm Req ||Order Received Confirmation Required ||Order Received Confirmation Required ||DropDownList ||Yes,No | |Order Received Confirm Req ||Order Received Confirmation Required ||Order Received Confirmation Required ||DropDownList ||Yes,No | ||
|} | |} | ||
{{ContactsSection}} | |||
{{NotesSection}} | |||
Revision as of 10:17, 23 October 2019
This screen allows you to maintain the customers in the system.
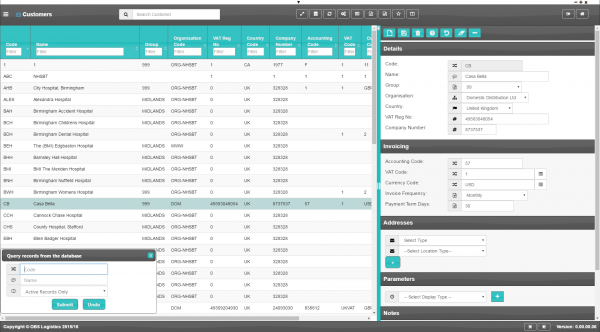
Caption1

You can query data by and/or choose to display data as follows:
- Code.
- Name.
- Group.
- Organisation Code.
- VAT Reg No.
- Country Code.
- Company Number.
- Accounting Code.
- VAT Code.
- Currency Code.
- Invoice Frequency.
- Payment Term Days.
- Active.
- Created By.
- Created Date.
- Last Updated By.
- Last Updated Date.
- Last Active Change By.
- Last Active Change Date.
- Last Process Id.
- Update Counter.
The following actions are available on the Details panel:
- New - create a new record.
- Save - save a new record or changes to an existing record.
- Delete - delete an existing record.
- Help - help on this screen.
- Undo - undo change made since last save.
- Clear - clear all fields.
- Toggle - toggle display of all accordion headers.
You can change or add the following information:
Details section
- Code.
- Name.
- Group - a drop-down list of customer groups configured in the system. You can configure customer groups in the Customer Groups screen.
- Organisation Code - a drop-down list of organisations configured in the system. You can configure organisations in the Organisation screen.
- Country Code - a drop-down list of countries configured in the system. You can configure countries in the Countries screen...
- Company Number
- VAT Reg No.
- Carrier - the carrier code used by the customer. You can look up a list of carrier codes configured in the system using the look-up button to the right of the entry field. The screen will pop-up a window to select a carrier code. You can configure carriers in the Carrier screen.
Invoicing section
- Accounting Code.
- VAT Code - the VAT code used by the customer. You can look up a list of VAT codes configured in the system using the look-up button to the right of the entry field. The screen will pop-up a window to select a VAT code. You can configure VAT codes in the VAT Codes screen.
- Currency Code - the currency code used by the customer. You can look up a list of currency codes configured in the system using the look-up button to the right of the entry field. The screen will pop-up a window to select a currency code. You can configure currency codes in the Currencies screen.
- Invoice Frequency - a drop-down list used to determine the invoice interval, Values: Weekly; Monthly; Yearly.
- Payment Term Days.
Address Details section
- Code - the location code.
- Type Code - a drop-down list of all the location types in the system. You can configure location types in the Location Types screen.
- Name - the name.
- Alternate Name - an alternate name.
- Address.
- Address 2.
- Address 3.
- Town.
- County.
- Country Code - a drop-down list of all countries configured in the system. You can configure countries in the Countries screen.
- Postcode.
- Latitude - the GPS position of the address.
- Longitude - the GPS position of the address.
- Postal Region - a postal region for the address.
A map will be displayed showing the location.
Parameters section
You can set parameters here to control additional functionality.
You can select a parameter to add using the provided Select Parameter drop-down list and clicking the ![]() Add button.
Add button.
The available parameters are configurable in the Customer Parameters screen.
Once you have selected the parameter, the screen will display it in this section. Parameters are displayed in the sequence which your system administrators have configured them to be displayed. Once the parameter is added, you can enter the value - in general, the screen will validate the value or will provide a list of values to select, depending on the parameter settings.
You can remove a parameter by clicking the ![]() Cancel button next to the parameter value.
Cancel button next to the parameter value.
The following parameters are currently available:
| Label | Description | Long Description | Type | Values |
|---|---|---|---|---|
| Consolidate with others | Allow Consolidate with other companies orders | Allow the consolidation of orders with orders placed by other companies | DropDownList | Yes,No |
| Fuel Base Price | Fuel Base Price | Fuel surcharge to be calculated and charged on variation of current price versus contract base price | TextBox | |
| Order Delivery Confirm Req | Order Delivery Confirmation Required | Order Delivery Confirmation Required | DropDownList | Yes,No |
| Order Received Confirm Req | Order Received Confirmation Required | Order Received Confirmation Required | DropDownList | Yes,No |
Contacts section
You can add any number of contacts here.
You can add a contact by clicking the ![]() New button in the section.
New button in the section.
You can edit an existing contact by selecting the contact row in the table and then clicking the ![]() Edit button in the section header.
Edit button in the section header.
The screen will display a pop-up window to enter the following:
- Title.
- Forename.
- Surname.
- Job Title.
- Contact Mediums - a list of all contact media for the customer.
- Primary Phone.
- Primary Email.
- Primary Mobile.
You can add additional contact media by selecting the media type from the drop-down list. The screen will add the medium to the Contact Mediums list above. Additional contact media:
- Email.
- Fax.
- Mobile.
- Skype.
- Facebook.
- Twitter.
You can delete an existing contact by selecting the contact row in the table and then clicking the ![]() Delete button in the section header.
Delete button in the section header.
Notes section
You can add notes through the Notes section.
You can click the ![]() New button in the Notes section to create a new note. This will be tagged with your user name and date/time.
New button in the Notes section to create a new note. This will be tagged with your user name and date/time.
Any notes may be removed by clicking the x in the corner of the note.