Customer
This screen allows you to maintain the customers in the system.
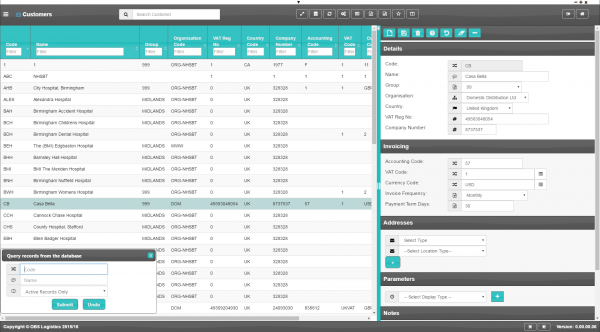
Caption1

You can query data by and/or choose to display data as follows:
- Code.
- Name.
- Group.
- Organisation Code.
- VAT Reg No.
- Country Code.
- Company Number.
- Accounting Code.
- VAT Code.
- Currency Code.
- Invoice Frequency.
- Payment Term Days.
- Active.
- Created By.
- Created Date.
- Last Updated By.
- Last Updated Date.
- Last Active Change By.
- Last Active Change Date.
- Last Process Id.
- Update Counter.
The following actions are available on the Details panel:
- New - create a new record.
- Save - save a new record or changes to an existing record.
- Delete - delete an existing record.
- Help - help on this screen.
- Undo - undo change made since last save.
- Clear - clear all fields.
- Toggle - toggle display of all accordion headers.
You can change or add the following information:
Details section
- Code.
- Name.
- Group - a drop-down list of customer groups configured in the system. You can configure customer groups in the Customer Groups screen.
- Organisation Code - a drop-down list of organisations configured in the system. You can configure organisations in the Organisation screen.
- Country Code - a drop-down list of countries configured in the system. You can configure countries in the Countries screen...
- Company Number
- VAT Reg No.
- Carrier - the carrier code used by the customer. You can look up a list of carrier codes configured in the system using the look-up button to the right of the entry field. The screen will pop-up a window to select a carrier code. You can configure carriers in the Carrier screen.
Invoicing section
- Accounting Code.
- VAT Code - the VAT code used by the customer. You can look up a list of VAT codes configured in the system using the look-up button to the right of the entry field. The screen will pop-up a window to select a VAT code. You can configure VAT codes in the VAT Codes screen.
- Currency Code - the currency code used by the customer. You can look up a list of currency codes configured in the system using the look-up button to the right of the entry field. The screen will pop-up a window to select a currency code. You can configure currency codes in the Currencies screen.
- Invoice Frequency - a drop-down list used to determine the invoice interval, Values: Weekly; Monthly; Yearly.
- Payment Term Days.
Addresses section
Parameters section
You can set parameters against the role to control functionality available for the customer.
You can select a parameter to add using the provided Select Parameter drop-down list and clicking the Add button.
The available parameters are configurable in the Customer Parameters screen.
The following parameters are available:
| Label | Description | Long Description | Type | Values |
|---|---|---|---|---|
| Consolidate with others | Allow Consolidate with other companies orders | Allow the consolidation of orders with orders placed by other companies | DropDownList | Yes,No |
| Fuel Base Price | Fuel Base Price | Fuel surcharge to be calculated and charged on variation of current price versus contract base price | TextBox | |
| Order Delivery Confirm Req | Order Delivery Confirmation Required | Order Delivery Confirmation Required | DropDownList | Yes,No |
| Order Received Confirm Req | Order Received Confirmation Required | Order Received Confirmation Required | DropDownList | Yes,No |
Once you have selected the parameter, you can enter the value - in general, the screen will validate the value or will provide a list of values to select, depending on the parameter settings.
You can remove a parameter by clicking the Delete button next to the parameter value.
Contacts section
You can add any number of contacts against a location.
You can add a contact by clicking the New button in the section. The screen will display a pop-up window to enter the following:
- Title.
- Forename.
- Surname.
- Job Title.
- Contact Mediums - a list of all contact media for the customer.
- Primary Phone.
- Primary Email.
- Primary Mobile.
You can add additional contact media by selecting the media type from the drop-down list. The screen will add the medium to the Contact Mediums list above. Additional contact media:
- Email.
- Fax.
- Mobile.
- Skype.
- Facebook.
- Twitter.
Notes section
You can add notes to the location through the Notes section.
You can click the Add button in the Notes section to create a new note. This will be tagged with your user name and date/time.
Any notes may be removed by clicking the x in the corner of the note.