Create Device Installer
 Windows Mobile
Create a CAB file
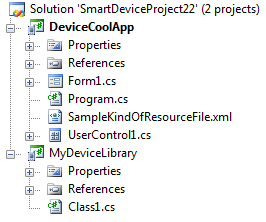
Assume we have the following solution:
and we want to include a project to create the cab installer for our application, which should:1) Copy DeviceCoolApp.exe, the referenced assembly MyDeviceLibrary.dll and the resource file called SampleKindOfResourceFile.xml to the application folder.2) Additionally, it should create a shortcut in the Programs folder on the device and3) Set the string value HKLM\Software\Mobile Practices\DeviceCoolApp\Version to "1.0".
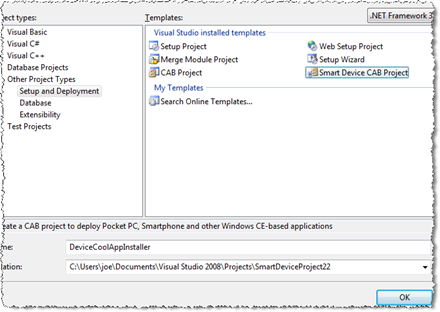
First of all, we need to add a new Smart Device CAB Project to the solution: Right click on the solution, Add - New Project...
Call it DeviceCoolAppInstaller and press OK. The new project will appear at the bottom in the Solution Explorer window.
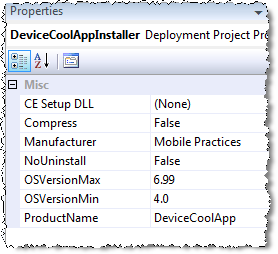
Now, I recommend we change the project properties to get a *nice* product installation. Set the Manufacturer (Mobile Practices) and Product Name (DeviceCoolApp) as follows:
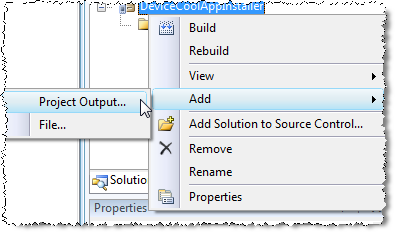
It's time to add DeviceCoolApp.exe (the DeviceCoolApp project output) to the CAB Project. Right click on DeviceCoolAppInstaller - Add - Project Output...
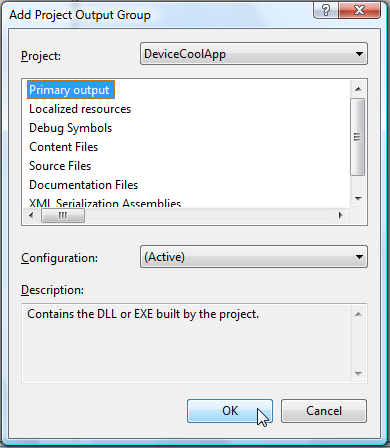
Select DeviceCoolApp on the Project selector, and Primary Output as follows, and press OK.
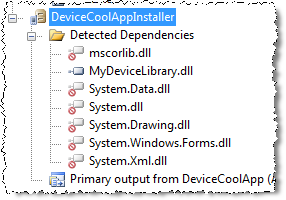
Visual Studio will detect automatically the DeviceCoolApp dependencies. In this case it will detect MyLibrary.dll
**If the dependencies are not detected, you can rebuild the solution and then Right Click on Detected Dependencies - Refresh Dependencies.
As you can see, due to the automatic dependencies detection, we don't need to add MyDeviceLibrary as Project Output on DeviceCoolAppInstaller.
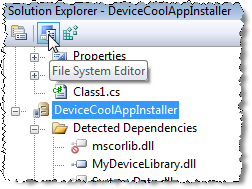
Now it's time to add the resource file SampleKindOfResourceFile.xml which should be installed on the Installation folder. Let's use the File System Editor, having the DeviceCoolAppInstaller project selected press the File System Editor button (btw, it's probably already open).
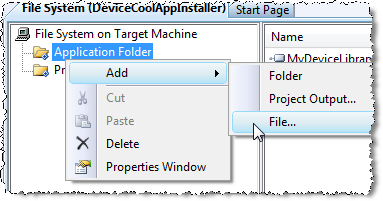
Now, right click on Application Folder - Add - File....
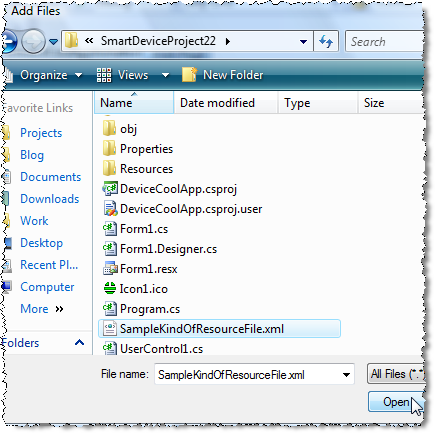
Browse and find SampleKindOfResourceFile.xml and press OK.
Congrats!, now we have all the necessary files ready to be installed. The next step is to add the shortcut.
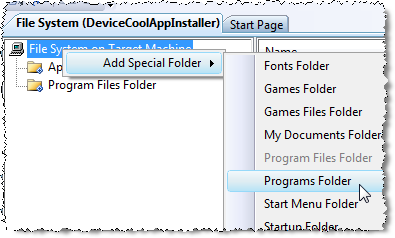
Unfortunately, the Programs Folder is not already included on the File System Editor, and we need to include it manually: Right click on File System on Target Machine - Add Special Folder - Programs Folder.
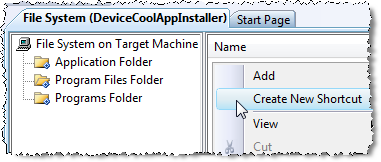
And now, select Programs Folder on the File System tree, and right click on the empty panel at right and select Create New Shortcut
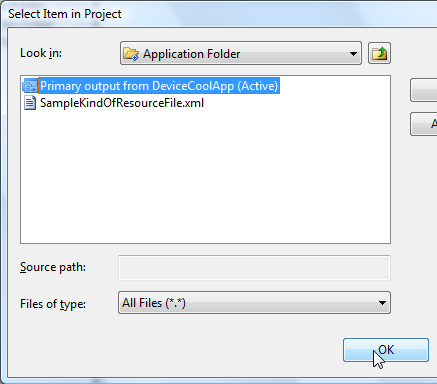
And select Application Folder - Primary output from DeviceCoolApp (Active) and press OK.
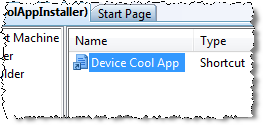
And rename it to "Device Cool App"
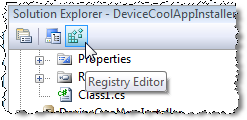
This will be the application shortcut on the Programs group on the smart device after installation. Now we just have to add the registry entry. Press the Registry Editor button:
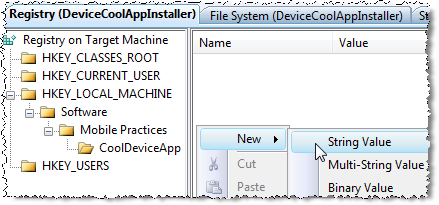
And add the string value "HKLM\Software\Mobile Practices\DeviceCoolApp\Version". You need to create the path key by key, and the add the string value on the right panel.
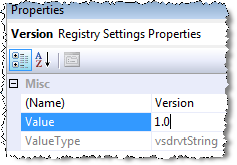
Name it "Version" and then, select it, and enter "1.0" into the Value field on the Properties Window
And *voila* the Smart Device CAB Project is done! We're ready to build the solution, right click on the DeviceCoolAppInstaller project and select Build.
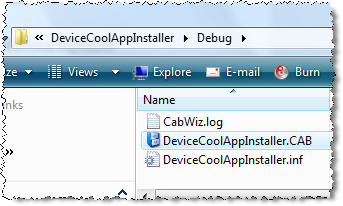
You can find the DeviceCoolAppInstaller.cab file in the DeviceCoolAppInstaller\debug folder.
We are ready to ship our application and distributing it. If you want to test it (highly recommendable), you can copy it to the emulator (or share de folder to make it visible from the emulator as a Storage Card) or to the device and install it. You can also uninstall it through the Remove Programs option.
 Android
Source Preparation
- Synchronise with SVN source control.
- Update Tiapp.xml (if distributing to market) or build for testing
- Update CHANGELOG.txt (get a list of changes from SVN since the last build and update those.
- Update Source in SVN - if building for market, check in Tiapp.xml and CHANGELOG.txt with the full details of the latest build from CHANGELOG.txt, example:
Version 1.2.20:
* 309133 - Fixed bug whereby loss of data connectivity could affect pending messages being sent.
- Clean the project
Create an APK file
The Android Client builds to an APK package file, and is created through Titanium Studio.
Configure the packager from Run/Configurations.
- Click Titanium Android App Store Configuration.
- Click Add and add a new configuration for the project, specifying:
- Distribution Location - P:\Releases\EPOD\Android\Distro
- Keystore Location - P:\Product\EPOD\_Development\Development Tools\AndroidKeyStore\KeyStore
- Password - as provided.
![]() Note: For testing purposes, you may want to add another packager configuration, to create a package locally. Copy the same configuration as above, but specify a different name and distribution location. ALWAYS use this local location for alpha builds, never the project folder.
Note: For testing purposes, you may want to add another packager configuration, to create a package locally. Copy the same configuration as above, but specify a different name and distribution location. ALWAYS use this local location for alpha builds, never the project folder.
The APK will be built when you choose your distribution configuration from the Publish button, called "CALIDUS ePOD.apk". Once complete, this should be compressed in this folder as "CALIDUS ePOD.v<versionText>.<ext>".
![]() Note: For completeness of documentation, keystores can be created as follows:
Note: For completeness of documentation, keystores can be created as follows:
- Click New next to the Keystore Location field to display the Create Keystore window.
- Next to the Location field, click Browse to display the Save window.
- Browse to select a folder where the keystore file will be saved.
- In the Save As field, enter a name for the keystore.
- Click Save.
- (Optional) In the Alias field, enter an alias for the private key. If you enter an alias for the key, it will use the same password as the keystore.
- In the Password field, enter a password for the keystore.
- In the Confirm Password field, re-enter the password to confirm it.
- In the Validity (years) field, enter the number of years for which the key will be valid. After the specified time period, the key will expire and the app will need to be resigned. Google recommends a validity period that will exceed the expected lifespan of the Android app (25 years or more).
- From the Type menu, select the key length for the key - use 2048-RSA.
- In the First and Last Name field, enter your name.
- In the Organization Name field, enter the name of the organization, OBS Logistics.
- In the Organization Unit field, enter the section or division of the organization, for example, EPOD, WCS, etc.
- In the City or Locality, enter the city or locale where the organization is located, i.e. Liverpool, London, Solihull.
- In the State or Province field, enter the state or province where your organization is located, e.g. Merseyside.
- In the Country Code (XX) field, enter the two-letter ISO code i.e. GB
- Click OK to create the keystore.
