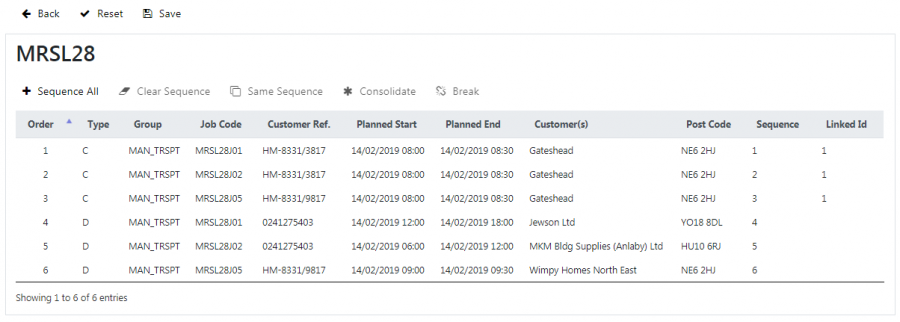
Job Sequencing
This screen allows you to set the sequence that the driver will see jobs on the load.
If the system is configured for it, this sequence is used to determine whether the driver can start the jobs out of sequence.
You can also use this screen to consolidate jobs together, so that they are completed together by the driver as if they were one job.
You can see how this affects the mobile device application in the mobile device application guide.
When you come to this screen from selecting a load on the loads maintenance screen, the jobs on that load are shown. For clarity, the load you selected is shown at the top of the screen.
The jobs table has the following columns:
- Order - this shows the sequence the jobs will be when they are saved.
- Type - the job type (collection, delivery or service).
- Group - the job group.
- Job Code.
- Customer Ref..
- Planned Start and End Date & Time.
- Customer - the customer name.
- Post Code.
- Sequence - this column shows the sequence of the jobs saved.
- Linked ID.
A button bar is shown at the top of the jobs table:
- Sequence All.
- Clear Sequence.
- Same Sequence.
- Consolidate.
- Break.
Once jobs have been sequenced or consolidated, you can use the buttons on the top of the screen to save or discard the changes:
- The Save button will save all changes.
- The Reset button resets all you changes back to the last time you saved the load, or to the state it was in when you entered the screen.
- The Back button will exit the screen with no confirmation.
When you save or reset changes, the jobs table will be re-displayed showing the current state of jobs on the load. This is the point to which you will return if you click the Reset button.
Sequencing Jobs
You can drag jobs on the table to a new position. You drag jobs by clicking and holding on the Order value in the row, moving it to the new spot then releasing. This will change the order value, which denotes the sequence the job will be in the load when the load is saved.
You can select a job by clicking on it - clicking on it again will deselect it. When you select a job, the will be highlighted blue. ![]() Note: Dragging and dropping a row does not select it.
Note: Dragging and dropping a row does not select it.
When you click Sequence All, the screen will display a pop-up confirmation, asking you to confirm that this will re-sequence all jobs to the order of the rows on the table and override all sequences.
When you select one or more jobs, clicking Clear Sequence removes the sequence from this job.
When you select two or more jobs, clicking the Same Sequence button will set the sequence of the selected jobs to the lowest of the sequences of the jobs selected.
Consolidating Jobs
You can select a job by clicking on it - clicking on it again will deselect it. When you select a job, the will be highlighted blue. ![]() Note: Dragging and dropping a row does not select it.
Note: Dragging and dropping a row does not select it.
When rows are selected, buttons may be enabled as indicated above.
When you select two or more jobs, clicking the Consolidate button will set the Linked ID of all the jobs to the same value. ![]() Note: If some of the selected jobs are already linked with this ID, all the jobs with this linked ID will be updated as well.
Note: If some of the selected jobs are already linked with this ID, all the jobs with this linked ID will be updated as well.
When you select one or more jobs with a link ID, clicking the Break button will clear the linked ID of all the selected jobs. Any jobs remaining with the same linked id that are only present once on the load will also be cleared.
