Jobs
This screen shows the Jobs is the system associated to the Load.
You can create, edit or delete jobs, if you are a full admin user.
![]() Note: Your system administrator can modify the text of the labels on this screen. For simplicity, the default labels are shown here.
Note: Your system administrator can modify the text of the labels on this screen. For simplicity, the default labels are shown here.
This screen is common to all job types (services, deliveries or collections).
The screen displays data only for your default site and only for those job groups to which you have access (controlled through the User Access screen).
When you come to this screen from selecting a load on the loads maintenance screen, the screen displays a results table of all jobs that are assigned to the Load selected. The screen has no Find button or search panel in this case - you cannot filter the data any further. The screen also has additional buttons:
- Job Assign - use this option to assign jobs to this load.
- Job Sequence - use this option to sequence jobs on the load.
When you come to this screen from the customer screen, the screen displays a results table of all jobs for that customer. The screen has no Find button or search panel in this case - you cannot filter the data any further.
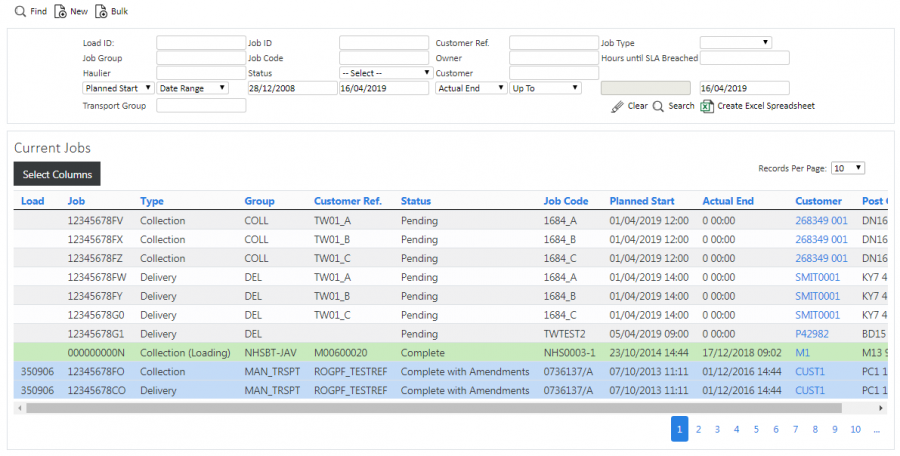
When you come to this screen from the main menu, the screen allows you to filter the data by:
- Load Id.
- Job Id.
- Customer Ref.
- Job Type, with a drop-down list of Collection, Delivery and Service.
- Job Group.
- Job Code.
- Owner.
- Haulier.
- Status, with a drop-down list of Pending, In Progress, Complete, Complete Amended and Cancelled.
- Customer.
- Hours until SLA Breached.
- 2 Date selectors.
- Transport Group.
The date selectors allow you to filter from all the common job dates, namely:
- Planned Start.
- Planned End.
- Actual Start.
- Actual End.
- Arrival.
- Ordered.
You can choose the way that you want to filter the dates, from the following:
- Specific - on the specific date you enter.
- Date Range - between the dates that you enter, including those dates.
- From - from the date you enter forward, including that date.
- Up To - up to the date you enter, including that date.
To help you select a date, the screen will display a calendar pop-up.
You can enter two date selections - remember that these are inclusive, so if you select on one planned start date and another planned start date, you won't get anything in the results, because a job can't start on two different dates.
Once you have entered the criteria, click Search. The screen will display a table of all the matching data. Any plain text boxes will match data that contains what you enter as the criterion.
Alternatively, if you click Create Excel Spreadsheet, the screen will export the users data to a Microsoft Excel spreadsheet. The functionality differs per the browser you have used to access the Admin system, but the likely result is the spreadsheet file will offered for download.
The results table displays a single line for each job found.
You can sort the results table by clicking on the column header - clicking again will reverse the sort sequence.
You can change the order of the columns in the results table. Click and drag the column header to a new position, then release it in the new position - the screen will indicate where the column will end up as you drag it.
You can choose to hide or show almost all of the columns in the results table by using the Select Columns button on the header. The results table shows the following columns:
- Load.
- Job ID - this is always displayed.
- Type - one of: Collection; Collection (Loading); Service; Delivery or; Delivery (Unloading).
- Group.
- Customer Ref..
- Job Code.
- Service Level.
- Planned Start.
- Planned End.
- Actual Start the start date and time, if the job is finished.
- Actual End - if the job is finished.
- Arrival - the arrival date and time, if the job is finished.
- Ordered - the ordered date and time.
- Status - one of: Pending; Assigned; In Progress; Complete; Complete with Amendments or; Cancelled.
- Customer.
- Owner Name.
- Owner Code.
- Haulier.
- Transport Group.
- Account.
- Customer Name.
- External Ref.
- Invoiced.
- SO Number.
- Job Instruction.
- Sequence - the sequence of the job on the load.
- Office Instruction.
- Trailer Id.
- Linked Id - an indicator as to whether this job is linked to any other jobs on the same load. The job is linked if the ID is the same non-blank value.
- Load Location.
- Address 1 -
 Note: The table displays address information sourced from either the job address if it exists, or the customer's address.
 - Address 2.
- Address 3.
- Address 4.
- Post Code.
- Contact.
- Telephone.
- Email.
- Product Description - the description of the first product on the job, plus an indication of how many others there may be ("[...+X more]").
- Total Product Qty - the total quantity of all products added together. The actual quantity will be used, then the planned, then the ordered.
 Note: This does not calculate cases and singles.
 - Total Product Cost - the calculated value of all products, based on the product quantity (as above) multiplied by the product unit cost.
 Note: This does not include the VAT value, if you have provided this separately.
 - Charge Description - the description of the first charge on the job, plus an indication of how many others there may be ("[...+X more]").
- Charge Cost - the sum of all charge costs.
 Note: This is the Net value.
The jobs will be coloured based on the status of the job being shown:
- Pending - No colour.
- In Progress - Amber.
- Complete - Green.
- Complete with Amendments - Blue.
- Cancelled - Red. Also, if the line has a Reason Code entered against it.
You can view the job in detail by clicking the Select action button against the job in the results table.
You can cancel a job by clicking the Cancel action button against the job in the results table. ![]() Warning: You should take care with this option. You will be asked to confirm before this happens. If you choose to proceed, the system will keep an audit log of the cancellation of the job.
Warning: You should take care with this option. You will be asked to confirm before this happens. If you choose to proceed, the system will keep an audit log of the cancellation of the job.
You can see the container (item) and product information of a job by clicking the Details action button against the job in the results table:
- If the job is a loading, unloading, collection or delivery, you will be shown the Container Details page.
- If the job is a service, you will be shown the Service Details page.
If a driver has started a job (i.e. at status In Progress), you can view the tracking information by clicking the Tracking action button against the job in the results table. This will take you to the User Tracking screen.
If the job has charges, you can view them quickly by clicking the Charges action button against the job in the results table. This will take you straight to the Time, Expense and Charges tab on the pop-up, automatically showing the charges against the job. You can also get to this by clicking the Select action button, clicking the Time, Expense and Charges tab on the pop-up, and then selecting CHARGES type from the drop-down list.
If the job is complete or cancelled, you can view, email or print the completion report in the configured format by clicking the Report action button against the job in the results table.
You can copy an existing job by selecting the line and choosing the the Copy action button. The selected job will be copied and the resulting job shown in a popup for further editing. Note that the job code and customer reference will have been amended to have a sequence added to the end of the data, to keep this unique for tracking purposes.
Creating a New Job
The screen allows you create a new Job, by pressing the provided "New" button at the top of the screen.
You can enter all the details of the job on three tabs.
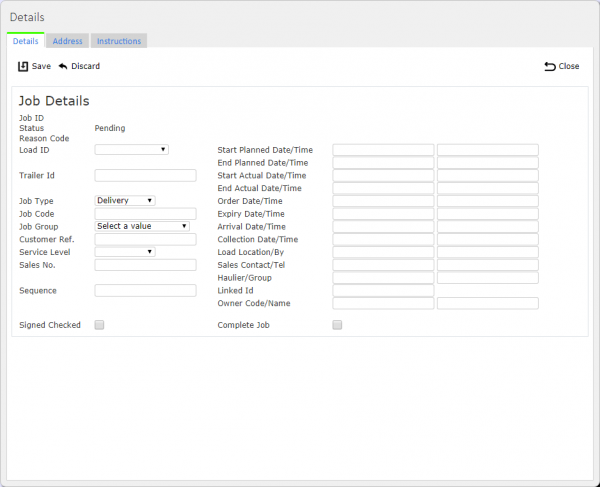
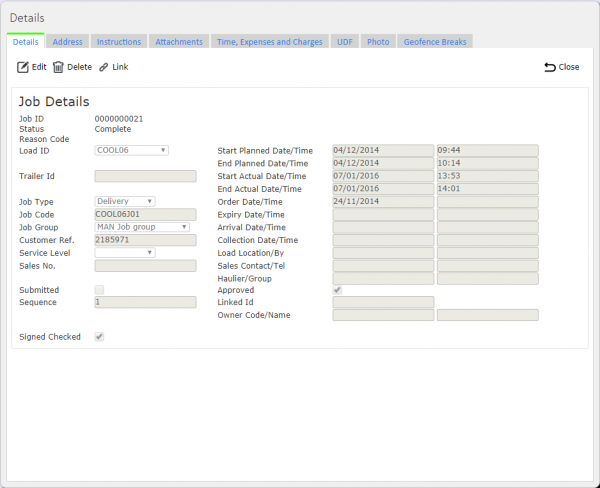
The main details of the job are entered on the Details tab:
- Load ID, from a drop-down list of available loads. If you came to this screen from the loads screen, the load will be set to the load selected. If not, the load will be left blank and can be assigned.
- Trailer ID.
- Job Type, from a drop-down list.
 Note: This information is required to be entered.
 - Job Code, the main unique order reference.
 Note: This information is required to be entered.
 - Job Group, selected from a Drop-down List.
 Note: This information is required to be entered.
 - Customer Ref, the customer's order reference.
- Service Level, either free-text entry or a drop-down list of predefined service levels (depending on system configuration).
- Sales No, the S/O reference.
- Start Planned and End Date and Time.
 Note: This information is required to be entered.
 - Order Date and Time, the time the order was requested by the customer.
- Expiry Date and Time, used to determine SLA compliance.
- Collection Date and Time, for reference only.
- Load Location/By, for reference only.
- Sales Contact/Tel No, your contact information.
- Haulier/Group, reference fields for the Haulier.
- Owner Code/Name, reference fields for the Owner.
Completion information may also be entered:
- Signed Checked.
- Start Actual and End Date and Time.
 Note: This information is required to be entered.
 - Arrival Date and Time, used to determine SLA compliance.
- Complete Job - if checked, this will close the job as complete when saved.
![]() Note: This information is expected to be automatically captured from the driver when they complete the job, but may be edited here, if the system is configured to allow this.
Note: This information is expected to be automatically captured from the driver when they complete the job, but may be edited here, if the system is configured to allow this.
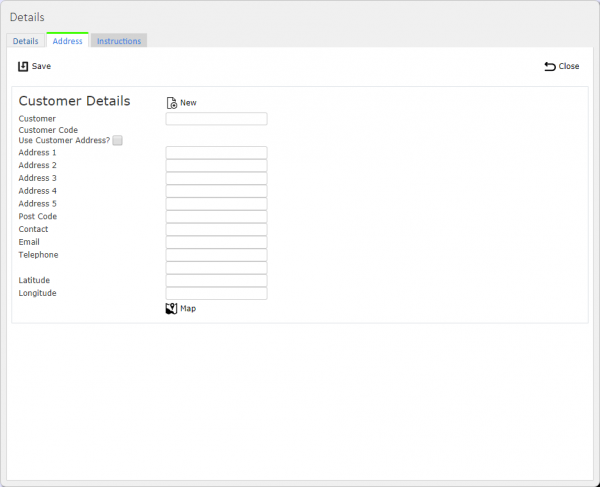
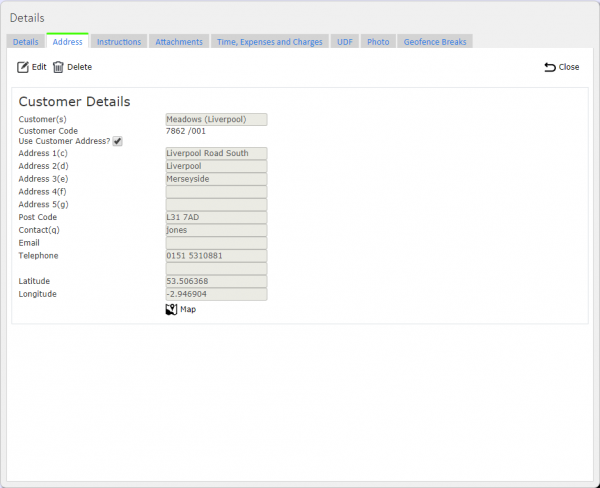
You can enter the customer address and contact information on the Address tab:
- A Customer Code, also allowing creation of a new customer if required.
 Note: This information is required to be entered.
 - The Job Address, either through using the selected customer's address, or through entering a specific address for this job. You can amend:
- Address 1.
- Address 2.
- Address 3.
- Address 4.
- Address 5.
- Post Code.
- Contact.
- Email.
- Telephone (x2).
- Latitude/Longitude - the GPS co-ordinate of the address.
If Latitude and Longitude have been provided, a Map button can be clicked to show the location of the address. ![]() Note: If latitude and longitude have been provided, this is used on the device for direct navigation in preference to the address itself, as this provided latitude and longitude is expected to be more accurate.
Note: If latitude and longitude have been provided, this is used on the device for direct navigation in preference to the address itself, as this provided latitude and longitude is expected to be more accurate.
You can also select a recent previously-used job address from a drop-down list.
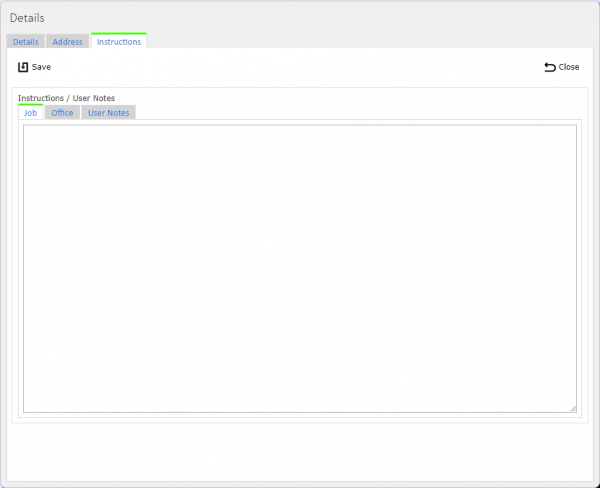
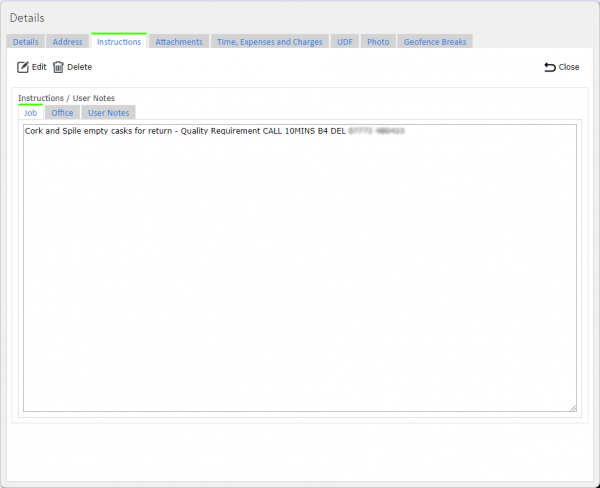
You can enter instructions and notes on the Instructions tab:
- Job Instructions, which the mobile device application will display.
- Office Instructions, which the mobile device application will not display.
- User Notes, normally entered by the driver when completing the job. However, they may be edited here.
When changes are complete, you can click Save to save the changes, or Close to close the pop-up without saving the changes.
When you save, the status of the job is set as "Pending".
The screen provides a Link button in the header of the New/Edit pop-up, to allow you to specify a job that in linked to this one (for example, the delivery job associated with a collection job). When you click this button, the screen will immediately create a copy of the original job, but as a delivery (if the original was a collection) or collection (if the original was a delivery). The screen will copy all details, including container (item) and product details. Depending on the site configuration, the screen will issue a warning when attempting to created a linked job when there are no containers (items) or products.
Viewing/Editing a Job
You can view and edit jobs by clicking the Select action button against the job in the results table - a pop-up screen will show all the details of the job.
You can edit the job by clicking the Edit button.
You can see all the details of the job on the tabs shown.
The main details of the job are viewed or changed on the Details tab. The following can be changed:
- Load, from a drop-down list of available loads.
- Trailer ID.
- Job Type, from a drop-down list.
 Note: This information is required to be entered.
 - Job Code, the main unique order reference.
 Note: This information is required to be entered.
 - Job Group, selected from a Drop-down List.
 Note: This information is required to be entered.
 - Customer Ref, the customer's order reference.
- Service Level, either free-text entry or a drop-down list of predefined service levels (depending on system configuration).
- Sales No, the S/O reference.
- Start Planned and End Date and Time.
 Note: This information is required to be entered.
 - Order Date and Time, the time the order was requested by the customer.
- Expiry Date and Time, used to determine SLA compliance.
- Collection Date and Time, for reference only.
- Load Location/By, for reference only.
- Sales Contact/Tel No, your contact information.
- Haulier/Group, reference fields for the Haulier.
- Owner Code/Name, reference fields for the Owner.
Completion information may also be entered:
- Signed Checked.
- Start Actual and End Date and Time.
 Note: This information is required to be entered.
 - Arrival Date and Time, used to determine SLA compliance.
- Submitted/Approved check boxes, for time and expense status information.
- Complete Job - if checked, this will close the job as complete when saved.
![]() Note: This information is expected to be automatically captured from the driver when they complete the job, but may be edited here, if the system is configured to allow this.
Note: This information is expected to be automatically captured from the driver when they complete the job, but may be edited here, if the system is configured to allow this.
You can view or change the customer address and contact information on the Address tab:
- A Customer Code, also allowing creation of a new customer if required.
 Note: This information is required to be entered.
 - The Job Address, either through using the selected customer's address, or through entering a specific address for this job. You can amend:
- Address 1.
- Address 2.
- Address 3.
- Address 4.
- Address 5.
- Post Code.
- Contact.
- Email.
- Telephone (x2).
- Latitude/Longitude - the GPS co-ordinate of the address.
If Latitude and Longitude have been provided, a Map button can be clicked to show the location of the address. ![]() Note: If latitude and longitude have been provided, this is used on the device for direct navigation in preference to the address itself, as this provided latitude and longitude is expected to be more accurate.
Note: If latitude and longitude have been provided, this is used on the device for direct navigation in preference to the address itself, as this provided latitude and longitude is expected to be more accurate.
You can also select a recent previously-used job address from a drop-down list.
You can edit instructions and notes on the Instructions tab:
- Job Instructions.
- Office Instructions.
- User Notes, normally entered by the driver when completing the job. However, they may be edited here.
When changes are complete, you can click Save to save the changes. If you don't want to save your changes, you can click Close to close the pop-up without saving the changes.
You can click the Delete button to delete the job - the screen will ask you to confirm before the job is deleted.
The pop-up may also be showing multiple other tabs for many purposes, which allow data to be viewed, edited or added:
You can use this screen to upload any attachment to the job.
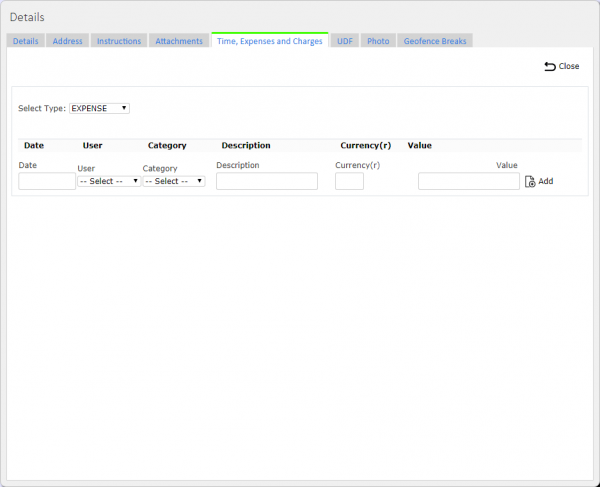
You can use this screen to view, edit or amend time, expenses or charges.
First, you must select the type through the Select Type drop-down list - this allows you the options of EXPENSE, TIME and CHARGES. This defaults to EXPENSE, and any expenses will be shown on the results table when you first enter the tab.
The Results table shows the following information about the entries:
- Date.
- User - This is only used for TIME or EXPENSE types.
- Category - This is only used for TIME or EXPENSE types.
- Description.
- Currency - This is only used for EXPENSE or CHARGES types.
- Value - This is only used for TIME or EXPENSE types.
- Net Value - This is only used for CHARGES types.
- VAT Rate % - This is only used for CHARGES types.
- Gross Value - This is only used for CHARGES types.
You can enter new time, expenses or charges by using the row on the bottom of the table.
- Date - you can use the pop-up calendar to enter the date, which defaults to today's date.
- User - a drop-down list of users in the system. This is only used for TIME or EXPENSE types.
- Category - a drop-down list of all time or expense categories, depending on type. This is only used for TIME or EXPENSE types.
- Description - plain text description of the entry.
- Currency - a plain text currency. You should use the currency code. This is only used for EXPENSE or CHARGES.
- Value - a numeric entry. This is only used for TIME or EXPENSE types.
- Net Value - a numeric entry. This is only used for CHARGES types.
- VAT Rate % - a percentage entry, defaulting to 20%. This is only used for CHARGES types.
- Gross Value - This is only used for CHARGES types.
When you have entered the new line, you can click Add to add the new time, expense or charge.
You can edit an existing time, expense or charge by clicking the Edit button against the entry. The screen will change to allow you to edit the values against the entry - everything can be changed.
When changes are complete, you can click Save to save the changes, or Discard to revert back to viewing the original entry.
You can click the Delete button against an entry to delete it - the screen will ask you to confirm before the entry is deleted.
You can copy this job by choosing the the Copy button. The selected job will be copied and the resulting job shown in a popup for further editing. Note that the job code and customer reference will have been amended to have a sequence added to the end of the data, to keep this unique for tracking purposes.
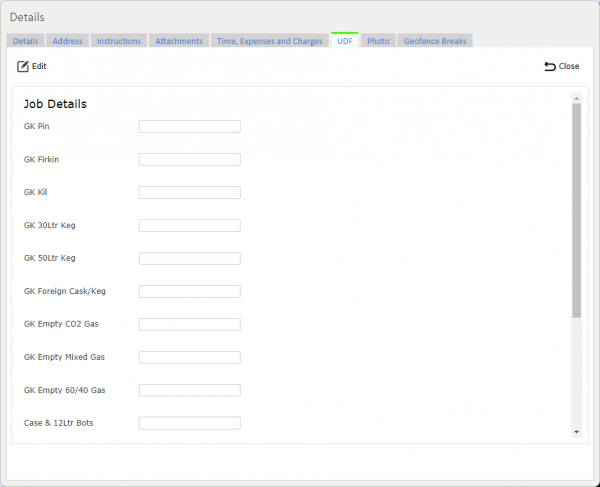
This tab displays any additional information the driver collected through user-defined forms (UDF). You can edit this information here if need be.
If the driver has taken photos as part of the UDF, clicking the button associated to the photo will show this in the Photos tab.
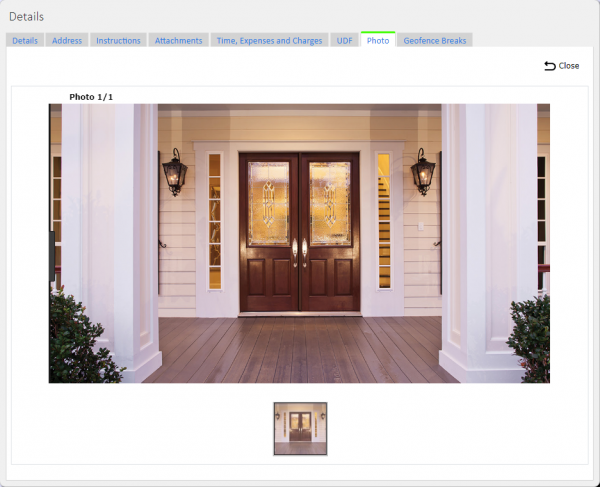
If the driver has taken any photos, you can see them here.
The tab is a carousel of images that you can flip through. The comments are displayed under the image.
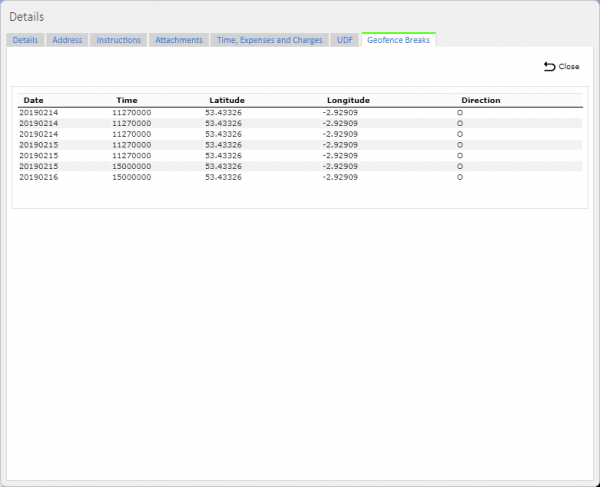
As a driver executes a job, if the address has any Geofences assigned to it, the mobile device will record when those geofences have been entered and/or exited. You can view this information here. ![]() Note: This functionality is still in development at this time.
Note: This functionality is still in development at this time.
The screen provides a Link button in the header of the New/Edit pop-up, to allow you to specify a job that in linked to this one (for example, the delivery job associated with a collection job). When you click this button, the screen will immediately create a copy of the original job, but as a delivery (if the original was a collection) or collection (if the original was a delivery). The screen will copy all details, including container (item) and product details. Depending on the site configuration, the screen will issue a warning when attempting to created a linked job when there are no containers (items) or products.
When changes are complete, you can click Save to save the changes, or Close to close the pop-up without saving the changes.
Bulk Job Creation
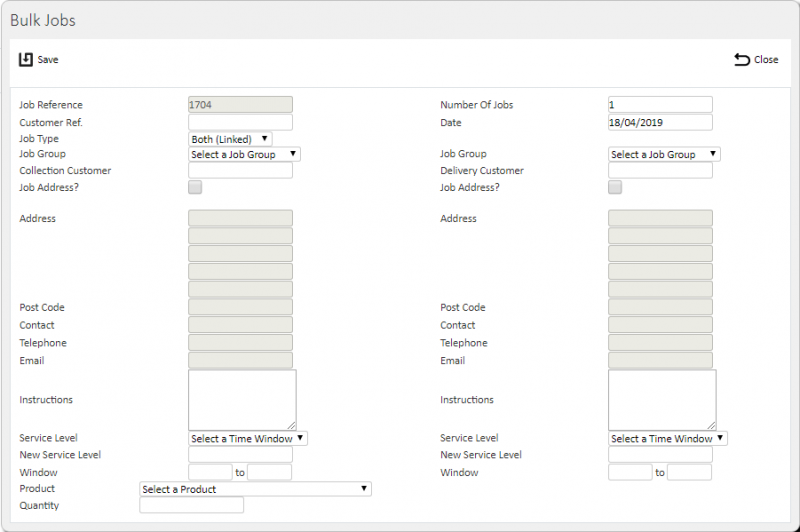
You can create jobs in bulk by using the Bulk Jobs button at the top of the screen.
When you click this, a window will be shown to enter the details. ![]() Note: The details prompted for are configurable through the Site maintenance screen.
Note: The details prompted for are configurable through the Site maintenance screen.
The pop-up screen may prompt for the following:
- Your Reference - the screen will automatically generate this (the job code) and this will be a unique reference for the site. You can't modify this.
- Number of Jobs - you can enter the number of (linked) jobs you want to create, which will be defaulted to 1.
- Customer Ref - this is the customer's reference, which you must enter in this free-text box.
- Date - you are required to enter a date, which will be a date-formatted entry supported by a calendar pop up. The value will default to the current date, or the last date selected in this session. Any date you enter will be validated as either the current date or forward from the current date - you cannot enter a dates in the past, either manually or through the date calendar pop-up.
- Job Type - this is a drop-down list. The screen will default this to the Job Type Default site-level Bulk Job Entry setting, but you can can change it here. If you choose Collection or Both (Linked), the screen enables the Collection address fields and you must enter them. If you choose "Delivery" or "Both (Linked)", the screen enables the Delivery address fields and you must enter them.
- Job Group (for collection and delivery) - this is a drop-down list of all configured job groups for the site. This will default to the job group selected in the "Default Bulk Job Group" site-level Bulk Job Entry setting, but you can change it.
- Customer (for collection and delivery) - a drop-down searchable list of all customers in the system. You are required to enter this for every job and address. When you select a customer, the screen will display the customer's address, post code, contact, telephone and email address and you may may not change it.
- Job Address (for collection or delivery) - this is a check-box, defaulting to unchecked. If you check it, the address, post code, contact, telephone and email address may be changed. The screen will also display a drop-down list of addresses that have been used for that customer in the past, and you can select one of those rather than editing the address. When you select of change an address, the customer address is not updated - the system will store this as a Job Address for the job being created.
- (Driver) Instructions (for collection and delivery job) - this is a text area for you to enter instructions for the driver. If the "Instructions" site-level Bulk Entry setting is set to "Required", you will be forced to enter instructions for collection and delivery jobs.
- Window (for collection or delivery) - you will be prompted to enter some of the following, depending on configuration:
- Service level (for collection and delivery) - a drop-down list is displayed, allowing you to enter a new service level or select an existing service level. If the "Window Entry" site-level Bulk Entry setting is set to "Required", you will be forced to either select an existing value or enter a new value. Spaces are not be allowed. If you select a previously-created service level, the system displays the from and to times in the Windows time entry boxes. If you enter a new service level, these windows will be blank.
- Windows - you will be required to enter a time in both boxes, which will be a time-formatted entry supported by a time pop-up.
 Note: There is no requirement for the second time to be greater than the first time, to support a delivery or collection window over-night. If the "Window Entry" site-level Bulk Entry setting is set to "Required", you will be forced to enter both windows for collection and delivery jobs.
- Product - you may be prompted to enter product information in one of two ways, depending on configuration:
- If the "Product Selection" site-level Bulk Entry setting is set to "Pre-set", the screen will offer a drop-down list of pre-configured products, showing the product code and description, plus a default option of "Select a value". If the "Product Entry" site-level Bulk Entry setting is set to "Required", you will not be allowed to select the default option of "Select a value".
- If the "Product Selection" site-level Bulk Entry setting is set to "Free Text", the screen will offer a text entry box. This is limited to 40 character entry only. Additionally, a free-text entry box will be offered to enter the description, again limited to 40 characters. If the "Product Entry" site-level Bulk Entry setting is set to "Required", you will be forced to enter the product code and description.
- Quantity - If a product has been selected, this will default to the standard product quantity (if set against a pre-configured product). If not or if this is a free-text entry, then you must enter this and the value may not be zero. If you have not entered or selected a product, this value is not required.
The site configuration affects the layout of the screen. They apply as follows:
- The pop-up will always display the following:
- Your Reference
- Number of Jobs
- Customer Ref
- Date
- Job Type
- Job Group.
- Customer
- Job Address
- The pop-up will only display the following fields if the "Instructions" site-level Bulk Entry setting is not set to "Disabled (Hidden)":
- (Driver) Instructions
- The pop-up will only display the following section if the "Window Entry" site-level Bulk Entry setting is not set to "Disabled (Hidden)":
- Window
- The pop-up will only display the following section if the "Window Entry" site-level Bulk Entry setting is not set to "Disabled (Hidden)", and based on the "Window or Service Level" Site-level Bulk Entry setting:
- Service level - displayed only if the "Window or Service Level" site-level Bulk Entry setting is set to "Service Level".
- Windows - displayed if the "Window or Service Level" site-level Bulk Entry setting is set to "Service Level" or Window.
- The pop-up will only display the following fields if the "Product Entry" site-level Bulk Entry setting is not set to "Disabled (Hidden)":
- Product
- Description - displayed only if the "Product Selection" site-level Bulk Entry setting is set to "Free Text".
- Quantity
If you are creating more than one job, the job code and customer references of the jobs created will be generated from the values in "Your Reference" and "Customer Reference" respectively, plus a character to keep them unique.
For example:
The job code is required to pair jobs. This is a unique reference that is applied to both jobs which, when combined with the job type (C or D) declares that these are linked. This job code is being system-generated. The screen will generate 1 core job code (for example "123456"). If there are 5 jobs being created of both collections and deliveries, the system will create those pairs of jobs with a counter to keep them unique. For example 123456_A, 123456_B, 123456_C, 123456_D, 123456_E).
When you save the bulk job entry (by clicking the provided Save button), the system will generate the required number of jobs based on the information entered. The generated jobs will then be displayed in the Jobs screen results table.
![]() Note: When fields are required to be entered or have specific validation, the pop-up form will display the validation errors when attempting to save the Bulk Job pop-up.
Note: When fields are required to be entered or have specific validation, the pop-up form will display the validation errors when attempting to save the Bulk Job pop-up.
If you have entered a new service level, the time windows will be saved as defaults for the next bulk job entry.
