PDA Collection
If the job is a Collection or Loading job, this screen will be displayed, initially showing a summary screen.
If configured, collections at a depot will be displayed as Loading tasks rather than Collection tasks.
The screen can display a number of different tabs:
- Job Details - see below
- Containers - uniquely-identified collectable items (if there are items to collect). When containers (items) are used across multiple consolidated jobs, this information is displayed here slightly differently, showing the destination.
- Products - products that are require to be collected, either loose or within a container, with a quantity to collect, if there a products to collect, and the system is configured to allow this.
- Ad Hoc - add uniquely-identified collectable items (if the system is configured to allow this)
- Notes - any driver notes (if the system is configured to allow this)
Select the tabs or swipe left and right to move between the tabs.
Job Details
Job Details Tab
Job Address


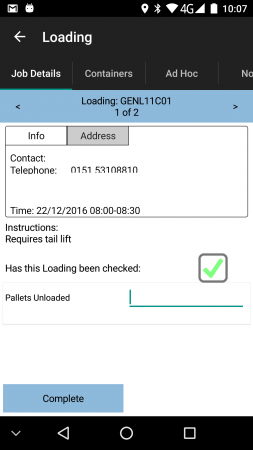
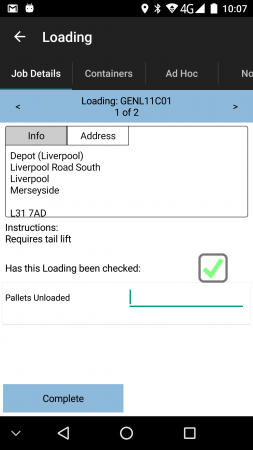
The Job Details tab has multiple sections:
- Contact information
- Address information - if supplied, both current collection address and ultimate delivery address are shown.
- Planned Start and End Time, if provided
- Job Instructions
- Some check-boxes for the driver to confirm:
- Has the collection been checked?
- Is invoicing required?
Additionally, this screen can display many other items to enter - this is customer-specific user-defined fields (UDF) information configured by the admin staff. If configured, this information is displayed in a scroll-able list for entry here. For example, the above screen-shots show the user being prompted for the number of pallets unloaded. ![]() Note: This may be configured so that this additional information is only required to be entered if the job has been amended in some way, for example, a container was not collected or a product quantity was changed during the collection.
Note: This may be configured so that this additional information is only required to be entered if the job has been amended in some way, for example, a container was not collected or a product quantity was changed during the collection.
The tab may also display a Complete button, allowing the user to complete the job when all details are entered. This job only appears if:
- Ad Hoc items are enabled (see later)
- No items or products are required for collection at all.
If configured to do so, this button may be replaced with other buttons:
- A Collect All button may be displayed. This will mark as collected all items not yet confirmed or cancelled, after confirming.
- A Cancel All button may be displayed. This will mark as cancelled with a preconfigured reason code all items and products that have not yet been marked as collected. This will also short-collect any products that have not been fully collected (for example, when using product quantity countdown functionality).
As with all screens, labels and fields can be removed or have the text changed as part of the styling service.
The jobs required for collection can be varied and can consist of:
- Container only.
- Loose Product Only.
- Containers with products within that should be counted.
- Ad Hoc containers.
- A mix of all the above.
Container Only Collection
If there are containers to be collected, either without products or the system or container is configured to be collected without scanning products, the following process will apply. Note that, regardless of system configuration, individual containers can be marked as requiring or not requiring content (product) scanning - this allows for (for example), bulk picking of pallets, bulk delivery of pallets, tote delivery with or without scanning of contents.
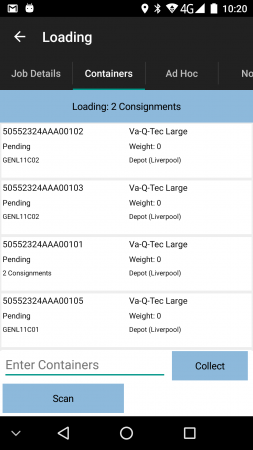
Containers Tab, showing single and consolidated containers

From the Containers tab, the device will show a list of the unique items to be collected, which can show:
- Container ID
- Package Description
- Status (starting at "Pending")
- Weight
- Long Description
- Job Reference (if consolidated)
- Customer Name (if consolidated)
- Product Count
- General Code - a general-purpose code on the container
Long-pressing on the title line will refresh the container list if required.
Actions against the items can be activated by long-pressing against the row, and have the following
actions:
- Collect - this option can be removed by configuration, if the user is not allowed to select items to collect from the list, but must scan or manually enter them instead.
- Collect Claused - this option is only available if Clausing is enabled.
- Cancel - to cancel the collection of this item - the exception screen will be displayed.
- Info - displays a window showing all the known information about this container.
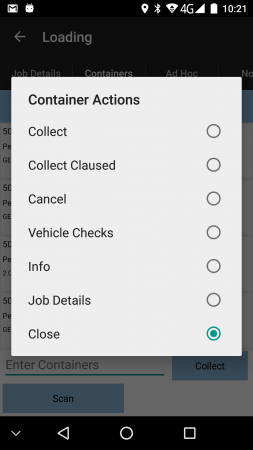
Container Long-press Pop-up
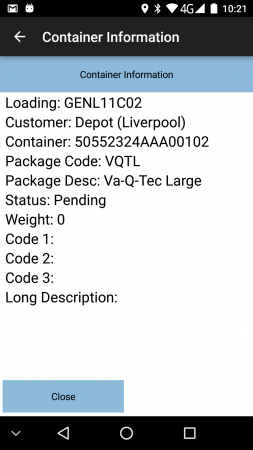
Container Info Pop-up


Additionally, if any user-defined fields have been configured to be required when collecting containers, the form to enter or view these details will be available from this pop-up Actions list. For example, if vehicles are being collected and an inspection should be done before loading, these might be captured on a form called "Vehicle Checks", an entry on this pop-up list would be displayed labelled as Vehicle Checks.
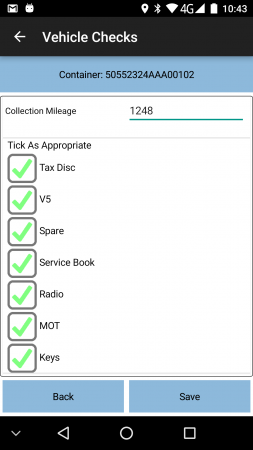
Containers UDF

For information on the actions above, see the appropriate following sections.
Each item on the list can be confirmed as collected by either:
- selecting the item from the list and selecting Collect
- entering the container ID manually and clicking the Collect button.
- scanning the container ID, using the application Scan button and camera scanning feature, or using a connected or integral hardware scanner.
If items are entered that are not part of this collection, the application will issue an error and will not collect the item. If this is required, Ad Hoc Item collection may be used if configured - see the following section for details of this process.
If any user-defined fields are required to be entered against the collected items, the application will prompt for this information at this stage. If required, the information must be entered before the item is marked as collected.
When marked as collected, the item will be removed from the list.
Products or Loose Products Collection
If loose products are to be collected without containers, there will be no Containers tab, only a Products tab.
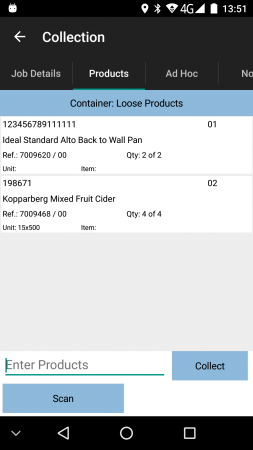
Products Tab

From the Products tab, the device will show a list of the products to be collected, which can show:
- The Product Code
- The Sequence
- The full Description
- The Long Description
- Any Customer Reference associated to this product
- The Planned Quantity
- The Job Reference (if consolidated)
- The Item Type
- The Unit Type
![]() Note: The planned quantity will display based on the system configuration and the quantity. For example:
Note: The planned quantity will display based on the system configuration and the quantity. For example:
- Decimal quantities (e.g. 3.75) are supported for planned and actual product quantities and case quantities.
- If a product case value has been supplied, the quantity will display as a number of cases and loose units e.g. for a quantity of 65 and a case size of 12, this will display as "5/5".
Long-pressing on the title line will refresh the product list if required.
Actions against the products can be activated by long-pressing against the row, and have the following actions:
- Collect X - this option can be removed by configuration, if the user is not allowed to select items to collect from the list, but must scan or manually enter them instead.
- Change Quantity - to change the collected quantity of the product - the exception screen will be displayed.
- Comments - to add comments and confirm the collected quantity of the product - the exception screen will be displayed. This option may be removed by configuration.
- Cancel - to cancel the collection of this product - the exception screen will be displayed.
- Info - displays a window showing all the known information about this product.
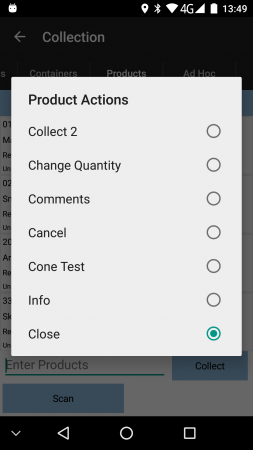
Products Long-press Pop-up
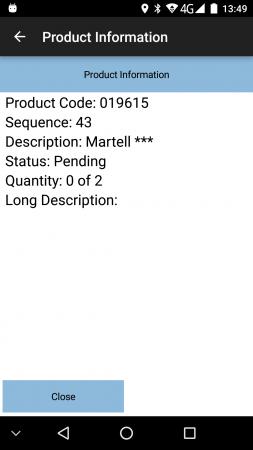
Products Info Pop-up


Additionally, if any user-defined fields (UDF) have been configured to be required when collecting products or products of a particular group, the form to enter or view these details will be available from this pop-up Actions list. For example, if fields are required to capture tests taken of the product when collected, on a form called "Cone Test", an entry on this pop-up list would be displayed labelled as Cone Test.
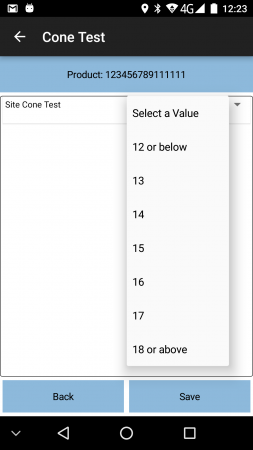
Product UDF

For information on the actions above, see the appropriate following sections.
Each product on the list can be confirmed as collected by either:
- long-clicking on the item in the list and choosing Collect X from the pop-up menu. This option can be removed by configuration if not required.
- entering the product code manually and clicking Collect X from the pop-up menu.
- scanning the product code and clicking Collect X from the pop-up menu, , using the application Scan button and camera scanning feature, or using a connected or integral hardware scanner.
 Note: This can be configured to recognise GS1 barcode elements and only extract the required part of the barcode (the configured AI).
![]() Note: If configured, alternate product barcodes will be recognised when scanning.
Note: If configured, alternate product barcodes will be recognised when scanning.
If products are entered that are not part of this collection, the application will issue an error and will not collect the product.
If any user-defined fields are required to be entered against the collected product, the application will prompt for this information at this stage. If required, the information must be entered before the product is marked as collected.
This standard mechanism of confirmation of the quantity of a product can be configured to count the number of products per scan, rather than confirming the product with a single scan (Product Quantity Countdown).
The app will count each scan of a product as 1, towards the actual quantity planned to be collected of this product. The application will pop up a confirmation message on each scan, indicating the amount scanned so far, and a final message when all product is scanned. These messages will disappear after a short time.
If there are shortages after the product is scanned, the Change Quantity exception can be then used to confirm the reason the remaining quantity was not collected.
When marked as fully collected, the product will be removed from the list.
Containers and Products Collection
If there are containers with products to be scanned within them (for example, a tote full of products to be confirmed), this process applies.
If there are a mix of containers and Loose Products, Loose Products will be shown as a special container on the Container tab. If not, the Containers tab will not be displayed at all, showing the Products tab only.
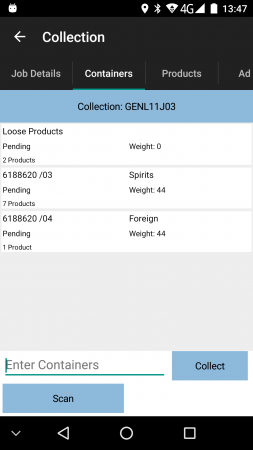
Containers list, showing loose products
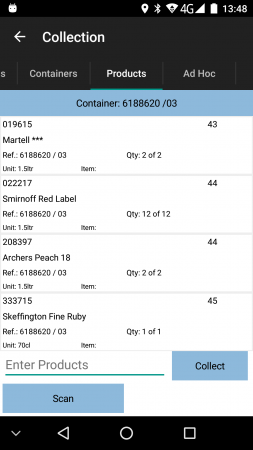
Products within a container


The Containers and Products tabs will be displayed, as shown above.
When a container is selected (by scanning, manually entering or selecting from the table), the products within that container will be displayed, ready for collecting.
Each product is confirmed collected as with loose products collection.
When all products within a container are confirmed as collected or cancelled, the Container tab will be shown and the container will be removed from the containers list.
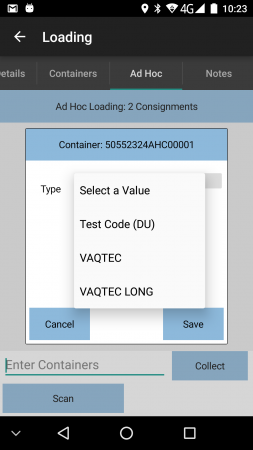
Ad Hoc Item Collection
The Collection process can also be configured with an Ad Hoc Collection facility, which allows you to specify the items collected, at the point of collection, without those items being planned in advance.
The Ad Hoc Collection process allows the user to specify the items collected, at the point of collection, without the specific items for those collections being planned in advance. This appears as a separate tab on the application within the Collections process, labelled as Ad Hoc, when this feature is enabled.
The layout and operation of this tab is almost identical to the existing Containers tab.
Unplanned item details
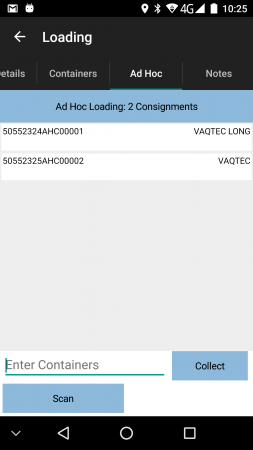
Ad Hoc item list


The tab will allow items to be entered in exactly the same way as the Containers tab:
- Manually entering the item through the "Scan Container" text box and Collect button.
- Scanning the item, using the application Scan button and camera scanning feature, or using a connected or integral hardware scanner.
This list of items on the screen will start empty - as items are scanned, these will be added to the table.
When adding Ad Hoc items, the application will validate these items entered, and warn you if they have already been scanned, were preadvised, or that they have already been cancelled.
If DU/Asset type entry is required, or the jobs are consolidated together at collection for multiple delivery locations, the scanning of an Ad Hoc item will pop up an Additional Details screen, to allow this information to be entered through drop-down lists. Saving here will add the item to the list.
If no further details are required, the scanned item will be added to the list without asking for any more information.
Pressing or long-pressing on an item in this Ad Hoc list will allow the item to be removed from the collection, through a confirmation pop-up.
Any items scanned ad hoc like this on a collection will be added to any delivery, unloading or return to depot job. This functionality can be disabled through server application configuration.
Cancelling a Container
If a container cannot be collected, it can be removed from the list with the pop-up option Cancel. Again, the exception screen will be shown where the driver can enter the reason for the cancellation. See the Exception screen for more information.
Clausing a Container
If a container is collected but customer or user notes are to be captured against the collection, it can be collected from the list with the pop-up option Collect Claused. Again, the exception screen will be shown where the driver can enter the reason or notes for the claused collection. See the Exception screen for more information.
![]() Note: The system can also be configured to capture clause codes through double-scanning on the device when loading or unloading. In this case, when the item is scanned again, rather than showing an error that the item has already been scanned, the device will prompt for a clause reason code to be entered.
Note: The system can also be configured to capture clause codes through double-scanning on the device when loading or unloading. In this case, when the item is scanned again, rather than showing an error that the item has already been scanned, the device will prompt for a clause reason code to be entered.
User Notes
If enabled, User Notes can also be entered through the Notes tab.
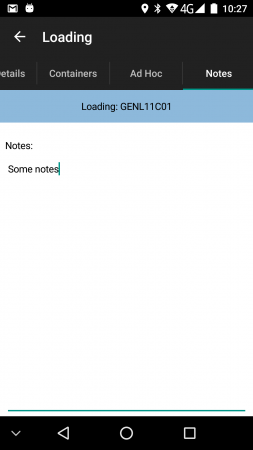
Notes Tab

Completion of a Collection
The collection job will be complete once all planned products and containers have been collected or cancelled. If Ad Hoc entry is not allowed, you will be immediately taken to the Job Confirmation screen.
![]() Note: If enabled, the application will instead return to the Job Details tab, where a Complete button will be displayed, to complete the job. It is then possible to review the list of cartons collected and change this if required. The list will display a border and status to indicate whether the items have been collected:
Note: If enabled, the application will instead return to the Job Details tab, where a Complete button will be displayed, to complete the job. It is then possible to review the list of cartons collected and change this if required. The list will display a border and status to indicate whether the items have been collected:
- Red - Cancelled.
- Green - Collected.
The status will be displayed for confirmation.
If there were no planned items, or Ad Hoc items are enabled, the Complete button on the Job Details tab must be clicked to go to the Job Confirmation screen. Note that if no Ad Hoc items are entered, the application will ask the user to confirm this first.
![]() Note: Typically, if the user backs out of a job using the back button on the device, the progress of the job is only saved locally on the device. If the job is restarted on another device (for example, if the device breaks), all currently scanned items will reset. The system can be configured to keep track of all scans, which will happen when the user backs out of the job. Then, if this is started on another device, the progress will have been retained.
Note: Typically, if the user backs out of a job using the back button on the device, the progress of the job is only saved locally on the device. If the job is restarted on another device (for example, if the device breaks), all currently scanned items will reset. The system can be configured to keep track of all scans, which will happen when the user backs out of the job. Then, if this is started on another device, the progress will have been retained.