PDA Service Tyres
The Service process is an entirely configurable process, all set up through the Admin front end.
The application will be configured as to what functionality is required in this process and therefore what entry and validation is required.
This works very similarly to the normal Services process, documented in Service. This guide will focus solely on the normal functionality required for Fleet Management and Breakdown Services.
The main entry is through tabs and pop-up screens, as follows:
- Overview/Job Details - Always displayed
- Info - information regarding the service item(s)
- Inspections/Inspections - vehicle inspections
- Products/Tyres - Tyre Installation, Removal and Services Supplied
- Completion
Each tab is configurable as to whether this appears in the system, usually depending on the process of the customer. The application style will define which stages are required, as well as server-side configuration.
The Back button will return you to the Job List.
For Fleet Management based services, there are several major job types:
- Callouts - a service job to service a specific vehicle.
- Rapid Callout - Roadside - a breakdown callout at the roadside.
- Callout - Non-roadside - a breakdown callout in a safe off the road location, usually a known location like a customer's site or depot.
- Scheduled Callout - a callout that has been scheduled in advance to resolve an action noted from a previous inspection.
- Fleet Inspection - a job to inspect fleet vehicles at a particular location. Usually many vehicles, most without any required work, identifying actions and in some cases replacing tyres and/or providing chargeable services.
Each of these service types use the same tools to complete them, but each has slightly different requirements, which are called out in each section below.
Overview/Job Details
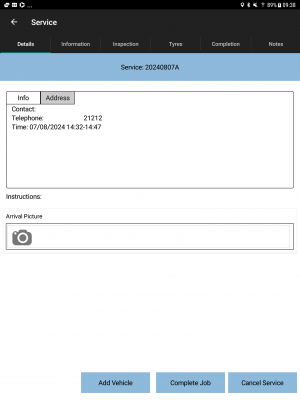
This tab will display the service information. This comes from the Job instruction. This tab is always displayed.
Job Details
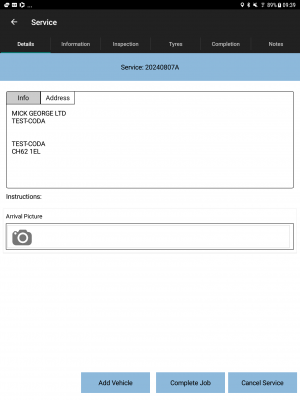
Job Address


The Job Details tab has multiple sections:
- Contact information
- Address information.
- Planned Start and End Time, if provided.
- Job Instructions.
Additionally, this screen can display many other items to enter - this is customer-specific user-defined fields (UDF) information configured by the admin staff. If configured, this information is displayed in a scroll-able list for entry here. In this screenshot, an arrival photo is required.
The entire service may be cancelled here by clicking the Cancel Service button - the Exceptions screen will be displayed for you to indicate the reasons.
You can complete the entire service job from here with the Complete Job button - you won't be able to complete the service job until you have completed or cancelled all vehicles on the service job, and you can't complete a job with no service items.
Each of the other tabs is related to the service items, the vehicles being services in this case:
- Information - the details of the vehicle being serviced.
- Inspection - the inspection of the vehicle being serviced
- Tyres - the tyres being fitted or removed, and any additional services being provided
- Completion - the completion of the service of this vehicle.
- Notes - optional notes against the entire job - just for information.
You progress from left to right on each vehicle., because that's the process that your organisation wants to follow. It makes sense to inspect the vehicle BBFORE servicing it, or completing the service, for example. But you don't have to in most cases - you just have to have everything completed BEFORE you complete the service of this vehicle, and you have to complete all vehicle services on a service job before you can complete the service itself.
Adding a Service Item
If the job has not vehicles (for a Fleet Inspection job), then you can add them using the Add Vehicle button.
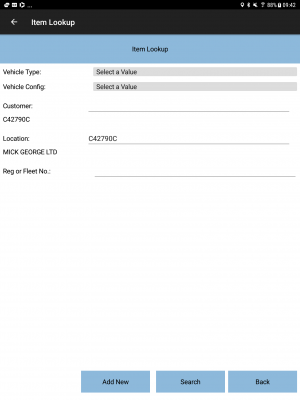
Add Vehicle - Search
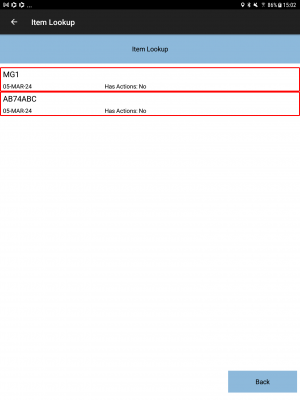
Lookup results
New Vehicle


As long as you have an internet connection, you will be prompted to find vehicles through the lookup.
You can enter parameters to search for your vehicle, or you can just search for all - the search will be set up to search for all vehicles for that customer registered at that location.
The parameters are:
- Vehicle Type - a drop-down list of vehicle types if you know what you're searching for, other wise leave as the default.
- Vehicle Config - a drop-down list of vehicle axle configs if you know what you're searching for, other wise leave as the default.
- Customer - defaults to the known customer code.
- The customer name is also displayed under the search criteria.
- Location - defaults to the current location.
- The location name is also displayed under the search criteria.
- Reg or Fleet No.
You can enter a partial part of the vehicle ID (either the registration or the fleet number) and for the details to be displayed in a list.
You can also search by vehicle type and config. Note that any vehicles that have been added without an axle config cannot be found by this method (although it will be shown if searching by any of the other criteria).
If the vehicle is already on the inspection job already (i.e. has already been added to this inspection), then the device will display the vehicle, but show that it is being inspected already and is not available for adding onto this job again.
Regardless of the state of the vehicle (i.e. if it had been inspected recently), you can inspect the vehicle again anyway.
When the search for vehicles is initiated, the information displayed will consist of:
- The vehicle ID/reg.
- The date last inspected.
- Any outstanding actions.
- RAG status - red for needs inspection/actions required.
When you select the vehicle, the device will use the information provided from the lookup to create tyre positions and inspection details.
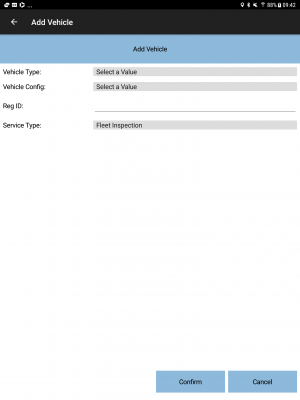
If you can't find the vehicle you need, it may be a new one - you can enter the details here. Click the Add New button from the Add Vehicle screen. You will be prompted to enter the vehicle details:
- Vehicle Type - a drop-down list of all vehicle types. You must select one.
- Vehicle Config - a drop-down list of all axle configurations. You must select one.
- Reg ID - you must enter the reg or trailer ID.
When you click Confirm this will create the vehicle and select it on the Information tab.
Regardless of how you create the vehicle, you can then start inspecting and potentially doing work if required.
Info
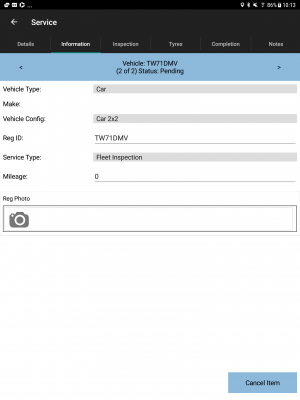
This tab will prompt for information on the service item - the vehicle being serviced. Configuration controls the fields shown for entry here.
Fleet Inspection Info, showing multiple vehicles
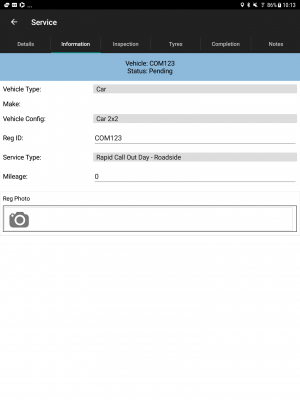
Callout Info


If there are multiple items to be serviced as part of this service job, this will be indicated on the title bar, with the ability of moving through and viewing each item using the buttons provided.
As an example, the following information may prompted for:
- Vehicle Type - Drop-down selection of service item model or group.
- Vehicle Config - Drop-down of available configurations.
- Reg ID - Numeric Only
- Service Type - a display of the type of service. You may be allowed to change this, depending on configuration.
- Mileage - Numeric Only.
Alternatively, these items may be labelled differently or not present in the configuration. This is part of the styling service offered.
Additionally, user-defined fields can be added to this tab, configured in the Admin system. The fields prompted for can be linked to the product or model being serviced. For example, a service of a truck might require different fields being entered to a trailer. All of this is user-configurable within the system.
In this case, a photo is required of the Registration or ID plate.
If the axle configuration has not been set, you will have to select it - the device will ensure that this is set and will not allow you to continue without this.
You may also modify the vehicle type and axle configuration for any vehicles that have one (for example, if it is wrong). The device will attempt to look up the details of the configuration selected – if found, the device will use the information provided from the lookup to create tyre positions and inspection details. If this is not found, then the device will use information stored on the device related to the axle configurations to generate the tyre positions. Note that this will result in any previous inspection detail on the vehicle being lost on the device (although the history may be retained within CTMS in certain circumstances).
You can also modify the vehicle ID here - you can enter an existing or new vehicle - just make sure that the information (including type and config) is correct.
Your modifications to the saved here and in the main system, for the report and for future vehicle maintenance.
The current service item may be cancelled here by clicking the Cancel Item button - the Exceptions screen will be displayed for you to indicate the reasons. Note that you will only have this option when there are multiple vehicles, so on a Fleet Inspection. For any other servies, there will only be one vehicle, and therefore you can just cancel the service job itself from the Details tab.
Inspections
This tab allows Inspections to be specified that were completed during the service.
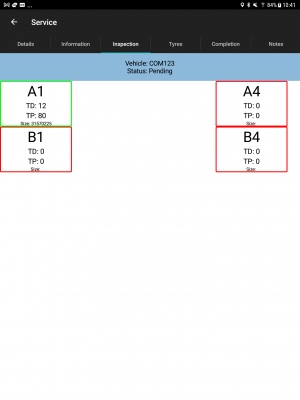
Inspections for a car
Inspections for a truck
Inspection Details


This information is generated from the axle and tyre information and will include the last known inspected tyres and details. Note that the tread depth is never copied for you - you are expected to measure this, even for a blowout tyre.
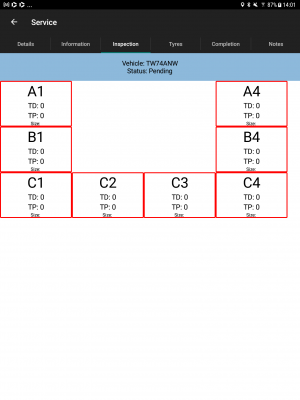
The screen will show all of the tyres in a vehicle plan, front left on the top left, front right on the top right, and so on for all axles. The system can support 1, 2 or 4 tyres per axle, across 26 axles. You can scroll the screen to show the different axles.
Each tyre displays some summary information if known:
- The position
- TD - The Tread Depth
- TP - The pressure
- Size - the tyre size (from the tyre).
The colours around the boxes indicate whether you have inspected that position yet - red means no, green means yes.
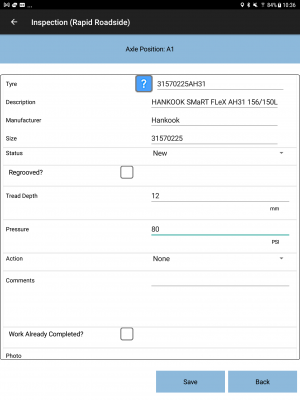
To inspect a tyre position, click on the position and the details will pop open for you to enter. Any known information will be pre-populated for you (except the tread depth). If this is a new or previously unknown vehicle, then all of the details will be empty.
On Roadside callouts, you will not be expected to inspect all of the tyre positions, nor will the system make you do so. However, for all other job types, you will be required to enter all of the details, as follows:
- Product - you can search for a tyre or part here - see Part Search later in this document for details.
- Status - drop-down list of New, Remould.
- Regrooved - a check box indicating whether the tyre has already been regrooved.
- Tread Depth - required
- Pressure
- Action - a drop-down list of actions. You should select one if you think that there is any potential work required, or None if the tyre is fine.
- Comments - comments for the action required
- Work Already Completed
- Photos
You can scroll the screen up and down to see all of the details to enter if they're not visible. Also, when you start entering, the Android device will normally just take you onto the next field to enter automatically after you enter the previous details - there's usually a button to move to the next text entry field.
When you have entered all of the details for this position, click Save, which will save your inspection details. You can also click Back, but this will not save the details of your inspection and the position will remain uninspected.
The positions will be shown again, and if you entered details and saved, the position will be shown as completed. You can move onto inspecting the other axle positions.
Note that you don't have to complete all inspections now, but (for non-roadside jobs) you WILL be forced to complete them before the job is completed. For Roadside jobs, you will be reminded if there are any inspections left incomplete, but you can dismiss the warning. However, it makes sense to inspect what you can at this point, regardless of job type, because this information will pre-fill in information required when removing or servicing tyres later, if there are any - see the Tyres section for more details on that.
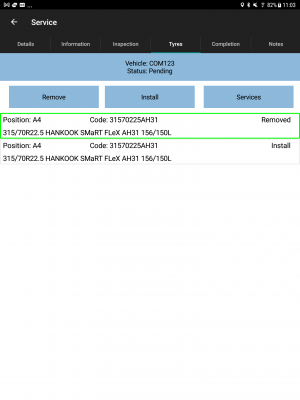
Tyres
This tab allows identification of the parts that were used as part of the service job.
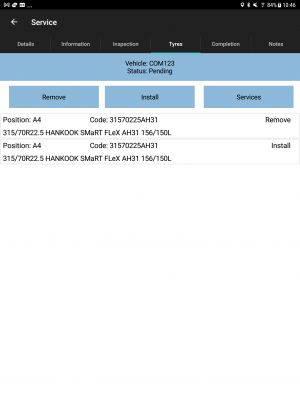
Tyres Tab

Parts can be removed from this list by long-pressing the row on the table to display a pop-up menu and choosing the Delete option.
Tyres and services may be pre-allocated to the job and will appear on the list already - you just need to update them and enter the details.
![]() Note: It is not required that any tyres or services supplied are entered at all on this screen. If they are entered (or pre-entered), any required additional details (specified against install, remove or services supplied UDF details forms) MUST be entered, or the service can't be completed.
Note: It is not required that any tyres or services supplied are entered at all on this screen. If they are entered (or pre-entered), any required additional details (specified against install, remove or services supplied UDF details forms) MUST be entered, or the service can't be completed.
![]() Note: All detailed information is subject to configuration - what is described in this guide is the basic functionality that is configured, but this can be added to or changed through configuration. Be aware that changes to this configuration will probably also require changes to any service report that is produced, as any new services supplied may need to be added to the report.
Note: All detailed information is subject to configuration - what is described in this guide is the basic functionality that is configured, but this can be added to or changed through configuration. Be aware that changes to this configuration will probably also require changes to any service report that is produced, as any new services supplied may need to be added to the report.
There are 3 different types of lines that can be present or added:
- Install - installing a new or customer-owned tyre, along with services supplied.
- Remove - removing a tyre.
- Services Supplied - supplying some services against an existing tyre.
You can edit or enter the details against a line by pressing the line, or long-pressing the line and choosing the Details option - a pop-up screen will be shown with the details that need entering. This is covered in the following sub-sections.
Remove
It makes sense to remove tyres first if you are going to install a new tyre. You don't need to mark a tyre as removed if you are just going to do some work on it - that is covered in the Supply Services section.
Removal - details
Tyres showing a completed removal


You can remove a tyre on axle positions.
Removals may be preadvised from the job, telling you to remove tyres, or you can indicate a removal your self ad hoc using the Remove button.
Any pre-entered (or partially entered) removal line will show as "Remove". Click on it to enter details.
For preadvised removals, the details will be gathered from the inspection when you click the line, and the details screen will be shown.
You can ad hoc add removals against a tyre position.
- Click the Remove button.
- Enter the tyre axle position from the drop-down list.
- Confirm the tyre details are correct, or enter new tyre information here using the Part Search process.
In both cases, a pop-up of other required information is displayed, which you have to enter. You can cancel but you won't be able to complete the service on this vehicle or the service job itself without entering at least the required additional information.
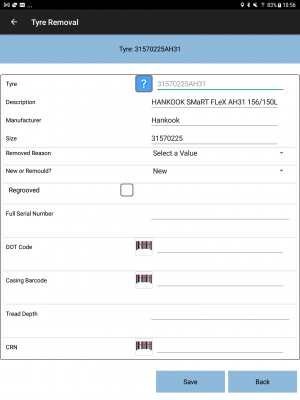
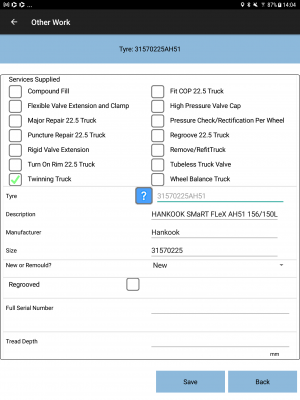
The other required information displayed is configurable, but is normally:
- Tyre - the current tyre information.
- Removal Reason - a drop-down list of removal reasons, which you are required to select.
- New or Remould? - a drop-down showing whether the tyre is a new tyre or remoulded.
- Regrooved - tick to show whether the tyre is CURRENTLY regrooved.
- Full Serial Number - this is required.
- Tread Depth - this is required.
- Barcode - you can use the scan button to use the camera to scan the barcode if it's possible.
- DoT Code - Department of Transport code, a production date. It should be a 2 digit week e.g. 01 to 53 followed by a 2 digit year e.g. 24 for 20204. For example, the second full week in January, 2024, this would be 0224. This is required. You can use the scan button if there is a scannable barcode and use the camera popup to scan it.
- Casing Barcode - You can use the scan button if there is a scannable barcode and use the camera popup to scan it.
- Casing Destination - a drop-down list
- Services Supplied - select the services supplied. If this has been preadvised that work needs to be done, the boxes will already be ticked.
- Notes - any additional notes.
- Removal Photo - this is required - you have to take a photo and enter a comment, although the comment will be pre-set for you.
You can scroll the screen up and down to see all of the details to enter if they're not visible. Also, when you start entering, the Android device will normally just take you onto the next field to enter automatically after you enter the previous details - there's usually a button to move to the next text entry field.
![]() Note: This information pop-up can be configured per service type, so may be different and can be configured for your operation, to change the fields requested, the validation, whether it's required or not, for example.
Note: This information pop-up can be configured per service type, so may be different and can be configured for your operation, to change the fields requested, the validation, whether it's required or not, for example.
Once you've entered the information, click Save - you will be returned to the tyres screen and the line will be shown as completed. If you haven't entered any of the required information or have entered it wrong, the screen will highlight the fields with the problem, and show a pop-up showing what is missing or wrong.
The status changes to "Removed" and the box will change colour to show that it has been completed correctly.
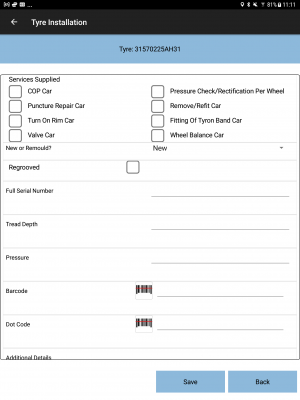
Install
You can install a tyres on axle positions. This can be selling a new tyre, or installing a pre-owned tyre or customer-owned tyre.
Install

Tyres, showing installed tyre


Installations may be preadvised or can be entered ad hoc.
Installations may be preadvised from the job, telling you to install tyres, or you can indicate a removal your self ad hoc using the Install button.
Any pre-entered (or partially entered) installation line will show as "Install". Click on it to enter details.
You can ad hoc add installations against a tyre position.
- Click the Install button.
- Enter the tyre axle position from the drop-down list.
- Confirm the tyre details are correct, or enter new tyre information here using the Part Search process.
In both cases, a pop-up of other required information is displayed, which you have to enter. You can cancel but you won't be able to complete the service on this vehicle or the service job itself without entering at least the required additional information.
The other required information displayed is configurable, but is normally:
- Services Supplied - select the services supplied. If this has been preadvised that work needs to be done, the boxes will already be ticked.
- New or Remould? - a drop-down showing whether the tyre is a new tyre or remoulded.
- Regrooved - tick to show whether the tyre is CURRENTLY regrooved.
- Full Serial Number
- Tread Depth - this is required.
- Pressure - this is required.
- Barcode - you can use the scan button to use the camera to scan the barcode if it's possible.
- DoT Code - Department of Transport code, a production date. It should be a 2 digit week e.g. 01 to 53 followed by a 2 digit year e.g. 24 for 20204. For example, the second full week in January, 2024, this would be 0224. This is required.
- Notes - any additional notes.
- Tyre Swap - only present if twinning tyres - see Tyre Swapping below for more details on this process.
You can scroll the screen up and down to see all of the details to enter if they're not visible. Also, when you start entering, the Android device will normally just take you onto the next field to enter automatically after you enter the previous details - there's usually a button to move to the next text entry field.
![]() Note: This information pop-up can be configured per service type, so may be different and can be configured for your operation, to change the fields requested, the validation, whether it's required or not, for example.
Note: This information pop-up can be configured per service type, so may be different and can be configured for your operation, to change the fields requested, the validation, whether it's required or not, for example.
Once you've entered the information, click Save - you will be returned to the tyres screen and the line will be shown as completed.
The status changes to "Installed" and the box will change colour to show that it has been completed correctly.
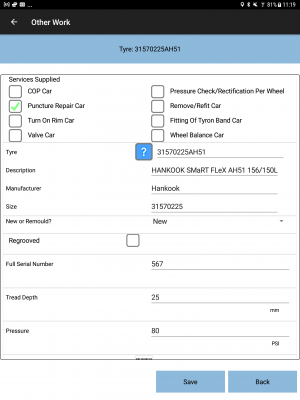
Supply Services
You can supply services when installing a tyre, through the UDF. But you can also supply services without installing a tyre.
Services Supplied
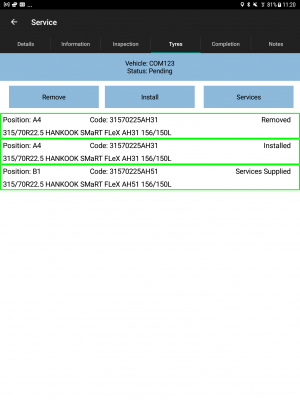
Tyres, showing Services Supplied


Services may be preadvised or can be entered ad hoc.
Any pre-entered (or partially entered) services supplied line will show as "Supply Services". Click on it to enter details.
You can ad hoc add services supplied against a tyre position.
- Click the Services Supplied button.
- Enter the tyre axle position from the drop-down list.
- Confirm the tyre details are correct, or enter new tyre information here using the part search process.
In both cases, a pop-up of other required information is displayed, which you have to enter. You can cancel but you won't be able to complete the service on this vehicle or the service job itself without entering at least the required additional information.
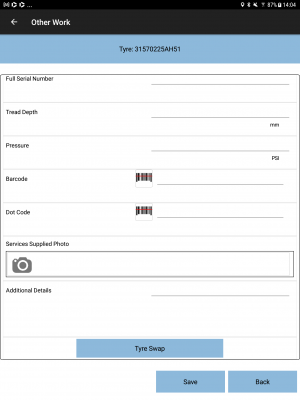
The other required information displayed is configurable, but is normally:
- Services Supplied - select the services supplied. If this has been preadvised that work needs to be done, the boxes will already be ticked.
- Tyre - the current tyre information.
- New or Remould? - a drop-down showing whether the tyre is a new tyre or remoulded.
- Regrooved - tick to show whether the tyre is CURRENTLY regrooved.
- Full Serial Number
- Tread Depth - this is required.
- Pressure - this is required.
- Barcode - you can use the scan button to use the camera to scan the barcode if it's possible.
- DoT Code - Department of Transport code, a production date. It should be a 2 digit week e.g. 01 to 53 followed by a 2 digit year e.g. 24 for 20204. For example, the second full week in January, 2024, this would be 0224. This is required.
- Services Supplied Photo - this is required - you have to take a photo and enter a comment, although the comment will be preset for you.
- Additional Details - any additional notes.
- Tyre Swap - only present if twinning tyres - see Tyre Swapping below for more details on this process.
You can scroll the screen up and down to see all of the details to enter if they're not visible. Also, when you start entering, the Android device will normally just take you onto the next field to enter automatically after you enter the previous details - there's usually a button to move to the next text entry field.
![]() Note: This information pop-up can be configured per service type, so may be different and can be configured for your operation, to change the fields requested, the validation, whether it's required or not, for example.
Note: This information pop-up can be configured per service type, so may be different and can be configured for your operation, to change the fields requested, the validation, whether it's required or not, for example.
Once you've entered the information, click Save - you will be returned to the tyres screen and the line will be shown as completed.
The status changes to "Services Supplied" and the box will change colour to show that it has been completed correctly.
Part Search
Part Search is used in many places throughout the process, such as installations, removals, Installs and services supplied. The descriptions above show when this is needed, and this section shows how to use the search.
Part Search
Part Search Results
Other Product


The part search is prompted for when adding a new install, remove or services supplied. You are also shown the product as part of the Remove and Services Supplied processes.
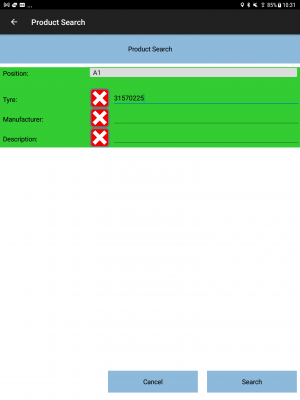
The screen will display the following:
- Position - a drop-down list of the axle positions for the vehicle. Note that the list may exclude positions if there is already an entry for that item (for removals and services supplied), as you are expected to use the existing entries for a single position. For installs, you can have multiple installs in the same position (for example, a tyre and a part).
- Location - where the tyre being installed is sourced from. This is only present for installations and is covered in detail at the end of this section.
- Tyre - a partial or full match of the product code you are searching for, e.g. "31570225"
- Manufacturer - a partial or full match of the manufacturer code you are searching for.
- Description - a partial or full match of the description of the product you are searching for, e.g. "315/70R22.5" or "SMaRT FLEX".
You must select the position - if there is any known information about the position (from the inspections) the details will be pre-filled in for you.
You can change the criteria you are searching for, or remove it completely with the X button provided against each criteria line.
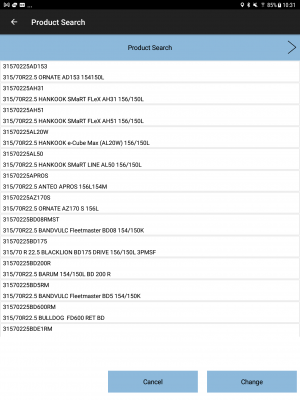
You then click the Search button - this will search the parts list for your part based on your provided criteria and display the results.
You then select the tyre or part that you are after - the application will then use this information and move on to or back to entering details.
If your search doesn't give you the results you want, you can click Change to return to entering search criteria and start again.
You can click Cancel to return to where you were before without selecting a part.
![]() Note: By default for part searches, the part search searches known product supplied by your company. For installs, this is different. In this case, location is important. Typically you are choosing to install product from your van stock, and therefore the system defaults to searching just what it knows is in your van.
Note: By default for part searches, the part search searches known product supplied by your company. For installs, this is different. In this case, location is important. Typically you are choosing to install product from your van stock, and therefore the system defaults to searching just what it knows is in your van.
If the part or tyre is not found in your van stock, that might just be a simple error, but it doesn't stop you working on the vehicle. You can click the Location and choose "All Stock". This then searches for all parts and tyres that might be provided by your company, as opposed to just your van stock. When this job is completed, your stock control system will be informed that the product was taken from all stock, and a stock discrepancy will be noted for further investigation.
If you are installing customer owned product which is present at that customer's location, you can indicate that by selecting "Customer Location" from the drop-down Location list. This then will search for product that your stock control system knows is in the customer location instead.
However, all of this is based on whether you have an internet connection to check with your stock control system. If you don't, the part search will search its own list of parts and tyres for the parts that are required. The device will tell you that when it displays the results, and also lets the stock control system know this when updating, so that discrepancies can be checked.
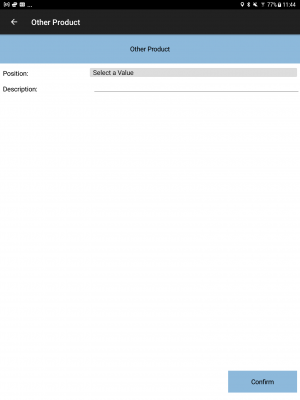
![]() Note: For removals, you can specify other products than you have in stock. By default, the system is searching the list of parts and tyres that your company supplies, but the tyre being removed might not be one of those. Therefore, you can click the Other button to specify an unknown product description, perhaps "BUDGET".
Note: For removals, you can specify other products than you have in stock. By default, the system is searching the list of parts and tyres that your company supplies, but the tyre being removed might not be one of those. Therefore, you can click the Other button to specify an unknown product description, perhaps "BUDGET".
Tyre Swapping
Tyre swapping be done through Install or Services Supplied.
Tyre Swap - Twinning service
Tyre Swap - Swap button
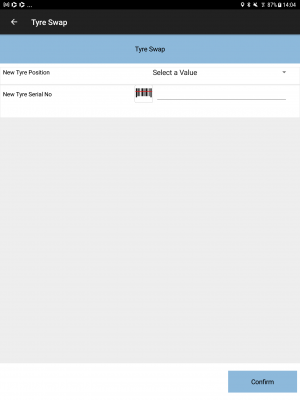
Tyre Swap details


The process is:
- Against the tyre being serviced or installed, select to supply the "Twining" service for that vehicle type.
- Click the "Tyre Swap" button which will have been added to the bottom of the form.
- Enter the tyre position you are swapping the tyre to.
So, for swapping A1 (front left) tyre with the space (C1) tyre on a car, you select service supplied on position A1, select Twin Tyres option, enter C1.
For twinning tyres B1 and B2 (second axle, leftmost two tyres) on a truck/tractor/trailer, select B1, select service supplied on position B1, select Twin Tyres option, enter B2 as the inner tyre you swapped with.
This information is passed back to system and the known tyres on these positions are swapped, so that the information is correct on the next inspection or service.
Service Item Completion
This tab allows entry of problem completion/resolution information.
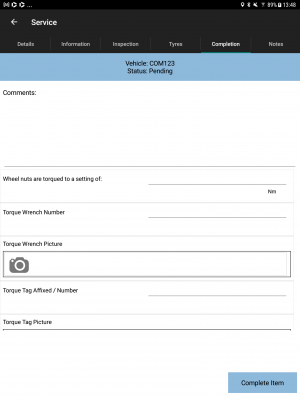
Completion information

Completion information


The application will prompt to specify the results of the service and any relating details that are required.
Comment information is not required, but is encouraged. Note that this information appears on the service report, and can be used to store additional information that can be used on the invoice, for example, litres of product used.
Note that these items may be labelled differently or not present in the configuration. This is part of the styling service offered.
Additionally, user-defined fields can be added to this tab, configured in the Admin system.
In this configuration, common vehicle-based services supplied are available to be selected here, along with tyre torque information.
Details prompted for are:
- Wheel nuts are torqued to a setting of:
- Torque Wrench Number
- Torque Wrench Picture
- Torque Tag Affixed / Number
- Torque Tag Picture
- Services Supplied - a checkbox list of all services that can be suppled at a vehicle level, as opposed to tyre or removal services.
These fields are required for callout jobs, but are not required to be entered for fleet inspection jobs.
Once you have entered everything, you can complete the service with the Complete Item button. The device will check that all required details in all sections are complete - if any details are missing, the device will let you know and take you to the section that is incomplete. You can then complete the job.
![]() Note: For roadside callouts, you will be warned if you have not completed all inspections, but you can accept this and complete the job anyway.
Note: For roadside callouts, you will be warned if you have not completed all inspections, but you can accept this and complete the job anyway.
Service Completion
Once the vehicle is serviced and completed, you will be returned to the Information tab. The vehicle will be shows as service completed (or cancelled if you have cancelled the service).
For callouts or jobs with only one vehicle to service, you can complete the service job.
For Fleet inspections, you can add another vehicle to inspect or, if there is already another vehicle added to the job that is not yet completed, this vehicle will be shown so that you can complete that one.
You should check that all service items on the job are complete - you can do this by using the buttons on the header to scroll through the different vehicles, making sure that the status is complete or cancelled.
Once you have completed all services on this job, you can complete the job with the Complete Job button on the Details tab.
You will be taken to the Job Confirmation screen, where you (the technician) and the customer will be required to review the job and sign as confirmation that it is complete.