Vehicles
This screen allows you to maintain the Vehicles within the system.
![]() Note: Typically, an external ERP or TMS system would maintain this data and send it to CALIDUS ePOD as part of the data imported into the system, for example CALIDUS TMS. This data should not require any further maintenance. However, if the external system does not pass this information in, or CALIDUS ePOD/eSERV is being run as a stand-alone system, system administrators can use this screen.
Note: Typically, an external ERP or TMS system would maintain this data and send it to CALIDUS ePOD as part of the data imported into the system, for example CALIDUS TMS. This data should not require any further maintenance. However, if the external system does not pass this information in, or CALIDUS ePOD/eSERV is being run as a stand-alone system, system administrators can use this screen.
This page provides functionality to view, create and edit vehicles.
The screen allows you to filter data by:
- Vehicle ID.
- Registration.
- Description.
- Status - a drop-down list of Active, Inactive or Deleted.
- External ID.
Once you have entered the criteria, click Search. The screen will display a table of all the matching data. Any plain text boxes will match data that contains what you enter as the criterion.

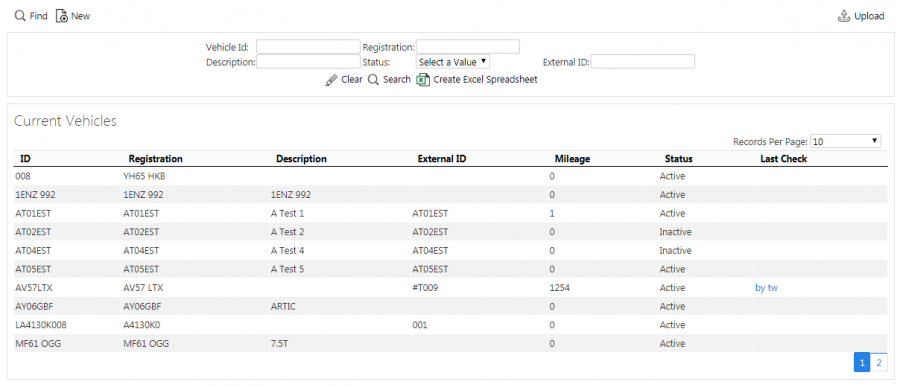
Vehicles Search Panel and Results table
Alternatively, if you click Create Excel Spreadsheet, the screen will export the vehicles data to a Microsoft Excel spreadsheet. The functionality differs per the browser you have used to access the Admin system, but the likely result is the spreadsheet file will offered for download.
A single line is displayed per Vehicle found.
The columns displayed are:
- ID - the system's vehicle ID. This is usually the registration.
- Registration - the vehicle's registration.
- Description - the description. Normally this would be a vehicle type and can be used for some configuration purposes in the system, so this is the recommended usage.
- External ID - a reference used for external vehicle tracking systems (e.g. TomTom WEBFLEET).
- Mileage - the last known Odometer reading of the vehicle. You can maintained this here or it can be maintained automatically, depending on whether the system is linked to automated vehicle tracking and metric systems.
- Status - a drop-down list of Active, Inactive or Deleted. Only Active vehicles may be used when drivers log on.
- Last Check - the details of the last vehicle defect check. If you click this link, the Vehicle Check Responses screen will be shown, automatically showing the details of the specific check for that vehicle.
You can view tracking information of the vehicle by clicking the Tracking action button against the line. This will take you to the User Tracking screen.
Uploading Vehicles
The screen allows upload functions - you can access these by pressing the Upload button. You can hide the upload buttons by pressing the Hide button.
The screen allows you to upload vehicles through a spreadsheet template file. You can get this template by clicking the Obtain Upload Template button - results differ per browser used to access the Admin system, the likely result being that the template will be offered for download.
You can then enter vehicles data into this template and save it there, external to the CALIDUS ePOD application. Alternatively, an external system could generate a file to upload in this format. Regardless, you can then upload this data into the system by selecting the file (using the Choose File selector on the screen), then clicking Upload Excel Spreadsheet.
The screen will indicate the success or failure of the upload in a message on the button panel at the top of the screen - you can download detailed results using the provided Download Results Spreadsheet button.
CALIDUS ePOD can also update standing data from TomTom WEBFLEET, if the TomTom WEBFLEET Orders Interface has been configured for the system.
In this case, you can can import the vehicles created in WEBFLEET through an Import from WEBFLEET button in the button bar. ![]() Warning: This can update existing vehicles and the details over-ridden with the details from WEBFLEET, so you should take care when using this option.
Warning: This can update existing vehicles and the details over-ridden with the details from WEBFLEET, so you should take care when using this option.
New Vehicles
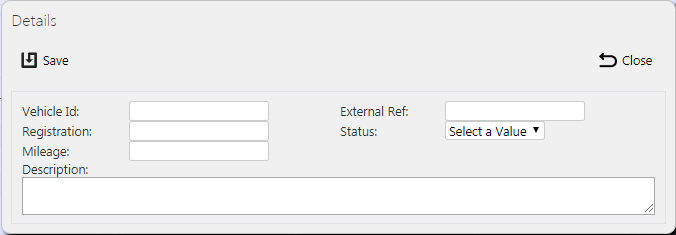
You can create new vehicles by clicking the provided New button at the top of the screen.
You can enter the following details:
- Vehicle ID - the system's vehicle ID. This is usually the registration. This will be validated that this Vehicle ID is not a duplicate for a site. If it is, the screen will display an error and the data will not be saved.
- External Ref - a reference used for external vehicle tracking systems (e.g. TomTom WEBFLEET). You must enter this if you want the system to send jobs for this vehicle to the external system. The reference you enter must match the external system's vehicle reference exactly.
- Registration - the vehicle's registration.
- Status - a drop-down list of Active, Inactive or Deleted. Only Active vehicles may be used when drivers log on.
- Mileage - The last known Odometer reading of the vehicle. You can maintain this here or it can be maintained automatically, depending on whether the system is linked to automated vehicle tracking and metric systems.
- Description - the description. Normally this would be a vehicle type and can be used for some configuration purposes in the system, so this is the recommended usage.
When changes are complete, you can click Save to save the changes, or Close to close the pop-up without saving the changes.
View/Edit Vehicles
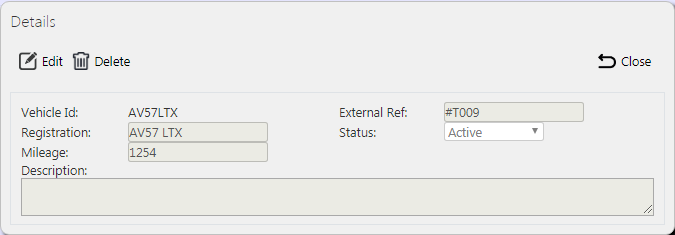
You can view and edit vehicles by clicking the Select button against the line in the table. The screen will display a pop-up showing all the details of the vehicle.
You can edit the vehicle by clicking the provided Edit button.
You can edit the following elements:
- External Ref.
- Registration.
- Status - through a drop-down list.
- Mileage.
- Description.
When changes are complete, you can click Save to save the changes. If you don't want to save your changes, you can click Cancel to stop editing, or Close to close the pop-up without saving the changes.
You can click the Delete button to delete the vehicle - the screen will ask you to confirm before the vehicle is deleted.

