PDA Job Confirmation: Difference between revisions
m (Remove Windows reference) |
(Update for app version 3.3.2.X) |
||
| Line 1: | Line 1: | ||
__NOTOC__ | |||
This screen controls the confirmation that the job has been completed satisfactorily, and is used regardless of job type. | This screen controls the confirmation that the job has been completed satisfactorily, and is used regardless of job type. | ||
| Line 8: | Line 9: | ||
Customer signatures | == Customer signatures == | ||
<gallery widths=250px heights=300px perrow=3> | <gallery widths=250px heights=300px perrow=3> | ||
File:EPOD_Signature1.PNG| | File:EPOD_Signature1.PNG|''Signature and T&Cs'' | ||
File:EPOD_Signature2.PNG|''Containers'' | |||
File:EPOD_Signature3.PNG|''Products'' | |||
</gallery> | </gallery> | ||
The Signatory box defaults to the customer contact name (if present on the job) and also allows free text entry, which will be sent back to the main system if the customer contact is not the person planned for the job. | The Signatory box defaults to the customer contact name (if present on the job) and also allows free text entry, which will be sent back to the main system if the customer contact is not the person planned for the job. A signatory must be entered. The screen can be styled so that the signatory must be entered if required - this is part of the styling service. | ||
The '''Clear''' button is provided to clear the signature. | |||
For all job types, if configured, the | For all job types, if configured, the application will also display Terms and Conditions. This can be simply defined against the job with up to 3 optional check boxes for entry, or can be created with more complex user-defined field configuration. | ||
Depending on the Job Type and the data, several other tabs may appear in this section: | |||
* Deliveries/Collections: | * Deliveries/Collections: | ||
** ''Jobs'' - For | ** ''Jobs'' - For consolidated Collections/Deliveries, the list of the Job References. | ||
** ''Items/Containers'' - All items delivered or collected, ad-hoc or planned. | ** ''Items/Containers'' - All items delivered or collected, ad-hoc or planned. | ||
** ''Products'' - All products delivered or collected, ad-hoc or planned, with quantity and status. | ** ''Products'' - All products delivered or collected, ad-hoc or planned, with quantity and status. | ||
| Line 34: | Line 36: | ||
If any of the items being collected or delivered are outside their issue life, the customer signature screen will pop up a warning as the screen is displayed, asking that the customer may need to check them. | If any of the items being collected or delivered are outside their issue life, the customer signature screen will pop up a warning as the screen is displayed, asking that the customer may need to check them. | ||
The '' | The ''Containers'' tab can also be used by the customer to Clause delivery jobs. | ||
<gallery widths=250px heights=300px perrow=3> | <gallery widths=250px heights=300px perrow=3> | ||
File:EPOD_Clause1.PNG| | File:EPOD_Clause1.PNG|''Pop-up Clause Information'' | ||
File:EPOD_Clause2.PNG| | File:EPOD_Clause2.PNG|''Claused items'' | ||
</gallery> | </gallery> | ||
If containers are accepted but the customer wishes to note that the delivery may be queried later, they can enter clause text against specific containers. | |||
When the container row is clicked in the container list, a pop-up will be displayed, allowing the user to enter clause information. The information displayed is: | |||
* ID | |||
* Package Code and Description | |||
* Weight | |||
* Code 1/2/3 (Multi-use fields) | |||
* Valid To Date and Time | |||
* The job reference (or job references if this item was for multiple jobs) on which the container was collected or delivered. | |||
If any of the items have exceeded their issue life (Valid To Date and Time), the item will be automatically claused with text indicating the contents must be checked. | |||
When saved, the ''Container'' tab will be re-displayed, showing in the status that the container is claused. | |||
The signature can be completed by pressing '''Done''' - this will require a confirmation to continue. | |||
{{Note}} Should the customer wish to see a more detailed view of the items or services rendered, (for example, to cancel items after delivery), the application allows the user to return to the previous screen. | |||
The Signatory will already be populated with | |||
== Driver Signatures == | |||
The Signatory will already be populated with the driver name rather than the customer's. There is also no additional tab information, clausing or issue life confirmation on this screen. Otherwise, this screen operates the same as the Customer Signature screen. | |||
<gallery widths=250px heights=300px perrow=3> | |||
File:EPOD_Signature4.PNG|''Driver Signature'' | |||
</gallery> | |||
Job Photo Capture | == Job Photo Capture == | ||
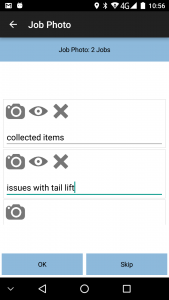
The application can also be configured for Job Photo Capture. When configured for this, the application will display the Job Photo Capture screen. This will contain a Photo-bar, ready for taking of any photos. | |||
<gallery widths=250px heights=300px perrow=3> | |||
File:EPOD_Signature5.PNG|''Job Photo Capture'' | |||
</gallery> | |||
Clicking the Camera button will start the camera. When taken and confirmed, the photo-bar will allow re-taking, viewing or deleting of the photo. A new panel will be added to take subsequent photos. Comments against each photo are required. | |||
Job Photos may be optional or required. If required, at least one photo must be taken before the job can be completed. If optional, a '''Skip''' button will be provided. | |||
== Completed Job == | |||
The completed job will be transferred back to the system with all the details, signatures and photos. | The completed job will be transferred back to the system with all the details, signatures and photos. | ||
| Line 85: | Line 92: | ||
If no tasks are remaining on | == Next Job == | ||
Once completed, the application will return to the Job List to pick up the next task. | |||
Several things may then automatically trigger, depending on how the system is configured: | |||
* If configured this way, and the next task is for the same location (for example, a planned collection after a planned delivery), this job will start automatically, and the application will move directly to the [[PDA Job Details|Job Details]] screen for the next job. | |||
* If configured this way, any items on cancelled jobs or undelivered items on completed jobs will be planned for return to the depot, through the creation of a new Depot Unloading task at the end of the load. | |||
* If configured this way, and when all planned jobs at a location are complete, the application will ask whether an unplanned (ad hoc) collection is required at this location. If confirmed, one will be created and will automatically be started. If this is created in error, this may be cancelled in the normal way. This function allows the driver to pick up any unplanned items at the location (for example, empty boxes/pallets to return). | |||
* If an Unplanned Ad Hoc Collection is created and completed in this way, a depot unloading job will be created for this job as well. | |||
If no tasks are remaining on the current Load/Worklist, the application will prompt to enter any Load End Metrics if configured (for example ODO readings). When entered and confirmed (or if none are required, the application will then request more work from the system - see section [[PDA New Loads|New Loads]] for details. | |||
[[Category:UG 291097 EPOD Client User Guide|400]] | [[Category:UG 291097 EPOD Client User Guide|400]] | ||
Revision as of 16:41, 22 December 2016
This screen controls the confirmation that the job has been completed satisfactorily, and is used regardless of job type.
The process can be configured for:
- Customer Signature
- Driver (or Engineer) Signature
- Job Photo Capture (also referred to as Document Photo Capture)
- None of the above
Customer signatures
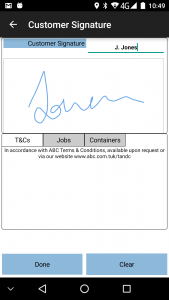
Signature and T&Cs

Containers
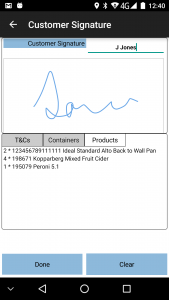
Products


The Signatory box defaults to the customer contact name (if present on the job) and also allows free text entry, which will be sent back to the main system if the customer contact is not the person planned for the job. A signatory must be entered. The screen can be styled so that the signatory must be entered if required - this is part of the styling service.
The Clear button is provided to clear the signature.
For all job types, if configured, the application will also display Terms and Conditions. This can be simply defined against the job with up to 3 optional check boxes for entry, or can be created with more complex user-defined field configuration.
Depending on the Job Type and the data, several other tabs may appear in this section:
- Deliveries/Collections:
- Jobs - For consolidated Collections/Deliveries, the list of the Job References.
- Items/Containers - All items delivered or collected, ad-hoc or planned.
- Products - All products delivered or collected, ad-hoc or planned, with quantity and status.
- Services:
- Services - service-level information (the serviceable items and the service ID)
- Products - All products installed or removed, with quantity and status.
If any of the items being collected or delivered are outside their issue life, the customer signature screen will pop up a warning as the screen is displayed, asking that the customer may need to check them.
The Containers tab can also be used by the customer to Clause delivery jobs.
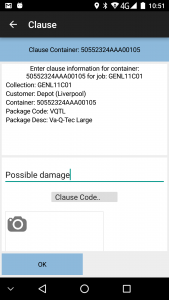
Pop-up Clause Information
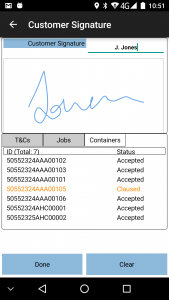
Claused items


If containers are accepted but the customer wishes to note that the delivery may be queried later, they can enter clause text against specific containers.
When the container row is clicked in the container list, a pop-up will be displayed, allowing the user to enter clause information. The information displayed is:
- ID
- Package Code and Description
- Weight
- Code 1/2/3 (Multi-use fields)
- Valid To Date and Time
- The job reference (or job references if this item was for multiple jobs) on which the container was collected or delivered.
If any of the items have exceeded their issue life (Valid To Date and Time), the item will be automatically claused with text indicating the contents must be checked.
When saved, the Container tab will be re-displayed, showing in the status that the container is claused.
The signature can be completed by pressing Done - this will require a confirmation to continue.
![]() Note: Should the customer wish to see a more detailed view of the items or services rendered, (for example, to cancel items after delivery), the application allows the user to return to the previous screen.
Note: Should the customer wish to see a more detailed view of the items or services rendered, (for example, to cancel items after delivery), the application allows the user to return to the previous screen.
Driver Signatures
The Signatory will already be populated with the driver name rather than the customer's. There is also no additional tab information, clausing or issue life confirmation on this screen. Otherwise, this screen operates the same as the Customer Signature screen.
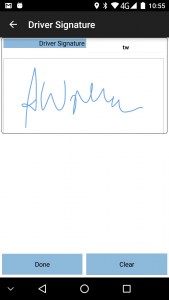
Driver Signature

Job Photo Capture
The application can also be configured for Job Photo Capture. When configured for this, the application will display the Job Photo Capture screen. This will contain a Photo-bar, ready for taking of any photos.
Job Photo Capture

Clicking the Camera button will start the camera. When taken and confirmed, the photo-bar will allow re-taking, viewing or deleting of the photo. A new panel will be added to take subsequent photos. Comments against each photo are required.
Job Photos may be optional or required. If required, at least one photo must be taken before the job can be completed. If optional, a Skip button will be provided.
Completed Job
The completed job will be transferred back to the system with all the details, signatures and photos.
If configured, the customer will receive an automatic email of the generated completion document (that is, the POD, POC or Service Report) in the format set up (PDF or HTML). Any other customer systems can also be updated at this time.
Next Job
Once completed, the application will return to the Job List to pick up the next task.
Several things may then automatically trigger, depending on how the system is configured:
- If configured this way, and the next task is for the same location (for example, a planned collection after a planned delivery), this job will start automatically, and the application will move directly to the Job Details screen for the next job.
- If configured this way, any items on cancelled jobs or undelivered items on completed jobs will be planned for return to the depot, through the creation of a new Depot Unloading task at the end of the load.
- If configured this way, and when all planned jobs at a location are complete, the application will ask whether an unplanned (ad hoc) collection is required at this location. If confirmed, one will be created and will automatically be started. If this is created in error, this may be cancelled in the normal way. This function allows the driver to pick up any unplanned items at the location (for example, empty boxes/pallets to return).
- If an Unplanned Ad Hoc Collection is created and completed in this way, a depot unloading job will be created for this job as well.
If no tasks are remaining on the current Load/Worklist, the application will prompt to enter any Load End Metrics if configured (for example ODO readings). When entered and confirmed (or if none are required, the application will then request more work from the system - see section New Loads for details.