PDA Job Details: Difference between revisions
(Added Call and Navigate buttons) |
(Added Job Code Display reference) |
||
| Line 1: | Line 1: | ||
This screen displays full details of the job being undertaken. | This screen displays full details of the job being undertaken. | ||
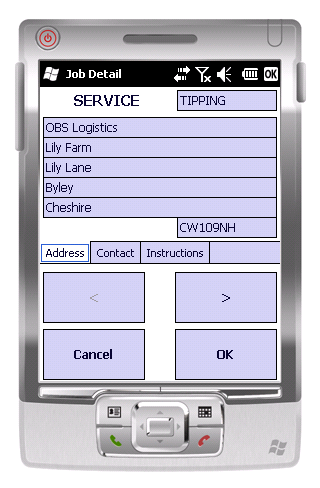
This screen will be displayed regardless of job type. The translated job type will be displayed on the top left (i.e. COLLECTION, DELIVERY, SERVICE) | This screen will be displayed regardless of job type. The translated job type will be displayed on the top left (i.e. COLLECTION, DELIVERY, SERVICE). The right of the screen displays the Job ID (or other descriptive text, as configured for the system). | ||
[[File:PDA-JobDets1.PNG]] | [[File:PDA-JobDets1.PNG]] | ||
Revision as of 15:38, 4 April 2012
This screen displays full details of the job being undertaken.
This screen will be displayed regardless of job type. The translated job type will be displayed on the top left (i.e. COLLECTION, DELIVERY, SERVICE). The right of the screen displays the Job ID (or other descriptive text, as configured for the system).
The screen has several Tabs, each showing:
- The Job Type (Collection, Delivery, Service)
- The customer details (Customer Code, Name, Address and Postcode)
- The contact information (Contact name and number)
- The Instructions for the job
You can click on the tabs to see the information.
From these tabs, you can:
- Call the customer by clicking on the Call button.
- Navigate to the customer's address by clicking on the Navigate button. If you have CoPilot installed on the device, this will be shown with the customer's address pre-loaded. CoPilot will automatically route you to this destination.
You can accept the job using the OK button. This should be clicked on arrival to the customer and the user will be taken to the process type associated with the job type (i.e. the Collection, Delivery or Service processes).
If you press Cancel, this job will be cancelled. The unit will take to you an Exception screen and prompt you to enter a reason code explaining why this job was cancelled.
The < and > buttons can be used to move between the all the jobs assigned to the load, so that the you can choose which job to do first.
