PDA Collection: Difference between revisions
No edit summary |
No edit summary |
||
| Line 3: | Line 3: | ||
<gallery widths=250px heights=300px perrow=3> | <gallery widths=250px heights=300px perrow=3> | ||
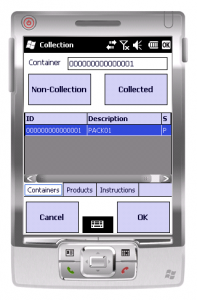
File:PDA-Collection1.PNG|{{PDAType|WinMo=Y}} | File:PDA-Collection1.PNG|{{PDAType|WinMo=Y}} | ||
File:EPOD_Collection1.PNG|{{PDAType|Android=Y}} Job Details Tab | File:EPOD_Collection1.PNG|{{PDAType|Android=Y}} ''Job Details Tab'' | ||
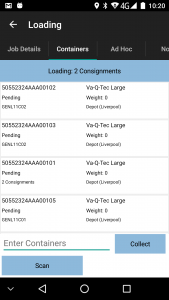
File:EPOD_Collection2.PNG|{{PDAType|Android=Y}} Containers Tab | File:EPOD_Collection2.PNG|{{PDAType|Android=Y}} ''Containers Tab, showing a consolidated container'' | ||
File:EPOD_Collection2A.PNG|{{PDAType|Android=Y}} ''Containers Tab, showing a single container'' | |||
</gallery> | </gallery> | ||
{{PDAType|Android=Y}} | |||
* If configured, collections at a depot will be displayed as Loading tasks rather than Collection tasks. | |||
* When containers (collection or delivery items) are used across multiple consolidated jobs, this information is displayed here slightly differently, showing the destination. | |||
The screen can display a number of different tabs: | |||
* ''Job Details'' - see below | |||
* ''Container/Items'' - uniquely-identified collectable items (if there are items to deliver) | |||
* ''Products'' - products that are require to be collected, usually with a quantity (if there a products to deliver, and the system is configured to allow this). | |||
* ''Ad Hoc'' - add uniquely-identified collectible items (if the system is configured to allow this) | |||
* ''Notes '' - any driver notes (if the system is configured to allow this) | |||
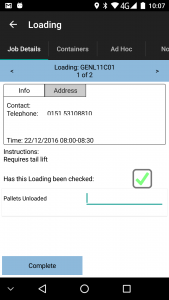
The ''Job Details'' tab has multiple sections: | |||
* Contact information | |||
* Address information - if supplied, both current collection address and ultimate delivery address are shown. | |||
* Job Instructions | |||
* Some check-boxes for the driver to confirm: | |||
** Has the collection been checked? | |||
** Is invoicing required? | |||
* Additionally, this screen can display many other items to enter - this is customer-specific information configured by the admin staff. If configured, this information is displayed in a scrollable list for entry here. | |||
* The tab may also display a '''Complete''' button, allowing the user to complete the job when all details are entered. This job only appears if: | |||
** Ad Hoc items are enabled (see later) | |||
** No items or products are required for delivery at all. | |||
The jobs required for collection can be varied and can consist of: | |||
* Item (Container) only | |||
* Loose Product Only | |||
* Items with products within that should be counted | |||
* A mix of all the above | |||
For Container Only: | |||
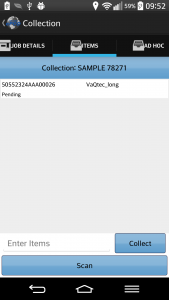
From the ''Container/Items'' tab you can enter the Container in the text box or click '''Collect''', which will mark the item as collected and remove it from the list. | |||
You can (if allowed) select the item from the list and click either '''Non-Collection''' or '''Collected''': | |||
* {{PDAType|WinMo=Y}} '''Non-Collection''' will give you the ability to cancel the whole container. | |||
* '''Collected''' will simply mark the item as collected and remove it from the list. | |||
For Containers with Products in them: | |||
From the ''Container/Items'' tab you can enter the Container in the text box and click '''Collect''', which will progress you to the ''Products'' tab with all products within the selected container will shown. These can then be counted like Loose Products below. You may use any device-connected scanner in this text box to the same effect. | |||
You may also use the '''Scan''' button to start the camera scanning facility built into ''CALIDUS'' ePOD. This will allow you to use the camera to scan any barcodes. This can be singly, or scanning batches or barcodes at a time, depending on configuration. The result of scanning barcodes is the same as entering them through the text box. | |||
You can (if allowed) select the item from the list and click either '''Non-Collection''' or '''Collected''': | |||
* {{PDAType|WinMo=Y}} '''Non-Collection''' will give you the ability to cancel the whole container and any products within it. | |||
* '''Collected''' will progress you to the ''Products'' tab with all products within the selected container will shown. These can then be counted like Loose Products below. | |||
You are able to long-press any container in the grid. This will provide a pop-up menu, allowing you to see the either the details of the selected container, or a list of the contained products. | You are able to long-press any container in the grid. This will provide a pop-up menu, allowing you to see the either the details of the selected container, or a list of the contained products. | ||
Choosing Details, the PDA displays a screen showing: | Choosing {{PDAType|WinMo=Y}} ''Details'' or {{PDAType|Android=Y}} ''Info'', the PDA displays a screen showing: | ||
* ID | * ID | ||
* Package Code and Description | * Package Code and Description | ||
* Weight | * Weight | ||
* Code 1/2/3 (Multi-use fields) | * Code 1/2/3 (Multi-use fields) | ||
The pop-up | The pop-up screen will also display the jobs the item is used on, if the item is consolidated across multiple jobs. | ||
For Products, the PDA displays | The pop-up menu also allows cancellation or collection, as described above. | ||
For Products or Loose Products: | |||
From the ''Products'' tab, the PDA displays a grid of all the products in the container, or all the loose products. {{Note}} This option is only available if the container has products and the PDA is configured not to require you to confirm each product separately (i.e. Container-only Collection). | |||
<gallery widths=250px heights=300px perrow=3> | <gallery widths=250px heights=300px perrow=3> | ||
File:PDA-Collection2.PNG|{{PDAType|WinMo=Y}} | File:PDA-Collection2.PNG|{{PDAType|WinMo=Y}} | ||
File:EPOD_Collection3.PNG|{{PDAType|Android=Y}} Products Tab | File:EPOD_Collection3.PNG|{{PDAType|Android=Y}} ''Products Tab'' | ||
File:EPOD_Collection5.PNG|{{PDAType|Android=Y}} ''Pop-up Products Menu'' | |||
</gallery> | </gallery> | ||
{{PDAType|WinMo=Y}} In this case, the PDA will simply show you the list of products and quantities to be collected, without having to scan a container. If there are a mix of products in containers and loose, the PDA will collect the containers first, then tell you to collect the loose products. | {{PDAType|WinMo=Y}} In this case, the PDA will simply show you the list of products and quantities to be collected, without having to scan a container. If there are a mix of products in containers and loose, the PDA will collect the containers first, then tell you to collect the loose products. | ||
{{PDAType|Android=Y|iOS=Y}} ''Loose Products'' will be shown as a special container on the | {{PDAType|Android=Y|iOS=Y}} If there are a mix of containers and Loose Products, ''Loose Products'' will be shown as a special container on the ''Container/Items'' tab. If not, the ''Containers/Items'' tab will not be displayed at all, showing the ''Products'' tab only. | ||
Similarly to the ''Container/Items'' tab, the ''Products'' tab gives you the ability to collect a product in full or amend the quantity collected, by: | |||
* Keying the product code in the provided text box and clicking ''Collect''' | |||
* Scanning the product barcode in this text box | |||
* Using the '''Scan''' button to use the Camera Scanning facility built into the application | |||
* Selecting the product from the list (if allowed) | |||
In any case, the device will prompt you to decide on your action through a pop-up list allowing you to: | |||
* Change the quantity collected | |||
* Collect the product in full | |||
* Cancel the product | |||
* See further details of a product can be viewed by long-pressing against a line of the grid and choosing ''Details''. The PDA will display: | |||
** The Product Code | |||
** The Description | |||
** The Item Type | |||
** Any Customer Reference associated to this product | |||
** The planned quantity | |||
The Collection process can also be configured with an Ad Hoc Collection facility. | |||
The Ad Hoc Collection process allows you to specify the items collected, at the point of collection, without those collections being planned in advance. | The Ad Hoc Collection process allows you to specify the items collected, at the point of collection, without those collections being planned in advance. | ||
This appears as a separate tab on the PDA within the Collections menu. You are able to select pre-created products from a drop down list and add or remove them from the collection. These products are added as Loose Products. | {{PDAType|WinMo=Y|Text=This appears as a separate tab on the PDA within the Collections menu. You are able to select pre-created products from a drop down list and add or remove them from the collection. These products are added as Loose Products. | ||
The functionality provided by Containers without products means that in the scenario that there are no products/containers pre-defined, the Containers and Products tabs will be disabled on the PDA. If the Loose Product container is pre-defined, the Ad Hoc products will be placed onto this container. | The functionality provided by Containers without products means that in the scenario that there are no products/containers pre-defined, the Containers and Products tabs will be disabled on the PDA. If the Loose Product container is pre-defined, the Ad Hoc products will be placed onto this container. | ||
}} | }} | ||
{{PDAType|Android=Y|Text=The Ad Hoc Collection process allows you to specify the items collected, at the point of collection, without the specific items for those collections being planned in advance. This appears as a separate tab on the PDA within the Collections process, labelled as "Ad Hoc" when this feature is enabled. | |||
The layout and operation of this tab is almost identical to the existing ''Items (Containers)'' tab. | |||
<gallery widths=260px heights=400px perrow=2 caption="Ad Hoc Collection Prototype Screen-shots"> | |||
File:EPOD_Collection_AdHoc1.PNG|''Unplanned item details'' | |||
File:EPOD_Collection_AdHoc2.PNG|''Ad Hoc item list'' | |||
</gallery><br /> | |||
The tab will allow items to be entered in exactly the same way as the ''Items (Containers)'' tab: | |||
* Through a "Scan Container" text box and '''Collect''' button. | |||
* Through the use of the built in Camera Scanner feature, through the '''Scan''' button. | |||
This list of items on the screen will start empty - as items are scanned, these will be added to the table. | |||
When adding Ad Hoc items, the application will validate these items entered, and warn you if they have already been scanned, were preadvised, or that they have already been cancelled. | |||
If DU/Asset type entry is required, or the jobs are consolidated together at collection for multiple delivery locations, the scanning of an Ad Hoc item will pop up an Additional Details screen, to allow this information to be entered through drop-down lists. Saving here will add the item to the list. | |||
If no further details are required, the scanned item will be added to the list without asking for any more information. | |||
Pressing or long-pressing on an item in this Ad Hoc list will allow you to remove an item from the collection, through a confirmation pop-up. | |||
}} | |||
If enabled, User Notes can also be entered through another tab. | |||
<gallery widths=250px heights=300px perrow=3> | |||
File:EPOD_Collection4.PNG|{{PDAType|Android=Y}} ''Notes Tab'' | |||
</gallery> | |||
The job will be complete once all planned products and containers have been collected. If Ad Hoc entry is not allowed, you will be immediately taken to the [[PDA Job Confirmation|Job Confirmation]] screen. | |||
If there were no planed items, or Ad Hoc items are enabled, you will be required to press the {{PDAType|WinMo=Y|Block='''OK'''}} or {{PDAType|Android=Y|iOS=Y|Block='''Complete'''}} button on the ''Job Details'' tab to take to the [[PDA Job Confirmation|Job Confirmation]] screen. Note that if you have entered no Ad Hoc items, you will be asked to confirm this first. | |||
[[Category:UG 291097 EPOD Client User Guide|320]] | [[Category:UG 291097 EPOD Client User Guide|320]] | ||
Revision as of 12:03, 16 October 2014
If the job is a Collection, you will be shown this screen. You will be initially presented with ![]()
![]() a summary screen or
a summary screen or ![]() a list of containers to be collected.
a list of containers to be collected.

 Job Details Tab
 Containers Tab, showing a consolidated container
 Containers Tab, showing a single container


![]()
- If configured, collections at a depot will be displayed as Loading tasks rather than Collection tasks.
- When containers (collection or delivery items) are used across multiple consolidated jobs, this information is displayed here slightly differently, showing the destination.
The screen can display a number of different tabs:
- Job Details - see below
- Container/Items - uniquely-identified collectable items (if there are items to deliver)
- Products - products that are require to be collected, usually with a quantity (if there a products to deliver, and the system is configured to allow this).
- Ad Hoc - add uniquely-identified collectible items (if the system is configured to allow this)
- Notes - any driver notes (if the system is configured to allow this)
The Job Details tab has multiple sections:
- Contact information
- Address information - if supplied, both current collection address and ultimate delivery address are shown.
- Job Instructions
- Some check-boxes for the driver to confirm:
- Has the collection been checked?
- Is invoicing required?
- Additionally, this screen can display many other items to enter - this is customer-specific information configured by the admin staff. If configured, this information is displayed in a scrollable list for entry here.
- The tab may also display a Complete button, allowing the user to complete the job when all details are entered. This job only appears if:
- Ad Hoc items are enabled (see later)
- No items or products are required for delivery at all.
The jobs required for collection can be varied and can consist of:
- Item (Container) only
- Loose Product Only
- Items with products within that should be counted
- A mix of all the above
For Container Only:
From the Container/Items tab you can enter the Container in the text box or click Collect, which will mark the item as collected and remove it from the list.
You can (if allowed) select the item from the list and click either Non-Collection or Collected:
- Non-Collection will give you the ability to cancel the whole container.
- Collected will simply mark the item as collected and remove it from the list.
For Containers with Products in them:
From the Container/Items tab you can enter the Container in the text box and click Collect, which will progress you to the Products tab with all products within the selected container will shown. These can then be counted like Loose Products below. You may use any device-connected scanner in this text box to the same effect.
You may also use the Scan button to start the camera scanning facility built into CALIDUS ePOD. This will allow you to use the camera to scan any barcodes. This can be singly, or scanning batches or barcodes at a time, depending on configuration. The result of scanning barcodes is the same as entering them through the text box.
You can (if allowed) select the item from the list and click either Non-Collection or Collected:
- Non-Collection will give you the ability to cancel the whole container and any products within it.
- Collected will progress you to the Products tab with all products within the selected container will shown. These can then be counted like Loose Products below.
You are able to long-press any container in the grid. This will provide a pop-up menu, allowing you to see the either the details of the selected container, or a list of the contained products.
Choosing ![]() Details or
Details or ![]() Info, the PDA displays a screen showing:
Info, the PDA displays a screen showing:
- ID
- Package Code and Description
- Weight
- Code 1/2/3 (Multi-use fields)
The pop-up screen will also display the jobs the item is used on, if the item is consolidated across multiple jobs.
The pop-up menu also allows cancellation or collection, as described above.
For Products or Loose Products:
From the Products tab, the PDA displays a grid of all the products in the container, or all the loose products. ![]() Note: This option is only available if the container has products and the PDA is configured not to require you to confirm each product separately (i.e. Container-only Collection).
Note: This option is only available if the container has products and the PDA is configured not to require you to confirm each product separately (i.e. Container-only Collection).
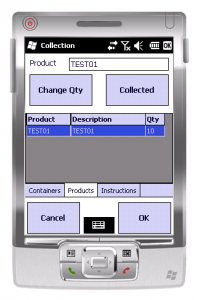
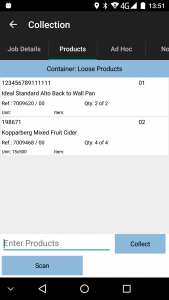 Products Tab
 Pop-up Products Menu


![]() In this case, the PDA will simply show you the list of products and quantities to be collected, without having to scan a container. If there are a mix of products in containers and loose, the PDA will collect the containers first, then tell you to collect the loose products.
In this case, the PDA will simply show you the list of products and quantities to be collected, without having to scan a container. If there are a mix of products in containers and loose, the PDA will collect the containers first, then tell you to collect the loose products.
![]()
![]() If there are a mix of containers and Loose Products, Loose Products will be shown as a special container on the Container/Items tab. If not, the Containers/Items tab will not be displayed at all, showing the Products tab only.
If there are a mix of containers and Loose Products, Loose Products will be shown as a special container on the Container/Items tab. If not, the Containers/Items tab will not be displayed at all, showing the Products tab only.
Similarly to the Container/Items tab, the Products tab gives you the ability to collect a product in full or amend the quantity collected, by:
- Keying the product code in the provided text box and clicking Collect'
- Scanning the product barcode in this text box
- Using the Scan button to use the Camera Scanning facility built into the application
- Selecting the product from the list (if allowed)
In any case, the device will prompt you to decide on your action through a pop-up list allowing you to:
- Change the quantity collected
- Collect the product in full
- Cancel the product
- See further details of a product can be viewed by long-pressing against a line of the grid and choosing Details. The PDA will display:
- The Product Code
- The Description
- The Item Type
- Any Customer Reference associated to this product
- The planned quantity
The Collection process can also be configured with an Ad Hoc Collection facility.
The Ad Hoc Collection process allows you to specify the items collected, at the point of collection, without those collections being planned in advance.
| This appears as a separate tab on the PDA within the Collections menu. You are able to select pre-created products from a drop down list and add or remove them from the collection. These products are added as Loose Products. The functionality provided by Containers without products means that in the scenario that there are no products/containers pre-defined, the Containers and Products tabs will be disabled on the PDA. If the Loose Product container is pre-defined, the Ad Hoc products will be placed onto this container. |
| The Ad Hoc Collection process allows you to specify the items collected, at the point of collection, without the specific items for those collections being planned in advance. This appears as a separate tab on the PDA within the Collections process, labelled as "Ad Hoc" when this feature is enabled.
The layout and operation of this tab is almost identical to the existing Items (Containers) tab.
The tab will allow items to be entered in exactly the same way as the Items (Containers) tab:
This list of items on the screen will start empty - as items are scanned, these will be added to the table. When adding Ad Hoc items, the application will validate these items entered, and warn you if they have already been scanned, were preadvised, or that they have already been cancelled. If DU/Asset type entry is required, or the jobs are consolidated together at collection for multiple delivery locations, the scanning of an Ad Hoc item will pop up an Additional Details screen, to allow this information to be entered through drop-down lists. Saving here will add the item to the list. If no further details are required, the scanned item will be added to the list without asking for any more information. Pressing or long-pressing on an item in this Ad Hoc list will allow you to remove an item from the collection, through a confirmation pop-up. |


If enabled, User Notes can also be entered through another tab.
 Notes Tab

The job will be complete once all planned products and containers have been collected. If Ad Hoc entry is not allowed, you will be immediately taken to the Job Confirmation screen.
If there were no planed items, or Ad Hoc items are enabled, you will be required to press the ![]() OK or
OK or ![]()
![]() Complete button on the Job Details tab to take to the Job Confirmation screen. Note that if you have entered no Ad Hoc items, you will be asked to confirm this first.
Complete button on the Job Details tab to take to the Job Confirmation screen. Note that if you have entered no Ad Hoc items, you will be asked to confirm this first.