Job Groups: Difference between revisions
No edit summary |
No edit summary |
||
| Line 7: | Line 7: | ||
When the screen starts, it will allow you to search using the following items: | When the screen starts, it will allow you to search using the following items: | ||
* Job Group | * Job Group | ||
* | * Description | ||
[[File:EPOD-JobGroups1.PNG|600px|border]] | [[File:EPOD-JobGroups1.PNG|600px|border]] | ||
When this information is entered, click ''' | When this information is entered, click '''Search''' and the screen will display all matching job groups. | ||
[[File:EPOD-JobGroups2.PNG|600px|border]] | [[File:EPOD-JobGroups2.PNG|600px|border]] | ||
| Line 20: | Line 20: | ||
A job group can be added by clicking the '''New''' button provided. | A job group can be added by clicking the '''New''' button provided. | ||
Enter all required information here, then click '''Create''' to save the data or '''Cancel''' to discard changes. | |||
Job groups also have configuration applied to them, in the same way as a Site. If a Job has a Job Group, the Job Group configuration settings will be used in place of the Site configuration settings. | |||
Whether entering or editing Job Groups, the Job Group configuration breaks down into multiple sections, as follows. | |||
== Details == | |||
[[File:EPOD-JobGroups3.PNG|600px|border]] | [[File:EPOD-JobGroups3.PNG|600px|border]] | ||
Here, the user can enter the basic details of the Job Group: | |||
* Job Group | |||
* Description | |||
* Formats for the different types of jobs | |||
* An image for the POD formats | |||
== Admin == | |||
[[File:EPOD-JobGroups4.PNG|600px|border]] | |||
Here, the user can set: | |||
* Whether completed jobs are automatically emailed to customers | |||
* The configuration that controls exporting of data. | |||
== PDA == | |||
[[File:EPOD-JobGroups5.PNG|600px|border]] | |||
* Capture Arrival Times - if enabled, the device will capture, start time, arrival time and end time. | |||
This tab allows check-box configuration of PDA functionality, namely: | |||
* Ad Hoc Collection - if enabled, this allows the PDA user to manually scan collected containers, which are then added to the job. | |||
* Delivery Payment - if enabled, the user is prompted to confirm payment received at completion of a job. | |||
* Job Status - if enabled, Job Status will be prompted for on the device. | |||
* Driver Sign Collection - if enabled, the driver is prompted to sign for Collections as well as the customer. | |||
* Driver Sign Delivery - if enabled, the driver is prompted to sign for Deliveries as well as the customer. | |||
* Customer Sign Collection - if enabled, the customer is prompted to sign for Collections as well as the customer. | |||
* Customer Sign Delivery - if enabled, the customer is prompted to sign for Deliveries as well as the customer. | |||
* Container Only Delivery - if enabled, Deliveries with Container and Product information are treated as if they have no product information on the PDA. | |||
* User Notes - if enabled, the user is given a tab to enter notes when processing collections, deliveries and services, through a ''Notes'' tab. | |||
* Job Consolidation - if enabled, the user is able to consolidate jobs together themselves on the job list. | |||
* Product Comments - if enabled, the user is allowed to add comments to products when collecting them. | |||
* Force Non-Zero Product Quantities - if enabled, force the entry of a product quantity. | |||
* Scan at Vehicle - if enabled, the user is able to perform 2-stage scans of items, first at the vehicle, second in front of the user. | |||
* Ad Hoc Delivery - if enabled, this allows the PDA user to manually scan delivered containers, which are then added to the job. | |||
* Job Photo - if enabled, this prompts to PDA user to photograph a physical document after signing for the delivery/collection. | |||
* Claused Delivery - if enabled, the customer is able to comment on delivered items. | |||
* Image Required for Cancellations - if enabled, force the entry of an image during the exception process. | |||
* Signature Checkbox Label - if set, replaces the label of the Signatory on the Windows Mobile device. | |||
== Service == | |||
[[File:EPOD-JobGroups6.PNG|600px|border]] | |||
This tab allows the user to configure the service functionality of the PDA. | |||
{{Note}} This controls both the information shown in Service Details and that can be entered during the completion of a service task on the PDA client. | |||
Each element controls a tab or section that appears during the service process. | |||
== Terms and Conditions == | |||
[[File:EPOD-JobGroups7.PNG|600px|border]] | |||
This tab allows the user to enter the terms and conditions that appear on the PDA when the customer is signing for the goods, along with up to 3 check boxes for the customer. | |||
[[Category:UG 291094 EPOD Admin User Guide|400_130]] | [[Category:UG 291094 EPOD Admin User Guide|400_130]] | ||
Revision as of 16:56, 16 October 2014
Job groups are required to add areas of access and configuration to the system. Job groups are assigned to Jobs at the point of creation, and can be added and changed when editing jobs.
Job Groups are used to split work tasks, for example if a used requires to only deal with jobs in group A but not group B, these groups can be configured and then a user can be granted access to them.
From this page users can create, delete and amend job groups.
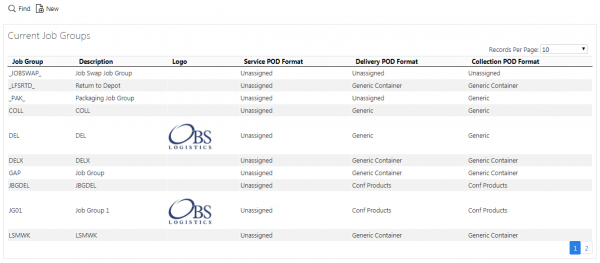
When the screen starts, it will allow you to search using the following items:
- Job Group
- Description
When this information is entered, click Search and the screen will display all matching job groups.
Groups can be edited by clicking Select then Edit against the job group in the grid. Once editing is complete, click Update to save the changes, or Cancel to discard them.
Groups can be deleted by clicking Select then Delete against the job group in the grid.
A job group can be added by clicking the New button provided.
Enter all required information here, then click Create to save the data or Cancel to discard changes.
Job groups also have configuration applied to them, in the same way as a Site. If a Job has a Job Group, the Job Group configuration settings will be used in place of the Site configuration settings.
Whether entering or editing Job Groups, the Job Group configuration breaks down into multiple sections, as follows.
Details
Here, the user can enter the basic details of the Job Group:
- Job Group
- Description
- Formats for the different types of jobs
- An image for the POD formats
Admin
Here, the user can set:
- Whether completed jobs are automatically emailed to customers
- The configuration that controls exporting of data.
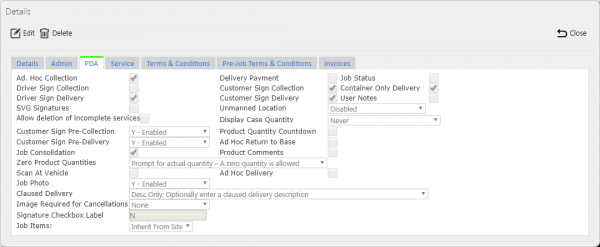
PDA
- Capture Arrival Times - if enabled, the device will capture, start time, arrival time and end time.
This tab allows check-box configuration of PDA functionality, namely:
- Ad Hoc Collection - if enabled, this allows the PDA user to manually scan collected containers, which are then added to the job.
- Delivery Payment - if enabled, the user is prompted to confirm payment received at completion of a job.
- Job Status - if enabled, Job Status will be prompted for on the device.
- Driver Sign Collection - if enabled, the driver is prompted to sign for Collections as well as the customer.
- Driver Sign Delivery - if enabled, the driver is prompted to sign for Deliveries as well as the customer.
- Customer Sign Collection - if enabled, the customer is prompted to sign for Collections as well as the customer.
- Customer Sign Delivery - if enabled, the customer is prompted to sign for Deliveries as well as the customer.
- Container Only Delivery - if enabled, Deliveries with Container and Product information are treated as if they have no product information on the PDA.
- User Notes - if enabled, the user is given a tab to enter notes when processing collections, deliveries and services, through a Notes tab.
- Job Consolidation - if enabled, the user is able to consolidate jobs together themselves on the job list.
- Product Comments - if enabled, the user is allowed to add comments to products when collecting them.
- Force Non-Zero Product Quantities - if enabled, force the entry of a product quantity.
- Scan at Vehicle - if enabled, the user is able to perform 2-stage scans of items, first at the vehicle, second in front of the user.
- Ad Hoc Delivery - if enabled, this allows the PDA user to manually scan delivered containers, which are then added to the job.
- Job Photo - if enabled, this prompts to PDA user to photograph a physical document after signing for the delivery/collection.
- Claused Delivery - if enabled, the customer is able to comment on delivered items.
- Image Required for Cancellations - if enabled, force the entry of an image during the exception process.
- Signature Checkbox Label - if set, replaces the label of the Signatory on the Windows Mobile device.
Service
This tab allows the user to configure the service functionality of the PDA.
![]() Note: This controls both the information shown in Service Details and that can be entered during the completion of a service task on the PDA client.
Note: This controls both the information shown in Service Details and that can be entered during the completion of a service task on the PDA client.
Each element controls a tab or section that appears during the service process.
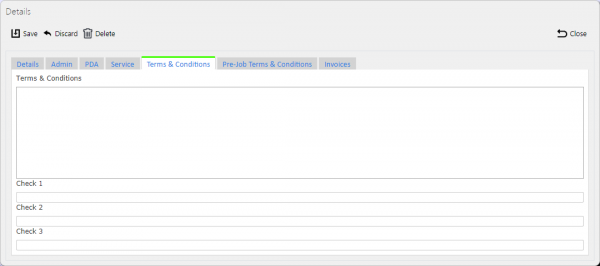
Terms and Conditions
This tab allows the user to enter the terms and conditions that appear on the PDA when the customer is signing for the goods, along with up to 3 check boxes for the customer.


