Job Groups
Jobs require job groups to add areas of access and configuration to the system. You assign job groups to Jobs at the point of creation, and you can added and changed them when editing jobs.
You use job groups to split work tasks, for example if a user requires to only deal with jobs in group A but not group B. You can configure these groups and grant a user access to them.
You can use this screen to view, create, delete and edit job groups.
You can filter data by:
- Job Group
- Description
Once you have entered the criteria, click Search. The screen will display a table of all the matching data. Any plain text boxes will match data that contains what you enter as the criterion.

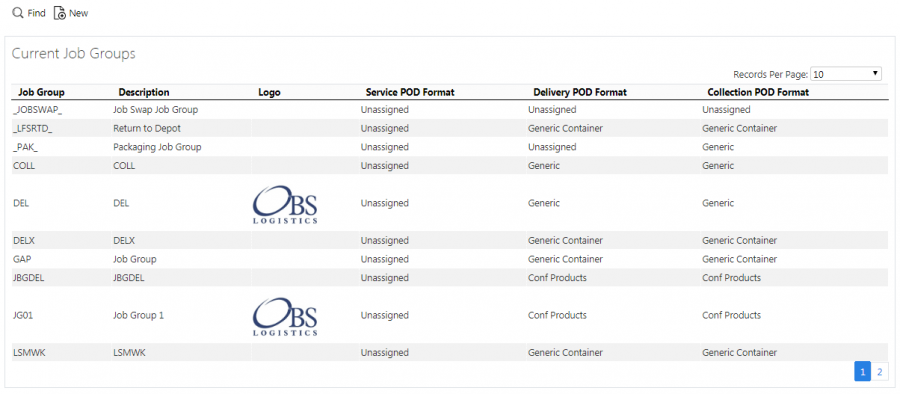
Job Groups Search Panel and Results table
The results table displays each job group found in a single line.
The results table shows the following columns:
- Job Group - the job group ID.
- Description - the description of the job group.
- Logo - a picture of any logo uploaded against the job group. This may be used on the POD/POC/Service report formats.
- Service Format - the Service Report format for the job group.
- Delivery Format - the POD Report format for the job group.
- Collection Format - the POC Report format for the job group.
You apply configuration to job groups in the same way as a site. If a job has a job group, the job group configuration settings will be used in place of the site configuration settings.
Whether you are entering or editing job groups, the job group configuration breaks down into multiple tabs as shown in the Tabs section below.
New Job Groups
You can create new job groups by pressing the provided New button at the top of the screen.
Whether you are entering or editing job groups, the job group configuration breaks down into multiple tabs as shown in the Tabs section below.
When changes are complete, you can click Save to save the changes, or Close to close the pop-up without saving the changes.
When you save a new job group, the screen will prompt you whether job group access should be created for all non-PDA users for this new job group - if you confirm this, this will be created. Regardless of your choice, the screen will still save the new job group.
![]() Note: Remember that the users (both remote and admin) will not be able to view jobs in this job group until they have been granted access rights through the User Access screen, or you have chosen here to allow all users to access this job group.
Note: Remember that the users (both remote and admin) will not be able to view jobs in this job group until they have been granted access rights through the User Access screen, or you have chosen here to allow all users to access this job group.
View/Edit Job Groups
You can view and edit job groups by clicking the Select button against the line in the table. The screen will display a pop-up showing all the details of the job group.
You can edit the job group by clicking the provided Edit button.
Whether you are entering or editing job groups, the job group configuration breaks down into multiple tabs as shown in the Tabs section below.
When changes are complete, you can click Save to save the changes. If you don't want to save your changes, you can click Cancel to stop editing, or Close to close the pop-up without saving the changes.
You can click the Delete button to delete the job group - the screen will ask you to confirm before the job group is deleted.
Tabs
You apply configuration to job groups in the same way as a site. If a job has a job group, the job group configuration settings will be used in place of the site configuration settings.
Whether you are entering or editing job groups, the job group configuration breaks down into multiple tabs as shown in the Tabs section below.
Details
Here, you can enter the basic details of the job group:
- Job Group - the job group ID, unique to the site.
- Description - a text box for entry of the description
- Time and Expense - a drop-down list to enable or disable time and expense information entry in admin and the mobile device application. The system defaults this to the site value.
- Invoice Format - a drop-down list enabling you to select a format for invoice reports.
- POD Formats - formats for the different types of jobs.
- Deliveries.
- Collections.
- Services.
- A logo image for the report formats, if required.
You can click the Choose File button to select and upload a new logo for the report formats - the screen will display a file selector. You can select the logo (an image format) and click Open' to select it. When you save the job group, the file will be uploaded to the system.
Admin
The following configuration can be made to items generally affecting how the back-end system works for jobs in this job group:
- Auto Email - a drop-down list controlling whether completed jobs are automatically emailed to customers. The values are:
- Disabled - no emails will be sent to the customer.
- Enabled (Complete Only) - only successfully-completed (fully or amended) jobs will be emailed.
- Both Enabled (Complete and Cancelled) - Complete and Cancelled jobs will be emailed.
- Enabled (Complete and non-amended) - Only fully-complete jobs will be emailed (i.e. jobs that are amended will not be emailed)
- Email Subject - the subject of the email, allowing insertion of some fields.
- Email Body - the body of the email, allowing insertion of some fields.
- Auto Email job Type - whether job type is taken into consideration when emailing job/POD reports for jobs with this job group. Select from the drop-down list of values below.
- All - the default value. All jobs are sent.
- Deliveries Only - only delivery jobs are sent.
- Collections Only - only collection jobs are sent.
- Export Email Source - when trying to email job/POD reports, where the process checks for emails to send to. Select from the following values:
- Job Address or Customer - send to email(s) specified against the jobs address and the customer (if different).
- Job Address Only - send to email(s) specified against the jobs address only, ignoring any customer details.
- Export Email Owner - if checked, when trying to email job/POD reports, whether the process checks for emails to send to sourced from a customer record associated to the owner against the job. The default is unchecked.
- POD Export - a drop-down list controlling Whether PODs of completed jobs are automatically exported. The values are:
- Disabled - no PODs will be exported.
- Enabled (Complete Only) - only successfully-completed (fully or amended) jobs will be exported.
- Both Enabled (Complete and Cancelled) - Complete and Cancelled jobs will be exported.
- Enabled (Complete and non-amended) - Only fully-complete jobs will be exported (i.e. jobs that are amended will not be exported)
- Enabled (Complete and Amended Only) - Complete jobs (whether fully-complete or amended) will be exported.
- Enabled (Cancelled Only) - Only cancelled jobs will be exported.
- Enabled (Not Clean) - Cancelled and Complete (Amended) jobs will be exported.
- XF Config - a drop-down list of all the configuration that controls exporting of data that can be assigned to this job group.
- Exclusive Reason Codes - whether this job group is only to use reason codes marked as explicit to this job group.
- Request Job Approval - controls whether job approval is enabled.
- Post Job Approval - controls whether job approval is enabled.
![]() Note: You can insert markers into the email subject and body to indicate where data from the job is to be positioned. You do this by by identifying the data in square brackets. Any field from the job record may be used, with some additions, as in the following examples:
Note: You can insert markers into the email subject and body to indicate where data from the job is to be positioned. You do this by by identifying the data in square brackets. Any field from the job record may be used, with some additions, as in the following examples:
- [EPL_CUSTOMER_NAME] - the name of the customer linked to by the job.
- [EPL_END_ACTUAL_DATE] - converted to a normal date format.
- [EPL_JOB_TYPE] - translated to "Collection" or "Delivery".
Other key job fields are:
- [EPL_JOB_CODE] - the main transport or order reference.
- [EPL_CUST_REF] - the customer's order reference.
- [EPL_SO_REF] - the sales order reference.
- [EPL_EXT_REF] - any external reference.
PDA
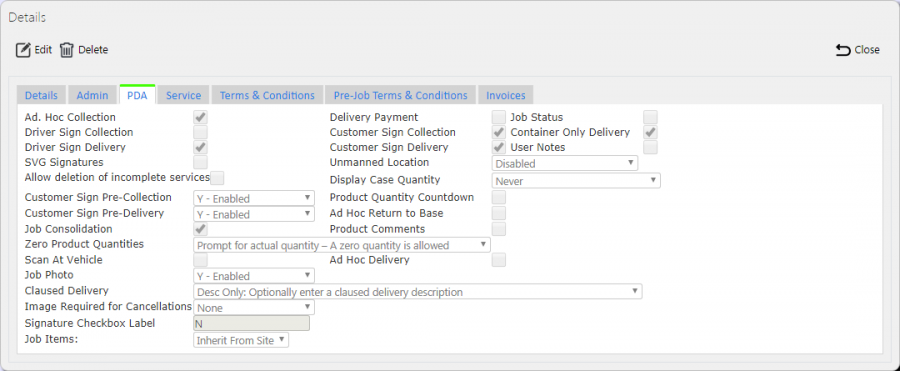
This tab allows you to configure the mobile device application functionality that will be used when processing jobs in this job group:
- Ad Hoc Collection - if enabled, this allows the driver to manually scan collected containers, which are then added to the job.
- Delivery Payment - if enabled, the user is prompted to confirm payment received at completion of a job.
- Job Status - if enabled, Job Status will be prompted for on the device.
- Driver Sign Collection - if enabled, the driver is prompted to sign for Collections as well as the customer.
- Customer Sign Collection - if enabled, the customer is prompted to sign for Collections as well as the customer.
- Container Only Delivery - if enabled, Deliveries with Container and Product information are treated as if they have no product information on the mobile device application.
- Driver Sign Delivery - if enabled, the driver is prompted to sign for Deliveries as well as the customer.
- Customer Sign Delivery - if enabled, the customer is prompted to sign for Deliveries as well as the customer.
- User Notes - if enabled, the user is given a tab to enter notes when processing collections, deliveries and services, through a Notes tab.
- SVG Signatures - Capture SVG signature as well as JPG signature on device.
- Unmanned Location - Defines the Unmanned Delivery process. Currently, if a location is determined to be unmanned, the only options are to capture the driver signature and enforce a photo to be entered.
- Allow deletion of incomplete services - if enabled, allows deletion of incomplete service items.
- Display Case Quantity - Display Case and Unit Quantities on device, if appropriate. Choose from "Never", "When Pack Size is greater than 1" and "When Pack Size is greater than 0".
- Customer Sign Pre-Collection - whether the customer requested to sign for the delivery on entry to the collection address.
- Product Quantity Countdown - this controls whether the product quantity is counted per scan of the product code, rather than through a quantity entry confirmation.
- Customer Sign Pre-Delivery - whether the customer requested to sign for the delivery on entry to the delivery address.
- Ad Hoc Return to Base - if this is enabled and the driver creates an unplanned ad hoc collection job with this job group, the driver will be asked to confirm whether items collected on this job will be scanned off the vehicle when returning to base.
- Job Consolidation - if enabled, the user is able to consolidate jobs together themselves on the job list.
- Product Comments - if enabled, the user is allowed to add comments to products when collecting them.
- Zero Product Quantities' - If products are the items being delivered, and the products have been advised with zero quantities, this controls how to act on these. If set to Do Not Prompt, the product can be marked as delivered zero. If set to Prompt for actual quantity - A zero quantity is allowed, the device will always prompt for a quantity, allowing zero. If set to Prompt for actual quantity - A non-zero quantity is required, the device will prompt for a quantity and a valid non-zero value must be entered.
- Scan at Vehicle - if enabled, the user is able to perform 2-stage scans of items, first at the vehicle, second in front of the user.
- Ad Hoc Delivery - if enabled, this allows the driver to manually scan delivered containers, which are then added to the job.
- Job Photo - if enabled, this prompts to driver to photograph a physical document after signing for the delivery/collection. If set to Optional, a photo will be prompted but may be skipped.
- Scanning Damages - If enabled, scanning an item twice when loading or unloading will attempt to mark the item as damaged (claused) on the device.
- Claused Delivery - if enabled, the customer is able to comment on delivered items. Choose from entering descriptive text only, a reason code and descriptive text, or optionally either.
- Image Required for Cancellations - if enabled, force the entry of an image during the exception process. Choose from forcing at All times, Job exceptions or Detail exceptions only.
- Collect/Deliver All - You may use this option to over-ride the collect/deliver all option against the site.
 Note: Using Deliver All or Collect All will override any container or product level data entry. The options are:
- Inherit from Site
- Disabled
- Deliver All Enabled
- Collect All Enabled
- Both Deliver & Collect All Enabled
- Cancel All Enabled
- Signature Checkbox Label - if set, replaces the label of the Signatory on the Windows Mobile device. Deprecated.
- Cancel All Reason - if Cancel All Enabled is selected for Collect/Deliver All above, you must select the reason code that will be applied for the cancelled items from the drop-down list provided.
- Job Items - enables job items. You can enable or disable this explicitly against a job group, or inherit the value from the site configuration.
Service
This tab allows the you to configure the service functionality of the mobile device application.
![]() Note: This controls both the information shown in service details and that can be entered during the completion of a service task on the mobile device application.
Note: This controls both the information shown in service details and that can be entered during the completion of a service task on the mobile device application.
Each element controls a tab or section that appears during the service process.
Terms and Conditions
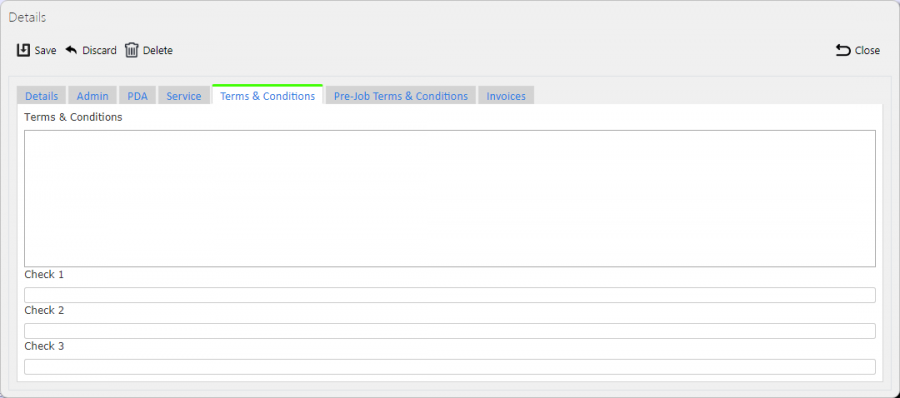
This tab allows you to configure the terms and conditions that appear on the mobile device application when the customer is signing for the goods, along with up to 3 check boxes for the customer. These check boxes are not validated on the mobile device application. The terms and conditions entered here will be used for services, collections and deliveries.
![]() Note: More complex configuration of Terms and Conditions exists using UDF that allow for exact, validated configuration for all job types and stages, including driver signature. You can configure these through the UDF Configuration screen.
Note: More complex configuration of Terms and Conditions exists using UDF that allow for exact, validated configuration for all job types and stages, including driver signature. You can configure these through the UDF Configuration screen.
Pre-Job Terms and Conditions
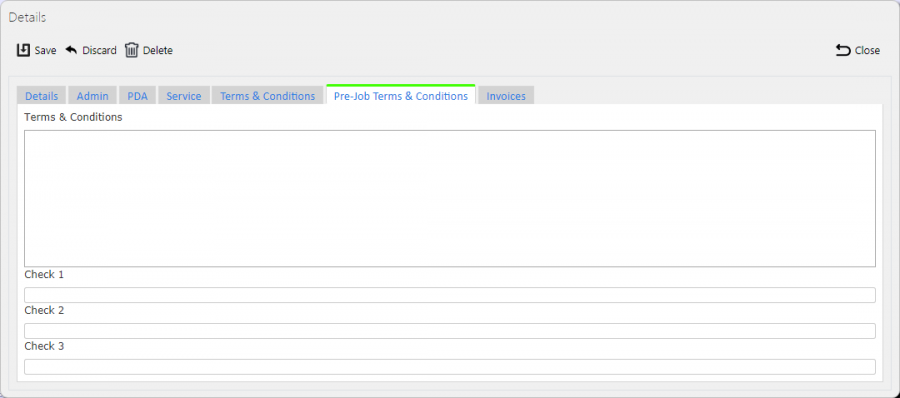
This tab allows you to configure the terms and conditions that appear on the mobile device application when the customer is signing on arrival, along with up to 3 check boxes for the customer. These check boxes are not validated on the mobile device application. The Terms and Conditions entered here will be used for services, collections and deliveries.
![]() Note: More complex configuration of Terms and Conditions exists using UDF that allow for exact, validated configuration for all job types and stages, including driver signature. You can configure these through the UDF Configuration screen.
Note: More complex configuration of Terms and Conditions exists using UDF that allow for exact, validated configuration for all job types and stages, including driver signature. You can configure these through the UDF Configuration screen.
Invoices
This tab allows you to configure invoice-related information. This is inherited by jobs that have this job group attached.
- Tax Code.
- Nominal Code.
- Project Code.


