Despatch
Clicking 'Despatch' from the menu will take you to the despatch screen.
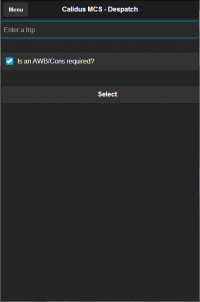
The application will prompt you to enter the Trip ID that is to be loaded and despatched.
If configured to do so, the application will also ask whether an Airway bill or Consignment reference is required. The default is yes. If you select no and the carrier does require a Consignment or AWB's to be entered, the application will display a warning message prompting you that it is required
Despatch Trip Entry
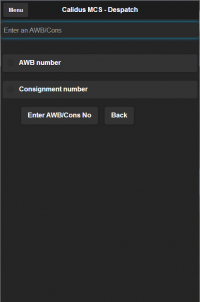
AWB/Consignment Select
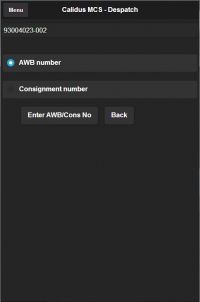
AWB Entry


Once the AWB/Cons is entered, or if one is not required or prompted for, the application will retrieve a list of all the items that require loading onto that trip.
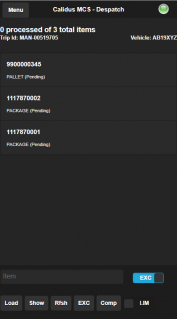
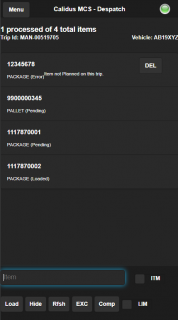
Items to Despatch

The application will display the trip details and a summary of the items planned to be despatched on this trip in a header at the top of the screen by default. If the trip has an AWB or Consignment number, this will be displayed here with a button to enter a new number if required.
![]() Note: If you want more room on the screen to display the list of items, click on the list. The header will be set so that it can scroll off the screen (rather than floating at the top).
Note: If you want more room on the screen to display the list of items, click on the list. The header will be set so that it can scroll off the screen (rather than floating at the top).
The item list will display the following information for each item that is planned to be loaded on this trip:
- Item ID - this can be either the individual package ID or the pallet ID.
- Item type - this is normally either PACKAGE for individual items or PALLET for palletised items. This can be configured so that the transport system's transport unit (or DU type) is displayed here instead of PACKAGE.
- Item status - for items that have not yet been scanned, this will be "Pending".
- Product type - the system can be configured to display the product type of packages here.
- AWB/Consignment ID - if the pallet has been updated with an AWB or consignment number in the transport system, this will be displayed here, along with an indicator as to whether this is an AWB (A) or Consignment (C) number. An AWB/Con button is also present to change this reference here.
- Drop No - if configured to use drop sequence in despatch, the drop number will be displayed after the item.
If configured to do so, the items will be displayed in ascending product type, then reverse drop sequence.
For example, if there are AMBIENT and CHILLED items, and 2 drops, each with 2 orders and 2 items, the item list will look like this:
- AMBIENT, Drop 2, Order 1, item 1
- AMBIENT, Drop 2, Order 1, item 2
- AMBIENT, Drop 2, Order 2, item 1
- AMBIENT, Drop 2, Order 2, item 2
- AMBIENT, Drop 1, Order 1, item 1
- AMBIENT, Drop 1, Order 1, item 2
- AMBIENT, Drop 1, Order 2, item 1
- AMBIENT, Drop 1, Order 2, item 2
- CHILLED, Drop 2, Order 1, item 1
- CHILLED, Drop 2, Order 1, item 2
- CHILLED, Drop 2, Order 2, item 1
- CHILLED, Drop 2, Order 2, item 2
- CHILLED, Drop 1, Order 1, item 1
- CHILLED, Drop 1, Order 1, item 2
- CHILLED, Drop 1, Order 2, item 1
- CHILLED, Drop 1, Order 2, item 2
The application will display a number of buttons and actions at the bottom of the screen.
- ITM/EXC mode selector (described below).
- Load - mark the item as Loaded (in ITM mode) or as an exception (in EXC mode).
- Show/Hide - show all items (including Loaded items) or just Pending/Error items.
- Rfsh - refresh the planned items on the list from the transport system.
- EXC - mark all pending items as exceptions.
- Comp - complete the trip and despatch it.
- LIM/ALL slider - show a limited number of items in the screen (which improves performance) or show all items on the trip.
The screen operates in two modes, signified by the ITM slider in the bottom-right of the screen:
- ITM - each item you scan will be marked as Loaded.
- EXC - each item you scan will be marked as an Exception - you will be shown the Damages screen to see the details on enter the reason.
The screen always starts in item loading mode (ITM), but you can switch at any time by clicking this slider to the other mode, and back again.
When you scan an item that is planned on this trip, the screen will automatically mark it as loaded. If you enter the item manually and hit return or click the Load button, this will also mark the item as loaded.
![]() Note: If you are using MCS Location Scanning at despatch, the device will prompt for confirmation of the correct vehicle and compartment, matching the product type of the item. The user will be shown the name of the vehicle and temperature, and prompted to confirm. The user can scan or enter the vehicle ID and product type combined together to confirm this. For example "TRAILER123AMBIENT", "AB75XYZCHILLED". It is recommended that these are barcodes and attached to the vehicles/trailers/compartments.
Note: If you are using MCS Location Scanning at despatch, the device will prompt for confirmation of the correct vehicle and compartment, matching the product type of the item. The user will be shown the name of the vehicle and temperature, and prompted to confirm. The user can scan or enter the vehicle ID and product type combined together to confirm this. For example "TRAILER123AMBIENT", "AB75XYZCHILLED". It is recommended that these are barcodes and attached to the vehicles/trailers/compartments.
When you scan an item that is not planned on this trip, the screen will add this item to the list and mark it as pending validation with the system. If the device has a data connection, this will be immediately validated. If not, this additional item will be validated when the device has a data connection.
If the system is configured not to allow additional items, the device will inform you when validating the item that unplanned items are not allowed. Otherwise, if the item is not planned to move through the location that is a destination on this trip, then the device will inform you that this item is not allowed onto this trip. In both cases, they will be marked as Error status.
If the item is planned, or the system allows additional unplanned items and this item is valid for this trip, the status will be set to 'Loaded'.
By default, the screen displays only items that have not yet been loaded (i.e. status Pending) and any error items (status Error). The screen header shows the amount of items scanned so far, and the amount remaining. If you want to see details of all the items on the trip, you can click the Show button on the screen footer. You can then hide them again using the Hide button.
Partial Complete Despatch

If an items is scanned and a 3rd party label is required then the user will be prompted to enter a 3rd party label ID. This can be entered by either scanning the 3rd party label barcode or manually keying the label ID
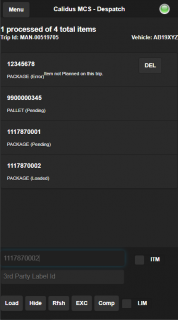
3rd Party Label Entry

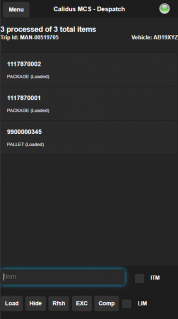
For items that have been scanned as loaded, the following information may be displayed:
- 3rd-party label - if the item required a 3rd-party label when loading, it is displayed on the list.
- Item status - for successfully-loaded items, the status will be "Loaded". For additional items (i.e. items that were not planned on this trip), the status will be "Validating" if this has not yet been completed, "Loaded" if they are allowed on this trip, or "Error" if there has been an issue with this item. A description of the problem will also be displayed, and a DEL button to remove this item from the trip once the physical item has been removed.
All items will then be scanned to confirm despatch.
If at any point an item is damaged, you can click the ITM/EXC slider to move into Exception mode - any items you scan in this mode will take you to the Damages screen to enter the exception reason.
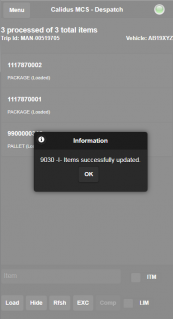
Once all items are scanned you can click Complete to confirm the trip as despatched.
![]() Note: All items planned on the trip must be confirmed as either Loaded or have an exception reason code assigned to them. If not, the application will inform you and will not despatch the trip. You can use the EXC button on the footer to mark all remaining pending items with an exception reason through the Damages screen.
Note: All items planned on the trip must be confirmed as either Loaded or have an exception reason code assigned to them. If not, the application will inform you and will not despatch the trip. You can use the EXC button on the footer to mark all remaining pending items with an exception reason through the Damages screen.
Ready for Despatch
Despatch Confirmed


![]() Note: Only once a trip is confirmed will TMS be informed of the successful scans and complete the trip.
Note: Only once a trip is confirmed will TMS be informed of the successful scans and complete the trip.