291211
![]()
DHL C-TMS
Modifications to Order Entry
FUNCTIONAL SPECIFICATION - 10.7
16/11/2011 - 1.1
Reference: FS 291211 NW-8KND7U
Functional Overview
Client Requirement
Modify the manual order entry capability within C-TMS to allow a user to create a new location when entering an order.
The user should firstly enter the post code of the location which will display all existing matches (active or inactive displayed by selection flag) and allow the user to select one of these if it matches, otherwise the user will be able to create a new location without exiting the order.
This should also be incorporated into the existing functionality to automatically create a new location via interfacing.
The ability to capture Hazardous information either manually or via an inbound interface should also be added, this should include the following:
- It is envisaged that a flag will be added to the Order in C-TMS which denotes that the Order includes hazardous products, if this flag is either ticked or set to “Y” the key reference fields on the Order should be displayed in red.
- An additional tab should also be added to the Order that will contain the UN number and associated quantities. In this instance the details will be populated manually but there is an additional requirement to be able to load the data from the .csv file or via the interface from Unison or another WMS.
Solution
The ‘Order Details’ screen will be changed to allow a user to create a new location during the entry of a transport order.
Two new buttons called ‘Postcode Search’ will be displayed in the ‘Detail’ tab page for the ‘Collect From’ and ‘Deliver To’ fields to allow the user to view and select a location from a lookup screen for the following fields:
- Location Name (mandatory)
- Contact Name (non-mandatory)
- Ward / Department ? (non-mandatory)
- Street / Address Line 1 (mandatory)
- Area / Locality / Address Lines 2 and 3 (non-mandatory)
- Town (mandatory)
- County / State (non-mandatory)
- Postal Code / Zip Code (mandatory, validated on format for the country)
- Country Code (mandatory)
The user will then be able to select the existing location for the collection or delivery location, or generate a new location ID by specifying a unique location ID.
N.B. The existing functionality to create a new location via the EDI inbound order process when the collection or delivery location received is unknown will be retained.
A new tick box called ‘Hazardous’ will be displayed in the ‘Detail’ tab page to denote whether the transport order includes any hazardous products, if so then the relevant records will be highlighted as hazardous.
A new tab page called ‘Hazardous Data’ will be created to display and maintain the ‘UN Number’, quantity and other references for the hazardous products.
The hazardous data will be uploaded via the CSV order import and the EDI inbound order process.
The ‘Order Details’ screen will be changed to store the recipient address details (i.e. phone number or e-mail address) and the method of transfer (i.e. SMS or e-mail) as received from WMS.
Reference additional changes for addition of manual pack confirmation button NW-8KEMRU
Label Reprinting will also be covered within the scope of this RIO.
Scope
This change will be applied to system version 10.7.
Set-up
Pre-requisites
None
Menu Structure
No change
Data
-
- A new ‘HAZARDOUS_ITEMS’ column will be added to the ‘SCH_ORD’ table.
- A new sequence called ‘SEQ_HAZARDOUS_ITEMS’ will be developed.
- A new table called ‘HAZARDOUS_ITEMS’ will be developed.
- A new system parameter called ‘ORD_POSTCODE_SEARCH’ will be setup and will be set to ‘Y’.
Functional DESCRIPTION
Order Entry
Postcode Search
The ‘Order Detail’ screen will be amended to allow a user to create a new location during the entry of a transport order.
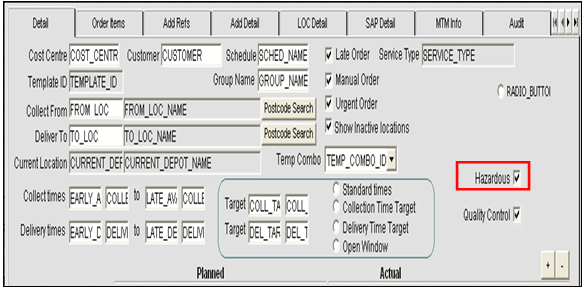
To achieve this two new buttons titled ‘Postcode Search’ will be added to the order details tab of the order entry form. The new buttons will be located to the right of the ‘Collect From’ and ‘Deliver To’ fields and a suggested layout of the screen is shown below:
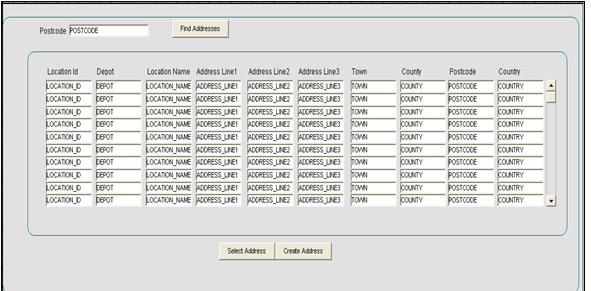
When either of these buttons is selected a new screen will be displayed to allow the user to enter the postcode value they wish to search for. Once a postcode has been entered the user will press a ‘Find Address’ button which will display all existing addresses with the specified postcode.
The ‘Postcode Search’ buttons will only be displayed if the new ‘ORD_POSTCODE_SEARCH’ system parameter is set to ‘Y’.
A suggested layout for the ‘Postcode Search’ screen is displayed below:
The items that will be displayed will be:
- Location ID
- Depot
- Location Name
- Address Line 1
- Address Line 2
- Address Line 3
- Town
- County
- Postcode
- Country
- Postal Region
- Planning Region
A horizontal scrollbar will be available to display all of the items in the screen.
The user can scroll through the list of addresses and a vertical scrollbar will be provided to the right of the data.
There will then be two options to select from:
- Select an address from the displayed list
- Create a new address
If the ‘Select Address’ option is pressed, the address record that the cursor is currently in will be used to populate either the ‘Collect From’ or ‘Deliver To’ address, this information will be determined by identifying which of the ‘Postcode Search’ buttons was selected from the orders screen. If an existing location address is not displayed in the current record then an error message will be issued because an address cannot be selected. Once a valid address has been selected, the ‘Postcode Search’ screen will be exited and the user returned to the ‘Order Detail’ screen.
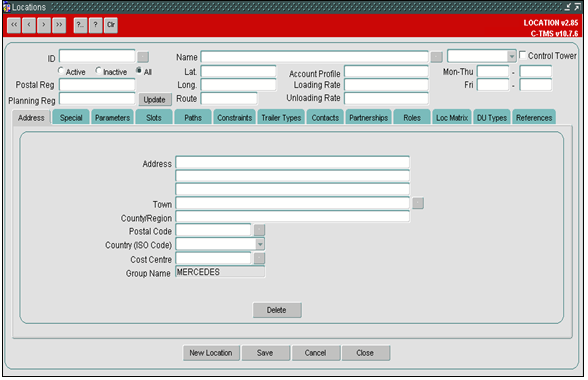
If the ‘Create Address’ button is pressed, the user will be taken to the ‘Locations’ form as shown below.
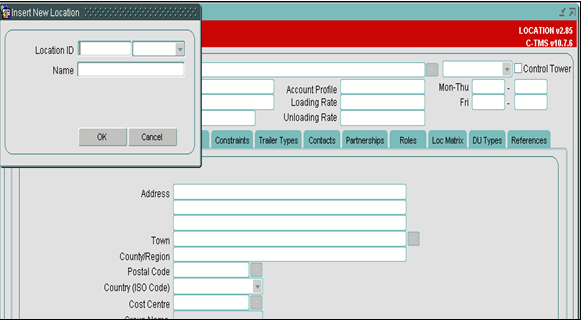
The ‘New Location’ button will then be defaulted automatically and the ‘Insert New Location’ screen (shown in ‘Location Screen 2’ below) will be displayed.The user can then enter a new address as normal and all required existing validation will be performed.
The ‘Locations’ form will be amended to allow the new address details to be returned to the calling form as parameters. When the ‘Close’ button is pressed the calling form will be checked to determine if it has been called from the ‘Order Detail’ screen and, if so, it will pass back to the ‘Orders’ form the details of the ‘Location ID’ generated for the new address created; it may then be used as the ‘Collect From’ or ‘Deliver To’ location as previously described.
Location Screen 1:
Location Screen 2:
Hazardous Items
A new tick box titled ‘Hazardous’ will be added to the ‘Order Detail’ screen above the existing ‘Quality Control’ tick box.
The ‘Hazardous’ tick box will be unchecked upon entry and when it is checked it will indicate that the order contains hazardous items. The suggested layout is shown below:
A new table ‘HAZARDOUS_ITEMS’ will be created as detailed below:
| COLUMN | DATA TYPE | SIZE | MANDATORY |
| ID | NUMBER | 10 | Yes |
| OMS_REF | CHARACTER | 12 | Yes |
| UN_NUMBER | CHARCATER | 50 | Yes |
| DESCRIPTION | CHARACTER | 40 | Yes |
| QUANTITY | NUMBER | 28,4 | Yes |
A sequence called ‘SEQ_HAZARDOUS_ITEMS’ will be created to be used as the primary key to the table (i.e. ‘ID’).
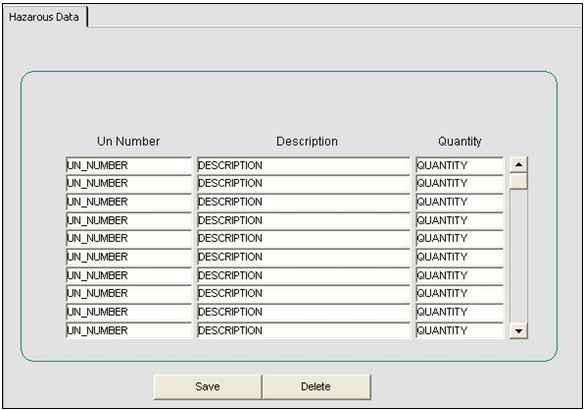
A new tab page ‘Hazardous Data’ will be added to the ‘Orders’ form, this tab page will be based upon the new ‘HAZARDOUS_ITEMS’ table. The new tab page will be used to capture the details of hazardous items for the order being captured. If the hazardous items field is set to ‘Y’ these details must be populated.
The ‘SEQ_HAZARDOUS_ITEMS’ next value should be used as the primary key of the table for all inserts. A suggested layout is shown below:
The screen will contain a vertical scrollbar to the right of the data to allow the user to display all the hazardous data related to the order. There will be two buttons on the screen:
- ‘Save’ will save any changes made
- ‘Delete’ will delete the current record
Message Medium
The ‘Order Detail’ screen will be amended to show the recipient address details related to the order in the ‘LOC Detail’ tab page.
The ‘Message Medium’ will be either ‘SMS’, ‘EMAIL’, ‘BOTH’ or ‘NONE’. The value entered here will be used to determine if the user must enter at least one SMS address, an e-mail address or both, these values will not be validated. The information entered will be used to update the relevant fields on the order.
A suggested layout is shown below:
The ‘Message Medium’ will be a single character to denote the method of transfer to be used:
| Value | Description |
| S | SMS |
| E | |
| B | Both SMS and EMAIL |
| N | None |
‘SMS Addresses’ each will store up to 12 characters, whereas ‘Email Address’ will store up to 100 characters.
N.B. Up to 4 SMS addresses may be stored per transport order and these addresses will be visible in the ‘Message Medium’ tab page for maintenance and they will be uploaded in the sub-references section in the ‘TripOrder’ file.
Mandated Carrier
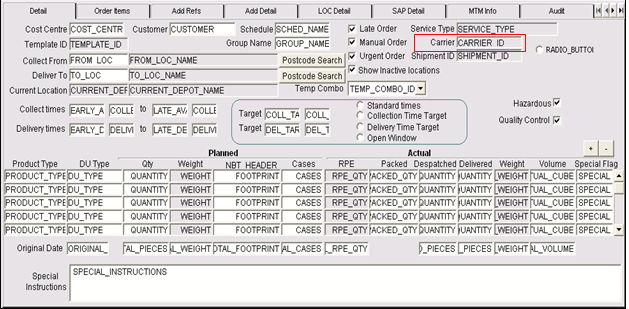
A mandated carrier may be required for the transport order and a new ‘Carrier’ field will be added to the ‘Detail’ tab page below the new ‘Service Type’ field.
The ‘Carrier’ will be validated that it exists as a ‘Carrier ID’ in the ‘Carriers’ tab page in the ‘Resource Maintenance’ screen and a list of values will be available for selection:
The mandated carrier can then be used in the consolidation and scheduling processes as per the orders imported via XML and CSV files.
The mandated carrier will be stored in the new ‘SCH_ORD_INFORMATION.CARRIER_ID’ database item.
Shipment ID
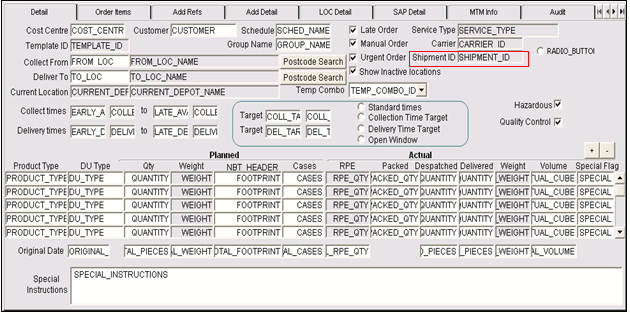
A unique shipment ID will be generated for each transport order entered in C-TMS using the existing database trigger ‘T_SCH_ORD_AUDIT’ for ‘INSERT’ actions on the ‘SCH_ORD’ database table: a new database sequence number ‘SEQ_SCH_ORD_SHIPMENT_ID’ will be used to generate the shipment ID with a starting value of ‘100000’ and a maximum value of ‘999999999999999999999999’.
The shipment ID will be displayed in the ‘Detail’ tab page below the new ‘Carrier’ field:
The ‘Shipment ID’ field will not be editable.
The shipment ID will be stored in the new ‘SCH_ORD.SHIPMENT_ID’ database item.
The database trigger will ensure that each transport order generates a shipment ID
The database trigger, sequence and the new items may be created using the scripts in Appendix A.
Packed Quantity
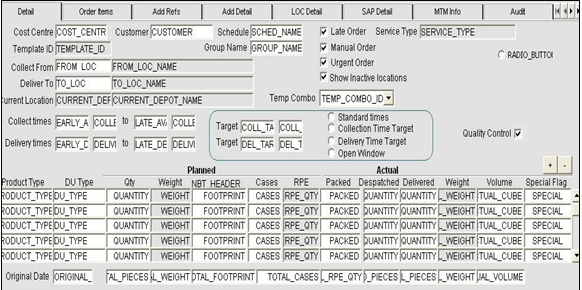
The ‘Order Detail’ screen will also be changed to display the ‘Packed’ quantity before the ‘Actual Despatched’ quantity of an order line in the ‘Detail’ tab page:
Pack Confirm
A new button called ‘Pack Confirm’ will be added to the bottom of the ‘Order Summary’ and ‘Order Detail’ screens.
It is expected that the ‘Pack Confirm’ button will only be used for manually entered orders because they will be effectively consolidated shipments.
N.B. A ‘CIPD’ message will not be received for these orders.
The ‘Pack Confirm’ button will be used to run the scheduling engine for the OMS reference.
Once the scheduling engine has been run successfully then the labels will be printed automatically to the user’s default printer.
In summary:
- Enter an order with, or without, a mandated carrier in the new field in the ‘Order Details’ tab page.
- Press the new ‘Pack Confirm’ button in the same tab page:
-
- If the order is not on a trip (i.e. it is not already scheduled) then it will be scheduled by running the scheduling engine for that OMS reference.
- The scheduling engine will only be run for the single order if it is not already running via the database job.
- A mandated carrier will be used if it exists for the order as per the standard scheduling functionality.
Once the scheduling has been performed successfully (if required) then the labels will be printed to the default printer for the user for the trip and carrier assigned to the order.
A suggested layout is shown below:
‘Order Summary’:
‘Order Detail:
The ‘Pack Confirm’ button will only be active for ‘UNSCHEDULED’ orders. When this button is pressed the order should be scheduled onto a shipment and then a trip and a label produced. The functionality to achieve this is detailed within a separate RIO ‘290934-NW-8KEMRU’.
Reprint Label
A new button called ‘Reprint Label’ will be added to the bottom of the ‘Order Summary’ and ‘Order Detail’ screens.
The ‘Reprint Label’ button will enable the user to request reprinting for whatever reason and this button will not perform any scheduling.
A popup box will be displayed with the default printer for the user but the user will have the ability to specify another printer name provided that it exists as a default printer for any user.
N.B. The ‘Pack Confirm’ and ‘Reprint Label’ buttons will need to check that the carrier of the order (or the trip if not mandated) has a label format setup and, if not, advise the user that the processing is not required for that carrier.
Repacking
If repacking is required (e.g. the carrier has advised that the scheduled collection will not be performed) then the user will have to follow the procedure to unscheduled the order, modify it and reschedule it.
Afterwards, the labels can be produced via either the ‘Pack Confirm’ or ‘Reprint Label’ buttons as appropriate.
Order Import
The order import flows from either a ‘CSV’ format or an ‘XML’ format (i.e. ‘TripOrder’) will now contain the details of hazardous items related to an order. The order imports will be changed to create the hazardous data records in the new ‘HAZARDOUS_ITEMS’ table. If there are hazardous items present in the import file the hazardous items field for the order will be set to ‘Y’, if no hazardous items are not present the field will be set to ‘N’.
These import changes will be described in more detail in RIOs ‘291449 NW-8L3JXV’ and ‘291614 NW-8L8JRN’.
References
| EST-291211 NW-8KND7U Modifications to Order Entry v1.0.doc | |||
| 290934-NW-8KEMRU’ Parcel Carrier Management | |||
| 291449 NW-8L3JXV’ Order Import from Transport Manifest | |||
| 291614 NW-8L8JRN’ C-TMS Interface Modifications |
Glossary
| C-TMS | Calidus TMS |
Document History
| Initial version | ||||
| Updated | ||||
| Review | ||||
| Review of the initial draft | ||||
| Issued to client | ||||
| Included 3 extra SMS addresses | ||||
| Updated data types on HAZARDOUS_ITEMS; described functionality of the Pack Confirm button; added mandated ‘Carrier’ field; added ‘Shipment ID’ for display and maintained via a database trigger and sequence. |
AUTHORISED BY
| Matt Crisford | Development Manager | |
| Peter Greer | TMSCC MTS Product Manager |

