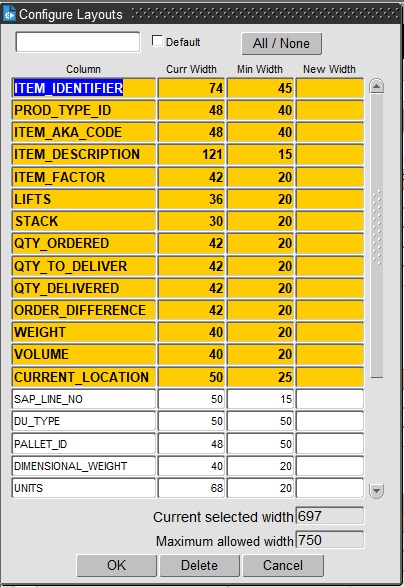
Layout Configuration
Several forms allow you to configure the layout of tables, including or excluding elements up to a maximum width.
How this is accessed depends on the screen:
- Right-clicking on a table may show an option "Configure ..." or similar - clicking this will show the Configure Layouts panel.
The Configure Layouts pop-up will show all of the items that can be configured to be shown or hidden.
You can select or deselect items to be shown by control-clicking on the elements in the table.
When you are configuring tables, you will also be shown the current and minimum width of the item, plus the maximum width of the table. Once you have selected an item, you can change the width of the displayed items with the New Width box, up to the maximum width of the items in the table, which is shown at the bottom of the form.
You can name the layout using the text box at the top of the screen, and set this layout as the default. This is optional, but means that you can have multiple layouts that you can select from to configure the screen best for a particular task.
You can save and apply the layout with the OK button. The layout is is stored in the system against your user, so you will be able to access the layout from anywhere you access the system.
You can cancel your changes with the Cancel button - the form will exit and the the layout will not be saved or changed.
You can delete the currently-selected layout by clicking the Delete button.
Usually, in screens that allow configuration, there will be a drop-down list situated on the screen to allow you to quickly select configurations for that table or section.
List of screens with configurable layouts:
- Orders/New Order
- Order Items
- Trip Details
- Planning/Trip Manipulation
- Stops
- Order Well
- Trip Debrief
- Order Debrief
- Order Items
- Carrier Trip Planning
- Trip Overview (Waterfall)
