Maintenance - Locations
![]()
Aptean
Locations
Calidus TMS - 12.48
29th April 2025 - 4.0
Reference: MAINTENANCE
MAINTENANCE - LOCATIONS
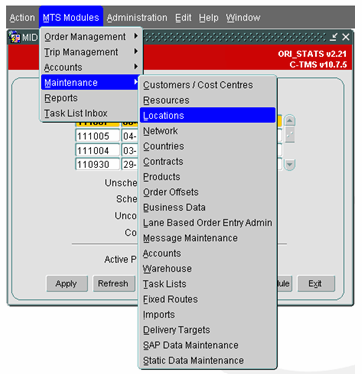
Locations are used to maintain the details related to a specific location such as their Address information, Contacts and Constraints. Location Maintenance form can be accessed from Maintenance Menu as shown below:
The Locations module assists in the creation, maintenance and retrieval of C-TMS data pertaining to how each location functions. The Locations data determines to a small degree how the orders are created in the Bookings form.
A Default Loading and Unloading rate controlled by 2 system parameters (GEO_DEFAULT_LOAD_RATE and GEO_DEFAULT_UNLOAD_RATE) is populated when a location is created.
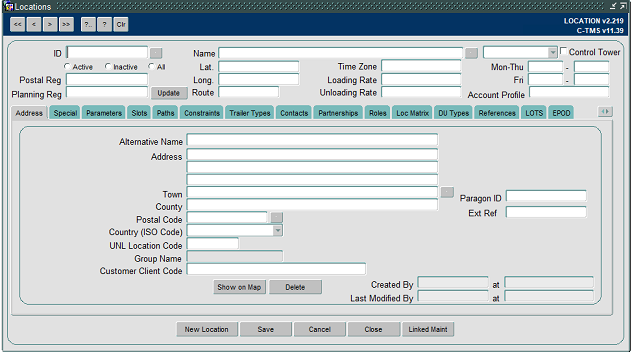
The Locations data can be viewed, created, edited and maintained through the following Locations form.
Query existing Locations:
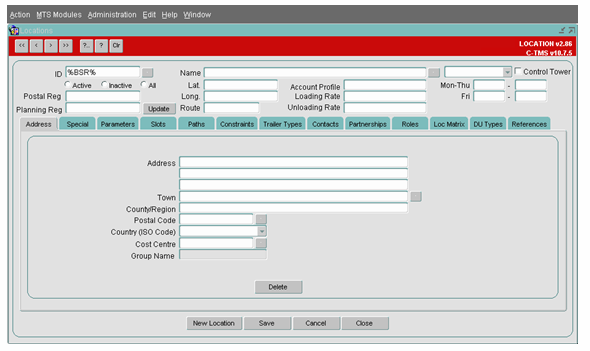
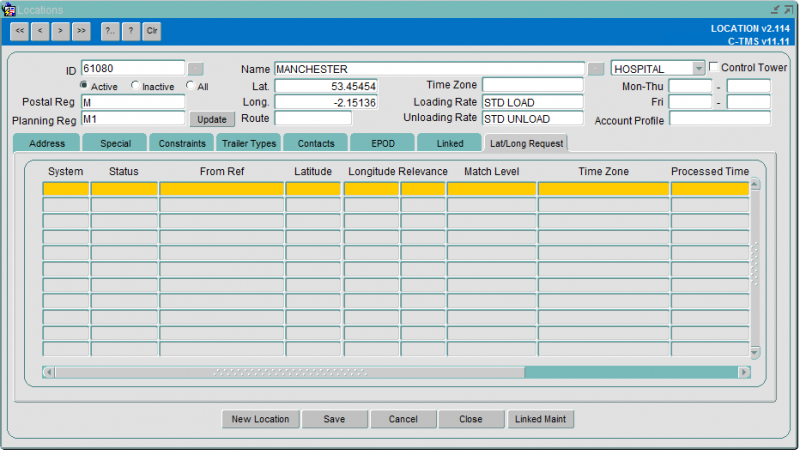
To query for a Location, enter the ID of the location with a '%' as shown and click on the query button. This will provide the details of the Location queried. An example is shown below.
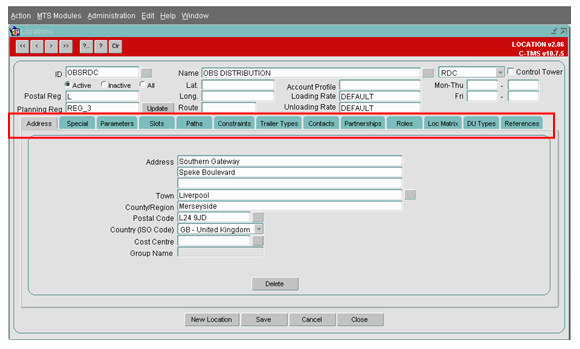
You can traverse through the relevant tabs to get details of them. Note the tabs will be discussed later in the document
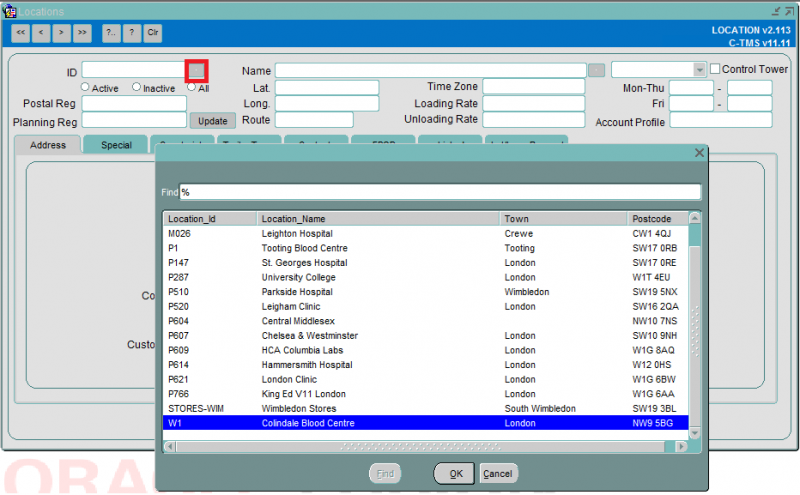
You can also query using a lookup against the location ID. press the button indicated by the red square below to get a list of locations:
Choose your location and press the OK button. The data for the chosen location is displayed.
Creation of a new Location:
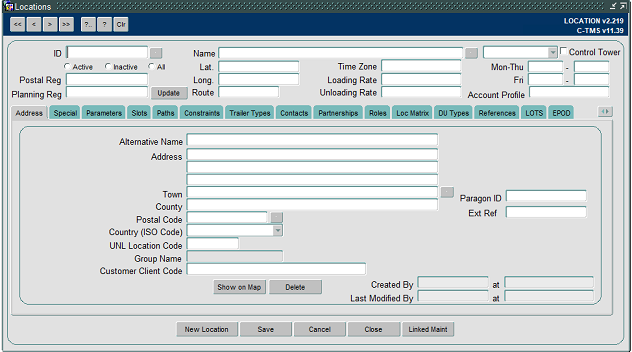
The Address tab provides the facility to define and maintain Depots. As well as the address, the depot can be defined as a Branch or RDC. The longitudes and latitudes of the depot are entered along with open and close times - if required.
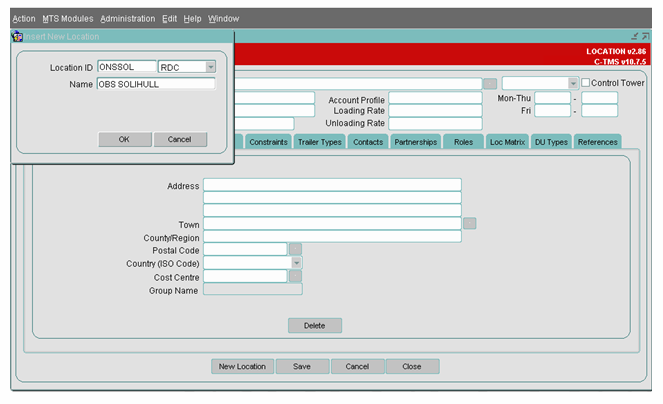
To create a new Location, click on the New Location button and enter the Location ID, Location Type and the Location Name as shown below.
When creating a new location, you may assign a time zone, which will be used to set transaction times at the location. You may also assign a customer client code which allows you to select a subset of locations in order entry.
The Location ID should identify the location uniquely. The Location Type can hold one of the types set up in the system, typically from the below:
- BRANCH - if the location is a delivery point.
- RDC - if the location is a depot/distribution centre.
- SUPPLIER - if the location is a vendor/supplier location.
Types are maintained in the system, so you can have many others, such as:
- CROSSDOCK
- HOSPITAL
- SESSION - if the location is a session location.
- SWAP - if the location is a SWAP location (PARK, LAYBY etc.)
- TEAMBASE - if the location is a session teambase location.
- AIRPORT - if the location is an airport
Address
This tab contains the address of the location.
In the address tab, enter the address details and the most important fields in this tab are the Postal Code, Town and Country (ISO Code). The 'Postal Reg' and the 'Planning Reg' will be populated by the system based on the postal code.
The Lat and Long fields will be populated by the External Map Applications used to geocode locations, once the location is used in an Order. This can also be manually entered here. The location needs to be required upon first entry to display the latitude and longitude values.
The Loading Rate and Unloading Rate specify the time required to load and unload a truck in the given location. This will be described in the Resources section of the training.
The Paragon id can contain up to 40 characters no additional validation is performed.
The Ext Ref can contain up to 50 characters and must be unique to the location. If a duplicate value is entered an error will be raised and the changes will not be saved.
UNL Location is related to emissions reporting. The code will be automatically created for you when the location is created, from the country code and the first 3 characters of the Town. This is used in the Carbon Emissions extract only.
You can click the Show on Map button to open a new tab in your browser to show the position of the location on a map.
Once you have entered the required information, click on the Save button to save the changes that you have made.
To delete the location, use the Delete button - you will be prompted for confirmation before it is deleted, and the system will not allow you to delete a location where that location has been used on orders.
Special
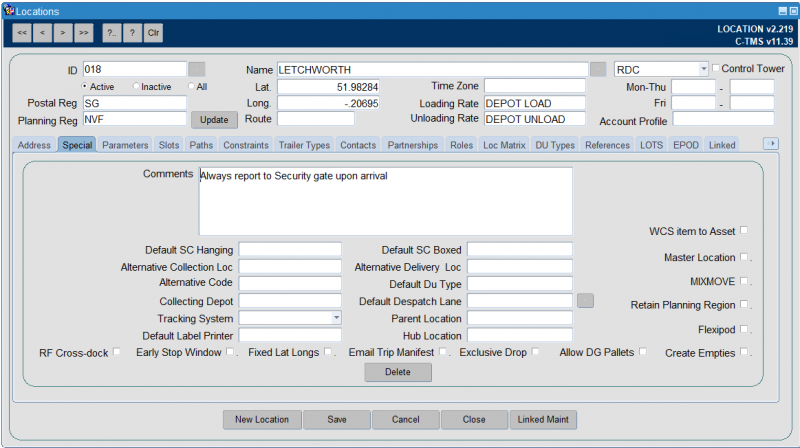
Additional data such as Alternative Collection/Delivery Location can be attached to a location or comments can be added.
The following fields are available
- Comments - Location comments are for reference - these are used in some interfaces to electronic POD systems (such as Aptean Proof of Delivery (FleXipod) and are used as location instructions.
- Default SC Hanging
- Default SC Boxed
- Alternative Collection Loc
- Alternative Delivery Loc
- Alternative Code
- Default Du Type - A default DU type can be added against the location which can be used to automatically assign to orders generated for collection from this location.
- Collecting Depot
- Default Despatch Lane
- Tracking System - a drop-down list of ISOTRAK, MICROLISE, TOMTOM.
- Parent Location
- Default Label Printer
- Hub Location
- RF Cross-dock (Checkbox) - this controls whether the location is used for item scanning through CALIDUS WCS.
- Early Stop Window (Checkbox)
- Fixed Lat Longs (Checkbox)
- Email Trip Manifest (Checkbox)
- Exclusive Drop (Checkbox)
- Allow DG Pallets (Checkbox) - whether the location allows dangerous goods.
- Create Empties (Checkbox)
- WCS Item to Asset (Checkbox) - whether goods scanned at this depot through CALIDUS WCS may be added to assets.
- Master Location (Checkbox)
- MIX MOVE (Checkbox)
- Retain Planning Region (Checkbox) - see notes below.
- Flexipod (Checkbox) - controls whether this depot (RDC) location is using Aptean POD (APOD or FleXipod) for execution of trips, if configured at depot level.
![]() Note: The system will always automatically default to the planning region associated with the postal region of the address.
Note: The system will always automatically default to the planning region associated with the postal region of the address.
If you have changed your postal/planning region setup, you may need to update your locations that already exist.
- Find the location in the Locations form.
- Click Update - this should update your location from the planning/post region mapping.
- Click Save to save the change.
If you want to fix the location to a particular planning region outside of the mapping, that's possible too. It’s just a checkbox against the locations.
- Find the location in the Locations form.
- Change the Planning Reg value to what you want – you can use a lookup.
- Click the Special tab.
- Check the “Retain Planning Region” box.
- Click Save.
Slots
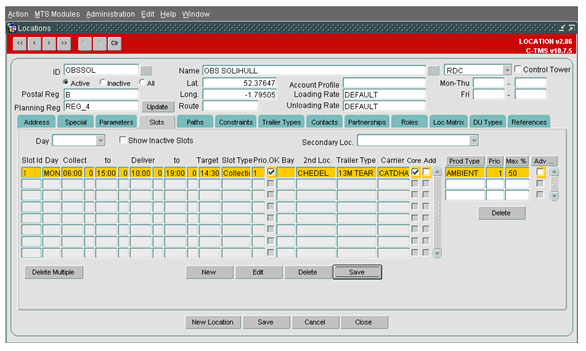
Collection and Delivery Slots are maintained for each location. Each Slot details the collection and delivery windows on a particular day that the collection or delivery of goods from one location to another should be scheduled. Slots can be configured to use a specific Trailer Type and accept specific Product Types. Slots are filled by the Create Transport Instructions process invoked from the Bookings form.
The slots are relative to a particular day of the week and cover a specified collection and delivery time window. It is these windows that are propagated onto the generated order.
Manual Slot Manipulation
Provides the facility to manually add, edit, delete and inactivate Slots. Only Slots in a Status of Active are displayed by default in the Slots tab as only Active Slots are considered by the system in the Create Transport Instructions's process. A function to view Inactive Slots is included. An inactive slot gets ignored during the Create TI's process.
This also provides the facility to add, edit and delete Product Types and a Trailer Type from a Slot.
Slot Import
Slots can be imported into C-MTS Host via an inbound interface. In the case of Sainsbury's Supermarkets this is the VAST interface that runs nightly. This interface process inactivates all Slots in the system then either reactivates any Slots that exist in both the system and the new interface file or creates any new Slots. The Slot Import functionality on the Slots tab simply allows this import process to be invoked manually if required.
Multiple Slot Deletion
This function allows Inactive Slots to be removed from the system if they have not been activated for a user specified period of time. This ensures a manageable number of entries are displayed in the Slots tab if the option to display Inactive Slots is selected.
Dynamic Day Offsets
All Slots have collection and delivery windows and apply to a particular day. Slot windows are held with actual times, e.g. 10:00 - 11:00, and day offset. The use of day offset minimizes user maintenance as the actual date a Slot is used is not stored, it is implied by the day offset e.g. on Friday 12th July 2002, a Slot stored with a delivery window of 0 23:30 to 1 00:30 will be interpreted as 12th July 23:30 - 13th July 00:30 i.e. the day offset is used to decrement or increment the actual date on which the Slot is being used.
Slot Trailers
Each Slot can be configured with a specific Trailer Type. This allows a Slot to be configured to use, for example, a more maneuverable Trailer if access is restricted.
Slot Products
Slots can be configured to accept one or more Product Types. When Orders are created in Slots by the Create Transport Instructions process, the process is constrained to only fill Slots with permissible Product Types. If a Product Type is not compatible with a Slot it cannot be assigned to the Slot.
Each Product Type in a Slot has a Priority. If the Priority is one then the Product Type will always be assigned to the Slot. However, if the Priority is two, the Product Type will only be assigned to the Slot if it is topping up the Slot i.e. the Slot already contains some Priority one Product Type.
Slot Product Types can also be designated as Advance Only so that only Advance Orders for the appropriate Product Type are assigned to the Slot
Constraints
This tab allows for constraints to be set up against a location.
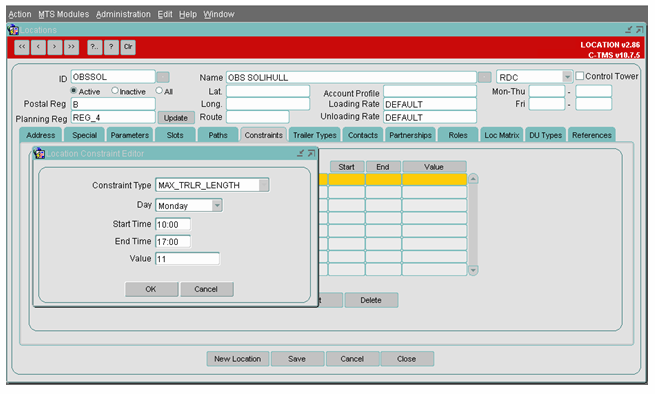
Constraints can be added to a location, which are taken into account when orders are created. If a constraint is added to a location, then the constraint name, day, start time, end time and value are required. For example if a constraint MAX_TRLR_LENGTH with a value of 33 exists for a location, then, it indicates that trailers over the length of 33 cannot be used on a particular day, for the location in question.
To create constraints for the location, click on the New button and enter the details as shown. The Constraint Type specifies the constraint in a specific location such as only an 11 ft truck is allowed on Mondays between 10:00 to 17:00 hours. Once the details are entered, click on the OK button to save it.
Trailer Types
The Trailer Types tab specifies the trailers that are compatible with the location.
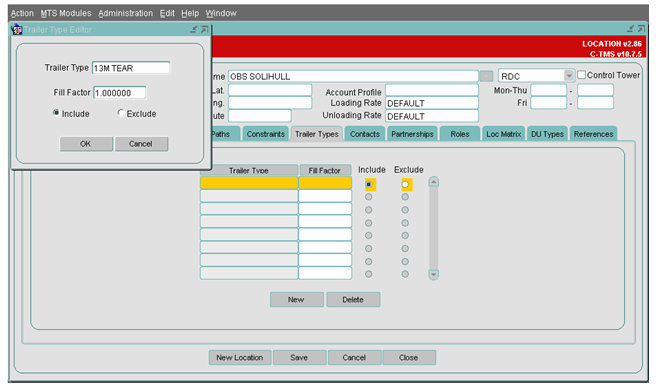
To create a new record click the New button.
For the example here, this location can handle only 45ft curtain side trailers, i.e. when the 'Include' option is selected then only those trailer mentioned in the list are compatible with the location.
When the 'Exclude' option is selected then, excluding those trailer all other trailers are compatible with the location.
![]() Note: A location may only use one trailer type or many.
Note: A location may only use one trailer type or many.
Contacts
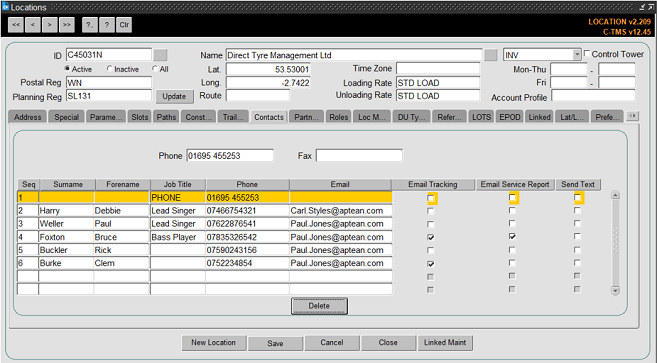
This tab allows for the details of the contacts for the location to be maintained.
Type in the contract details into the empty fields. Please ensure that you click on the Save button to save all the changes that you have made.
Once contacts are in the system, users can use this screen to set a default value for Email Tracking, Email Service Report and Send Text.
- Email Tracking – This contact’s email will be used when sending a tracking link for the Portal TTM system.
- Email Service Report – This contact’s email will be used when sending the completed work report from the EPOD system.
- Send Text – This contact’s phone number will be used when sending a text from the EPOD system.
The Email Tracking, Email Service Report and Send Text check boxes will show how they are set up within CTMS.
This information is assessed when sending data to EPOD and TTM on the created jobs.
Roles
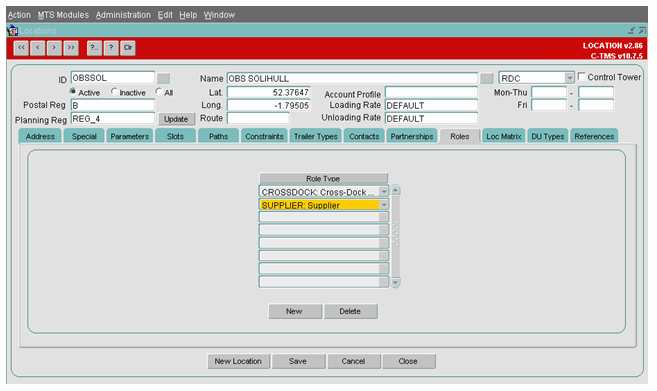
A single location could behave as multiple location types, so that, for example, a Crossdock could also be a depot. This functionality is not currently used by any automated part of the system and is for reference only.
DU Types
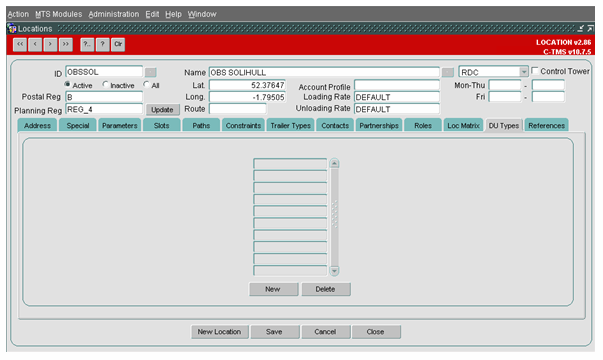
This is a client specific form but it is used in conjunction with a Supplier Portal. In the Portal, when a new order is generated it will default to have an order line for each of the DUs held on this tab.
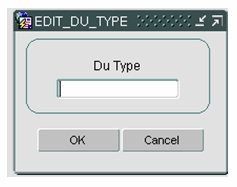
To enter a DU Type select the New button and the below screen is populated. Enter a DU Type manually or use the available list of values to find the relevant DU Type
Click OK to return back to the main screen
References
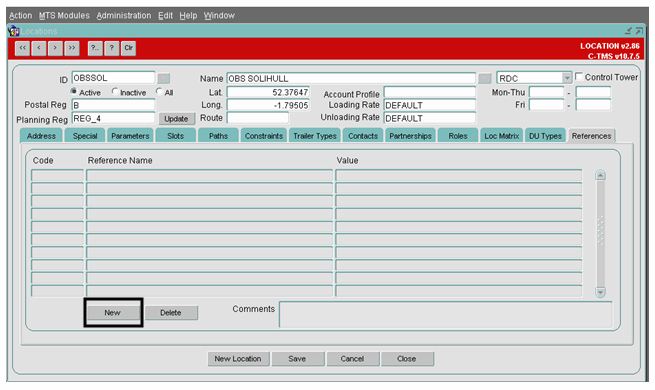
This Tab has been designed to add any additional Location Level references that may be needed for a specific project
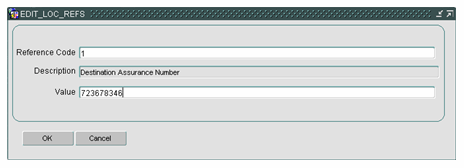
To add a reference click the New button. The below screen is then populated:
Enter a Reference code. If known it can be typed in manually or selected from a list of values. The description is automatically populated and is a read only field. Then enter the relevant value
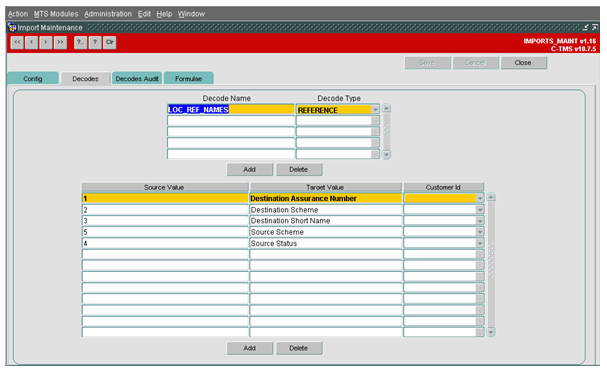
Please note the list of values is maintained in the Imports screen, within the Decodes tab as shown in the screenshot below
LOTS
LOTS (Live Order Tracking System) or TTM (Track and Trace Module) can be used to track orders through a a portal.
This screen can be used to determine whether a customer is included or excluded from the data sent to Calidus Portal TTM.
EPOD
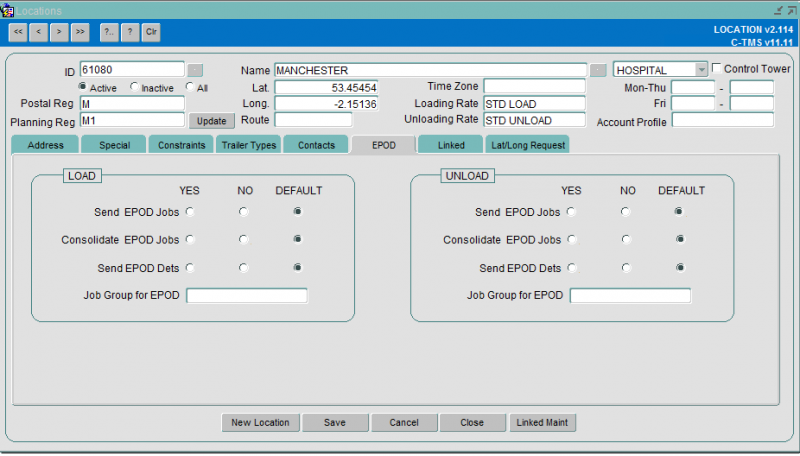
This screen allows you to maintain location-specific parameters controlling how and when jobs for this location are sent to EPOD.
You can enter:
- Send EPOD Jobs Load/Unload - whether these jobs are sent to C-ePOD on this activity.
- Consolidate EPOD Jobs Load/Unload - whether these jobs are automatically consolidated when sent to C-ePOD on this activity.
- Send EPOD Dets Load/Unload - whether these jobs are sent with details (items) to C-ePOD on this activity.
- Job Group for EPOD Load/Unload - a specific job group to use when sending these jobs to C-ePOD on this activity.
All parameters are initially set to Default - the system uses the location type defaults set up in the Business Data Maintenance screen.
Linked Locations
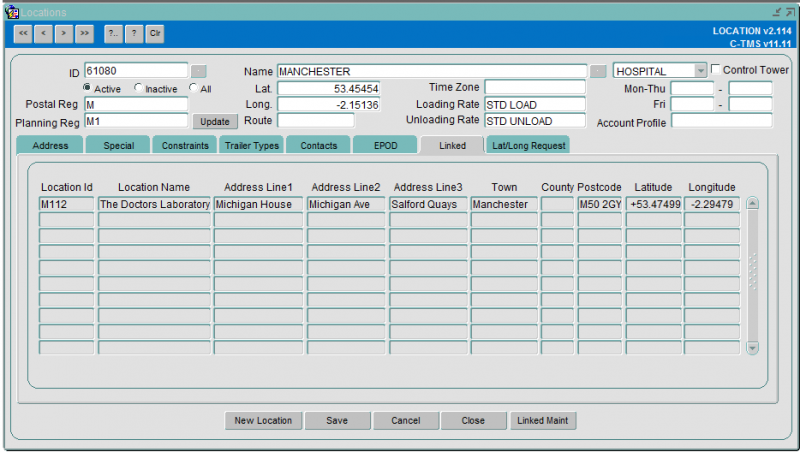
This tab allows for locations to be linked. Locations may be linked where they are the same building or same site. Linking may be automatically applied through EPOD or manually applied in C-TMS. While linked locations will create separate stops on a C-TMS trip, they will be presented in EPOD as a single stop.
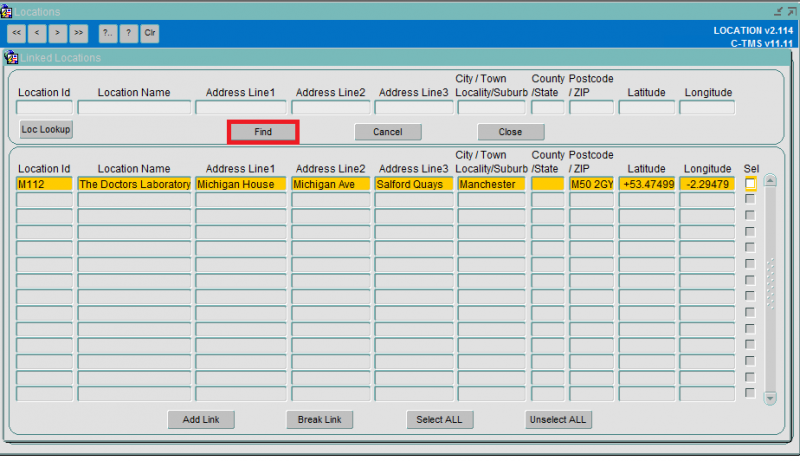
To manually link locations, click the Linked Maint button. This will display the following screen:
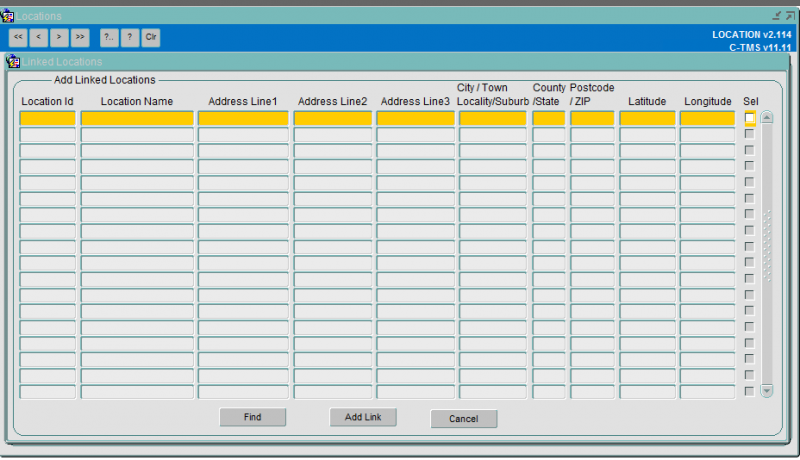
Click on the Find button. This will populate the location details of the location you are linking to. Click the Add Link button.
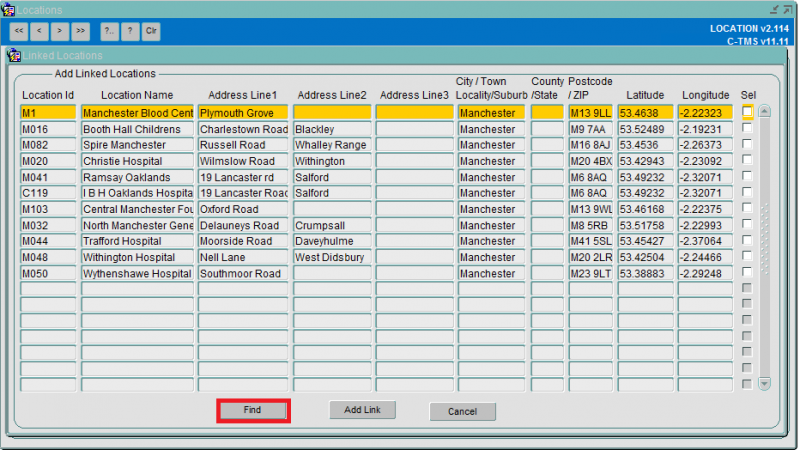
Enter data that you would like to search on, for example, data with 'Man' in the 'City' field with '%Man%'. Press the Find button to bring back the data:
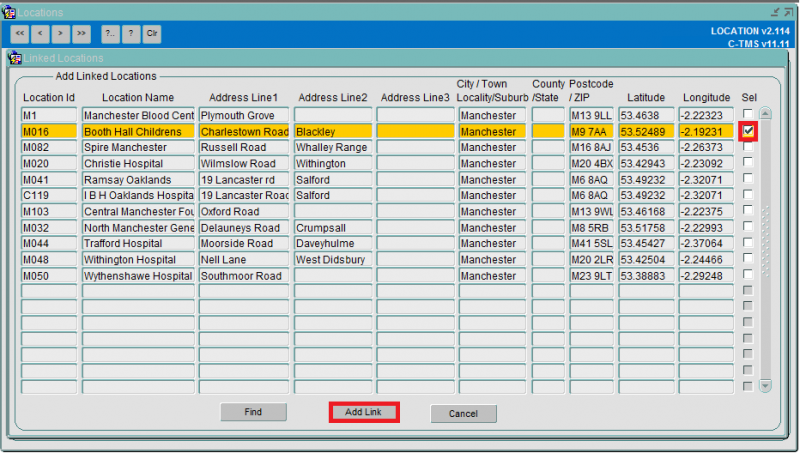
Select the locations that you want to link with the checkbox and then press the Add Link button as below:
The linked locations screen will be shown again with all linked locations.
Press the Close button and you are returned to the main screen. ![]() Note: At this point you will need to close the screen completely and go back in to show the change.
Note: At this point you will need to close the screen completely and go back in to show the change.
You can remove linked locations with the Break Link button.
Lat/Long
Here you can view the auditing of when the location's co-ordinates were automatically processed.
As described earlier in this document, C-TMS can be integrated with an online web service to automatically set the latitude and longitude values against a location.
Preferred Carriers
You can use this tab to set preferred carriers and the preference (priority).
This is required for some scheduling engine processes, in order to determine whether a route for a carrier can be used from this location.
Location Usage
You can maintain location usage here.
Location usage helps filter location data automatically depending on which customer or customer group your user has been configured to see.
Location usage can be by customer group or individual customer.
You can allocate location usage here by double-clicking on the location usage available section.
You can remove location usage here by double-clicking on the location usage allocated section.
You can also add or remove all location usage allocations by using the Add All and Remove All buttons.
Information
You can add notes against a location here.
Note types are set up in the Business Data Maintenance screen.
Network
You can view all point to point (network) distances and times from and to this location in this tab. These are used by the planning system to determine the time between stops, and are calculated automatically.
You can also delete, edit and add new network entries here.
MCS
You can maintain the configuration of your depot item scanning solution Calidus MCS here.
![]() Note: You can only configure MCS against locations of type "RDC".
Note: You can only configure MCS against locations of type "RDC".
The following flags may be configured:
- MCS Active - this flag controls whether C-MCS is used at this location.
- MCS Identifier - this is an identifier of the depot, used by MCS. This is displayed against items in receipt, so the user can see from which depot the items originated, to aid in unloading.
- Receipt Only - this flag controls whether the onward stops on this trip (and subsequent trips to the next RDC) are automatically debriefed with the time this stop is debriefed. If set, only the stop being receipted will be debriefed.
- Despatch Only - this flag controls whether the previous stops on this trip (and prior trips back to the previous RDC) are automatically debriefed with the time this stop is debriefed. If set, only the stop being despatched will be debriefed.
- Print Pallet Label - this flag controls whether pallets built through C-MCS at this location will use pre-printed stationary (when unchecked), or will print the label from C-MCS (when checked).
- Pallet Building validation - this flag controls the validation of pallets built through MCS. In all cases, pallets are retained until the pallet is received at the next depot location, whether this is an MCS-enabled location or not. Values are:
- "To Next RDC" - items built onto pallets at this location will be validated that they are all going to the same next depot location;
- "To Final RDC" - items built onto pallets at this location will be validated that they are all going to the same final delivery depot;
- "By Final RDC Trip" - items built onto pallets at this location will be validated that they are all being delivered on the same final delivery trip.
- Pallet Building Process - values are:
- "Continuous"
- "Single"
- Pallet Closure - this flag controls whether pallet closure is an option for the C-MCS mobile device users.
- Pallet Seal at Closure - this option controls whether Seal number will be prompted for at pallet closure. Seal numbers are stored against a pallet in the AWB/Cons reference.
- Trans-ship Enabled - this flag enables the Trans-Ship process at this location. Trans-ship processing will identify whether the item is planned out of this location on a trip and, if so, will show the user the trip and vehicle and ask them to confirm by entering the vehicle registration. For pallets on the received trip, all items on the pallet must be planned out on the same trip. Successfully trans-shipped items will be marked as despatched on the outbound trip. if any item is not planned out of this location, or not all items on a pallet are planned together, the system will inform the user that trans-ship can't be completed and the items must be despatched separately.
- Debrief Stop Times - this flag controls whether C-MCS loading or unloading will debrief the stop times at that location.
- Set Trip Status at Receipt - if checked, the system will attempt to automatically move the trip to COMPLETED status when it is completed in C-MCS.
- Set Trip Status at Despatch - if checked, the system will attempt to automatically move the trip onto the next applicable status when it is completed in C-MCS. For PLANNED or TENDERED trips, this will be ACCEPTED status. For ACCEPTED trips, this will be EN-ROUTE.
Fleet Inspection
![]() Note: This functionality affects only Vehicle Fleet Maintenance systems.
Note: This functionality affects only Vehicle Fleet Maintenance systems.
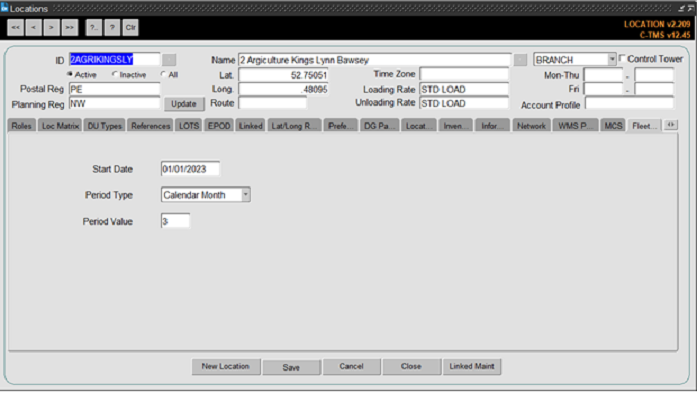
A customer's location's fleet of vehicles has a checking period. This could differ per customer location i.e. a hub depot might check once a month, a radial depot might check once every three months.
The period could differ for each location for the customer. So, a hub location (with a large number of vehicles that pass through and work regularly) might require checking more regularly than a small depot with minimal vehicles and lower runs.
The period for checking may be rolling or fixed. I.e. check 90% of vehicles in any 3-month period from any date or check 90% of vehicles between a fixed date range.
The Calidus systems will support a fixed period against the location only, consisting of:
- A start date.
- A period type, of the following values only:
- Calendar month.
- Days.
- A period value, consisting of a numeric entry.
For example, if the period value was 30 and the type was Days, if this was a fixed period that started 1st February (non-leap year), it would end 2nd March. The next period would begin 3rd March.
If the period was 1 calendar month fixed, that starts 1st February (non-leap year), it would end 28th February. The next period would begin 1st March and end 31st March.
The period start date and length will be determined when the inspection reports are run, determined by the date entered when the report is run.
Route Details
![]() Note: This is specific to the Fixed Drop Scheduling Engine.
Note: This is specific to the Fixed Drop Scheduling Engine.
You can maintain the route and drop number for this location on this tab. This defines which fixed routes the location is on, and what drop number it should be on. You can also specify whether the route/drop identified here is for use on bank holidays only.
Location Windows
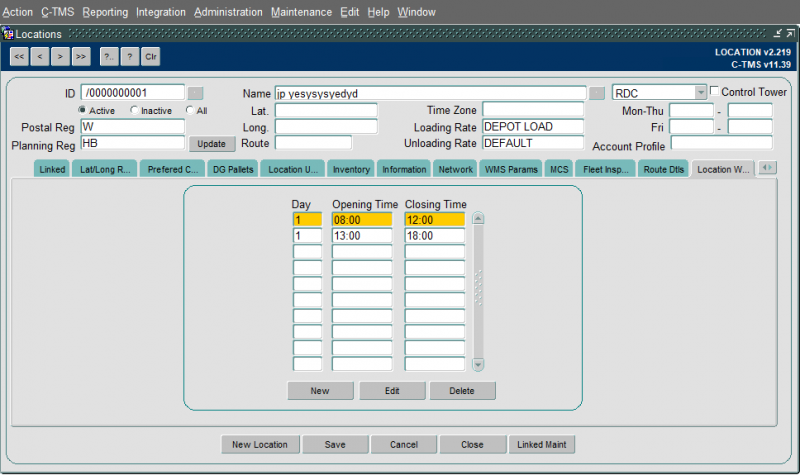
Location windows can be added or amended using the location windows tab.
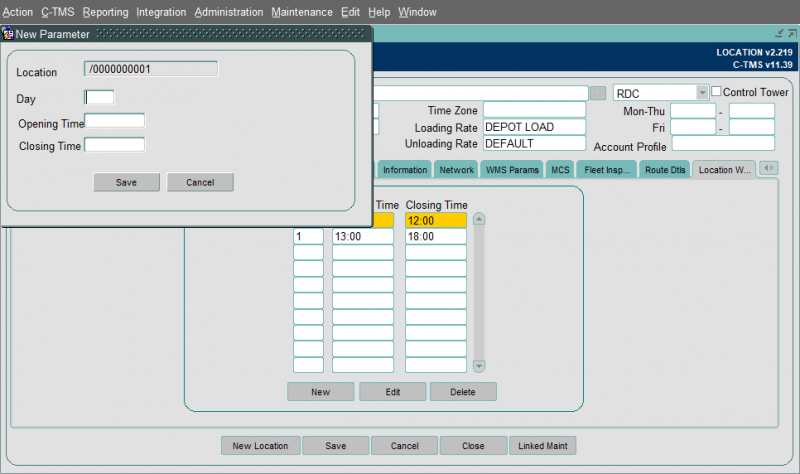
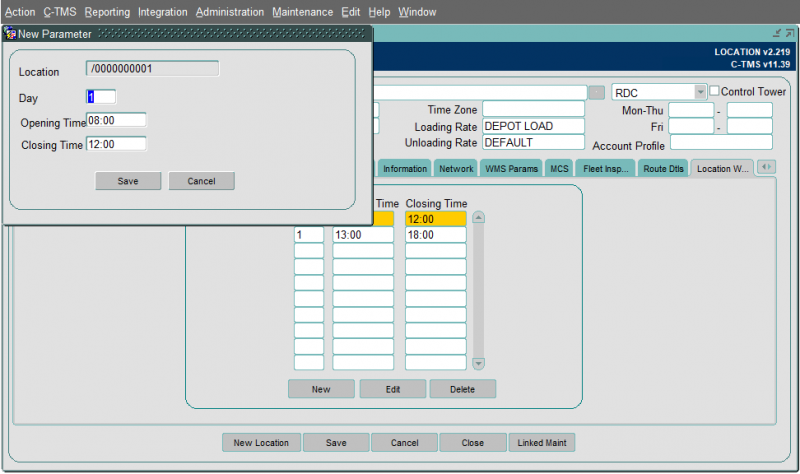
Windows can be Added by pressing the New button.
- Day must be be between 1 and 7.
- Both windows must be entered in a HH24:MI format.
- Duplicate values are not allowed.
- Windows must not overlap.
Windows can be edited by pressing the Edit button.
Edited records will be validated in the same way as new records.
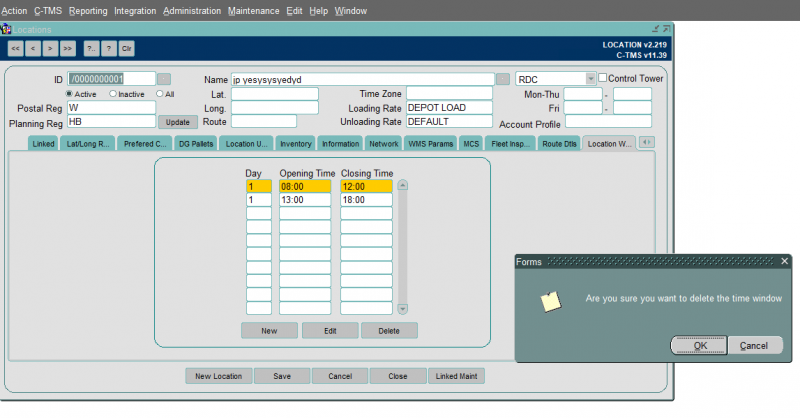
Windows can be removed by pressing the Delete button a confirmation message will be displayed to confirm the deletion.
Imports
Locations may also be created or modified through the customer onboarding interface, when adding orders (through EDI, imports or manual entry) or through Imports:
