New Order: Difference between revisions
No edit summary |
No edit summary |
||
| Line 91: | Line 91: | ||
A record of the reason for rebooking can be viewed in the non conformance tab of the rebooked order. | A record of the reason for rebooking can be viewed in the non conformance tab of the rebooked order. | ||
== Cross Docking == | |||
[[Crossdock]] or x-dock – means of delivering an Order via one or many additional locations. | |||
== Tips & Tricks == | |||
RPE stands for Regular Pallet Equivalent and provides a standard measure for comparing DU Type size and thus how much space a DU will take up on a Trailer. For example, a Standard Roll Pallet may equate to 1 RPE, a Large Board may equate to 2 RPEs. | |||
== Recent Changes == | == Recent Changes == | ||
Revision as of 16:33, 29 December 2008
Introduction
Orders, or Transport Instructions, can be created, modified, viewed and deleted from the Order Management module. This is invoked by selecting Orders from the main menu.
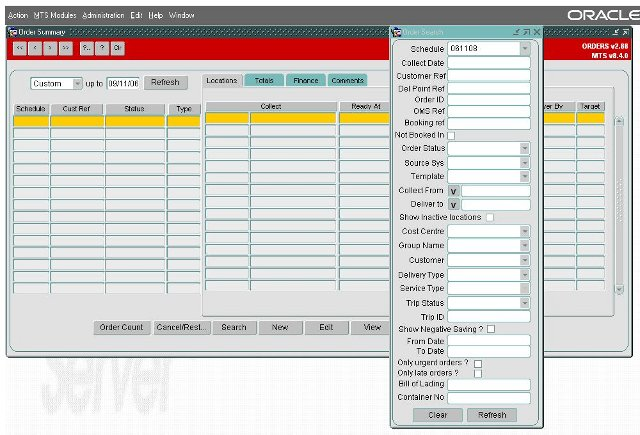
Upon selection the primary Order Summary screen will open accompanied with the “Order Search” screen:
The “Order Search” screen enables you to query orders by a variety of criteria that can be made as specific as required. For example, by purely entering the schedule date the query will extract all orders for that schedule currently within the MTS software. Once data has been entered or changed it is highlighted in red as are the “Refresh” buttons on both forms.
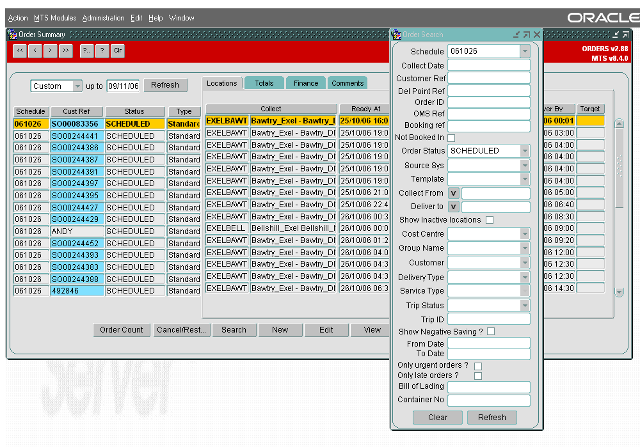
Clicking the “Refresh” button executes the query and populates the primary screen. An example of how these queries extract data is shown below where only those orders in a status of “SCHEDULED” on the schedule of “061026” are shown:
Once the Order Summary form has been populated the order(s) can be viewed and edited as required and also sorted by the column headers as required (this is done by clicking on the column header by which you wish to sort). Orders can also be cancelled from this screen by using the “Cancel/Restore” button with the benefit of them being able to be restored if required. The example shown below shows all orders for schedule “061108” which are in a status of “CANCELLED”:
Creating a new order
Click on the "New" button on the Order Summary screen to start entering a new order manually.
Order Details
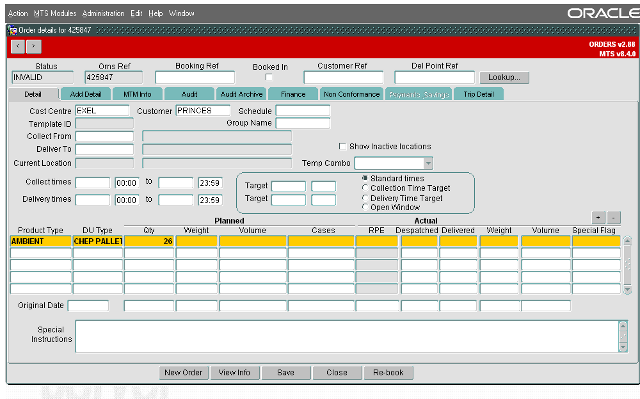
When creating a new order, once the “New” button has been pressed the “Order Details” form shown below will open :
In the example shown above the order has been partly populated by defaults set up against the user; the “Cost Centre”, “Customer”, “Product Type” and “Qty” have been predetermined. In the absence of defaults set against the user, defaults from the “System Parameters” will be used, although this will only apply to the “Cost Centre” and “Customer”. Each time a new order is created the “Oms Ref” is populated by default to the next numerically sequenced number and the status will default to “INVALID”. The “Cost Centre” and “Customer” fields must be populated and the “Schedule” field can be populated manually if the schedule already exists, however, if it does not exist this field should be left blank and the MTS software will calculate the schedule from the collection and delivery windows, attempting to enter a schedule that does not exist will result in a drop down menu of existing schedules being presented.
The required location should be selected either by double clicking with the mouse or by highlighting and left mouse clicking on the “OK” button. This will then populate the field on the “Order Details” form. The “Deliver To” location can be populated in the same way and then the time windows entered manually; date first and then time. Note that for orders driven by a delivery time the latest collection time should always be the same as the latest delivery time and for orders driven by the collection time the earliest delivery time should always be the same as the earliest collection time.
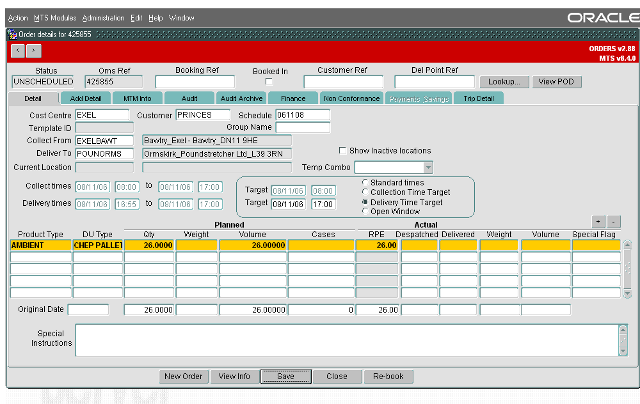
Rather than key in four dates and times there is also functionality that allows the time windows to be created either by the target collection or target delivery time. Select the “Delivery Time Target” option and this will grey out all of the fields apart from the “Target” fields to the left of it. Click “Save” and the collection and delivery windows will automatically be populated
You may see a validation message, which will generally be saying that the earliest collection time for the order is already in the past. This is a sense check and provided there is no issue with this click “OK”: The order time windows have now been populated by the pre-set values associated with the location types as shown in a later section. The “Collection Time Target” works in a similar way, by creating the windows from the Target collection time rather than delivery. You will notice that the order status has also changed to “UNSCHEDULED” as all of the required details have been entered and the “Schedule” has been automatically populated, it should be noted that this is calculated from the earliest collection date and time and therefore if an order crosses midnight you may need to check that the schedule is correct and as required. If the product type is not set up to populate automatically it can be selected in the same way as the other data but the “DU Type” will populate automatically with the default value associated with the product, this can be overtyped if required. “Weight”, “Volume” and “RPE” will be calculated automatically from defaults set against the product and DU types therefore only the “Qty” (Quantity) value needs to be entered. The totals for all lines is displayed at the bottom to prevent excessive volume being placed on a single order. The “Special Flag” field can be used to represent particular classes of order such as “Advance” or “Left Off”; this will be populated automatically if the “Booking Entry” form has been used to create the order.
Add Details Tab
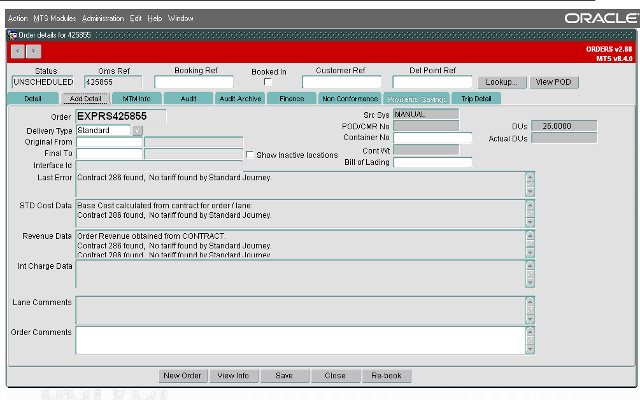
The second tab “Add Detail” of the order form allows extra details to be added if required:
The “Order” in this case “EXPRS425855” holds a number of pieces of information; the first two characters “EX” refer to the cost centre, the third and fourth characters “PR” refer to the customer and the fifth character “S” relates to the order “Delivery Type”, in this instance “Standard”. The “Delivery Type” is either specified against a user ID or from a “System Parameter”, it can also be changed manually but for it to impact on the “Order” it should be changed prior to the order being saved for the first time. “Booking Ref” , “Customer Ref”, and “Del Point Ref” can be added as required and are available regardless of which tab you have selected. The “Src Sys” shows the origin of the order, in this case “MANUAL” as the order has been create manually rather than from a Lane or Template etc. The “POD/CMR No” (Proof Of Delivery) is entered from the Order Tracking or Trip debrief form upon confirmation of delivery, “Container No” is a free text field to record container numbers and the “Cont Wt” or container weight is taken again from another field. “DUs” and “Actual DUs” is a simple measure of planned against actual and is taken from the information on the “Detail” tab. The “Last Error” field will display the last error, which occurred when saving the order, in this case it is a contract error linked to the way freight payment is configured. The “Lane Comments” is read only and is only populated when orders are created by Lane based order entry. The “Order Comments” field is a free text field to record any information not incorporated at this point.
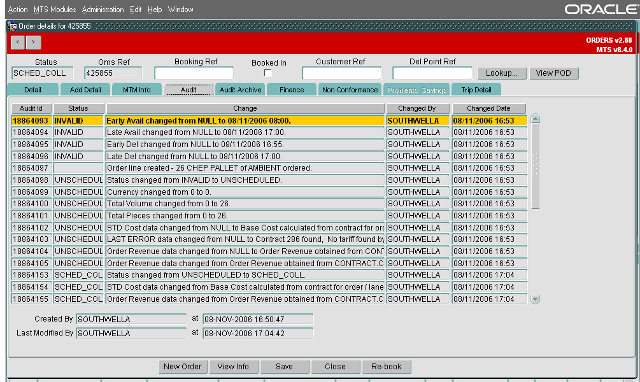
Audit Tab
The “Audit” tab details the original user that created the order along with the date and time of creation and also the last user to update or amend the order along with a history of changes made to the order. This tab maybe restricted by user:
Audit Archive Tab
The “Audit Archive” tab displays the information previously held in the “Audit” tab which has been deleted after a pre determined number of days. A system parameter setting determines for how many days the order audit information will be retained against the order. After this period has expired the data will be moved to the archive tab, for a further pre determined number of days.
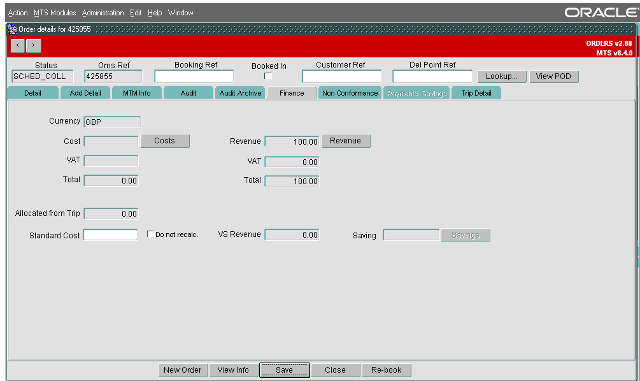
Finance Tab
The “Finance” tab displays information calculated from base data set up within the software as part of freight payment:
Generally either the “Cost” or the “Revenue” will be used, the “VAT” will be shown separately and then the “Total” displayed. The “Allocated from Trip” field will display costs that have been allocated from the trip on which the order is scheduled. The “Standard Cost” of the order is calculated either from a contract, from a value set against a lane or through “Combinations” which are linked to the lanes. By checking the “Do not recalc” box this value will be fixed. “VS Revenue” is calculated from the trip on which the order is scheduled and, if there are two or more orders on the trip, will be a proportion of the trip cost.
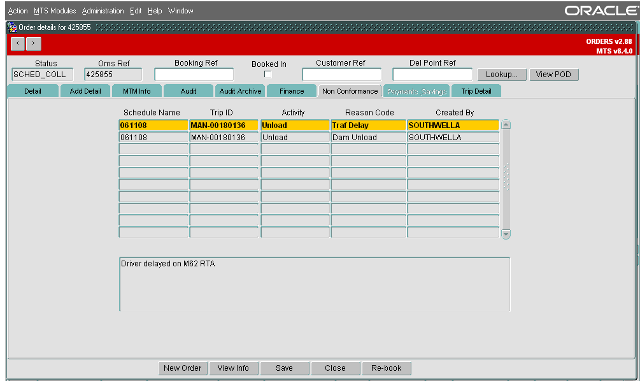
Non Conformance Tab
The “Non Conformance” tab details any non conformances associated with the order. These will generally be applied from the “Trip Debrief” form and will be reasons for early or late despatch or delivery, discrepancies etc. Non conformance is covered in the Debrief page.
Trip Detail Tab
The “Trip Detail” tab is a view only form. The order needs to be scheduled on to a trip for the fields to be populated. This gives the user an alternative way to view trip and find information.
Re-booking Orders
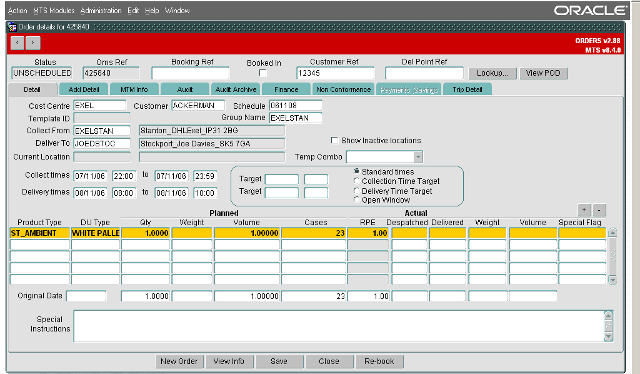
To Re book an order click on the re book button at the bottom of the order form:
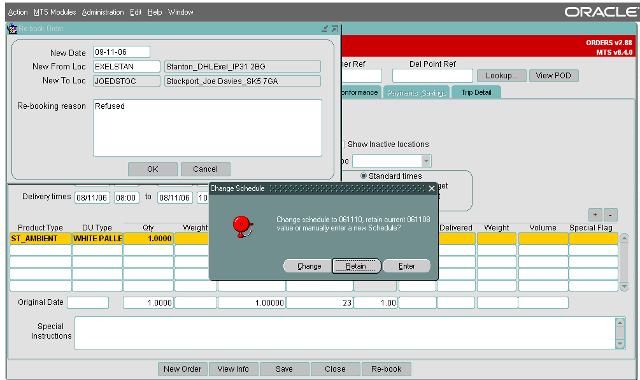
A pop window will appear, you will need to input the new delivery date and give a reason for re booking the order. Once the “New Date” and “Re booking reason” have been entered click “OK”. You will now be asked if you want to change the schedule to that of the earliest collection window of the rebooking, to retain the same schedule as the original order or enter a different schedule completely.
The re booked order is now created. Note _R1 will be added to the “Customer Ref” field, any re-books of this _R1 order will become _R2 etc.
Note: Orders that have no actuals against them will be set to a status of “aborted” and cannot be edited. If the order is on a trip then it will be removed, and the order status set to “aborted”, if it is the only order on the trip, then the trip will also be deleted.
If the order has actuals against it then the status of the order remains unchanged. The order will also remain on the trip.
A record of the reason for rebooking can be viewed in the non conformance tab of the rebooked order.
Cross Docking
Crossdock or x-dock – means of delivering an Order via one or many additional locations.
Tips & Tricks
RPE stands for Regular Pallet Equivalent and provides a standard measure for comparing DU Type size and thus how much space a DU will take up on a Trailer. For example, a Standard Roll Pallet may equate to 1 RPE, a Large Board may equate to 2 RPEs.
Recent Changes
Any changes made to Order Summary and Order Detail forms will be shown here:
