Finance Guide: Difference between revisions
(Initial Creation) |
m (Minor formatting change) |
||
| Line 11: | Line 11: | ||
Contracts functionality can be accessed by selecting the Contracts option from the Maintenance Menu as shown below. | Contracts functionality can be accessed by selecting the Contracts option from the Maintenance Menu as shown below. | ||
<gallery widths=600px heights= | <gallery widths=600px heights=300px perrow=1> | ||
Image:finance_contract_1.png|''Figure 1: Data Upload - Import screen.'' | Image:finance_contract_1.png|''Figure 1: Data Upload - Import screen.'' | ||
</gallery> | </gallery> | ||
| Line 45: | Line 45: | ||
# Select New Contract | # Select New Contract | ||
# Select the correct Cost Centre, Contract Type (Customer or Carrier/Haulier), Counter Party Name and fill in the Effective From date. Once this is complete click OK | # Select the correct Cost Centre, Contract Type (Customer or Carrier/Haulier), Counter Party Name and fill in the Effective From date. Once this is complete click OK | ||
<gallery widths=600px heights= | <gallery widths=600px heights=300px perrow=1> | ||
Image:finance_guide_2..png|''Figure 2'' | Image:finance_guide_2..png|''Figure 2'' | ||
</gallery> | </gallery> | ||
| Line 51: | Line 51: | ||
<li value="4">To create a new tariff right click on first empty line and select ADD TARIFF</li> | <li value="4">To create a new tariff right click on first empty line and select ADD TARIFF</li> | ||
# Tariff details box appears, select delivery type (Standard) and tier units (CTN) | # Tariff details box appears, select delivery type (Standard) and tier units (CTN) | ||
<gallery widths=600px heights= | <gallery widths=600px heights=300px perrow=1> | ||
Image:finance_guide_3..png|''Figure 3'' | Image:finance_guide_3..png|''Figure 3'' | ||
</gallery> | </gallery> | ||
| Line 57: | Line 57: | ||
# Continue this until all ranges are entered then press SAVE and then OK. | # Continue this until all ranges are entered then press SAVE and then OK. | ||
# Once the Charges have been set up, now the Standard Journey has to be set up. On the SJID pane, right click and then select Add Route. Refer Fig 4. | # Once the Charges have been set up, now the Standard Journey has to be set up. On the SJID pane, right click and then select Add Route. Refer Fig 4. | ||
<gallery widths=600px heights= | <gallery widths=600px heights=300px perrow=1> | ||
Image:finance_guide_4..png|''Figure 4: Use the "ctrl L" functionality to set the "from" and "to" fields as appropriate. The can be specific (individual locations) or more broad (country level).'' | Image:finance_guide_4..png|''Figure 4: Use the "ctrl L" functionality to set the "from" and "to" fields as appropriate. The can be specific (individual locations) or more broad (country level).'' | ||
</gallery> | </gallery> | ||
<li value="9"> The Route can be set up between a Location, Postal Region, Planning Region, Town or a Country to a Location, Postal Region, Planning Region, Suburb, Zone or a Country. Select the appropriate details of the route and click OK. </li> | <li value="9"> The Route can be set up between a Location, Postal Region, Planning Region, Town or a Country to a Location, Postal Region, Planning Region, Suburb, Zone or a Country. Select the appropriate details of the route and click OK. </li> | ||
<gallery widths=600px heights= | <gallery widths=600px heights=300px perrow=1> | ||
Image:finance_guide_5.png|''Figure 5'' | Image:finance_guide_5.png|''Figure 5'' | ||
</gallery> | </gallery> | ||
| Line 72: | Line 72: | ||
3. A list of contracts should appear, if no contracts appear then there is not a contract with those details | 3. A list of contracts should appear, if no contracts appear then there is not a contract with those details | ||
<gallery widths=600px heights= | <gallery widths=600px heights=300px perrow=1> | ||
Image:finance_guide_6.png|''Figure 6'' | Image:finance_guide_6.png|''Figure 6'' | ||
</gallery> | </gallery> | ||
| Line 84: | Line 84: | ||
3. At this point it is also possible to delete an individual tier or charge by again right clicking on the appropriate line. | 3. At this point it is also possible to delete an individual tier or charge by again right clicking on the appropriate line. | ||
<gallery widths=600px heights= | <gallery widths=600px heights=300px perrow=1> | ||
Image:finance_guide_7.png|''Figure 7'' | Image:finance_guide_7.png|''Figure 7'' | ||
</gallery> | </gallery> | ||
| Line 96: | Line 96: | ||
* Go to CTMS -> finance -> invoices | * Go to CTMS -> finance -> invoices | ||
<gallery widths=600px heights= | <gallery widths=600px heights=300px perrow=1> | ||
Image:finance_guide_8.png|''Figure 8'' | Image:finance_guide_8.png|''Figure 8'' | ||
</gallery> | </gallery> | ||
* It is possible to view the itemised breakdown of the invoice by double clicking into it and selecting "both" | * It is possible to view the itemised breakdown of the invoice by double clicking into it and selecting "both" | ||
<gallery widths=600px heights= | <gallery widths=600px heights=300px perrow=1> | ||
Image:finance_guide_9.png|''Figure 9'' | Image:finance_guide_9.png|''Figure 9'' | ||
</gallery> | </gallery> | ||
| Line 115: | Line 115: | ||
This is a configurable setting within TMS and can be amended in the accounts maintenance screen - located in Maintenance -> Finance Setup -> Accounts Maintenance | This is a configurable setting within TMS and can be amended in the accounts maintenance screen - located in Maintenance -> Finance Setup -> Accounts Maintenance | ||
<gallery widths=600px heights= | <gallery widths=600px heights=300px perrow=1> | ||
Image:finance_guide_10.png|''Figure 10'' | Image:finance_guide_10.png|''Figure 10'' | ||
</gallery> | </gallery> | ||
| Line 121: | Line 121: | ||
To amend the date range, select the "edit" option. The user can then amend the Invoice Period and the Day in the Period the invoices are created: | To amend the date range, select the "edit" option. The user can then amend the Invoice Period and the Day in the Period the invoices are created: | ||
<gallery widths=600px heights= | <gallery widths=600px heights=300px perrow=1> | ||
Image:finance_guide_11.png|''Figure 11'' | Image:finance_guide_11.png|''Figure 11'' | ||
</gallery> | </gallery> | ||
| Line 133: | Line 133: | ||
* Once reviewed, set the relevant invoice status from Draft to Approved - this is achieved by right clicking on the line, select "set status" and select "approved" | * Once reviewed, set the relevant invoice status from Draft to Approved - this is achieved by right clicking on the line, select "set status" and select "approved" | ||
* Select "Exports" | * Select "Exports" | ||
<gallery widths=600px heights= | <gallery widths=600px heights=300px perrow=1> | ||
Image:finance_guide_12.png|''Figure 12'' | Image:finance_guide_12.png|''Figure 12'' | ||
</gallery> | </gallery> | ||
* Select "generate export" | * Select "generate export" | ||
<gallery widths=600px heights= | <gallery widths=600px heights=300px perrow=1> | ||
Image:finance_guide_13.png|''Figure 13'' | Image:finance_guide_13.png|''Figure 13'' | ||
</gallery> | </gallery> | ||
| Line 144: | Line 144: | ||
* Select "OK" | * Select "OK" | ||
* User will see the screen below: | * User will see the screen below: | ||
<gallery widths=600px heights= | <gallery widths=600px heights=300px perrow=1> | ||
Image:finance_guide_14.png|''Figure 14'' | Image:finance_guide_14.png|''Figure 14'' | ||
</gallery> | </gallery> | ||
* Select "OK" | * Select "OK" | ||
<gallery widths=600px heights= | <gallery widths=600px heights=300px perrow=1> | ||
Image:finance_guide_15.png|''Figure 15'' | Image:finance_guide_15.png|''Figure 15'' | ||
</gallery> | </gallery> | ||
| Line 156: | Line 156: | ||
* The next stage is to select the "send export" button - this will set the status to "processed" | * The next stage is to select the "send export" button - this will set the status to "processed" | ||
* This is the trigger point that will send the invoice across. The invoice will display as "processed" - as below. | * This is the trigger point that will send the invoice across. The invoice will display as "processed" - as below. | ||
<gallery widths=600px heights= | <gallery widths=600px heights=300px perrow=1> | ||
Image:finance_guide_16.png|''Figure 16'' | Image:finance_guide_16.png|''Figure 16'' | ||
</gallery> | </gallery> | ||
| Line 171: | Line 171: | ||
The criteria below shows all revenue payments allowing the data to be totalled in CSV format. | The criteria below shows all revenue payments allowing the data to be totalled in CSV format. | ||
<gallery widths=600px heights= | <gallery widths=600px heights=300px perrow=1> | ||
Image:finance_guide_17.png|''Figure 17'' | Image:finance_guide_17.png|''Figure 17'' | ||
</gallery> | </gallery> | ||
| Line 183: | Line 183: | ||
There are various filters available for selection if you want to select specific payment charges, dates, debit accounts or credit accounts for example. | There are various filters available for selection if you want to select specific payment charges, dates, debit accounts or credit accounts for example. | ||
<gallery widths=600px heights= | <gallery widths=600px heights=300px perrow=1> | ||
Image:finance_guide_18.png|''Figure 18'' | Image:finance_guide_18.png|''Figure 18'' | ||
</gallery> | </gallery> | ||
* It is possible to amend the details of a line by highlighting the line, selecting "edit" and then overwriting the "amount" field followed by selecting the "save" option. | * It is possible to amend the details of a line by highlighting the line, selecting "edit" and then overwriting the "amount" field followed by selecting the "save" option. | ||
<gallery widths=600px heights= | <gallery widths=600px heights=300px perrow=1> | ||
Image:finance_guide_18B.png|''This amount can be adjusted up or down as required. '' | Image:finance_guide_18B.png|''This amount can be adjusted up or down as required. '' | ||
</gallery> | </gallery> | ||
| Line 195: | Line 195: | ||
* Drill into the relevant line by double clicking into it | * Drill into the relevant line by double clicking into it | ||
* Copy the "Order ref" number: | * Copy the "Order ref" number: | ||
<gallery widths=600px heights= | <gallery widths=600px heights=300px perrow=1> | ||
Image:finance_guide_19.png|''Figure 19'' | Image:finance_guide_19.png|''Figure 19'' | ||
</gallery> | </gallery> | ||
| Line 201: | Line 201: | ||
* Go to CTMS - Orders - Order Entry - input the order ref into the "customer ref" field and select "refresh". | * Go to CTMS - Orders - Order Entry - input the order ref into the "customer ref" field and select "refresh". | ||
* Note: the "event ref" can also be used - this relates to the OMS ref in the search field. | * Note: the "event ref" can also be used - this relates to the OMS ref in the search field. | ||
<gallery widths=600px heights= | <gallery widths=600px heights=300px perrow=1> | ||
Image:finance_guide_20.png|''Figure 20'' | Image:finance_guide_20.png|''Figure 20'' | ||
</gallery> | </gallery> | ||
* This will bring up the associated TMS order where the user can view the specific details: | * This will bring up the associated TMS order where the user can view the specific details: | ||
<gallery widths=600px heights= | <gallery widths=600px heights=300px perrow=1> | ||
Image:finance_guide_21.png|''Figure 21'' | Image:finance_guide_21.png|''Figure 21'' | ||
</gallery> | </gallery> | ||
| Line 214: | Line 214: | ||
* Go to CTMS -> finance -> invoices | * Go to CTMS -> finance -> invoices | ||
<gallery widths=600px heights= | <gallery widths=600px heights=300px perrow=1> | ||
Image:finance_guide_22.png|''Figure 22'' | Image:finance_guide_22.png|''Figure 22'' | ||
</gallery> | </gallery> | ||
* It is possible to view the itemised breakdown of the invoice by double clicking into it and selecting "both" | * It is possible to view the itemised breakdown of the invoice by double clicking into it and selecting "both" | ||
<gallery widths=600px heights= | <gallery widths=600px heights=300px perrow=1> | ||
Image:finance_guide_23.png|''Figure 23'' | Image:finance_guide_23.png|''Figure 23'' | ||
</gallery> | </gallery> | ||
| Line 230: | Line 230: | ||
New Invoice Creation: | New Invoice Creation: | ||
<gallery widths=600px heights= | <gallery widths=600px heights=300px perrow=1> | ||
Image:finance_guide_24.png|''Figure 24'' | Image:finance_guide_24.png|''Figure 24'' | ||
</gallery> | </gallery> | ||
Set the debit and credit accounts appropriately: | Set the debit and credit accounts appropriately: | ||
<gallery widths=600px heights= | <gallery widths=600px heights=300px perrow=1> | ||
Image:finance_guide_25.png|''Figure 25'' | Image:finance_guide_25.png|''Figure 25'' | ||
</gallery> | </gallery> | ||
| Line 247: | Line 247: | ||
* Right click and select print -> invoice | * Right click and select print -> invoice | ||
* Note: You can send the Invoice to a CSV Spreadsheet format by Right click and select Export Invoice. | * Note: You can send the Invoice to a CSV Spreadsheet format by Right click and select Export Invoice. | ||
<gallery widths=600px heights= | <gallery widths=600px heights=300px perrow=1> | ||
Image:finance_guide_26.png|''Figure 26'' | Image:finance_guide_26.png|''Figure 26'' | ||
</gallery> | </gallery> | ||
* Select "Print" | * Select "Print" | ||
<gallery widths=600px heights= | <gallery widths=600px heights=300px perrow=1> | ||
Image:finance_guide_27.png|''Figure 27'' | Image:finance_guide_27.png|''Figure 27'' | ||
</gallery> | </gallery> | ||
* An example output is illustrated below: | * An example output is illustrated below: | ||
<gallery widths=600px heights= | <gallery widths=600px heights=300px perrow=1> | ||
Image:finance_guide_28.png|''Figure 28'' | Image:finance_guide_28.png|''Figure 28'' | ||
</gallery> | </gallery> | ||
An itemised breakdown of the associated invoice is also displayed: | An itemised breakdown of the associated invoice is also displayed: | ||
<gallery widths=600px heights= | <gallery widths=600px heights=300px perrow=1> | ||
Image:finance_guide_29.png|''Figure 29'' | Image:finance_guide_29.png|''Figure 29'' | ||
</gallery> | </gallery> | ||
| Line 272: | Line 272: | ||
Set the appropriate currency: | Set the appropriate currency: | ||
<gallery widths=600px heights= | <gallery widths=600px heights=300px perrow=1> | ||
Image:finance_guide_30.png|''Figure 30'' | Image:finance_guide_30.png|''Figure 30'' | ||
</gallery> | </gallery> | ||
In the Currency Usage tab, set the customer, cost centre and customer group as having the appropriate currency: | In the Currency Usage tab, set the customer, cost centre and customer group as having the appropriate currency: | ||
<gallery widths=600px heights= | <gallery widths=600px heights=300px perrow=1> | ||
Image:finance_guide_31.png|''Figure 31'' | Image:finance_guide_31.png|''Figure 31'' | ||
</gallery> | </gallery> | ||
| Line 284: | Line 284: | ||
== Setting VAT rates == | == Setting VAT rates == | ||
VAT rates are reflected in individual payment lines: | VAT rates are reflected in individual payment lines: | ||
<gallery widths=600px heights= | <gallery widths=600px heights=300px perrow=1> | ||
Image:finance_guide_21.png|''Figure 32'' | Image:finance_guide_21.png|''Figure 32'' | ||
Image:finance_guide_21.png|''Figure 33'' | Image:finance_guide_21.png|''Figure 33'' | ||
| Line 292: | Line 292: | ||
Set the appropriate VAT code: | Set the appropriate VAT code: | ||
<gallery widths=600px heights= | <gallery widths=600px heights=300px perrow=1> | ||
Image:finance_guide_34.png|''Figure 34'' | Image:finance_guide_34.png|''Figure 34'' | ||
</gallery> | </gallery> | ||
| Line 299: | Line 299: | ||
In the example of GB, set the VAT rate and effective date as illustrated below: | In the example of GB, set the VAT rate and effective date as illustrated below: | ||
<gallery widths=600px heights= | <gallery widths=600px heights=300px perrow=1> | ||
Image:finance_guide_35.png|''Figure 35'' | Image:finance_guide_35.png|''Figure 35'' | ||
</gallery> | </gallery> | ||
The customer setup links to the country code which links to the VAT rate. | The customer setup links to the country code which links to the VAT rate. | ||
Revision as of 17:35, 28 July 2023
INTRODUCTION
This document is intended as a top level guide to explain CTMS finance, accounts setup, invoicing rules, rating logic, manual overrides and the associated outputs.
CONTRACT GUIDE
Contract Explanation
"Contracts" are used to store a set of rates agreed between a "Cost Centre" and a "Customer", or between "Cost Centre" and a "Carrier". Contracts and their associated tariffs and tiers ensure that correct revenues are captured within C-TMS as well as the associated costs to the business.
Contract Setup
Contracts functionality can be accessed by selecting the Contracts option from the Maintenance Menu as shown below.

Figure 1: Data Upload - Import screen.

In any contract, two parties are involved. For trip rates, the agreement is between a Cost Centre and a Carrier, whereas for Order rates the agreement is between a Cost Centre and a Customer.
In order to maintain Contracts in C-TMS, it is important to understand the following concepts:
- The CONTRACT is an agreement between the Cost Centre and Customer (for orders) or Carrier (for trips), and consists of a collection of TARIFF’S.
- The TARIFF is a set of charges applicable to a certain 'job', or type of work. The tariff is usually identified by a journey, either by defining the collection and delivery locations.
- Each TARIFF consists of a number of TIERS, to enable different charges to be levied for different amounts. TIERS can be tailored to the specific requirements of the customer. Typical examples can include charges by weight, number of pallets, fixed cost per trip, time, distance or demurrage. Capping rates can be applied to the tiers up to a specified amount - i.e. charge "X" incrementally until "Y" amount is reached. It is also possible to incrementally increase the charge rates in line with customer requirements - i.e. charge of "X" for a set number of miles/pallets and then charge "Y" thereafter. Capping rates ensure that set amounts are not exceeded and allow for pro rata charging in relation to what was ordered. Demurraged relates to waiting time outside of an agreed time window and can be set to charge at a set rate per minute, hour or 15 minute increments (or any other variation) as required by the customer.
- A CHARGE is an amount levied for a particular unit of work, e.g. "per weight", "per KG", "number of units" etc. These charges will be added together to calculate the total cost of a particular ORDER or TRIP (but if less than the MINIMUM for the TIER, then the MINIMUM will apply, and if greater than the MAXIMUM, then the MAXIMUM will apply).
- A STANDARD JOURNEY is defined by a FROM and TO region, and a number of STANDARD JOURNEYS may be associated with a given TARIFF in order for C-TMS to work out which TARIFF to use for a particular ORDER or TRIP. Note that it is not necessary to set up STANDARD JOURNEYS for ORDER BASE RATES if the tariff is to be determined directly from the LANE.
How C-TMS Uses Contracts to apply charges to an ORDER or TRIP
When C-TMS calculates the amount of money to be levied against an ORDER or TRIP, it collects the set of parameters for which charges may be applied, such as
- Type of delivery
- Quantity
- Weight
Next, it looks for the contract, using the COST CENTRE and CUSTOMER on the order, or the COST CENTRE and CARRIER on the trip, in conjunction with the DELIVERY DATE, so that it can find the contract which was in force at the date of delivery.
Having found the contract, it then needs to find the appropriate TARIFF to apply, either by finding the TARIFF with the same name as the LANE on the ORDER, or by looking at the STANDARD JOURNEYS.
Once the TARIFF has been found, the correct TIER is established, by picking the lowest tier whose LIMIT is the same or greater than the ORDER or TRIP being considered.
Once the TIER has been found, it applies each of the CHARGES in turn, to arrive at the total charge for the ORDER or TRIP, then compares this with the MINIMUM or MAXIMUM for the TIER (if specified).
Adding a New Contract
- In TMS, select MAINTENANCE, then CONTRACTS.
- Select New Contract
- Select the correct Cost Centre, Contract Type (Customer or Carrier/Haulier), Counter Party Name and fill in the Effective From date. Once this is complete click OK

Figure 2

- Tariff details box appears, select delivery type (Standard) and tier units (CTN)
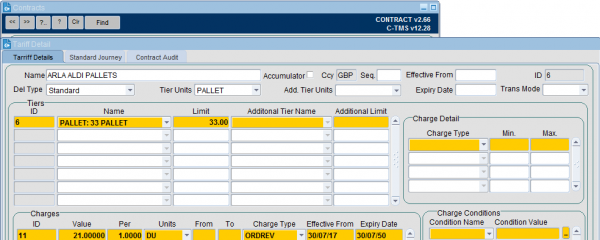
Figure 3

- Continue this until all ranges are entered then press SAVE and then OK.
- Once the Charges have been set up, now the Standard Journey has to be set up. On the SJID pane, right click and then select Add Route. Refer Fig 4.
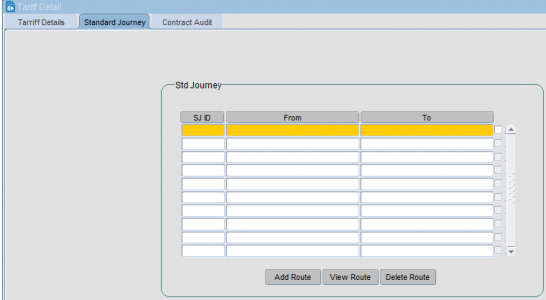
Figure 4: Use the "ctrl L" functionality to set the "from" and "to" fields as appropriate. The can be specific (individual locations) or more broad (country level).

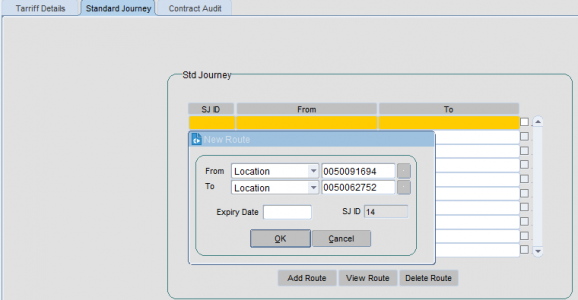
Figure 5

How to Find a Contract
1. To find a contract which is already in the system, select the COST CENTRE from drop down box
2. Select the correct COUNTER PARTY (Customer or Carrier) from drop down box
3. A list of contracts should appear, if no contracts appear then there is not a contract with those details
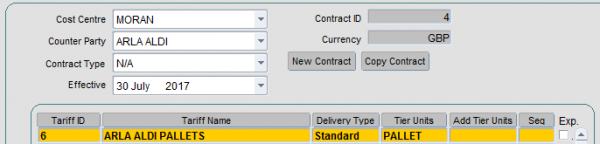
Figure 6

Editing Pallet Tariff / Rates
1. It is possible to edit the tariff by simply double clicking on the appropriate Lane ID or right clicking on the appropriate Lane ID, then selecting Edit Tariff.
2. The TARIFF DETAILS box will appear again.
3. At this point it is also possible to delete an individual tier or charge by again right clicking on the appropriate line.

Figure 7

INVOICING
View invoice details
TMS has functionality that allows the user to cumulate all payment lines within a selected date range and place onto an invoice. Invoices comprise of payment lines where each payment line will contain details of the specific order.
To access the invoices screen:
- Go to CTMS -> finance -> invoices

Figure 8

- It is possible to view the itemised breakdown of the invoice by double clicking into it and selecting "both"

Figure 9

Invoice Date Ranges
Invoices can be set to be generated on a set frequency as required by the customer - example below:
From: Sunday 00:00
To: Saturday 23:59.
This is a configurable setting within TMS and can be amended in the accounts maintenance screen - located in Maintenance -> Finance Setup -> Accounts Maintenance
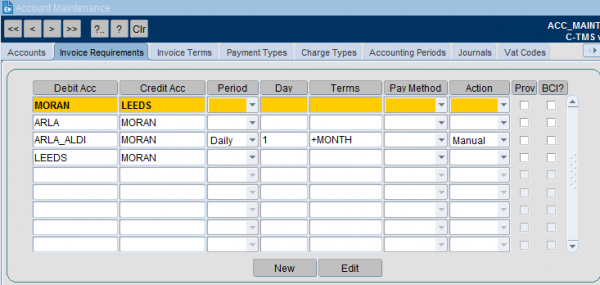
Figure 10

To amend the date range, select the "edit" option. The user can then amend the Invoice Period and the Day in the Period the invoices are created:
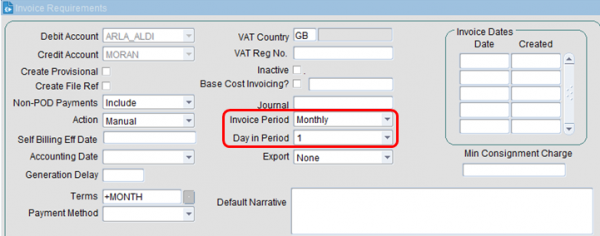
Figure 11

To send an invoice to a customer
Once an invoice has been reviewed, it can be approved and sent across to the customer in the following way:
- Highlight the invoice to be sent
- Once reviewed, set the relevant invoice status from Draft to Approved - this is achieved by right clicking on the line, select "set status" and select "approved"
- Select "Exports"
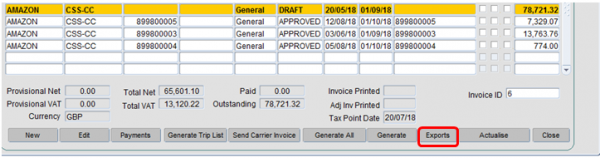
Figure 12

- Select "generate export"
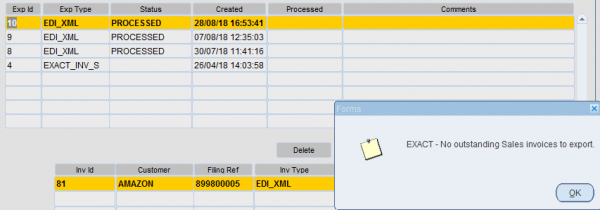
Figure 13

- Select "OK"
- User will see the screen below:
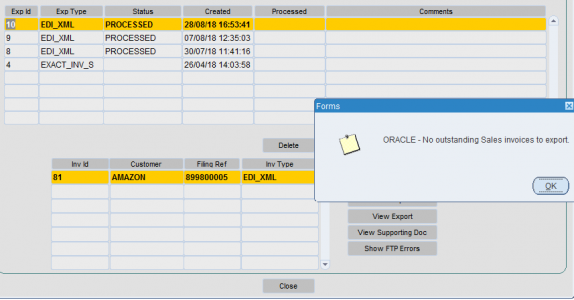
Figure 14

- Select "OK"
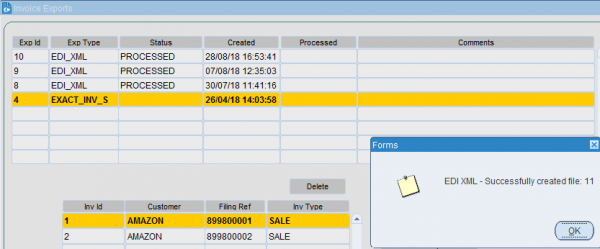
Figure 15

- User will then see the "successfully created file" message as above.
- The next stage is to select the "send export" button - this will set the status to "processed"
- This is the trigger point that will send the invoice across. The invoice will display as "processed" - as below.
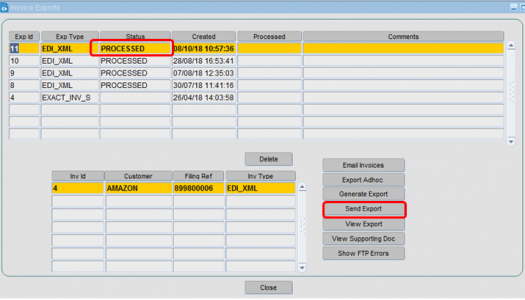
Figure 16

- Note - there is specific setup required beforehand to ensure that the relevant customer will receive the invoice in the required format.
Profit & Loss
The oracle report suite (Reporting -> Extract Suite) allows data to be extracted into CSV. A Profit and Loss report can be created. Once created, this can be run daily, weekly or monthly and will show all inbound and outbound payments within a specific time frame.
By amending the Credit account, the user can extract costs and then revenue separately. The criteria below shows all revenue payments allowing the data to be totalled in CSV format.
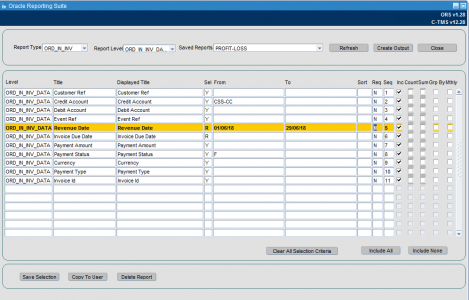
Figure 17

Review and Amend Payment Lines
To View all payment details, go to CTMS -> Finance -> Payments: Note: selecting "Both" all finance related lines will be displayed (both costs and revenues).
There are various filters available for selection if you want to select specific payment charges, dates, debit accounts or credit accounts for example.
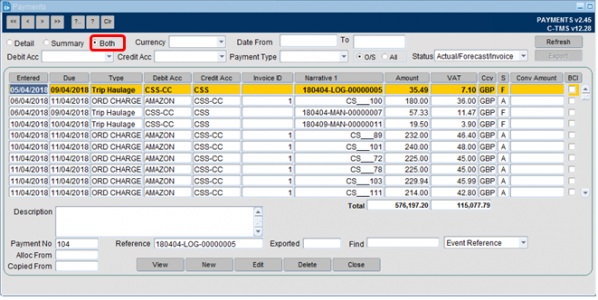
Figure 18

- It is possible to amend the details of a line by highlighting the line, selecting "edit" and then overwriting the "amount" field followed by selecting the "save" option.
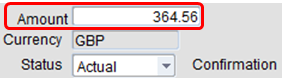
This amount can be adjusted up or down as required.

To determine the trip a specific line relates to:
- Drill into the relevant line by double clicking into it
- Copy the "Order ref" number:
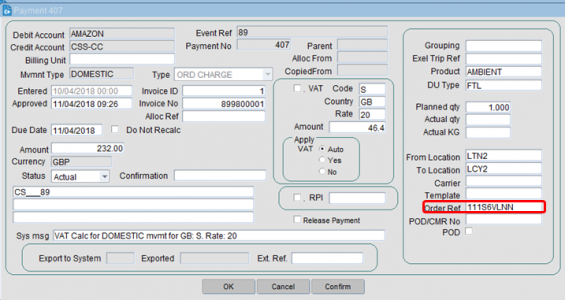
Figure 19

- Go to CTMS - Orders - Order Entry - input the order ref into the "customer ref" field and select "refresh".
- Note: the "event ref" can also be used - this relates to the OMS ref in the search field.
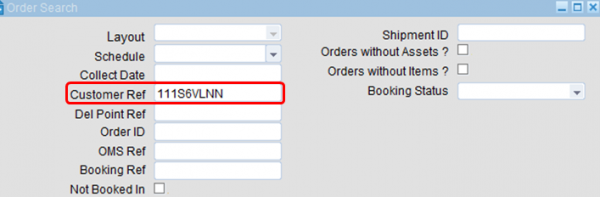
Figure 20

- This will bring up the associated TMS order where the user can view the specific details:

Figure 21

View invoice details
- Go to CTMS -> finance -> invoices
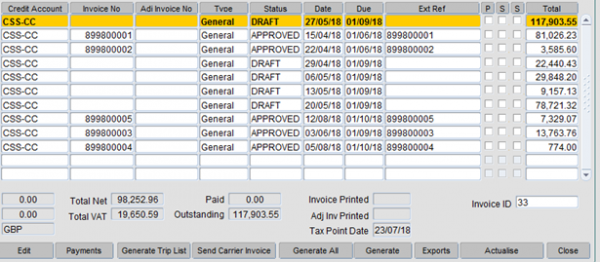
Figure 22

- It is possible to view the itemised breakdown of the invoice by double clicking into it and selecting "both"
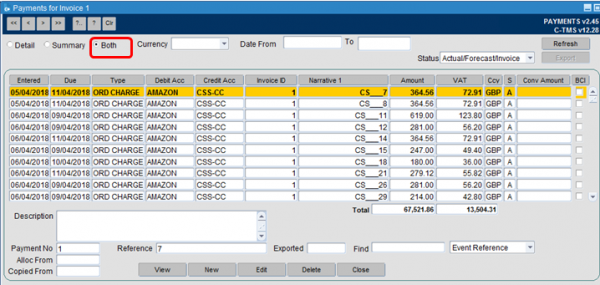
Figure 23

Invoice Generation and Printing
- To generate a new invoice for a new date range, select CTMS -> Finance -> Invoices -> followed by "generate"
- Payment Lines can only be assigned to invoices in a status of "Draft"
- Once a previous invoice has been reviewed and all relevant payment lines are included, the status should be changed to "approved" as part of the exporting to customer Process
New Invoice Creation:
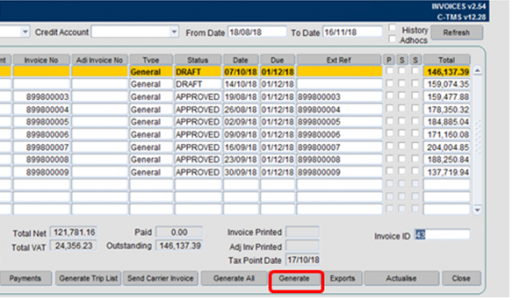
Figure 24

Set the debit and credit accounts appropriately:
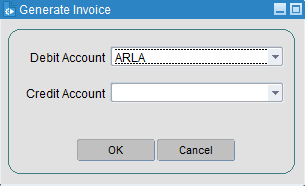
Figure 25

- This invoice will then appear in the invoices screen with a status of "Draft". All relevant payment lines in a status of "A" (Actualised) will automatically be added to the invoice.
Printing of an Invoice
To print of an Invoice to review or to keep a manual copy within CTMS -> Finance -> Invoices:
- Highlight the associated invoice
- Right click and select print -> invoice
- Note: You can send the Invoice to a CSV Spreadsheet format by Right click and select Export Invoice.

Figure 26

- Select "Print"
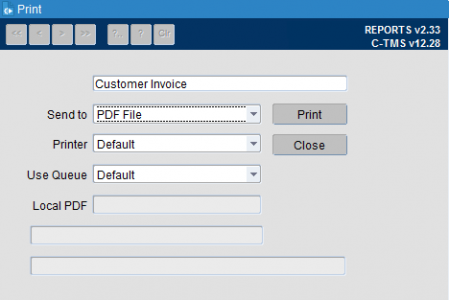
Figure 27

- An example output is illustrated below:
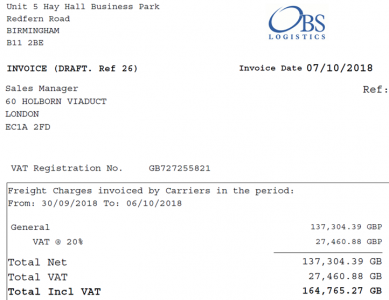
Figure 28

An itemised breakdown of the associated invoice is also displayed:
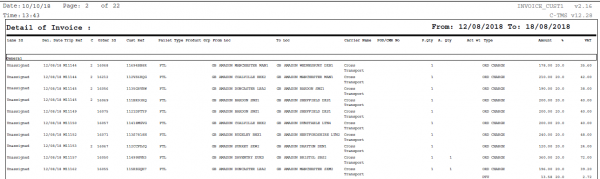
Figure 29

Currency Setup
To add a currency in TMS, go to: Maintenance - Finance Setup - Accounts Maintenance - Currency:
Set the appropriate currency:

Figure 30

In the Currency Usage tab, set the customer, cost centre and customer group as having the appropriate currency:
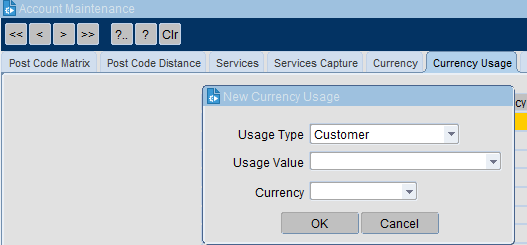
Figure 31

Setting VAT rates
VAT rates are reflected in individual payment lines:
Figure 32
Figure 33
To set the appropriate VAT rate, go to Maintenance - Finance - Accounts Maintenance - VAT Codes
Set the appropriate VAT code:

Figure 34

Set the VAT code for the appropriate country. This is found in Maintenance - Geographical Setup - Countries:
In the example of GB, set the VAT rate and effective date as illustrated below:
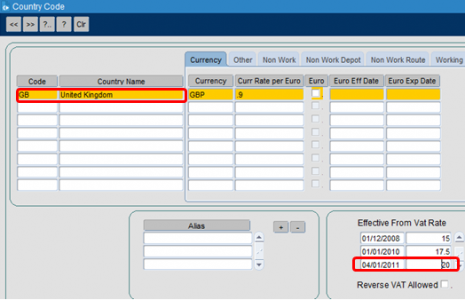
Figure 35

The customer setup links to the country code which links to the VAT rate.