Finance Guide
INTRODUCTION
This document is intended as a top level guide to explain CTMS finance, accounts setup, invoicing rules, rating logic, manual overrides and the associated outputs.
CONTRACTS
The Contracts module is used to calculate the payment and revenue relating to an order for a cost centre and a counter party. A counter party could be any entity who has a financial relationship with a cost centre. However, for the purpose of this document we will consider carriers and customers to be relevant counter parties. If a contract is set up between a cost centre and a customer then the contract will be used to calculate the revenue that the cost centre can expect to receive from the customer in respect of orders placed by that customer. If a contract is set up between a cost centre and a carrier then the contract will be used to calculate the payments that the cost centre must make to the carrier in respect of trips that the carrier has undertaken for that cost centre (in order to deliver the orders placed by a customer).
Definitions
In order to maintain Contracts in C-TMS, it is important to understand the following concepts:
- The CONTRACT is an agreement between the Cost Centre and Customer (for orders) or Carrier (for trips), and consists of a collection of TARIFFS.
- The TARIFF is a set of charges applicable to a certain 'job', or type of work. The tariff is usually identified by a journey, either by defining the collection and delivery locations.
- Each TARIFF consists of a number of TIERS, to enable different charges to be levied for different amounts. TIERS can be tailored to the specific requirements of the customer. Typical examples can include charges by weight, number of pallets, fixed cost per trip, time, distance or demurrage. Capping rates can be applied to the tiers up to a specified amount - i.e. charge "X" incrementally until "Y" amount is reached. It is also possible to incrementally increase the charge rates in line with customer requirements - i.e. charge of "X" for a set number of miles/pallets and then charge "Y" thereafter. Capping rates ensure that set amounts are not exceeded and allow for pro rata charging in relation to what was ordered. Demurraged relates to waiting time outside of an agreed time window and can be set to charge at a set rate per minute, hour or 15 minute increments (or any other variation) as required by the customer.
- A CHARGE is an amount levied for a particular unit of work, e.g. "per weight", "per KG", "number of units" etc. These charges will be added together to calculate the total cost of a particular ORDER or TRIP (but if less than the MINIMUM for the TIER, then the MINIMUM will apply, and if greater than the MAXIMUM, then the MAXIMUM will apply).
- A STANDARD JOURNEY is defined by a FROM and TO region, and a number of STANDARD JOURNEYS may be associated with a given TARIFF in order for C-TMS to work out which TARIFF to use for a particular ORDER or TRIP. Note that it is not necessary to set up STANDARD JOURNEYS for ORDER BASE RATES if the tariff is to be determined directly from the LANE.
- CONDITIONS allow charges to be applied in specific circumstances and allow multiple charges to be defined for the same charging tier. Examples of Conditions include Perishable, weight, refrigerated and Trailer types.
Each contract is defined in a particular currency (C-TMS will allow a user to configure which currencies are in use for a particular database), all payments relating to that contract will then be created in that currency. The currency will also be allocated to Invoices, Trips and Orders. C-TMS will not allow payments in different currencies to be applied to the same Invoice.
Therefore, cost centres receive monies from customers for the orders that they place within the C-TMS system and carriers receive monies from cost centres in respect of trips they have undertaken to deliver the orders that customers have placed.
Given that contracts involve several parties i.e. cost centres, customers and carriers it is worth noting that data maintenance forms are available within C-TMS that allow an operation to define the parties that it will use within a contract and elsewhere in the system too.
The contracts module uses a number of different items to find out how much the payment or revenue should be for a particular order. The mechanism it uses for identifying this value is described below.
- Identify the contract being used based on the cost centre and the counter party.
- Identify the journey that is taking place for the order (can be identified as being the location id, town, postal region or country).
- Identify the tariff that exists for that journey OR identify the tariff using a lane_ID (if lanes being used).
- Identify which tariff tier should be used based on either the weight of the order, the number of RPEs associated with the order or the number of pallets associated with the order.
- Identity which charge conditions and therefore, charges should be used. Add up all of the charges that relate to this contract, journey, tariff and tier and charge condition.
- Identify the minimum and maximum charge for the tariff if the total of all the charges fall between this value then charge the derived value, if it falls below the minimum then charge the minimum if it falls above the maximum then charge the maximum.
How C-TMS Uses Contracts to apply charges to an ORDER or TRIP
When C-TMS calculates the amount of money to be levied against an ORDER or TRIP, it collects the set of parameters for which charges may be applied, such as:
- Type of delivery (Standard, Return, etc)
- Number of Pallets.
- Weight.
- Distance.
- Package Quantities.
- Time.
Next, it looks for the contract, using the COST CENTRE and CUSTOMER on the order, or the COST CENTRE and CARRIER on the trip, in conjunction with the DELIVERY DATE, so that it can find the contract which was in force at the date of delivery.
Having found the contract, it then needs to find the appropriate TARIFF to apply, either by finding the TARIFF with the same name as the LANE on the ORDER, or by looking at the STANDARD JOURNEYS.
Once the TARIFF has been found, the correct TIER is established, by picking the lowest tier whose LIMIT is the same or greater than the ORDER or TRIP being considered.
Once the TIER has been found, it applies each of the CHARGES in turn, to arrive at the total charge for the ORDER or TRIP, then compares this with the MINIMUM or MAXIMUM for the TIER (if specified).
The charges that apply to tariff tiers are calculated differently depending upon the type of charge and the value for that tariff charge. The different types of charge and the way that they are calculated are as follows:
- Weight: calculates the charge based on the weight of the order based on the following: weight of the order divided by the weight per unit charge (rounded up) multiplied by the value for the tariff. Therefore, if the value for the tariff was 100 and an order has a weight of 7250KG and the weight per unit charge was 1000 (because you wanted to charge per tonne) you would have a value of 7.25 (7250/1000) which would be 8 (rounded up) multiplied by a value of 100 i.e. £100 per tonne would give you a payment of £800.
- Pallet: calculates the charge as the number of pallets for the order multiplied by the value.
- Unit: calculates the charge as the number of pieces for the order multiplied by the value.
- RPE: calculates the charge as the number of RPEs for the order multiplied by the value.
Note that more than one charge can be defined for each tier, for example a fixed charge, a pallet charge and a weight charge could be entered which will create a single combined payment for those orders using that charge type. However, the final charge that is applied to the trip/order/base cost will always fall between the minimum and maximum values for that particular tier.
As well as multi charge conditions on a charge, conditions can be applied to a tariff condition can be applied. This is achieved by declaring an "Additional Tier Unit" and populating the "Additional Tier Name" and the "Additional Limit" columns. For example, if Additional Tier Unit is populated with "Weight" and the Additional Tier Name is "800 Weight" and the "Additional Limit" is 800.00 for tier 33, then, an extra check is made to ensure that the weight or an order does not exceed 800, if not, then the process continues as normal, using the charges on the contract. On the other hand, if the weight of the order exceeds 800.00, then, the process will try to find another contract with weights and endeavour to calculate the charges accordingly. If an alternative contract is not found, then an error message is displayed.
Revenue Calculation
The basis by which payments and revenue are calculated by C-TMS are defined as charges. A tariff is given a name, ideally, the name of the name of a lane and or a to and from location can be assigned to the tariff. Within the tariff, a number of tiers can be set up, and within each tier a number of charges can be assigned. Charges are dependant upon the payment types that are in the system.
For each charge set up, a unit type and a Charge type MUST be assigned. There are a number of units, which are currently available. These are:
- Fixed.
- Pallet.
- RPE.
- Weight.
The diagram below illustrates a contract between the cost centre EXEL_EMT and the customer JOULIE_F and is effective from 3rd August 2003. The tariff L-KF034-F represents a suite of charges for any Trips going to and from location KF134-F and UB187-F (These locations are found on the Standard Journey tab).
Contracts
The Contracts screen can be used to set up new contracts and tariffs, and find and edit existing contracts and tariffs.
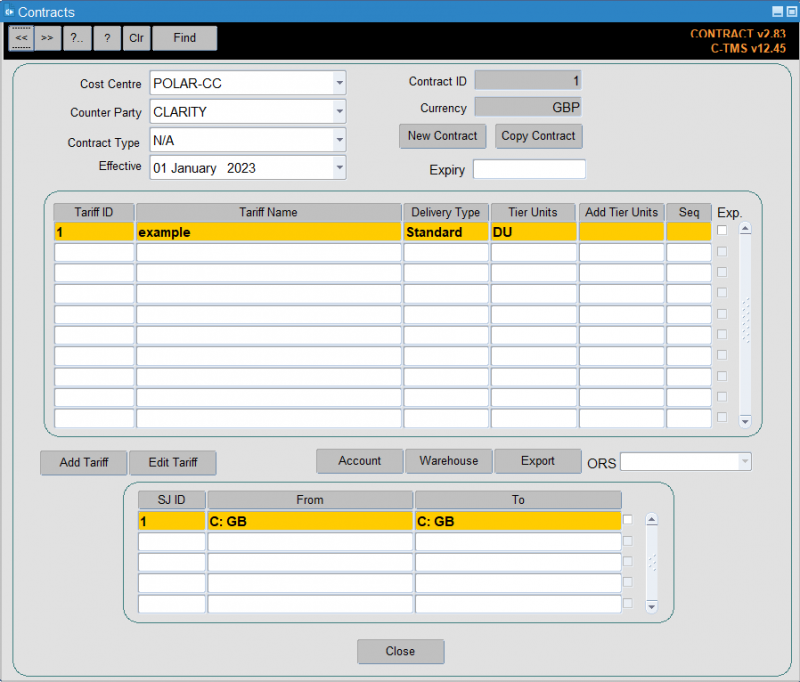
The screen is accessed from the menu C-TMS Modules, Maintenance, Contracts.
Adding a new Contract
You can create a contract between the cost centre and a counter party by clicking the New Contract button.
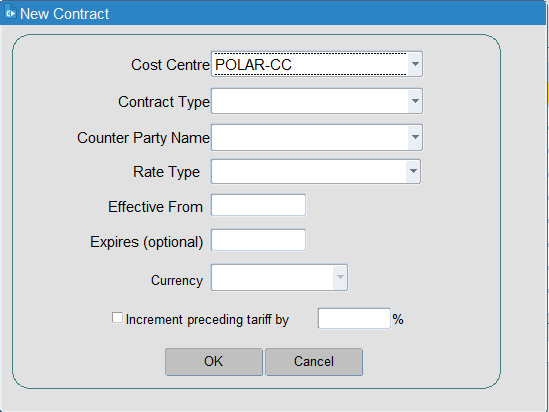
You will be prompted for:
- Cost Centre - this will default to your cost centre
- Contract type - one of Customer, Customer Group, Carrier/Haulier, Internal, Party
- Counter Party Name - the counter party of the type selected above - you can use a lookup to see all available values.
- Rate Type - one of N/A (the default), Radial or Trunk.
- Effective from - the date effective from
- Expires (optional)
- Currency - a shared currency between the two parties - use the drop-down list to select.
If you already have a tariff for this customer, you can also choose to increment any previous tariff by a percentage.
Click OK to create the contract, or Cancel to discard your new contract.
You can find existing contracts in this screen by using the 4 drop-downs in the top left:
- Select the cost centre from the drop-down list.
- Select the counter party from the drop-down list - only counter parties with contracts will be seen.
- If a contract is found, the details will be displayed. If multiple contracts are found, you can use the Contract Type and Effective drop-down lists to select the other contracts.
You can copy an existing contract you have found to create a new contract by clicking the Copy Contract button.
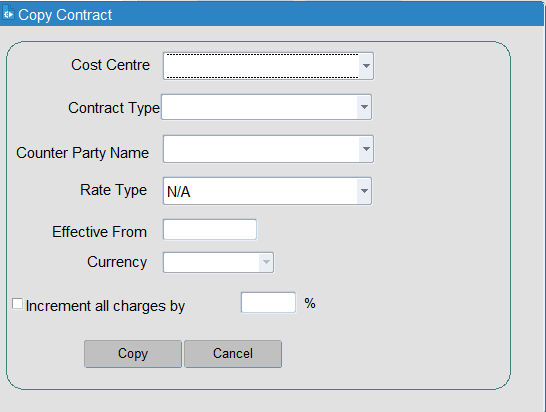
You will be prompted for:
- Cost Centre - this will default to your cost centre
- Contract type - one of Customer, Customer Group, Carrier/Haulier, Internal, Party
- Counter Party Name - the counter party of the type selected above - you can use a lookup to see all available values.
- Rate Type - one of N/A (the default), Radial or Trunk.
- Effective from - the date effective from
- Expires (optional)
- Currency - a shared currency between the two parties - use the drop-down list to select.
You can also choose to increment all charges on the contract being copied by a percentage.
Click OK to create the contract, or Cancel to discard your new contract.
Whether created, copied or found, the screen will display the tariffs associated to the contract, as well as any standard journeys applying to that contract.
For speed, this form includes buttons to quickly access the Account and Warehouse forms, so that data can be quickly set up if required before the contract.
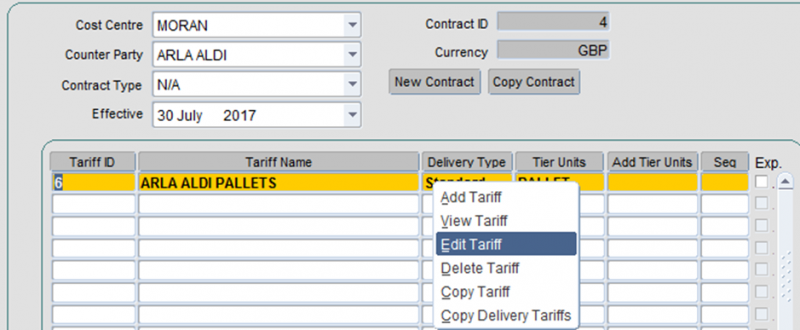
You can create a new tariff by using the Add Tariff button or edit tariffs by either double-clicking the tariff in the list, or selecting the tariff in the list and then clicking Edit Tariff.
You can also access options on a particular tariff by right-clicking on the tariff:
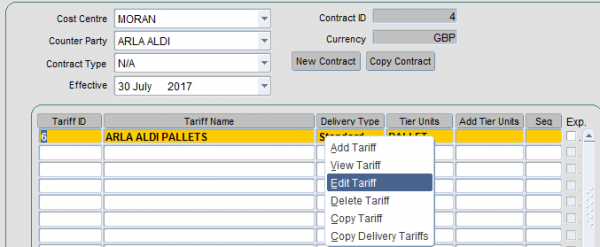
Options available are:
- Add Tariff.
- View Tariff.
- Edit Tariff.
- Delete Tariff.
- Copy Tariff.
- Copy Delivery Tariff.
You can export the contract and tariff data from this form directly, as long as you have created at least one ORS contracts report - you can select the report from the drop-down list here, and then click Export.
Tariffs
Tariffs can be entered, amended or deleted by anyone with the appropriate access rights, when you create a tariff you need to enter some properties for that tariff. The values that need to be configured are the name of the tariff, the delivery type that applies to the tariff, the units that any tariff tiers will be measured in and if required an expiry date can be added, so that the tariff automatically ends on a given date.
To create a new tariff right click on first empty line and select Add Tariff
Tariff details box appears, select the delivery type and tier units.
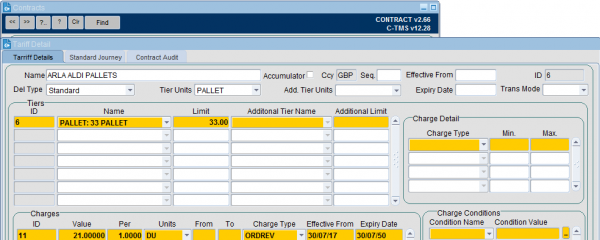
Select correct amount from drop down box to the left of first line.
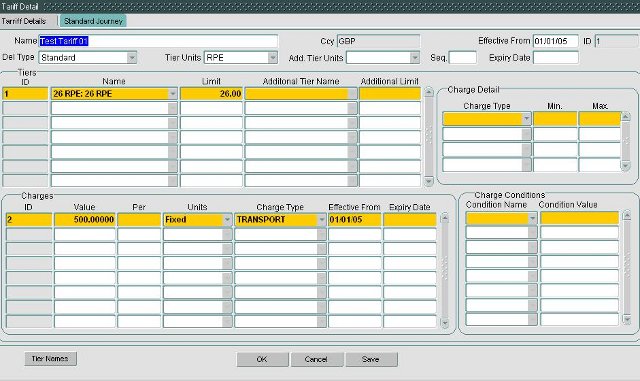
More information about the tariff can be found by right clicking the tariff and choosing View Tariff - this displays the tariff detail, which is illustrated above. The tariff detail shows that different charges can be made for different numbers of RPEs (or indeed weight limits) for example you may want to charge more if you are handling a small number of pallets on an order than if you are handling a large number of pallets. Once a charge has been created, then charge conditions may be applied (currently there are three- Refrigerated, > Weight and < Weight). Tariffs can only be created or amended on the Tariff Details screen.
Once a Tariff has been entered it is possible to create Tiers for it (i.e. a method of defining different rates for different measurements of the order, for example 0-5 pallets, 6-11 pallets, 11-20 pallets). Each tariff tier has a name, a default measurement unit and a default limit.
The charge tiers contain the following details: the tier name, the maximum number of units that the charge tier can be used with. For every tier set up, a corresponding charge must be set up.
In the Charges box, enter the rate as shown above. The Charge detail is optional. The Charge Type must be set up as Order Revenue for all contracts involving Customers.
Continue this until all ranges are entered then press Save and then OK.
Conditions may be added to charge. For example, if a perishable condition had been added to the charge, the order must be a perishable order for the charge to be applied.
A minimum and maximum charge can also be applied to the charge type.
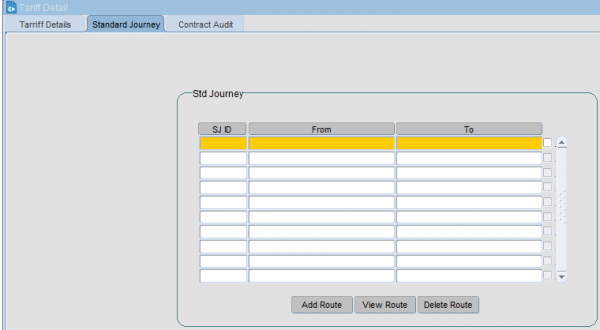
All tariffs must have an associated standard journey. The tariff will refuse to save and the user will be redirected to the Standard Journey tab (illustrated below) until such time as either a valid journey has been entered or the Add / Edit tariff transaction has been cancelled.
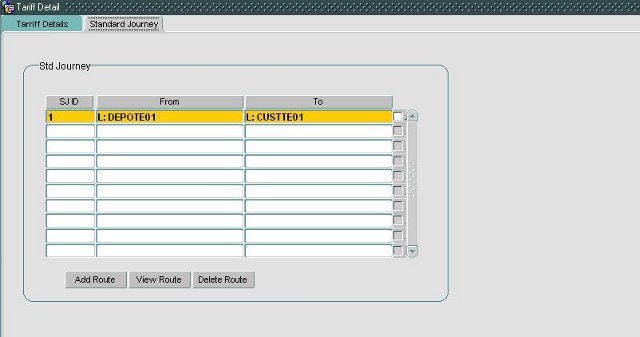
On the SJID pane, right click and then click Add Route.
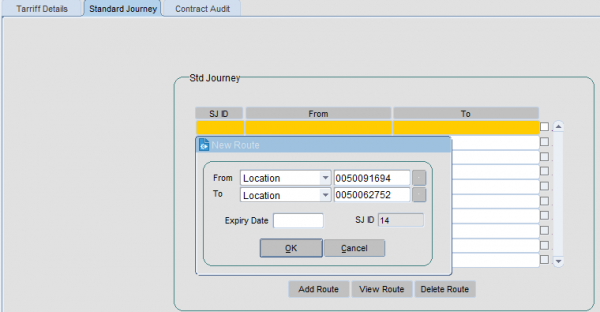
The Route can be set up between a Location, Town, Postal Region, Planning Region, Zone or a Country to a Location, Town, Postal Region, Planning Region, Zone or a Country. You are provided a lookup button, and can also use CTRL-L to activate it, once you have selected the type. Select the appropriate details of the route and click OK.
![]() Note: When using Zones in the standard journeys, the system would have to look through all zones created on the system for other purposes like scheduling engine. Rather than consider zones that have not been defined for Finance, you may set up zones based on the areas for charging and click the "Rating" flag - the contracts function only looks at these zones.
Note: When using Zones in the standard journeys, the system would have to look through all zones created on the system for other purposes like scheduling engine. Rather than consider zones that have not been defined for Finance, you may set up zones based on the areas for charging and click the "Rating" flag - the contracts function only looks at these zones.
Finding a Contract
- To find a contract which is already in the system, select the COST CENTRE from drop down box
- Select the correct COUNTER PARTY (Customer or Carrier) from drop down box
- A list of contracts should appear, if no contracts appear then there is not a contract with those details
Editing Pallet Tariff / Rates
- It is possible to edit the tariff by simply double clicking on the appropriate Lane ID or right clicking on the appropriate Lane ID, then selecting Edit Tariff.
- The TARIFF DETAILS box will appear again.
- At this point it is also possible to delete an individual tier or charge by again right clicking on the appropriate line.
Notes
It is important that sequence is populated, if conditional tariffs is being used. The main tariff should be set to 1 and the alternate tariff should be set to 2.
If you want to amend a tariff it is possible to amend it directly by altering the parameters associated with it or you could use the copy contract facility, choose the same cost centre and counter party and then set a new effective date and increment the minimum, maximum value elements within the tariff by a certain percentage in order to take account of inflation and price increases for example. Once this process has been completed you will see multiple entries under the effective from section of the contract form.
If you wanted to create a new tariff that was very similar to an existing tariff you could use the copy tariff function, choose an existing cost centre and counter, you can then increment the minimum and maximum value elements by a percentage value as before. Once this process is completed you will have a tariff on a contract that you entered.
A Contracts screen search facility has been provided for quick navigation to the Contract ID, Tariff ID, Tier ID, Charge ID or Standard Journey ID of choice. When a valid tier ID is selected, the search record will be highlighted amidst a display of all of the associated contract’s valid tiers.
C-TMS will allow a Customer to be charged a consolidated rate if there are multiple Orders on the same Trip with the same From Loc, To Loc, Cost Centre, Delivery Type and Customer or Customer Group. If a Trip contains 3 orders for 1 pallet with the same From Loc, To Loc, Customer, Cost Centre and Delivery Type it would be possible for C-TMS to charge the 3 pallet rate rather than charging the 1 pallet rate three times.
It is possible to re-charge internally using the Internal Recharging Mechanism.
Importing Contracts
You can import contracts and tariffs through the standard Imports "CONTRACT" import format.
One will be set up for you and should be visible within the Imports Maintenance screen, accessed from C-TMS Modules, Maintenance, Imports.
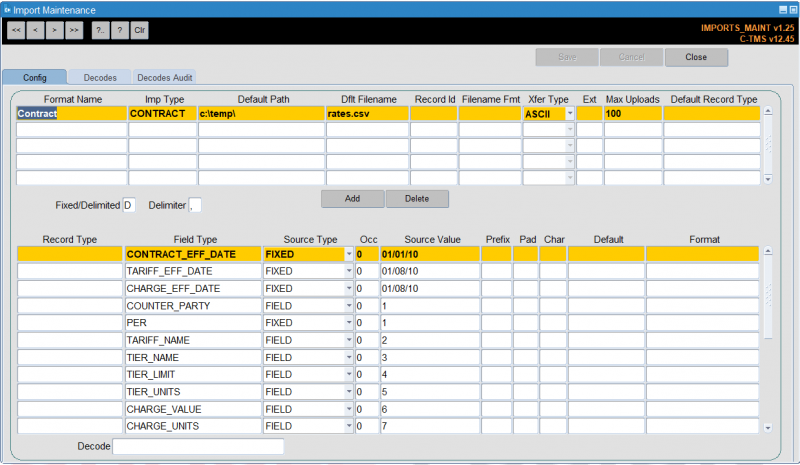
The import has been set up to allow you to pre-configure various data, and to upload the rest:
Pre-configured (FIXED) data:
- CONTRACT_EFF_DATE
- TARGET_EFF_DATE
- CHARGE_EFF_DATE
- PER
- CURRENCY
- CHARGE_TYPE
- SERVICE_TYPE
- COST_CENTRE
Variable (FIELD) data (in columns of a CSV file):
- COUNTER_PARTY
- TARIFF_NAME
- TIER_NAME
- TIER_LIMIT
- TIER_UNITS
- CHARGE_VALUE
- CHARGE_UNITS
- STJ_FROM
- STJ_TO
To use this, first change the FIXED data in the import to your desired values:
- CONTRACT_EFF_DATE - the effective date from for the contract
- TARGET_EFF_DATE - the effective date from for the tariff
- CHARGE_EFF_DATE - the effective date from for the charge
- PER - defaulting to 1
- CURRENCY - the shared currency between the two parties.
- CHARGE_TYPE - typically Order Revenue for customer contracts or Trip Cost for carrier contracts, but could be any charge types set up in the system.
- SERVICE_TYPE - the delivery type.
- COST_CENTRE - set to your cost centre, who will pay or receive payment, depending on the counter party (carrier or customer)
Next step in to prepare the import file. This should be a CSV file.
Details of the columns:
- COUNTER_PARTY - the carrier or customer code.
- TARIFF_NAME - a description of the tariff being configured
- TIER_NAME - a description of the tier being configured
- TIER_LIMIT - the limit to this tier
- TIER_UNITS - the unit being assessed by this tier. This could be any unit set up in the system.
- CHARGE_VALUE - the value charged per this charge line.
- CHARGE_UNITS - the unit being charged against
- STJ_FROM - the geographical range (standard journey) of this tariff.
- STJ_TO - the geographical range (standard journey) of this tariff.
![]() Note: Standard journeys are formatted as type, then a colon (:) then the value, for example "C:GB" denotes a country range for the specific country "GB" as set up in the countries system data.
Note: Standard journeys are formatted as type, then a colon (:) then the value, for example "C:GB" denotes a country range for the specific country "GB" as set up in the countries system data.
- Type is one of the following:
- "R" - Planning Region
- "P" - Postal Region
- "T" - Town
- "C" - Country
- "Z" - Zone
- "L" - Location
- Value is the specific ID of one of the types. For example, "GB" as set up in Countries.
You can then import the file through the Imports option on Administration, File Interfaces, Imports, if your user has been authorised to use the "Contracts" import format:
- Find the format "Contracts"
- Click Browse and find your CSV file.
- Click Import and confirm any pop up messages.
You will then be able to see the contract in CTMS Modules, Maintenance, Contracts.
Example:
With the following fixed data:
- CONTRACT_EFF_DATE - 01/01/23
- TARGET_EFF_DATE - 01/01/23
- CHARGE_EFF_DATE - 01/01/23
- PER - 1
- CURRENCY - GBP
- CHARGE_TYPE - Order Revenue
- SERVICE_TYPE - Standard
- COST_CENTRE - POLAR-CC
and the following CSV:
CLARITY,example,example: 9999 DU,9999,DU,19,DU,C:GB,C:GB
Will create the following contract:
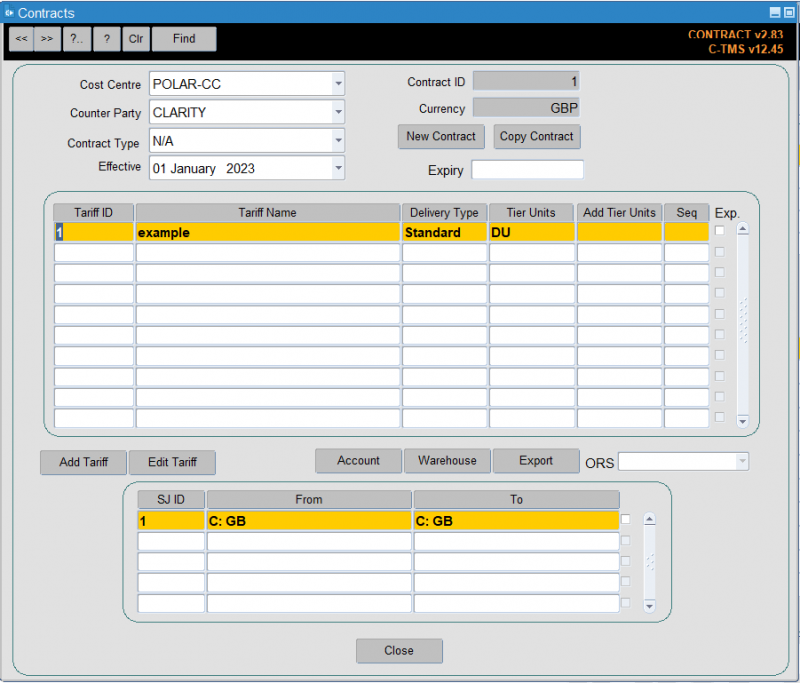
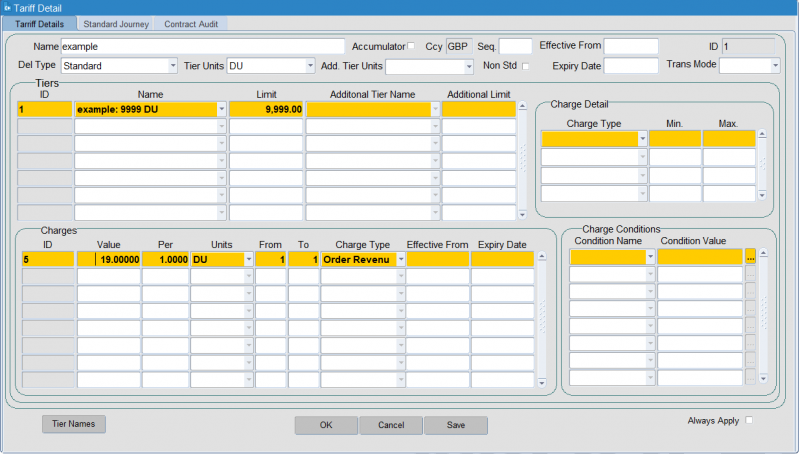
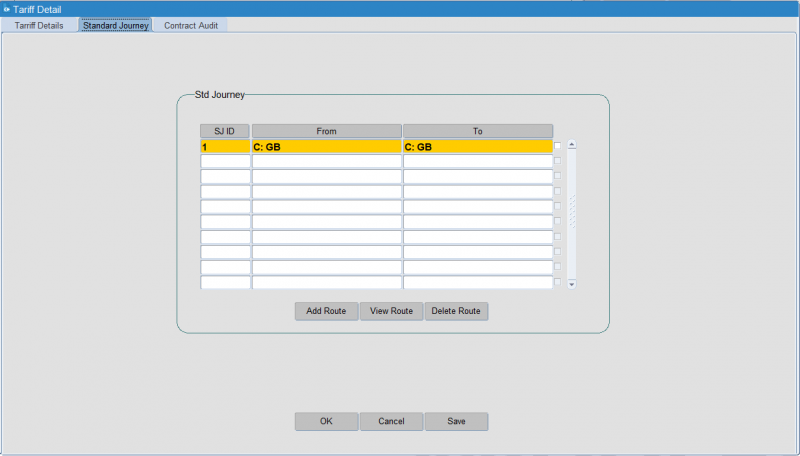
The import can be modified so that you can change fixed values to variable fields, and then add columns to the CSV. You can also include charge conditions, standard journey, contract, tier and charge expiry dates, min and max charges, transport modes, etc.
INVOICING
C-TMS can be configured, so that a customer invoice can be generated, once Trip Debrief has taken place.
Customer Setup
Customers can be set up so that they can use BCI (Base Cost Invoicing) or ACI (Actual Cost Invoicing).
If a customer changes from BCI from ACI, then a BCI Start Date MUST be entered, this allows the system, to know when to start generating payments using the Base Cost amount instead of the Actual amount.
Customers can also be configured to use Provisional Invoicing, this method generates a provisional invoice consisting of trips which have been ‘ACCEPTED’, another invoice, called adjustments will be generated, several weeks later, which again is configurable.
Configuration Form
Invoicing is configured within the Invoice Requirements tab of the Accounts form
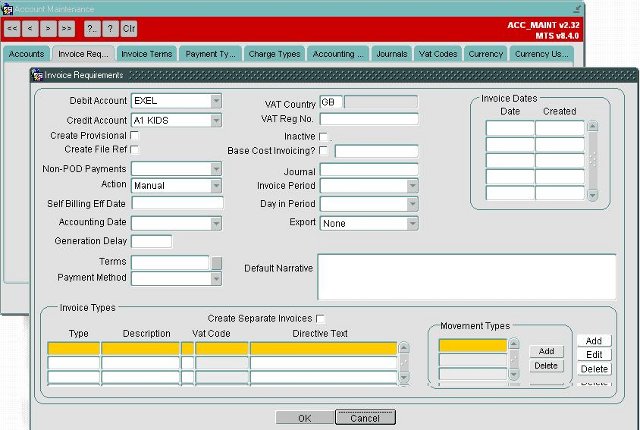
Invoices
TMS has functionality that allows the user to cumulate all payment lines within a selected date range and place onto an invoice. Invoices comprise of payment lines where each payment line will contain details of the specific order. Invoices can be generated weekly or monthly or to a specific date schedule.
To access the invoices screen, go to C-TMS Modules, Finance, Invoices.
It is possible to view the itemised breakdown of the invoice by double clicking into it and selecting "both".

Invoice Date Ranges
Invoices can be set to be generated on a set frequency as required by the customer - example below:
From: Sunday 00:00
To: Saturday 23:59.
This is a configurable setting within TMS and can be amended in the Accounts maintenance screen - located in C-TMS Modules, Maintenance, Accounts Maintenance.
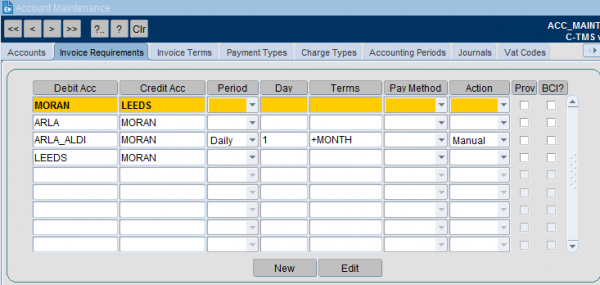
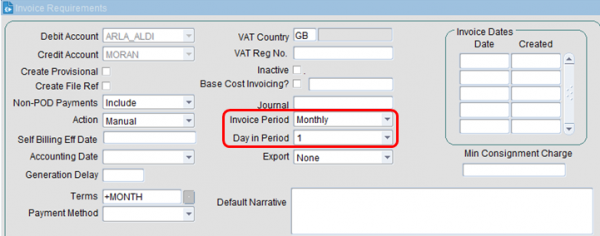
To amend the date range, select the Edit option. You can then amend the Invoice Period and the Day in the Period the invoices are created:
To send an invoice to a customer
Once an invoice has been reviewed, it can be approved and sent across to the customer in the following way:
- Highlight the invoice to be sent
- Once reviewed, set the relevant invoice status from Draft to Approved - this is achieved by right clicking on the line, select Set Status and select Approved.
- Select Exports.

- Select Generate Export
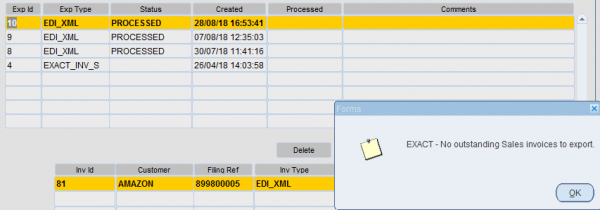
- Select OK. You will see the screen below:
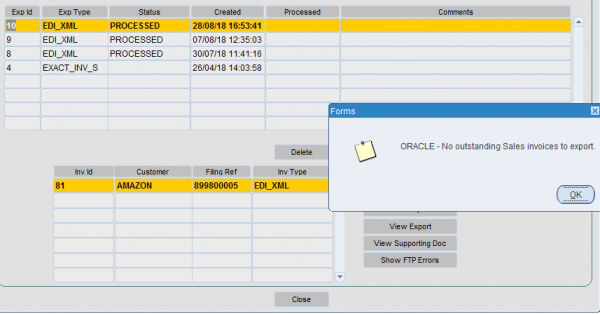
- Select OK.
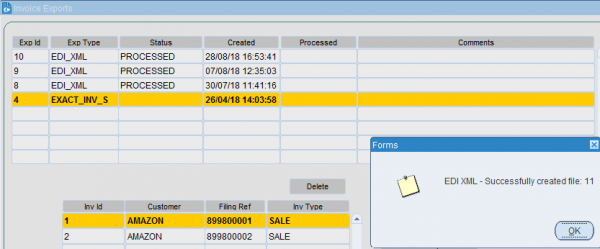
- You will then see the "successfully created file" message as above.
- The next stage is to select the Send Export button - this will set the status to "Processed".
- This is the trigger point that will send the invoice across. The invoice will display as "Processed" - as below.
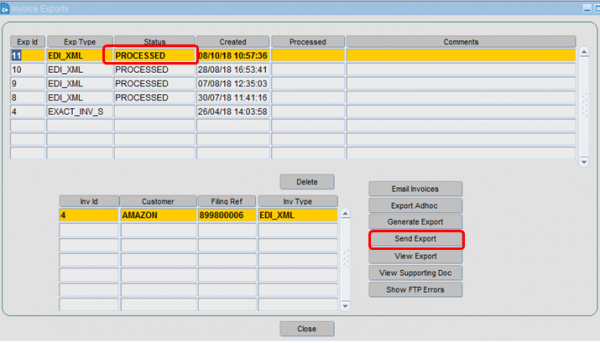
![]() Note: There is specific setup required beforehand to ensure that the relevant customer will receive the invoice in the required format.
Note: There is specific setup required beforehand to ensure that the relevant customer will receive the invoice in the required format.
If the push of the file fails, users may view the FTP Errors to find out why the extract failed.

From this form, the invoices can be printed or exported to a CSV file.
C-TMS provides the ability to see the savings generated for a particular date range for a particular customer. This can then be exported into a CSV file.
View Export and Supporting Docs
Once an invoice has been generated, it will be displayed first in the top data block. You may then select View Export to see the payments that will be posted when the export is sent. Selecting view will automatically display the header for the selected.
You are also able to view the details of the export, this includes details of the items for which payments have been generated. When selecting the View Supporting Doc button, the following screen is displayed, You enter the export id and select a customer, to view the payment details.
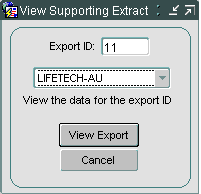
The support documents will run for a single customer, where the customer has at least one invoice included in the export. If the customer selected does not have an invoice in the export, the supporting doc will be blank.
Profit & Loss
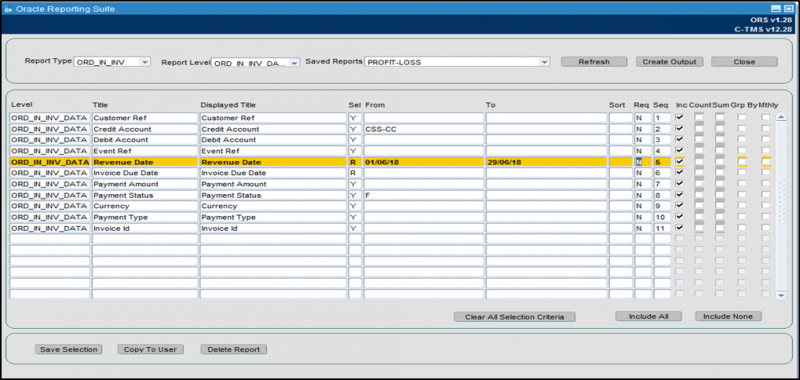
The oracle report suite (Reporting & Extract Suite) allows data to be extracted into CSV. A Profit and Loss report can be created. Once created, this can be run daily, weekly or monthly and will show all inbound and outbound payments within a specific time frame.
By amending the Credit account, you can extract costs and then revenue separately.
The criteria below shows all revenue payments allowing the data to be totalled in CSV format.
View invoice details
It is possible to view the itemised breakdown of the invoice by double clicking into it and selecting "Both"
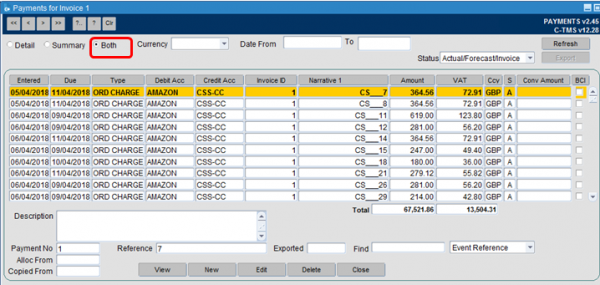
Invoice Generation and Printing
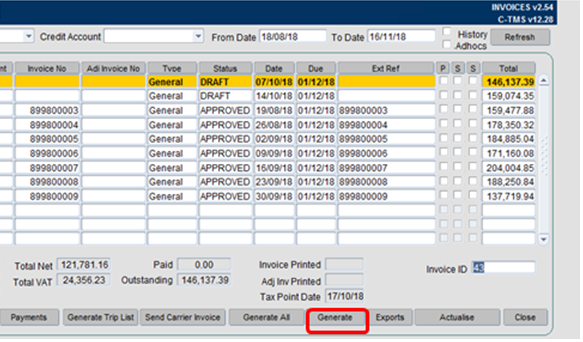
- To generate a new invoice for a new date range, click Generate.
- Payment Lines can only be assigned to invoices in a status of "Draft"
- Once a previous invoice has been reviewed and all relevant payment lines are included, the status should be changed to "approved" as part of the exporting to customer process.
New Invoice Creation:
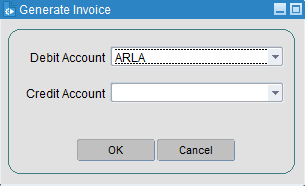
Set the debit and credit accounts appropriately:
This invoice will then appear in the invoices screen with a status of "Draft". All relevant payment lines in a status of "A" (Actualised) will automatically be added to the invoice.
Printing of an Invoice
To print of an Invoice to review or to keep a manual copy:
- Highlight the associated invoice
- Right click and select Print -> Invoice
 Note: You can send the Invoice to a CSV Spreadsheet format by right-clicking and selecting Export Invoice.

- Select Print
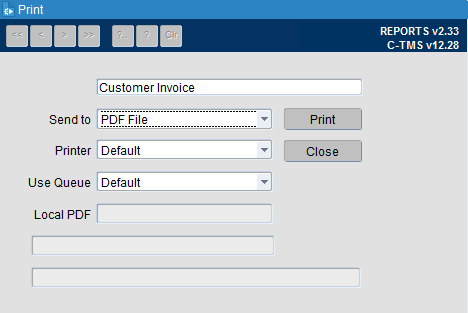
An example output is illustrated below:
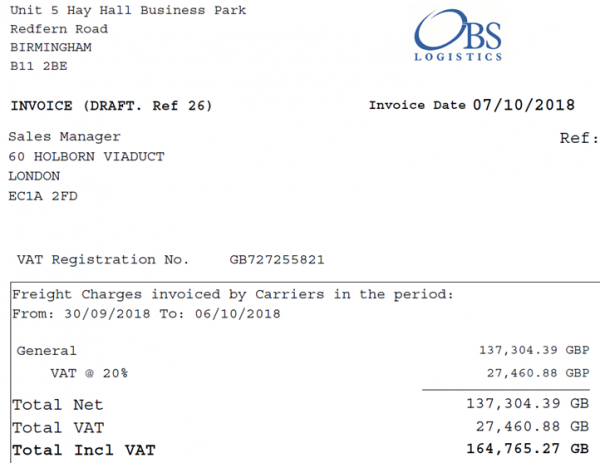
An itemised breakdown of the associated invoice is also displayed:

Carrier Billing
C-TMS also allows a Carrier to be invoiced using a "Self Bill" mechanism - this process involves sending a list of trips and payments to the carrier to validate. The carrier reports any discrepancies and once all issue are resolved a Carrier invoice is sent to the carrier. The purpose of this is to speed up the process of paying the carrier and reducing the amount of time spent resolving issues with and de-briefing carrier invoices.
Further Configuration
The following system parameters affect this functionality:
| Parameter | Description | Level |
|---|---|---|
| OF_CURRENCY_CODE | Oracle Financial Currency Code | SYSTEM |
| OF_FILE_ARCHIVE | Oracle financials archive file path. | SYSTEM |
| OF_FILE_NAME_SECTION2 | Stores the name of section 2 on the OF filename | SYSTEM |
| OF_FILE_PATH | Oracle financials file path. | SYSTEM |
| OF_FTP_DESTINATION_DIRECTORY | Oracle Financials FTP Dir | COST_CENTRE |
| OF_FTP_DESTINATION_DIRECTORY | Oracle Financials FTP Dir | SYSTEM |
| OF_FTP_DESTINATION_IP_ADDRESS | Oracle Financials FTP IP | SYSTEM |
| OF_FTP_DESTINATION_IP_ADDRESS | Oracle Financials FTP IP | COST_CENTRE |
| OF_FTP_DESTINATION_PASSWORD | Oracle Financials FTP Password | COST_CENTRE |
| OF_FTP_DESTINATION_PASSWORD | Oracle Financials FTP Password | SYSTEM |
| OF_FTP_DESTINATION_PORT | Oracle Financials FTP Port | SYSTEM |
| OF_FTP_DESTINATION_PORT | Oracle Financials FTP Port | COST_CENTRE |
| OF_FTP_DESTINATION_USERNAME | Oracle Financials FTP User | SYSTEM |
| OF_FTP_DESTINATION_USERNAME | Oracle Financials FTP User | COST_CENTRE |
| OF_FTP_DEST_DTL_DIRECTORY | Cargowise Details directory | COST_CENTRE |
| OF_FTP_DEST_DTL_PASSWORD | Cargowise Details password | COST_CENTRE |
| OF_FTP_DEST_DTL_USERNAME | Cargowise Details username | COST_CENTRE |
| OF_IF_DTL | Oracle Financial IF DTL | SYSTEM |
| OF_IF_FTR | Oracle Financial IF FTR | SYSTEM |
| OF_IF_HDR | Oracle Financial IF HDR | SYSTEM |
| OF_JRNL_ENTRY_SOURCE_NAME | Oracle Financial Journal Entry Source Name | SYSTEM |
| OF_ORIGID | Stores the name of ORIGID | SYSTEM |
| OF_SECTION2 | Stores the name of section 2 on the OF filename | SYSTEM |
| OF_SETTINGS | Controls if Oracle Financial settings are required for 11i and R12 | SYSTEM |
| OF_SOURCE_SYSTEM_CODE | Oracle Financial System Code | SYSTEM |
Profit & Loss
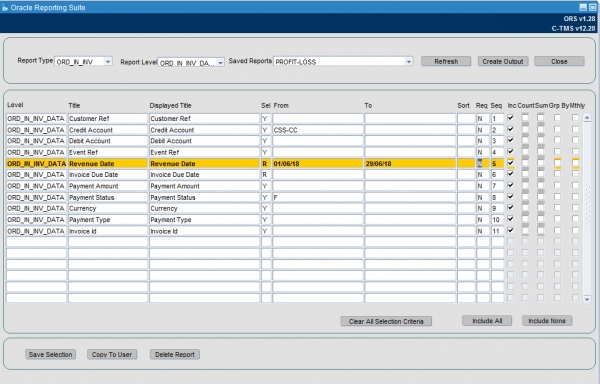
The Oracle Report Suite (Administration, File Interfaces, Extract Suite) allows data to be extracted into CSV. A Profit and Loss report can be created. Once created, this can be run daily, weekly or monthly and will show all inbound and outbound payments within a specific time frame.
By amending the Credit account, the user can extract costs and then revenue separately. The criteria below shows all revenue payments allowing the data to be totalled in CSV format.
Review and Amend Payment Lines
To view all payment details, go to CTMS Modules, Finance, Payments.
Alternatively, Payments can also be accessed directly from the following forms:
Note: selecting "Both" all finance related lines will be displayed (both costs and revenues).
There are various filters available for selection if you want to select specific payment charges, dates, debit accounts or credit accounts for example.
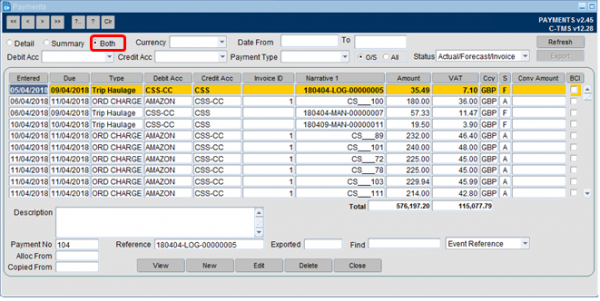
It is possible to amend the details of a line by highlighting the line, selecting Edit and then overwriting the "amount" field followed by selecting the Save option.

To determine the trip a specific line relates to:
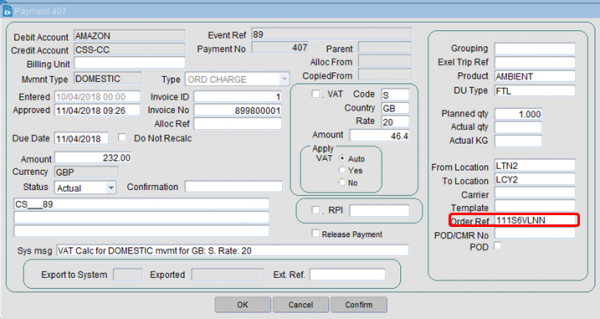
- Drill into the relevant line by double clicking into it.
- Copy the "Order ref" number:
- Go to C-TMS Modules, Orders, New Order
- Input the order ref into the "customer ref" field and select Refresh.
 Note: the "event ref" can also be used - this relates to the OMS ref in the search field.

- This will bring up the associated TMS order where you can view the specific details:

Allocating a cost to a trip (Payment)
The set up of account charges, is covered fully in the Accounts module. This section will show you how to allocate a cost to a trip within the trip manipulation or Planning screen after all the set-up has taken place.
There are two ways that the cost of a trip can be allocated. These are either manually, or automatically, both of which are covered below.
To allocate a cost automatically (assuming that rates and contracts have been set up), all you need to do is to allocate the relevant carrier to the trip in question, recalculate the trips times and then set the trip status to "TENDERED". You should then select the "Finance" tab from within the trip detail section of the screen. You should notice that the cost of the trip has been automatically assigned to the trip below. In this example the cost of £100 has been allocated to the trip.
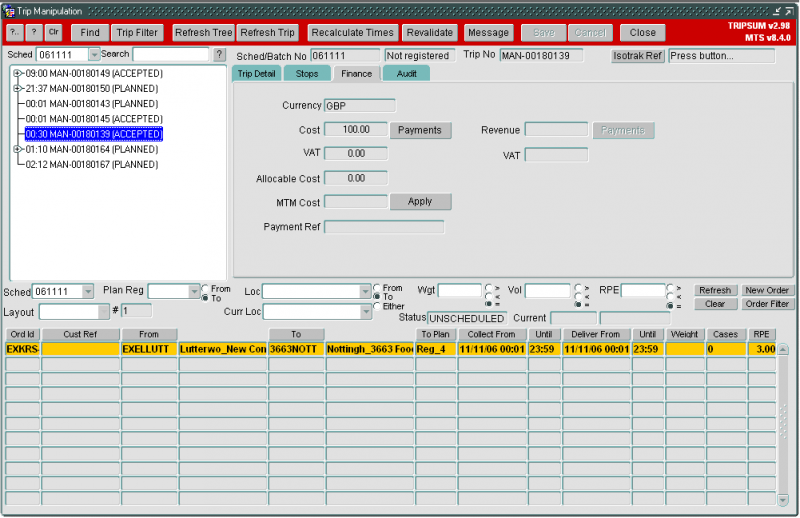
This automation has been possible because a contract and rate matrix have been set up for this carrier. If you do not have this set up, you are still able to enter a cost against the trip, but again the relevant set-up must have taken place beforehand. To do this, select your trip and allocate the relevant carrier to that trip. Re-calculate times of the trip and save your changes. Next, switch to the finance tab and press the ‘Payments’ button. This will bring up the "payments for trip" screen which details all the payments that have been allocated to the trip so far. At this point this screen will be empty as you have not entered any payments yet.
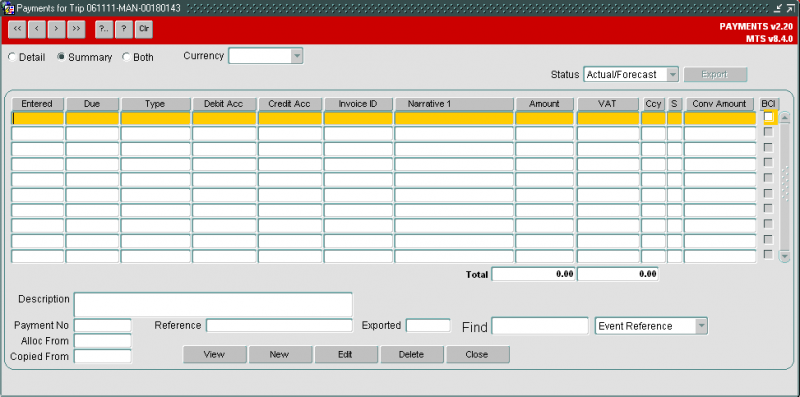
To enter a payment press the New button at the bottom of the screen. This will take you into the "Create payment" screen.
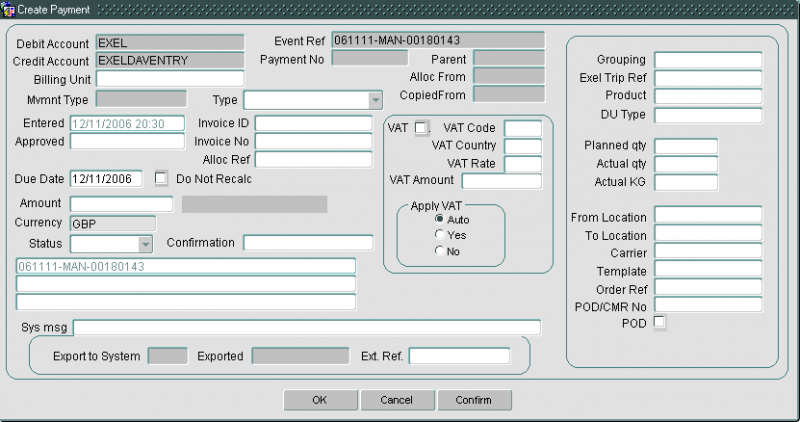
First enter the payment type. This will usually be "Trip haul ma" (as in the example below), but may also be payments such as fuel surcharge. Next, enter the cost of using the selected carrier for doing this trip (the example below has a cost of £100 entered). Lastly enter the status of the payment as "forecast".
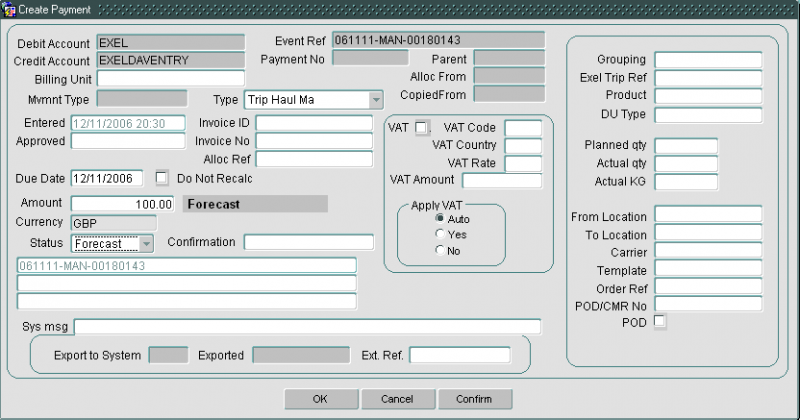
Once you have entered those three pieces of information you can press the OK button to create the payment. This will take you back to the "Payment for trip" screen where you will see your newly created payment. When you close this screen you will see the payment assigned to the trip. If you want to add further payments against the same trip, you will simply need to repeat the process detailed above. If you chose to add a manual payment, the system will no longer calculate the cost from contract, recognizing that you have chosen to overrule the cost.
VAT Calculation
VAT rates are reflected in individual payment lines:


Any account can be set up to generate payments with VAT, and payments manually or automatically generated can generate VAT. Different payment types can be created which either generate or do not generate VAT. See Accounts for details of setting up payment types.
To set the appropriate VAT rate, go to C-TMS Modules, Maintenance, Accounts Maintenance and select the VAT Codes tab.
Set the appropriate VAT code:

VAT rates can be set up against payments generated in any currency, from/to any country, as long as a common currency between the payer and the payee is determined. VAT rates and effective dates are determined by the country. See Countries for details of setting up VAT rates against countries.
This is found in C-TMS Modules, Maintenance, Countries:
In the example of GB, set the VAT rate and effective date as illustrated below:
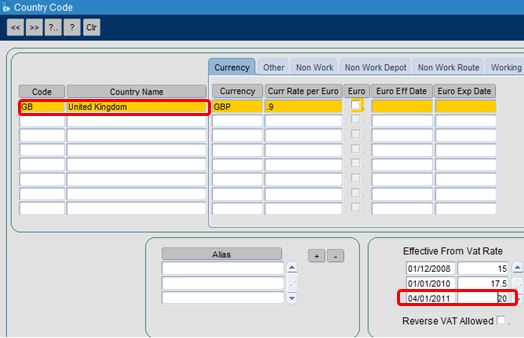
If VAT is determined to be required against a payment, it is calculated when the payment is calculated, based on the valid rate at the point of the payment calculation. CTMS determines the calculation point of the payment through settings, when it is actualised or fixed is dependent upon these settings. For some customers, that might be at the point of raising the job, collecting the job, completing the job or manual. See Customers for details of setting up customers.
VAT is calculated against the individual payments and then totalled. All VAT calculations are to two decimal places, and are rounded through normal rounding rules (i.e. round up for 5 or higher, down for 4 or lower). All payments and VAT amounts are rolled up onto an invoice for that period. The VAT amount against an invoice is the sum of the VAT amounts on the payments for that invoice, also to two decimal places. See Invoices for more details on invoicing.
Currency Setup
To add a currency in TMS, go to: C-TMS Modules, Maintenance, Accounts Maintenance and select the Currency tab:
Set the appropriate currency:

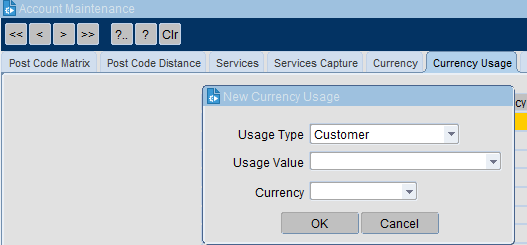
In the Currency Usage tab, set the customer, cost centre and customer group as having the appropriate currency:
