Trip Overview (Waterfall): Difference between revisions
No edit summary |
(Updated to latest screen version) |
||
| Line 1: | Line 1: | ||
The Trip Overview is used to give the user a general overview of all trips on a particular Schedule, sectioned into Statuses. If required, all trips with a particular status can be displayed on a page of their own using the tab pages at the bottom. | The Trip Overview is used to give the user a general overview of all trips on a particular Schedule, sectioned into Statuses. If required, all trips with a particular status can be displayed on a page of their own using the tab pages at the bottom. | ||
<center>[[Image:waterfall.png|800px]]</center> | |||
This screen can be used to Allocate Resources to Planned and Accepted trips, Debrief trips which are En-Route or Confirmed and update PODs for trips at status of Completed. | This screen can be used to Allocate Resources to Planned and Accepted trips, Debrief trips which are En-Route or Confirmed and update PODs for trips at status of Completed. | ||
The buttons at the top of the screen are used to help you find specific trips and each section can have | The buttons at the top of the screen are used to help you find specific trips and each section can have its layout configured to suit your needs. The number below each status, in bold, is a count of the number of trip in that particular status for the schedule selected from the drop down list. | ||
<center>[[Image:waterfall_find.png]]</center> | |||
The trips can be found using the following criteria: | |||
* Schedule | |||
* From/To | |||
* Trip ID | |||
* One additional other criteria from the following list: | |||
** Trip Ref | |||
** Order No | |||
** Booking Ref | |||
** Customer Ref | |||
** Container No (Trip) | |||
** Container No (Order) | |||
** Bill Of Lading (Order) | |||
** EFX Ref (Trip) | |||
** EFX Ref (Order) | |||
** Trailer ID | |||
** Driver | |||
** Tractor ID | |||
The trips can also be filtered using the following criteria: | |||
* The Schedule drop-down list. | |||
* The Depot drop down list. | |||
* From/To dates. | |||
* Temp Control check-box. | |||
You can apply the filter with the '''Filter''' button. | |||
The tabs can be configured as to which trip status to display on each tab. | |||
You can access this through the right-click ''Preferences'' option against any trip status table. | |||
<center>[[Image:waterfall_prefs.png]]</center> | |||
You can select which statuses to display in the screen, up to 5. | |||
You can also set the auto-refresh settings from this pop-up window. This will enable the auto-refresh functionality and set the refresh time. | |||
Yuo can also switch auto-refresh on or off from the main screen heading. | |||
If you switch on auto-refresh, this screen can be used as a real time monitor of trip statuses. | |||
Each table layout is configurable - right click on the table in the ''ALL'' tab and select ''[[Layout Configuration|Configure Layout]]''. Each trip status table can be configured with a different layout. If you have a saved layout configuration for a particular trip status, you can select it from the drop-down list on the left of the table. | |||
The configured layout applies to the trip status on the ''ALL'' tab and on the specific trip status tab, selected from the bottom of the screen. | |||
Each trip status allows different available button functionality, as below: | |||
* PLANNED/TENDERED/ALLOCATED status: | |||
** '''Alloc Resources''' | |||
** '''Delete Trip''' | |||
* EN-ROUTE/CONFIRMED status: | |||
** '''Debrief''' | |||
* COMPLETED status: | |||
** '''Go To POD''' | |||
Each panel has right-click options: | |||
* Common to all statuses: | |||
** ''Refresh'' | |||
** ''Configure Layout'' | |||
** ''Set Trip Status'' | |||
** ''Set Sub Contractor'' | |||
** ''Remove Sub Contractor'' | |||
** ''Desp Conf Message Hold'' | |||
** ''Preferences'' | |||
* PLANNED/TENDERED/ACCEPTED status | |||
** ''Remove Driver'' | |||
** ''Remove Tractor'' | |||
** ''Remove Trailer'' | |||
** ''Allocate Resources'' | |||
** ''Delete Trip'' | |||
* EN-ROUTE/COMPLETED/CONFIRMED status | |||
** ''Debrief'' | |||
=== Allocate Resources === | === Allocate Resources === | ||
Select a trip from the well | Select a trip from the well that you want to allocate resources to, then click the 'Alloc Resource' button. | ||
The Allocated Resources screen will be displayed - depending on your configuration, it may be one of two: | |||
* [[Allocate Resources]] | |||
* [[Allocate Resources (Diary)]] | |||
These are covered in the following sections. | |||
=== Debrief === | |||
Clicking the '''Debrief''' button or selecting the ''Debrief'' action option will take you into the [[Trip Debrief]] screen when you can debrief the trip as normal. | |||
=== Go to POD === | === Go to POD === | ||
Clicking the 'Go to POD' button will again take you into the [[Trip Debrief]] screen when you apply a POD. | Clicking the '''Go to POD''' button will again take you into the [[Trip Debrief]] screen when you apply a POD. | ||
<!-- | |||
=== Recent Changes === | === Recent Changes === | ||
| Line 65: | Line 136: | ||
| Waterfall Right click options | | Waterfall Right click options | ||
|} | |} | ||
--> | |||
[[Category:Trip Management|150]] | [[Category:Trip Management|150]] | ||
[[Category:C-TMS Modules|B-150]] | [[Category:C-TMS Modules|B-150]] | ||
[[Category:C-TMS User Guide|BB-150]] | [[Category:C-TMS User Guide|BB-150]] | ||
Revision as of 12:25, 8 May 2024
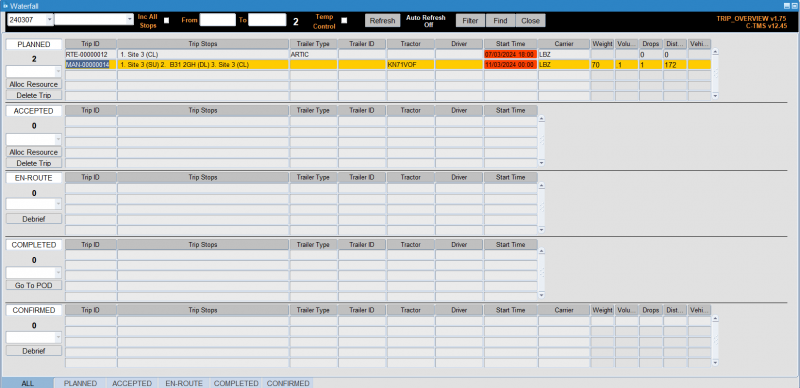
The Trip Overview is used to give the user a general overview of all trips on a particular Schedule, sectioned into Statuses. If required, all trips with a particular status can be displayed on a page of their own using the tab pages at the bottom.

This screen can be used to Allocate Resources to Planned and Accepted trips, Debrief trips which are En-Route or Confirmed and update PODs for trips at status of Completed.
The buttons at the top of the screen are used to help you find specific trips and each section can have its layout configured to suit your needs. The number below each status, in bold, is a count of the number of trip in that particular status for the schedule selected from the drop down list.

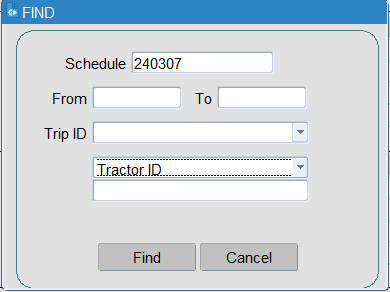
The trips can be found using the following criteria:
- Schedule
- From/To
- Trip ID
- One additional other criteria from the following list:
- Trip Ref
- Order No
- Booking Ref
- Customer Ref
- Container No (Trip)
- Container No (Order)
- Bill Of Lading (Order)
- EFX Ref (Trip)
- EFX Ref (Order)
- Trailer ID
- Driver
- Tractor ID
The trips can also be filtered using the following criteria:
- The Schedule drop-down list.
- The Depot drop down list.
- From/To dates.
- Temp Control check-box.
You can apply the filter with the Filter button.
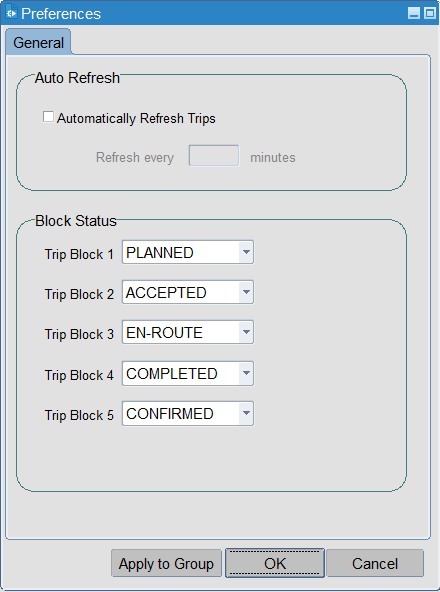
The tabs can be configured as to which trip status to display on each tab.
You can access this through the right-click Preferences option against any trip status table.

You can select which statuses to display in the screen, up to 5.
You can also set the auto-refresh settings from this pop-up window. This will enable the auto-refresh functionality and set the refresh time.
Yuo can also switch auto-refresh on or off from the main screen heading. If you switch on auto-refresh, this screen can be used as a real time monitor of trip statuses.
Each table layout is configurable - right click on the table in the ALL tab and select Configure Layout. Each trip status table can be configured with a different layout. If you have a saved layout configuration for a particular trip status, you can select it from the drop-down list on the left of the table.
The configured layout applies to the trip status on the ALL tab and on the specific trip status tab, selected from the bottom of the screen.
Each trip status allows different available button functionality, as below:
- PLANNED/TENDERED/ALLOCATED status:
- Alloc Resources
- Delete Trip
- EN-ROUTE/CONFIRMED status:
- Debrief
- COMPLETED status:
- Go To POD
Each panel has right-click options:
- Common to all statuses:
- Refresh
- Configure Layout
- Set Trip Status
- Set Sub Contractor
- Remove Sub Contractor
- Desp Conf Message Hold
- Preferences
- PLANNED/TENDERED/ACCEPTED status
- Remove Driver
- Remove Tractor
- Remove Trailer
- Allocate Resources
- Delete Trip
- EN-ROUTE/COMPLETED/CONFIRMED status
- Debrief
Allocate Resources
Select a trip from the well that you want to allocate resources to, then click the 'Alloc Resource' button.
The Allocated Resources screen will be displayed - depending on your configuration, it may be one of two:
These are covered in the following sections.
Debrief
Clicking the Debrief button or selecting the Debrief action option will take you into the Trip Debrief screen when you can debrief the trip as normal.
Go to POD
Clicking the Go to POD button will again take you into the Trip Debrief screen when you apply a POD.