EDI - Report/Extract Scheduling: Difference between revisions
(Updated) |
m (Minor formatting change) |
||
| Line 1: | Line 1: | ||
This section demonstrates how to set up an EDI process in order to schedule ORS reports and extracts. | This section demonstrates how to set up an EDI process in order to schedule ORS reports and extracts. | ||
=== ORS Reports Scheduling === | ==== ORS Reports Scheduling ==== | ||
The extract suite option can be used to extract data into a CSV file format. These extracts are in a predefined format and the data can be controlled by the use of selection criteria which can be entered when the extract runs, the columns of data extracted can be selected or excluded by the user to control the actual data values extracted. These reports can be created by users and saved as reports, which can then be run on demand or scheduled and emailed. | The extract suite option can be used to extract data into a CSV file format. These extracts are in a predefined format and the data can be controlled by the use of selection criteria which can be entered when the extract runs, the columns of data extracted can be selected or excluded by the user to control the actual data values extracted. These reports can be created by users and saved as reports, which can then be run on demand or scheduled and emailed. | ||
| Line 100: | Line 100: | ||
You may then specify an email for the report using the '''Output''' button, specifying the destination email in the ''E-Mail'' column. You may specify multiple destinations. | You may then specify an email for the report using the '''Output''' button, specifying the destination email in the ''E-Mail'' column. You may specify multiple destinations. | ||
=== Extracts Scheduling === | ==== Extracts Scheduling ==== | ||
<center> | <center> | ||
[[File:EDI-Extracts.png|800x800px]] | [[File:EDI-Extracts.png|800x800px]] | ||
| Line 195: | Line 195: | ||
You may then specify an email for the report using the '''Output''' button, specifying the destination email in the ''E-Mail'' column. You may specify multiple destinations. | You may then specify an email for the report using the '''Output''' button, specifying the destination email in the ''E-Mail'' column. You may specify multiple destinations. | ||
=== Reports Scheduling === | ==== Reports Scheduling ==== | ||
<center> | <center> | ||
[[File:EDI-Reports.png|800x800px]] | [[File:EDI-Reports.png|800x800px]] | ||
| Line 290: | Line 290: | ||
You may then specify an email for the report using the '''Output''' button, specifying the destination email in the ''E-Mail'' column. You may specify multiple destinations. | You may then specify an email for the report using the '''Output''' button, specifying the destination email in the ''E-Mail'' column. You may specify multiple destinations. | ||
=== MIS/BI Extracts Scheduling === | ==== MIS/BI Extracts Scheduling ==== | ||
The MIS/BI processes are configured by your implementation team - see [[BI Data Extract Guide]] for more information on this process. The process is then scheduled to run daily at a specific time.<center> | The MIS/BI processes are configured by your implementation team - see [[BI Data Extract Guide]] for more information on this process. The process is then scheduled to run daily at a specific time.<center> | ||
[[File:EDI-BI-Extracts.png|800x800px]] | [[File:EDI-BI-Extracts.png|800x800px]] | ||
Revision as of 13:49, 31 July 2025
This section demonstrates how to set up an EDI process in order to schedule ORS reports and extracts.
ORS Reports Scheduling
The extract suite option can be used to extract data into a CSV file format. These extracts are in a predefined format and the data can be controlled by the use of selection criteria which can be entered when the extract runs, the columns of data extracted can be selected or excluded by the user to control the actual data values extracted. These reports can be created by users and saved as reports, which can then be run on demand or scheduled and emailed.
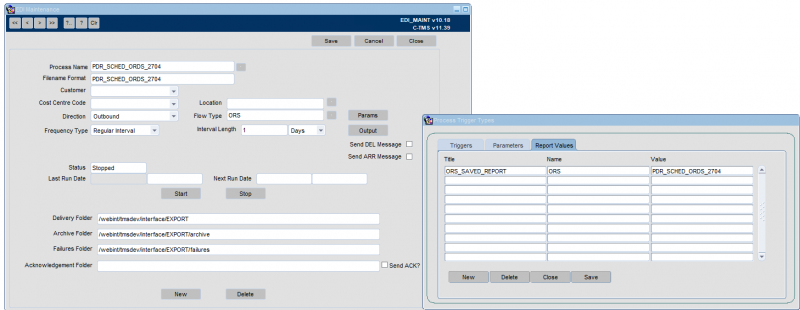
Any report saved may be scheduled as EDI outbound messages, where parameters may be entered and the output configured. The below screens show an ORS report being configured for running every 1 day:
| Field | Description | Value |
|---|---|---|
| Process Name | This should indicate the nature of the job so it may be identified in the screen. Required. | A unique identifier for the report, e.g. OPS_REPORT1 |
| Filename Format | This indicates how any files created or required by the process are names, for outbound files, the system will add the system date and time to ensure a unique filename is always generated. Required. | rep1 |
| Customer | Enter the Customer required using the Drop Down List. Optional. | Optional |
| Cost Centre Code | The cost centre code may be used when the process is checking parameter values and may be matched to orders or trips to identify if the process should be running. Required. | Optional |
| Location | The location may be used to specify selection of data from a particular location code. A lookup is provided. | N/A |
| Direction | The direction is defined as outbound or inbound. This will indicate if the process in bringing data into C-TMS or sending data out of C-TMS. Required. | Outbound |
| Flow Type | This indicates the type of process, there are several different options discussed later. Required. | ORS |
| Frequency Type | Frequency type indicates how often the process is run, are regular interval or specific time. Required. | As required |
| Process Time | Only available if selecting Frequency Type of Specific Time. The time at which the process is to run. | As required |
| (Day Selection) | Only available if selecting Frequency Type of Specific Time. Check All Days, or check the days on which you want the process to run. | As required |
| Interval Length | Only available if selecting Frequency Type of Regular Interval. Interval length indicates the regular interval. Enter the number , and then the unit (Seconds, Minutes, Hours, Days, Monthly). Required. | As required |
| Send DEL Message | If this box is checked then this can create an ARR message when the actual arrive times are fully entered | Unchecked |
| Send ARR Message | If this box is checked then this can create a DEL message when the order to deliver quantities are fully entered | Unchecked |
| Delivery Folder | When the file has been created this is the directory that the file will sit in until it has been picked up | A server-side folder for the extracted files. Provided by your implementation team. Usually /webint/(client-database)/export.
|
| Archive Folder | When the file has been picked up by the relevant source successfully the file gets moved to this directory | A server-side folder for the extracted files. Provided by your implementation team. Usually /webint/(client-database)/export.
|
| Failures folder | The directory of any files that failed to upload | A server-side folder for the extracted files. Provided by your implementation team. Usually /webint/(client-database)/export.
|
| Acknowledgment Folder | The directory for an acknowledgment message to sent to | N/A |
| Send ACK? | The box is checked if the Acknowledgment of an inbound flow is requested. The Acknowledgment will then been sent to folder to be picked up by the relevant source | Unchecked |
Parameters must then be entered for the process through the Params button:
| Title | Name | Value |
|---|---|---|
| ORS_SAVED_REPORT | ORS | Your saved report name |
| audit_process | audit_process | Optional - whether the report production is audited for diagnostic purposes for the Aptean support team. Omit unless asked to apply by your Aptean support team. |
You may then specify an email for the report using the Output button, specifying the destination email in the E-Mail column. You may specify multiple destinations.
Extracts Scheduling
| Field | Description | Value |
|---|---|---|
| Process Name | This should indicate the nature of the job so it may be identified in the screen. Required. | A unique identifier for the extract, e.g. DAILY_EXTRACTS |
| Filename Format | This indicates how any files created or required by the process are names, for outbound files, the system will add the system date and time to ensure a unique filename is always generated. Required. | A unique name for the extract. |
| Customer | Enter the Customer required using the Drop Down List. Optional. | As required |
| Cost Centre Code | The cost centre code may be used when the process is checking parameter values and may be matched to orders or trips to identify if the process should be running. Required. | As required |
| Direction | The direction is defined as outbound or inbound. This will indicate if the process in bringing data into C-TMS or sending data out of C-TMS. Required. | Outbound |
| Flow Type | This indicates the type of process, there are several different options discussed later. Required. | EXPORT |
| Frequency Type | Frequency type indicates how often the process is run, are regular interval or specific time. Required. | As required |
| Process Time | Only available if selecting Frequency Type of Specific Time. The time at which the process is to run. | As required |
| (Day Selection) | Only available if selecting Frequency Type of Specific Time. Check All Days, or check the days on which you want the process to run. | As required |
| Interval Length | Only available if selecting Frequency Type of Regular Interval. Interval length indicates the regular interval. Enter the number , and then the unit (Seconds, Minutes, Hours, Days, Monthly). Required. | As required |
| Send DEL Message | If this box is checked then this can create an ARR message when the actual arrive times are fully entered | Unchecked |
| Send ARR Message | If this box is checked then this can create a DEL message when the order to deliver quantities are fully entered | Unchecked |
| Delivery Folder | When the file has been created this is the directory that the file will sit in until it has been picked up | A server-side folder for the extracted files. Provided by your implementation team. Usually /webint/(client-database)/export.
|
| Archive Folder | When the file has been picked up by the relevant source successfully the file gets moved to this directory | A server-side folder for the extracted files. Provided by your implementation team. Usually /webint/(client-database)/export.
|
| Failures folder | The directory of any files that failed to upload | A server-side folder for the extracted files. Provided by your implementation team. Usually /webint/(client-database)/export.
|
| Acknowledgment Folder | The directory for an acknowledgment message to sent to | N/A |
| Send ACK? | The box is checked if the Acknowledgment of an inbound flow is requested. The Acknowledgment will then been sent to folder to be picked up by the relevant source | Unchecked |
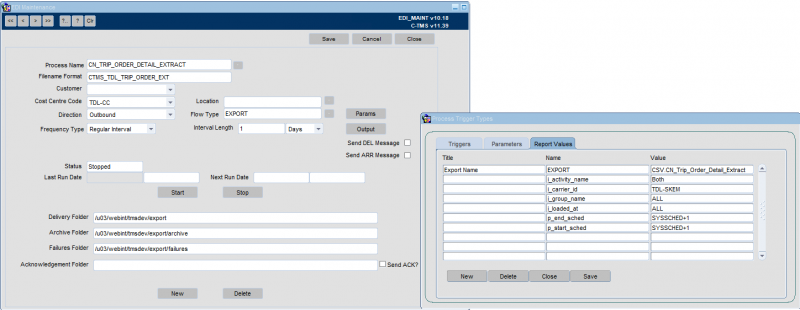
Parameters must then be entered for the process through the Params button:
| Title | Name | Value |
|---|---|---|
| Export Name | EXPORT | The name of the export required. |
| An optional parameter id, for ease of identification | the unique parameter name for the export | The value for this parameter |
Note that many of these parameter names and packages can be seen in the Extracts Details section.
You may then specify an email for the report using the Output button, specifying the destination email in the E-Mail column. You may specify multiple destinations.
Reports Scheduling
| Field | Description | Value |
|---|---|---|
| Process Name | This should indicate the nature of the job so it may be identified in the screen. Required. | A unique identifier for the report |
| Filename Format | This indicates how any files created or required by the process are names, for outbound files, the system will add the system date and time to ensure a unique filename is always generated. Required. | A unique name for the report. |
| Customer | Enter the Customer required using the Drop Down List. Optional. | As required |
| Cost Centre Code | The cost centre code may be used when the process is checking parameter values and may be matched to orders or trips to identify if the process should be running. Required. | As required |
| Direction | The direction is defined as outbound or inbound. This will indicate if the process in bringing data into C-TMS or sending data out of C-TMS. Required. | Outbound |
| Flow Type | This indicates the type of process, there are several different options discussed later. Required. | REPORT |
| Frequency Type | Frequency type indicates how often the process is run, are regular interval or specific time. Required. | As required |
| Process Time | Only available if selecting Frequency Type of Specific Time. The time at which the process is to run. | As required |
| (Day Selection) | Only available if selecting Frequency Type of Specific Time. Check All Days, or check the days on which you want the process to run. | As required |
| Interval Length | Only available if selecting Frequency Type of Regular Interval. Interval length indicates the regular interval. Enter the number , and then the unit (Seconds, Minutes, Hours, Days, Monthly). Required. | As required |
| Send DEL Message | If this box is checked then this can create an ARR message when the actual arrive times are fully entered | Unchecked |
| Send ARR Message | If this box is checked then this can create a DEL message when the order to deliver quantities are fully entered | Unchecked |
| Delivery Folder | When the file has been created this is the directory that the file will sit in until it has been picked up | A server-side folder for the extracted files. Provided by your implementation team. Usually /webint/(client-database)/export.
|
| Archive Folder | When the file has been picked up by the relevant source successfully the file gets moved to this directory | A server-side folder for the extracted files. Provided by your implementation team. Usually /webint/(client-database)/export.
|
| Failures folder | The directory of any files that failed to upload | A server-side folder for the extracted files. Provided by your implementation team. Usually /webint/(client-database)/export.
|
| Acknowledgment Folder | The directory for an acknowledgment message to sent to | N/A |
| Send ACK? | The box is checked if the Acknowledgment of an inbound flow is requested. The Acknowledgment will then been sent to folder to be picked up by the relevant source | Unchecked |
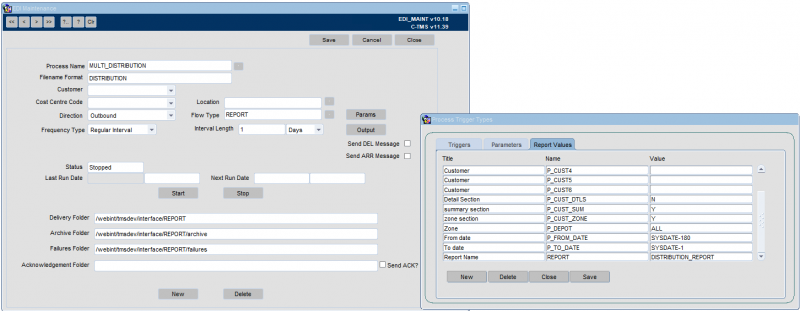
Parameters must then be entered for the process through the Params button:
| Title | Name | Value |
|---|---|---|
| Report Name | REPORT | The name of the report required. |
| An optional parameter id, for ease of identification | The unique parameter name for the export | The value for this parameter |
Note that many of these parameter names and packages can be seen in the Reports Details section. The reports name can be found in the System Configuration screen and are listed in the Reports List.
You may then specify an email for the report using the Output button, specifying the destination email in the E-Mail column. You may specify multiple destinations.
MIS/BI Extracts Scheduling
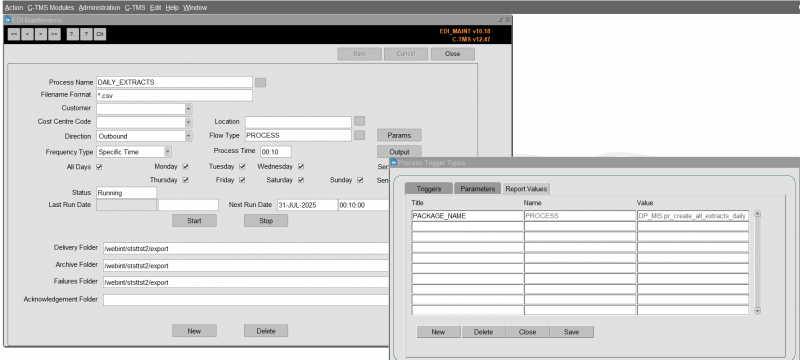
The MIS/BI processes are configured by your implementation team - see BI Data Extract Guide for more information on this process. The process is then scheduled to run daily at a specific time.
| Field | Description | Value |
|---|---|---|
| Process Name | This should indicate the nature of the job so it may be identified in the screen. Required. | A unique identifier for the extracts, e.g. DAILY_EXTRACTS |
| Filename Format | This indicates how any files created or required by the process are names, for outbound files, the system will add the system date and time to ensure a unique filename is always generated. Required. | *.csv |
| Customer | Enter the Customer required using the Drop Down List. Optional. | N/A |
| Cost Centre Code | The cost centre code may be used when the process is checking parameter values and may be matched to orders or trips to identify if the process should be running. Required. | N/A |
| Direction | The direction is defined as outbound or inbound. This will indicate if the process in bringing data into C-TMS or sending data out of C-TMS. Required. | Outbound |
| Flow Type | This indicates the type of process, there are several different options discussed later. Required. | PROCESS |
| Frequency Type | Frequency type indicates how often the process is run, are regular interval or specific time. Required. | Specific Time |
| Process Time | Only available if selecting Frequency Type of Specific Time. The time at which the process is to run. | e.g. 00:10 |
| (Day Selection) | Only available if selecting Frequency Type of Specific Time. Check All Days, or check the days on which you want the process to run. | All Days |
| Interval Length | Only available if selecting Frequency Type of Regular Interval. Interval length indicates the regular interval. Enter the number , and then the unit (Seconds, Minutes, Hours, Days, Monthly). Required. | N/A |
| Send DEL Message | If this box is checked then this can create an ARR message when the actual arrive times are fully entered | Unchecked |
| Send ARR Message | If this box is checked then this can create a DEL message when the order to deliver quantities are fully entered | Unchecked |
| Delivery Folder | When the file has been created this is the directory that the file will sit in until it has been picked up | A server-side folder for the extracted files. Provided by your implementation team. Usually /webint/(client-database)/export.
|
| Archive Folder | When the file has been picked up by the relevant source successfully the file gets moved to this directory | A server-side folder for the extracted files. Provided by your implementation team. Usually /webint/(client-database)/export.
|
| Failures folder | The directory of any files that failed to upload | A server-side folder for the extracted files. Provided by your implementation team. Usually /webint/(client-database)/export.
|
| Acknowledgment Folder | The directory for an acknowledgment message to sent to | N/A |
| Send ACK? | The box is checked if the Acknowledgment of an inbound flow is requested. The Acknowledgment will then been sent to folder to be picked up by the relevant source | Unchecked |
Parameters must then be entered for the process through the Params button:
| Title | Name | Value |
|---|---|---|
| PACKAGE_NAME | PROCESS | DP_MIS.pr_create_all_extracts_daily |


