Trip Overview (Waterfall)
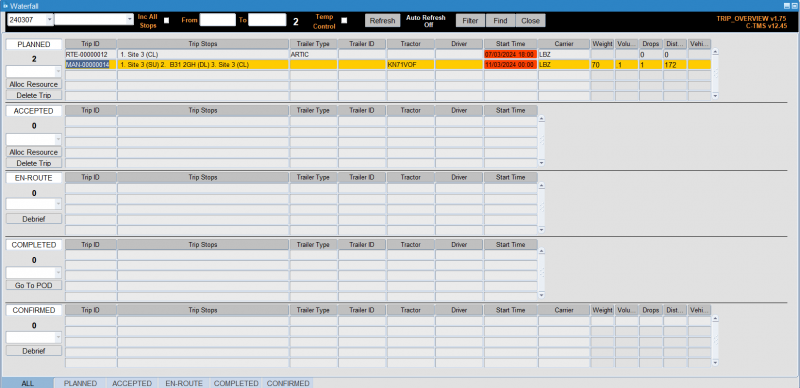
The Trip Overview is used to give the user a general overview of all trips on a particular Schedule, sectioned into Statuses. If required, all trips with a particular status can be displayed on a page of their own using the tab pages at the bottom.
The Trip Overview or Waterfall screen allows you to view multiple trips and move them on by status all in one place, also allowing the user to allocate or change resources and debrief the trips. The screen can be accessed through C-TMS Modules/ Trip Management/ Trip Overview (Waterfall) menu option.

This screen can be used to Allocate Resources to Planned and Accepted trips, Debrief trips which are En-Route or Confirmed and update PODs for trips at status of Completed.
Basic Usage
Initially, the screen displays all trips for the current schedule.
You can change the filters at the top of the screen to change the trips displayed:
- Schedule - The Schedule defaults to the current date but the drop down list button shows all other available schedules.
- (Depots) - the drop-down list next to Schedule. This field allows the user to select "All depots" or filter trips to show for a specific Depot. This is based on user privileges. (See Access and Login Guide).
- All Stops check box.
- From/To - The date range fields can be used as an alternative to using a schedule. The Schedule field must be blanked out prior to putting in a date range.
- Temp Control check-box.
You can apply the filter with the Refresh button.
Total Order Count
There are two indicators that give you the Trip order count after the search parameters have been entered. The first being the total amount Orders against all the trips shown at the top of the form, the other being by Trip Status shown to the left of each panel.
Refresh
If you press the Refresh button the screen will refresh and show any changes that have been updated by other users. There is an option to auto refresh the screen. (See Preferences)
Finding Trips
The buttons at the top of the screen are used to help you find specific trips and each section can have its layout configured to suit your needs. The number below each status, in bold, is a count of the number of trip in that particular status for the schedule selected from the drop down list.

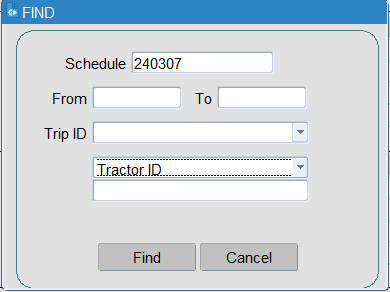
The trips can be found by clicking the Find button and entering the following criteria:
- Schedule - The Schedule defaults to the current date but you can enter any available schedule.
- From/To - The date range fields can be used as an alternative to using a schedule. The Schedule field must be blanked out prior to putting in a date range. After the date range has been entered you should press the Refresh button for the data to be populated.
- Trip ID - an optional drop-down list of available trips.
- One additional other optional criteria from the following list:
- Trip Ref
- Order No
- Booking Ref
- Customer Ref
- Container No (Trip)
- Container No (Order)
- Bill Of Lading (Order)
- EFX Ref (Trip)
- EFX Ref (Order)
- Trailer ID
- Driver
- Tractor ID
When found, the screen will display all matching trips in the appropriate sections of the screen.
If you decide not to use the find trips you can click the Close button to exit the screen and return back to the overview without any changes taking affect.
Filtering Trips

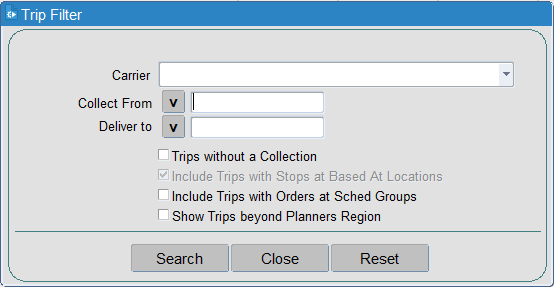
The trips can also be filtered using the following criteria:
- Carrier - a drop-down list of all available carriers you your user.
- Collect From - a list of location from which the orders are being collected. You can use the v button to initiate a pop-up lookup.
- Deliver To - a list of location from which the orders are being delivered. You can use the v button to initiate a pop-up lookup.
- Checkboxes can also apply a filter:
- Trips without a Collection - this is initially unchecked.
- Include Trips with Stops at Based At locations - this is initially checked.
- Include Trips with Orders at Sched Groups - this is initially unchecked.
- Show Trips beyond Planning Region - this is initially unchecked.
You can apply the filter with the Search button. You can exit without changing the filters with the Close button. You can reset the filters to the default values using the Reset button.
When found, the screen will display all matching trips in the appropriate sections of the screen.
Configuring the Layout
Each table layout is configurable - right click on the table in the ALL tab and select Configure Layout.
The Layout can be given a name and save as the Default layout. Multiple layouts can be created but note these are only layouts for the current logged on User.
The Yellow highlighted rows are the columns currently being used. They can be deselected by holding down the CTRL key and clicking the line. This same function is also used for adding new columns to the layout. The display size of individual fields can be amended down to the minimum width to allow more fields to be added.
The columns are:
- Column – This is a full list of all the columns that can be added to the layout.
- Curr Width – This is the current Width of the fields
- Min Width – This is the minimum width of the fields
- New Width – You can enter a new Column Width, this cannot be less than the minimum width
- Ok button - when happy with your selection you should press this, which will return you back to the overview screen.
- Delete button – This button deletes a column from the list. This button does not work unless the privilege has been given to you to do so.
- Cancel button - To Cancel any changes you should click the Cancel button, which will take you back to the overview screen without making any changes
Note that each status section can have its own respective layout.
Note that at the bottom of the screen there are two view only fields that show the user the Current total selected Width and the Maximum allowed Width. Ensure that by adding additional fields the size remains within this maximum allowed width, or you will not be able to save or apply the layout.
Each trip status table can be configured with a different layout. If you have a saved layout configuration for a particular trip status, you can select it from the drop-down list on the left of the table.
The configured layout applies to the trip status on the ALL tab and on the specific trip status tab, selected from the bottom of the screen.
Status Tabs
At the bottom of the form you have the ability to see all trips by their respective status. All blocks can be expanded to show all the trips with the respective status.
On these specific status tabs, you can see the same columns that have been configured in the layout against each status section.
Preferences
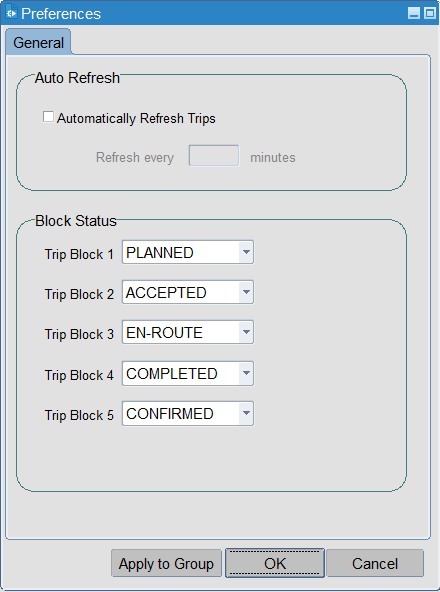
The tabs can be configured as to which trip status to display on each tab. You can access this through the right-click Preferences option against any trip status table.

You can select which statuses to display in the screen, up to 5.
You can also set the auto-refresh settings from this pop-up window. This will enable the auto-refresh functionality and set the refresh time.
You can also switch auto-refresh on or off from the main screen heading.
If you switch on auto-refresh, this screen can be used as a real time monitor of trip statuses.
Actions
Each trip status allows different available button functionality, as below:
- PLANNED/TENDERED/ALLOCATED status:
- Alloc Resources
- Delete Trip
- EN-ROUTE/CONFIRMED status:
- Debrief
- COMPLETED status:
- Go To POD
Each panel has right-click options:
- Common to all statuses:
- Refresh
- Configure Layout
- Set Trip Status
- Set Sub Contractor
- Remove Sub Contractor
- Desp Conf Message Hold
- Preferences
- Edit Trip
- Run Report - the screen will display a popup window showing any extracts which have been configured for use in the Waterfall screen. You can then select and run the extract and the results will be downloaded through your browser. A list of all extracts including those specified for use in the waterfall screen can be found in the Extracts List.
- PLANNED/TENDERED/ACCEPTED status
- Remove Driver
- Remove Tractor
- Remove Trailer
- Allocate Resources
- Delete Trip
- EN-ROUTE/COMPLETED/CONFIRMED status
- Debrief
Set Trip Status
Right click to see the option to set the status. Note that a single trip line will need to be highlighted in order to move the status on for that trip.
The exception to this is when setting multiple trips to ACCEPTED status - you can select multiple trips when doing this.
When changing a trip status from ACCEPTED to ENROUTE a message is displayed informing you that a departure time must be entered. Press OK to enter the departure time.
Allocate Resources
Select a trip from the well that you want to allocate resources to, then click the 'Alloc Resource' button.
The Allocated Resources screen will be displayed - depending on your configuration, it may be one of two:
Debrief
Clicking the Debrief button or selecting the Debrief action option will take you into the Trip Debrief screen when you can debrief the trip as normal. This guide does not cover the debrief process, but this is covered in a separate guide.
Go to POD
Clicking the Go to POD button will again take you into the Trip Debrief screen when you apply a POD.
Edit Trip
Yoiu can right-click on any single trip in any tab and select Edit Trip - this will take you to the planning screen, showing the schedule and trip selected.
You can also double-click any trip on any panel to do the same.
Trip Completion
At the end of a working day all status blocks should be completed with the exception of "Completed" and "Confirmed".
You can press the Close button to close the waterfall screen.
Further Configuration
The following system parameters affect this functionality:
| Parameter | Description | Level |
|---|---|---|
| TRIP_OVERVIEW_CURRENT_TYRES | Use the current quantity of tyres in the Trip Waterfall screen (Y/N) | SYSTEM |
| TRIP_TRAMPS_ON_WATERFALL | Allow tramping trips to be shown in waterfall form by date not schedule | SYSTEM |
| TRM_HIGHLIGHT_OVERDUE_FINISH | Trip Status used in Trip Overview screen to highlight overdue finish time | SYSTEM |
| TRM_HIGHLIGHT_OVERDUE_START | Trip Status used in Trip Overview screen to highlight overdue start time | SYSTEM |
| TRM_ORD_OVERVIEW | Include Orders in Trip Overview screen | COST_CENTRE |
| TRM_OVERVIEW_AMBER_TIME | Time allowed before start and finish times are amber in TRIP OVERVIEW | SYSTEM |
| TRM_OVERVIEW_RED_TIME | Time allowed before start and finish times are red in TRIP OVERVIEW | SYSTEM |
| USE_PACK_QUANTITY | Use the current quantity of tyres in the Trip Waterfall screen (Y/N) | SYSTEM |
| WATERFALL_UPDATES | control updates on the waterfall screen | SYSTEM |