EDI Maintenance
The EDI interface screen is accessed from the Interface menu.
General Functionality
The EDI interface screen allows users to control the following activities on the system
- Outbound Flows
- Inbound Flows
- Database Jobs
- Database Processes
- Report and Extract generation
- ORS Report generation
Controllable settings include setting the time, frequency, type of process, outbound file names and folders, outbound emails, data parameters and ftp settings.
The following buttons are available:
- New Button - Clears any data currently in any of the fields to allow the user to enter a new process flow.
- Delete Button - Deletes the Process flow.
- Params Button - A number of Parameters / Triggers Can be entered. These control various rules about the business that are out of scope of the Standard xml schemer. These are normally set by by your implementation team in the first instance.
- Output Button - This screen is for Outbound flows only and contains Destination IP Address and security usernames and passwords.
To create a new EDI process, select the New button on the screen.
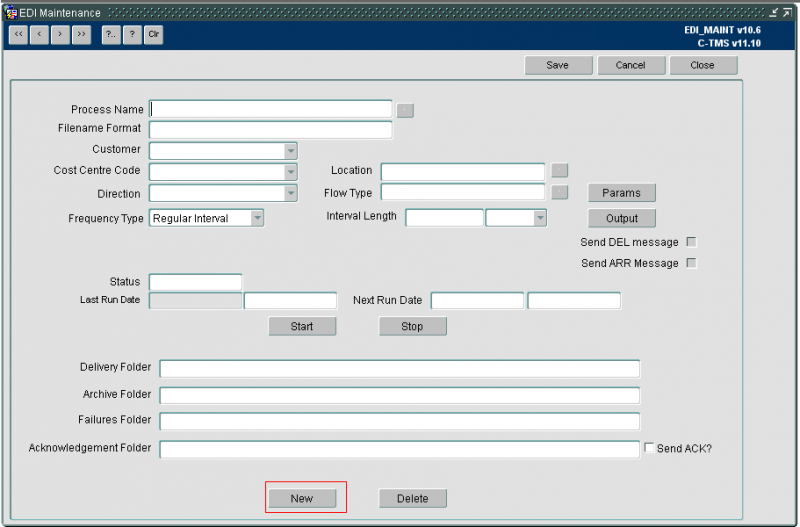
The following Information may be entered when creating a new EDI process
| Field | Description |
|---|---|
| Process Name | This should indicate the nature of the job so it may be identified in the screen. Required. |
| Filename Format | This indicates how any files created or required by the process are names, for outbound files, the system will add the system date and time to ensure a unique filename is always generated. Required. |
| Customer | Enter the Customer required using the Drop Down List. Optional. |
| Cost Centre Code | The cost centre code may be used when the process is checking parameter values and may be matched to orders or trips to identify if the process should be running. Required. |
| Location | The location may be used to specify selection of data from a particular location code. A lookup is provided. |
| Direction | The direction is defined as outbound or inbound. This will indicate if the process in bringing data into C-TMS or sending data out of C-TMS. Required. |
| Flow Type | This indicates the type of process, there are several different options discussed later. Required. |
| Frequency Type | Frequency type indicates how often the process is run, are regular interval or specific time. Required. |
| Process Time | Only available if selecting Frequency Type of Specific Time. The time at which the process is to run. |
| (Day Selection) | Only available if selecting Frequency Type of Specific Time. Check All Days, or check the days on which you want the process to run. |
| Interval Length | Only available if selecting Frequency Type of Regular Interval. Interval length indicates the regular interval. Enter the number , and then the unit (Seconds, Minutes, Hours, Days, Monthly). Required. |
| Interval Length | Interval length indicates the regular interval. Required. |
| Send DEL Message | If this box is checked then this can create an ARR message when the actual arrive times are fully entered |
| Send ARR Message | If this box is checked then this can create a DEL message when the order to deliver quantities are fully entered |
| Delivery Folder | When the file has been created this is the directory that the file will sit in until it has been picked up |
| Archive Folder | When the file has been picked up by the relevant source successfully the file gets moved to this directory |
| Failures folder | The directory of any files that failed to upload |
| Acknowledgment Folder | The directory for an acknowledgment message to sent to |
| Send ACK? | The box is checked if the Acknowledgment of an inbound flow is requested. The Acknowledgment will then been sent to folder to be picked up by the relevant source |
The screen also displays the following information about the flow:
| Field | Description |
|---|---|
| Process Time | This option is only visible if the Frequency Type has been set to ‘Specific Time’. The user can simply enter the time that the flow should be run. Also the checkboxes can be flagged for the required days of the week |
| Status | This is not an editable field and tells the user if the Flow is running or has been stopped |
| Last Run Date | This tells the user the Date and time the process last ran |
| Next Run Date | This is the date and time the flow is due to run next |
| Start / Stop Buttons | Stops and starts the process flow. Please note that only the user that started the process can stop it |
The flow types available to select are listed below:
- EXPORT - Run an Export process.
- FORD_EDI_IN - bespoke EDI process
- MILE_XML
- MILK_ROUND - generation of milk rounds
- ORD_COLL_XML
- ORD_OR3
- ORD_XML
- ORD_XML_OUT
- ORS - run an ORS report
- PLUTO_ACTUALS
- POD_XML
- PROCESS - trigger a process
- PULSE_ORDERS - bespoke EDI process
- REPORT - run a report
- SCN
- SESSION_XML - import sessions
- STS_XML
- TRACK_IMPORT
- TRIP_ORD_XML
- TRIP_XML
- UNISON_FLAT - Legacy WMS flat-file import process
For running specific extracts and processes, PROCESS should be used.
For automatically running reports, use the REPORTS type.
For automatically running extracts, use the REPORTS type.
For automatically running exports created through ORS, use the ORS type.
If a frequency type of Specific time is selected, the following information is displayed on screen. Users are required to specify a process time and the days of the week the job will run.

Parameters
In addition to the EDI header, users may be required to specify additional outputs and job parameters. There are several job parameters which will control how jobs are run and the data they process. If a parameter is required for a job, users will be informed by the developer to set up the parameter and the value they should set it to.
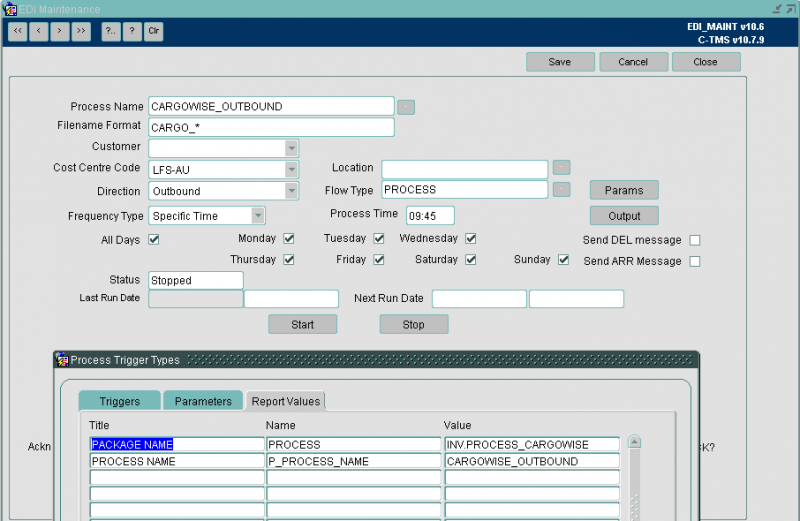
Output
Output applied to a process may be different, depending upon the type of process. If a PROCESS type is selected, users are able to define FTP information. If a REPORT type is selected, users may define email addresses for report output.
Users will always be instructed how to set up the jobs but may use the screen to control when the job runs.
Examples
Creating an Inbound Order EDI Flow
- Enter the Process Name e.g. INB_ORDERS
- Enter the Filename Format e.g. INB_ORD
- Enter the Customer from the list available
- Enter the Cost Centre from the list available
- Enter "Inbound" from the Direction field
- Click on the button next to the Flow Type field to populate a list of values and select ORD_XML
- Enter the required Frequency type and interval length. For example, a set Regular Interval could be chosen and an interval length of 15 minutes.
- Enter a Delivery folder directory path
- Enter an Archive Folder directory path
- Enter a Failures Folder directory path
When everything is set-up click the Start Button to run the process.
Creating an Outbound EDI Flow
- Enter the Process Name e.g. OUT_TRIPS
- Enter the Filename Format e.g. OUT_TRP
- Enter the Customer from the list available
- Enter the Cost Centre from the list available
- Enter "Outbound" from the Direction field
- Click on the button next to the Flow Type field to populate a list of values and select TRIP_XML
- Enter the required Frequency type and interval length. In the example screenshot below, Regular Interval has been chosen and an interval length of 15 minutes
- Enter a Delivery folder directory path
- Enter an Archive Folder directory path
- Enter a Failures Folder directory Path
You may also click the Output button - this shows a screen that allows you to enter the access details to allow C-TMS permission to FTP a file to another system.
- Destination IP - The IP Address of recipient Server
- FTP Port - The Port Number of recipient server
- FTP Username - Login ID for recipient server
- FTP Password - Password for above login ID
- FTP Directory - Delivery Directory for recipient server
![]() Note: An Outbound file can be collected from the Aptean Server or delivered by FTP.
Note: An Outbound file can be collected from the Aptean Server or delivered by FTP.
Creating Scheduled Reports/Extracts
This section demonstrates how to set up an EDI process in order to schedule ORS reports and extracts.
ORS Reports Scheduling
The extract suite option can be used to extract data into a CSV file format. These extracts are in a predefined format and the data can be controlled by the use of selection criteria which can be entered when the extract runs, the columns of data extracted can be selected or excluded by the user to control the actual data values extracted. These reports can be created by users and saved as reports, which can then be run on demand or scheduled and emailed.
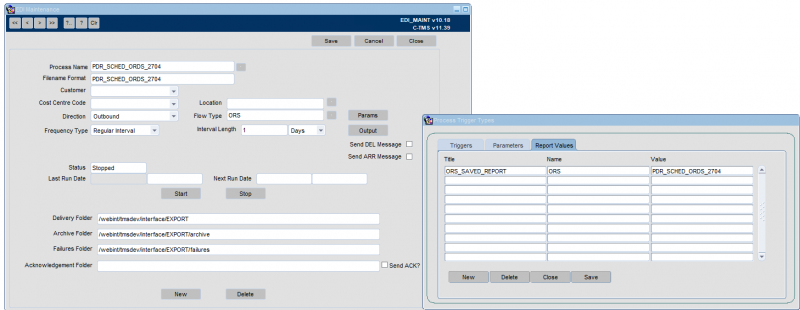
Any report saved may be scheduled as EDI outbound messages, where parameters may be entered and the output configured. The below screens show an ORS report being configured for running every 1 day:
| Field | Description | Value |
|---|---|---|
| Process Name | This should indicate the nature of the job so it may be identified in the screen. Required. | A unique identifier for the report, e.g. OPS_REPORT1 |
| Filename Format | This indicates how any files created or required by the process are names, for outbound files, the system will add the system date and time to ensure a unique filename is always generated. Required. | rep1 |
| Customer | Enter the Customer required using the Drop Down List. Optional. | Optional |
| Cost Centre Code | The cost centre code may be used when the process is checking parameter values and may be matched to orders or trips to identify if the process should be running. Required. | Optional |
| Location | The location may be used to specify selection of data from a particular location code. A lookup is provided. | N/A |
| Direction | The direction is defined as outbound or inbound. This will indicate if the process in bringing data into C-TMS or sending data out of C-TMS. Required. | Outbound |
| Flow Type | This indicates the type of process, there are several different options discussed later. Required. | ORS |
| Frequency Type | Frequency type indicates how often the process is run, are regular interval or specific time. Required. | As required |
| Process Time | Only available if selecting Frequency Type of Specific Time. The time at which the process is to run. | As required |
| (Day Selection) | Only available if selecting Frequency Type of Specific Time. Check All Days, or check the days on which you want the process to run. | As required |
| Interval Length | Only available if selecting Frequency Type of Regular Interval. Interval length indicates the regular interval. Enter the number , and then the unit (Seconds, Minutes, Hours, Days, Monthly). Required. | As required |
| Send DEL Message | If this box is checked then this can create an ARR message when the actual arrive times are fully entered | Unchecked |
| Send ARR Message | If this box is checked then this can create a DEL message when the order to deliver quantities are fully entered | Unchecked |
| Delivery Folder | When the file has been created this is the directory that the file will sit in until it has been picked up | A server-side folder for the extracted files. Provided by your implementation team. Usually /webint/(client-database)/export.
|
| Archive Folder | When the file has been picked up by the relevant source successfully the file gets moved to this directory | A server-side folder for the extracted files. Provided by your implementation team. Usually /webint/(client-database)/export.
|
| Failures folder | The directory of any files that failed to upload | A server-side folder for the extracted files. Provided by your implementation team. Usually /webint/(client-database)/export.
|
| Acknowledgment Folder | The directory for an acknowledgment message to sent to | N/A |
| Send ACK? | The box is checked if the Acknowledgment of an inbound flow is requested. The Acknowledgment will then been sent to folder to be picked up by the relevant source | Unchecked |
Report Values must then be entered for the process through the Params button:
| Title | Name | Value |
|---|---|---|
| ORS_SAVED_REPORT | ORS | Your saved report name |
| audit_process | audit_process | Optional - whether the report production is audited for diagnostic purposes for the Aptean support team. Omit unless asked to apply by your Aptean support team. |
You may then specify an email for the report using the Output button, specifying the destination email in the E-Mail column. You may specify multiple destinations.
Extracts Scheduling
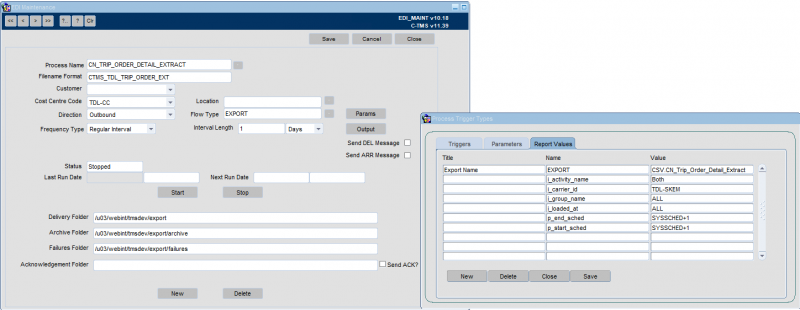
| Field | Description | Value |
|---|---|---|
| Process Name | This should indicate the nature of the job so it may be identified in the screen. Required. | A unique identifier for the extract, e.g. DAILY_EXTRACTS |
| Filename Format | This indicates how any files created or required by the process are names, for outbound files, the system will add the system date and time to ensure a unique filename is always generated. Required. | A unique name for the extract. |
| Customer | Enter the Customer required using the Drop Down List. Optional. | As required |
| Cost Centre Code | The cost centre code may be used when the process is checking parameter values and may be matched to orders or trips to identify if the process should be running. Required. | As required |
| Direction | The direction is defined as outbound or inbound. This will indicate if the process in bringing data into C-TMS or sending data out of C-TMS. Required. | Outbound |
| Flow Type | This indicates the type of process, there are several different options discussed later. Required. | EXPORT |
| Frequency Type | Frequency type indicates how often the process is run, are regular interval or specific time. Required. | As required |
| Process Time | Only available if selecting Frequency Type of Specific Time. The time at which the process is to run. | As required |
| (Day Selection) | Only available if selecting Frequency Type of Specific Time. Check All Days, or check the days on which you want the process to run. | As required |
| Interval Length | Only available if selecting Frequency Type of Regular Interval. Interval length indicates the regular interval. Enter the number , and then the unit (Seconds, Minutes, Hours, Days, Monthly). Required. | As required |
| Send DEL Message | If this box is checked then this can create an ARR message when the actual arrive times are fully entered | Unchecked |
| Send ARR Message | If this box is checked then this can create a DEL message when the order to deliver quantities are fully entered | Unchecked |
| Delivery Folder | When the file has been created this is the directory that the file will sit in until it has been picked up | A server-side folder for the extracted files. Provided by your implementation team. Usually /webint/(client-database)/export.
|
| Archive Folder | When the file has been picked up by the relevant source successfully the file gets moved to this directory | A server-side folder for the extracted files. Provided by your implementation team. Usually /webint/(client-database)/export.
|
| Failures folder | The directory of any files that failed to upload | A server-side folder for the extracted files. Provided by your implementation team. Usually /webint/(client-database)/export.
|
| Acknowledgment Folder | The directory for an acknowledgment message to sent to | N/A |
| Send ACK? | The box is checked if the Acknowledgment of an inbound flow is requested. The Acknowledgment will then been sent to folder to be picked up by the relevant source | Unchecked |
Report Values must then be entered for the process through the Params button:
| Title | Name | Value |
|---|---|---|
| Export Name | EXPORT | The name of the export required. |
| An optional parameter id, for ease of identification | the unique parameter name for the export | The value for this parameter |
Note that many of these parameter names and packages can be seen in the Extracts Details section.
You may then specify an email for the report using the Output button, specifying the destination email in the E-Mail column. You may specify multiple destinations.
Reports Scheduling
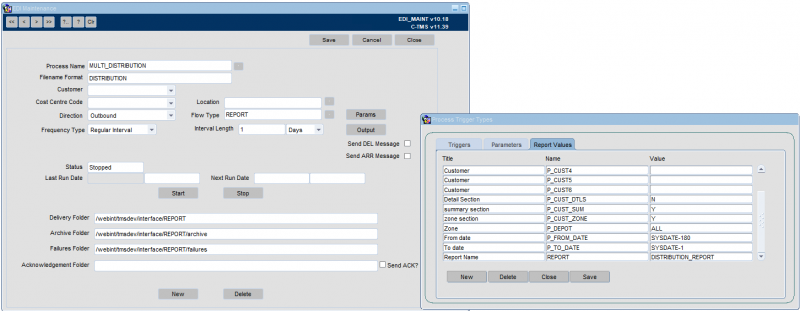
| Field | Description | Value |
|---|---|---|
| Process Name | This should indicate the nature of the job so it may be identified in the screen. Required. | A unique identifier for the report |
| Filename Format | This indicates how any files created or required by the process are names, for outbound files, the system will add the system date and time to ensure a unique filename is always generated. Required. | A unique name for the report. |
| Customer | Enter the Customer required using the Drop Down List. Optional. | As required |
| Cost Centre Code | The cost centre code may be used when the process is checking parameter values and may be matched to orders or trips to identify if the process should be running. Required. | As required |
| Direction | The direction is defined as outbound or inbound. This will indicate if the process in bringing data into C-TMS or sending data out of C-TMS. Required. | Outbound |
| Flow Type | This indicates the type of process, there are several different options discussed later. Required. | REPORT |
| Frequency Type | Frequency type indicates how often the process is run, are regular interval or specific time. Required. | As required |
| Process Time | Only available if selecting Frequency Type of Specific Time. The time at which the process is to run. | As required |
| (Day Selection) | Only available if selecting Frequency Type of Specific Time. Check All Days, or check the days on which you want the process to run. | As required |
| Interval Length | Only available if selecting Frequency Type of Regular Interval. Interval length indicates the regular interval. Enter the number , and then the unit (Seconds, Minutes, Hours, Days, Monthly). Required. | As required |
| Send DEL Message | If this box is checked then this can create an ARR message when the actual arrive times are fully entered | Unchecked |
| Send ARR Message | If this box is checked then this can create a DEL message when the order to deliver quantities are fully entered | Unchecked |
| Delivery Folder | When the file has been created this is the directory that the file will sit in until it has been picked up | A server-side folder for the extracted files. Provided by your implementation team. Usually /webint/(client-database)/export.
|
| Archive Folder | When the file has been picked up by the relevant source successfully the file gets moved to this directory | A server-side folder for the extracted files. Provided by your implementation team. Usually /webint/(client-database)/export.
|
| Failures folder | The directory of any files that failed to upload | A server-side folder for the extracted files. Provided by your implementation team. Usually /webint/(client-database)/export.
|
| Acknowledgment Folder | The directory for an acknowledgment message to sent to | N/A |
| Send ACK? | The box is checked if the Acknowledgment of an inbound flow is requested. The Acknowledgment will then been sent to folder to be picked up by the relevant source | Unchecked |
Report Values must then be entered for the process through the Params button:
| Title | Name | Value |
|---|---|---|
| Report Name | REPORT | The name of the report required. |
| An optional parameter id, for ease of identification | The unique parameter name for the export | The value for this parameter |
Note that many of these parameter names and packages can be seen in the Reports Details section. The reports name can be found in the System Configuration screen and are listed in the Reports List.
You may then specify an email for the report using the Output button, specifying the destination email in the E-Mail column. You may specify multiple destinations.
MIS/BI Extracts Scheduling
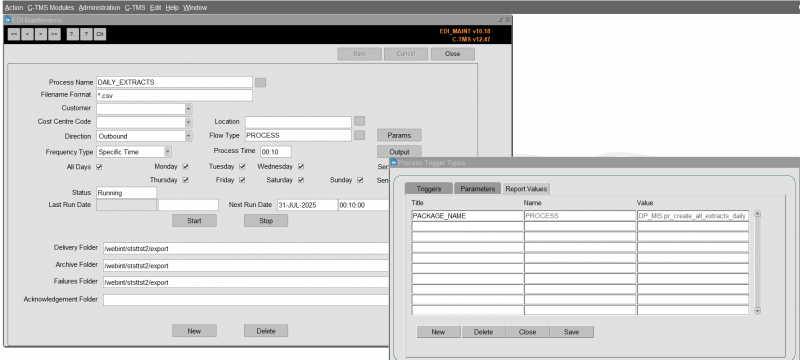
The MIS/BI processes are configured by your implementation team - see BI Data Extract Guide for more information on this process. The process is then scheduled to run daily at a specific time.
| Field | Description | Value |
|---|---|---|
| Process Name | This should indicate the nature of the job so it may be identified in the screen. Required. | A unique identifier for the extracts, e.g. DAILY_EXTRACTS |
| Filename Format | This indicates how any files created or required by the process are names, for outbound files, the system will add the system date and time to ensure a unique filename is always generated. Required. | *.csv |
| Customer | Enter the Customer required using the Drop Down List. Optional. | N/A |
| Cost Centre Code | The cost centre code may be used when the process is checking parameter values and may be matched to orders or trips to identify if the process should be running. Required. | N/A |
| Direction | The direction is defined as outbound or inbound. This will indicate if the process in bringing data into C-TMS or sending data out of C-TMS. Required. | Outbound |
| Flow Type | This indicates the type of process, there are several different options discussed later. Required. | PROCESS |
| Frequency Type | Frequency type indicates how often the process is run, are regular interval or specific time. Required. | Specific Time |
| Process Time | Only available if selecting Frequency Type of Specific Time. The time at which the process is to run. | e.g. 00:10 |
| (Day Selection) | Only available if selecting Frequency Type of Specific Time. Check All Days, or check the days on which you want the process to run. | All Days |
| Interval Length | Only available if selecting Frequency Type of Regular Interval. Interval length indicates the regular interval. Enter the number , and then the unit (Seconds, Minutes, Hours, Days, Monthly). Required. | N/A |
| Send DEL Message | If this box is checked then this can create an ARR message when the actual arrive times are fully entered | Unchecked |
| Send ARR Message | If this box is checked then this can create a DEL message when the order to deliver quantities are fully entered | Unchecked |
| Delivery Folder | When the file has been created this is the directory that the file will sit in until it has been picked up | A server-side folder for the extracted files. Provided by your implementation team. Usually /webint/(client-database)/export.
|
| Archive Folder | When the file has been picked up by the relevant source successfully the file gets moved to this directory | A server-side folder for the extracted files. Provided by your implementation team. Usually /webint/(client-database)/export.
|
| Failures folder | The directory of any files that failed to upload | A server-side folder for the extracted files. Provided by your implementation team. Usually /webint/(client-database)/export.
|
| Acknowledgment Folder | The directory for an acknowledgment message to sent to | N/A |
| Send ACK? | The box is checked if the Acknowledgment of an inbound flow is requested. The Acknowledgment will then been sent to folder to be picked up by the relevant source | Unchecked |
Report Values must then be entered for the process through the Params button:
| Title | Name | Value |
|---|---|---|
| PACKAGE_NAME | PROCESS | DP_MIS.pr_create_all_extracts_daily |
Creating Processes
In general, creating specific EDI processes follows the same procedure as the above. The MIS/BI Reporting extract process is an example of a process.
There are many processes, mostly for a very specific reason or bespoke processes. A list of processes follows. Note that this list if evolving and may not be complete:
| Process | Notes |
|---|---|
| ACC.GENERATE_WAREHOUSE_CHARGES | |
| ASSET.REMOVE_DELETED_ASSETS | |
| DP_3PL_SCHED.DEPOT_SWEEP | The Depot Sweep process, used in conjunction with the fixed drop scheduling engine |
| DP_BMW_EDI_IN.PROCESS_FILES | |
| DP_BMW_EDI_OUT.SEND_CLAIMS | |
| DP_BNL_EDI_IN.P_PROCESS_FILES | |
| DP_BNL_EDI_OUT.P_PROCESS_PLAN | |
| DP_BWSC.PROCESS_FILES | |
| DP_CSV4.TOKAIRO_CUST_EXPORT | |
| DP_CSV6.TIMI_EXTRACT | A bespoke tracking extract. |
| DP_CSV_DUN.STORE_PVA | |
| DP_CSV_POD.P_PROCESS_CSV_POD | |
| DP_DRIVER_SCHEDULING.ADD_SCANNED_ORDERS_TO_TRIP | |
| DP_EPOD_WEBSERVICE.epod_locked_job | A helper process for any locked jobs, used in conjunction with Calidus ePOD . |
| DP_EPOD_WEB_SERVICE.get_vehicle_info | A helper process, used in conjunction with Calidus ePOD . |
| DP_EXPORT_EVENTS.PROCESS_XML_OUTBOUND_API | |
| DP_FINANCE.D365_EXPORT | |
| DP_FINANCE.D365_EXTRACT | |
| DP_FIXED_IMPORT.P_PROCESS_FILES | |
| DP_IMP.P_PROCESS_CIPD | |
| DP_INT_XML_CARPOD.PROCESS_CARPOD_IN | A process for importing Carrier POD files. |
| DP_LFE_POD.PROCESS_FILES | |
| DP_LOGINEXT.PROCESS_OUTBOUND | A process for exporting trips and orders to 3rd party carriers using the LogiNext system. |
| DP_LOGIX_NHSBT.OUTBOUND_PROCESS | |
| DP_MIS.PR_CREATE_ALL_EXTRACTS | An MIS/BI extract process |
| DP_MIS.PR_CREATE_ALL_EXTRACTS_DAILY | An MIS/BI extract process |
| DP_MIS.PR_CREATE_ALL_EXTRACTS_DATES | An MIS/BI extract process |
| DP_NOKIA_LOC_PLAT.FIND_SIMILAR_SUBURBS | A help process for Nokia Maps extracts |
| DP_PAR_API.READ_PARAGON_IN | A Paragon API process |
| DP_PAR_API_STP.P_UNSCHEDULE | A Paragon API process |
| DP_PAR_API_STP.get_paragon | A Paragon API process |
| DP_PAR_API_STP.get_paragon_route | A Paragon API process |
| DP_PAR_API_STP.process_paragon | A Paragon API process |
| DP_REPORTS.DAY_BEFORE_MSG | A Reports process |
| DP_REPORTS.PROCESS_CLICK_OUTBOUND | A Reports process |
| DP_REPORTS.P_PROCESS_ORD_CONF | A Reports process |
| DP_REPORTS.P_PROCESS_PRE_DEL | A Reports process |
| DP_REPORTS.P_PROCESS_URGENT | A Reports process |
| DP_REPORTS.P_RUN_DAILY_STORE_ASN_REPORT | A Reports process |
| DP_REPORTS.P_RUN_STORE_REPORT | A Reports process |
| DP_REPORTS.SEND_CALLBACK_EMAIL | A Reports process |
| DP_REPORTS.SEND_DEL_EMAIL | A Reports process |
| DP_REPORTS.SEND_NON_CONFORM_EMAIL | A Reports process |
| DP_REPORTS.p_run_manifest_report | A Reports process |
| DP_RICO.RECEIVE_REPORT_STATUS | |
| DP_SCHEDULING_NHSBT.p_nhsbt_schedule | A bespoke scheduling process, used with the NHS scheduling engine. |
| DP_SHIPMENT.CLOSE_SHIPMENTS | |
| DP_SHIPMENT.RUN_CONSOLIDATION | |
| DP_TESLA_EDI_IN.IMPORT_ORDERS | A bespoke import process |
| DP_TOMTOM.GET_GEOFENCE | Part of the WEBFLEET interface |
| DP_TOMTOM.GET_MESSAGES | Part of the WEBFLEET interface |
| DP_TOMTOM.SEND_ORDERS | Part of the WEBFLEET interface |
| DP_TOMTOM.resend_stop(2029828,'A','911GT2') | Part of the WEBFLEET interface - a helper/support process. |
| DP_TOY_EDI_IN.P_PROCESS_FILES | A bespoke import process |
| FIXED.Gen_Fixed_Schedule | Part of the Fixed Schedule process |
| GEO.PROCESS_NEW_LOCATIONS | |
| HKP.Delete_interface_records('HUK') | |
| INT_XML_MIC.PROCESS_XML_OUTBOUND_MIC | The Microlise scanning interface |
| INT_XML_OUT2.PROCESS_XML_DESP_CONF | The Microlise scanning interface |
| INT_XML_OUT2.PROCESS_XML_MANIFEST | The Microlise scanning interface |
| INV.GENERATE_ALL_INVOICES | Invoice generation |
| INV.PROCESS_CARGOWISE | Bespoke Invoice Generation |
| ORS.UPDATE_ORDER_STATS | |
| ORS.UPDATE_ORDER_STATS_all | |
| TRIP.BUF_DEL_INVALID | Bespoke process |
| TRM.P_AUTO_COMPLETE | |
| TRM.fn_load_trunks | |
| int_msg.process_msg_header_int_file | |
| int_msg.process_pod_int_file | |
| int_xml_in.process_lift_update | |
| int_xml_in.process_on_hold | |
| process_xml_outbound_LOTS_ORDC |
Each process can be scheduled through this EDI screen.
In most cases, they also use parameters to determine the functionality of the process itself.
A list of applicable parameters is shown here: EDI Process Parameters.
Further to this, Report Values may need to be set for each process, to determine which data is being affected by the process..
A list of applicable report values is shown here: EDI Process Report Values.
