FS 318517 SCR22 NHSBT C-EPOD Hospital Own Transport
![]()
NHSBT
Hospital Own Transport
CALIDUS ePOD
22nd July 2014 - 0.5
Reference: FS 318517 SCR22
Contents
Functional Overview
Client Requirement
The following changes from the Solution Design document are included in this specification:
- SCR-316403-05 - Hospital Own Transport
- EPOD Scanning at handover at Depot and delivery into depot from 3rd-party carriers and Hospital Own Transport - Configured via CTMS. This needs to include empties and samples collected from hospitals and all items collected from sessions by TNT. EPOD application development
Solution Overview
In detail, the following C-EPOD execution functionality was requested:
The process for Hospital Own Transport deliveries is as follows:
- Hospital Services will scan all tags to Assets, as normal.
- These jobs will be planned onto a Trip assigned to a hospital-related user (i.e. one per hospital or depot), for the carrier "Hospital Own Transport". The Resource Allocation functionality will assist in choosing an available "driver". The trip will be allocated a vehicle (it is suggested only one vehicle is created and this same one is used for all trips for this carrier) and set to Accepted.
- When giving the jobs to Hospital Own Transport, Hospital Services will log on to the C-EPOD device and select the Job that the user is picking up. C-EPOD will be configured to allow users to select any job out of sequence.
- Hospital Services will scan to complete this collection, via the Asset tags. If there are any Buff Tags that have not been scanned to Assets, the device will make this known at this time.
- Once all items have been scanned, Hospital Services will obtain the driver's name and Signature on the device, to confirm change of ownership.
- C-TMS will automatically complete this job.
- No scanning or user entry is required for the delivery job - this will be automatically completed with the collection job.
Hospital Own Transport will be bringing samples and/or empty Assets into the network themselves. It was requested that the C-EPOD device prompt the user at the end of the collection if there is anything additional to collect from Hospital Own Transport. This is an Ad Hoc Delivery and is currently unsupported by C-EPOD. This should be completed via the manual Debrief screen in C-TMS.
Assets may be manually marked as in the depot by:
- Manually adding an order and adding the assets or samples to the order before confirming the job completed.
- Using the Asset Maintenance screen
- Waiting until they are scanned again for Tag to Asset (for deliveries) or Ad Hoc Collection later.
To complete this manually (i.e. without C-EPOD), the following steps would be taken:
- If offered and accepted, C-TMS should be used to create a planned, empty collection from the hospital back to the depot, and assign this to the trip on which the Delivery is being completed.
- When the carrier returns with assets or samples, these can then be actioned as with Hospital Own Transport above.
The process for 3rd-party Carrier deliveries is as follows:
- Hospital Services will scan all tags to Assets, as normal.
- These jobs will be planned as per the normal process (i.e. sent through the DPS interface or manually planned) onto a Trip and then assigned to a driver code (using resource allocation), for the specific 3rd-party Carrier. Default driver codes may be created, for example, "TNT1", "TNT2", etc. The Resource Allocation functionality will assist in choosing an available "driver". The trip will be allocated a vehicle (it is suggested only one vehicle is created and this same one is used for all trips for this carrier) and set to Accepted.
- When giving the items for the jobs to the carrier, Hospital Services will log on to the C-EPOD device with the correct user (the driver code) and select the Job that the carrier is picking up. C-EPOD will be configured to allow users to select any job out of sequence.
- Hospital Services will scan to complete this collection, via the Asset tags. If there are any Buff Tags that have not been scanned to Assets, the device will make this known at this time.
- Once all items have been scanned, Hospital Services will obtain the driver's name and signature on the device, to confirm change of ownership.
- C-TMS will automatically complete this job.
- No scanning is required for the delivery job - the debrief will be manually completed when the 3rd-party carrier returns the completed POD documentation.
3rd-party Carriers may be offered the option of a return leg to the depot, to bring back any planned (e.g. sample) or unplanned items (e.g. empty assets). 3rd-party Carriers are also regularly used for Session collections.
The process for 3rd-party Carrier returns to depot is as follows:
- The return order (the order to collect at the hospital and return items to the depot) will be created and planned on the trip above, which will have been allocated to the TNT 'driver' above.
- When the TNT driver returns to the depot with the collected goods, a user (transport or hospital services) will obtain the paperwork, retrieve the trip that the driver is completing and find out the TNT user. This can be through many different methods, the easiest being:
- Through the C-TMS Waterfall screen, if the user has access to C-TMS.
- Through the C-EPOD Admin Loads or Users screen, if the user has access to C-EPOD.
- Through the C-Portal Arrive/Depart (Airport) screen, if the user has access to C-Portal, or the C-Portal Airport screen is displayed in transport and/or hospital services.
- The user will log in to the C-EPOD device using this TNT driver and select the order from the list.
- The user will scan any preadvised items for delivery (e.g. Samples) and use a new "Ad Hoc Delivery" process to scan any other items brought in by the TNT driver (e.g. unplanned samples, returned assets, etc). If the TNT driver was planned to collect from multiple hospitals, the process will request the user to enter the hospital from which the items were collected. If single trip are scanned, the process will request the user to identify the asset type.
- Once all items have been scanned, Hospital Services will obtain the driver's name and signature on the device, to confirm change of ownership.
- C-TMS will automatically complete this job.
- The TNT paperwork will then be used to manually debrief the collection from the various hospitals.
The process for 3rd-party Carrier Session collections is as follows:
- For sessions, these will already have an order and will be planned on a trip. This will have been set to TNT carrier, resourced (allocated to a TNT driver code and vehicle) and set to status Accepted.
- When the TNT driver returns to the depot with the collected goods, a user will obtain the paperwork, retrieve the trip (as above) and find out the TNT driver code assigned to the trip.
- The user will log in to the C-EPOD device using this TNT driver code and select the order from the list.
- The user will use a new "Ad Hoc Delivery" process to scan any items brought in by the TNT driver (e.g. polar bags of blood, document packs, returned assets, etc). If the TNT driver was planned to collect from multiple sessions, the process will request the user to enter the session location from which the items were collected. If single trip labels are scanned, the process will request the user to identify the asset type.
- Once all items have been scanned, the user will obtain the driver's name and signature on the device, to confirm change of ownership.
- C-TMS will automatically complete this job.
- The TNT paperwork will then be used to manually debrief the collection from the various sessions.
Scope
- Individual PO cost will not be able to be calculated per trip, only for the trip as planned (i.e. all combined)
- Consolidation of jobs together at the depot (to provide a single loading task) may compromise the use of the C-EPOD application, if several distinct jobs are to be collected by different TNT drivers within the same collection or delivery timeframe, as these will be consolidated together.
- Mitigation of the above (i.e. turning off consolidation) would be impractical, as this would result in instructions to load assets multiple times (once for each job with contents in the asset), as the system has been instructed not to consolidate.
Set-up
Pre-requisites
- A working CALIDUS ePOD system.
C-TMS Interface Changes
- C-EPOD Configuration per Carrier, at certain location types. Broadly, this would be configured to send tasks to C-EPOD at depots, not at customer locations (hospitals), specifying a different job group.
- For HOT, Delivery jobs out to the hospital will not be sent to C-EPOD. The collections (loading) at the depot will, however.
- For 3PC, Delivery and Collection jobs at the hospital will not be sent to C-EPOD. Collections (loading) and Deliveries (unloading) at the depot will, however.
- These unloading jobs at the depot will include the 'from' address information.
- A configuration flag will be held against the carrier type, to indicate this sending of information.
- Configuration flags will also be created and held against the carrier, to control whether the paired jobs are automatically completed (i.e. HOT deliveries to hospital) or not (i.e. TNT deliveries that will be manually debriefed later from the paperwork returned).
Menu Structure
None
Data
- A site record will be created for each 3rd-party carrier or for a single hospital own transport carrier.
- The standard Job Groups will
- Only one vehicle per site will be created.
- No vehicle checks are required.
- Multiple drivers will be created for the 3rd-party Carrier, to allow multiple trips to be actioned per day.
- Multiple drivers will be created for the Hospital Own Transport, one per hospital or depot.
- The jobs group created for other carriers will also be created for these sites and be configured similarly, except for:
- allow drivers to select any incoming job from the job list.
- prompt for signature on collections and deliveries.
Functional Description
Database/DAL changes
- New flag Ad Hoc Delivery
Table EPOD_SITE requires the following modifications:
- EPL_AD_HOC_DELIVERY - nvarchar(1), NOT NULL DEFAULT 'N', values 'Y' or 'N'.
Existing packages will be modified to allow the creating, editing and selecting of the new flag, including but not limited to:
- EPOD_SITE_INSERT
- EPOD_SITE_SELECT
- EPOD_SITE_SELECT_UPDATED_DATA
- EPOD_SITE_UPDATE
The existing EPOD_SITE DAL object will be changed to:
- Read the new flag
![]() Note: It is not necessary to add this flag as a search-able item. However, if allowing this keeps the packages and DAL objects standard in design, then this can also be done, within the DAL and the packages.
Note: It is not necessary to add this flag as a search-able item. However, if allowing this keeps the packages and DAL objects standard in design, then this can also be done, within the DAL and the packages.
The XML Export of EPOD_SITE records will look as follows:
 <EPOD_SITE>
   <EPL_SITE_ID></EPL_SITE_ID>
   <EPL_DESCRIPTION></EPL_DESCRIPTION>
   <EPL_SERVICE_POD_FORMAT></EPL_SERVICE_POD_FORMAT>
   <EPL_DELIVERY_POD_FORMAT></EPL_DELIVERY_POD_FORMAT>
   <EPL_COLLECTION_POD_FORMAT></EPL_COLLECTION_POD_FORMAT>
   <EPL_SERVICE_ACTIVITIES></EPL_SERVICE_ACTIVITIES>
   <EPL_SERVICE_PREWORK></EPL_SERVICE_PREWORK>
   <EPL_SERVICE_INFO></EPL_SERVICE_INFO>
   <EPL_SERVICE_PRODUCTS></EPL_SERVICE_PRODUCTS>
   <EPL_SERVICE_MC_REF></EPL_SERVICE_MC_REF>
   <EPL_SERVICE_DIAGNOSIS></EPL_SERVICE_DIAGNOSIS>
   <EPL_SERVICE_POSTWORK></EPL_SERVICE_POSTWORK>
   <EPL_AUTO_COMPLETE_EMAIL></EPL_AUTO_COMPLETE_EMAIL>
   <EPL_AD_HOC_COLLECTION></EPL_AD_HOC_COLLECTION>
   <EPL_DEL_DRIVER_SIGN></EPL_DEL_DRIVER_SIGN>
   <EPL_COL_DRIVER_SIGN></EPL_COL_DRIVER_SIGN>
   <EPL_DELIVERY_PAYMENT></EPL_DELIVERY_PAYMENT>
   <EPL_DOCUMENT_PHOTO></EPL_DOCUMENT_PHOTO>
   <EPL_CONTAINER_ONLY></EPL_CONTAINER_ONLY>
   <EPL_PDA_DIS_JOB_CODE></EPL_PDA_DIS_JOB_CODE>
   <EPL_LINKED_C_D></EPL_LINKED_C_D>
   <EPL_METRICS_ENTRY></EPL_METRICS_ENTRY>
   <EPL_NOTES></EPL_NOTES>
   <EPL_FORCED_ENTRY></EPL_FORCED_ENTRY>
   <EPL_SYSTEM_TYPE></EPL_SYSTEM_TYPE>
   <EPL_UPDATE_FUNCTIONS></EPL_UPDATE_FUNCTIONS>
   <EPL_VEHICLE_CHECK_CONFIG></EPL_VEHICLE_CHECK_CONFIG>
   <EPL_JOB_LIST_CFG></EPL_JOB_LIST_CFG>
   <EPL_ARRIVAL_FLAG></EPL_ARRIVAL_FLAG>
   <EPL_SCAN_ERROR_FLAG></EPL_SCAN_ERROR_FLAG>
   <EPL_LAST_CHANGED_DATE></EPL_LAST_CHANGED_DATE>
   <EPL_LAST_CHANGED_TIME></EPL_LAST_CHANGED_TIME>
   <EPL_RESEQUENCE></EPL_RESEQUENCE>
   <EPL_CLAUSE_DELIVERY></EPL_CLAUSE_DELIVERY>
   <EPL_JOB_STATUS></EPL_JOB_STATUS>
   <EPL_CONSOLIDATION></EPL_CONSOLIDATION>
   <EPL_VEHICLE_STOCK_FLAG></EPL_VEHICLE_STOCK_FLAG>
   <EPL_SCAN_AT_VEHICLE></EPL_SCAN_AT_VEHICLE>
   <EPL_PDA_FULL_ADDRESSES></EPL_PDA_FULL_ADDRESSES>
   <EPL_JOB_TRANSFER></EPL_JOB_TRANSFER>
   <EPL_NEXT_JOB_FLAG></EPL_NEXT_JOB_FLAG>
   <EPL_RETURNS_DEPOT_FLAG></EPL_RETURNS_DEPOT_FLAG>
   <EPL_SCANNING_FLAG></EPL_SCANNING_FLAG>
   <EPL_AUTOLOGIN_FLAG></EPL_AUTOLOGIN_FLAG>
   <EPL_ADHOC_ANYTIME_CONFIG></EPL_ADHOC_ANYTIME_CONFIG>
   <EPL_AUDIT_LOGIN_FLAG></EPL_AUDIT_LOGIN_FLAG>
   <EPL_TRAILER_VEHICLE_FLAG></EPL_TRAILER_VEHICLE_FLAG>
   <EPL_AD_HOC_DELIVERY></EPL_AD_HOC_DELIVERY>
 </EPOD_SITE>
Table EPOD_JOB_GROUP requires the following modification:
- EPL_AD_HOC_DELIVERY - nvarchar(1), NOT NULL DEFAULT 'N', values 'Y' or 'N'.
Existing packages will be modified to allow the creating, editing and selecting of the new flag, including but not limited to:
- EPOD_JOB_GROUP_INSERT
- EPOD_JOB_GROUP_SEARCH
- EPOD_JOB_GROUP_SELECT
- EPOD_JOB_GROUP_SELECT_UPDATED_DATA
- EPOD_JOB_GROUP_UPDATE
The existing EPOD_JOB_GROUP DAL object will be changed to:
- Export the new flag in XML requests
- Read the new flag
![]() Note: It is not necessary to add this flag as a searchable item. However, if allowing this keeps the packages and DAL objects standard in design, then this can also be done, within the DAL and the packages.
Note: It is not necessary to add this flag as a searchable item. However, if allowing this keeps the packages and DAL objects standard in design, then this can also be done, within the DAL and the packages.
Example: The XML Export of EPOD_JOB_GROUP records will now look as follows:
<EPOD_JOB_GROUP>
  <EPL_SITE_ID></EPL_SITE_ID>
  <EPL_JOB_GROUP></EPL_JOB_GROUP>
  <EPL_DESCRIPTION></EPL_DESCRIPTION>
  <EPL_SERVICE_POD_FORMAT></EPL_SERVICE_POD_FORMAT>
  <EPL_DELIVERY_POD_FORMAT></EPL_DELIVERY_POD_FORMAT>
  <EPL_COLLECTION_POD_FORMAT></EPL_COLLECTION_POD_FORMAT>
  <EPL_SERVICE_ACTIVITIES></EPL_SERVICE_ACTIVITIES>
  <EPL_SERVICE_PREWORK></EPL_SERVICE_PREWORK>
  <EPL_SERVICE_INFO></EPL_SERVICE_INFO>
  <EPL_SERVICE_PRODUCTS></EPL_SERVICE_PRODUCTS>
  <EPL_SERVICE_MC_REF></EPL_SERVICE_MC_REF>
  <EPL_SERVICE_DIAGNOSIS></EPL_SERVICE_DIAGNOSIS>
  <EPL_SERVICE_POSTWORK></EPL_SERVICE_POSTWORK>
  <EPL_AUTO_COMPLETE_EMAIL></EPL_AUTO_COMPLETE_EMAIL>
  <EPL_AD_HOC_COLLECTION></EPL_AD_HOC_COLLECTION>
  <EPL_DEL_DRIVER_SIGN></EPL_DEL_DRIVER_SIGN>
  <EPL_COL_DRIVER_SIGN></EPL_COL_DRIVER_SIGN>
  <EPL_DEL_CUST_SIGN></EPL_DEL_CUST_SIGN>
  <EPL_COL_CUST_SIGN></EPL_COL_CUST_SIGN>
  <EPL_SIGN_CHECK_LBL></EPL_SIGN_CHECK_LBL>
  <EPL_DELIVERY_PAYMENT></EPL_DELIVERY_PAYMENT>
  <EPL_DOCUMENT_PHOTO></EPL_DOCUMENT_PHOTO>
  <EPL_CONTAINER_ONLY></EPL_CONTAINER_ONLY>
  <EPL_METRICS_ENTRY></EPL_METRICS_ENTRY>
  <EPL_NOTES></EPL_NOTES>
  <EPL_TNCS></EPL_TNCS>
  <EPL_LAST_CHANGED_DATE></EPL_LAST_CHANGED_DATE>
  <EPL_LAST_CHANGED_TIME></EPL_LAST_CHANGED_TIME>
  <EPL_JOB_STATUS></EPL_JOB_STATUS>
  <EPL_CONSOLIDATION></EPL_CONSOLIDATION>
  <EPL_SCAN_AT_VEHICLE></EPL_SCAN_AT_VEHICLE>
  <EPL_AD_HOC_DELIVERY></EPL_AD_HOC_DELIVERY>
</EPOD_JOB_GROUP>
The existing database package EPOD_SETUP will be modified to ensure that the new flags are defaulted appropriately.
Import/Export Messages
The PDA web request server (Calidus_ePOD.asmx, both the XML and JSON versions) will be modified to include the new Site and Job Group flags in the LOGON_REQUEST message processor (through the LOGON_RESPONSE message).
Admin Changes
The Job Group and Site maintenance screens (job_group.aspx and site_header.aspx respectively) will be modified to allow the system to be configured for:
- EPL_AD_HOC_DELIVERY, a checkbox, labelled as "AD Hoc Delivery", defaulting to 'N' (Disabled).
This configuration field will be added to the PDA tab of these screens.
![]() Note: Ensure that the new check-boxes line up with the existing fields.
Note: Ensure that the new check-boxes line up with the existing fields.
PDA Changes
Database/DAL changes
A new column will be added to the EPOD_SITE and EPOD_JOB_GROUP tables:
- EPL_AD_HOC_DELIVERY - This will be a one character field with of Values 'Y' and 'N'. The default value is 'N'.
This new field should be added to every procedure as part of the PDA_SITE and PDA_JOB_GROUP DAL objects.
Login
![]() Note: No changes are required to the Login process - this section described how the process will work when configured as described.
Note: No changes are required to the Login process - this section described how the process will work when configured as described.
The device will be configured for the Carrier (i.e. TNT or the hospital) as the site.
The transport user will log on using the carrier driver assigned to the trip (either found through C-TMS or preset to a single default value), select the default vehicle and enter the password.
This will retrieve the list of jobs on the load assigned to that user and display them on the job list.
Job List
![]() Note: No changes are required to the Job List process - this section described how the process will work when configured as described.
Note: No changes are required to the Job List process - this section described how the process will work when configured as described.
Only the jobs on the current trip will be shown. The Job List will be configured to allow the user to select any of the jobs on that load, and also to show all jobs singly (i.e. not consolidated together).
Delivery Process
When a Delivery job (i.e. in this case, a depot unloading task) is selected from the Job List and started from the Job Details form, the Delivery screen will show.
This will be modified to display the Ad Hoc tab in a similar way to the
![]() Note: The existing Items tab is there to show all preadvised items - unplanned delivery of items will be shown on a different tab (described later). The Items (Container) tab will only be shown if there are items preadvised for the jobs. If there are none, this tab will not be present.
Note: The existing Items tab is there to show all preadvised items - unplanned delivery of items will be shown on a different tab (described later). The Items (Container) tab will only be shown if there are items preadvised for the jobs. If there are none, this tab will not be present.
![]() Note: The Complete button should only appear on the Job Details tab if any of the following conditions are true:
Note: The Complete button should only appear on the Job Details tab if any of the following conditions are true:
- There are no preadvised items to deliver.
- The application is configured for Ad Hoc Delivery (new Job Group flag EPL_AD_HOC_DELIVERY is enabled).
When all preadvised items have been scanned as delivered (or marked as cancelled), the application currently recognises this and automatically moves on to the Job Completion stage. This will not occur if this is a delivery job, and the application has been configured for Ad Hoc Delivery (EPL_AD_HOC_DELIVERY is enabled). In this case, the device will simply display the empty items list (as there are no more items to scan) and wait, as there may be unplanned items to scan as part of the Ad Hoc Delivery process (in the next section).
Ad Hoc Delivery Tab
This tab will have functionality extremely similar to the Ad Hoc Collection tab - this functionality is re-stated here, with any exceptions noted.
The Ad Hoc Delivery process allows the driver to specify the items delivered, at the point of Delivery, without the specific items for those Deliveries being planned in advance. This appears as a separate tab on the PDA within the Delivery process, labelled as "Ad Hoc" when this feature is enabled (through the flag EPL_ADHOC_DELIVERY for Delivery-type jobs only). This tab will be to the right of the existing Containers and Products tabs, but before the Notes tab.
The layout of the tab will be almost identical to the existing Items (Containers) tab. The following are sample screen layouts for the features of the tab.
- Ad Hoc Delivery Prototype Screen-shots
Unplanned item details
Ad Hoc item list


![]() Note: These are the Ad Hoc Collection prototype screenshots.
Note: These are the Ad Hoc Collection prototype screenshots.
The tab will allow items to be entered in exactly the same way as the Items (Containers) tab:
- Through a "Scan Container" text box and Deliver button.
- Through the use of the built in Camera Scanner feature, through the Scan button.
Note that there is no method of entry through the table (i.e. pressing or long-pressing on the table row will show no Deliver option).
This table of items on the screen will start empty - as items are scanned, these will be added to the table. ![]() Note: Developer Note: The table should be built to the same scrolling view mechanism as the Items (Container) table on that tab.
Note: Developer Note: The table should be built to the same scrolling view mechanism as the Items (Container) table on that tab.
Like the Items (Containers) tab, this tab will only allow asset formats to be scanned in the formats detailed in the Scanning section - any invalid formats will be discarded with a transient message displayed on the screen.
The tab will check whether the scanned item is an item that has been preadvised for the job. If so, and the item has already been confirmed as received, a transient message will inform the driver "This item already scanned". If this preadvised item has not yet been scanned for Delivery, the tab will interrupt the scanning (if continuous scanning is enabled) and will display an alert "Ad Hoc Delivery"/"Preadvised items must be scanned on the Items tab". If this preadvised item has been marked as cancelled on the preadvised list, the tab will interrupt the scanning (if continuous scanning is enabled) and will display an alert "Ad Hoc Delivery"/"Preadvised item has been cancelled and cannot be delivered.".
The tab will check whether the scanned item has already been scanned by the Ad Hoc Delivery process. If so, a transient message will inform the driver "This item already scanned".
The different types of Asset will be dealt with differently:
- Fixed (Permanent) Assets IDs will always be associated with a particular Asset Type in C-TMS, so the application will not require the driver to confirm the Asset Type for a Fixed Asset. These will simply be added directly to the table.
- Single Trip Assets must have an asset type entered.
Additionally, the application will check to see if this collection is part of a consolidation (multiple delivery jobs) with multiple collection destinations. Note that this is completed differently to the Ad Hoc Collection screen, in that the device will check for the address from the Alternate address sent to the device from the server, rather than from a linked job (that will not have been sent to C-EPOD from C-TMS). If the addresses found are different, then the driver must be prompted to enter a destination location.
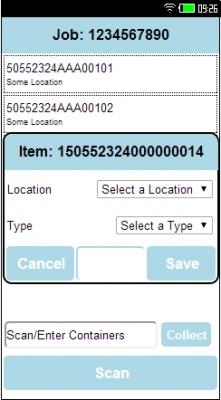
After these checks are made on a scanned Item ID, and further entry is required, the application will stop the scanning process (if continuous scanning is in use) and display a pop-up data entry screen. This will have the following fields:
- Header label, showing the scanned Item ID.
- Location label and drop-down list. These will only be shown if there are multiple collection locations. If this is the case, the location names will be listed in a drop-down list, forcing the driver to select one. The default entry on the drop-down list will be "Select a Location".
- Type label and drop-down list. These will only be shown if the item scanned is a single-trip format Item ID. If this is the case, all DUs (Asset Types) will be displayed in a drop-down list, forcing the driver to select one. The default entry on the drop-down list will be "Select a Type". The list will be built from all DU-type codes on the Reason Codes table (EPL_DESCRIPTION from EPOD_REASON_CODE where EPL_REASON_TYPE = "DU").
- A Cancel button. When pressed, this closes the pop-up data entry screen. The scanned ID will be discarded and not added to the Ad Hoc Items list.
- A Save button. When pressed, this button will validate that all required data is entered. If not, the screen will display a pop-up alert showing the item that has not been entered ("Ad Hoc Additional Details"/"You must select a (Field)", where (Field) is replaced with the data type that has not been entered, i.e. "Type" or "Location"). When this alert is cleared, the user will be returned to the pop-up entry screen. If there are no errors found when clicking the Save button, the pop-up data entry screen will be closed and the item will be added to the Ad Hoc Items list.
If items have been scanned and need to be added to the list, they will be added as a new row on the EPOD_CONTAINER table, as follows:
- EPL_JOB_ID - This will be from the job being scanned. If there are consolidated jobs with the same (or linked) destinations, this will be the Job ID of the first job. If there are consolidated jobs with different destinations, this will be the Job ID of the job with the destination as selected by the driver in the pop-up details entry screen
- EPL_CONTAINER_ID - As scanned, minus the leading barcode application identifiers ("00" or "8004")
- EPL_CONTAINER_PACKAGE_CODE - If this is a permanent Asset barcode ("8004"), this will be left blank. If not, this will be the code of the asset type selected by the driver in the pop-up details entry screen (EPL_REASON_CODE).
- EPL_CONTAINER_PACKAGE_DESC - If this is a permanent Asset barcode ("8004"), this will be left blank. If not, this will be the description of the asset type selected by the driver in the pop-up details entry screen (EPL_DESCRIPTION).
- EPL_STATUS - "C"
- EPL_TYPE - "A", to indicate that this is an Ad Hoc Delivery
- EPL_SEQUENCE - Set as 3-digit numeric counting from 001, incrementing with each item added to this screen.
All other items will be blank or added as normal.
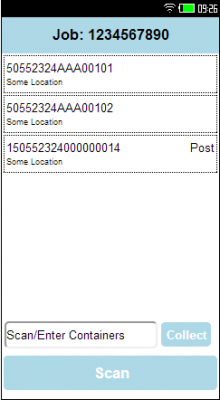
These records will be added as a new row at the top of the list, by retrieving all records in reverse sequence order (through the PDA_CONTAINER DAL function SelectAllContainersForJob with parameter p_blnAdHoc set to true). This will return only scanned Ad Hoc items, in reverse sequence. The details displayed will differ, depending on the information delivered:
- Item ID - EPL_CONTAINER_ID
- Type - EPL_CONTAINER_PACKAGE_DESC
- Location - EPL_CUSTOMER_NAME of EPOD_JOB
Pressing or long-pressing on an item in this Ad Hoc table will allow the driver to remove an item from the Delivery. The application will display a pop-up alert "Ad Hoc Delivery"/"Do you want to remove this item?" with options "Yes" and "No". Choosing "No" will leave the item on the list. Choosing "Yes" will delete the item from the scanned containers and refresh the list without this item.
A Complete button should be available on the Job Details tab, to allow the users to manually indicate that all items have now been delivered. Clicking this will instigate the Job Completion stage. If at this time no items have been scanned as part of the Ad Hoc Scanning tab for this Delivery (and Ad Hoc Delivery is enabled), a pop-up alert will be displayed, showing "Unplanned Items"/"Please confirm that there are no unplanned items to scan", with options "Confirm" and "Cancel". Choosing "Confirm" will move on to Job Completion, whereas "Cancel" will return to the Delivery process and activate the Ad Hoc scanning tab.
Appendix A: TEST PLAN
| Test Script / Scenario Reference | Hospital Own Transport | Call Number(s): 318517 SCR22 |
| Test Script / Scenario Description | Test the C-EPOD changes made for NHSBT. | PASS / ISSUES / FAIL |
| Menu Access | None | |
| Pre-requisites | Data set up as per Data Setup section; Note that individual setup information is provided for each test area. | Tested By: |
| Test Objective | To test that: Admin can view and maintain configuration for the changes; the EPOD Client application can perform Ad Hoc Deliveries. | Date: |
| Step | Action | Result | Remarks | P/F |
| 1 | Admin Tests | |||
| 1.01 | Enter the Site Maintenance screen. Ensure the new fields are present and can be set and maintained. | New fields can be set, changed and saved:
|
||
| 1.02 | Enter the Job Group Maintenance screen. Ensure the new fields are present and can be set and maintained. | New fields can be set, changed and saved:
|
| Step | Action | Result | Remarks | P/F |
| 2 | PDA Ad Hoc Delivery. | |||
| Create a load with several deliveries from hospitals and deliveries to the depot and assign to the carrier, user and vehicle. Ensure that there are planned items on some deliveries and deliveries. | ||||
| 2.01 | Log in to the application and pick up the load. | The 'Job List' is displayed:
|
||
| 2.02 | Select the second unloading job and start it at the Job Details page. | No error will be displayed; the job may be started and the delivery screen shown. | ||
| 2.03 | Click Start Job. | The device checks for any changes to the jobs. When checked, the 'Delivery' screen is displayed:
|
||
| 2.04 | Click the Complete button. | An error should be displayed showing that there are still items awaiting scanning. | ||
| 2.05 | Switch to the Items tab. Cancel one of the items and confirm the exception with a reason code. | The Items list is displayed with only one item on it. | ||
| 2.06 | Switch to the Ad Hoc tab | The Items list is displayed (with nothing in it). The screen is laid out as expected. | ||
| 2.07 | Using the provided text box, enter "invalid". Click Deliver. | A transient error should be displayed, showing that the format is invalid. | ||
| 2.08 | Enter "8004invalid". Click Deliver. | A transient error should be displayed, showing that the format is invalid. | ||
| 2.09 | Enter "00invalidlength". Click Deliver. | A transient error should be displayed, showing that the format is invalid. | ||
| 2.10 | Enter "00invalidformat00000". Click Deliver. | A transient error should be displayed, showing that the format is invalid. | ||
| 2.11 | Enter a valid temporary Asset ID. Click Deliver. | The pop-up 'Details' window should be shown, prompting for Type only. The type list should show all valid Asset types. | ||
| 2.12 | Click Cancel | The Ad Hoc tab should be shown. The item should not be added to the list. | ||
| 2.13 | Enter a valid temporary Asset ID. Click Deliver. Click Save in the pop-up up 'Details' window. | An error should be displayed, asking for Type details. | ||
| 2.14 | Select a type. Click Save | The item should be added to the list, showing the selected type. The format of the list row should be as expected. | ||
| 2.15 | Press the Scan button. | A Scan reticule should be displayed, allowing barcodes to be scanned. | ||
| 2.16 | Repeat the item tests for invalid formats and items above ("invalid", "8004invalid", "00invalidlength", "00invalidformat00000") | Each time these items are scanned, a transient error should display, as previously. The Scan reticule should stay open. | ||
| 2.17 | Scan an invalid barcode type (for example, a CODE 39 or EAN-8 or EAN-13 barcode). | A transient error should display, showing that the format is invalid. The Scan reticule should stay open. | ||
| 2.18 | Scan the cancelled item from the planned items list. | The Scan reticule should be closed and the Ad Hoc tab be displayed, showing a pop-up error, saying that the item must not be Delivered, as it has already been cancelled. | ||
| 2.19 | Press the Scan button. Scan the remaining planned item from the planned items list. | The Scan reticule should be closed and the Ad Hoc tab be displayed, showing a pop-up error, saying that the item must be Delivered through the Items tab. | ||
| 2.20 | Switch to the Items tab and scan the item. | A transient message should be displayed, showing that the item has been Delivered. The Scan reticule should be closed and the Items tab be displayed, with no items on the Items list. | ||
| 2.21 | Switch to the Ad Hoc tab and scan the same item. | A transient message should be displayed, showing that the item has already been Delivered. The Scan reticule should stay open. | ||
| 2.22 | Scan an item that is already on the Ad Hoc items list. | A transient message should be displayed, showing that the item has already been Delivered. The Scan reticule should stay open. | ||
| 2.23 | Close the Scan reticule. | The Ad Hoc tab and Items list should be displayed, showing the items scanned, with the latest at the top. | ||
| 2.24 | Click on the top item. | An alert should ask whether the item should be removed. | ||
| 2.25 | Click No. | The Ad Hoc tab and Items list should be displayed again, with item selected still on the list. | ||
| 2.26 | Click on the top item. When prompted, click Yes. | The Items list should be displayed again. The item selected should be removed from the list. | ||
| 2.27 | Move to the Job Details tab and press the Complete button. | The signature should be prompted for. | ||
| 2.28 | Complete the signature. | A transient message should display that the job is complete.
The jobs will be completed in Admin. The Job list should be redisplayed. The Unloading task will be removed from the Job List. |
||
| 2.29 | Create a trip with consolidated deliveries back to the depot, from different collection locations. Log in to the C-EPOD device, start the job and move to the Ad Hoc Items tab. Enter a valid permanent Asset ID. Click Deliver. | The pop-up 'Details' window should be shown, prompting for Location only. The Location list should show a list of all unique collection locations for the orders. | ||
| 2.30 | Click Cancel | The Ad Hoc tab should be shown. The item should not be added to the list. | ||
| 2.31 | Enter a valid permanent Asset ID. Click Deliver. Click Save in the pop-up up 'Details' window. | An error should be displayed, asking for Location details. | ||
| 2.32 | Select a Location. Click Save | The item should be added to the list, showing the selected location. The format of the list row should be as expected. | ||
| 2.33 | Enter a valid single trip Asset ID. Click Deliver. | The pop-up 'Details' window should be shown, prompting for Type and Location. The type list should show all valid Asset types. The Location list should show a list of all unique collection locations for the orders. | ||
| 2.34 | Click Cancel | The Ad Hoc tab should be shown. The item should not be added to the list. | ||
| 2.35 | Enter a valid temporary Asset ID. Click Deliver. Click Save in the pop-up up 'Details' window. | An error should be displayed, asking for Type and Location details. | ||
| 2.36 | Select a type. Click Save | An error should be displayed, asking for Location details. | ||
| 2.37 | Select a Location. Click Save | The item should be added to the list, showing the selected type and location. The format of the list row should be as expected. |
Appendix B: Quote & Document References
| Cost Details | ||||
| Activity | Estimate No. of Days |
No. of Days | Rate per Day (£) | Cost (£ Exc. VAT) |
| Requirements | 0.00 | 0.00 | 655 | £0.00 |
| Change Request Evaluation | 0.00 | 0.00 | 655 | £0.00 |
| Functional Specification | 0.75 | 0.75 | 655 | £491.25 |
| Technical Specification | 0.00 | 0.00 | 655 | £0.00 |
| Development | 3.00 | 3.00 | 655 | £1,965.00 |
| Testing and Release | 0.50 | 0.50 | 655 | £327.50 |
| Implementation | 0.00 | 0.00 | 655 | £0.00 |
| Project Management | First argument to "number_format" must be a number. | First argument to "number_format" must be a number. | 655 | £First argument to "number_format" must be a number. |
| TOTAL | First argument to "number_format" must be a number. | First argument to "number_format" must be a number. | £First argument to "number_format" must be a number. | |
| Estimate excludes training, release to live and go live support. |
B.1 References
| Ref No | Document Title & ID | Version | Date |
| 1 | NHSBT High Level Solution Design v2.0.doc | 2.0 | 21/05/2014 |
| 2 | FS 317907 SCR01 EPOD-TMS Interface | ||
| 3 | FS 317761 SCR15 NHSBT C-EPOD Collection Changes | 0.4 | 04/06/2014 |
B.2 Glossary
| Term | Definition |
|---|---|
| EPOD | Electronic Proof of Delivery. The OBS EPOD system is CALIDUS ePOD. |
| CALIDUS eSERV | The OBS mobile system to complete Service functionality in the field. This is part of the CALIDUS ePOD system. |
| PDA | The mobile device on which the C-ePOD system will run in the field. This can be a Phone, EDA or industrial PDA, running Android. |
| DAL | Data Access Layer. A mechanism for accessing data by the system that is removed from the application, allowing for simplified access and providing protection to the data, as only approved DAL methods can be used to modify it. |
| GPS | Global Positioning System. A mechanism of retrieving accurate positioning information in the form of Latitude and Longitude (Lat-Long) co-ordinates from a device. |
| GPRS, 3G, HSDPA, Data Service | All terms referring to mobile device network connectivity, and the speed at which the device connects to the internet. |
B.3 Authorised By
Julie Scott | Project Manager | _____________________________ |
Ed Bond | Client Representative | _____________________________ |