FS 338835 KOO-GAP-SCR1 GAP Scan Store Barcode on Arrival
![]()
Knights of Old
GAP Scan Store Barcode on Arrival
CALIDUS ePOD
26th October 2016 - 2.0
Reference: FS 338835 KOO-GAP-SCR1
Contents
Functional Overview
Client Requirement
As part of the Knights of Old GAP contract, add configuration to allow the driver to scan a store barcode upon arrival to the store.
The GAP contract is owned by KOO, but every part of the process is performed by GAP or 3rd parties.
The GAP warehouse in Rugby loads the trailers by handballing of cartons and creates ASNs in their system. This is likely the full quantity of product required for the week in France. Each carton is uniquely labelled.
A French 3PL TSA goes to the GAP warehouse and collects the trailer and trunks the load to Paris. The Paris depot is owned and operated by French 3PL MCE, which unloads the trailer. This is updated onto Empirica, KOO's WMS, which is being updated by MCE. This initiates an 861 "Arrival Scan at Pooler" message from Empirica to TrueCommerce (an EDI hub) and on to GAP. The unloaded cartons are sorted into stores. These store cartons are then palletised. These cartons are then loaded onto vehicles, physically scanning each item being loaded. This is updated onto Empirica, KOO's WMS, which is being updated by MCE, which generates an 861 "Pooler Outbound Scan from their Facility" message from Empirica to True Commerce and on to GAP. Empirica is also updated with a load number and each job is routed onto specific days (fixed route/milk runs) and assigned to a trailer. All cartons for a particular store are loaded onto the same load. This also generates messages to CALIDUS ePOD for the execution of the jobs.
MCE then organises the final leg delivery of the cartons to the GAP stores. There are 3 MCE depots:
- Paris - 8 devices
- Lyon - 2 devices
- Strasbourg - 2 devices.
The Paris depot trunks to the other two depots, not controlled by C-ePOD.
The driver process is as follows:
- Log on using a provided user/password and the trailer ID.
- Complete the jobs in sequence where possible.
- Start and navigate to the store.
- Arrive and scan store barcode - these will be unmanned locations.
- Scan every carton off the vehicle.
- No signature is required.
- Cancellation of jobs and cartons is allowed, through a curated list of reason codes.
Solution Overview
As the existing Partnerlink JobShare CSV interface does not support explicit naming of individual containers (cartons), Empirica will send the required loads and jobs to C-ePOD through the OBS C-ePOD XML format, which allows this. This will be sent as an FTP or flat-file transfer of the file, which will be uploaded by C-ePOD - this is standard functionality.
Mapping has been completed on all aspects of the load and jobs and will be documented as a mapping spreadsheet for the purposes of the project. Additional standard interface documentation (e.g. XSDs, sample files, standard specifications) will also be provided.
Mapping Notes:
- All MCE depots will be seen as 1 site within C-ePOD - there is no need to split these.
- The carton ID is 18 digits. This may need to be expanded to 20 alpha-numeric characters. As C-ePOD's Container ID (where this is stored) is 30 characters, this is not an issue.
When the job is completed in C-ePOD, there is no required update back to Empirica. A message will be created from C-ePOD to TrueCommerce, consisting of a formatted 861 message is ANSI X12 format. This is covered elsewhere in a separate specification.
The mobile device process for Store Barcode Scanning will be as follows:
- After Arrival is pressed, but before scanning starts, the mobile device must show a Store Barcode screen, to scan a store barcode.
- The "Store Barcode" field will allow entry through a pop-up keyboard, as well as through the embedded device scanner. A button will be provided for the user to use the camera scanner as a backup.
- A Confirm button will be provided. Once the barcode is scanned, the driver will click this button. This will validate the scanned barcode against the Store Number. If they do not match, or the entered barcode value is the wrong format or length, or nothing is entered, the screen will pop up an alert, informing the user that "the store barcode is incorrect - continue anyway?". The driver will be offered options of Yes or No, with No being the default. If No is clicked, the screen will be re-shown, displaying the Store Barcode field in red border, as it has an error.
- If Yes is clicked, or the store barcode matches the store number, the driver will be allowed to continue.
The mobile device process must include:
- No Deliver All functionality
- No Clausing
- No signatures
- Force container entry
The mobile device will be configured to use a version of the standard Partnerlink style. Note that the image displayed on the login screen will be that configured for the Site, so this may be the KOO or GAP logo, or other if required, with no further development required.
The style will translate the word "Container" to "Carton".
A French language translation file will be created for the mobile device. This is likely to be delivered after the initial go-live. It is further noted that, due to the configurable nature of the labels within the device, this is likely to be an iterative process, and will probably require several releases to ensure that the language file is correctly translated. This is not covered by a specification.
Scope
An implementation of the latest version of the CALIDUS ePOD application is required for this contract.
This will be a separate instance of CALIDUS ePOD, hosted on the existing Partnerlink servers. Although this will utilise the Partnerlink servers and database, the application will be distinct and separate and the data will be kept in a separate schema, , to ensure that no issues are generated to the Partnerlink contract.
CALIDUS Portal TTM is not required.
The mobile devices that will be used are M3 SM10 devices, with 1D barcode scanners. 12 are required.
With respect to the Scan Store Barcode functionality, the following scope is assumed:
- The barcode scanned by the driver is used purely for validation - this will not be sent back to the server for storing in the database, visible in the Admin console or exported out with any standard job exports. As the Admin console is not likely to be generally used by the operation, and there is no job export other than the bespoke GAP export (which does not include this information), this will not cause an issue.
- The scanned barcode will not be visible on the device after it is entered. As this is simply used to prevent the driver from arriving before the job begins, this will not cause an issue.
- The configuration of this screen may not be amended within the CALIDUS ePOD Admin console at this time - during implementation, the OBSL teams will make any necessary changes to the configuration until this is confirmed as working as expected. Any further modifications will require software support logs to be raised with OBSL, which may then be chargeable.
Set-up
Pre-requisites
Menu Structure
Data
A new PreJob UDF will be created for this implementation:
- Description "Store Barcode"
- Type: "Pre-Job"
- Key Type: "Job Group"
- Key Value: "GAP|GAP"
- Name: "Store Barcode"
- Generated UDF:
   <FORM NAME="Store Barcode" REQUIRED="Y">
       <FIELD ID="STORE_BARCODE">
           <TEXT>Scan Store Barcode</TEXT>
           <FORMAT>T</FORMAT>
           <ACTION>B</ACTION>
           <REGEXP>DBV:GPS3PL.{7,8}([EPOD_JOB.EPL_CUSTOMER_CODE])</REGEXP>
           <REQUIRED>C</REQUIRED>
       </FIELD>
       <BUTTON CONFIRM="The store barcode is incorrect - continue anyway?">
           <TYPE>C</TYPE>
           <TEXT>Confirm</TEXT>
       </BUTTON>
   </FORM>
![]() Note: This configuration may not be amended within the CALIDUS ePOD Admin console at this time - during implementation, the OBSL teams will make any necessary changes to the configuration until this is confirmed as working as expected. Any further modifications will require software support logs to be raised with OBSL, which may then be chargeable.
Note: This configuration may not be amended within the CALIDUS ePOD Admin console at this time - during implementation, the OBSL teams will make any necessary changes to the configuration until this is confirmed as working as expected. Any further modifications will require software support logs to be raised with OBSL, which may then be chargeable.
![]() Note: Trailers will be mapped as Vehicles. These need not be pre-created within CALIDUS ePOD - these will be created if required when the loads are created.
Note: Trailers will be mapped as Vehicles. These need not be pre-created within CALIDUS ePOD - these will be created if required when the loads are created.
Reason Codes mapped for Job and Detail - no clause codes will be created as they are not required.
- JOB Cancellation Reason Codes
- "NA" - "No Access to Store"
- DETAIL cancellation Reason Codes
- "01" - "Damaged Carton"
- "04" - "Quality Problem (e.g. Carton open, missing items)"
Site/Job Group Configuration:
- Deliver All disabled.
- Clausing disabled.
- Driver and Customer signatures disabled for collections and deliveries.
- Force container entry enabled.
- Capture Arrival times enabled.
- Consolidation disabled.
- Generic container POD format should be set.
- The new KOO GAP style should be set.
- Container Only Delivery enabled.
- Scan Errors Intrusive enabled.
- Scan at Vehicle enabled.
- Seamless Scanning enabled.
- Display Job Code set to "Job Code".
- User Notes enabled.
- Import Create Standing Data enabled.
Functional Description
Data Import
Mapping has been completed on all aspects of the load and jobs and will be documented as a mapping spreadsheet for the purposes of the project. Additional standard interface documentation (e.g. XSDs, sample files, standard specifications) will also be provided.
Mapping Notes:
- All MCE depots will be seen as 1 site within C-ePOD - there is no need to split these. It is assumed this will be "GAP".
- The carton ID is 18 digits. This may need to be expanded to 20 alpha-numeric characters. As C-ePOD's Container ID (where this is stored) is 30 characters, this is not an issue.
Load:
- Load ID - From the entered load ID.
- Start Planned Date - Delivery Date
- Start Planned Time - 00000000
- Assigned Vehicle - the trailer ID
Job:
- Job Code - Empirica BOL
- Job Type - "D" for delivery
- Job Group - fixed text, assumed to be "GAP"
- Start Planned Date - Delivery Date
- Start Planned Time - if available, set to the defined delivery time, else "0900"
- End Planned Date/Time - If no planned start time is available, set these to the Delivery Date and "1700" respectively, or end end windows time.
- Customer Code - the GAP Store code, fully zero-filled. For example, "012345"
- Name/Address/Post Code - the store delivery address.
- Telephone - from the store address
- Sequence - Drop Number
Containers (Cartons)
- Container ID - the carton number, fully-qualified. So, this is an 18-digit number, but is qualified with a 2-digit prefix of "00". So this should be included, as this is matched when scanning carton barcodes.
- Package Code - "CTN"
- Package Description - "CARTON"
- Long Description - GAP BOL #
Logon
It is expected that a device style will be created based on the Partnerlink style. The logo will be taken from the logo uploaded against the site, and is likely to be the KOO or GAP logo. Note that the screen-shots shown in this document are the standard Partnerlink style - this can be modified before development begins. Note that the current style uses the word "Pallet" in preference to "Container" or "Carton" - this will be changed in the final style. The log-in screen-shots below show first the Partnerlink style, then the intended GAP style.
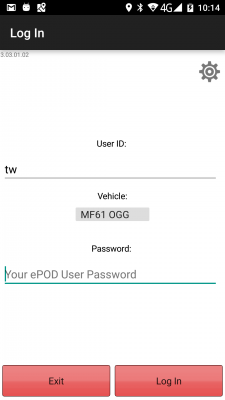
Log In
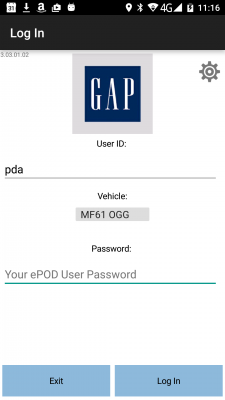
Log In - updated style


The drivers will be provided a user-name and password, and the loads will be allocated to specific vehicles, ensuring that they can complete only the loads required. The users and their passwords must be configured within CALIDUS ePOD.
A driver will log on to a device using the provided user name, password and vehicle. The vehicle can be selected from a list, and will be a list of trailers. The device will remember the last used User name and Vehicle, but will always require that the password is entered.
![]() Note: Vehicle checks are not required.
Note: Vehicle checks are not required.
Job List
When log-in is complete, the assigned work-list will be downloaded onto the device, showing all the jobs in sequence on a Job List screen. If no workload has been assigned to the vehicle, the device will tell the user that there is no work available. The driver can exit, or try to download again.
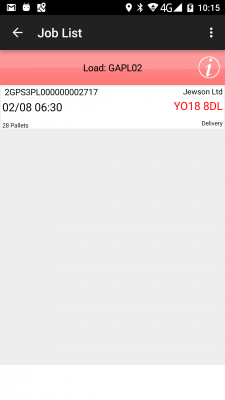
Job List

The device will show a list of the jobs on this load, showing:
- Job Reference - configured to show the Job Code (KOO BOL Number)
- Job Type - Collection/Delivery
- Customer Name
- Postcode
- Planned Date/Time -
 Note: Unlike the screen-shot above, this will be the full date and time, including the year.
 - Carton Count (the sub-totalled quantity of all items on the job)
The screen will display the status of the jobs on the load through a coloured background, as follows:
- Red - Cancelled
- Green - Completed
- Blue - Completed (with amendments)
- Yellow - In Progress
- None - Pending/Incomplete
Note that this status is also displayed prominently in the Job Details screen (following).
The jobs are displayed in the sequence in which they should be completed, with the first job selected. However, the jobs can be viewed in any sequence by clicking the line of the job to be completed - the device will display the Job Details page.
The Menu button can be used here to allow the following options:
- Refresh Load - Refresh the Load/Worklist
- Show All / Outstanding Jobs - Toggle between showing all or only incomplete jobs.
- Log Out - Log out of the system and return to the log-in screen.
- Change Vehicle - Return to the log-in screen to change only the vehicle.
- Load Information - display any load information. This is also accessible from the Information button on the title bar.
- Vehicle Checks - perform ad hoc vehicle defect checks, if configured.
- Cancel Jobs - select jobs to cancel from a list.
Some support information can also be accessed from this menu.
The system can be configured to control allowing the drivers' ability to complete jobs out of sequence, as follows:
- No re-sequencing of jobs - this is not allowed by the driver - the jobs must be completed in the order planned, or cancelled if they cannot be completed.
- Confirm re-sequencing allowed - this requests the user to confirm first.
- Always allowed - no confirmation.
This configuration will be decided at the point of implementation, but is expected that initially re-sequencing will be allowed with a warning.
If any jobs have been added to a Load while the load is in progress, the Refresh option (which also is timed to happen on a regular 5 minute interval) will get the details of the new job and add it to the job list, showing the user a summary of the job(s) added. This functionality will also pick up any amendments to the jobs if, for example, if quantities have been amended, products added, etc.
Jobs can be cancelled by the driver at this time, by long-pressing on the job in the table and choosing Cancel from the pop-up options. The user will be prompted to enter a reason why this job is being cancelled, and optionally take a picture. If a job is confirmed cancelled, the device will show the Job List again with the cancelled job removed from the list. It is expected that there will a single reason code to cancel jobs, to account for the scenario whereby jobs cannot be delivered due to failed access to the site. However, the reason codes used for job cancellation are controlled by the system and may be modified or added to at any time.
![]() Note: The system may be configured for Image Capture in the following ways:
Note: The system may be configured for Image Capture in the following ways:
- Force Image Capture at all times when cancelling or changing quantity (i.e. at Job and Detail level)
- Optional Image Capture at all times.
It is expected that Photo at exception and at Job completion will be allowed but optional.
Job Details
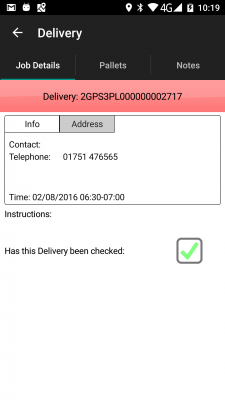
Selecting a job from the Job List will show the user the job report and customer contact details (on a Job Details screen). The user can back out of the selected Job and view any Job on the list.
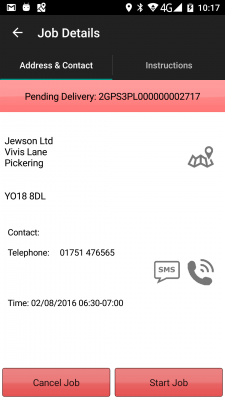
Job Details

The screen has several Tabs, showing:
- The Job Type (Collection, Delivery, Service)
- The customer details (Customer Code, Name, Address and Postcode)
- The contact information (Contact name and number)
- The Instructions for the job
Clicking on the tabs will display the information.
![]() Note: The screen allows the driver to contact the customer (through either text or phone) by clicking on the provided buttons.
Note: The screen allows the driver to contact the customer (through either text or phone) by clicking on the provided buttons.
Cancelling a Job
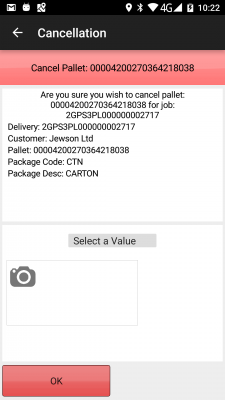
The driver can cancel jobs by clicking the Cancel Job button on the job detail screen.
This will call the cancellation screen where the user will be prompted to enter a reason why this job is being cancelled. The cancellation screen also allows the user to take a picture.
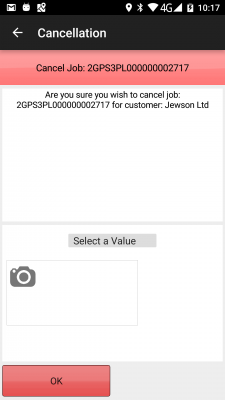
Job Cancellation

![]() Note: Whether or not a picture is required for a job cancellation is controlled by the 'Image Required for Cancellations' setting against the job group for the job. If this is set to 'All' or 'Job Only' then a picture must be taken to cancel a job, otherwise the picture is optional.
Note: Whether or not a picture is required for a job cancellation is controlled by the 'Image Required for Cancellations' setting against the job group for the job. If this is set to 'All' or 'Job Only' then a picture must be taken to cancel a job, otherwise the picture is optional.
If a job is confirmed cancelled, the device will show the Job List again with the cancelled job removed from the list.
![]() Note: This job cancellation screen can also be called from the job list.
Note: This job cancellation screen can also be called from the job list.
Starting/Navigating
When the driver has selected their Job, they can choose the Job with the Start Job button.
Delivery instructions are not expected to be provided through the interface. However, if there have been instructions provided on the Job and the driver has not already switched to this tab to view the instructions, the device will switch to the Instructions tab, to force the user to see the instructions before starting.
![]() Note: It is expected that re-sequencing of jobs is initially to be allowed with a warning. If a job is attempted to be started out of sequence, the user will be told this at this point and allowed to confirm.
Note: It is expected that re-sequencing of jobs is initially to be allowed with a warning. If a job is attempted to be started out of sequence, the user will be told this at this point and allowed to confirm.
When clicking this button to start or arrive at the job, the application performs a check whether the job has been changed since it was loaded on the device, to ensure that the latest data is on the device for the job. If there are changes, the driver will be informed and the screen will refresh.
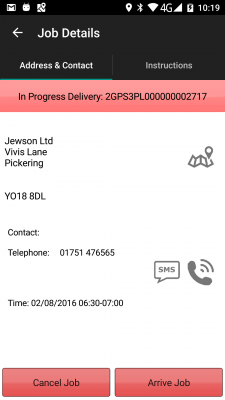
Arrive Job

When a Job is successfully started, this will take the Job to 'In Progress' status, at this point the 'Start Job' button will change to an 'Arrive Job' button and the navigation icon is shown. When the navigation icon is clicked on the device will use a navigation application installed on the device to navigate to the destination using any installed navigation application. The destination address will be entered in the device and will allow immediate navigation to the address.
Arriving
Once arrived at the destination, the driver will then indicate arrival by clicking the Arrive Job button. The mobile device will be configured to display the Store Barcode scan screen at this point.
The Store Barcode screen will be configured through User-definable fields, with a title of "Store Barcode", a "Scan Store Barcode" text field with a barcode button, and a Confirm button.
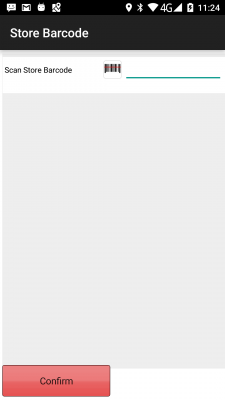
Store Barcode Scanning

The screen will be configured to allow the use of the mobile device's built-in scanner - the text field will be highlighted and ready for input, and the on-screen keyboard will not be shown.
The driver will scan the store barcode, an example of which is shown below:
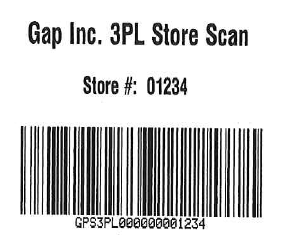
Store Barcode

If the barcode cannot be scanned using the internal scanner, the app's camera scanner may be used by pressing the Barcode action button against the field.
If the barcode cannot be scanned at all, the text from the barcode may be manually keyed into the text field, using the on-screen keyboard, activated by clicking the field.
The driver will then click the Confirm button. The device will compare the store barcode text entry to the configuration of the barcode contents. This is expected to be:
- "GPS3PL"
- 7 or 8 intervening characters
- The Store Number
e.g. "GPS3PL 000000001234"
If this entry does not match this pattern, the device will highlight this by displaying a pop-up message:
- "The store barcode is incorrect - continue anyway?"

Store Barcode Scanning

The driver will be offered options of "Yes" or "No", with "No" being the default. If "No" is clicked, the screen will be re-shown, displaying the Store Barcode field in red border, as it has an error.
If "Yes" is clicked, or the store barcode matches the store number, the driver will be allowed to continue without confirmation.
The device will move on to the Delivery process.
Scan Store Barcode - Technical Information
In order to achieve the above, the following mobile device changes will be made:
The EPOD_JOB table and DAL object will be modified to add a new field EPL_UDF_PREJOB.
The Job Update export back to the server will be modified to add this field, although this will be ignored at this time in the server.
A createUDFButtons method will be created in the Style object to create buttons as per the current Services Pre-/Post-work screen. This will then be modified to check if any fields in the UDF being actioned by these buttons have a REQUIRED attribute/tag of "C". If so, the Confirm button will display the confirmation dialogue if any of these indicated fields fail validation.
The createUDFields2 method will be modified to support the REQUIRED tag value of "C". It will also be modified to extend the REGEXP tag validation for data-bound validation.
If the REGEXP tag begins with "DBV:", this is a data-bound validation. In this case, replace any data tags with the value from the DAL objects referenced and remove the DBV indicator. For example:
- DBV:GPS3PL.{7,8}([EPOD_JOB.EPL_CUSTOMER_CODE])
This will have the Customer Code from the job inserted into the pattern in the indicated place (between and including the square brackets). The prefix "DBV:" will be removed. Assuming a customer code of "01234", this will result in a pattern of:
- GPS3PL.{7,8}(01234)
This pattern may then be stored against the field and used for standard validation.
A new pop-up screen will be created in Job Details, to display PreJob UDF forms when the Arrive Job button is clicked. This will be in the standard way that this is achieved in the current Services Pre-/Post-work screens. This will be modified to use the new createUDFButtons style method. This new pop-up screen must listed for the auto-updates event, and exit gracefully if this event is raised. This form will allow back-out.
The screen will include a title taken from the UDF title, and a form of all the fields in the UDF. Any buttons will be displayed as standard on the bottom of the form.
A new function will be created in the Job Details form to control which tasks must be completed when the Arrive Job or Continue Job button is pressed - this will be called nextJobStartTask. This will start tasks in the following sequence:
- NextJobStartTask in the following sequence:
- Arrival
- PreJobUDF
- PreJob Signature
- ActionJob (Vehicle Swap or Col/Del/Service)
The PreJob UDF action will check if the job has any saved UDF against it in the new EPOD_JOB field EPL_UDF_PREJOB. If there is none, the action will check if there is any configured PreJob UDF (based on the site and job group). If present, the new PreJob UDF pop-up screen will be shown.
If the user backs out of the PreJob UDF screen, the usual confirmation dialogue will be displayed. When returning from the screen, if no UDF is present to store, the Action should check the FORM tag's REQUIRED attribute. If set to "Y", the action should stop at this point. If set to anything else, the action can continue to the next task.
Delivery Processing
![]() Note: There are only delivery jobs in this implementation.
Note: There are only delivery jobs in this implementation.
Deliveries will initially consist of multiple cartons to deliver.
The following are the standard tabs that are expected to be displayed:
Job Details Tab
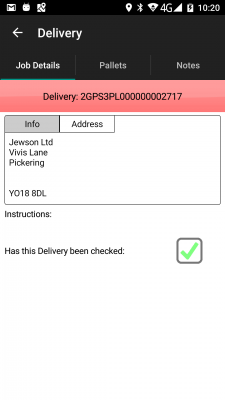
Job Details Tab - Addresses
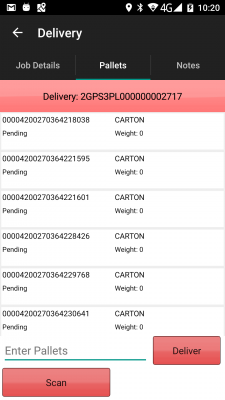
Containers (Cartons) Tab
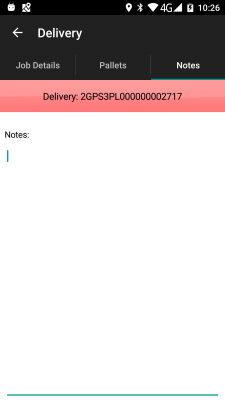
Notes Tab


The Job Details tab has multiple sections:
- Contact information
- Address information - if supplied, both current address and origin address are shown.
- Job Instructions, if provided.
![]() Note: A Deliver All button will NOT be available on this first tab.
Note: A Deliver All button will NOT be available on this first tab.
From the Cartons tab, the device will show a list of the cartons to be delivered, which can show:
- Carton ID
- Package Description
- Status ("Pending")
- Weight
- Long Description - the GAP BOL #
Actions against the cartons can be activated by long-pressing against the row, and have the following actions:
- Cancel
- Info
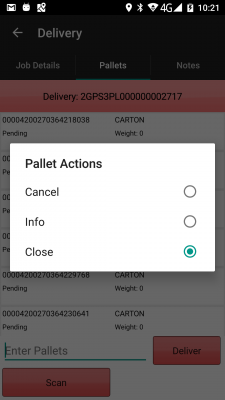
Carton Long-press Pop-up
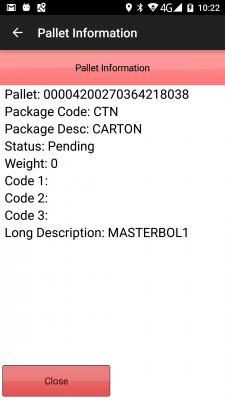
Carton Info Pop-up


For information on the actions above, see the appropriate following sections.
When all cartons have been confirmed as delivered or cancelled, the Delivery process will return to the Job Details tab, where a Complete button will be displayed, to complete the job. It is then possible to review the list of cartons delivered and change this if required. The list will display a border and status to indicate whether the products have been delivered:
- Red - Cancelled
- Green - Delivered in full.
The status will be displayed for confirmation.
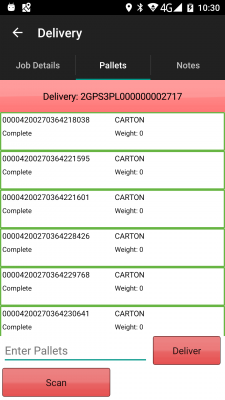
Completed Cartons
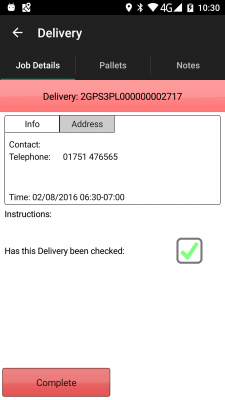
Complete Button


When the driver has confirmed that everything is complete and clicked the Complete button, this screen will close and the user will be directed to the Job Completion process.
Delivering a Carton
Each carton on the list can be confirmed as delivered by either:
- entering the carton ID manually and clicking the Deliver button.
- scanning the carton ID.
The carton label looks as follows:
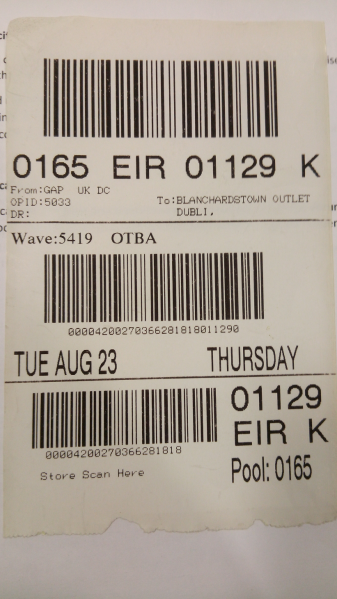
Carton Label

![]() Note: Either the top or bottom barcodes may be scanned, as they both contain the carton ID - for training purposes, assume that the bottom barcode is the barcode that must be scanned by the driver.
Note: Either the top or bottom barcodes may be scanned, as they both contain the carton ID - for training purposes, assume that the bottom barcode is the barcode that must be scanned by the driver.
When marked as delivered, the item will be removed from the list.
Cancelling a Carton
If a carton can't be delivered, it can be removed from the list with the pop-up option Cancel. Again, the exception screen will be shown where the driver can enter the reason for the cancellation.
Cancel Carton

The reason codes mapped for carton cancellation will be as follows:
- "01" - Damaged Carton
- "04" - Quality Problem (e.g. Carton open, missing items)
The user will also be able to optionally take a picture associated with this cancellation.
![]() Note: Whether or not a picture is required for a product cancellation is controlled by the 'Image Required for Cancellations' setting against the job group for the job. If this is set to 'All' or 'Detail Only' then a picture must be taken to cancel a product, otherwise the picture is optional.
Note: Whether or not a picture is required for a product cancellation is controlled by the 'Image Required for Cancellations' setting against the job group for the job. If this is set to 'All' or 'Detail Only' then a picture must be taken to cancel a product, otherwise the picture is optional.
![]() Note: No clausing i.e. entering a comment against a delivered carton) will be allowed.
Note: No clausing i.e. entering a comment against a delivered carton) will be allowed.
Job Completion
It is expected that no signatures (driver or customer) will be required for this implementation. Furthermore, no additional photos are required at this point. Both of these may be configured at a later date if required.
Therefore, when all items are complete (delivered or cancelled) and the driver has clicked the Complete button, the driver will be returned to the Job List screen and the completed Job will be removed from the list. Any completed jobs can be optionally viewed again, by pressing the Menu button and choosing Show All Jobs. The list can be made to show only outstanding jobs again by pressing the Menu button and choosing Show Outstanding Jobs.
Post-Load
Once all Jobs have been completed, the Load will be marked as completed when the user returns to the Job List screen.
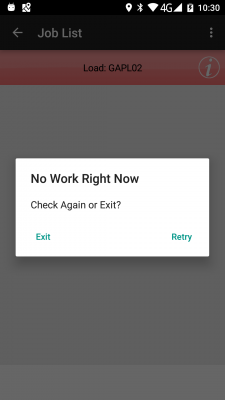
Completed Load

The device will attempt to download a new load for the user and/or vehicle. If one has not been provided, the device will confirm this and allow the user to check again or log off the system.
POC/POD Documents
No POD documents are required to be produced for this implementation - POD confirmation is through the GAP 861 EDI message. The generic container report will be configured.
Data Export
There is no requirement to update Empirica with completed jobs. However, GAP must be updated through the development of a new 861 EDI message. This is specified elsewhere.
Appendix A: TEST PLAN
| Test Script / Scenario Reference | GAP Scan Store Barcode on Arrival | Call Number(s): 338835 KOO-GAP-SCR1 |
| Test Script / Scenario Description | Tests covering the whole mobile device process. | PASS / ISSUES / FAIL |
| Menu Access | N/A | |
| Pre-requisites | Configured as per specification | Tested By: |
| Test Objective | To test that: Scan Store Barcodes are displayed and validate as expected and; the device styling is correct. | Date: |
| Step | Action | Result | Remarks | P/F |
| 1 | Mobile Device | |||
| Requires 3 jobs on a load, the first two configured for the PreJob store barcode as shown above, the third with a different job group without any pre-job configuration. | ||||
| 1.01 | Ensure that the app is styled as expected | The app is coloured as expected. The login screen displays the correct logo. The Job List and Container tab are styled correctly. The app always shows "Carton" where "Container" would be displayed. | ||
| 1.02 | Log on and pick up a load for the vehicle. Select the first job and start it. Click Arrive Job | The configured Scan Store Barcode screen should be displayed, laid out as expected. | ||
| 1.03 | Back out of this screen using the Back button. | The app should return to the Job Details screen. The Continue Job button should be displayed. | ||
| 1.04 | Click Continue Job. | The Scan Store Barcode screen should be displayed again. | ||
| 1.05 | Click Confirm | A confirmation alert should be displayed with the expected wording. | ||
| 1.06 | Click No | The Scan Store Barcode screen should be displayed again. | ||
| 1.07 | Enter (or scan using the device's internal scanner) an invalid barcode (wrong length). Click Confirm. | A confirmation alert should be displayed. | ||
| 1.08 | Click No. Key in an invalid barcode (right store number but without the preceding characters). Click Confirm. | A confirmation alert should be displayed. | ||
| 1.09 | Click No. Use the app scanner to enter an invalid barcode (right format, wrong store number) . Click Confirm. | A confirmation alert should be displayed. | ||
| 1.10 | Click Yes. | The Delivery screen should be displayed. | ||
| 1.11 | Back out of the delivery. Click Continue Job. | The Delivery screen should be displayed as the store barcode has already been saved. | ||
| 1.12 | Complete the job by scanning/entering all the cartons. | No signatures should be prompted. The Job List screen should be displayed. | ||
| 1.13 | Start the next job. Click Arrive Job. Scan a valid store barcode. Click Confirm. | The Delivery screen should be displayed without confirmation. | ||
| 1.14 | Complete the job. Start the next job. Click Arrive Job. | The Delivery screen should be displayed, as there is no store barcode configuration. |
Appendix B: Document References
B.1 References
| Ref No | Document Title & ID | Version | Date |
| 1 | FS 338875 KOO-GAP-SCR2 GAP Export Interface | 0.1 | 26/10/2016 |
B.2 Glossary
| Term | Definition |
|---|---|
| EPOD | Electronic Proof of Delivery. The OBS EPOD system is CALIDUS ePOD. |
| CALIDUS eSERV | The OBS mobile system to complete Service functionality in the field. This is part of the CALIDUS ePOD system. |
| PDA | The mobile device on which the C-ePOD system will run in the field. This can be a Phone, EDA or industrial PDA, running Android. |
| DAL | Data Access Layer. A mechanism for accessing data by the system that is removed from the application, allowing for simplified access and providing protection to the data, as only approved DAL methods can be used to modify it. |
| GPS | Global Positioning System. A mechanism of retrieving accurate positioning information in the form of Latitude and Longitude (Lat-Long) co-ordinates from a device. |
| GPRS, 3G, HSDPA, Data Service | All terms referring to mobile device network connectivity, and the speed at which the device connects to the internet. |
B.3 Authorised By
Ken Hayes | KOO Representative | _____________________________ |
Matt Turner | OBSL Representative | _____________________________ |