FS 340547 PROD-75 Admin Job Assignment Improvements
![]()
OBS Logistics Ltd
Admin Job Assignment Improvements
CALIDUS ePOD
24th January 2017 - 0.2
Reference: FS 340547 PROD-75
Contents
Functional Overview
Client Requirement
Driven out of NAV requirements, it is necessary to improve the job assignment and sequencing functions with CALIDUS ePOD Admin system.
Solution Overview
Change to the load assignment screen in EPOD, whereby the screen can be sorted and filtered.
- Add filters
- Add filter to only show jobs with no load.
- Remove Actual Date, Job ID and Status from the table of jobs that may be assigned.
- Add other fields e.g. Customer Name, Post Code, etc.
- Only ever select Pending jobs.
- Only ever select jobs from loads that are Pending or Assigned (i.e. not In Progress, Cancelled or Complete).
Additionally, a screen is required to allow fixed sequencing of jobs on a load, also allowing blank sequences and duplicate sequences.
Scope
All changes will be made in the latest version of the CALIDUS ePOD system.
Set-up
Pre-requisites
Menu Structure
Data
Functional Description
![]() Note: All new buttons should be assigned an appropriate icon from the icon set used by CALIDUS ePOD, or a new icon created if an applicable icon is not found.
Note: All new buttons should be assigned an appropriate icon from the icon set used by CALIDUS ePOD, or a new icon created if an applicable icon is not found.
Existing Screen Modifications
An action button will be added to the results table on the Load screen (labelled Assign Jobs), for each row where the load is not complete or cancelled. This will call the new Assignment screen passing in the Load ID.
An action button will be added to the results table on the Load screen (labelled Sequence Jobs), for each row where the load is not complete or cancelled. This will call the new Assignment screen passing in the Load ID.
When a load is selected from the Loads screen with the Details button, the jobs screen is shown with an Assign button. Currently this displays a new panel on the Jobs screen and allows multiple selects of jobs to be assigned to the selected load.
This panel will be removed from this screen and moved to a new screen with a Back button. The Assign button on this screen will now point to this new screen. In this case, the screen will be called with a Load ID, to identify the load that is being modified.
A button will be added to the title bar of the Jobs screen, when called from the Load screen with the Load ID. This button will be called Sequence Jobs and will call the new Job Sequence screen passing in the Load ID.
The jobs screen Select Pop-up will be modified to display the sequence and Link ID of the job.
Furthermore, this pop-up will be reorganised into tabs to reduce the size of the pop-up. Details will become Job, and will comprise new sub-tabs of Details, Address Details and Instructions. Address details and Instructions will be from the existing tab, and the remaining field left on the Details tab. The new Instructions tab will now show the instructions separately rather than in a tab block. These new tabs should be visible at all times, like the Details tab. The details tab should be re-organised after these details are removed, to make better use of the width of the screen.
The Link tab will similarly be reorganised.
The validation of entered jobs must validate that a customer code has been selected for the job, and the appropriate tabs shown if this is the case.
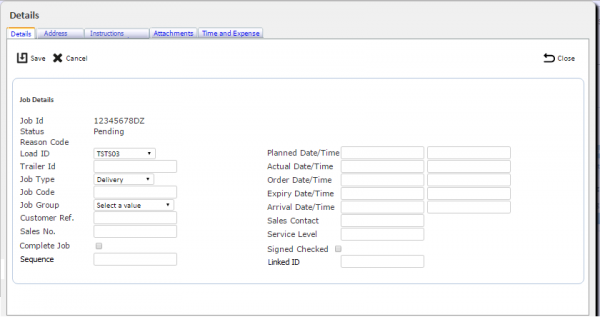
New Job Details layout
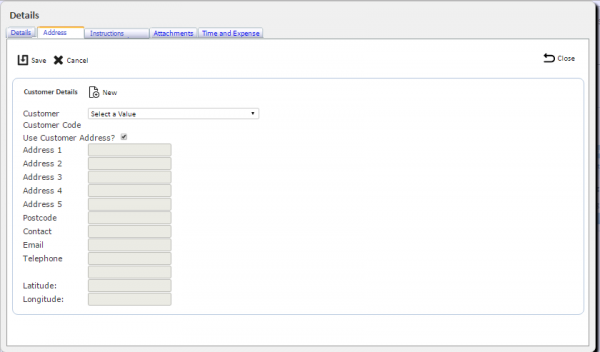
New Address tab
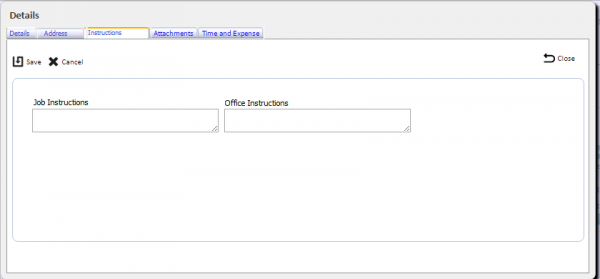
New Instructions tab


![]() Note: The screenshots above show the organisation of the details tab without sub-tabs and are to show the required structure of the fields, rather than the tabs.
Note: The screenshots above show the organisation of the details tab without sub-tabs and are to show the required structure of the fields, rather than the tabs.
![]() Note: The existing capability of entering Expenses should be amended so that this is not available when creating a new Job until the actual job has been created and saved. It should also not be possible to create a job without identifying a customer or a job code.
Note: The existing capability of entering Expenses should be amended so that this is not available when creating a new Job until the actual job has been created and saved. It should also not be possible to create a job without identifying a customer or a job code.
Pop-up actions will be added to all screens, to reclaim space lost by adding multiple buttons to grid rows and modernise the UI.
The solution is:
- Hide the column containing the action buttons on the results tables.
- Add a generic pop-up Action form.
- Trigger this form when clicking on a row, which will display the actions of that row on the pop-up form, along with a close and action button.
- Selecting an option from this Action pop-up will close the action pop-up and click the appropriate button.
- Links and other buttons on the row will not trigger this pop-up action.
- The pop-up will be positioned below and to the right the row at the cursor point in general, except when the action pop-up is too close to the right of the window, when it will display to the left of the cursor, and when it is too close to the bottom of the window, when it will display above the row.
The code has been prototyped and is referenced here, and is available for inclusion immediately.
Specific screens and grid views to change:
- load_header.aspx - the main results table
- job_details.aspx - the main results table
- product_containers.aspx - both tables.
- service_job.aspx - the main results table
- product_services.aspx - the main services table, the Product and Activities tables.
- reason_code.aspx - the main results table
- vehicle_maintenance.aspx - the main results table
- product_maintanance.aspx - the main results table
- serivce_activity_maintenance.aspx - the main results table
- service_vehicle_product_maintenance.aspx - the main results table
- customer_maint.aspx - the main results table
- expense_category.aspx - the main results table
- user_view.aspx - the main results table
- user_access_control.aspx - the main results table
- user_tracking.aspx - the main results table
- vehicle_check_response.aspx - the main results table
- job_group.aspx - the main results table
- xf_config.aspx - the main results table
- udf_config.aspx - the main results table. Note that the drop-down list table would also benefit from this change, but may require additional work to complete effectively. This should be reviewed as part of this change and completed if functionality is acceptable.
- menu_options.aspx - the main results table
Excluded or unaffected by this change are:
- service_invoicing.aspx - this screen requires rewriting to select rows through any press on the row, rather than a check box.
- upload.aspx
- excelreports.aspx
- load_assignment.aspx - this screen requires rewriting to select rows through any press on the row, rather than a check box.
- Vehicle_checks.aspx - This screen requires replacing with UDF Vehicle checks.
- xf_audit.aspx - this screen operates differently to others and already has a row event to display request and response queries. This should be revisited in the future to bring into line with other screens.
![]() Note: In some cases, where the table row has only one option that is "Select", the pop-up action screen need not be shown, and the button clicked immediately. Screens and tables that should be affected by this are:
Note: In some cases, where the table row has only one option that is "Select", the pop-up action screen need not be shown, and the button clicked immediately. Screens and tables that should be affected by this are:
- product_services.aspx - the Product and Activities tables.
- reason_code.aspx
- vehicle_maintenance.aspx
- product_maintanance.aspx
- serivce_activity_maintenance.aspx
- service_vehicle_product_maintenance.aspx - note that the Edit button should be renamed Select.
- expense_category.aspx
- user_access_control.aspx
- user_tracking.aspx
- job_group.aspx
- xf_config.aspx
- udf_config.aspx - the main results table
- menu_options.aspx
![]() Note: This modification to auto-select should be available to any new screens and should be part of the standard code used for all screens, not a bespoke version specifically for these screens - the list is provided for reference and testing only.
Note: This modification to auto-select should be available to any new screens and should be part of the standard code used for all screens, not a bespoke version specifically for these screens - the list is provided for reference and testing only.
![]() Note: The code should be written in such a way that, if no buttons are found against the line, no pop-up action should be displayed. This affects:
Note: The code should be written in such a way that, if no buttons are found against the line, no pop-up action should be displayed. This affects:
- user_tracking.aspx
![]() Note: This modification to not display a pop-up if there are no actions should be available to any new screens and should be part of the standard code used for all screens, not a bespoke version specifically for these screens - the list is provided for reference and testing only.
Note: This modification to not display a pop-up if there are no actions should be available to any new screens and should be part of the standard code used for all screens, not a bespoke version specifically for these screens - the list is provided for reference and testing only.
Add a new appConfig.xml setting, to control this new UI method, Default to 1 (enabled).
Create a new popupActions.js file with the prototyped pop-up actions code.
Create a new popupActions.css file with the prototypes pop-up actions css.
Include these two files into the Master form if the new appConfig property is 1.
In each form that requires this functionality:
In aspx:
- Add class hasPopupActions to the gridview class. This can be added at all times.
- Add OnRowDataBound property to the gridview class if it does not contain one and set to code-behind.
- Add prepActionPopup() to $(document).ready function. This can be added at all times.
- Add ItemStyle-CssClass="gridview_actions" HeaderStyle-CssClass="gridview_actions" FooterStyle-CssClass="gridview_actions" to the asp:TemplateField where the action buttons are located. This can be added at all times.
In aspx.cs:
- Amend or add code-behind for OnRowDataBound for the grids that require this functionality:
   if (e.Row.RowType == DataControlRowType.DataRow)
   {
       e.Row.Attributes["onclick"] = "actionPopupEvent(event);";
   }
- Add this code only if the new appConfig property is 1.
Job Assign Screen
A new screen will be created in the Admin system.
A title will be added to show the load having jobs assigned to it.
A label displaying the currently selected number of jobs to assign to the load and being removed from the load will be shown in the title bar. This will be updated whenever a job is selected or deselected.
Find, Add All, Remove All, Reset and Save buttons will be added to the title bar, as well as a Back button.
A Search panel will be present on this panel, which will initially be hidden and shown when the Find button is displayed, to allow the user to select by:
- Only show jobs with no load, or all jobs. A drop-down list of options, defaulting to "No Load".
- Job Group - a text entry box that will be used to 'fuzzy match' against the job group value against the jobs. Blank as default
- Job Code - a text entry box that will be used to 'fuzzy match' against the job code value against the jobs. Blank as default
- Customer Code - a drop-down list or (auto-complete text box if the volume of codes is high) that will be used select specific customers against the jobs. Blank as default
- Customer Ref - a text entry box that will be used to 'fuzzy match' against the Customer Reference value against the jobs. Blank as default
- Job Type - a drop-down list to select the job types, consisting of "Collection", "Delivery", "Service" or "All" (the default value).
- Planned Date - a pop-up Calendar to select the Planned Start Date, defaulting to no value. When selected, this should default to today's date. An option to clear the selected data will be provided.
Clear and Search buttons will be provided, working exactly as they do on other screens. ![]() Note: No export options are required on this Search panel.
Note: No export options are required on this Search panel.
The Search panel will not be initially displayed on the form, and the jobs matching the default filter criteria will be displayed in the results table.
Clicking Search will display a results table with the following fields:
- Load
- Type
- Group
- Code
- Customer Ref.
- Planned Start and End Date & Time
- Customer Name
- Post Code
![]() Note: These results should be shown on initial start-up of the page.
Note: These results should be shown on initial start-up of the page.
The search for these jobs will be modified to also return the results of the current load in this table, sorted to appear at the top of the list, followed by any free jobs (i.e. not assigned to a load) and then jobs assigned to other loads.
The selection of data for this table will also support all of the filtering shown above, plus the following:
- Only ever select status Pending jobs.
- Only ever select jobs from loads that are status Pending or Assigned (i.e. not In Progress, Cancelled or Complete).
The table must allow resorting by clicking on a label in the title row of the results table.
Each table row will allow selection by clicking on it. Clicking on it again will deselect it.
- Unassigned jobs and jobs assigned to another load that are selected will be highlighted blue.
- Jobs already assigned to this load will be initially highlighted green.
- Jobs already assigned to this load that are selected will be highlighted red.
The Add All button will count all jobs not currently assigned to the load in the results table. It will then show a confirmation that this number of jobs will be immediately added to the load. On confirmation, the jobs will be added immediately.
The Remove All button will count all jobs currently assigned to the load in the results table. It will then show a confirmation that this number of jobs will be immediately removed from the load. On confirmation, the jobs will be removed immediately.
The titlebar label displaying the currently selected number of jobs to assign to the load and being removed from the load will be updated with each selection:
- If a single unassigned job is selected, the "To Assign" number selected will be incremented by one.
- If a selected unassigned job is deselected, the "To Assign" number selected will be decremented by one.
- If a job that is already assigned to the load is selected, the "To Deassign" number will be incremented by 1.
- If a job that is already assigned to the load is deselected, the "To Deassign" number will be decremented by 1.
If the results table is paginated, the screen will remember the checked results of each job on all pages.
Once jobs have been selected for assigning to and deassigning from the load, these changes can be saved or discarded through the title bar buttons:
- The Save button will save all changes to assigned jobs (pending a pop-up confirmation).
- The Reset button will reset all the selections against jobs in the Assigned Jobs table (pending a pop-up confirmation).
- The Back button will exit the screen with no confirmation.
On clicking any button that changes the data in the grid view, or resets the selections in the grid view (namely Save, Add All, Remove All and Reset), the grid view should be refreshed from the server.
Job Sequencing Screen
A new screen will be created.
A title will be added to show the load having jobs sequenced or consolidated on it.
Reset and Save buttons will be added to the title bar, as well as a Back button.
The screen will display a results grid view of all jobs on the load.
- Load
- Type
- Group
- Code
- Customer Ref.
- Planned Start and End Date & Time
- Customer Name
- Post Code
- Sequence
- Linked
![]() Note: This will not be a paginated list - all jobs should be shown.
Note: This will not be a paginated list - all jobs should be shown.
Buttons will be present on the title of the table:
- Sequence All - always enabled.
- Clear Sequence - only if a row is selected with a sequence.
- Same Sequence - only if two or more rows are selected, at least one with a sequence.
- Consolidate - only if two or more rows are selected.
- Break - only if a row is selected with a link ID.
Rows on the grid should be capable of being dragged vertically within the table.
Each table row will allow selection by clicking on it. Clicking on it again will deselect it. They will be highlighted blue. ![]() Note: Dragging and dropping a row does not select it.
When rows are selected, buttons may be enabled as indicated above.
Note: Dragging and dropping a row does not select it.
When rows are selected, buttons may be enabled as indicated above.
Clicking Sequence All will require a pop-up confirmation that this will resequence all jobs in the order of the rows on the table (achieved by dragging) and override all sequences. If confirmed, apply a sequence to all jobs in the order on the screen.
Once a row is selected, clicking Clear Sequence removes the sequence from this job.
Selecting two or more rows enables the Same Sequence button - clicking this will set the sequence of the selected jobs to the lowest of the sequences of the jobs selected.
Selecting two or more rows enables the Consolidate button - clicking this will set the Linked ID of all the jobs to the same value. If some jobs are already linked, all the jobs with this linked ID will be updated as well. Where Linked IDs already exist, set the linked ID to the lowest value.
Selecting a row or rows with a link ID will enable the Break option - clicking this will clear the linked ID of all the jobs. Additionally, any jobs remaining with the same linked id that are only present once on the load will also be removed.
All options should sequence the data on the screen, and not save until the Save button is clicked.
All options should sort the data in the table after clicking a button, to reflect any changes.
Once jobs have been sequenced or consolidated, these changes can be saved or discarded through the title bar buttons:
- The Save button will save all changes.
- The Reset button will reset all the changes against jobs (pending a pop-up confirmation).
- The Back button will exit the screen with no confirmation.
On clicking the Save and Reset buttons, the grid view should be refreshed from the server.
Appendix A: TEST PLAN
| Test Script / Scenario Reference | Admin Job Assignment Improvements | Call Number(s): 340547 PROD-75 |
| Test Script / Scenario Description | Testing new Admin functionality. | PASS / ISSUES / FAIL |
| Menu Access | N/A | |
| Pre-requisites | Several jobs and loads with jobs should be present, at a variety of statuses. | Tested By: |
| Test Objective | To test that: job assignment works as expected; job sequencing works as expected; the new screens are available and; existing screen Action Button functionality can be made to work in the new way, while retaining the old way of operation. | Date: |
| Step | Action | Result | Remarks | P/F |
| 1 | Job Assignment Screen | |||
| N/A | ||||
| 1.01 | Find loads in the Loads screen. | A new Assign Jobs button should be present on incomplete lines. | ||
| 1.02 | Click the Assign Jobs button. | The new Job Assignment screen should be displayed. | ||
| 1.03 | Click the Back button. | The Loads screen is displayed. | ||
| 1.04 | Click the Details button. | The Jobs screen should be displayed with all the jobs for the load. The Assign button should be present on the title bar. | ||
| 1.05 | Click the Assign button. | The new Job Assignment screen should be displayed. All existing jobs on the load should be displayed highlighted in green, along with all jobs matching the selection criteria. The results table shows the expected columns. The title should display the number of jobs on the load, and the number selected for assigning and deleting. | ||
| 1.06 | Click the Find button and test the search criteria. | The jobs displayed match the search criteria entered. | ||
| 1.07 | Click the Find button and clear any search criteria, then search again. | All jobs are shows as before. | ||
| 1.08 | Click on a results table header | The results table sorts by that column. | ||
| 1.09 | Select a free job. | The line should be selected, highlighted in blue. The number of jobs for assignment should increment. | ||
| 1.10 | Select a job already assigned to the load. | The line should be selected, highlighted in red. The number of jobs for deletion should increment. | ||
| 1.11 | Move to page 2 of the results and select a line. Return to page 1. | The new line should be highlighted. The number selected for assignment should be incremented. The original selected jobs on the first page should still be highlighted as normal. | ||
| 1.12 | Deselect both lines. | The line should be return to their original unselected colouration. The number of jobs for assignment and deletion should be decremented. | ||
| 1.13 | Click Save. | A confirmation dialogue should be displayed. | ||
| 1.14 | Click Cancel on the dialogue. | The jobs should be displayed - the selections should not be reset. | ||
| 1.15 | Click Save and Confirm. | The selected job should be assigned to the load. The table should refresh, with the new job highlighted in green. The number of jobs on the load should be increased by 1. | ||
| 1.16 | Select a job to remove. Click Remove All. | The selected job should be highlighted in red and the number to remove incremented. A confirmation dialogue should be displayed, showing the total number of jobs being removed. | ||
| 1.17 | Click Cancel on the dialogue. | The jobs should be displayed - the selections should not be reset. | ||
| 1.18 | Click Remove All and Confirm. | All jobs should be removed from the load. The table should refresh, with no jobs highlighted in green. The number of jobs on the load should be 0. | ||
| 1.19 | Select a job to assign. Click Assign All. | The selected job should be highlighted in blue and the number to assign incremented. A confirmation dialogue should be displayed, showing the total number of jobs being added. | ||
| 1.20 | Click Cancel on the dialogue. | The jobs should be displayed - the selections should not be reset. | ||
| 1.21 | Click Assign All and Confirm. | All jobs should be added to the load. The table should refresh, with all jobs highlighted in green. The number of jobs on the load should be the total number of jobs. | ||
| 1.22 | Select a number of jobs to remove from the load. Click Save and Confirm. | The jobs should be removed from the load and the titlebar counts set appropriately. | ||
| 1.23 | Select a number of jobs to assign to and remove from the load, from several pages. Click Reset. | The jobs should be selected and highlighted and the titlebar counts incremented initially, then all selections should be removed and the title bar counts reset appropriately. |
| Step | Action | Result | Remarks | P/F |
| 2 | Job Sequencing Screen | |||
| N/A | ||||
| 2.01 | Find loads in the Loads screen. | A new Sequence Jobs button should be present on incomplete lines. | ||
| 2.02 | Click the Sequence Jobs button. | The new Job Sequence screen should be displayed. | ||
| 2.03 | Click the Back button. | The Loads screen is displayed. | ||
| 2.04 | Click the Details button. | The Jobs screen should be displayed with all the jobs for the load. The Sequence Jobs button should be present on the title bar. | ||
| 2.05 | Click the Sequence Jobs button. | The new Job Sequence screen should be displayed, showing all jobs on the load. All columns are shown as expected. | ||
| 2.06 | Drag a row to a new position. | The row is shown in the new position. | ||
| 2.07 | Click 'Reset | The rows return to their original sequence. | ||
| 2.08 | Click Sequence All. | A pop-up confirmation is displayed. | ||
| 2.09 | Click Cancel. | No rows are sequenced - the table is redisplayed. | ||
| 2.10 | Click Sequence All and Confirm. | Each row is given a sequence counting from 1. | ||
| 2.11 | Select multiple rows and click Clear Sequence. | The sequence is cleared from the selected jobs. | ||
| 2.12 | Select multiple rows and click Same Sequence. | The same sequence is set on the selected jobs. | ||
| 2.13 | Select multiple rows and click Consolidate. | The same Linked ID is set on the selected jobs. | ||
| 2.14 | Consolidate 2 more jobs separately. | A different linked ID is set against those rows. | ||
| 2.15 | Select one of the first consolidated rows, one of the second consolidated rows and another unconsolidated row. Click Consolidate. | The same Linked ID is set on the selected jobs and on the other consolidated rows. | ||
| 2.16 | Select two of the consolidated rows. Click Break. | The Linked ID is removed from these rows. | ||
| 2.17 | Select all bar one of the consolidated rows. Click Break. | The Linked ID is removed from all the rows, including the remaining row with the linked ID. | ||
| 2.18 | Consolidate two more rows. Click Save, then exit and re-enter the screen. | All sequence and consolidation changes should be reflected. | ||
| 2.19 | Create a consolidation, break an existing consolidation, drag several rows and resequence all, clear some sequences. Click Reset. | The rows return to their original sequence and linked ID values. | ||
| 2.20 | Go to the Job screen for the load and click Details on the jobs. | The Pop-up details screen should be tabbed as shows. The Sequence and Linked IDs should be set as they were in the Job Sequence screen. |
| Step | Action | Result | Remarks | P/F |
| 3 | Existing screen tests | |||
| N/A | ||||
| 3.01 | Ensure that the app is configured for the old UI functionality. Check all screens that have been modified. | The results tables on the screens show the final column with the action buttons. Rolling over the rows does not show the Hand pointer. Clicking on a line does not show the Action pop-up. The buttons work as expected. | ||
| 3.02 | Ensure that the app is configured for the new UI functionality. Check all screens that have been modified. | The results tables on the screens do not show the final column with the action buttons. Rolling over the rows shows the Hand pointer. Clicking on a line shows the Action pop-up. The pop-up buttons work as expected. |
Appendix B: Quote & Document References
| Cost Details | ||||
| Activity | Estimate No. of Days |
No. of Days | Rate per Day (£) | Cost (£ Exc. VAT) |
| Requirements | 0.00 | 0.00 | 0 | £0.00 |
| Change Request Evaluation | 0.00 | 0.00 | 0 | £0.00 |
| Functional Specification | 2.75 | 2.75 | 0 | £0.00 |
| Technical Specification | 0.00 | 0.00 | 0 | £0.00 |
| Development | 11.25 | 11.25 | 0 | £0.00 |
| Testing and Release | 2.25 | 2.25 | 0 | £0.00 |
| Implementation | 0.25 | 0.25 | 0 | £0.00 |
| Project Management | 0.75 | 0.75 | 0 | £0.00 |
| TOTAL | 17.25 | 17.25 | £0.00 | |
| Estimate excludes training, release to live and go live support. |
B.1 References
| Ref No | Document Title & ID | Version | Date |
| 1 |
B.2 Glossary
| Term | Definition |
|---|---|
| EPOD | Electronic Proof of Delivery. The OBS EPOD system is CALIDUS ePOD. |
| CALIDUS eSERV | The OBS mobile system to complete Service functionality in the field. This is part of the CALIDUS ePOD system. |
| PDA | The mobile device on which the C-ePOD system will run in the field. This can be a Phone, EDA or industrial PDA, running Android. |
| DAL | Data Access Layer. A mechanism for accessing data by the system that is removed from the application, allowing for simplified access and providing protection to the data, as only approved DAL methods can be used to modify it. |
| GPS | Global Positioning System. A mechanism of retrieving accurate positioning information in the form of Latitude and Longitude (Lat-Long) co-ordinates from a device. |
| GPRS, 3G, HSDPA, Data Service | All terms referring to mobile device network connectivity, and the speed at which the device connects to the internet. |
B.3 Authorised By
Neil Appadu | OBSL Representative | _____________________________ |