SDD 350229 Port of Dover Solution Design
![]()
Port of Dover
Port of Dover Solution Design
CALIDUS WMS
3rd October 2018 - 1.2
Reference: REQ 350229
Introduction
This document is the functional description for the implementation of the CALIDUS 3pl WMS and related systems for the Port of Dover Cargo Ltd contract
Objective
The primary purpose of this document is to supply a full functional description of the usage of each area of the CALIDUS WMS and supporting systems, in order for the Port of Dover Cargo Ltd staff to sign off against the processes.
Scope & Limitations
Note that the Container Yard Management system is not included in detail in this functional description and has been supplied in a separate document, referenced in the appendices.
The processes surrounding ISPS Advanced Passenger and Vehicle Information and Transfer of Custody are still being defined by the operation. Changes relating to this will affect Booking Creation, Arrival at Gatehouse, Completion of Bookings and Despatch Confirmation.
When defined, this will be evaluated and the process confirmed as part of the specification of these changes.
Information regarding Charging, Invoicing and interfaces to IFS will all be documented separately in the respective functional specifications (referenced in the appendices) and are shown here in limited detail, as a placeholder only.
The operation currently has no plans for case picking. Sections have been added to this document, however, to show the potential processes that may be used should this be required in the future.
The operation will not be using Pick and Drop (P&D) locations in the warehouse (i.e. areas for transferring pallets between trucks from the chamber to the wider area of the warehouse. However, descriptions of these processes have been left in place to show the capability of the system.
Multi-pallet movements are usually performed by suitable truck types (for example with long tines). These are not normally suitable handling equipment for locating the pallets in racking or multi-pallet stacks. This is normally suited to an operation that utilises P&D locations so that the moves from inbound bays to P&D locations can move multiple pallets, and that the final stage (move from P&D to racking) is completed by a more suitable truck, for example reach trucks. The operation is not expected to be utilising P&D locations - the description remains here to show capability should they be reinstated in the overall warehouse design.
The type of trucks to be used in the operation is still being defined, of a current choice of Reach Truck and Counter Balance. It is likely that Reach Truck will be selected.
It is also not likely that the operation will require the ability to pick up multiple pallets at a time.
A Customs Clearance interface must be live with Customs by April 2019.
Several options are being investigated by the operation:
- CNS
- Destinate
- Penton
When this is defined, the process for Hold/Release within WMS and Container Yard will be defined as part of this.
Several additional changes were identified whilst reviewing this document on 27-28/09/2018. Although these are shown in this document, these changes are additional to the changes already described here, as subject to interface Port of Dover Cargo Ltd business case review and the raising of an additional change request with OBS Logistics.
These changes relate to:
- Multiple Seals capture in Container Yard
- Hazardous Goods information capture
- EDI Upload of Manifests (Goods Receipts)
OverView
The Port of Dover Cargo Ltd is the cross-channel port situated in Dover, Kent, south-east England and is one of the world's busiest ports with 16 million travellers, 2.1 million lorries, 2.8 million cars and motorcycles and 86,000 coaches passing through it each year.
The site warehouse will contain multiple locations for fast moving stock codes, pallet storage locations (Bulk Locations) in a chilled configuration.
The site will make use of scanning technology in order to improve efficiency but in order to do this they require a warehouse management system (WMS) with the correct capability.
The systems deployed as part of this implementation will be:
- CALIDUS WMS - warehouse management.
- CALIDUS WCS - remote warehouse operations using RF devices. This will be used specifically for Goods Receipt/Returns and Enquiries. Ad Hoc Pallet Movements and Bulk PI options will also be allowed for stock control/administrative operatives
- CALIDUS Bay Diary - will be used to manage inbound and outbound road vehicles.
- CALIDUS Container Management - will be used to record containers used by the port and locate them whilst on site.
- CALIDUS Portal - for customer track and trace and (potentially in the future) for customers booking their own bay reservations.
The WMS and customer systems need to communicate with each other as the site will still use the customer system for placing goods receipt and sales orders information which will be sent to the WMS.
The existing facility is referred to as the Dover Cargo Terminal (DCT) and provides refrigerated storage and docking facilities.
The new facility is referred to as the Refrigerated Cargo Terminal (RCT) and will provide the same facilities, but more suitable to modern requirements, vessel sizes and volumes.
The types of task undertaken by the operation are:
- Unloading Inbound Vessel of pallets and containers
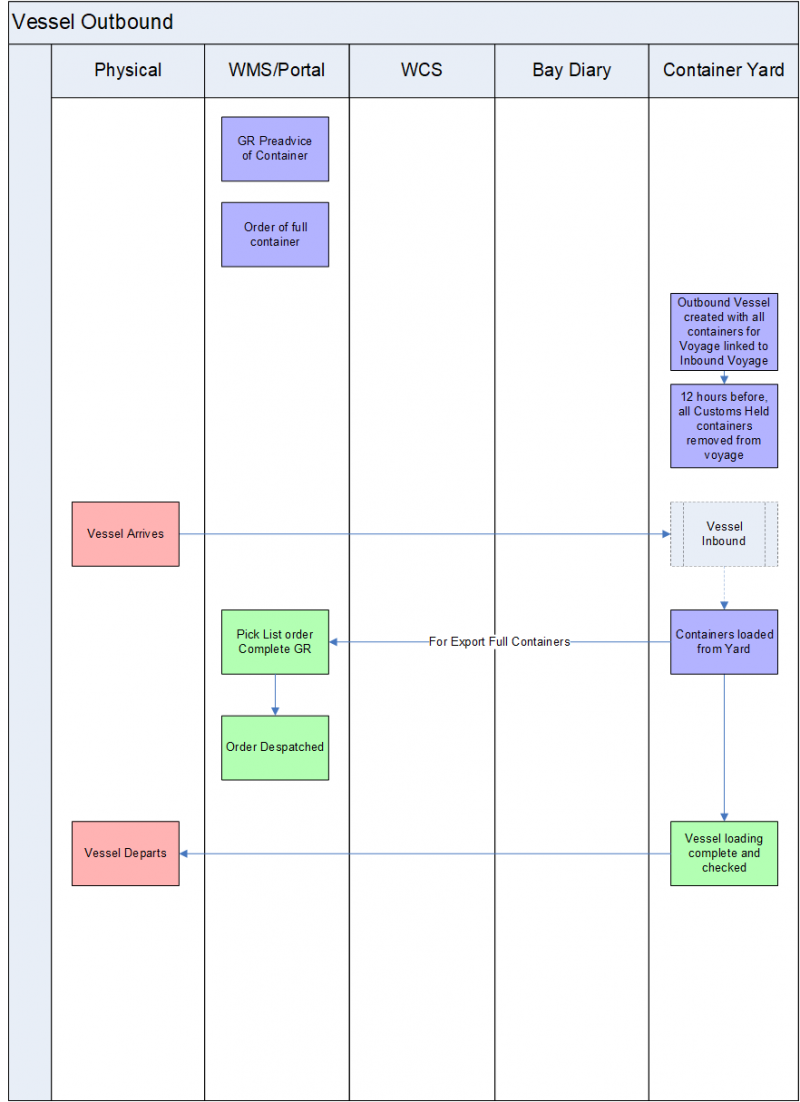
- Loading Outbound Vessel with containers.
- Customs Control
- Bay Door control
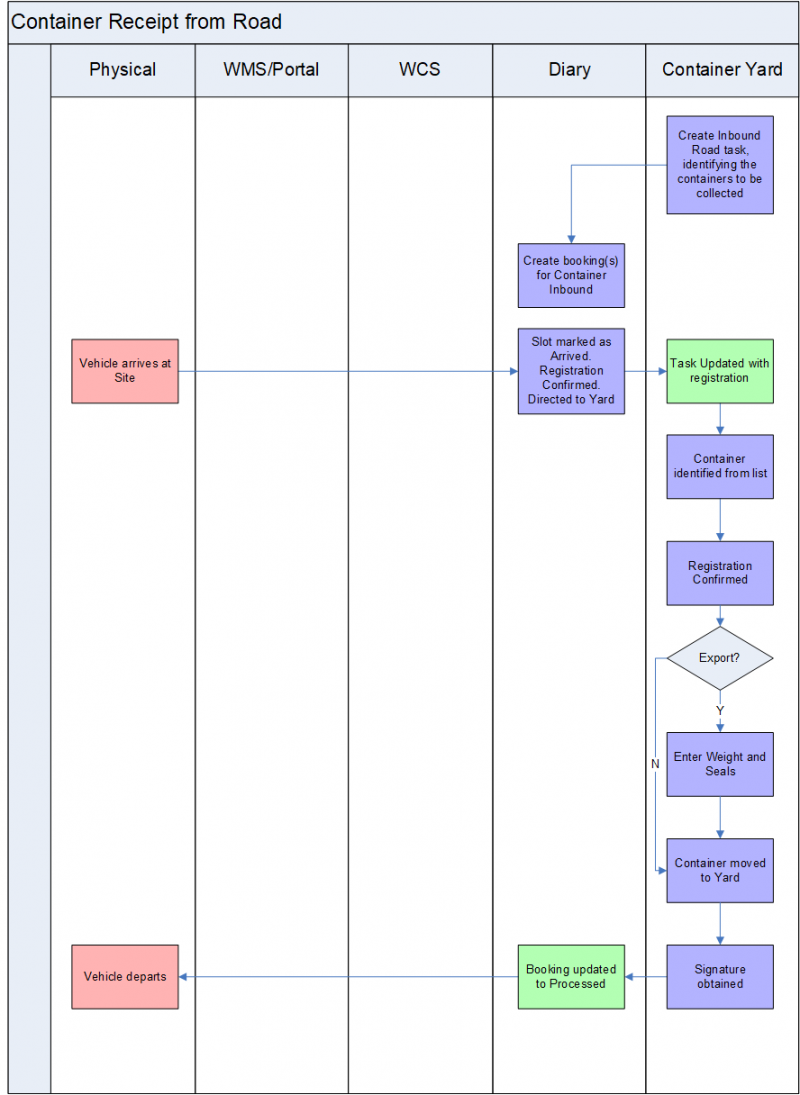
- Inbound containers (full and empty) from the road.
- Receipt of Vessel Hold Pallets
- De-stuffing of containers
- Putaway to racking in the warehouse
- Inventory Control operations within the warehouse
- Picking of full pallets in the warehouse
- Picking of part pallets at Carton level
- Handling of Dangerous goods
- Fulfilment of full container orders
- Storing of containers in a yard
- Refrigerated and Empty stack control
The CALIDUS systems will control all of these tasks except Customs Control
There are many different types of containers dealt with by the operation. Predominantly they are refrigerated containers (reefers).
Client Data Requirements
Static Data
Warehouse
The warehouse will be given a 3 character alpha numeric code with a description, e.g. 'RCT' Refrigerated Cargo Terminal.
In the RCT, there will be a separate shed for Geist export goods. This will be configured as part of the same warehouse code in WMS, as an internal area, to simplify all processes.
When the new site is configured and available, a period of parallel running may take place.
Location Setup
At present, the warehouse has locations with location codes which will need to be replicated or replaced.
The C-WMS system requires location codes to be uniform in size and to be configured with the following values:
- Aisle Code
- Bay Code
- Level Code
The aisle code, bay code and level code values can all be set up to 4 characters in length but the total number of characters must not exceed 10 characters.
For example:
- Aisle code 4, bay code 4 and level code 2
- Or aisle code 3, bay code 3 and level code 4
- Or aisle code 2, bay code 2 and level code 1
Location example - 010011 (Aisle 01; Bay 001; Level 1)
![]() Note: All elements of the location code are required. For this implementation, locations exist in chambers (areas) and are most commonly a single bay. In this case, the Aisle will be configured the same as the area (i.e. chamber 1 will contain aisle 1 only) and the level will be considered as the first level, for example CA/01/1, CA/02/1, etc.
Note: All elements of the location code are required. For this implementation, locations exist in chambers (areas) and are most commonly a single bay. In this case, the Aisle will be configured the same as the area (i.e. chamber 1 will contain aisle 1 only) and the level will be considered as the first level, for example CA/01/1, CA/02/1, etc.
Once the location format has been agreed for the warehouse and the warehouse map created then the locations can be setup on the C-WMS system.
All storage locations will be seen to be palletised multi-pallet locations.
The storage locations are in chambers. There is also a plan for a mezzanine area, currently being discussed. Note that the system is fully configurable with any combination of the above and can extended for any number of unique areas.
There are currently 6 storage chambers and 2 discharge chambers. Although this is the current expected layout, these areas and locations can be configured and changed in the WMS as required.
There is one aisle per chamber. The locations are predominantly drive-in multi-pallet locations, 5 deep, 3 high. The locations line the left and right walls of the chambers, with a central space for manoeuvring.
The WMS will be configured so that the product stored in these locations maybe the same manufacture date and product code, otherwise a different (empty) multi-pallet location will be suggested.
Note that some chamber locations may not be this configuration i.e. may be split into levels, may not be configured for same product/manufacture date.
In this way, should 26 pallets be received, WMS will be able to suggest all pallets to be put away into this area at the same time.
In the RCT, there will be a separate shed for Geist export goods. This will be configured as part of the same warehouse code in WMS, as an internal area, to simplify all processes.
It is not expected that the operation will require a part (case) picking process, as Port of Dover Cargo Ltd currently have no plans to operate in this way. Should a case picking operation be required, then the WMS will require case picking locations to be created.
Part picks are generated from specific pick areas from pick faces defined against the product code. It is expected that these pick locations and a pick area will both be physically created in the warehouse and reflected within the system as case pick locations, and sequenced so that they provide a clear and reasonable pick walk sequence.
Each truck driver can also be limited to working with one truck type, which has limited access to areas.
In this way, the following processes will be supported concurrently:
- WCS users may be scanning to receive pallets in the dock or inbound area. Unlimited by truck or location type.
- Picking operatives can be limited to performing pick tasks (and the moves to Marshalling locations) only.
Additionally, should P&D locations be in use in the warehouse (locations for transferring pallets in and out of the chambers), the following tasks can be limited to specific truck types.
- Wide-area fork-lift drivers may be picking up and moving pallets from the goods in locations to the chamber doors. Limited to any truck except Reach Trucks.
- Chamber Reach Truck drivers may be moving pallets from the chamber door to the final destination location. Limited only to reach trucks.
Note that the system is flexible on the number of truck types that may be configured, and how they are assigned to each location type. The above description of Reach Trucks and Counterbalance Trucks is a suggestion.
The type of trucks to be used in the operation is still being defined, of a current choice of Reach Truck and Counter Balance. It is likely that Reach Truck will be selected.
The inbound location is a free standing floor location.
Container Yard Stack locations will be organised and named by bay, row and level. For example BAY1/3/1, where the first portion is Bay, second is Row and third in Level.
There will also be several bays within the container yard for carriers picking up full containers:
- 4 in the 'Refrigerated' area
- 6 in the 'Ambient' area.
Each will be set up with location use type "Y" (Yard), with the location type determining the use of the location. The location types are limited to 3 characters, with a description added as below, for example:
- EMT - Empties stack
- YBY - Collection/Delivery bay in the yard
- YRF - Refrigerated stack
- QUY - Quay/Dock
- DRY - Dry Van i.e. non-refrigerated containers.
The number of location types is flexible in the system, so others may be added as required. As many locations of each type may be created.
Yard locations will be associated to Areas, which will be designated Chill or Ambient, for the purposes of generating the charges.
Owner Setup
There are multiple customers of the port, all served through this implementation. The system data is organised by owners within a single warehouse, the list of owners has yet to be confirmed
Stock Setup
There are circa 150 live products. This number grows continuously due to the nature of the business and the suppliers used.
During the meetings, it was ascertained that the main values that need to be captured during the goods receipt process are the product code, quantity and pallet I.D.
Each product will be configured for auto-putaway location suggestion, which will suggest a best storage location for this particular product and configuration.
It is expected that all products will have a put away location suggested using putaway algorithm Y, which uses product location anchor point configuration to determine the best storage location and the process will search for the following available locations:
- Pick Locations (not expected to be configured for this implementation)
- High Bay Locations (Narrow Aisle Bulk Locations) (not configured for this implementation)
- Block Stack Locations
- Normal wide area Bulk locations (not expected to be configured for this implementation)
The stock code being received / putaway will need to have anchor points set up for the auto-putaway location suggestion process to work.
Each product can have a number of locations attached to the configuration but for this implementation only the Bulk Anchor Points will be needed.
It is not expected that the operation will require a part (case) picking process, as Port of Dover Cargo Ltd currently have no plans to operate in this way. Should a case picking operation be required, then the WMS will require case picking locations to be created and assigned against the product code.
In any case, locations may be over-ridden or decided by putaway operatives at the time of locating the pallet, and at various other points in the flow, for example.
All of the picks in the warehouse are full-pallet picks picked directly from a bulk storage location, or part-pallet picks from separate pick areas, should this be a process in the future.
Where required, products may also be configured as hazardous, identifying the class and the UN number.
Hazards Maintenance and Hazardous Class Maintenance screens are provided to maintain the UN numbers and classes used by the operation. Reporting and querying those products that are hazardous is also allowed through the WMS.
Voyages/Vessels Management
A Vessels Maintenance screen allows vessels to be viewed and created quickly.
The screen allows searching and creation of Vessel Codes and Vessel Names in a table. These may be edited and saved on the screen.
Both Vessel ID and description are required.
Feeder vessels (ships that come in to the dock for export only, delivering no containers) may be defined here as normal vessels if required. Alternatively, a single vessel ID of "FEEDER" can be created, with the vessel name captured on the Voyage.
A Voyage Maintenance screen allows Voyages to be:
- Viewed
- Created with Date, Rate Code, Vessel and Comments and Notes
- Status-changed to indicate whether the voyage is current, complete, cancelled, etc.
- Show all GR pre-advices linked to the Voyage
- Allow Pre-advices to be viewed and completed by showing the GR Confirmation screen.
The screen allows searching for, creation and editing of individual Voyages.
The screen allows entry of:
| Label | Notes |
|---|---|
| *Voyage reference | This must be a unique reference |
| *Vessel | Lookup from the created Vessels data |
| *Start/End Date | |
| *Voyage Status | A drop-down list of values will be provided, defaulted to Current status when created. |
| *Rate Code | A drop-down list of system-configurable Rate Codes. This is expected to be used as a default rate code for all Goods Receipt Pre-advices created linked to this voyage. |
| Comments and Notes | Entered on a table. This consists of any comments on the voyage that may be useful to the operation, and are not used by WMS for any automatic purpose. |
| Delete | Mark for deletion. A drop-down list of Yes/No, defaulting to No. This option is used to delete unwanted or mistakenly created voyages. |
Fields marked * are required.
![]() Note: Rate Codes and Charges are subject to further definition and will be detailed in the appropriate functional specifications. This rate code is present here to provide a default to any Goods Receipt pre-advices created for this voyage only.
Note: Rate Codes and Charges are subject to further definition and will be detailed in the appropriate functional specifications. This rate code is present here to provide a default to any Goods Receipt pre-advices created for this voyage only.
Voyage Status and Rate Code are provided through a drop-down list of the system-configurable codes.
Voyage Status allows the following values:
- Cancelled
- Current
- Outstanding
- Complete
Voyage Statuses may be used for any purpose by the operation. Voyages that have been set to Cancelled or Complete status will not be allowed to have any further pre-advices created against them and will not be available in any lookup lists, to ensure that the list of voyages to be selected is always the most current list.
Comments and Notes are on a tab labelled Comments.
For import voyages, a list of all GR Pre-advices associated to this voyage are on a tab labelled "Receipts".
This shows:
- GRN Number
- Advice Note
- Container ID
- Status (values Open, Receipt Confirmed, Complete)
Double-clicking on a GR Pre-advice displays the GR Confirmation screen.
If a voyage is modified for Start Date or Rate Code, then all GR Pre-advices (that are not complete) will be modified to reflect the change of Start Date and Rate Code.
For export voyages, this information will not be available.
Export voyages through a feeder ship may be defined in one of two ways:
- Set the vessel to "FEEDER" and capture the name of the vessel in Comments and Notes
- Set the vessel to a pre-created feeder vessel.
Both of these screens are available from the main menu and are expected to be configured with appropriate security levels so that only super users can maintain this data.
Charges
Charge codes will be created and managed in the WMS.
CALIDUS-WMS presently has three types of owner invoicing available:
- At Receipt
- At Despatch
- Rent
Goods receipt charges are generated when goods are receipt confirmed. A screen will pop up showing the auto-created charges and allowing additional miscellaneous charges to be entered.
Despatch charges are created when an order is despatch confirmed. Again, a screen pops up showing the auto-created charges and allowing further manual charges to be entered.
Three different rent calculations are supported:
- The average of the goods in the warehouse at the start and the end of the invoice period.
- Goods in the warehouse at the start of the invoice period plus all goods received during the invoice period.
- Goods in the warehouse at the end of the invoice period plus all of the goods despatched during the invoice period.
Rent charges are generated manually from a parameter screen for invoice cycle periods.
The invoice Data will be generated by the WMS and interfaced to the ERP (IFS) using an EDI interface.
Product Master Upload EDI Flow
It is envisaged that the host systems will provide the product master details in the OBS format via EDI. This may be automated or uploaded from a CSV through the existing C-WMS screens.
The operational team will review the stock descriptions before or during uploading the data in order to confirm the stock descriptions are meaningful to the operational staff.
In order to aid in this, the standard C-WMS Stock Upload CSV formats will be provided so that the customer can use these to modify the product data in preparation for upload.
This must also include the product barcode information.
All product master information uploaded into the system may be modified and configured after upload, using the Stock Maintenance screen.
Stock Unit of Measure (UOM) Upload EDI Flow
A lot of the stock is barcoded on the pallet label to identify the stock code. These values need to be sent to the C-WMS system using the stock UOM upload flow.
Inbound Stock Inventory EDI Flow (Data Take On)
The Inbound Stock Inventory EDI flow can be used to upload the physical stock onto the system.
It is expected that the existing stock holding of the terminal warehouse will be uploaded prior to go-live through this mechanism, or by the following standard mechanisms available within the WMS:
- Non-PO Goods Receipt
- Stock Adjustments
- Stock Take
Description of Processes
Deliveries / Arrivals
The Port of Dover Cargo Ltd warehouse has different bays where deliveries are received and orders are loaded.
The C-WMS system has a 'Delivery Diary Maintenance' screen to allocate bays and time slots to arrivals. This screen will be used to manage outbound and inbound deliveries.
The Bay Diary will give Port of Dover Cargo Ltd a visual representation of what is happening across the 20 doors around what is Expected, Expected within 1 Hour, Late, Arrived & Processed.
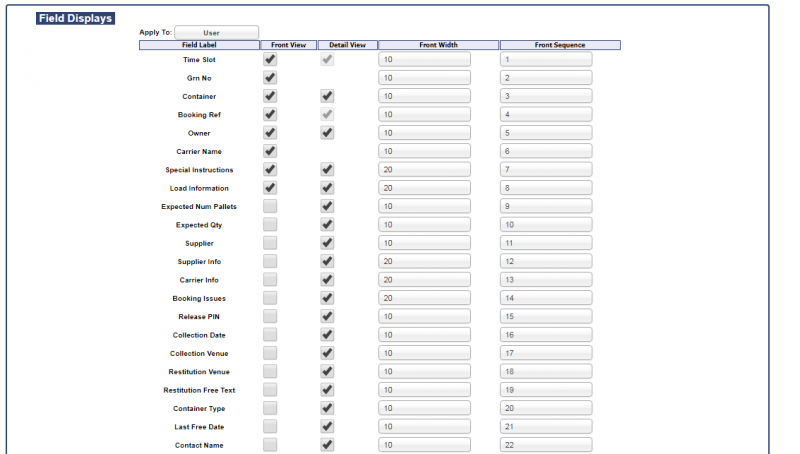
General changes will be made to the Bay Diary to integrate the system more fully to the WMS and to provide the functionality required by the operation, such as:
- Changing the colour of individual statuses
- Using the same container types as the Container Yard system
- Styling appropriately
The screenshots in this document reflect the new style as designed.
Configuration
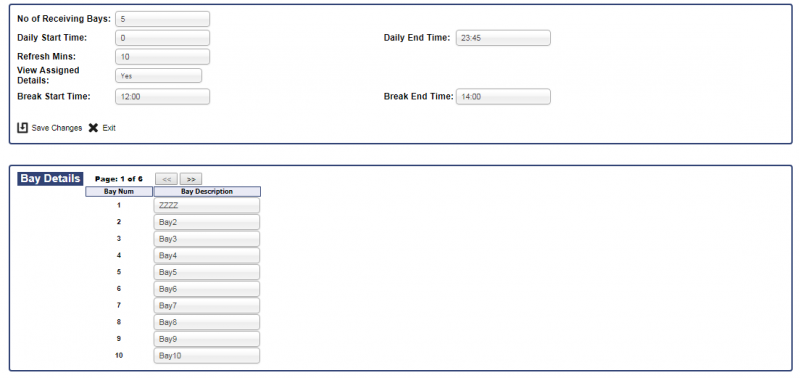
The Bay Diary system allows configuration of the basic settings itself.
The opening hours for all bays of all types is configured here. This also controls the number of bays available in the system of all types.
There will be several bays within the container yard for carriers picking up or dropping off full or empty containers:
- 4 in the Refrigerated area
- 6 in the Ambient area.
Each bay will be added the number of times required to satisfy the number of bookings, with the same location and description.
So, for the refrigerated stack bays, assuming a bay of RFRBAY, 4 additional bay swill be added, each with a unique bay number, but with the bay description set to RFRBAY.
The container type's configuration here mirrors the configuration of container types within the Container Yard system, so bookings can be made of all types of containers without configuring them again here. As many container types may be added as are used by the operation.
Creating Bookings
Bookings can be created against an available slot.
On entry to the screen, the user will be prompted to choose a date. Once a date has been chosen, the screen will display a grid detailing the number of bays and 24 time slots per bay broken down by hours.
The screen will also display any time slots that have already been booked or reserved. This can be seen in the example screenshot below:
The screen will enable the users to assign time slots more efficiently to trucks bringing loads to and from the site.
There will more than likely be a requirement for an out of hours booking in the Bay Diary, if for example a ship was delayed berthing but they still need to unload. So the operation would do this outside of their normal working hours. Note that this is viewed as an exception to the norm.
To support this, the main Diary screen will now always show all blocks on the day (i.e. all 24 hours) but will 'shade out' non-working times. Bookings can be taken on non-working times if required.
There are certain minimum requirements to the booking, depending on the booking type
- Inbound - linked to GRN
- Outbound - linked to Order
- Full Container Collection - linked to Order and Container Yard
- Empty Collection - linked to Container Yard
- De-stuffing - linked to Container Yard and GRN
- Blocking Out - no references required, just a reason for blocking any bookings against this bay.
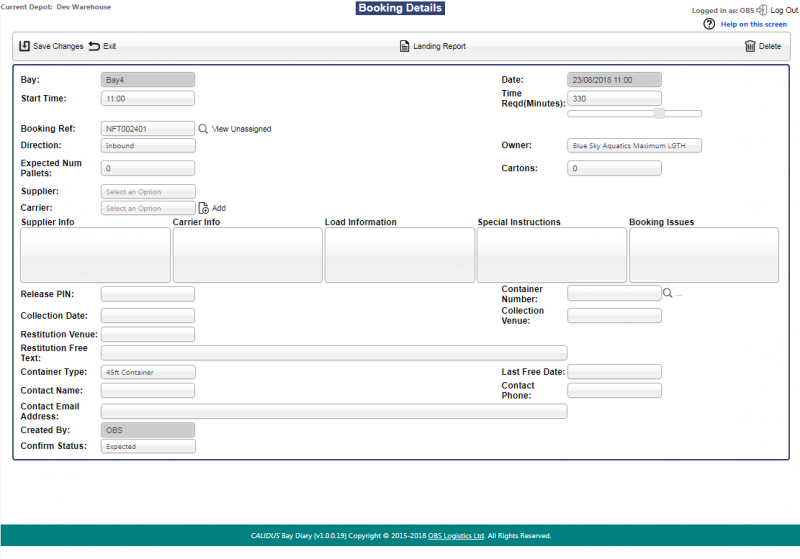
With the exception of Blocking out, a booking should include the following information:
- Date, Slot and amount of time required
- Registration - the vehicle registration
- Carrier - from a list of manually entered.
- Reference - the task being referenced:
- Inbound - The GRN pre-advice
- Outbound - The Sales Order
- Full Container Collection - The container, and through it the Sales Order and Container Yard task
- Empty Collection - The Container Yard task
- De-stuffing - The GRN pre-advice, and through it to the container and Container Yard task.
- Inbound Road deliveries - the Container Yard task
- Owner
Much more additional information can also be entered for reference.
Carriers are determined to be common or non-common by the operation:
- Common carriers are carriers that they see many times
- Non-common are carriers that are rarely used.
Carrier may be selected from a drop-down list of all carriers defined in the system. If the carrier required is not available, one may be added using the Add button, or a non-common carrier can be used by entering the details in Carrier Info.
If adding a new carrier, enter the new carrier name in the field provided. This will be created when saving the booking. This field is only displayed if the Add button has been pressed.
Non-common carriers will not be created as carriers but instead their carrier information will be typed into the Carrier Information field instead.
![]() Note: The processes surrounding Advanced Passenger and Vehicle Information and Transfer of Custody are still being defined by the operation. Changes relating to this will affect Booking Creation.
Note: The processes surrounding Advanced Passenger and Vehicle Information and Transfer of Custody are still being defined by the operation. Changes relating to this will affect Booking Creation.
It will be necessary in this case to potentially pre-advise on the booking the following information:
- Vehicle Registration
- Driver Name
- Crew/Passenger Names
- ID Checked checkbox.
This will be required to be stored against the booking itself. If this information is not available at the time of the booking, this will be captured at Arrival.
![]() Note: Vehicle Registration capture will, when defined, affect other processes such as Empty Container Collection or Full Container Picking.
Note: Vehicle Registration capture will, when defined, affect other processes such as Empty Container Collection or Full Container Picking.
When all of the above processes are defined, this will be evaluated and the process confirmed as part of the specification of these changes.
The Booking will default to Expected status and will appear on the Bay Diary.
Web Bookings
This will be a much simpler booking process. The data entered will be less, but required.
- The customer must enter an order reference.
- The booking will be locked to the customer booking the slot (the owner) through the user/password used to create the booking.
- The booking created will be for a single slot.
- A date will be required.
A booking slot will then be offered by the system, using an 'algorithm' to spread bookings around. This will be defined in more detail at specification stage.
No repeat bookings can be created this way.
The expectation is that if the customer cannot adhere to these minimum data requirements, they must call Port of Dover Cargo Ltd for a manual booking.
![]() Note: The processes surrounding Advanced Passenger and Vehicle Information and Transfer of Custody are still being defined by the operation. Changes relating to this will affect Booking Creation, including Web Bookings.
Note: The processes surrounding Advanced Passenger and Vehicle Information and Transfer of Custody are still being defined by the operation. Changes relating to this will affect Booking Creation, including Web Bookings.
It will be necessary in this case to potentially pre-advise on the booking the following information:
- Vehicle Registration
- Driver Name
- Crew/Passenger Names
- ID Checked checkbox.
This will be required to be stored against the booking itself. If this information is not available at the time of the booking, this will be captured at Arrival.
When defined, this will be evaluated and the process confirmed as part of the specification of these changes.
Blocking Out
As can be seen, a facility is available to allow slots to be blocked, to prevent any reservations being booked against those slots. For example, 1400 is a shift change for half an hour on every bay or the bay is out of use for a particular reason.
Blocking Out can be configured across all bays through the Bay Diary general settings screen, by entering a Break Start and End Time.
Blocking out individual areas of bays can be completed by creating a Blocking Out type booking.
Once a booking slot and duration have been selected, the Booking Type may be set to Blocking Out and the Status to Blocked. This will then mark the selected bay and slots as unavailable for booking, and will display this as such in the Bay Slot table on the Diary (Front) view.
Inbound Receipts
When creating an 'Inbound' booking, the system will display a list of unplanned bookings (Goods Receipt pre-advices).
Particular advice note numbers may be searched for using the Advice Note search box, then clicking the Search button.
An inbound Receipt reference may then be added to the booking using the Add button provided against each line. Several Receipt references may be added, and all selected will be shown on a Receipt Details list:
Receipt References may be removed by using the Remove button against each line.
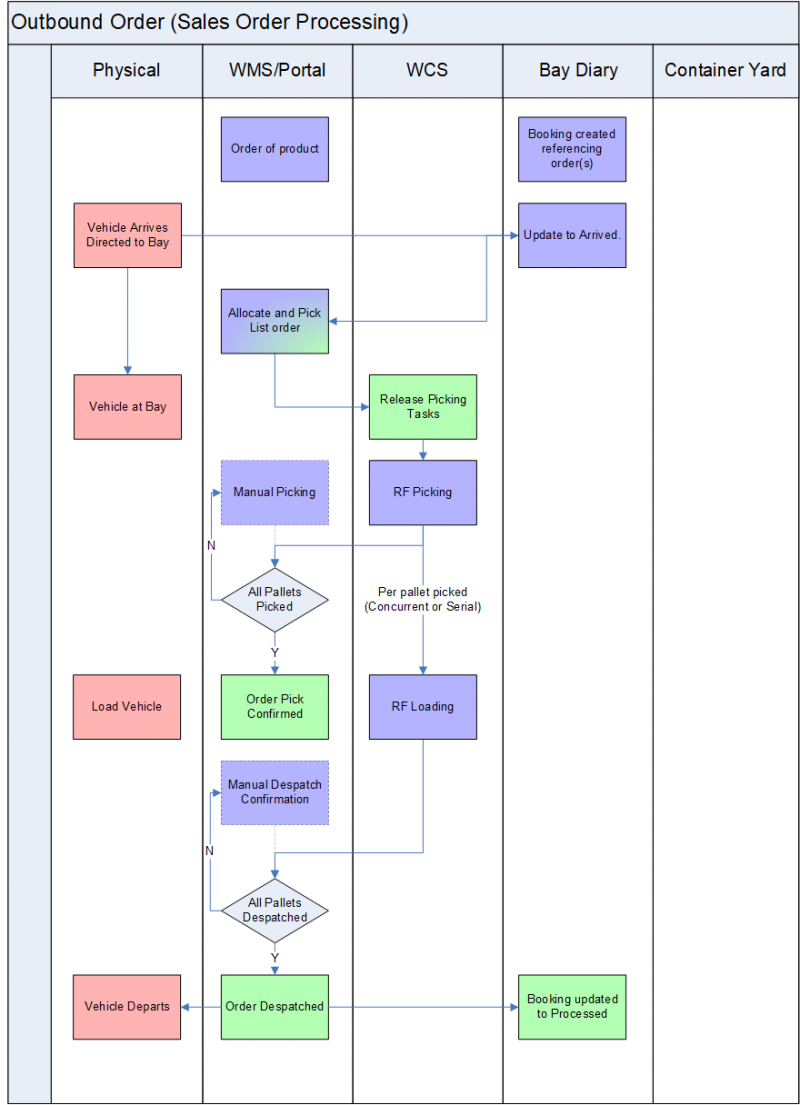
Outbound Orders
As part of the Outbound Order modifications, Bookings can be made without references, although note that arrival of the vehicle before this booking is finalised with the correct information will result in the follow-on processes not being automated. So, for example, if there is no order associated to an outbound booking, the order cannot be automatically allocated and sent for picking, nor can the operation confirm that the correct bay door is being used.
In order to highlight this, the Booking Report will be modified to include an option to select only non-finalised bookings.
It is expected that these bookings will have the reference updated on them later when available.
For orders, the screen allows a lookup of the available orders in the system. This shows all orders below Despatched status, indicating the status itself.
Bookings against an order will populate the Booking Date and Time, Booking End Date and Time and Booking Reference within the WMS.
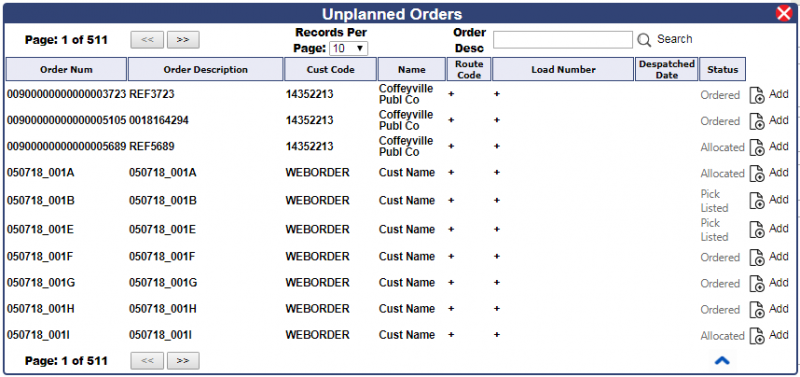
When creating an Outbound booking, the system will display a list of unplanned Orders, indicating the status.
Particular Order References may be searched for using the Order Desc search box, then clicking the 'Search' button.
An outbound Order reference may then be added to the booking using the 'Add' button provided against each line. Several Order references may be added, and all selected will be shown on an Order Details list:
Order References may be removed by using the Remove button against each line.
When identified and the booking saved, bookings against an order will populate the Booking Date and Time, Booking End Date and Time and Booking Reference within the WMS.
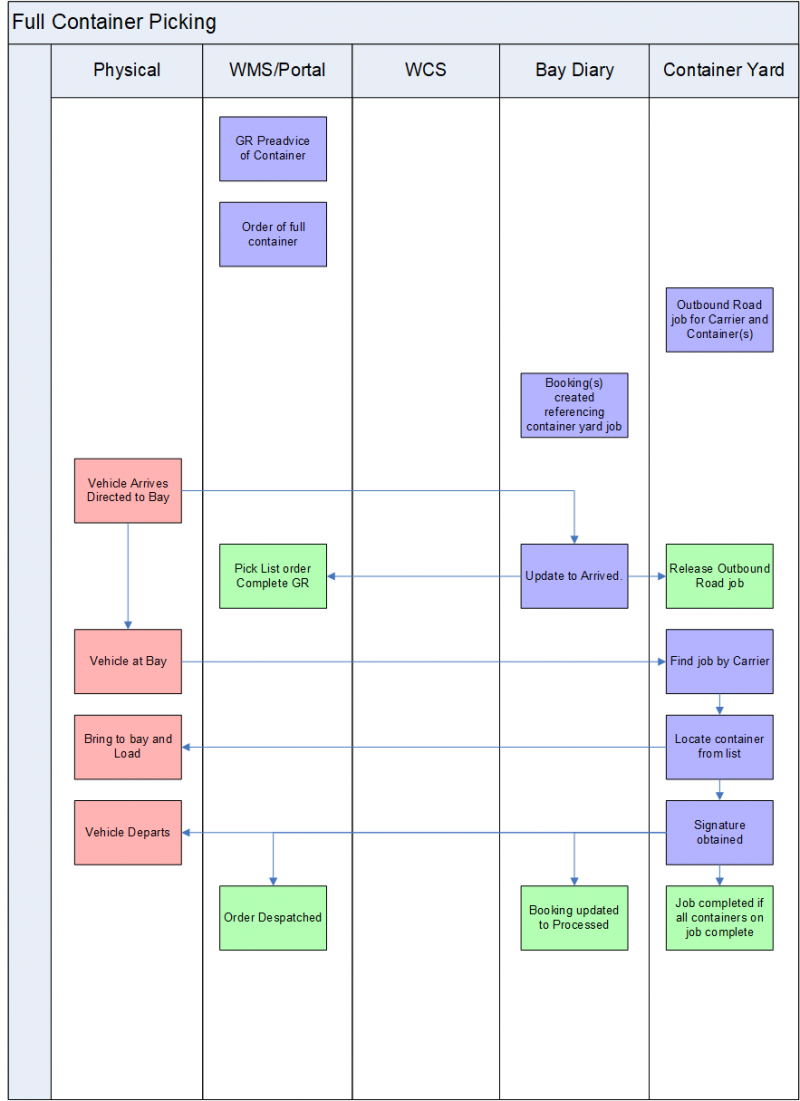
Full Container Picking
For Full Container Picking (both import and export), bookings for the orders will not be set against the door, but against the container yard locations based on the storage area of the container required. These bays in the container yard will accept multiple bookings against them. For example, as there are 4 bays in the refrigerated area, that would be listed as a single bay that can accept up to 4 bookings at a time.
A booking will be created on the Bay Diary, of Type Full Container Pick. The user will look up the Job from the Container Yard (through the haulier) and store the reference on the booking, if the Container Yard system is integrated. If the haulier is collecting a single container, the container will also be defaulted in this booking from the container yard job.
If the WMS system is configured as integrated and if the haulier is collecting a single container, the order reference will be looked up from the WMS and stored against the booking.
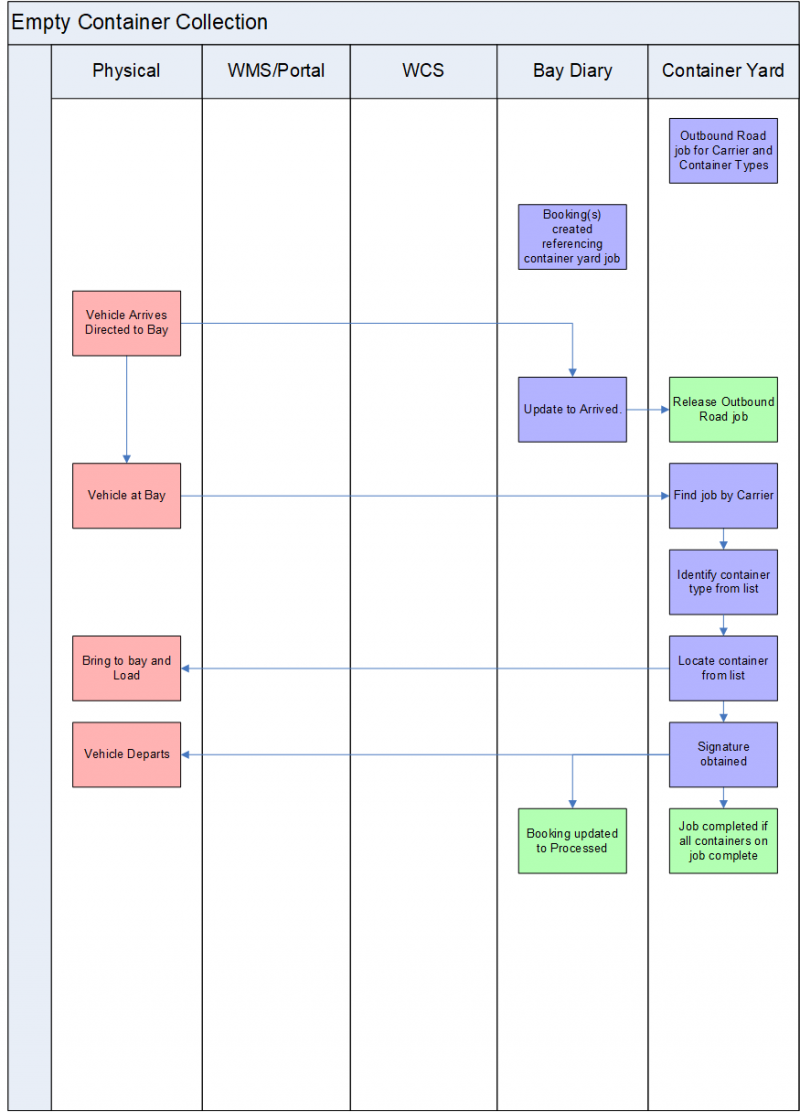
Empty Container Collection
When a haulier is coming in to collect empty containers, the operation will book this in to the Bay Diary as an Empty Collection type booking.
In this case, the only required data entry is container type being collected. Expected would also be the haulier, order number, etc, looked up from the job in Container Yard.
For Empty Container Collection, bookings for the orders will not be set against the door, but against the container yard locations based on the storage area of the container required. These bays in the container yard will accept multiple bookings against them. For example, as there are 4 bays in the refrigerated area, that would be listed as a single bay that can accept up to 4 bookings at a time.
If the haulier is collecting a single container, the container should also be defaulted in this booking from the container yard job.
Container type will be defaulted from the container yard job, if there is only one type of container specified on the job.
If multiple containers are being collected, then the hauliers can take any of the empty containers of the types specified against the container yard job.
Multiple email addresses may be entered against a booking.
Arrival
When a vehicle arrives at the gatehouse, the vehicle will be booked in against the Booking on the bay diary, finding the booking by time and haulier.
Note that, if a booking is not present on the diary, a manual process should be in place. It is recommended that this requires a phone call (or failing that an email) to the administrative office in the warehouse, so that they can manually confirm which bay is to be used for the vehicle.
The status of the booking will be updated to Arrived by the Gatehouse by changing the status using the Quick Update view or the details of the booking.
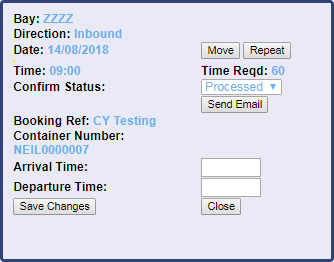
Hovering over a booking slot will display a small Update view in the top-right of the Diary screen, as follows:
Some details of the selected booking are displayed at this time slot, and this allows the user to quickly set the status and take some actions.
Editable Fields:
- Confirm Status - a drop-down list of the available statuses. This may be used to quickly arrive or complete a booking at the gatehouse.
- Arrival Time - the Arrival time to be keyed in when setting the status to Arrived. The time will be automatically populated with the current time in this case, but may be modified.
- Departure Time - the Departure time to be keyed in when setting the status to Processed. The time will be automatically populated with the current time in this case, but may be modified.
When all details are entered, click Save Changes to save the details or Close to abandon them
Saving the booking at Arrived status will trigger other actions against the booking:
- Inbound - The GRN pre-advice will be released to the WCS for receipt.
- Outbound - The Sales Order will be automatically allocated and pick listed, ready for picking on the WCS. The Marshalling bay for the order will be set to be the marshalling bay associated to the bay door in the configuration. These will be sent to the WCS at the highest priority for picking.
- Full or Empty Container Collection - The Container Yard task will be updated with the vehicle registration.
When the vehicle arrives for a Full Container or Empty Container Collection, the booking will be marked as status Arrived.
If the Container Yard system is integrated then the Container Yard job referenced on the booking will be released at that time.
At this stage, the gatehouse may also:
- Send an email to email addresses registered against the booking.
- Print a ticket for the driver.
If an email is required to be sent to the recipients on arrival or completion, this can be achieved through clicking the Send Email button, which will then send a confirmation email directly.
A ticket can be printed using the Print Ticket button on the screen.
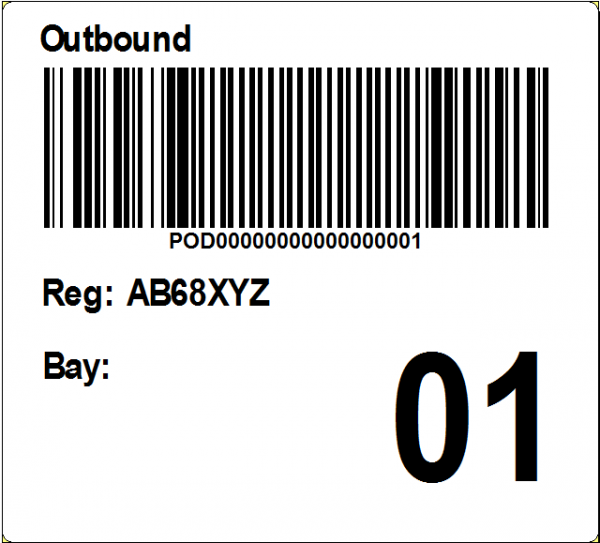
The ticket printed will contain:
- The Reference (if present, the Advice Note, Order Number, etc), both human-readable and barcoded as a CODE-128 barcode.
- The Bay
Note that this will require the Gatehouse browser to be connected to a printer. It is recommended that this be a simple receipt-type label printer, for example the Zebra ZD410 Ethernet printer.
The print will be sent directly from the browser to the connected printer, and will require confirmation of the printer to which the label is to be printed.
![]() Note: Arrival Ticket Print will no longer be used to help with the direction of drivers to bays - the likely scenario is that there will be an operative outside to direct operations.
Note: Arrival Ticket Print will no longer be used to help with the direction of drivers to bays - the likely scenario is that there will be an operative outside to direct operations.
![]() Note: The processes surrounding Advanced Passenger and Vehicle Information and Transfer of Custody are still being defined by the operation. Changes relating to this will affect Arrival at Gatehouse.
Note: The processes surrounding Advanced Passenger and Vehicle Information and Transfer of Custody are still being defined by the operation. Changes relating to this will affect Arrival at Gatehouse.
It will be necessary in this case to pre-advise on the booking or, if not pre-advised, capture at arrival, the following information:
- Vehicle Registration
- Driver Name
- Crew/Passenger Names
- ID Checked checkbox.
This will be required to be stored against the booking itself.
The Ticket print will likely also be required to be changed, to include this information. That will likely change the format of the label to standard printing on A4 stock, rather than printing to a Zebra printer in custom control language.
When defined, this will be evaluated and the process confirmed as part of the specification of these changes.
The gatehouse will direct the vehicle to the correct area depending on the booking's bay.
For Full Container or Empty Container Collection, the driver will be sent to the Container Yard bay from the booking.
For other types, the driver will be sent to the Warehouse bay from the booking.
Completion
In a fully integrated implementation (where the Bay Diary, WMS and/or Container Yard systems are fully integrated), completion of the onward task will automatically complete the booking, by setting the status to Processed when the associated Warehouse or Container Yard tasks are completed.
However, the Bay Diary system may also be used to capture this manually, in the same way as arrival, by capturing the Departure Date and Time and changing the status to Processed on exit from the site through the gatehouse. This can be completed as above, using the Quick View or Details screen for the booking.
![]() Note: Transfer of Custody is still under discussion as a process and is likely to affect Completion of a Booking.
Note: Transfer of Custody is still under discussion as a process and is likely to affect Completion of a Booking.
This is likely to require a signature on outbound stored against the booking.
This, along with the bookings themselves, must be kept for a 6 month period, after which this can be cleared down, so a clear-down process must be included as part of the process.
When defined, this will be evaluated and the process confirmed as part of the specification of these changes.
Moving Bookings
It is noted that bookings may need to be moved and the system provides several mechanisms for doing that. In the instance where a vessel is late, many bookings for a day may need to be moved to subsequent days.
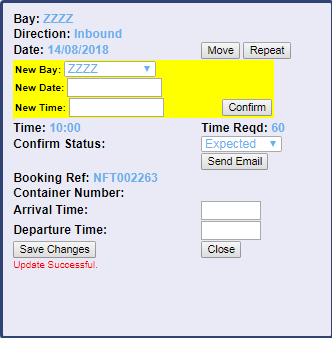
Once bookings are identified as requiring to be moved through the reports, the booking may be easily moved using the Quick View screen for that booking.
Click the Move button to move the booking to a new date and time, or bay - fields will be displayed for this purpose. Click Confirm to confirm the move.
Diary Reporting
To run a report from the Diary (Front) view, select the report from the Report Type drop-down list and click the Run Report button.
If parameters are required for the report (identified below) they will be prompted first through a pop-up parameter entry window.
All reports extract in Microsoft Excel spreadsheet format, formatted with a header. Depending on the browser and settings, this may open in a browser window or tab, or prompt to download the file with an appropriate name.
Unloading Diary Report
This report shows the following for the date selected:
- Loading Bay
- Date
- Time
- Booking Ref
- Container Type
- Container Number
- Advice
- Carrier
- Product Description
- Stock Code
- Pallet Config
- Cases Qty
- Pallet Qty
- Owner
- Location
- Arrived Date
- Restituted Details
- Contact
- Phone Number
Only Inbound direction bookings are shown.
Diary Report
This report shows the following for the date selected:
- Direction
- Loading Bay
- Date
- Time
- Booking Ref
- Container Type
- Container
- Owner
- Contact
- Phone Number
- Carrier
- Special Instructions
- Load Information
This report requires a parameter selection of whether only unconfirmed bookings are reported. If checked, the report will only show Outbound bookings without an order number attached. If unchecked, all bookings are shown.
Rebook Report
The Rebook Report will be used to show full booking and contact information about all bookings, to aid in changing bookings over a period.
This report requires a parameter selection of a date range.
This report shows the following for the date range selected:
- Direction
- Type
- Bay
- Date
- Time
- Booking Ref
- Container Type
- Container
- Owner Name
- Owner Email
- Owner Phone Number
- Carrier
- Carrier Contact
- Booking Contact Name
- Booking Contact Phone
- Booking Emails
- Special Instructions
All bookings are shown.
Goods Receipt
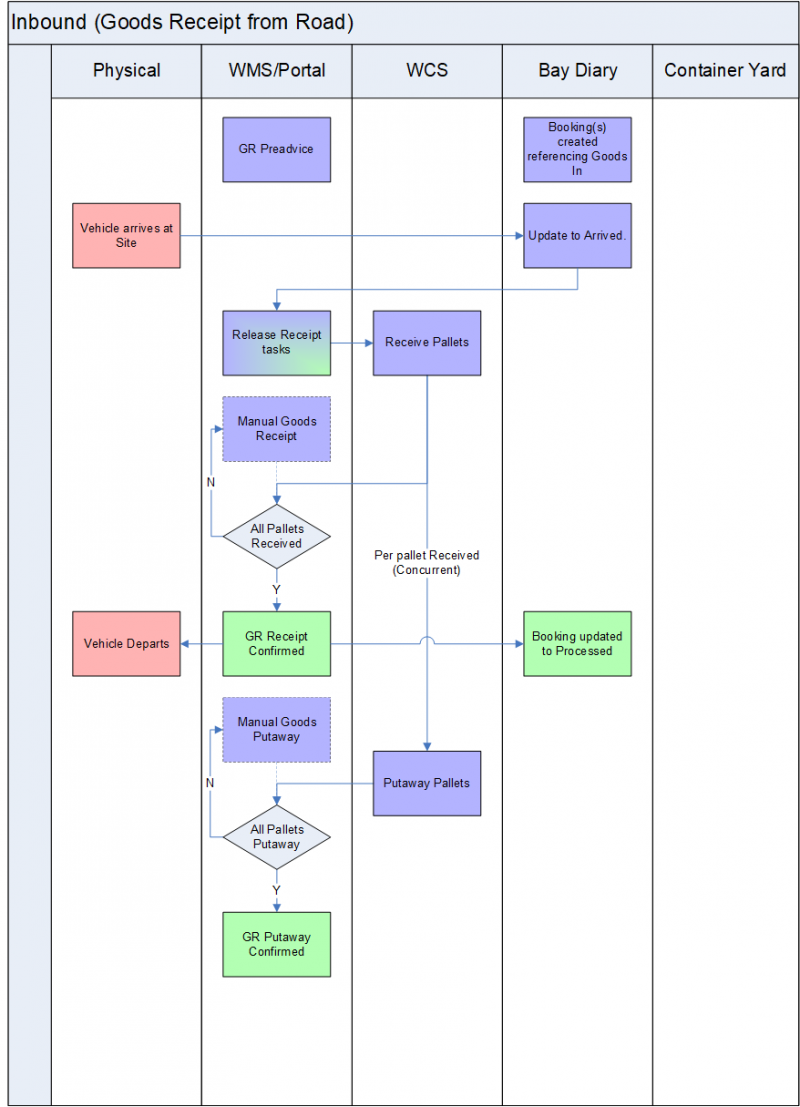
The C-WMS configuration for the Port of Dover Cargo Ltd will be a single stage receipt confirm process with a putaway into the final warehouse destination.
Pre-Advice
The Goods Receipt pre-advice will consist of a number of header details referencing a vessel, voyage and container where appropriate. The details provided will consist of at least a list of the stock codes and total quantity, and may also consist of the individual pre-advised pallet IDs from the customer.
The supplier and haulier will provide the container number. If not, the haulier will provide a delivery number, to be stored in Advice Note Number, which will be updated later with the container ID.
Where the product being delivered to the warehouse contains hazardous products, the supplier will request hazardous permits for each delivery from Terminal Control. When granted, they will email to a distribution list of the supplier and Port of Dover Cargo, giving permission per delivery with hazardous goods, using a pro-forma email template. This Hazardous Goods permit process is off-system.
The WMS Goods Receipt pre-advice stage is where the GRN is created either manually by keyboard entry into the WMS or via EDI.
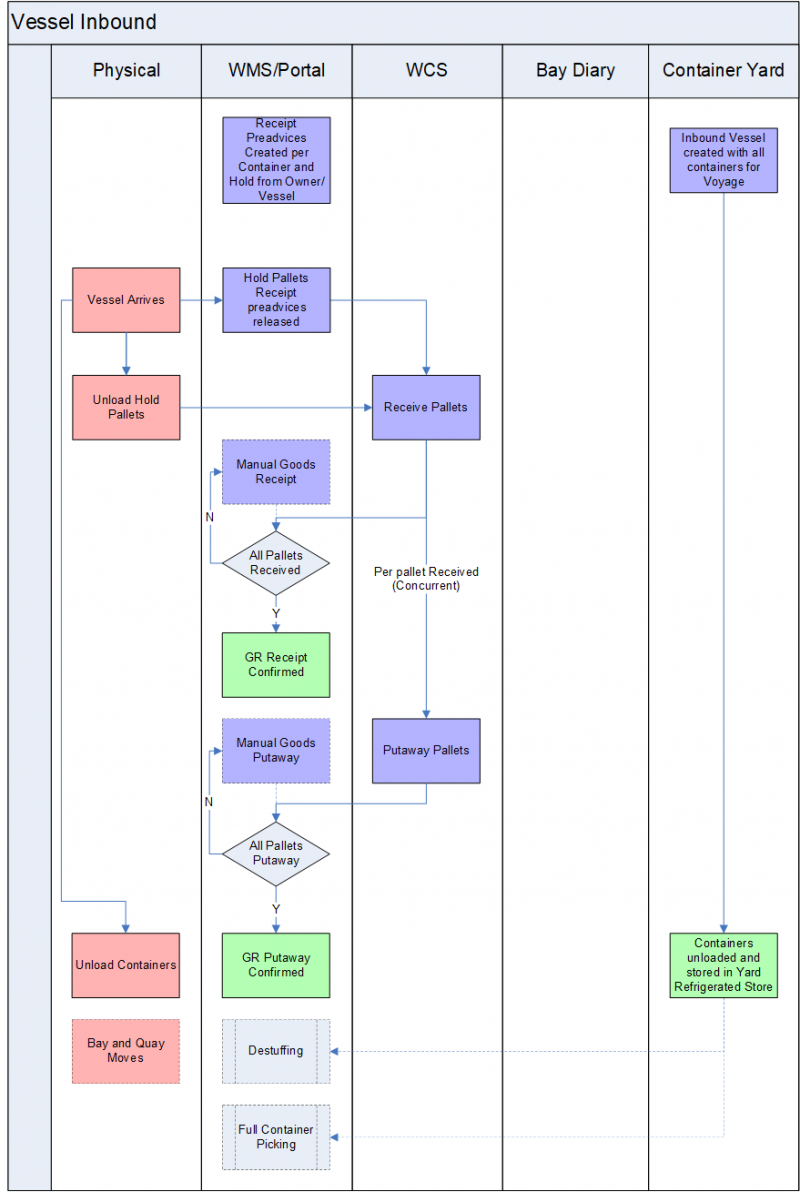
Goods Receipt Pre-advices will be created based on the vessel manifest provided to them.
- GR pre-advices will be created for Hold pallets (by deck/hatch)
- Each container on a vessel.
Goods Receipt Pre-advices will also be created for goods to be brought into the warehouse of container yard for export, although these will not be linked to a vessel or voyage. It is expected that this will be for export goods that are to be stored in the warehouse. Example products are bundles of steel, cars in containers, loose cars, outside cargo, etc.
![]() Note: During review of this document, EDI upload of manifest pre-advices has been returned to scope, to be used for uploading CSV manifests both internally and by the suppliers. This is subject to internal confirmation of the business case and the raising of a new change request with OBS Logistics. The operation will supply CSVs formats that will be investigated during the specification process. Likely through Portal upload.
Note: During review of this document, EDI upload of manifest pre-advices has been returned to scope, to be used for uploading CSV manifests both internally and by the suppliers. This is subject to internal confirmation of the business case and the raising of a new change request with OBS Logistics. The operation will supply CSVs formats that will be investigated during the specification process. Likely through Portal upload.
It is expected that the receipts from voyages will be advised with the vessel; hatch; deck; date as the unique identification. Each hatch/deck combination will be created as a pre-advice in the WMS.
The pre-advice will identify a container for those receipts where the product is in containers.
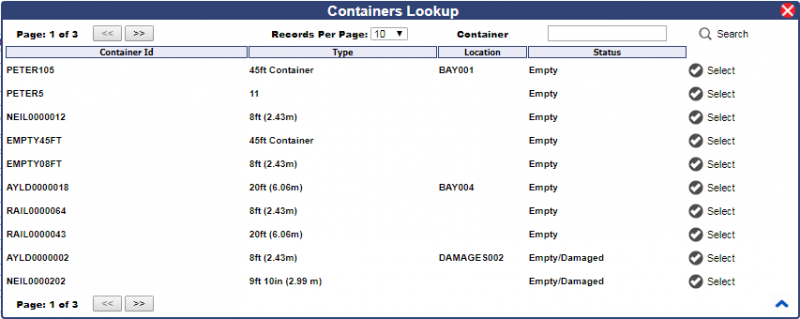
When a Pre-advice is created, if a container is entered, a lookup is available on the Containers known in the system,
If a container is entered that does not exist, the process will recognise this and prompt the user to create the container.
The pre-advice will also identify the Vessel and Voyage, and a Rate code defaulted from the Voyage.
The Vessel will be a lookup on all available vessels created on the VESSELS table.
The Voyages lookup will be on Voyages created on the new Voyages table, in Start Date descending sequence. Only Voyages that are not Cancelled or Complete will be viewed here.
This lookup will allow selection of the Vessel, and be preselected if the vessel already exists.
The lookup will show:
- Vessel and Name
- Voyage Reference
- Voyage Status
Rate Code entry will be provided through a drop-down list of the preconfigured rate codes in the system. When selecting the Voyage, the Rate code of the GR Pre-advice will be defaulted from the voyage.
If not entered, the Vessel will be defaulted from the vessel of the selected Voyage.
![]() Note: Rate Codes and Charges are subject to further definition and will be detailed in the appropriate functional specifications. This rate code is present here to provide a default to any Goods Receipt pre-advices created for this voyage only.
Note: Rate Codes and Charges are subject to further definition and will be detailed in the appropriate functional specifications. This rate code is present here to provide a default to any Goods Receipt pre-advices created for this voyage only.
If a voyage is entered that does not exist, then the screen will, before saving the data, inform the user that "the Voyage entered does not exist - create it?".
Selecting 'OK' will create the Pre-advice, and creates the Voyage, defaulting the Vessel, start and End date and Rate code to the values entered against the pre-advice. Selecting 'Cancel' will not save the Pre-advice or create the Voyage.
When saving a GR pre-advice, should the Expected date be changed on the pre-advice, the screen will confirm with the user that "The expected date has changed - Voyage and other Pre-advices will be changed to match - confirm". Selecting 'OK' will update the Pre-advice. Every other pre-advice for that Voyage will also be updated with the new Expected date. The Voyage will be updated with the start date sent to the new expected date. Selecting Cancel will not save the Pre-advice or update any other pre-advices or the voyage.
The screen will also allow printing of pallet labels from this screen, by adding 'Print Labels' button to the screen, adjacent to the existing 'Print' button. This will be from the pre-advised pallet records, and will be in the pallet label format set against the owner. If no pre-advised pallet records exist, then this button will be disabled.
No existing WMS pallet label format exists that matches the requirements of the operation, and as such one will be created.
A new pallet label format (called "POD") will be created. This will contain:
- Pallet ID (barcoded and human-readable)
- Owner ID and Name
- Stock Code (barcoded and human-readable)
- Arrival Date (from the pre-advised planned arrival date).
- GRN Number and Advice Note Number
The format and layout of this label is subject to confirmation from the operation, depending on the label stock and confirmation of requirements below. It is expected to be a Zebra-compatible label printer with at least 4*4 inch label stock, for legibility.
If enabled, the Pre-advice process will automatically generate pallet details from the number of pallets entered against the stock-level pre-advice. A unique pallet ID will be generated for each record (a customer pallet ID in this case). All other values will be defaulted at receipt, as if this were a pallet-level pre-advice. The product quantity will be distributed evenly through the number of pallets requested.
Should the quantity or the number of pallets per line be modified, this process will recreate the pallet details records, generating new pallet IDs as required. Pallet IDs removed need not be reused.
Goods Receipt Confirmation
Goods Receipt Pre-advices will be sent to the WCS for the receiving process to begin.
This can be either automatically through the Bay Diary system or manually from the Goods Receipt Pre-advice screen, by using the 'Send' button provided.
Receipt will be by pallet I.D. (scanned) and stock code (visual) on a pallet.
The C-WCS system can be configured so that RDT users are prompted to enter either a system generated GRN number or an advice note number on entry to the goods receipt module on the RDT to identify the GRN being received.
It is envisaged that the C-WCS system will be configured so that the RDT users are prompted to enter the advice note number as this value will be the delivery hatch and deck combination for the vessel.
![]() Note: Pallets will be marked on receipt with a manufacture date of the pre-advised date, not the receipt date (i.e. the arrival date of the voyage). Therefore, if pallets are processed for receiving in the warehouse 3 days after the vessel arrival (i.e. de-stuffing a container), the product will have the same manufacture date as all pallets received on that vessel. The user will not be required to enter the manufacture date - it will be defaulted when the pallet is created in WMS.
Note: Pallets will be marked on receipt with a manufacture date of the pre-advised date, not the receipt date (i.e. the arrival date of the voyage). Therefore, if pallets are processed for receiving in the warehouse 3 days after the vessel arrival (i.e. de-stuffing a container), the product will have the same manufacture date as all pallets received on that vessel. The user will not be required to enter the manufacture date - it will be defaulted when the pallet is created in WMS.
If a pallet has an issue, it will be marked as having a reason code against it, which will receive the pallet on hold for that reason, and automatically locate the pallet in the hospital (slow) lane location. These pallets may then be examined and dealt with, before using the WMS pallet movement's module to put the pallet away, and using the WMS hold/release screen to release the stock for picking.
The pallets will be received into the standard "GOODS IN" location, and the tasks will be available for putaway
The Receiving process will keep track of the quantities of pallets and stock received against the GRN.
The system may be configured in several ways, but is expected to be configured as follows:
- If the total quantity of a product pre-advised on the GRN is exceeded, a warning will be issued to the receiver, but the stock will be received anyway.
- No warning will be issued if the total number of pallets expected has been exceeded.
Loose pallet receiving process:
- If the pallets are pre-labelled AND pre-advised with all the required information:
- The EDI message including all the required information is uploaded into the WMS and the inbound tasks are passed to the WCS for execution by the warehouse operations team.
- Once unloaded from the vessel using the cranes the FLT operator will scan the unique pallet label, then will take the pallet to the interim inbound location and scan the location code to locate the pallet and repeat this process for each new pallet.
- A different operative will then scan the unique pallet label and move the pallet into its final WMS location and confirm the movement by scanning the location barcode.
Auto-putaway will generate the required move upon scan of the pallet number in the temporary inbound location.
If the pallets are NOT pre-labelled:
- The pre-advice will be:
- Entered into the WMS including all the required pallet detail information or
- Found by the operator on the WMS
- Then all the required pallet labels for the inbound pallets will be created (pre-advice labels will be created per deck / hatch combination and the physical labels stored in specific boxes for that delivery) ready for the delivery into the warehouse.
- Once the pallets are unloaded from the ship an operator will apply the correct labels to the pallets so the FLT operators can perform the goods receipt / putaway process described above.
- Once the user confirms that the entered details are correct, a goods receipt confirmation message is sent to the C-WMS system.
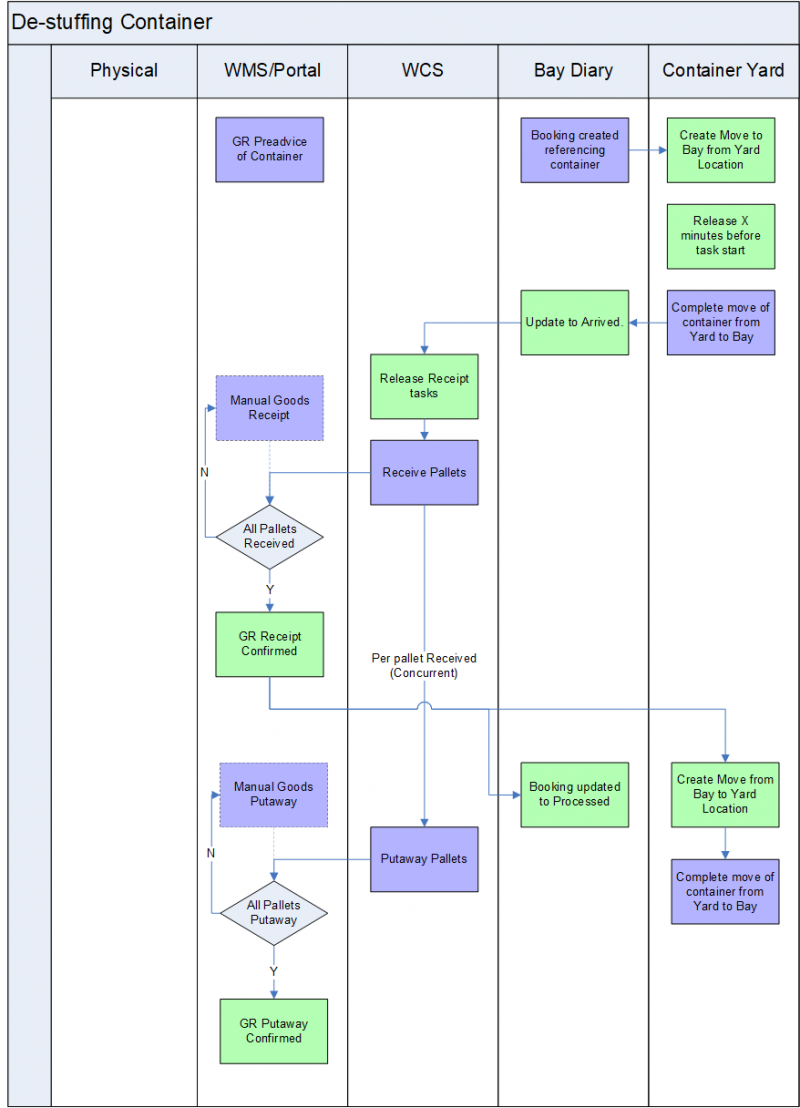
Container Pallet Receiving (De-stuffing):
As the container is unloaded it will be moved in the container management system and located in the container yard, the locations will be visible in the WMS
- Is it a reefer charge - Y/N
- If 'Y'es then raise a charge on the WMS, the container management operative will confirm the action in the location process, if 'N'o, no charge is raised.
- Stock is required in the warehouse:
- The required container is located by the container management operative and moved to the required unloading bay
- Unload pallets, refer to the 'loose pallet receiving process´ above for the full process
- Return the empty container back to the container yard and locate then set the status to 'Empty'
The Goods Receipt Confirmation processes will, when a receipt is marked as receipt confirmed and the receipt has a container specified against it (and if configured to do so), generate a movement for the container yard system to move the empty container back to the empty stack.
The container in the container yard will also be marked as Empty on completion of the receipt.
At this time, the Bay Diary task will also be updated for status to Processed.
Automatic Putaway Location Suggestion
The WCS will be configured to suggest a location for the pallet being putaway at the time that the pallet is scanned.
The storage locations in the chambers are drive-in, multi-pallet locations. The expected configuration will be:
- 2 wide
- 2 deep
- 3 levels
- Top two levels can hold 4 pallets, double wide and deep.
- The ground level can hold 8 pallets in a block stack.
- Total 16 pallets.
![]() Note: This is just an example configuration - some locations may be configured differently, but the majority are expected to be of this type, if not this exact configuration.
Note: This is just an example configuration - some locations may be configured differently, but the majority are expected to be of this type, if not this exact configuration.
The locations will be created as type "M" (Multi-deep), with a validation rule that controls whether pallets can be stored in the same location. Currently this validation rule allows for:
- Same Stock
- Same Stock/Rotation
- Same Stock/Batch
- Same Stock/Manufacture Date
- Same Stock/Sell-by Date
As only one vessel will arrive each day, pallets received from those vessels will have a unique manufacture date.
Therefore these locations will be set up with the "Same Stock/Manufacture Date" validation rule.
In the future, should it be possible that the operation can receive two vessels on the same day, then pallets of the same stock can be stored in the same location, regardless of vessel or voyage, maximising warehouse storage.
There is a requirement to pre-assign locations to a receipt, where the operation manually decides on the location to be used in advance. This can be achieved through several ways:
- When manually confirming receipt through the WMS screens, locations may be assigned when confirming the pallets as putaway confirmed.
- The driver (if allowed through menu options) may be allowed to reposition the item to a required location.
- The product configuration may be changed to point to a specific location prior to putaway location suggestion (when scanning the pallet for putaway in the process below).
- The pallets may be received and confirmed onto the floor, then housekeeping moves generated for the pallets to the desired location.
Regardless, it is expected that, when the system is kept up to date with the locations that are available to the system, the automatic putaway suggestion routine will use the best locations for the product in any case.
Putaway Confirmation
The pallets may be scanned for putaway in a variety of ways:
- Through Wide Area Dual Cycling, where users may be given putaway or picking tasks
- Through Putaway, where users will only be given putaway tasks.
Both processes allow multi-pallet scanning by:
- Pressing the F5 key to indicate picking up multiple pallets
- Scanning the pallets picked up
- Pressing F1 to confirm that all pallet have been picked up.
![]() Note: Multi-pallet movements are usually performed by suitable truck types (for example with long tines). These are not normally suitable handling equipment for locating the pallets in racking or multi-pallet stacks. This is normally suited to an operation that utilises P&D locations so that the moves from inbound bays to P&D locations can move multiple pallets, and that the final stage (move from P&D to racking) is completed by a more suitable truck, for example a reach truck. The operation is not expected to be utilising P&D locations - the description remains here to show capability should they be reinstated in the overall warehouse design.
Note: Multi-pallet movements are usually performed by suitable truck types (for example with long tines). These are not normally suitable handling equipment for locating the pallets in racking or multi-pallet stacks. This is normally suited to an operation that utilises P&D locations so that the moves from inbound bays to P&D locations can move multiple pallets, and that the final stage (move from P&D to racking) is completed by a more suitable truck, for example a reach truck. The operation is not expected to be utilising P&D locations - the description remains here to show capability should they be reinstated in the overall warehouse design.
If a location cannot be suggested at the time of scanning the pallet for putaway, the user will be instructed that putaway is unavailable.
At present, the Putaway module allows multiple pallets to be selected for putaway and then prompts the RDT user to putaway the pallets selected in a location efficient sequence if the 'Multi-pallet putaway' rule is set to 'Enabled'.
A rule called 'Multi-Pallet WADC' exists within the WCS. The rule has the values 'Enabled', 'Disabled', 'Putaway Only' and 'Picking Only'.
If the RDT user is prompted to putaway a pallet in the WA Dual Cycling module and the 'Multi-Pallet WADC' rule is set to 'Enabled' or 'Putaway Only' then the RDT will display the 'F5 Multi-select' option. If the user selects the 'F5' option, they will be prompted to select multiple pallets to putaway in exactly the same was as in the Putaway module. They will also be prompted to putaway the selected pallets in exactly the same was as in the Putaway module.
The user will be instructed to take each pallet successfully scanned for putaway to the destination location.
Once there, they will confirm they are at the location with a scan or entry of either the location check-digits or the location code itself.
The WCS application requires confirmation that the user is at the correct location as directed. The WCS offers several ways of doing that:
- Through confirmation of the location code itself.
- Through check-digit confirmation.
This process is configurable in the system.
Location confirmation will direct the users to the location, and then require that the same location code is either scanned from a barcode or keyed into the application.
Check Digit confirmation will direct the users to the location, and then requires that the check digit (a 3-character code configured against that specific location in the WMS Locations standing data) is either scanned from a barcode or entered.
![]() Note: The barcodes must contain either the check digits or location code, depending on WMS system configuration. It is expected that the locations will not have check digits.
Note: The barcodes must contain either the check digits or location code, depending on WMS system configuration. It is expected that the locations will not have check digits.
Putaway Reposition
During the process pallets that have been identified with damaged product items or pallets or missing identification labels will need to be managed so they can be processed by the warehouse.
If the operator determines that the stock is damaged, he responds by pressing the F4 key to 'reposition' the pallet.
The proposed solution is to divert these pallets into a slow lane where a separate resource will evaluate the issue and respond accordingly, either re-palletizing the stock, adjusting the quantity on a pallet or creating a new label using a static or hip printer.
If stock adjustments are made to the quantity on a pallet the user will need to enter a reason code, the WMS is delivered with a list of reason codes but this data is user configurable so can be amended as required.
- DA - Damaged Stock
- PE - Pallet Exchange
- RE - Repaired
- SA - Stock Adjustment
- D1 - Damaged at receipt
- D2 - Damaged in warehouse
- 90 - Awaiting Putaway
- 92 - Test in progress
- DS - Disposal Item
- 6A - Scrap item - AUTOMATIC
- H1 - Housekeeping - Pallet Movement
- IC - Inventory Control
- Q1 - Quality - Inventory Control
- QA - Quality - Assurance
- S1 - Stock adj - Damaged hold
- S2 - Stock adj - Lost item removed
- S3 - Stock adj - Found stock added
- S4 - Stock adj - Damaged removed
- SH - Stock hold - quality check
- QH - Quality - Hold Stock
- H2 - Housekeeping - Stock On Hold
- RT - Returned Stock - Auto Hold
- 81 - Stock Putaway
- H3 - Stock check - release to good
- ** - Stock Take Adjustment
- 19 - Stock Take - Decrease
- 20 - Stock Take - Increase
- R1 - Reserved Stock
- R2 - Reserved Stock - Release
- DD - Downdate at despatch
- R3 - RETURN - Requires Inspection
- R4 - RETURN - No Inspection Require
- QC - Quality - Inbound Stock Check
- HZ - Hazardous Item Code
- Q - Quarantine Control
- LD - Location Damaged
- LF - Location Full
Inventory Management
Housekeeping Moves
Pallet and Stock Moves
Standard stock control moving pallets and stock from location to location (bin to bin movements) will take place in the operation.
A move is classed as a pallet move if the whole quantity on the pallet is being moved.
Pallet moves can be created on the C-WMS system and sent to the RF application.
Controlled pallet movements will be completed in the standard way:
- Generate the pallet movements through C-WMS
- Send the movements to RF.
When an operator requests the next task and receives a Manual Pallet Move, the system directs him towards the source location where the pallet currently resides. Upon reaching the location, the operator is asked to scan the pallet I.D. If the value scanned by the operator matches the expected one the system directs the operator to the destination location.
Once the operator reaches the destination location, the system prompts for a scan of the location code to ensure that the operator is at the right location. If the value scanned by the operator matches the expected one, the operator is then ready to start the next task or log out of the system.
Once the pallet move has been completed, a pallet move confirmation message is sent to the C-WMS system which updates the pallet record with the new location.
Ad Hoc Pallet Move
Where pallet movements must be completed quickly to free up space the operation will use the Ad Hoc Pallet Movement module on C-WCS. This allows the users the move a pallet from one location to another without first generating the move within C-WMS.
Note: that this option may only be available to supervisory stock control operatives.
Replenishments
Pallet Replenishments
Replenishments will not be required as the proposed WMS configuration is for full pallet picks direct from bulk locations.
When allocated, the WMS will determine whether a case pick is required. If this is required, the process will check the defined pick face and determine if there is enough stock in the pick face to fulfil the order and, if not, generate a move of that stock from the bulk location to the pick face. Normally, this is a full pallet of stock from the bulk storage locations in sequence.
Replenishment moves are considered to be a special kind of move within the warehouse and can be completed as part of housekeeping moves or completed through a separate process on the RF application that will direct the user to only complete replenishment moves. Regardless of the way of accessing the move, the process is identical, described in the Inventory Management section above.
Hold / Release Stock
The CALIDUS 3pl system allows stock to be held and released as required by authorised users.
The process requires reason codes to hold and release stock (listed above), the reason code data is user definable. The holding and releasing of stock is a manual process on the CALIDUS 3pl system.
It is expected that this holding and releasing of stock may also be interfaced to the ERP through an EDI message, so that available stock levels can be adjusted accordingly.
Adjustments
Manual Adjustments
In addition to the process outlined above (4.3.5 above) the C-WMS system allows stock to be adjusted off and on the system by users with the correct authorization. The system requires reason codes (listed above) to adjust stock on and off, the reason code data is user definable. The adjusting on and off of stock is a manual process on the C-WMS system.
If stock is adjusted either on or off the system then an EDI message may be sent to the ERP system to inform it that stock has been adjusted so that the stock levels can be amended accordingly.
RF Adjustments
C-WCS includes functionality for adjusting counts of products in locations from Stock Take, Perpetual Inventory and Residual Balance checks. All of these follow the processes outlines in the following Stock Take section.
Stock Levels
There are a number of options that the site could use including the following:
- Stock Snapshot - an EDI process that produces a file containing the stock levels for all of the stock in the warehouse. It is expected that this EDI to the ERP will be daily, but this is configurable and may also be generated on demand.
- Oracle Reporting Suite - a report can be created by the site using the Oracle Reporting Suite to give the stock levels on the warehouse. This report could be run monthly, weekly or daily depending upon what was required by the client.
- Stock Balances Report - an existing report which displays the totals for each stock code in warehouse. The report can be produced in a report or spreadsheet format and could be run monthly, weekly or daily depending upon what was required by the client.
C-WCS Enquiries
There are instances where issues with stock in locations must be resolved as quickly as possible.
For example, where replenishments or putaways cannot be completed to locations being full or picks cannot be completed because of empty pick faces (pick faces are not required in this implementation of the WMS).
In these cases, C-WCS will be deployed with Pallet and Location Enquiry modules, and will be configured for the use of stock control (administrator) staff only. These will be used to help resolve those issues that occur.
Picking
Order Entry
The C-WMS system can be configured so that the C-WMS order number is populated with the customer's order number details (tbc.).
The C-WMS system requires a line type value at the order detail level (stock code level). The line type value determines how stock is allocated by the allocation process.
The line type can be set to the following values:
- 1 - Standard method by stock code only
- 2 - Non-stock order
- 3 - Order by Rotation Number
- 4 - Order by Pallet Id
- 5 - Order by Customer Rotation Number
- 6 - Order by Customer Pallet Id
- 8 - Sole Lot
- M - Med/Serial Numbers
- R - Order by Rotation but do not commit at detail level
- C - Full Container
For full-pallet and case picks, the line type "1" above is used, to determine the stock and quantity to be picked. If the quantity matches full pallets, then full pallets will be picked.
For full container picking from the yard (import and export), the line type "C" above is used, identifying the container.
It is also envisioned that customers could log onto CALIDUS Portal and enter or upload their own orders through screens provided for that purpose. The upload is likely to be a CSV upload in a format agreed during specification of the change, referenced in the appendices. These mechanisms will allow definition of orders for both line types described above.
From inbound from the vessel, some portion of the goods will be stored in full containers in the yard. The remaining portion will be stored in their containers in the refrigerated stack until required for order fulfilment. They may be stored temporarily until de-stuffed into the warehouse store, or the full container may be picked to fulfil an order, as follows.
Containers in the Yard will be subject to full container picking. The choice of whether a container is stored in the yard or de-stuffed is based on the customer's order - if they require the full container, it will remain stored in the yard, if not then it will be moved through the warehouse through de-stuffing.
For Full Container Picking, the order will be marked as requiring a full container and the container required to be picked, as an Order Line type of C - Container.
There will be a GRN pre-advice of the product on the container.
An order will be received or entered through the WMS Sales Order screen with the line type of Container, and will have the container ID of the container to be delivered to them.
Note that the screen will not allow this line type in conjunction with any other line type, and to allow only one "C" line to be specified against an order.
Orders can be manually allocated and pick listed through the WMS screens. It is also possible that the Bay Diary will automatically allocate the order when the booking is set to Arrived status.
When the order is allocated, the order will go straight to Pick Confirmed status. The order lines will be created from the pre-advice and the audit trail maintained in the WMS as Received in Container and Picked From Container, using the storage location of the container as the location for the audit trail. The pre-advice will then be closed as received.
This order will then be ready for despatch and will not require warehouse picking.
Allocation / Pick List
Orders selected for the pick run will be determined when the vehicle assigned to the collection of the order in the bay diary has been marked as arrived in the VBS.
The WMS process for Port of Dover Cargo Ltd will be changed to automatically allocate and pick list orders as soon as the status is updated, this process will create the RF picking tasks for the fork lift truck users to execute.
If required this process can be a manual decision as and when the site decide to process the orders to pre-prepare deliveries for collection.
Once the allocation process has been run, a user can then run the pick list process.
The pick list process either produces a physical pick list if the orders are being manually picked (not required in this implementation of the WMS) or sends the electronic pick tasks to the RF application.
The allocation process hard allocates the stock to the relevant orders.
The WMS will determine whether a full pallet pick or a case pick is required, dependent on the quantity of stock ordered. If a part pick is required, the process will check the defined pick face and determine if there is enough stock in the pick face to fulfil the order and, if not, generate a move of that stock from the bulk location to the pick face. Normally, this is a full pallet of stock from the bulk storage locations in sequence.
![]() Note: The operation is expected at this time to be full-pallet picking only. Case picking is not expected, but is defined here are a possibility for the future.
Note: The operation is expected at this time to be full-pallet picking only. Case picking is not expected, but is defined here are a possibility for the future.
The manual pick list process prompts the user to enter a marshalling location to deliver the order to prior to loading, this data will be a required field as the process has not been automated.
The marshalling location is the location where the order will be taken to after being picked.
Note: that an order is NEVER picked in advance into a container and then the product left in the yard for collection.
The site will have multiple different marshal locations and the required location needs to match the bay diary bay if the allocation process has been initiated by this application.
Picking in 'Just in Time' and will be triggered when the vehicle arrives at the gatehouse.
Bay Diary Arrival will trigger allocation and pick list. The tasks will be sent to the RF users on C-WCS at the highest priority.
Orders can be released earlier. For example, trusted carriers will let the operation know when they are 20 minutes away.
In the case where picks are manually released, the user releasing the picks in WMS is in control of the priority of the RF tasks. It is expected that usually these will be released at a lower priority than automatically released picks.
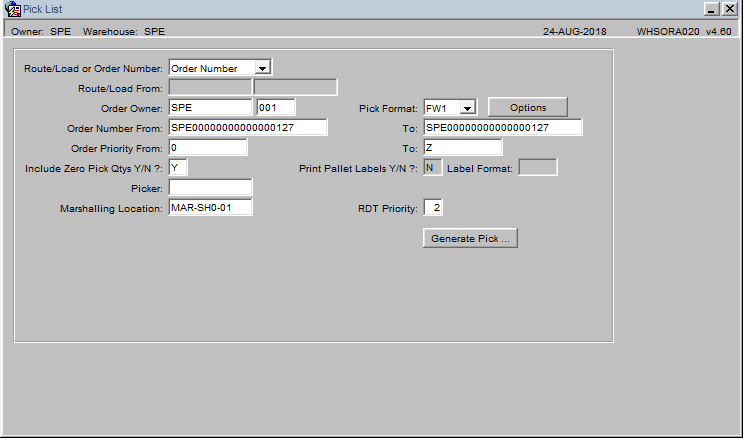
For example, through the Pick List screen:
![]() Note: Any screen that allows Pick List screens will default the Marshalling Bay for the pick list from the bookings associated to the order.
Note: Any screen that allows Pick List screens will default the Marshalling Bay for the pick list from the bookings associated to the order.
Full Pallet Picking
All of the picks in the warehouse are full-pallet picks picked directly from a bulk storage chamber.
A pick task is classed as a full pallet pick task if the quantity to be picked is for the full quantity remaining on the pallet and the pallet is being picked from a location that is not a pick location. Full pallet pick tasks are completed using the RF application.
When P&D locations are not in use, the full-pallet picks are taken from the storage locations direct to the marshalling location using the option Picking on the RF application.
When an operator starts the Picking process, the system allocates the next highest priority order, defined when allocating the order.
The system directs him towards the source location where the pallet currently resides.
Upon reaching the location, the operative will be asked to scan the location barcode. The operator is then asked to scan the Pallet ID number.
If the value specified by the operator matches the expected one, the operator is asked to take the pallet to the Marshalling location associated to the order.
Once the user scans the correct marshalling location to confirm that the pick task has been completed, a pick confirmation message will be sent to the WMS.
The operator will then be directed to the next pick for that order, until all picks are completed.
Note that, due to the nature of the truck types working in these areas, it is not possible to pick up multiple pallets in a single stage full-pallet pick as described above.
It is expected that the operation will not use P&D locations to stage movements between the chambers and the wider area, in which the Marshalling locations reside. If this is enabled through configuration of the locations, however, the RF application has options to accommodate this.
The options used to complete full pallet picks differ if using P&D locations, utilising Dual Cycling options, which control the mixing of inbound (e.g. putaways) and outbound (e.g. picks) tasks together, to keep the operative in the same area:
- The first stage of the pick, from the storage location to the P&D location, will be completed either as a Narrow Aisle Dual Cycling task, picked up with any other task coming out of the chambers or as a full-pallet picking task (as described above, but taking to the P&D location rather than taken direct to Marshalling.
- The subsequent stage, from the P&D to the marshalling location, will be completed as a Wide Area Dual Cycling task, picked up with any other task coming out of the chambers. In this case, the truck types typically handing this type of movement may be able to pick up more than one pallet at a time (for example, with long-tine trucks) and the process supports this.
When an operator requests the next task and receives a Full Pallet Pick, the system directs him towards the source location where the pallet currently resides.
Upon reaching the location, the operative will be asked to scan the location barcode. The operator is then asked to scan the Pallet ID number.
If the value specified by the operator matches the expected one, the operator is asked to take the pallet to the P&D location associated to the pick location's chamber. The chamber picker can continue to pick tasks in that chamber.
The pallets left at the P&D locations for the chambers will be able to be picked up by wide-area operatives using Wide Area Dual Cycling (WADC).
The WA Dual Cycling module allows multiple types of tasks to be completed from the same module, e.g. putaway, picking, etc., within the wide area, as long as Pick-up and Drop-off (P&D) locations are defined for the aisles in the chambers. So, tasks within the chambers will be performed by drivers using Narrow Aisle Dual Cycling (for putting pallets away from the P&D locations, and picking pallets to the P&D locations), and tasks within the wider area will be performed by operatives using Wide-Area Dual Cycling (to put pallets to the P&D location of the chamber in which the pallet will be put away, and to pick up pallets from the chamber's P&D location and take them to the defined marshalling location.
A rule called 'Multi-Pallet WADC' exists within the WCS. The rule has the values 'Enabled', 'Disabled', 'Putaway Only' and 'Picking Only'.
If the RDT user is prompted to complete a pick task in the WA Dual Cycling module and the 'Multi-Pallet WADC' rule is set to 'Enabled' or 'Picking Only', then after the user has confirmed the location of the assigned pick task and identified the pallet to be picked, the RDT will prompt the user to either take the pallet to marshalling or select another pallet.
If the user chooses to take the pallet to marshalling, the RDT will display the relevant marshalling location and prompt the user to confirm the marshalling location.
If the user chooses to select another pallet, then the RDT will send a new request to the WCS to find the nearest available pick task that can be completed by the user. The WCS will search for available full pallet pick tasks that can be completed by the RDT user (truck type, etc) within the same area as the pick task that is in the process of being completed.
If no other available pick tasks are found in the same area of the warehouse then the RDT will display an informational message before prompting the user to complete the first pick task.
Once the nearest pick task has been determined, the RDT will display the pick location of the assigned (nearest) pick task.
The user will then confirm the location and identify the pallet to be picked in the standard manner before being prompted whether they want to take the pallet to marshalling or select another pallet.
Once the user chooses to take the pallets to marshalling, the RDT will prompt the user to go to the relevant marshalling location(s). The sequence that the pallets will be taken to marshalling will be based on the Multi-Pallet Picking Sequence rule which controls whether the last pallet scanned will be the first pallet taken to marshalling or the first pallet scanned will be the first pallet taken to marshalling.
Once the user scans the correct marshalling location to confirm that the pick task has been completed, a pick confirmation message will be sent to the WMS.
After confirming all of the pallets into the relevant marshalling locations, the WA Dual Cycling process will return to the standard process, i.e. checking whether there are any putaway tasks to complete.
Part Pallet Picking
![]() Note: It is not expected that the operation will require a part (case) picking process, as Port of Dover Cargo Ltd currently have no plans to operate in this way. This section has been added to show capability of the WMS to operate a case picking operation.
Note: It is not expected that the operation will require a part (case) picking process, as Port of Dover Cargo Ltd currently have no plans to operate in this way. This section has been added to show capability of the WMS to operate a case picking operation.
A pick task is classed as a part pallet pick task if the quantity to be picked is less than the full quantity remaining on the pallet or the pallet is being picked from a pick location. Part pallet pick tasks are completed using the RF application Part Picking module.
The Part Picking process can be customised in many different ways. However the mechanism below is a fairly simple process that could be followed with this operation in mind.
Part picks are generated from specific pick areas from pick faces defined against the product code. It is expected that these pick locations and a pick area will both be physically created in the warehouse and reflected within the system.
The Part Pick process can group the picks for the case pickers in many different ways, but for this operation it is expected that these will be picked by a single picker for the order, in the order as defined by the pick sequence for the pick locations.
The part pick process will direct the picker to start picking for the next high priority order, as defined when allocating the orders.
The picker will be prompted to prepare a picking container (a pallet for the picked stock for the order). It is expected that either a pre-printed label will be attached at this time, identifying the pick pallet, or that the system will generate a picking container automatically and print a label when all picking on this pallet is completed.
Once prepared, the user will be directed to each pick face for the required stock for the order. The user will confirm that they are at the location by either scanning or entering the location ID or the check digits associated to the pick location.
The user will be prompted to confirm the pallet and stock being picked, through scanning or entering of the existing pallet ID and stock code from the pallet's label.
The user will be prompted to confirm the amount picked, and can reflect a short pick here if required, with a confirmation of a reason code as to why it is short-picked. This can be password-controlled.
Each pick location for the order will be picked in this fashion until the pallet is full or there are no more picks for that order. At that time, the user will be directed to the assigned marshalling location for that order.
Note that, if labels are to be printed at the end of this process, the user can be directed to enter the printer being used for the label at that time, collect the label and apply it to the built pallet once it has been prepared for despatch.
The user will confirm that they are at the location by either scanning or entering the location ID or the check digits associated to the marshalling location. This picked pallet will then be treated as a single despatch pallet for loading, much like a full-pallet pick.
Pick Dependencies
There are several options controlling the process around part picking, as follows:
- Should the user be allowed to start the pick if the stock has not yet been replenished?
- If not, should the user be allowed to call the replenishment at the time that it is required?
- Should all replenishments be allowed to be completed regardless or should they be released sequentially?
Any of the above dependencies can be enabled in the system, decided should this process be implemented in the operation and dependent on the physical restrictions of the pick area.
Sky Picking
Sky Picking is defined as the process of picking cases from a bulk storage location and is only attempted if case picking is required and there is no pick areas defined.
Sky Picking will not be required for this implementation of the WMS system.
Pick Exchange
It is possible for a forklift driver to request a pick of an alternative pallet during the full pallet picking process, e.g. if multiple pallets of the same product are stored in a single location and it is more convenient for the operator to pick a different pallet ID number than the one allocated to the order originally.
The RF system will be configured to use the 'Seamless Pick Exchange' process which allows users to pick any pallet from the allocated location with the correct credentials and use that if the original allocated pallet isn't scanned.
Short Pick Email
The C-WMS system can be configured to send an email to a designated email address if a pick task is short picked via RF.
The email would allow a supervisor to investigate why the pick task was short picked before manually locating more of the same stock on the C-WMS system so that it can be manually assigned to the order to fulfil the ordered quantities.
Loading / Despatch
When configured, the process will work as follows:
The RDT User finishes picking of any picking container (a full-pallet pick in this instance) - picking containers are then available for loading at that time.
The loading process works as follows:
- The RDT prompts for Dock Door.
- Enter Route/Load - the RDT will also allow loading by order if this is required.
- The RDT shows a list of all picking containers for that route/load.
- Scan a pallet ID - if not for this route/load or order, the user will be warned.
- Note that the system can be configured to allow loading of multiple items.
- RDT prompts to confirm the bay door, the pallet is now loaded.
- This process can then continue, scanning as many pallets as are available.
- The user can stop loading this vehicle at any time and start a different load, returning to this load at any time as required.
C-WMS will mark orders as despatched as and when every pallet is picked and scanned on to the vehicle.
On confirmation of despatch through any method (manually or through WCS or Container Yard processes) the booking will be marked as status Processed if not already marked as Processed.
The despatch confirmation screen allows Full Container Picking to be despatch confirmed only.
The Despatch Confirmation process will, on confirmation, create 'Sale From Container' transactions for the order in the WMS. The order and order well will have their status and status tracking updated at this time.
If the Bay Diary system is configured as integrated then the process will look for a booking against that order reference. If found, then the booking will be marked as status Processed.
![]() Note: The Despatch Confirmation process is subject to definition of a future Transfer of Custody change. When defined, any changes to the above Despatch process description will be evaluated and captured as part of that specification when the change request is raised with OBS Logistics.
Note: The Despatch Confirmation process is subject to definition of a future Transfer of Custody change. When defined, any changes to the above Despatch process description will be evaluated and captured as part of that specification when the change request is raised with OBS Logistics.
Charges
![]() Note: Generation of all charges are subject to definition in greater detail, and will be discussed and detailed through the functional specifications in these areas.
Note: Generation of all charges are subject to definition in greater detail, and will be discussed and detailed through the functional specifications in these areas.
Free Days, there is a requirement to allow a number of free days on various types of charges, e.g. rent.
Currently when a 'rent' type charge is applied, the charge applies immediately from the entered 'receipt' date.
However certain charges where the 'business type' is CYC (Interval charge) will need to have the ability (at owner / stock code level) to apply a certain number of 'free' days
For example - temperature controlled storage - the client gets 7 free days (at present), so if a container is in storage for 6 days, no 'rent' charge would be applied, but if it is in storage for 8 or more days, a charge of 1 day or more would need to applied.
The charge code table and maintenance screen will need new field (no of free days) adding to allow the creation and management of this data. The charge creation processing will need to take this data into account during the creation of charges for the client. We will need to apply the change to both pallet and container data.
RH&D Pratts - Over 500 pallets per vessel:
The WMS will separate charge codes configured which will use defined break points to separate charges, e.g. pallets 1 to 500 have one rate, pallets 501 and above will have another.
Some charges can't be linked to an individual GRN - i.e. Quay and Bay moves, when a container, not pre-advised on a GRN linked to the vessel, is temporally removed from the ship for operational reasons, for example to allow access to other containers, and then put back on the vessel.
This charge would then need to be linked to the voyage reference itself.
The miscellaneous charges will be set up using the existing rates table maintenance.
The charge type should be set to Miscellaneous and the calculation option set to manual, as show below:-
An Ad Hoc Invoice Entry screen will be provided. The owner code will default to the current owner code and display the current owner's details.
This screen will allow entry of the owner code or selection of the owner code from a list of values. The list of values will show all the owners the user is authorised to access. The invoice address, for the entered owner's default customer, will be displayed.
The "Invoice" button will be used to call the "Detail Handling Charges" (WHS0168) screen. This is the same screen called from goods receipt and despatch to include any miscellaneous charges.
Container Management:
This includes charges for:
- Rent for containers in the yard (Ambient)
- Rent for containers in the yard (Refrigerated)
- Loading vessels
- Unloading vessels
These charges will be calculated from the Container Yard movement information and generated at the time of invoicing.
![]() Note: Quay and Bay moves will be recorded manually as an Ad Hoc charge.
Note: Quay and Bay moves will be recorded manually as an Ad Hoc charge.
Yard locations will be associated to Areas, which will be designated Chill or Ambient, for the purposes of generating the charges.
![]() Note: The charges generated from the container management information are from each individual task or pair of tasks in the Container Yard system. For example, for refrigeration charges, the system will note the date and time of the move to the stack in the first place (linked to the inbound voyage) and will have a separate move from the stack (linked to the outbound voyage). It is noted that there could be multiples of charges relating to several storages of the same container within a single invoice period, and the process will allow for that.
Note: The charges generated from the container management information are from each individual task or pair of tasks in the Container Yard system. For example, for refrigeration charges, the system will note the date and time of the move to the stack in the first place (linked to the inbound voyage) and will have a separate move from the stack (linked to the outbound voyage). It is noted that there could be multiples of charges relating to several storages of the same container within a single invoice period, and the process will allow for that.
Waste Removal Keeling:
As this charge is 'By Month' this charge would then need to be linked to the vessel or PIMS reference itself.
During the charging discussions multiple requirements were discussed to allow the seamless creation of automated WMS charges and extra control for the management of additional ad-hoc charging in the WMS.
The list below includes some (but not all) of the of the extra detail required to allow management of the creation of charges from the WMS -
- Free days on various types of charges
- Will use break points to separate charges
- Ad-hoc charges linked to a vessel
- Reefer plugin charges
- Container rent charges
- Multi rate management (stripping continental bound containers)
- Stevedoring containers
- Stevedoring cars
- Receiving/delivery of empty containers including wharfage payable
- Additional EDI interface (SCR-350229-38)
(Inserted at the request of Mark Burton - email sent 27 July 2018)
Invoicing will be carried out by the Port of Dover Cargo Ltd's IFS ERP system and the WMS will provide functionality to display backup information for the invoice's to the ERP.
The WMS will produce invoice backing sheets to support invoicing on demand as required.
Stock Take
At present, the C-WMS system has two processes to check stock levels.
The first is the stock take cycle generation functionality where the user generates stock take cycles on the C-WMS system and these cycle counts can be completed either manually or via mobile devices.
For cycle count stock takes, all outstanding movements (putaways, picks, moves, etc.) need to be completed before the cycle count can be generated.
The second is the Bulk PI functionality on the RF and C-WCS applications, which is an ad hoc stock take where the mobile device user identifies a location and then checks the stock that should be in the location.
C-WMS/C-WCS Stock Take Cycle Counting
Note that C-WMS and C-WCS also offer full stock take cycle counting modules, but those are not likely to be used in this situation.
Stock take templates can be set up on the C-WMS system prior to a stock take. The stock take templates can be configured in a variety of ways but usually sites create one template per aisle in the warehouse.
Before the stock take can be commenced, all outstanding movements (putaways, picks, moves, etc.) need to be completed.
Once the site is ready to start a stock take, they create stock take cycles. These can be created either by using the pre-created templates or at the point of starting the stock take but the configuration of the stock take cycles is the same as the configuration of the templates.
As part of the stock take cycle generation, the user will be prompted to enter the counting option which can be one of the following values:
- Check - displays location codes, stock codes, rotation numbers and pallet ids on the stock take sheet.
- Exception - prints location codes, stock codes, rotation numbers, pallet ids and stock quantities on the stock take sheets.
- Full - requires the user to enter pallet ids, stock codes, rotation numbers and quantities on the stock take sheets.
- Partial - prints the same information as the 'CHECK' on the stock take sheets with the option of stock quantities to be printed or left blank.
If the stock take cycles are to be completed manually then the stock take sheet will be printed with the details as described above and the user will enter the required information on the stock take sheets.
If the stock take cycles are to be completed via RF then there are two options. The 'FULL' stock take check and the 'PARTIAL' stock take check.
- Full - This is where the user enters what is counted without recourse to the current stock levels (blind stock check).
- Partial - This is where the user checks stock against the current stock levels.
On entry to the 'Stock Take' module on the RDT, the user will be presented with a stock take cycle based on the priority and age of the cycle. The user can either accept this cycle count or enter another valid cycle count.
Once the cycle count has been selected, the RDT will prompt the user to go to the first location and confirm that they are there.
If the cycle is a partial stock take check then the RDT will display the pallet details, including the quantity, of the first pallet in the location. At this point, the following actions are available to the user:
- If the quantities are correct, the user can confirm.
- If the quantities are incorrect, the user can amend the quantities. The RDT will then display the correct quantities and the user will confirm this amendment.
- If the pallet does not exist in the location, the user should zero the quantities. The RDT will then display the pallet, with zero quantities, and the user will confirm this.
If there are no more pallets to display in this location, the RDT will display a message as such, and allow the user to confirm this. If there is another pallet in this location, the user can add one by pressing the add key. The user will be taken into the add sub-process. Once all pallets in the location have been counted, the user confirms this and they will be taken to a new location to count.
If the cycle is a full stock take check then the RDT will prompt the user to enter a pallet id. If there are no pallets in the location, the user should press confirm and move on. If a pallet id is entered, the user should then enter the stock code and quantity. Once this has been entered, the user will be prompted to confirm the quantity entered. Once the data is entered and confirmed, the C-WCS system compares the data against the pre-advised levels on the stock take cycle. If the pallet id and stock code entered were part of the cycle, the quantities are checked. If the quantities are the same, a message is sent that the pallet was found successfully. If the quantities are different, the C-WMS system will be informed that the pallet was there, but modified. If the pallet was not advised, the user will be taken into the add sub-process, to enter the rest of the pallet details (such as the sell by date and customer batch values). At this point, the C-WCS system will decide if this was a mixed pallet, by trying to find any other advised pallets in that location of the same pallet id. If any are found, the user will be taken to the product prompt again. The user should confirm whether the remaining stock on the pallet is present in the same way as above.
Once all pallets in the location have been counted, the user confirms this and they will be taken to a new location to count.
The 'add' sub-process will prompt the user for all essential information about the pallet, such as the location, pallet id, stock code, manufacture date etc. When the user has finished entering the pallet's details, they will be taken through the cycle again to check the details entered. When the user is happy with the entered details, they will confirm it.
When pallets are confirmed as check a message is sent to the C-WMS system to update the counted quantities and create new pallets if required.
Once the RDT user has finished checking the cycle count, a supervisor confirms that the cycle count has been completed on the C-WMS system. All this does is confirm that the locations and pallets have been checked. It does not update and system pallet quantities.
The stock take variance reports (detail and summary) can then be produced displaying all of the pallets where there was a discrepancy between the expected quantities and counted quantities.
The cycle count then needs to be updated and there are three options:
- Confirm - confirm that the counted quantities are correct. This will update the C-WMS system including any differences.
- Partial - partially confirm the cycle count. This will update the pallet records where there were no discrepancies between the expected and counted quantities but create another iteration of the cycle count to re-check the locations and pallets where there were discrepancies. Cycle counts can be partially confirmed multiple times.
- Reject - reject the cycle count. This will reject all of the counted quantities and a new cycle count will need to be created in order to check the stock.
Only when the stock take cycles have been confirmed will the stock be removed from the 'Stock Take In Progress' status and be available for allocation, etc.
C-WCS Bulk PI
The Bulk PI functionality allows a user to check the contents of any location in the warehouse at any time.
On entry to the Bulk PI module on the RDT, the user is prompted to enter a location. The user will scan the location to be checked. The C-WCS system will then check what is in that location with the C-WMS system.
The user will then be prompted to enter the pallet(s) found in the location. Once the pallet has been identified, the user will be prompted to blind enter the quantity on the pallet. Should the user enter the quantity as expected, the check will be confirmed and the RDT will request if there are any more pallets in the location. The checks continue in similar fashion until all pallets are checked.
Should the quantity entered not be the same as on the C-WMS system, the user will be required to re-confirm the amount counted. Only when the user has confirmed two identical counts in a row will the value be accepted.
On confirming a pallet, a message will be sent to the C-WMS system with the count details. The C-WMS system will then automatically perform any required adjustments, although this is configurable.
Any discrepancies discovered by the process are fully documented on the C-WMS system, accessible through an Ad Hoc Stock Take report. This report can show, by date, owner and /or stock, the pallets checked and discrepancies discovered.
Operational Monitoring
The CALIDUS Vision system will provide operational status information and consists of several components:
- Dashboard - Simple queries and tabular summaries, designed to be used within a Warehouse to help improve productivity.
- Analytics - Queries, Graphs, Enquiries and summary screens providing a deeper analysis of the current warehouse operation. This component includes all the functionality of the Dashboard, plus additional 'deep dive' analysis and historical enquiries.
- Monitor - screens designed to allow users to gain visibility of potential errors within the systems monitored by Vision, within a reasonable timescale.
Additionally, CALIDUS Vision is designed to mine data from several systems and display screens associated to them within the user interface.
The operation will make use of many of the standard screens and views available within CALIDUS Vision as standard. It was noted specifically that the Warehouse Aisle and Area availability monitoring views would be useful.
CALIDUS Vision will however be modified to support specific requirements of this operation.
Order KPIs are required as follows:
- Time product on Dock
- Time from Start to End - less than 1 hour (parameter)
The data for this view will be sourced from the Bay Diary and WMS information.
A Bay Status monitoring screen is required, showing 'Now' and 'Next' bookings against each bay door, along with the type status. RAG colours will be used to show the lateness or completion of the tasks against the door.
It is envisioned that this screen will be used either on an overhead on the bay door or in the bay area to monitor the arrival of vehicles.
The data for this view will be sourced from the Bay Diary and WMS information.
Appendix A - Process Flows
The following sections are intended to show the interactions between the systems with respect to the operational processes followed.
Full Container Picking - followed when moving a container from the yard for removal by a haulier. Additionally, a similar process can be used when exporting full containers from the yard to the export vessel.
Empty Container Collection - followed when empty containers are being collected from the yard by the hauliers.
De-stuffing - followed when the contents of a container from the yard is to be brought into the warehouse.
Outbound Order (SOP) - followed when picking any product from the warehouse. Typically this is for export by road.
Inbound Receipt (GR) - followed when receiving any product from the road to be stored in the warehouse.
Inbound Vessel (Import) - followed when unloading a vessel and taking the load (pallets or containers) into the yard and warehouse.
Outbound Vessel (Export) - followed when loading a vessel.
Inbound Container (Road) - followed when receiving a container to the yard from the road.
Full Container Picking
Empty Container Collection
De-Stuffing
Outbound Order (SOP)
Inbound Receipt (GR)
Inbound Vessel (Import)
Outbound Vessel (Export)
Inbound Container (Road)
Appendix B - Document History
References
| Ref No | Document Title & ID | Version | Date |
| 1 | FDD Port of Dover Cargo Terminal Container Management v1.2.docx | 1.2 | 02/10/2018 |
| 2 | 352173 ERP (IFS) Interface | - | - |
| 3 | 352067 Key in or Upload orders through Portal | - | - |
Glossary
| Term or Acronym | Meaning |
|---|---|
| Ad Hoc (WCS) | A task instigated on the device (spec. Ad Hoc Pallet Move), rather than a task instigated from the WMS and Stock Control. |
| Advice Note Number | An external reference linked to a Goods Receipt. |
| Aisle (WMS) | A component of a location; usually a space through rows of racking or storage locations; a collection of locations; |
| Allocation (order) | The systemic act of identifying and ring-fencing product matching the order requirements, following proscribed warehouse rules. |
| Anchor Point (WMS) | A starting location for a search for a suitable storage location; auto-putaway location suggestion start point. |
| Area (WMS) | A collection of aisles; an area in the warehouse for a particular purpose. |
| Batch (WMS) | A production batch of a product; a quantity of product that is considered to have the same characteristics; |
| Bay (Warehouse) | A physical loading or unloading point for the warehouse. |
| Bay (WMS) | A component of a location; usually a space between uprights in racking, comprising several levels (horizontal beams). |
| Bay Diary | The mechanism for booking hauliers inbound/outbound and assigning bays. The OBS Logistics system is CALIDUS Bay Diary. |
| Block Stack | A stable stack of pallets. |
| Booking | A time slot for a bay, booked with a Carrier/Haulier. |
| Bulk (WMS) | Bulk storage; Usually full-pallet storage areas, racked or stacked. |
| Cancellation (WCS) | The facility to cancel a task due to some problem, identified by the user when performing the task. |
| Carrier; Haulier | The transport company (by road or sea). |
| Check Digit (WMS) | A short code, usually randomly generated and stored against a location, used to help identify that a user is at the right location before they proceed with a warehouse task. |
| Container | The actual physical container, identified uniquely by the Container Number. The Container will be identified as a Container Type. |
| Container Type | Descriptive of the use and capability and physical characteristics of a container. Container types are 40ft End Loader, Reefer, etc. |
| Container Yard | The storage areas for full and empty locations in the facility. The OBS Logistics system to manage this area is CALIDUS Container Yard. |
| CSV | Character-separated values; a text file with multiple rows and values, usually separated with commas. |
| C-WCS | CALIDUS WCS, the name of the OBS Logistics Warehouse Control system |
| C-WMS | CALIDUS WMS, the name of the OBS Logistics Warehouse Management system |
| Dead Leg (WCS) | A movement of a truck without a pallet; wasted resource. |
| Despatch | The final physical stage of an order; handover of goods to the haulier. |
| De-stuffing | The act of emptying a container and storing the contents in the warehouse. |
| Drive-In | A drive-in location, typically multi-level, multi-deep location. |
| Dry Van | Any type of non-refrigerated container. |
| Dual Cycling | Processes utilizing P&D locations for interleaving tasks in and out of specific areas, reducing dead leg movements. |
| EDI | Electronic Data Interchange; any form of automatically or semi-automatically uploading or downloading information from a computer system without manually re-keying the information. |
| ERP | Enterprise Resource Planning; a system for this. |
| Exchange (WCS) | Specifically Pick Exchange or Task Exchange. The process of allowing a user to select a different pallet in a multi-pallet location and exchanging the expected pallet for this one. If the pallet is planned for another task, task exchange will complete this task instead of the expected one first. If the pallet is not planned, pallet exchange will swap the pallet (if suitable). |
| GR; GRN | Goods Receipt; Goods Receipt Number or Note |
| High Bay | Typically tall (greater than 5 level) racking, usually full pallet storage, usually Narrow Aisle. |
| Inbound (Booking) | A booking linked to a Goods Receipt. |
| JIT | Just In Time; processes designed to trigger at the last instant. |
| KPI | Key Performance Indicator. |
| Level (WMS) | A component of a location; usually the vertical compartments of an area, delineated by horizontal beams. |
| Loading | The act of loading pallets onto a vehicle. |
| Location (WMS) | A uniquely identified space in the warehouse for storage of product. There are many types, most commonly Floor locations (for example, Marshalling, Inbound), Racking or Bulk Storage Locations and Pick faces. |
| Manifest | The contents of a vehicle or container. |
| Marshalling | The act of bringing pallets for an order or load together; an area to do so. |
| Multi-deep | A location with 2 or more pallets stored sequentially i.e. only one can be accessed at a time. |
| NA (WCS) | Narrow Aisle; usually any area in the warehouse that is restricted access due to space limitations, Narrow Aisles have associate P&D locations. |
| Outbound (Booking) | A booking linked to a Sales Order. |
| P&D | Pick-up and Drop-off locations; locations used to control the handover of pallets between distinct areas, for example between chambers and the wider area of the warehouse. |
| PI; Perpetual Inventory | The act of continuously checking locations in a warehouse, identifying and correcting product quantity issues. Usually used in Bulk environments rather than Pick Faces. In pick faces, this process is called is called Residual Stock Balance and usually takes place after picking from a pick face. |
| Pick Face | A location designed for picking part of a pallet of stock. Usually a low- or ground-level location. |
| Pick List (order) | The instructions to pick pallets or cases from locations; the paper report associated to this; the stage of preparing these instructions; the sending of these instructions to WCS. |
| PO | Purchase Order. |
| Pre-advice; Goods Receipt Pre-advice | An advanced notification of what is being received. Part of a manifest. Pre-advices can be stock and quantity, or individual pallet level. |
| Putaway | The physical move of a pallet to a storage location as a result of receiving it into the warehouse. |
| RAG | Acronym for Red/Amber/Green, a traffic light colouration system depicting (in sequence) Errors, Warnings or Informational messages. Usually used in operational monitoring to effectively display when certain processes are not working as expected. |
| RDT | Radio Data Terminal. |
| Reefers | Refrigerated Containers. |
| Replen; Replenishment | The act of moving product (usually a pallet) from bulk storage to a pick face. |
| Reposition (WCS) | The facility to change the location of a movement or putaway when at the final destination, sue to some issue discovered when performing the task. |
| RF | Radio Frequency; An RF device is an RDT, typically used by CALIDUS WCS for executing warehouse tasks. |
| SCR; CR | Software Change Request. |
| Short Allocate | The process of not fulfilling an order due to failure to identify sufficient product at Allocation. |
| Short Pick | The process of not fulfilling an order due to failure to identify sufficient product when picking. May also be used as a term to indicate Short Allocation. |
| SO | Sales Order. |
| Truck Types | Plants, Mechanical Handling Equipment. For example, Reach trucks, Counter-balance trucks, pallet riders, etc. |
| UOM | Unit of Measure. |
| WA (WCS) | Wide Area; usually any area in the warehouse that is not restricted access due to space limitations, for example, floor areas, not Narrow Aisle. |
| WCS | Warehouse Control System |
| WMS | Warehouse Management System |
Document History
| Version | Date | Status | Reason | Initials |
| 0.1 | 10/08/2018 | Draft | Initial draft | PJH |
| 0.2 | 22/08/2018 | Draft | Added functional text. | ANW |
| 0.3 | 22/08/2018 | Draft | Added introduction and objective; slight format changes; Added details of the Rebook report and Diary Report parameters. | ANW |
| 0.4 | 28/08/2018 | Draft | Added Outbound Order Booking functionality; modified setup of yard bay locations. | ANW |
| 0.5 | 30/08/2018 | Draft | Updated screenshots of the Bay Diary system, showing new styles | ANW |
| 0.5 | 31/08/2018 | Draft | Review of the initial draft document | PJH |
| 1.0 | 31/08/2018 | Issue | Issued to client | PJH |
| 1.1 | 19/09/2018 | Revision | Updated client name, logo and sign off page | PJH |
| 1.2 | 03/10/2018 | Draft | Updated after customer feedback; added process flows. | ANW |
Authorised By
| Phil Harding | OBS Logistics Project Manager | |
| Barbara Buczek | Port of Dover Cargo Ltd Representative |
