Calidus Portal User Guide - CORE
![]()
Aptean
Calidus Portal User Guide - CORE
Calidus Portal - 11.1.x
1st August 2024 - 11.1.x
Reference: TRAINING
Introduction
This document is the user guide for the core components of the Aptean Calidus Portal.
The Portal consists of modularised access to various systems including:
- CORE – The core portal system for managing users, security and access to modules.
- WMS - Warehouse Management and Reporting
- TMS - Transport Management, Planning and Tracking
- TTM - Track & Trace (also known as Live Order Tracking)
Within each module are individual components e.g. TMS Manifesting or WMS Ordering.
The core module comes as standard with any implementation but the other modules and their components are available separately and as such not all modules will be available to all clients.
Portal CORE Modules
Login
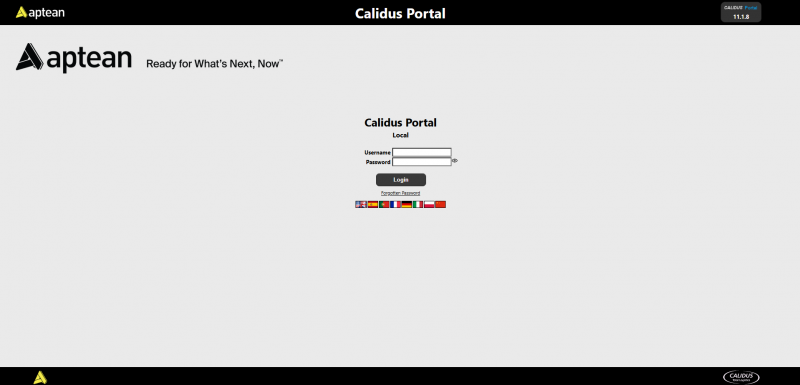
The login page allows access into the system, and consists of a username and password prompt:
If enabled, a "Forgotten Password" link will exist to email a password reset link to the user.
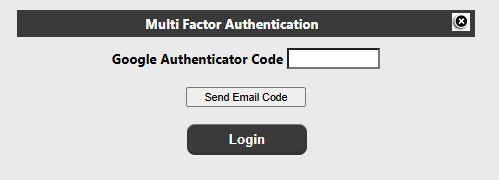
If Multi-Factor authentication is enabled within the system, an additional prompt will be displayed after the username/password has been entered and the Login button is pressed:
Once logged in successfully, the user will be taken into the system and the Home page will be displayed.
Home
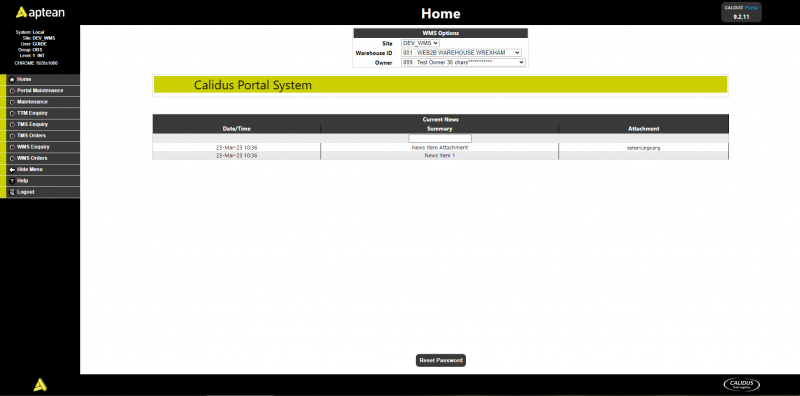
The Home page will welcome the user into the system, and display any current news items (see section 2.6 for more details).
The menu bar will be displayed down the left side of the page. The options on the menu bar will be based on the modules/components which the user has available, as well as the users' group and access level. From the menus the user can navigate to the available pages within the system and logout of the system.
Note: The screenshot shows WMS Options – This will only be displayed if the WMS module is enabled
At the base of the page a Reset Password will allow the user to change their password. Note that if the user does not have an email address specified against their account, they will be asked to update this first, before changing their password.
Menu Maintenance
This restricted page will allow the user to create menus, which can then be added to user groups. The page will initially show a menu selection section
Parent Groups will be discussed later in section 2.4
Selecting a menu from the menu selection drop-down and clicking find will retrieve details for that menu:
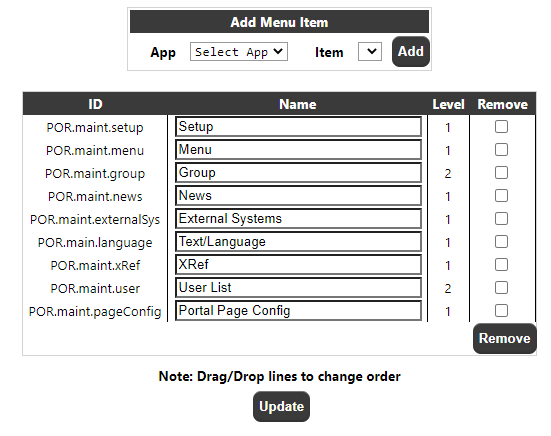
The main section below the 'Add Menu Item' displays the current menu items on that menu.
The user may drag/drop these menus up and down to sequence the order they appear on the menu, and may also select/remove the menu item from the menu if required.
The 'Add Menu Item' section can be used to add a new menu item onto the existing menu. The user will select the 'App' (POR, LOTS (TTM), TMS, WMS etc) then the 'Item' drop-down will be populated with the available menu items which can be added:
The Create/Copy/Delete Menu section Allows the user to create a new menu, copy the currently selected menu to another menu name including all of the menu items, and also to delete the currently selected menu from the system.
Note: Menus are at system level so care needs to be taken when adding/removing Items off the menu
Group/User Maintenance
The Group/User maintenance page will allow the user to create a group and assign users into groups. It will also allow the maintenance of group options including security levels and visibility of modules etc.
Initially, if Parent Groups are setup (to 'group' Groups for easier maintenance) then a Parent Group drop-down will be available, otherwise just the group selection drop-down will be visible:
The User should select the group they wish to modify and click the 'find' button to retrieve the details for that group. Note: Group creation is done by selecting an existing group and copying it to a new one, as detailed later.
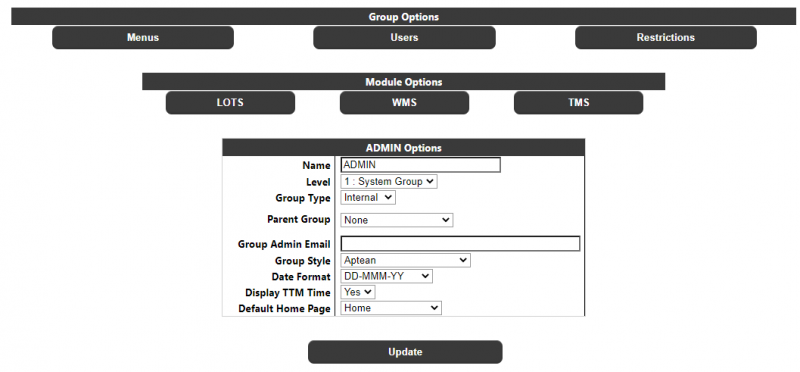
Once the group has been selected, the options for the group will be displayed:
Group Options
Menus Button This will take the user into the Menu Maintenance page. See section 2.4.1
Users Button This will take the user into the User Maintenance page. See section 2.4.2
Restrictions Button This will take the user into the Restrictions Maintenance page. See section 2.4.3
Module Options
This section will contain a button for each of the non-core modules available in the system. Each button will take the user into the specific options page for that module. See the relevant module documents for details.
Group <group> Options
- Name The name of the group
- Level The security level of the group. The following options are available:
- Aptean Group Reserved for Aptean Administrators
- System Group Highest privilege level
- Admin Group Standard privilege level
- User Group Restricted privilege level
The security level will determine the availability of certain functions within the system
Note: A user cannot see a security level above his/her own level.
- Group Type The type of group. The following levels will always be available:
- Internal For internal users i.e. Aptean and Aptean clients
- External For external users i.e. the clients of Aptean clients.
In addition to these groups, dependent on the modules installed, other group types may be available e.g. Supplier or Store for the TMS module or Haulier for the WMS module.
As with security levels, the group type will determine the availability of certain functions within the system.
- Parent Group This can be used to assign a parent group. This can then be used to find groups by parent in the Group Maintenance page below.
- Group Admin Email The collective email address of the group - used in modules e.g. WMS Error reporting to alert the group administrators. NOTE: This is not the email used for password resets - that is the email against the user.
- Group Style The colour scheme for the group. The initial login page will always have a fixed style, but this setting allows the user to select the groups preferred colour scheme once logged into the system.
- Date Format This is the date format that is displayed in the TTM pges
- Display TTM Time This determines if the time portion of certain dates within the TTM module e.g. on enquiry results are displayed, or just the date.
- Default Home Page This sets the initial page on login. Dependent on the system, available pages will be available in addition to the standard/default Home page.
- Update Button This will update all of the above details for the selected group.
- Copy Group This section is used to copy the currently selected group and it's settings to a new group. Note: Only the group will be copied - the Users and Restrictions of the current group will not be copied.
- Delete Group This will delete the group and its users/restrictions. This option is only available to level 0 users.
Group/User Maintenance - Menus
This is a restricted option to maintain the menus available to a group.
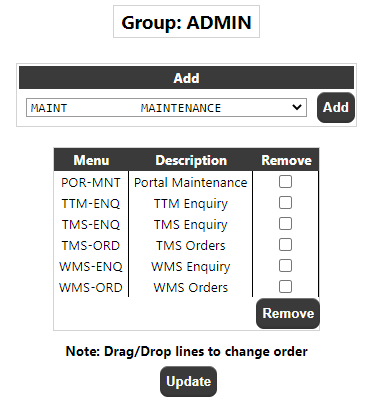
Add This drop-down will display the menus (see section 2.3) available to the group, which may be added to the groups' menu layout by selecting the menu and clicking the 'Add' button. Note: If the group has all of the available menus assigned to them then the Add section will not be displayed.
Under the 'Add' section are the current menus available to the selected group. The user may drag/drop these menus up and down to sequence the order they appear on the menus, and may also select/remove the menu from the groups' visibility if required.
Group/User Maintenance - Users
The Users button on the Group Maintenance page will take the user into the User Maintenance Page. Initially the following will be displayed:
Create New User
This section is used to create a new user with the currently selected group. The user will be created with the default system settings. The password will be validated using the pasword parameters set up on the system.
A checkbox, selected by default, will specify whether the created account will be prompted to change their password on the first (and subsequent if not changed) login for this user.
The email will be required for new users.
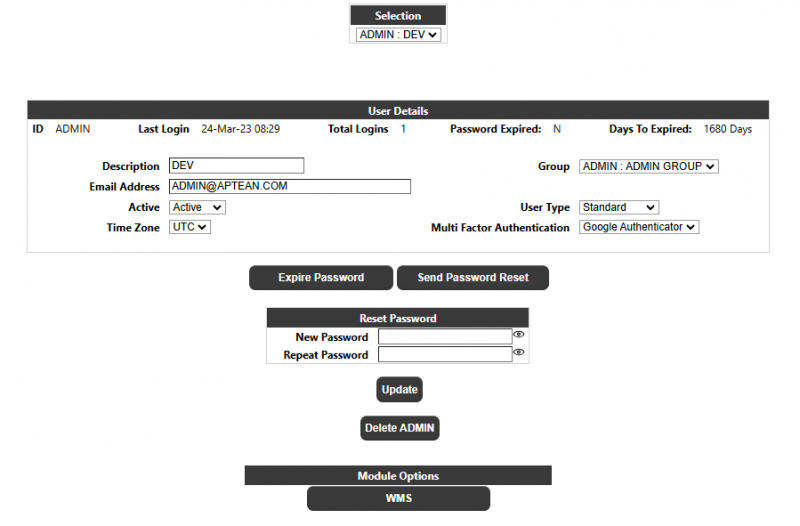
Selection
A drop-down will display all the users within the selected group. Selecting a user and clicking 'Find' will display the details for the user.
User Details
Id The name of the user
Last Login The date/time the user last logged in
Total Logins The total no. of times the user has accessed the Portal System
If the system is setup to expire passwords, the following 2 fields will also be displayed:
- Password Expired A Y/N flag to indicate if the users password has expired
- Days To Expired The number of days before the users password expires.
Description The Name of the user (this is not the users Id)
Group The users group can be changed by selecting a different group from the list.
Email Address The email address for the User. Note: This is the email used in the password reset
functionality.
Active The user can be set to active or inactive. The default is 'Active' for new users.
Type Whether the user is a Standard User, or a user for the Web Service
Timezone If the system is multi-timezone, then the users timezone can be selected from the
dropdown.
- Multi Factor Authentication This setting is used to control/override an individual users MFA type, if MFA is enabled
at the System level. The values are None, Google Authenticator or Email.
- Expire Password If the system is setup to expire passwords and the users' password is not already expired, this
button can be used to immediately expire the users password, which will require them to change
the password on their next login into the system.
- Send Password Reset This button can be used to send a password reset email to the selected user for them to log into the system and reset their password
Reset Password Allows an Administrator to change another users Password
Update To update the user details.
Delete To delete the selected user.
Module Options If there are any user specific options for a module, they may be accessed here.
See the relevant module documentation for details.
Group/User Maintenance - Restrictions
The Restrictions button on the Group Maintenance page will take the user into the Group Restrictions Page, which will allow the entry of restrictions against the group so that, for example, the selection of supplier, owners etc. can be limited i.e. so a group can only see certain data.
NOTE: By default, if restrictions are not specified, then a group may see all available data for each type.
Once a restriction has been set against a type, the user will then be restricted to only view data setup against their group.
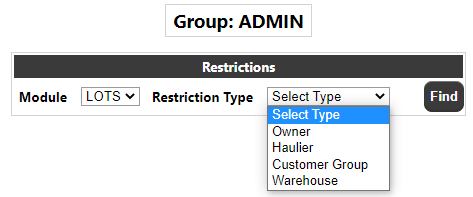
The user should select a module e.g. LOTS (TTM) from the list of available modules and a list of restriction types for that module will appear:
The user should then select the required restriction and if necessary the Restriction Key - this is an additional key e.g. Owner code to limit the restriction within a restriction type. Clicking the 'Find' button will view the current restrictions.
Add Restriction
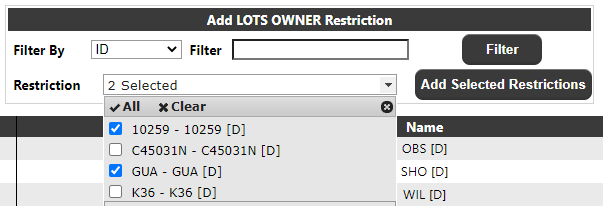
The 'Add Restriction' section allows the user to add a new restriction. A filter will be available to limit the restrictions for selection. The user may select to filter by ID or Description then enter the filter they require (Note: this is optional, and a filter does not have to be entered, but retrieval of certain data lists on the module systems e.g. customers may take a long if not filtered and there is a limit to the number of records that can be displayed - if this is exceeded a message will be shown in the dropdown and the user must use the filter to restrict the number of records retrieved).
Clicking the Filter button will populate the Restriction Drop-down:
The user can then select a specific restriction to add to the group or select multiple restrictions from the drop-down list then click 'Add Selected Restrictions' to add into the groups restrictions.
NOTE: The Filter is used against Adding Restrictions - this does not apply to the group's current restrictions, all of which will always be displayed.
The user can use the Select boxes to select and remove restrictions by clicking on the 'Remove' button. They can also specify the default restriction, which is used by some of the pages in certain modules.
User List
The User List page will allow the user to view details of the users accessing the system and allow easy access into the group and user maintenance pages.
System Statistics:
- Total Users The total number of users created on the system (Active and Inactive)
- Active The total number of Active users
- Logins This Month The current number of logins for the current month across all users.
- Users This Month The number of distinct user Id's who have accessed the system this month.
- Logins This Year The current number of logins for the current year across all users.
- Users This Year The number of distinct user Id's who have accessed the system this year.
Details
This will be a list of all users who currently created on the system.
- Group The Group Id of the user. Clicking on this will take the user into the
maintenance page for the group.
- User The User Id of the user. Clicking on this will take the user into the
maintenance page for the user.
- Name The Description of the user
- Description The Description of the users group
- Type The users type e.g. INT, EXT etc.
- Level The users security level (1-3)
- Parent Group The users Parent Group (if setup)
- Active Whether the user is Active or Inactive
- Email The Email Address setup against the user. This will be set to 'BLANK' if no
Email is setup, so this can be filtered to find users who need to be updated.
- Last Login The Date/Time the user last logged into the system.
- Total Logins The total number of logins against the user
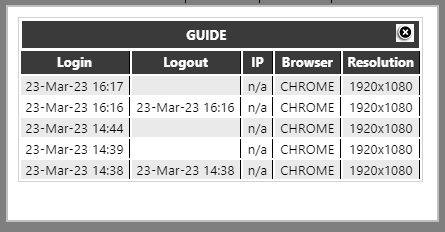
- Detail An icon to click which will show details of the recent logins for the user:
News Maintenance
This page will allow the maintenance of news items which are displayed on the home page.
Add News Item
- Group A news item can be added for All Groups, a single group or multiple groups
by selecting the group from the drop-down list. If added for specific groups then only the selected group will see the news item on the home page.
- News Type This may be:
- Text For a plain text news item
- Attachment For a plain text news item which also contains an attachment
- Scrolling For a text news item which appears on the scrolling bar on the home page.
- News Summary This is a brief description of the news item i.e. the text for the news.
- Attachment Optional - Can be any type of document capable of being viewed on the
users PC e.g. a txt, word or PDF document; spreadsheet etc. Clicking on the attachment will download the document to be viewed locally on the users PC.
- Add News Item Button Clicking on this button will add the news item to the Current news items.
Current News Items
This section displays all of the current news items for all groups. News items can be removed by selecting the 'Remove' select box and clicking the 'Remove' button. This will also delete any attachment associated with the news item.
Note: There is no automatic expiry of news items - they will remain on the Home page until they are removed from the system as described above.
Portal Setup / Config
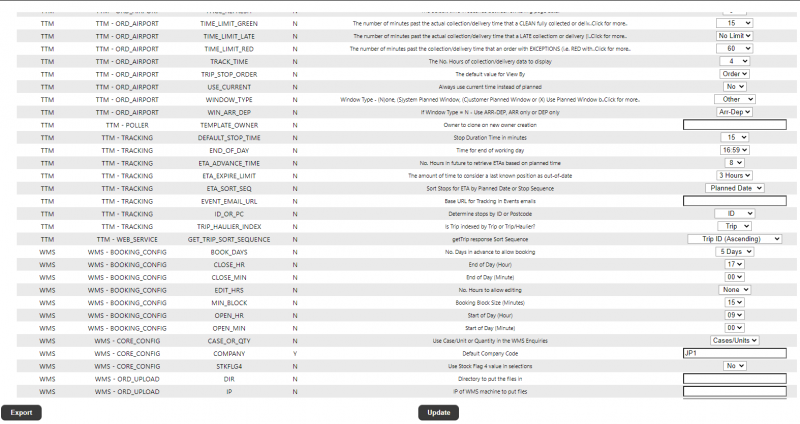
This page is used to setup/maintain configuration options for the portal system and set options/configuration for specific pages within the Portal. This page is only available for certain users.
The user can use filters at the top of the page to find modules, sections or specific configuration.
See section 3 (or the relevant sections in each module user guide) for details of individual options
NOTE: It is advisable NOT to change any of the values in this page
unless specifically instructed to do so by a member of the Aptean support team
or unless you are confident of the effects of the change
Portal X-Ref
This page is used to setup/maintain ‘List’ data which is not retrieved from other source systems. The most common use of this data is for drop-downs of data which are in the core Portal pages or on module pages where the source system does not hold the required data.
The user can select the module then the X-Ref value (these will be retrieved from the Portal system based on the Portal version in use) and then enter values/descriptions for the required data setup.
They can also edit the descriptions of existing values, set a value as a default (though this will only apply if the specific X-Ref has been coded to use a default) or delete X-Ref values.
NOTE: It is advisable NOT to change any of the values in this page
unless specifically instructed to do so by a member of the Aptean support team.
External Systems
This page is used to setup/maintain details to access external systems, for example mapping or EPOD systems.
NOTE: It is advisable NOT to change any of the values in this page
unless specifically instructed to do so by a member of the Aptean support team.
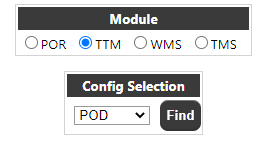
The user should first select the required module. This will then display a drop-down list of the available configurations for that module. The user should select the config they want and click on the Find button to display the configuration for that selection:
The user can then enter/amend the details such as Username/Password and URL. Some configurations will have a detail level to enter details against, for example Owners as show above.
Clicking on this button will take the user into the detail page, for example:
Additional details can be entered here, and the values will depend on what is required – contact Aptean support for details of which fields/values need to be entered for each external system.
NOTE: By default, details on this page will have a Format of "Not Set" – to enable, for example as displayed above, an owner to have a POD format, the user must change the Format from "Not Set" to one of the setup formats.
In this example, when a new owner is added to the system, this owner will NOT have a format set on this page until this is manually updated in this page.
Text/Language
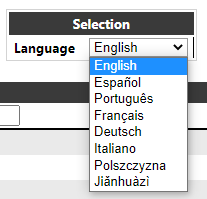
This page is used to maintain the text displayed on the pages within the system. The page has a Language drop-down to select the language being maintained
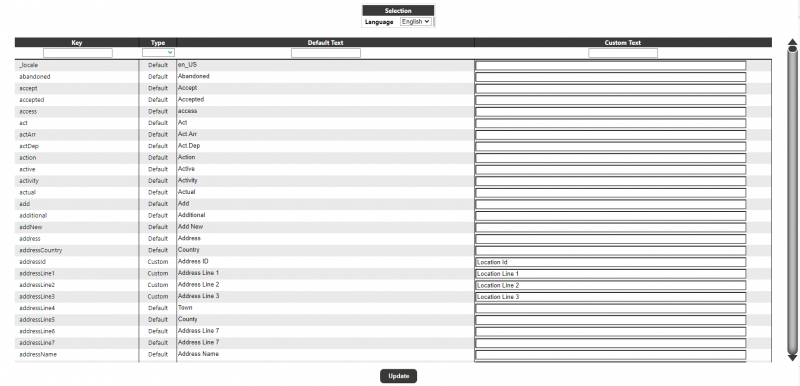
Once selected the user will be shown all of the 'words and phrases' used within the system:
- Key This is the 'language key' which is used to uniquely identify the word or phrase.
- Type This will be either 'Default' if the system default text is being used, or 'Custom' if the system default text has been customised. The drop-down at the top can be used to select 'Custom' to see if any of the text has been customised.
- Default Text This is the default system text that will be used by the system if no custom text exists for that key. If the user is looking to change a specific word on the system they should type it into the filter for this column to find it.
- Custom Text This allows the user to override the text for s specific key.
NOTE: This configuration is SYSTEM wide, so changing a word e.g. 'Trip' to 'Route' will change it on all pages within the system where the key is 'trip'.
Page Configuration
This page is used to maintain which fields are displayed on selected pages within the Portal. This page is only available for certain users and should first be enabled on the system:
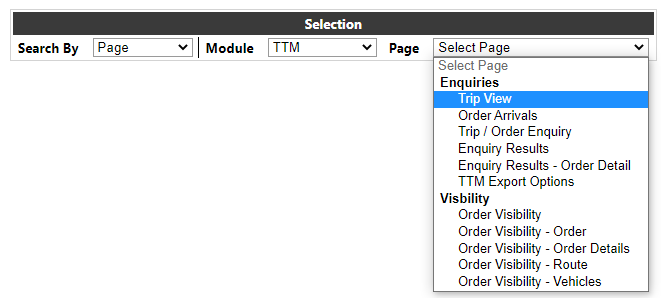
The user should initially select the method by which to search:
- Page This will find elements within a module for a specific page (and sections within the page). For example:
- Element This will find a specific element within a module across all available pages. For example:
- Web Service See the TTM User Guide for details of this functionality.
Once the Page or Element has been selected, the relevant data will be displayed.
Page:
Element:
The user can use the filters at the top of the selection to filter/search for data within the selection.
The following fields are non-maintainable by the user:
- Description (By Page) The name of the field as displayed on the pages
or
- Page (By Element) The Page the element is displayed on
- Section If there are sub-sections within the page, then the section will be listed
- Page Key This is the systems unique internal reference for the element
- ID This is the field element id used in the language translation
- Language Code The translated language code i.e. the title of the element displayed on the page
- System Default This displays Y/N to indicate whether the current setting for the element matches the system default, or whether it has been modified on the current system.
The following fields are maintainable by the user:
- Show/Hide The user can select whether the specific element is shown or hidden on the page.
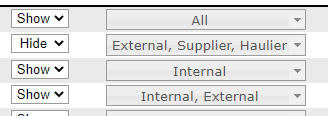
- Group Types The user can select one or more group types to show/hide. For example:
Line:
- The element will visible for All users.
- The element will be hidden for users in External, Supplier and Haulier group types but will be shown for other group types.
- The element will only be shown for users in Internal group types but hidden for all other group types.
- The element will be shown for Internal and External group types but hidden for all other group types.
NOTE: There are a limited number pages in the system which do not support this level of configuration.
File Upload
This page allows files to be uploaded for use in other functional areas.
Note: This is currently only visible within the Portal if the WMS module is in use
- Upload Type A drop-down will allow the user to select the type of file to be uploaded (e.g. a WMS despatch note image or a LOTS / TTM stock image). Note that the options available are limited based on the Portal modules that are available. Once this value is set a message will appear to provide any upload type specific information (such as the subdirectory or file naming requirements).
- Subdirectory Allows the user to specify a subdirectory for the uploaded file. The use of subdirectories is dependent on the upload type.
- File Clicking the ‘Browse’ button will open a file selection window to allow the user to select the file to upload (i.e. the file on their local machine).
- Filename This text box will allow the user to set the filename used for the file after it has been uploaded. This will initially be set to the filename of the local file. The file naming requirements will depend on the upload type.
- Upload Clicking this button will upload the selected local file to the system, storing it in the specified subdirectory with the specified filename. The message shown will change to indicate whether or not the file was successfully uploaded.
- Reset Clicking this button will reset the page without uploading any files.
This page can only be used to upload files for specific functional areas. It cannot be used to download or delete any previously uploaded files.
If the user sets the subdirectory and filename to an existing subdirectory and filename the existing file would be overwritten. A warning would be issued that must be acknowledged before uploading the file and overwriting the existing file.
Messaging
This page allows an admin user to send messages across the system, to a specific group or a specific user.
Note: The message will only be received when the recipient performs an action which returns data to the server e.g. performs an update, search or selects a menu item. The message will be displayed using the browsers standard dialog box, e.g.:
Portal Configuration
The following table documents the configuration options for the Core module on the Portal system.
| Section | Item | Admin* | Values | Description |
|---|---|---|---|---|
| ARGON_CONFIG | HASHLENGTH | Y | 16, 32, 64 | Generate a x byte hash |
| ARGON_CONFIG | ITERATIONS | Y | 3, 5, 10, 15, 20 | Run x iterations |
| ARGON_CONFIG | MEMORY | Y | 32, 64, 128, 256, 512, 1024, 2048 | Use xMB of memory |
| ARGON_CONFIG | PARALLELISM | Y | 2, 4, 6, 8 | Use x threads |
| CORE_CONFIG | MENU_ICONS | Y | No, Yes | Use Menu Icons? |
| CORE_CONFIG | MULTI_TIMEZONE | Y | No, Yes | Is system multi-timezone? |
| CORE_CONFIG | PAGE_CFG | Y | No, Yes | Use new Page Config? |
| CORE_CONFIG | PASSWORD_ATTEMPTS | 1, 2, 3, 4, 5 | No. Login attempts before login is locked | |
| CORE_CONFIG | PASSWORD_CASE_SENSITIVE | Y | No, Yes | Are Passwords Case Sensitive? |
| CORE_CONFIG | PASSWORD_EXPIRE | 30, 60, 90, 120, 365 | No. days before password expires | |
| CORE_CONFIG | PASSWORD_HISTORY | 2, 5, 10, 20 | No. of passwords to keep in history | |
| CORE_CONFIG | SQL_MAX_REC | Y | 500, 1000, 2000, 5000 | Max. No. records from a select |
| CORE_CONFIG | SQL_SLOW_LOG | Y | 10, 30, 60, 90, 120 | Runtime to log slow SQL (Seconds) |
| CORE_CONFIG | USER_LOGGING | None, Session, Menu, Detail | User Logging Level | |
| EMAIL_CONFIG | EMAIL_DEBUG | Y | No, Yes | Enable Email degugging? |
| EMAIL_CONFIG | EMAIL_FROM | From address for emails | ||
| EMAIL_CONFIG | EMAIL_PASS | Password to access email server | ||
| EMAIL_CONFIG | EMAIL_PORT | Email Server Port | ||
| EMAIL_CONFIG | EMAIL_SERVER | IP of email server | ||
| EMAIL_CONFIG | EMAIL_TRANSPORT | SMTP, SMTPS, TLS, OUTLOOK | Transport Type | |
| EMAIL_CONFIG | EMAIL_USER | Username to access email server | ||
| EXPORT_CONFIG | SQL_EXPORT_CACHE | Y | 0, 100, 200, 500, 1000, 2000, 5000 | Max. No. records for export cache |
| EXPORT_CONFIG | SQL_EXPORT_CHUNK | Y | 999999, 1000, 2000, 5000, 10000 | Max. No. records for an export chunk |
| HOME_CONFIG | WELCOME_MESSAGE | Welcome Message displayed on Home Page | ||
| MFA_CONFIG | MFA_ACCOUNT | Y | MFA Account | |
| MFA_CONFIG | MFA_CODE_REQUESTS | Y | 5, 10, 15, 20 | Number of code requests allowed within Expiry window before disable |
| MFA_CONFIG | MFA_EMAIL_EXPIRY | Y | 5 Minutes, 10 Minutes, 15 Minutes, 20 Minutes, 30 Minutes | Number of minutes to expiry of Emailed MFA Codes |
| MFA_CONFIG | MFA_ENABLED | Y | Disabled, Enabled | Is Multi Factor Authentication Enabled on the system? |
| MFA_CONFIG | MFA_ISSUER | Y | MFA Issuer | |
| MFA_CONFIG | MFA_SECRET | Y | MFA Secret | |
| MFA_CONFIG | MFA_TIME_SHIFT | Y | No, Yes | Allow MFA Time Shift |
| PWD_CONFIG | 0_MIN_LENGTH_1 | 8 Characters, 10 Characters, 12 Characters, 16 Characters | Minimum Password Length for Group Level 1 | |
| PWD_CONFIG | 0_MIN_LENGTH_2 | 8 Characters, 10 Characters, 12 Characters, 16 Characters | Minimum Password Length for Group Level 2 | |
| PWD_CONFIG | 0_MIN_LENGTH_3 | 8 Characters, 10 Characters, 12 Characters, 16 Characters | Minimum Password Length for Group Level 3 | |
| PWD_CONFIG | 1_USE_LETTER | Yes | Require Letter ('Y' Overrides Lower/Upper Settings) | |
| PWD_CONFIG | 2_USE_LOWERCASE | No, Yes | Require Lowercase Letter | |
| PWD_CONFIG | 3_USE_UPPERCASE | No, Yes | Require Uppercase Letter | |
| PWD_CONFIG | 4_USE_NUMBER | No, Yes | Require Number | |
| PWD_CONFIG | 5_USE_SPECIAL | No, Yes | Require Special Character | |
| PWD_CONFIG | 6_SPECIAL_CHAR | Y | Special Character List | |
| TAWK_TO | API_ID | tawk.to API ID | ||
| TAWK_TO | PROPERTY_ID | tawk.to Property ID |
- Items marked "Admin" can only be changed by System Administrators
Portal Chat
The Portal has a ‘chat’ system which can be used to support their users, independent of Aptean.
The chat system uses the free https://www.tawk.to/ chat service. Comprehensive help and instructions are available on the website to setup the system.
To use the chat system, the client needs to setup a dashboard on tawk.to with a unique
‘Property ID’:
NOTE: Each client requires its own dashboard/ID, which can be setup as the client requires.
It is advised that the user should also enable Secure Mode, and note the API Key
To enable the functionality on the Portal, the ID and the API Key needs to be matched in the Portal setup:
Once the Chat system is setup, when the user logs into the Portal, a chat icon will be visible on all of the pages (in the bottom left corner):
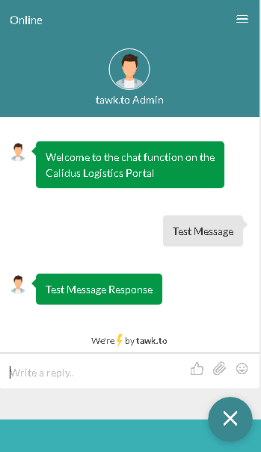
Clicking on this icon will initiate the tawk.to chat on the Portal:
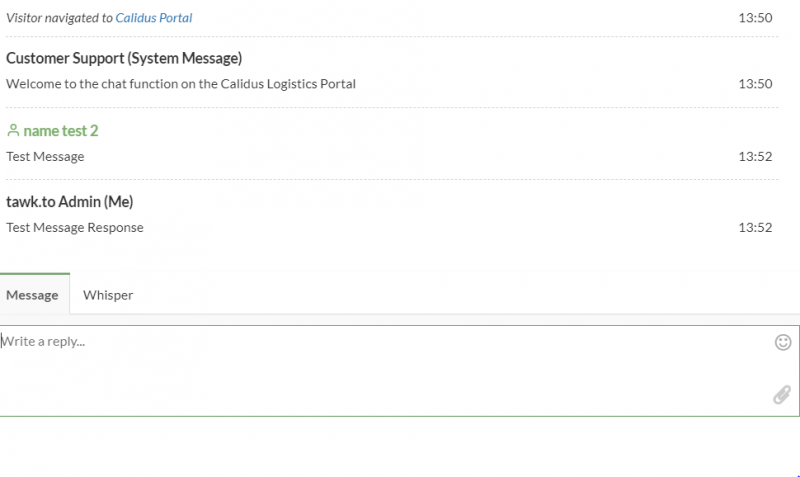
And on the tawk.to application / web site:
Portal Web Service
A SOAP web service exists within the Portal application.
For the CORE module, the following methods are available:
| Method Name | Description |
| getInfo | Returns basic information for the system i.e. system name and version. This can be used to test access to the Web Service |
| getKey | Returns a remote key which grants access to the Portal system for an existing user |
Request Header
On all requests made to the Portal Web Service, a SOAP header will be required supplying a Username and Password.
The username and password used should correspond to a valid login account on the Portal system, and in addition for the getKey method, the User Type set against the user must be ‘W’ (see section 2.4.2)
The login information will be used to set the restrictions that the response will use to return the data i.e. the user’s group will determine the restrictions setup against the user and these will be used (as they are in the actual TTM system) to restrict the data that the user can see. Any valid username/password can be used, including users where no restrictions have been added.
Response Header
The Response Header will be included on all responses from the Portal Web Service.
| Parameter | Data Type | Format | Description |
| <response_id> | xs:string | A35 | A unique ID for the web service response. This code (along with the response_datestamp) can be used to identify requests in the log files. |
| <response_datestamp> | xs:dateTime | XML Date/Time | A string date representing the time of the response as recorded on the logging table. |
| <response_code> | xs:int | 999 | The response code for the request. A return of 0 denotes a successful request/response and a return greater than 0 denotes an error. |
| <response_code_desc> | xs:string | A50 | The description of the response. |
| <record_count> | xs:int | 99999 |
A count of the number of records contained in the response for the given method:
|
An example response header will be as follows:
<responseHdr>
<response_id>befc95d5-5a74-4ecb-a3c5-91242ede3619</response_id>
<response_datestamp>2015-12-31 00:00:00</response_datestamp>
<response_code>0</response_code>
<response_code_desc>OK</response_code_desc>
<record_count>1</record_count>
</responseHdr>
Method: getKey
The getKey method can be used to retrieve a remote key which grants access to the Portal system for an existing user.
Request Details
| Parameter | Data Type | Format | Description |
|---|---|---|---|
| <user_id> | xs:string | A8 | This must be an existing user on the Portal system which is Active |
| <no_keys> | xs:int | 99 |
The number of keys to generate. If not supplied or non-numeric the default will be used and a single key will be returned. If supplied, the number of keys must be between 1 and 99. |
| <key_length> | xs:int | 99 |
The length of the key to be generated. If not supplied or non-numeric the default will be used and a 6 digit key will be returned. If supplied, the key length must be between 6 and 40. |
| <key_min> | xs:int | 9999 |
The length in minutes that the generated keys will be valid for, before they expire. If not supplied or non-numeric the default will be used and the key(s) will expire after 1 minute. If supplied, the key min must be between 1 and 1440 (1 day). |
| <session_min> | xsint | 9999 |
The length in minutes that the portal session will last for, once the key has been accepted and the user enters the system. If not supplied or non-numeric the default will be used and the session will expire after 1 hour. If supplied, the session min must be between 1 and 1440 (1 day). |
Note: A valid request header is required.
Validation – The user id is required, all other fields are optional, and validated as described above.
Response Details
<portalKey> Section
| Field Name | Data Type | Format | Description |
|---|---|---|---|
| <passKey> | xs:string | A* |
A comma separated list containing the requested number of keys for the user. The keys may contain any of the following characters: ABCDEFGHIJKLMNOPQRSTUVWXYZ0123456789_.-~ Note: Each key can only be used for a single login, and cannot be re-used once the user has logged out, or after the key or session has expired |
