Calidus Portal User Guide - TTM
![]()
Aptean
Calidus Portal User Guide - TTM
Calidus Portal - 11.1.x
1st August 2024 - 11.1.x
Reference: TRAINING
Introduction
This document is the user guide for the TTM (Track & Trace) module of the Calidus Portal.
The module is also known as the LOTS (Live Order Tracking) module.
Please see the Calidus Portal User Guide - CORE for a description of core Calidus Portal functionality
(User maintenance, menu maintenance, configuration etc.)
Maintenance
Warehouse Maintenance
The Warehouse Maintenance page allows maintenance of warehouse level information.
For users in a group which allows "Add Warehouses" from the Maintenance/Group/TTM Options, there will be an option to create a new warehouse:
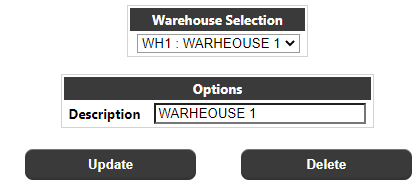
For maintenance of existing warehouses, the user can select a warehouse from the initial drop-down list that is displayed and click 'Find Warehouse' - Note: that the list will contain only the warehouse codes visible for the user's group. The options for the selected warehouse will then be displayed:
- Description - This will allow the description of this warehouse code to be maintained.
The user will press the 'Update' button to update details.
For users whose group allows "Add Warehouses" a Delete button will also be available to remove the warehouse from the system.
Owner Maintenance
The Owner Maintenance page allows maintenance of owner level information.
For users in a group which allows "Add Owners" from the Maintenance/Group/TTM Options, there will be an option to create a new owner
For maintenance of existing owners, the user can select an owner from the initial drop-down list that is displayed in the Owner Selection section and will click 'Find Owner' - Note: that the list will contain only the owner codes visible for the Users Group.
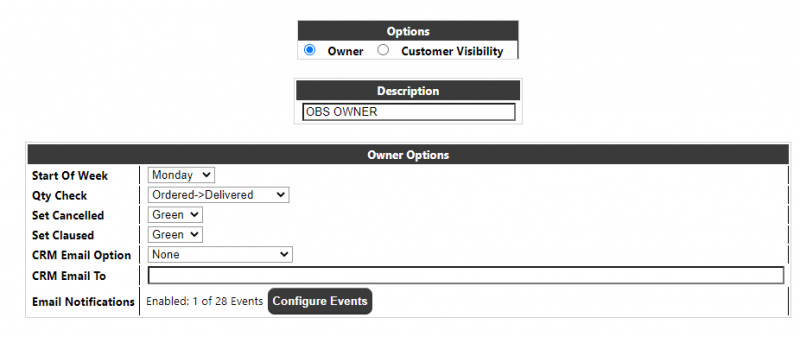
The options for the selected owner will then be displayed.
Owner Options:
Start Of Week This defines the start of the week, used in specific pages within the module.
Qty Check This defines the comparison used to determine short/over quantities. Values:
Ordered->Despatched
Ordered->Delivered
Despatched-> Delivered
Set Cancelled Defines the RAG status for Cancelled orders. Values: Red, Amber, Green, None.
Set Claused Defines the RAG status for Claused orders. Values: Red, Amber, Green, None.
CRM Email Option This is used by the Order Dashboard for controlling emails for CRM. Values:
None
At Creation Only
At Creation And Closure
CRM Email To The Email address (comma separated list) for admin recipients of CRMs
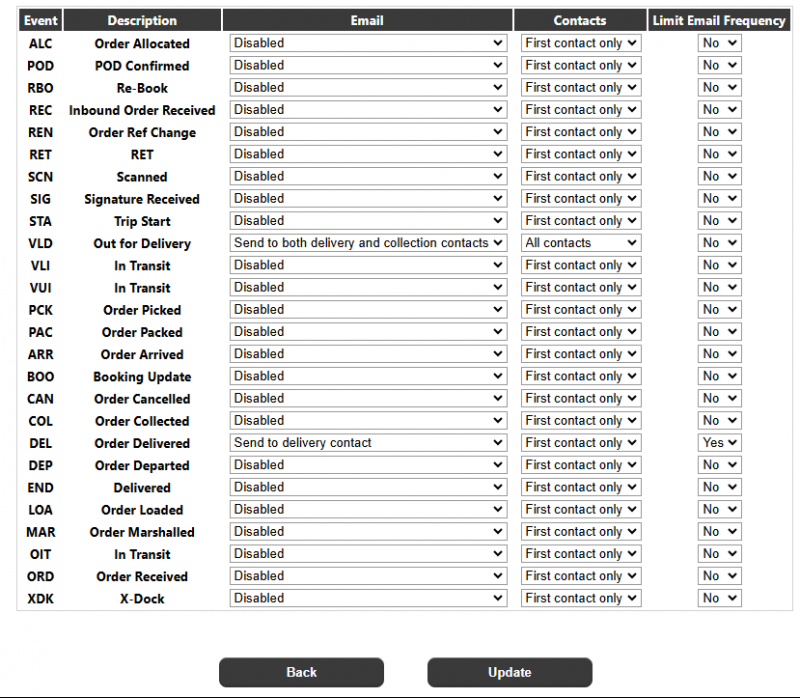
Email Notifications Clicking on the Configure Events button allows the configuration of whether Tracking emails will be sent for each event type by owner. This is a different view of the event/email maintenance which is described in section 2.3 The main difference on this
page is the additional "Limit Email Frequency" flag which allows the user to set at owner level whether emails are only sent on the first intance of that messsage type ("Yes") or whether emails are sent each time a message of that type is received ("No").
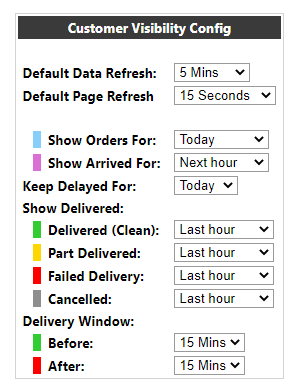
Customer Visibility Options:
These options relate to the Customer Visibility Page / Order Dashboard. See section 3.3 for more details.
Event Maintenance
The Event Maintenance page allows maintenance of system events.
Standard Events
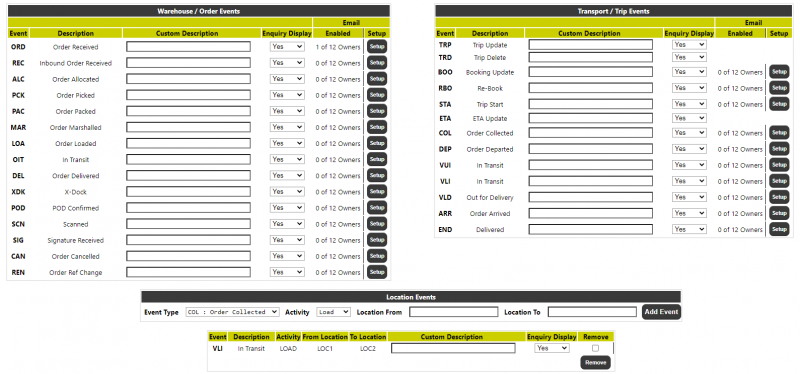
Warehouse/Order Events and Transport/Trip Events are the standard events that the Calidus Portal system can process. The user can enter a custom description to override the default (note: this will apply to all owners/users on the system) and control whether that event type is displayed on the Events Page of the enquiry - this includes allowing only internal user groups visibility of the event. If enabled, each event has a button which will take the user into the Event Email maintenance page. See section 2.3.1for details.
Location Events
Location Events allow the user to breakdown an Order/Trip event type so that an event e.g. DEP (Departure) may be split by activity and location. These events will only be available if configured:
A creation section will be available to add a new Location level event:
The user will be able to select one of the event types from the dropdown shown in the screenshot above. They will then select the activity at the location - either LOAD or UNLOAD. Finally they will enter the types of location From/To, for example SUPPLIER, RDC, AIRPORT or BRANCH. The location text boxes will be free-text and the entered text will be upshifted. The values entered by the user should correspond to a location type setup on the corresponding Calidus TMS system (or whichever system is sending the relevant messages) but note that the entries will not be validated. Both a From and To location will be required.
When the user clicks on the 'Add Event' button, the location event will be created and the data will be refreshed. Please note that clicking the 'Add Event' button will only add the event - if any of the other data has changed, then this will not be updated - the user should user the 'Update' button before adding new events, if they have made any changes.
Event Email Maintenance
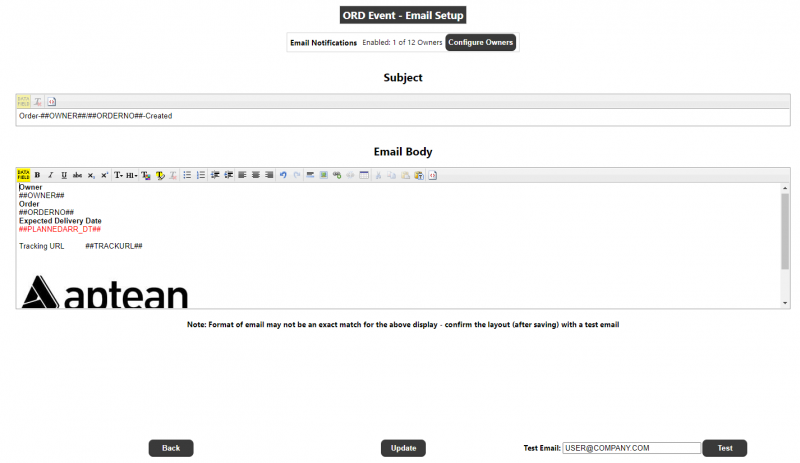
The Event Email Maintenance page allows the user to setup outbound email alerts from the TTM system when an XML file for the event type is received. A separate email layout can be created for each individual standard event.
Subject
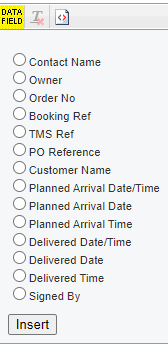
A text area will be available to define the Subject of the email. Clicking on the Data Field icon ![]() will display the following drop-down:
will display the following drop-down:
Selecting a data field from the drop-down will insert a marker into the subject which will be replaced with the actual data element from the order when the email is sent.
The subject will contain no text formatting options and should be restricted to a single line.
Body
The body section of the email will allow for text formatting e.g. bold, font-size, font-type (from a specific selection), alignment etc. and will also allow the insertion of URL links and images (but only via a link to an image stored on the internet i.e. a URL link to an image available on an existing website)
The data field drop-down will be available, but will contain an extra option to allow the insertion of a Calidus Portal Gateway tracking link. See the TTM gateway section for more details.
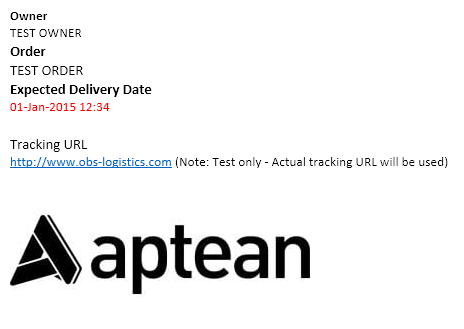
At the foot of the page, there is a text box and a 'Test Email' button to allow the user to send a test email to view what the email will look like when received, with the data fields translated, for example:
NOTE: The format of email may not be an exact match for display on the maintenance page - the user should confirm the layout (after saving) with a test email.
NOTE: Only a single format of email can be defined per Event Type, so for example, it would not be possible to include owner specific logos etc.
System Reason Code Maintenance
The System Reason Code Maintenance page allows maintenance of reason codes.
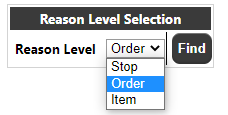
The user may create reason codes using the header section of the page, selecting the appropriate Reason Level:
- STOP Trip/stop level codes displayed in the Trip/Stop enquiry (see section 3.1.1).
- ORDER Order level code displayed in the Order Enquiry Reasons tab (see section 3.1.2.5).
- ITEM Order detail level codes displayed in the Order Enquiry Detail tab (see section 3.1.2.43.1.2.5).
Once the user clicks 'Find' the existing reason codes will be displayed, along with a Reason Code Creation section which can be used to add new Reason Codes.
The user can update the description or remove the reason code(s).
Note: The Reason Type is specific to the type of the reason codes being created e.g. DEL for delivery reasons, or CSRC for Customer Service reason codes. These types will be supplied by OBS.
Note: Reason codes sent in via XML upload will automatically get created on the reason codes table if they do not exist.
Customer Maintenance
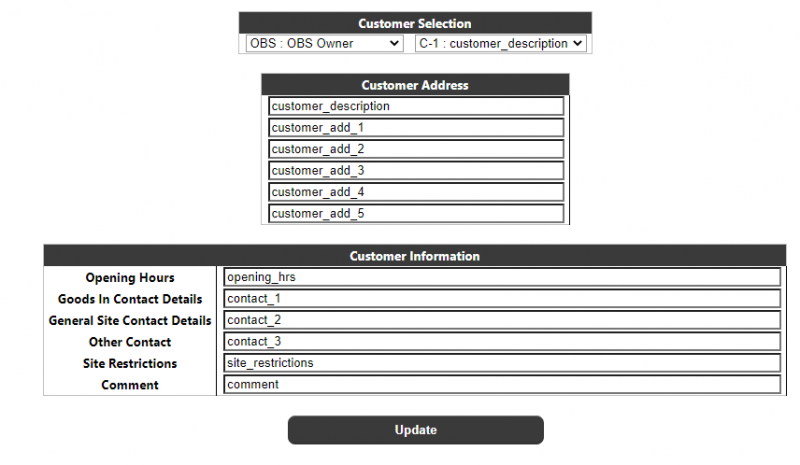
The Customer Maintenance page allows maintenance of Address and Customer Information for customers on the Calidus Portal system.
The user will select an owner then the customer they want to maintain. They can then modify the Customer Address and Customer Information.
Note: None of the "Customer Information" fields above are currently sent to the Calidus Portal system via XML, so this is the only place where these fields can be entered/maintained.
Note: Any data changed on this page will only apply to the Calidus Portal - data updates will not be transmitted to external systems.
Customer Group Maintenance
The Customer Group Maintenance page allows maintenance of customer group information.
The user has the option to create a new customer group by entering a Customer Group, Description and Owner in the 'Customer Group Creation' section of the page. The list of owners is limited to those assigned to the users group. The customer group will initially be created with no customers in the group. The customer group may be deleted by pressing the 'Delete' button (though the 'None' group cannot be deleted).
Once created, the new customer group or any existing customer group (visible to the user) can be selected from the drop-down. Initially, all new customers uploaded onto the system will be assigned into the group 'NONE'.
Selecting a customer group from the drop-down will bring up a list of the customers currently in the selected group. The customer, description (consisting of description and address line 1), town and post code will be displayed along with a tick box for selecting customer to process.
The user may Move or Copy selected Customers from one group to another (or back into the 'NONE' group).
Moving a customer will take the customer out of the existing group, and move it to the new group.
Copying a customer will leave the customer in the existing group, but also copy it to the new group.
The user also has the ability to remove a customer from the currently selected group (unless the group is 'NONE').
Order Enquiries
Trip / Order Enquiry
Parameter Selection Page
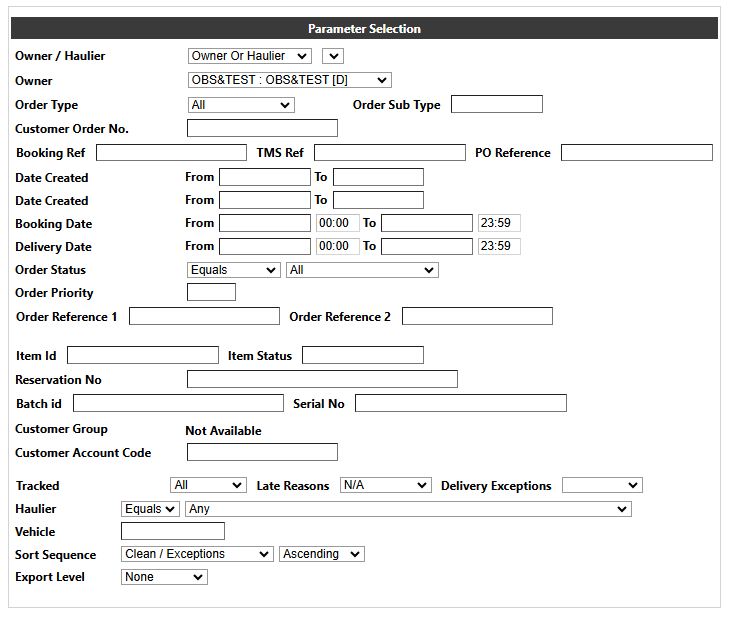
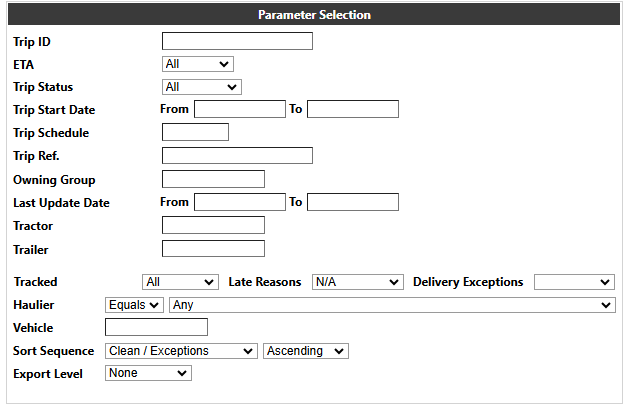
The Parameter Selection page allows the user to enter search criteria to enquire by Trip or Order. The parameters displayed for both the Trip and Order selections are configurable using the Custom Page configuration page (see the Calidus Portal CORE documentation) - the screenshots below show all of the available parameter fields.
Customer Order No:
Trip ID:
A description of some of the main selection criteria are as follows:
Order Specific:
- Owner - A drop-down of available owners, as determined by the restrictions set against the users group.
- Warehouse ID - the originating warehouse of the order.
- Client Order No - this will be the unique identifier for an order on the system.
- Booking Ref, Calidus TMS Ref & PO Ref - various references associated with the order.
- Order Date From/To - a date range with calendar lookup.
This is the transaction date from the ORD XML and should correspond to the date order was uploaded onto the LOTS system
- Book Date From/To - The Date the order was booked
- Delivery Date From/To - a date and time range with a calendar lookup for the date,
- Customer Group From/To - a drop-down range of available Customer Groups, if enabled for the Users group.
- Customer Account Code - this will be the Calidus WMS Customer Code.
- Current Order status - Selected from a drop-down of the Status Trigger points.
Trip Specific:
- Trip ID - The trip/journey.
- Current Trip Status - A drop-down with values 'All', 'En-Route', 'Complete' and 'Abandoned'. This information will be supplied by the Calidus TMS system.
- Trip Schedule - The schedule for a trip, if supplied from the Calidus TMS system.
- Trip Ref - Reference ID for the Trip
- Owning Group - The owning group/pool supplied from the Calidus TMS system.
- Tractor - The Tractor for the trip, supplied from the Calidus TMS system.
- Trailer - The Trailer for the trip, supplied from the Calidus TMS system.
Both:
- Haulier - A drop-down of all hauliers visible to the user.
- Sort Sequence - A drop-down with values from the above selections which determines the sequence of the results returned and displayed.
- Export - This will allow the export of the selected data at a trip, trip/order, order or order detail level dependent on the selection.
The defaults for all of these fields, if not entered, will be 'All Available'.
The values entered in the enquiry screen will be stored for the length of the user's session, so that if they return to the enquiry Parameter page, the last used parameters will be re-displayed. Closing the session or pressing the 'Reset' button will clear the stored parameters.
When the user clicks the 'Find' button the system will retrieve all orders matching the selected criteria and the results page will be displayed (see section 3.1.2). If no orders are found, the page will be displayed with 'No Data Selected'.
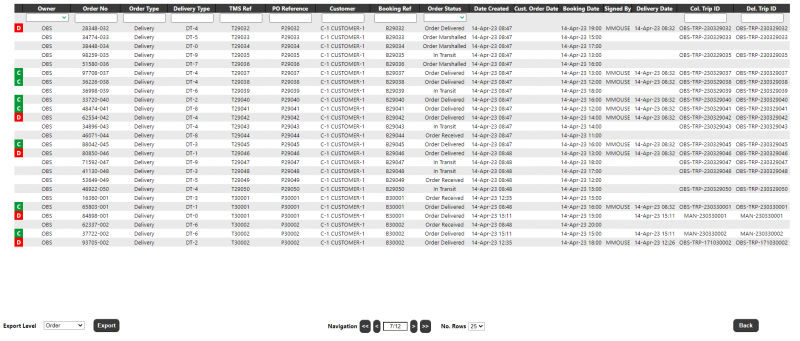
Enquiry Results Page
A section at the top of the page (visibility configurable) will allow additional filtering of certain data.
The first column will be a RAG status field (C/D/X) with the following values:
- Blank/White - If order less than status 'Order Delivered' and Order is Clean
- X/Amber - If order is less than status 'Order Delivered' and Order has Exceptions
- C/Green - If order is status 'Order Delivered' and Order is Clean without Exceptions
- D/Red - If order is status 'Order Delivered' and Order has any 'Quantity' Exceptions
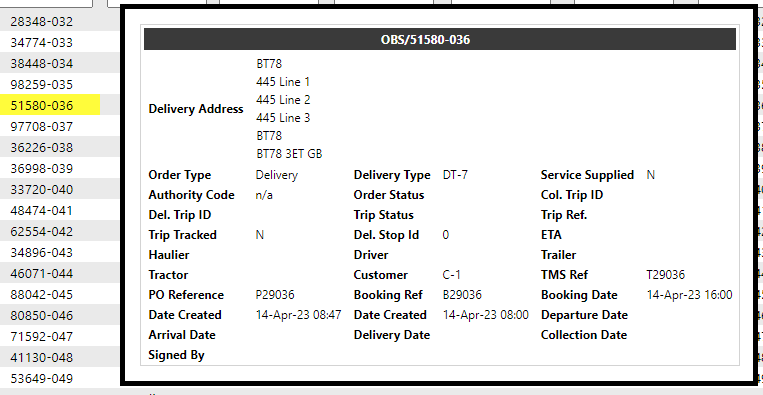
Hovering over the Order No field for around a second will show selected information for the order:
Clicking on the order will take the user to the enquiry results detail page to display full details for the selected order (see section 3.1.2)
Details of a selection of the fields i.e. the most commonly displayed, are as follows:
- Owner - The Customer ID
- Client Order No - The unique Order reference (<SO_REF>).
- TMS Ref - The OMS ref from the Calidus TMS system (<TMS_REF>)
- Customer - The Customer Name and Town.
- Booking Ref - The Booking Reference assigned to the order (<BOOK_REF>).
- Status - The current status of the order.
- Date Created - Date the order was uploaded into the LOTS system
- Customer Order date - The date the customer raised the order
- Booked Date - The <BOOK_DATE> of the ORD message, or the date/time from the last BOO (Booking) update message.
- Delivered Date - The <CONF_DATE> from the DEL message, if supplied, otherwise the <ORDER_TRANSACTION_DATE> of the DEL message.
- Delivery Trip ID - The Calidus TMS Trip ID on which the order is to be delivered to its final destination. Clicking on the trip will take the user to the Trip View page (see section 3.1.1).
Hovering over a Trip (Collection or Delivery) for around a second will show selected information for the trip:
Clicking on the trip in this section will take the user to the Trip View page (see section 3.1.1).
A section at the bottom of the page will allow the user to navigate through the pages of retrieved data and also to export data to XLS
Enquiry Results Trip View
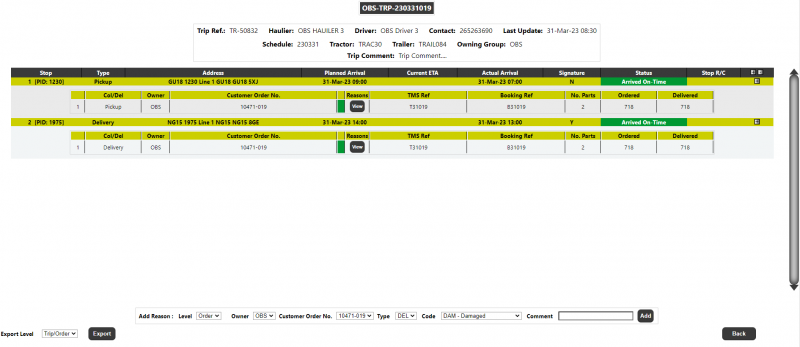
If the user has entered parameters on the Trip Parameter page or has clicked on a trip from the Enquiry results page then this page will be displayed:
The order information may also be minimised:
At the stop level of detail:
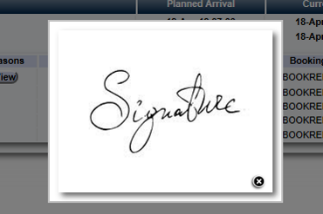
The signature will display Y or N to indicate if a signature has been uploaded for this stop. If a signature has been uploaded then clicking the "Y" value link will display the uploaded signature.
There will be a 'RAG' indicator for the delivery status of the stop:
- White - On Time (but Undelivered). The system has an expected date but no actual date has yet been received by the system and the current time is less than the expected date/time.
- Amber - Late (but Undelivered). The system has an expected date with no actual date and the current time is now greater than the expected date/time.
- Green - Arrived On Time. The system has received both an expected and actual date/time for the stop and the actual date/time was less than or equal to the expected.
- Red - Arrived Late. The system has received both an expected and actual date/time for the stop and the actual date/time was greater than the expected.
If Stop level reasons exist, clicking this button will display a table of the stop level reasons.
By Clicking on the '+' button next to each stop, order level information may be accessed:
Clicking on an order within this section will take the user to the to the enquiry results detail page to display full details for the selected order (see section 3.1.2).
The 'RAG' status indicator in the order section will have the following values:
- White Not yet delivered.
- Green Delivered and Qty Ordered equals Qty Delivered.
- Red Delivered and Qty Ordered does not equal Qty Delivered.
As with the Stop level information, if Order level reasons exist, clicking this button will display a table of the order level reasons.
At the foot of the page, a section will allow the user to export data or add a reason code against either a stop or order level:
To add a reason code, the user should first select the Level, either Order or Stop. Depending on this selection, either a Stop drop-down list or Owner/Order drop down lists will be displayed. Once the user has selected the required stop or owner/order, they should select a reason type from the list of available types (which will be any type for the reason level which exists on the system). Once a type has been selected, all existing reason codes for that type will be displayed and the user should select the reason code they require. Finally, the can optionally enter a comment then click 'Add' to add the reason code. The page will be refreshed and the reason code will be displayed against the appropriate stop or order.
Enquiry Results Order View
The enquiry results detail page displays information for the selected order and a choice of view for the details.
A brief header section will display selected information from the order:
For the display of further details, the user can select between:
- Events - the Messages received by the LOTS system via Calidus WMS, Calidus TMS and other systems.
- Info - Details of all of the header information stored on the system
- Route - Details of the trips/stops that the order is currently assigned to.
- SO Details - the Stock details received from the Calidus TMS or Calidus WMS.
- Reasons - Details of the Order level reasons placed against the order.
- Map - A map of the current location of the order (if co-ordinates have been supplied by an external system). The Mapping page will only be available to groups where the 'Mapping' parameter against the User Group is set to 'Available' and where licensing is available.
- Notes - Allows the entry of user notes against the order. These are only kept on the Calidus Portal system.
- Documents - Allows the upload/view of documents held in the Calidus Portal against the order.
If the application is configured for Vehicles, and the order is a service order, an additional Vehicles tab will be displayed:
At the base of the page, a drop-down and button will be available to export selected data:
Enquiry Results Order View - Events
The Events tab will display of all of the event information stored on the system for the selected order:
- Sequence - A numeric sequence for the event.
- Source - The source of the message e.g. WMS, TMS or LOTS. Hovering over this field displays the name of the XML file upon which this event was loaded.
- Transaction Date - The transaction date/time of the event - this is the date and time that the transaction was transacted on the source system, if supplied, otherwise the date/time received by the Calidus Portal.
- Event Type - The code for the event.
- Event - A description of the event. Only events which are flagged as visible or which have been set to a specific group type which matches the users group will be displayed.
- Trip Id - For trip based messages, the relevant trip will be displayed. This allows the user to see any changes in the trip history of the order. Clicking on the trip will take the to the Trip / Drop view page (section 3.1.1).
- Stop - The stop assigned to the trip/order event.
- Location - The Id of the delivery/pickup location
- Activity - The activity associated with the event.
- Ordered / To Deliver / Delivered - Quantity figures displayed from those supplied on the message or confirmed on the system - these default to the quantities on the previous table row if they are not present.
Note: If multiple events have been received for the same event type and trip/stop (if supplied) the duplicate events will be hidden by default. A button will be displayed underneath the events which can be used to show these duplicates.
Below the events, the page can conditionally include up to four links/buttons:
Delivery/Collection POD - This is a link to the POD on an external system. This link is only shown if the POD format and URL are set and the order is at an appropriate status.
Service Report - This is a link to the Service Report on an external system. This link is only shown for orders of type 'Service' and where the Service format and URL are set and the order is at an appropriate status.
TTM POD - This link shows a POD document that has been stored on the Calidus Portal server. This link is only shown if a POD document exists for this order.
TMS Labels - This is a link to the Calidus TMS labels for this order. This link is only shown if the Calidus Portal system is configured to have a Calidus TMS URL.
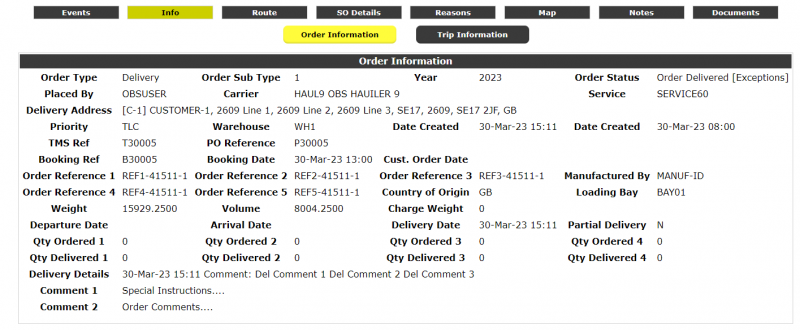
Enquiry Results Order View - Info
The Info tab will display of all of the header information stored on the system for the selected order. Most of the fields can be configured to be displayed or hidden at a system level.
Order Information:
Trip Information:
Enquiry Results Order View - Route
The Route tab will display the current trip/stop information stored on the system for the selected order:
Clicking on a Trip Id from this tab will take the user to the Trip / Drop view page (section 3.1.1).
Enquiry Results Order View - Item (SO) Details
The SO Details tab will display the available order details i.e. order line information for the order. Dependent on configuration and the information being supplied, there could be two levels of information - DU and/or Stock.
DU Level:
Stock Level:
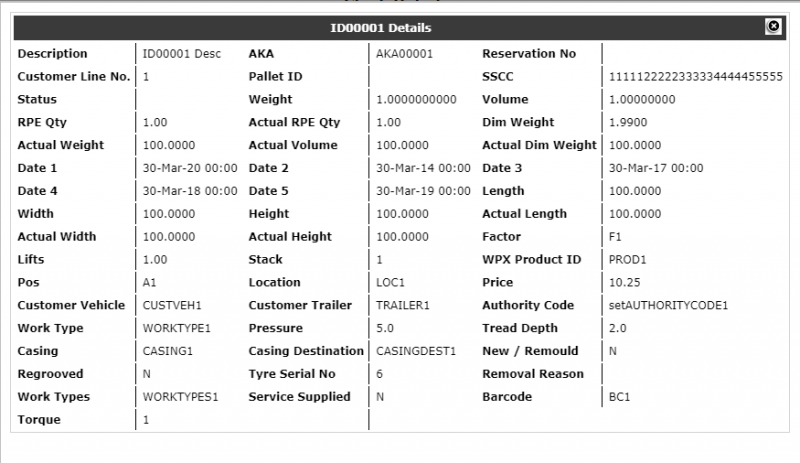
Clicking on the Stock Code against an order line will show all of the additional order detail information held for that line:
If reason codes exist against the order line, there will be a VIEW button against the R/C column. Clicking on the button will display the reasons associated with this line:
Enquiry Results Order View - Reasons
The Reasons tab will display any reason codes held at header level against the order.
A section underneath the list will allow the user to add an order level reason against the current order. A drop-down of types will be available which will be a list of the types currently on the system with an 'ORDER' level and a drop-down for codes which will show all codes currently on the system for the selected type. The user can optionally add a comment, and click 'Add' to add the reason to the order.
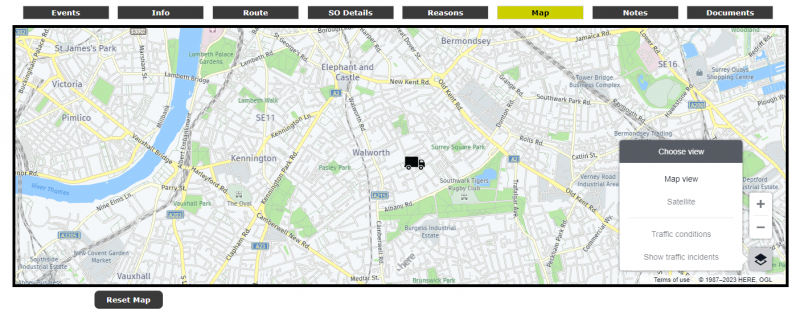
Enquiry Results Order View - Map
The Map tab will only be available to groups where the 'Mapping' parameter against the User Group is set to 'Available' and for systems where a mapping license has been purchased from Aptean.
A map of the current vehicle location will also be displayed if the system has Latitude/Longitude co-ordinates. If the order has been delivered, the truck will be shown at the delivery/collection location. If the order is currently out for delivery/collection, the truck will be shown at it's last known location, and the page will also display the current ETA of the vehicle to the next drop.
Note: The Latitude/Longitude of the vehicle is updated by an ETA poller.
Enquiry Results Order View - Notes
The Notes tab will allow the user to enter free-text notes against the order. It will display the date/time the note was added, the user who added the note, the note text and two buttons - Edit and Delete. Note: Users of level 2 or 3 will only be able to edit/delete their own notes, not those created by other users.
The Note section will be a fixed size, and will vertically scroll (with a fixed header) down the notes, with the latest note at the top of the list. The note text will expand so that all the text on a note will be visible i.e. no horizontal scroll.
A section at the bottom of the page will allow the entry of a new note. The text area will allow notes of up to 1500 characters per note. Clicking on an existing notes 'Edit' button will move the text into the bottom section of the page so it can be edited.
Please note: The stored text cannot be formatted e.g. bold, coloured text etc. cannot be stored.
Enquiry Results Order View - Documents
The Documents tab will allow the user to upload documents against the order being viewed and to view/download any documents already stored against this order.
Document types can be setup in the Calidus Portal X-Ref maintenance page:
NOTE: Documents will be stored against the order - it is not possible to store documents at Trip or Stop level.
Enquiry Results Order View - Vehicles
The Vehicles tab will be displayed if the system is configured for vehicles and the order type is a service order. It will display the vehicles associated with the order, and if the order is complete and a Service Report is available, then a button will be displayed in the last column to call the Calidus EPOD system to retrieve the service report for the specific vehicle.
Data Exports
An Export button will be available from the following pages:
- Enquiry Results
- Enquiry Results Detail
- Enquiry Results Trip View
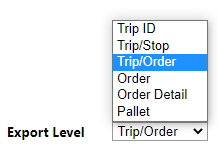
The export options in the drop-down will be:
The content of data exported will vary depending on the level of data selected, but for the selected level of data, the Calidus Portal Page Configuration page can be used to determine which fields are exported:
On clicking the export button, the selected information will be written into an XLS format spreadsheet and the user will be presented with an 'Open, Save' dialog box where they can open the spreadsheet or save it to disk.
NOTE: Care should be taken not to export too much information, or the process could take a considerable time to export/display the information.
Order Status Page
Please note: This page has been superseded by the Order Visibility Dashboard and is not actively developed. See section 3.3 for the latest Dashboard.
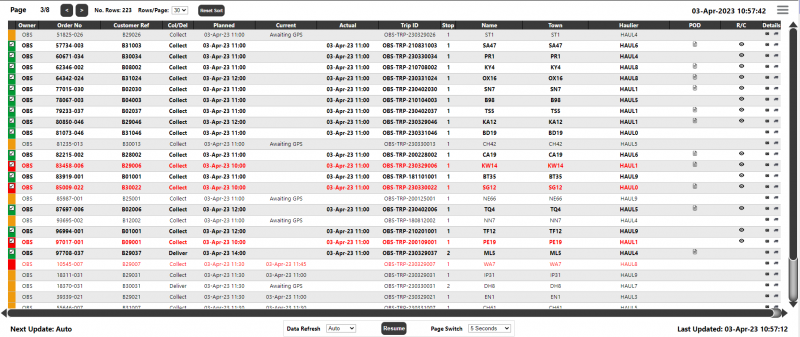
This page will track Order Collections & Deliveries on the system, either at Trip, Trip/Stop or Order level.
The page will initially be displayed with the system default settings:
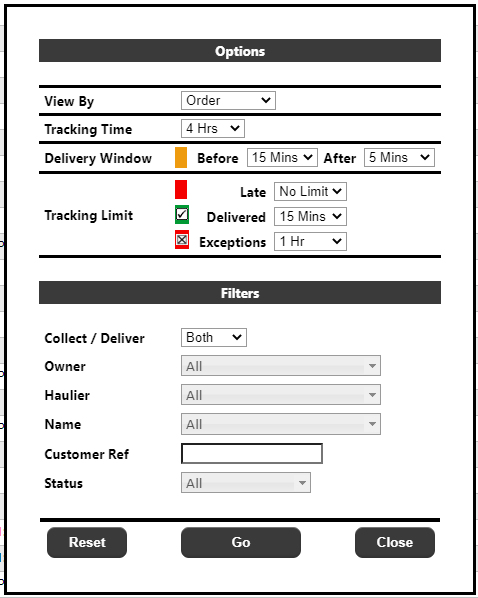
The settings can be changed by clicking the 'burger' menu on the top right corner of the page:
Options:
- View By - This setting determines the level of the data displayed. The options are:
- Order - Displays one line per Trip/Stop/Order combination with order level details - an order may appear twice on the page - once for collection, and again for delivery - the status of each line could be different e.g. the collection could show as status GREEN but the delivery could be AMBER or RED
- Trip Id / Stop - To display one line per Trip/Stop combination with Trip/Stop level details - if a trip has multiple stops which fit within the tracking limit, then multiple lines per trip (with different stop Id's) will be displayed.
- Trip Id - To display one line per Trip/Stop combination with Trip/Stop level details - if a trip has multiple stops which fit within the tracking limit, then only the stop with the closest planned (or current) arrival will be displayed.
- Tracking Time - The No. Hours of collection/delivery data to display. The default will be 4 hours though this may be changed to values of 1, 2, 4, 8 and 12 hours. There will also be a value of "Today" where all orders planned for collection or delivery on that day will be displayed. Note: Only orders where the Calidus Portal has a PLANNED Collection or Delivery date will be displayed - this will be either the planned collection/delivery date against the order/stop if supplied, or for deliveries only, the original booking date against the order. This may also be configured to use the actual arrival or ETA times.
- Delivery Window - The "RAG" indicator. This is the No. minutes before and after the PLANNED collection/delivery date/time (single or window). This will define an arrival window in which any PLANNED orders are marked as AMBER. The default values will be 15 minutes prior to the PLANNED collection/delivery and 5 minutes after the planned collection/delivery though both the Before and After values may be changed to values of 0, 5, 15, 30 and 60 minutes. At a basic level, orders will initially be GREEN and will move to AMBER after a page refresh if the PLANNED collection/delivery time is within this arrival window. If the window is exceeded without a collection/delivery, then the order will move from AMBER to RED on the next page refresh.
Examples (assuming order is not delivered)
Single collection/delivery date (default)
Delivery Window Before : 15 Minutes After: 5 Minutes Planned Delivery Time: 11:00AM
Before 10:45 the status will be GREEN
Between 10:45 and 11:05 the status will be AMBER
After 11:05 the status will be RED
Collection/delivery window
Delivery Window Before : 30 Minutes After: 30 Minutes Planned Delivery Time: 10:00AM - 11:00AM
Before 09:30 the status will be GREEN
Between 09:30 and 11:30 the status will be AMBER
After 11:30 the status will be RED
| See the Setting of RAG Status section for more details. |
|---|
Note: The status will only change on the next page refresh.
- Tracking Limit (Late) - The number of minutes past the planned collection/delivery time that a 'late' collection or delivery order will remain on the board. As well as several options for the number of minutes, a "0" value will also be available, which means that late orders will be removed from the board on the next page refresh.
- Tracking Limit (Delivered) - The number of minutes past the actual collection/delivery time that a 'clean' fully collected or delivered order (i.e. GREEN with a tick) will remain on the board after it has been collected/delivered. As well as several options for the number of minutes, a "0" value will also be available, which means that collected/delivered orders (which are not RED) will be removed from the board on the next page refresh.
Example
Tracking Limit Green : 5 Minutes Actual Delivery Time: 10:30AM Delivered: Clean
On the next refresh after 10:30 the status will change from GREEN to GREEN with a tick.
The order will remain on the board
On the next refresh after 10:35 the order will be removed from the board
Tracking Limit Green : 0 Minutes Actual Delivery Time: 10:30AM Delivered: Clean
On the next refresh after 10:30 the order will be removed from the board.
- Tracking Limit (Exceptions) - The number of minutes past the collection/delivery time that an order with 'exceptions' (i.e. RED with a tick) will remain on the board after it has been collected/delivered. As well as several options for the number of minutes, a "0" value will also be available, which means that collected/delivered orders which are RED with a tick will be removed from the board on the next page refresh.
Filters:
- Collect/Deliver - This will determine when only collections or deliveries are displayed on the page. The default will be both.
- Owner - This will be a list of owners visible to the user of the page. If the user has no restrictions, then the list will contain all owners on the system. An "All" option will also be available (as a default) which will take into account the users restrictions.
- Haulier- This will be a list of carriers/hauliers visible to the user of the page. If the user has no restrictions, then the list will contain all Hauliers stored on the "Trip" file on the system. An "Any" option will also be available (as a default) which will take into account the users restrictions.
The Owner and Haulier drop-downs above will allow the selection of multiple values within the drop-down, e.g. when selecting an owner, the user can take the default of all owners, a single owner or multiple owners.
- Customer Ref - This will allow the user to enter a partial (or full) customer reference to filter the data by. For example, entering "LIV" will only find orders where the reference is exactly "LIV". Wildcard entry will also be available, so entering "LIV%" will retrieve all orders with a customer reference beginning with "LIV". Entering "%LIV%" will retrieve all orders where "LIV" is anywhere within the customer reference. Note: This search will not be case sensitive.
- Status - This setting can be used to show only RED, AMBER or GREEN orders, or any combination. The default will be the display of all status.
Note: System configuration can be used to hide any or all of the above filtering fields. If a filter is hidden, then a value of "All/Any" will be assumed.
Once the user has chosen their settings/filters, they should click the 'Go' button to begin the retrieval/display of orders.
The page will display the current page number and total pages, the current date/time and also the date/time the data was last updated i.e. retrieved from the server.
The number of records shown on a single page will be determined by the resolution of the users screen. This will be a calculated value within the page.If the number of records retrieved is greater than what can be displayed on a single page, then the data will be displayed over multiple pages and the system will scroll through these pages in turn. See later for the settings to control this.
The page data will display the following information (dependent on the View By level selected):
- RAG Status - see section "Setting of RAG Status" below. If an order is RED then the whole line of text will appear in red text.
- Owner - the owner of the order
- Order No - the system order number
- Customer Ref - the customer's order reference
- Col/Del - A column to denote whether the line detail is for the collection or delivery of the order.
- Planned - the planned collection or delivery date/time. If a window is being used, then this will be the planned collection or delivery date/time window.
- Current - the current arrival date/time at the stop where the order is being collected or delivered. This will only be displayed if the tracking information is available, and the order has not been collected or delivered (dependent on the line is 'Col' or 'Del'). If the ETA time is older than 5 minutes (if it has not been updated from the poller process which updates ETA's) then it will not be displayed.
- Actual - the actual collection or delivery time recorded on the system (when supplied). If an order was cancelled, for the delivery ('Del') this will be the time of the cancellation.
- Trip Id - the trip ID for the collection or delivery
- Stop - the stop Id for the collection or delivery
- Name - the Name entered on the collection/delivery address
- Town - the Town entered on the collection/delivery address
- State - the State/County entered on the collection/delivery address
- Haulier - the name of the haulier assigned to the Trip (or order if not on a trip)
- Driver - the name of the driver assigned to the Trip (or blank if not on a trip). Hovering over the driver will display the contact information (if supplied)
- POD - Clicking on the POD icon will open a new tab (or window) displaying the POD for the order, if available. The POD icon will only appear if a POD is configured and the order is delivered.
- R/C - An icon will appear against any orders which have an ORDER level reason code associated with it. Clicking the icon will display a popup with the ORDER level reason codes associated with the order.
- Details (Camera Icon) - Clicking the icon will display a popup with the order line details:
- Details (Truck Icon) - Clicking the icon will display a popup with the route details:
Hovering over an order number will display the standard 'hover' text with further details for the order.
Clicking on an order number will take the user to the Enquiry Results Detail page.
Clicking on a Trip Id will take the user to the Trip/Stop view details page.
Clicking on any of the main headings will sort by that column.
Data refresh and display
At the top of the page will be a control box to allow the user to manually change the page (best achieved if the data is paused - see below) and a Rows/Page setting to alter the number of rows displayed on the page, if the automatic detection based on screen resolution is insufficient:
At the base of the page will be a control box to allow the user to specify the rate of data refresh and the rate at which multiple pages display:
- Data Refresh - The time in minutes between data refreshes. Values will be Auto, 2, 5, and 10 minutes. Default is Auto, which means that whenever the last page of data is reached, the system will refresh and start again. If only one page of data is displayed in Auto mode, then it will refresh every 2 minutes.
- Pause - a Pause button to stop both the data and page refresh, so that the data currently displayed on the page will remain until the user presses this button again (Note: when pressed, the text of the button will be changed to 'Resume' - clicking resume will force a full data refresh and display, resetting the view back to the first page).
- Page Switch - The time in seconds between switching page data. Values will be 15, 30, 60, 120 and 180 seconds. Default is 30 seconds.
Examples
Data Refresh: Auto Page Switch: 30 Seconds No. Records: 250 orders Records Per Page: 25
The page will initially display the 25 records with the nearest PLANNED delivery time to the current time. After 30 seconds, the next 25 records will be displayed - this will continue with a new page every 30 seconds until the last page (there will be 10 pages of data in this example and given these settings the last page will take 5 minutes to display) upon which the data will be refreshed, and again the 25 records with the nearest PLANNED delivery time to the 'new' current time will be displayed.
Data Refresh: 10 Minutes Page Switch: 30 Seconds No. Records: 250 orders Records Per Page: 25
The page will initially display the 25 records with the nearest PLANNED delivery time to the current time. After 30 seconds, the next 25 records will be displayed - this will continue with a new page every 30 seconds until the last page (as previous example, there will be 10 pages of data in this example). The same (non-updated) data will repeat, until the Data refresh time is exceeded (10 minutes) at which point the data will be refreshed, and again the 25 records with the nearest PLANNED delivery time to the 'new' current time will be displayed.
Data Refresh: 5 Minutes Page Switch: 60 Seconds No. Records: 250 orders Records Per Page: 25
The page will initially display the 25 records with the nearest PLANNED delivery time to the current time. After 60 seconds, the next 25 records will be displayed - this will continue with a new page every 60 seconds until Data refresh time is exceeded (5 minutes) at which point the data will be refreshed, and again the 25 records with the nearest PLANNED delivery time to the 'new' current time will be displayed. Note: With these settings, the page will never get to the oldest records retrieved, as the data refresh is less than the time it takes to page through all of the records - it will be the responsibility of the site/user to 'tweak' the Data and Page refresh settings (as well as the tracking time and tolerances) to ensure that it is displaying the data as they require.
Setting of RAG Status
Note: This section is highly configurable, and given the possible combinations, the exact details of what determines the RAG status can be difficult to document. The description below assumes a default configuration.
The following factors will determine what is displayed in the RAG status column:
- Collection/Delivery Window
- Actual Collection/Delivery Time, Current ETA and Current Time
- Order Status
Calculation of the "Window"
The Collection/Delivery Window (from this point referred to as the "Window" meaning a collection or delivery as appropriate) is dependent on the setting of the "Planned Window" parameter:
- "None" - If the Arr/Dep system parameter (set against the TTM Config item TRACK_CFG - Arr/Dep) is "A" (default) then the planned arrival time at the stop will be used, otherwise if set to "D" the stop planned departure will be used. In both of these situations, a window will not initially be set.
If the parameter is set to "B" then both the stop planned arrival and departure will be used.
If the TRACK_CFG Arr/Dep is set to "A" or "D" then if either of the "Delivery Window" parameters are set to a non-zero value then a window will be calculated using either the stop planned arrival/departure date (as configured) +/- the delivery window settings. If the "Delivery Window" parameters are both set to zero, then the window will be set with the same start/end window times.
If the value is "B", then both the arrival and departure times for the stop will be used for the window.
Examples:
TRACK_CFG: "D" Stop Planned Arrival: 10:00 Stop Planned Departure: 11:00 Delivery Window From 15Min To 30Min
The Window will be set from 10:45 to 11:30
TRACK_CFG: "A" Stop Planned Arrival: 10:00 Stop Planned Departure: 11:00 Delivery Window From 15Min To 30Min
The Window will be set from 09:45 to 10:30
TRACK_CFG: "D" Stop Planned Arrival: 10:00 Stop Planned Departure: 11:00 Delivery Window Not Set i.e. "0"
A window will not be used - the planned time will be displayed as 11:00 only, with no window.
TRACK_CFG: "B" Stop Planned Arrival: 10:00 Stop Planned Departure: 11:00 Delivery Window From 15Min To 30Min
The Window will be set from 09:45 to 11:30
TRACK_CFG: "B" Stop Planned Arrival: 10:00 Stop Planned Departure: 11:00 Delivery Window Not Set i.e. "0"
The Window will be set from 10:00 to 11:00
- "System" - The planned system window from the order will be used. If this is not available for an order, then the stop times will be used i.e. the page will operate as per "None" above.
Examples:
System Planned Arrival: 10:00 System Planned Departure: 11:00 Delivery Window From 15Min To 30Min
The Window will be set from 09:45 to 11:30
System Planned Arrival: 10:00 System Planned Departure: 11:00 Delivery Window Not Set i.e. "0"
The Window will be set from 10:00 to 11:00
- "Customer" - The planned customer window from the order will be used. If this is not available, then the system order planned times will be used i.e. the page will operate as per "System" above.
Examples:
Customer Planned Arrival: 10:00 Customer Planned Departure: 11:00 Delivery Window From 15Min To 30Min
The Window will be set from 09:45 to 11:30
Customer Planned Window: Not set
System Planned Arrival: 11:00 System Planned Departure: 12:00 Delivery Window From 15Min To 30Min
The Window will be set from 10:45 to 12:30
Calculation of the "Time"
The "Actual" or "Planned" time (from this point referred to as the "Time" meaning either an actual or current (ETA) time as appropriate) will be determined by the status of the stop/order and the value of the Use Current system parameter (set against the TTM Config item TRACK_CFG - Use Current).
At Trip or Trip/Stop Level
For stops which have an actual collection/delivery time against stop, then the Time will be set to the actual collection or delivery time against the stop as appropriate.
For stops which have not yet been collected/delivered, if the "Use Current" parameter is set to "Y" then the Time will be set to the Current/ETA time of the stop, if available, otherwise the system time will be used.
At Order Level
For orders which have an actual collection/delivery time against the final collection/delivery point, then the Time will be set to the actual collection or delivery time against the order as appropriate.
For orders which have not yet been collected/delivered at the final collection/delivery point, if the "Use Current" parameter is set to "Y" then the Time will be set to the Current/ETA time of the STOP, if available, otherwise the system time will be used.
Note: If the Current/ETA time is older than 5 minutes past the system time, then the system time will be used.
Calculation of RAG Status
A line will be RED when it has not yet been collected or delivered and the Time exceeds the upper value of the Window. These lines will remain on the board until collected/delivered or cancelled.
A line will be RED with a tick if the order has been cancelled, or it has been collected/delivered and the actual Time is after the upper value of the Window, or (for the deliveries only when viewing by order, and via configuration) the order has been delivered and a) any of the order lines are short or b) any of the order lines have a reason code assigned to them. These lines will remain on the board from their collection/delivery/cancellation Time until the next data refresh exceeding the Tracking Limit (RED).
A line will be AMBER if it has not been collected/delivered and the Time is within the bounds of the Window.
A line will be GREEN with a tick if the order has been fully collected/delivered before the upper value of the Window where (if viewing at Order level) no order lines having a reason code assigned to them. These orders will remain on the board from their collection/delivery Time until the next data refresh exceeding the Tracking Limit (GREEN).
If none of the above conditions are met then the order line status will be GREEN. This will apply to all un-collected or un-delivered orders where the Time is not yet within or exceeding the Window.
Order Dashboard / Customer Visibility
On initial entry into the page, the user can choose between the dashboard (by clicking the Apply Button in the Visibility Settings, or can search for specific data by clicking the Search icon in the lower left of the page.
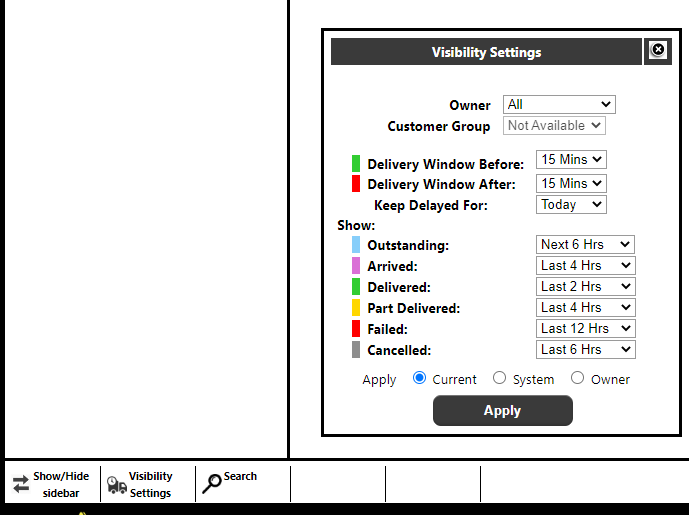
Customer Visibility Settings
The visibility settings will initially be presented to the user:
Note: The initial values for the above parameters will be taken from the maintenance settings against the owner, if only a single owner is available to the user or a single owner is in the current Order List, else from the default settings against the page. Changes to these parameters will be kept for the users session, but will be restored back to the defaults on each login (or change of owner status).
Owner - If 'Owner' is selected from the 'Apply' then the values set against the selected owner will be used.
Customer Group - If available, will allow the user to select the Customer Group.
Delivery Window Before/After - Defines the RAG status of undelivered orders. The two values (before and after) define the range for the Amber orders. For example, setting the values to 15 mins and 30 mins as above, means that until the planned arrival date of an order is within 15 minutes - the "before" setting - of the current time, it will be shown as RAG status green. Once it is within 15 minutes of its planned arrival, on the next data refresh, it will be changed to RAG status amber. Once the planned time is exceeded by more than 30 minutes - the "after" setting - and the order remains undelivered, then the RAG status will be red.
Keep Delayed For - this will determine how long planned, but undelivered orders will remain on the page after the planned delivery time has elapsed. Setting the value to "Today" will keep undelivered orders on the page for the whole day.
Show …: - The values in these dropdowns determine the visibility of the relevant order status to the drop-down e.g. Part-Delivered will allow the user to determine how long part-delivered orders will remain on the page after the actual delivery time. Setting the value to "Today" will keep undelivered orders on the page for the whole day. Setting the value to "None" will remove the orders immediately on the next page refresh.
Apply Details
Current - Will use the values as set above.
System - Will use the values set against the system.
Owner - Will use the values set against the selected owner in the drop-down, or the system values if no owner is selected.
Note: Selecting System or Owner will ignore any values manually set.
Apply Button - Will refresh the order list based on the selected 'Apply' Details settings and the current filters.
Customer Visibility Search
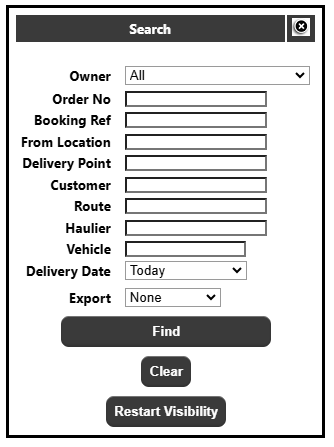
The Search Icon will open a Search Panel to allow the user to find specific data.
- Owner - A drop-down list of owners available to the user. Defaults to 'All'.
Order Number - Entering an order number (or partial order number) or list of orders will display the Order List if multiple orders are retrieved, or will take the user to the Order/Route details page if a single order is retrieved. To enter an order number, an owner must be selected. Note: A list of orders may be entered by separating the orders with a comma - in this case, partial matching will not be made, and an exact match will be retrieved for all of the orders in the comma separated list. For example, entering "MON" will find any order which contains the letters "MON". Entering "123,124,125" will find only orders "123", "124" and "125".
Booking Ref. - as above, but filtering on the Customer's booking reference. To enter a booking reference, an owner must be selected.
From Location - filters by From Location (no partial retrieval).
Delivery Point - filters by Delivery Point (no partial retrieval).
Customer - filters by the specific Customer (no partial retrieval) or list of customers.
Customer Group - a drop-down list of defined customer groups, defaulting to All/Any. To enter a customer group, an owner must first be selected. Note: This will only be available if customer groups are configured for the user.
Route ID - as with order number, but filtering on the Route ID.
Haulier - filters the Order List by the specific haulier (no partial retrieval) or list of hauliers.
Vehicle - filters by Vehicle ID. Only available if system is configured for Vehicles.
Delivery Date - Will have a drop-down list with the following values:
Yesterday
Today (default)
This Week - defined by the start/end day maintained parameters
This Month - based on the calendar month
Last 10 Days
Last 30 Days
Custom - this will then display a date range to allow the entry of a custom date range (though this will be limited to a maximum range of 31 days)
Export - Can be used to export the data in addition to displaying the data on the page.
Note: All searches will be limited within the users Restrictions i.e. the orders they can view will be limited within the restrictions set against the users group first, then within any of the filters applied.
Clicking on the Find button will execute the search. If only a route code was entered, then the user will be taken to the route page, otherwise the search will return the filtered Order List, or take the user into the Order/Route details page if a single order is retrieved.
Clicking on the Clear button will remove all of the current filters and re-run the Order List based on the defaults.
Customer Visibility Main Page
Side Panel
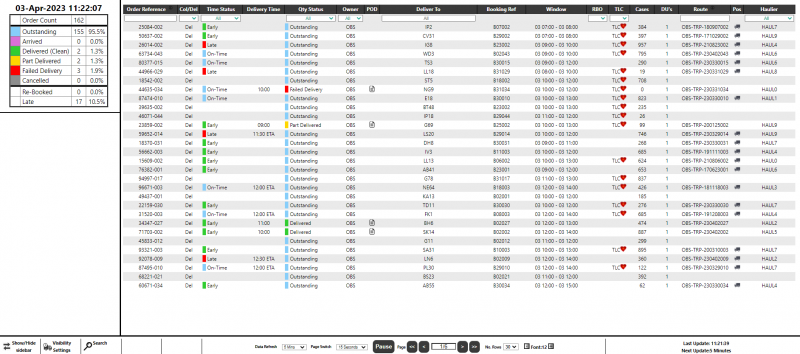
The Side Panel Order Summary displays a count - and where applicable a percentage - of the currently order selection (the 'Order List') broken down into various status:
- Order Count - A count of the number of orders displayed in the Order List.
Note: Clicking on this line will reset any of the filters from the below lines.
- RAG Order Status - this section will have colour coded lines for Outstanding, Arrived, Delivered (Clean), Part Delivered i.e. quantity exception, Failed i.e. 0 quantity delivered and Cancelled with the total number of orders for that type and the percentage against the total number of orders. Clicking any of the sections will filter the Order List for the selected status.
- Re-Booked/Late - this section will display the number and percentage of orders defined as Re-Booked and Late. Clicking on either line will filter the Order List.
- CRM (If enabled):
CRM Orders - this will filter the selection to orders with CRM's (of any status).
CRM Customer - this will filter the selection to orders where the order has an open
CRM where the 'Action With' is the CUSTOMER.
CRM <Client> - this will filter the selection to orders where the order has an open
CRM where the 'Action With' is the <Client>.
No percentage values will be calculated for the CRM columns. If an order has multiple CRM's it is possible an order can appear in both the Customer and <Client> filters.
The Side Panel may be hidden / displayed by clicking on "Show/Hide Slide Panel" at the base of the page.
Order Summary
The order list displays details of the selected orders, allowing the order to click on certain fields for more details, and then to click to drill down to the detail pages. A typical display of fields is as follows:
But the fields available may vary per system.
The user can click on any of the headings to sort (ascending/descending) on that column (Tip: You can also hold the shift key and click multiple columns to sort on the first then subsequent columns)
Most of the fields have a 'filter' available - either a drop-down list of the values within the Order List data or a free text box which allows partial / pattern matching searches for the current Order List data.
The order list shows the following fields:
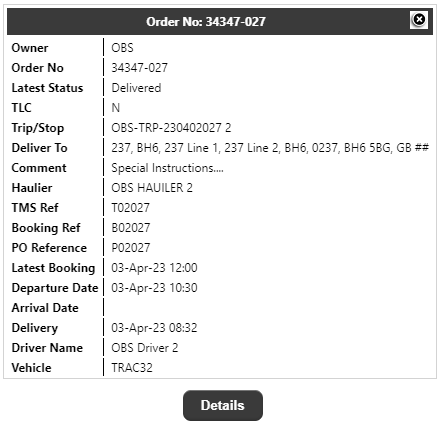
- Order Ref - The system(s) order reference. Clicking on the order number will display further information on the order:
Clicking on 'Details' will take the user into the detail pages.
- Col/Del - Whether the order line is for a collection or delivery
- Time Status - Either Early, On-Time or Late. The definition of what is Early, On-Time or Late is calculated based on the parameters in the Side Panel settings, and will be based on the current time (or ETA if configured) versus the Planned or Actual arrival (+/- window) date (depending on whether the order is outstanding or delivered) at the final delivery point, i.e. the trip/stop information supplied for delivery of the order. Late orders will be flagged Red, Early orders Green and On-Time orders will be flagged Blue.
- Delivery Time - The Actual delivery time if the order is delivered, else the ETA time if the order is outstanding and an ETA is available (the time will be suffixed with 'ETA') else the Planned delivery time.
- Qty Status - Outstanding (Blue), Arrived (Purple), Delivered (Green), Part-Delivered (Amber), Failed Delivery (Red) or Cancelled (Grey). The definition of the quantity status will be based on the side panel settings and the status of the order along with the planned vs actual delivered quantities.
- Owner - the owner of the order. This column will only be displayed if there are multiple owners within the Order List.
- POD - Will display a document
 icon to indicate a POD is available to view from the system. Clicking on the icon will open the POD document in a new tab.
 - Deliver To - The ID and town of the delivery address. Clicking on the address will display further details of the address. Note: As space on the screen is limited, this field will be truncated at 30 characters.
- Booking Ref - The customers booking reference
- RBO - the number of re-books against the order.
- TLC - An indicator against the order to highlight important customers orders.
- Cases - The total quantity of cases ordered on the order (for detail type 'S' lines)
- DU - The total quantity of DU's ordered on the order (for detail type 'D' lines)
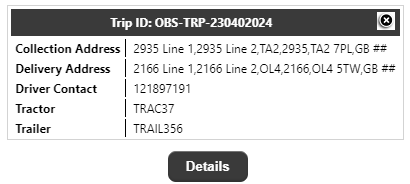
- Route - The Delivery route Id i.e. to the final delivery point. Clicking on the route will display further details:
Clicking on 'Details' will take the user to the Route Detail page.
- Pos. - Will display a truck
 icon to indicate that a map is available with the delivery vehicles last known position. Clicking on the icon will open a view of the map.
 - Haulier - the Haulier's name for the haulier of the delivery route. As space on the screen is limited, this field will be truncated at 18 characters.
If CRM functionality is enabled:
CSRC - will display the Customer Services reason code if one has been assigned to the order.
CRM - will display if an order has any CRM's associated with it. The figures displayed in the column will vary depending on the CRM status of the order:
If no CRM's exist for the order, the column will be blank
If CRM's exist, but are all resolved, only the total number of CRM's for the order will be displayed
If CRM's exist, and the Action is with the relevant user i.e. CLIENT or CUSTOMER the column will display the number of OPEN CRM's where the 'Action With' is against the current user followed by the TOTAL number of CRM's against the order i.e. all open and resolved. For example, if an order had 2 CRM's - one open with the Client and one closed, a Client user would see "1 of 2" whilst a Customer would see "2".
Detail Sections
Clicking on the details button for an order in the Order Summary page will take the user into a page with details for the order, and a series of tab pages with additional order information.
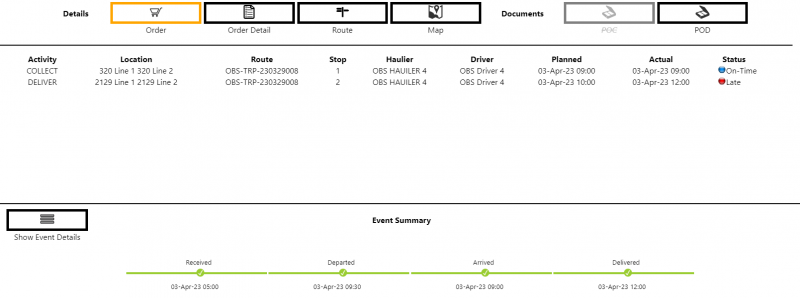
Left Side Details
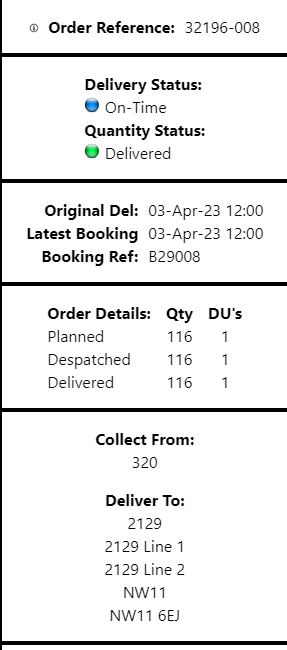
On the left hand side of the page for the Order, Order Details and Route pages the following will be displayed:
Order Reference - The selected order number
Delivery Status - A RAG indicator which will be:
Blue On Time
Green Delivered Early
Red Delivered Late or Running Late.
Quantity Status - A RAG indicator which will be:
Blue Outstanding (i.e. not delivered)
Purple Arrived (but not yet delivered)
Green Delivered where the delivered qty matches the ordered or despatched (configurable)
Yellow Part Delivered where the delivered qty does not match the ordered or despatched
(configurable) but is greater than 0
Red Failed Delivery where the delivered qty is 0 or the order was 'Claused' (configurable)
Grey Cancelled
Original Del - The first delivery date of the order
Latest Booking - The latest Booking date received by the system. Clicking on this field will display a list of previous bookings (latest first).
Booking Ref - The booking reference for the order
Order Details - A table of the following:
Planned - The total Quantity (detail type 'S') and DU Qty (detail type 'D') planned on the order
Despatched - The total Quantity and DU Qty despatched on the order
Delivered - The total Case Quantity and DU Qty delivered on the order
- Collect From - The name of the location where the order is collected
- Deliver To - The address of the location where the order is delivered (final delivery location) and telephone number (if supplied).
- Back to List - Will take the use back to the home page with the last retrieved order list.
- Refresh - Will refresh the current order details page and re-display the details.
Order Summary
The top section will contain a summary of the route (trips) for the order:
Activity:
Collect - for the collection of the order from the collection location
Deliver - for the delivery of the order at it's final delivery location
Location - the name of the location for the collection/delivery. Clicking on this will display further location details as per the main page.
Route - the Trip Id. Clicking on this will take the user to the Route Details page.
Stop - the sequence of the drop on the trip
Haulier - the name of the haulier for the trip. Clicking on this will display further location details as per the main page.
Driver - the name of the driver for the trip
Planned/Actual - the Planned/Actual time of arrival for the trip/stop
Status - A RAG indicator which will be:
Blue On Time
Green Delivered Early
Red Delivered Late or Running Late.
Note: This is the STOP status, which is different from the order status. The time status for the order uses the booking date of the order, and the time status for the stop uses the planned/actual arrival times, so it is possible an order could be booked for a later date than it is planned, and therefore delivered on-time as an order, even though the arrival time at the stop could be late.
Event Summary
The bottom section will contain details of the events against the order. Initially a summary of events will be displayed as per the above screenshot.
The events summary will contain the following events:
- Received - the date/time the order was received
- Departed - the date/time the order was 'out for delivery'
- Arrived - the date/time the order arrived at the final delivery point
- Delivered - the date/time the order was delivered at the final delivery point
If any of the times are not provided, then they will be left blank, and if the status has not yet been reached (delivered in the summary example above) then it will be 'greyed out'.
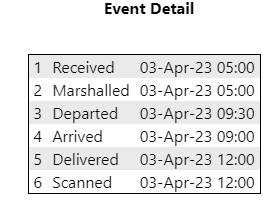
Clicking on the 'Show All Events' button will display a more detailed list of events:
If any of the events have not yet been received, then the event will still be displayed, but the date/time information will not be displayed. No other types of event will be displayed.
Order Detail
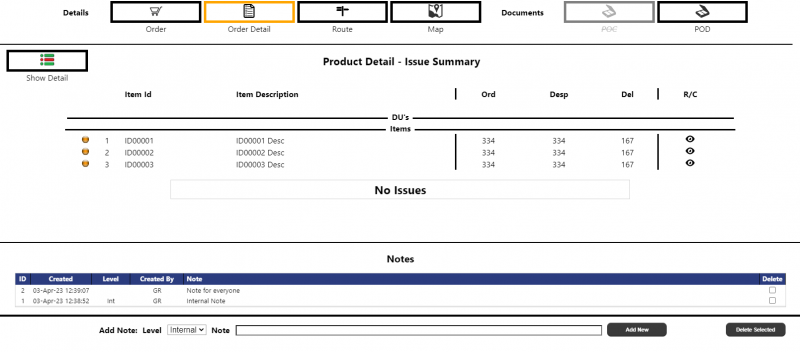
The top section will contain a summary of the stock for the order. The details will be sub-divided into "DU's" (line type 'D' details - which are not show on the screenshot, but see below) and "Items" (line type 'S' details). Initially only the order lines with 'issues' will be displayed (Issue Summary) but clicking on the 'Show All Detail' button will display all of the stock lines on the order (Full Order):
The line details will consist of:
Sequence - the line number on the order (if supplied, or a sequential count)
Item Id - the stock code/DU.
Item Description - the description of the item/DU.
Ord / Desp / Del - the quantities Ordered, Despatched and Delivered respectively.
R/C - this will display an icon if reason codes have been supplied for the order line. Clicking on the icon will display the reasons:
Notes
The bottom section will allow the user to view and create simple free-text notes to associate with the order.
The existing notes against the order will be displayed in a list with the latest note at the top:
- Id - A sequential count of the notes
- Date/Time Created - The Date/Time the note was created.
- Level - Either blank or 'INT' depending on the Level of the note. Internal notes - 'INT' - can only be created and viewed if the users group is defined as "Internal".
- Created By - The ID of the user that created the note.
- Note - The entered text/description for the note.
The user can create a new note (if allowed via configuration) by selecting the Level - Internal Only (default) or All Users - and entering the note text, followed by clicking on the 'Add New' button.
Each note is limited to 1500 characters.
They can also (if allowed via configuration) select an existing note and click 'Delete Selected'.
Route
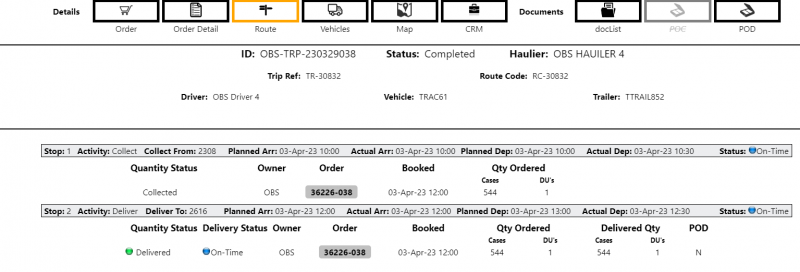
The Route Details tab displays information about a route.
The page displays the following header information (configurable):
- ID The Trip ID
- Status The status of the Route
- Haulier The name of the Haulier for the route
- Trip Ref The Reference for the Trip
- Route Code The Route Code
- Driver The name of the driver
- Vehicle The ID of the vehicle
- Trailer The ID of the trailer
For every stop on the route, the page will display (configurable):
Stop The ID sequence of the stop
Activity Either Collect or Deliver dependent on the stop activity
Collect/Deliver The name of the Location on the stop.
Planned/Actual Arrival The planned/actual arrival date/time. If no actual exists and an ETA is available, then the ETA time will be displayed, followed by "ETA"
Planned/Actual Departure The planned/actual departure time at the stop
Status A RAG indicator which will be:
Blue On Time
Green Delivered Early
Red Delivered Late or Running Late.
Note: This is the STOP status, which is different from the order status. The time status for the order uses the booking date of the order, and the time status for the stop uses the planned/actual arrival times, so it is possible an order could be booked for a later date than it is planned, and therefore delivered on-time as an order, even though the arrival time at the stop could be late.
For every delivery order on each stop, the page will display:
Quantity Status A RAG indicator which will be:
Blue Outstanding (i.e. not delivered)
Purple Arrived (but not yet delivered)
Green Delivered where the delivered qty matches the ordered or despatched
Amber Part Delivered where the delivered qty does not match the ordered or
despatched but is greater than 0
Red Failed Delivery where the delivered qty is 0 or the order was 'Claused'
Grey Cancelled
Delivery Status A RAG indicator which will be:
Blue On Time
Green Delivered Early
Red Delivered Late or Running Late.
Owner The owner code
Order The Calidus Portal system order number.
Booked The Bokking Date/Time
Ordered / Delivered Qty The total quantity / DU's ordered/delivered on the order
the system. Clicking on the icon will open the POD document in a new tab.
The page will also have up to 3 icons at the base of the page:
Back To Main - Will take the user back to the Main order page with the last run search.
Back To Order - this will only appear if the user has entered the page via the Order Details page and will take the user back to the Order Details (Route Summary) page.
Refresh - will refresh the Route Details page
Vehicles
If the system is configured for Vehicles, the Vehicle Details tab displays information about the vehicles which are due to be inspected on the order:
Map
The Map tab displays information about a route.
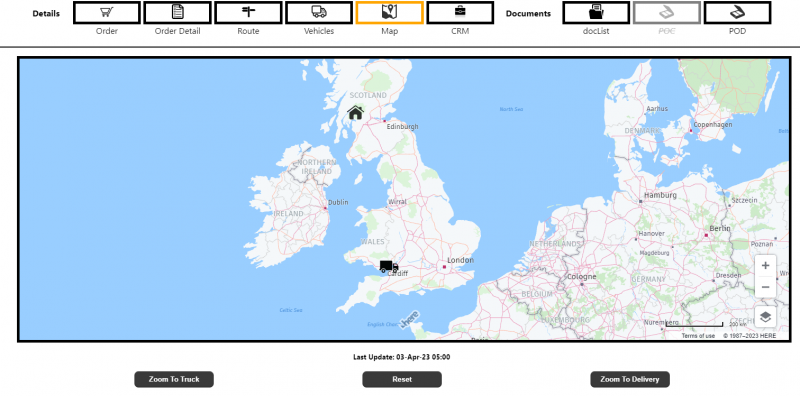
A Home icon will be displayed for the orders final delivery location (or collection point if it's a collection order). If the order's vehicle has been updated with Latitude/Longitude co-ordinates the last known vehicle location will be shown as a truck icon. If the order has been delivered, only the Home icon will be shown at the delivery location. The buttons can be used to zoom into the Truck, Reset the map view, or zoom into the Delivery location.
CRM Details
The CRM section of the page can be used to create and maintain CRM's against the order and apply a Customer Services reason code to the order.
The first section allows the user to apply a Customer Services reason code to the order:
The Customer Services reason codes displayed will be those setup in the Reason Maintenance page with a type of 'CSRC'. The reason code, if set will be displayed in the Order List.
Note: The default value will be "None" i.e. blank and only one code can be associated with an order at any time. The code will update automatically when the code is selected from the drop-down i.e. there is no 'update' button.
The next section of the page allows the user to view the existing CRM's against the order:
There will be a summary line of the Total CRM's, Open CRM's, with Internal/Customer and Closed.
The table will display one line per CRM, oldest first, with the following information:
CRM# The unique CRM number, consisting of the Order number, a dash and a 2 digit
sequence. Hovering over the CRM line will highlight the line - clicking on a line will
display all of the details for that CRM in the bottom section (see below)
Status The status of the CRM - OPEN or RESOLVED
Action With Whether the CRM currently needs to be actioned by <CLIENT> or the CUSTOMER.
Resolved CRM's will have no Action With.
Unread This will contain an Envelope image if there are unread notes specific for that user
i.e. if a note was created by <CLIENT> and marked as requiring response, external
users would see the envelope but <CLIENT> users would not and vice-versa.
Created The date/time the CRM was created
Created By The ID of the Calidus Portal User who created the CRM
Last Update The date/time of the last note against the CRM - this will only be populated after a
note is added in addition to the original CRM note.
- Last Update By The user who added the last note.
- CRM Issue The initial note entered against the CRM - if this is greater than 50 characters, the
note will be trimmed and "…" will be displayed after the note. Hovering over the note will display the full text of the note.
- Closed The date/time the CRM was closed
- Closed By The ID of the User who closed the CRM
Underneath the table, the user may Open/Create a new CRM:
- Action With Whether the CRM needs actioned by <CLIENT> or CUSTOMER (or None)
- Requires Response Whether the CRM needs a response i.e. requires the relevant user
(depending on the 'Action With') to mark the CRM/note as read.
- Initial CRM Note The description/summary of the CRM.
- Create A button to create/add the CRM.
The final section of the CRM page will display the specific details for a single (selected) CRM:
The table will display the notes associated with the selected CRM:
- Envelope Will display against lines which require response by the user - this is similar in
functionality to the 'Unread' column in the top section i.e. it will be specific to the type of user using the page.
- Date/Time The date/time of the specific note.
- Entered By The ID of the Calidus Portal user who entered the specific note.
- Status The status of the note - whether Read or Unread
- Read By This will display who 'Marked as Read' the specific note. 'n/a' will be displayed if the specific note did not require a response.
- Date Read The date/time the note was read.
- Note The text of the note, formatted as per the CRM/Issue column in the top section.
Above the table, the user can enter a new note against the selected CRM:
- Action With Whether the CRM created needs to be actioned by the <CLIENT> or the
CUSTOMER (or None).
- Response Required Whether the CRM needs a response i.e. requires the relevant user
(depending on the 'Action With') to mark the CRM/note as read.
- Add CRM Note The additional note text to add to the CRM.
- Create A button to add a note to the selected CRM.
There will also be a 'Mark ALL as Read' button to mark the relevant notes i.e. those with an Envelope image to 'Read'.
Finally, there will be a 'Close CRM' button to mark the selected CRM as Closed. The user will be prompted to confirm the closure, then the selected CRM will be updated to status 'Resolved', the CRM close date/time and user will be populated and all notes within the CRM (regardless of whether they are 'relevant' to the user) will be set to 'Read'.
Documents
Dependent on system configuration and the type and status of order being displayed, various document tabs mat be available, for example:
Document List
The Documents tab will allow the user to upload documents against the order being viewed and to view/download any documents already stored against this order.
As detailed in section 3.1.2.8 document types can be setup in the Calidus Portal X-Ref maintenance page
POD/POC/Service Report
Dependent on the type and status of order, a Proof Of Collection/Delivery and/or Service Report button may be displayed. Clicking on an active button i.e. one that is not greyed out will call the relevant external system to produce and display the report.
GPS Tracking Enquiry
The GPS tracking enquiry is integrated into the CALIDUS ePOD system. GPS coordinate messages are sent back from the ePOD devices at a timed interval these messages can then be accessed to pinpoint where a driver or vehicle has been at a certain point in time
The parameters to search for the GPS messages are as follows:
Vehicle tracking
Track by - Clicking 'Vehicle' on the drop down list allows you to track via the vehicle ID
Vehicle - A drop down list of vehicles ID's taken from the EPOD system
Driver Tracking
- Track by - Clicking 'Driver' on the drop down list allows you to track via the Driver ID
- Driver - A drop down list of drivers taken from the EPOD system
Whether Vehicle or Driver tracking, the following selection will also be available:
Date/Time From - The date and time the search criteria should start searching from
Date/Time To - The date and time the search criteria should start searching to
Clear Dates/Times - Clears all of the dates and times that have been entered as a search parameter
Find - Starts the search based on the parameters entered
Search Results
Once the find button is clicked a list of results will appear matching the search criteria:
A map will display with a list of the tracked points as 'dots' on the map:
If there are multiple points within the selected zoom, the points will be grouped:
Clicking on a map point, or clicking on the Zoom button from the table list will give details for the point:
Message Enquiries
Uploads / Exceptions Page
The Uploads/Exceptions page can be used to monitor the upload of XML files into the LOTS/TTM system.
At the top of the page a display will indicate the last that the XML Poller process executed. If the poller process has not executed in the last 15 minutes (note, this is a fixed value) then the text will be red, otherwise the text will be green.
A series of filters will be available to filter the selection:
- Status - Values are 'Any', 'Success' and 'Failure' to indicate the upload status of an XML file.
- Process Type - Values are 'All', 'Trip/Order' and 'Stock'. This corresponds to the two poller processes which pick-up the XML files.
- Event Type - A text box which allows the user to find a specific file type e.g. ORD, TRP, DEL etc.
- Filename - Specific filename to search for
- Duration - Values 'Any', '1 Day' (Default), '3 Days', '7 Days' and '30 Days' to filter how far back to retrieve the data. The date corresponds to the date of upload of the file.
- Action - Has the following values:
- Find - to retrieve the data and display on the web page (Default)
- Export - to write the retrieved data to an XLS file
- Purge (Keep Recent) - to mark all except the last 7 days records as 'closed' so as they will not appear in the exceptions page.
- Purge - to mark ALL current records as 'closed' so as they will not appear in the exceptions page.
- Delete - to remove all except the last 7 days records from the system - this option is for use as a clear-down for excessive data storage.
Clicking the Find button will display the selected files:
The details displayed will be:
- Status - An indicator of whether the file was uploaded successfully.
- Date/Time - The date/time the file was processed by the poller on the LOTS/TTM system.
- Process Type - Either 'STOCKINFO' or 'TRIPORD' corresponding to the poller type.
- Event Type - The event type of the XML file e.g. ORD, TRP, STK etc.
- Filename - the name of the uploaded file.
- No Errors - An indicator of the number of 'header level' errors within the file.
Clicking on the +/- button next to a file which failed to upload will display the header level error descriptions from within the file:
If further details exist, then a '?' button will be available. Clicking this will show details of the error:
The Exceptions page will automatically refresh at a selected period, but this will be disabled if any check box is checked, or the user clicks on the 'Stop Refresh' button.
NOTE: The uploads/exceptions page only shows exception details i.e. details for files which failed to upload. The page does not track which trips/orders were contained in successful uploads.
Stock Enquiries
Stock Master Enquiry
Parameter Page
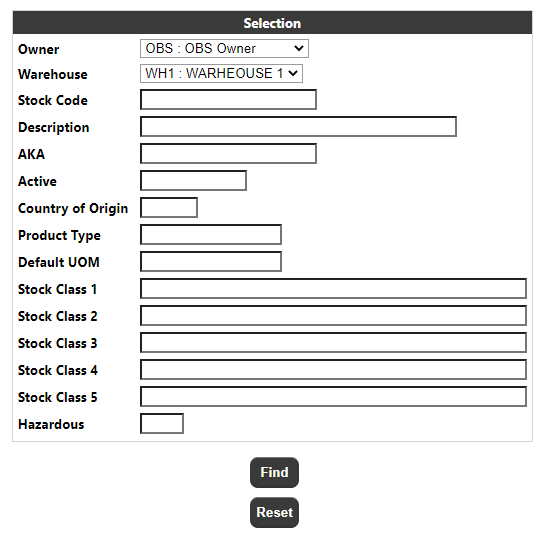
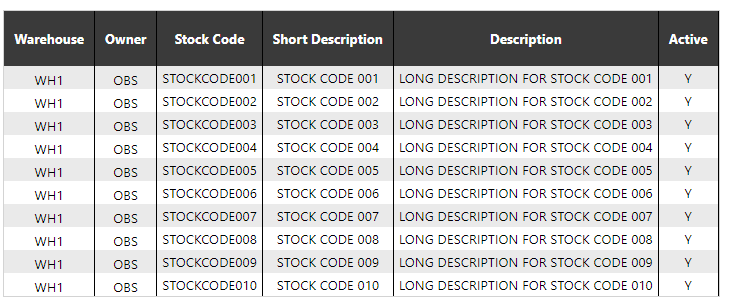
The Parameter Selection page allows the user to enter search criteria to enquire on the stock master data (i.e. as uploaded on the STK message).
The parameters visible and the labels used will depend on the system language configuration, but the complete list will be as follows:
- Owner - The owner of the stock master record. A drop-down of available owners, as determined by the restrictions set against the users group
- Warehouse - This will be set from a drop-down of available warehouses, as determined by the restrictions set against the users group
- Stock Code - This will accept a free text value up to 20 characters
- Description - This will accept a free text value up to 200 characters. Note that if a value is entered a stock master record will be selected if the long or short description matches the value entered
- AKA - This will accept a free text value up to 20 characters
- Active - This will accept a free text value up to 10 character
- Country of Origin - This will accept a free text value up to 3 characters
- Product Type - This will accept a free text value up to 15 characters
- Default UOM - This will accept a free text value up to 15 characters
- Classification 1 - This will accept a free text value up to 50 characters.
- Classification 2 - This will accept a free text value up to 50 characters.
- Classification 3 - This will accept a free text value up to 50 characters.
- Classification 4 - This will accept a free text value up to 50 characters.
- Classification 5 - This will accept a free text value up to 50 characters.
- Hazardous - This will accept a free text value up to 1 character. (Not visible on screenshot)
The warehouse and owner selection will match stock master data where the owner/warehouse matches the selected value.
For all free text fields:
- A blank value will match all stock master data.
- Matches are not case sensitive.
- Pattern matching is available using % as the meta-character.
Clicking find button will retrieve any stock master data that matches the specified parameters.
If this retrieves multiple stock master records the stock master stock selection page (see section 5.1.2) will be called to display the selected stock codes.
If this retrieves a single stock master record the stock master enquiry detail page (see section 5.1.3) will be called to display the stock master data.
If this does not retrieve any stock master records the stock master stock selection page will be called to display the 'No Data' message.
Clicking the reset button will reload the page restoring all fields to their default/blank values.
Stock Selection Page
This page will display a table of the stock master data that matches the specified parameters.
The data will initially be shown in warehouse, owner then stock code sequence but the user can sort the data by a specific column by clicking on the column heading.
Clicking on a stock code will call the details page (see section 5.1.3) for the warehouse, owner and stock code of that row.
The page footer:
Will include an export section with an export level drop-down and an export button.Clicking on the export button will run the stock master export process for the selected level and all of the stock master data records that are displayed.
The page footer will also include a navigation section which will allow the user to navigate between multiple pages of results and to define how many rows will appear on each page.
The page will also include a back button which will return the user to the parameter page.
Detail Page
This page will display the stock master data for a single stock master record. The header section will display the main stock master information and a detail view selection.
This will display the warehouse (along with its associated description), the owner (and its associated name), stock code and short description of the stock master data.
The detail view will always include the details and UOM (Container Type) options and will conditionally include the image option. The image option will be included if an image file is present for this stock master record (see image details below). The contents of the detail section of the page will depend on the selected detail view option.
When the details option is selected the page will show the stock master data.
The fields visible and the labels used will depend on the system language configuration. The screenshot above shows all available fields. When the UOM (Container Type) option is selected the page will show a table of the UOM data with one row for each unit of measure.
When the image option is selected the page will show the image file. This option will only be available if an image file is present. The image file for a stock master record is defined as a file called:
pppppppppp/images/stock/www/ooo/ssssssssss.xxx where:
ppppppppp - is replaced by the Calidus Portal external data store directory.
images - is a hard-coded images directory within the Calidus Portal external data store directory.
stock - is a hard-coded stock directory within the images directory.
www - is replaced by the three-character warehouse ID of the stock master record.
ooo - is replaced by the three-character owner code of the stock master record.
ssssssssss - is replaced by the stock code of the stock master record.
xxx - is replaced by the image file extension.
The page footer will include an export section with an export level drop-down and an export button.
Clicking on the export button will run the stock master export process for the selected level and the stock master data record that is displayed. The page will also include a back button which will return the user to the previous page.
Stock Inventory/Snapshot Enquiry
Parameter Page
The Parameter Selection page allows the user to enter search criteria to enquire on the stock inventory data (i.e. as uploaded on the INV message).
The parameters visible and the labels used will depend on the system language configuration, but the complete list will be as follows:
- Owner - The owner of the stock inventory record. A drop-down of available owners, as determined by the restrictions set against the users group. This drop-down will also include and 'All owners' option.
- Warehouse - This will be set from a drop-down of available warehouses, as determined by the restrictions set against the users group. This drop-down will also include and 'All Warehouses' option.
- Snapshot ID - This will accept a free text value up to 20 characters.
- Snapshot Date Range - Clicking on either field will call a pop-up calendar to allow the user to select the date. The clear button can be used to reset the dates to blank.
- Stock Code Range - These fields will each accept a free text value up to 20 characters.
- Location - This will accept a free text value up to 20 characters.
- Pallet ID 1 - This will accept a free text value up to 20 characters.
- Pallet ID 2 - This will accept a free text value up to 20 characters.
- Pallet ID 3 - This will accept a free text value up to 20 characters.
- Batch ID 1 - This will accept a free text value up to 50 characters.
- Batch ID 2 - This will accept a free text value up to 50 characters.
- Batch ID 3 - This will accept a free text value up to 50 characters.
The warehouse and owner selection will match stock inventory data where the owner/warehouse matches the selected value or the 'All' value is selected.
The snapshot date range will match stock inventory data where the snapshot date is within the specified date range (inclusive of the specified dates).
For all free text fields:
- A blank value will match all stock inventory data.
- Matches are not case sensitive.
- Pattern matching is not available.
The user must specify at least one of the following required parameters:
Snapshot ID, Snapshot Date Range, Owner, Stock Code Range, Location, Pallet ID 1, Pallet ID 2, Pallet ID 3, Batch ID 1, Batch ID 2, Batch ID 3.
Clicking find button will retrieve any stock inventory data that matches the specified parameters.
If the data retrieved includes multiple snapshot ID's the snapshot selection page (see section 5.2.2) will be called to display the snapshot ID's.
If the data retrieved includes a single snapshot ID's but multiple stock codes the stock selection page (see section 5.2.3) will be called to display the stock codes.
If the data retrieved includes a single snapshot ID's and a single stock codes the detail page (see section 5.2.4) will be called to display the inventory data.
If no data is retrieved the snapshot selection page will be called to display the 'No Data' message.
Clicking the reset button will reload the page restoring all fields to their default/blank values
Snapshot Selection Page
This page will display a table of the snapshot ID's that match the specified parameters.
The data will initially be shown in snapshot ID sequence but the user can sort the data by a specific column by clicking on the column heading.
Clicking on a snapshot ID will call the details page (see section 5.2.3) for that snapshot ID.
The page footer:
Will include an export section with an export level drop-down and an export button.
Clicking on the export button will run the stock inventory export process for the selected level and the snapshot ID data that is for the displayed snapshot ID's and matches any selection parameters.
The page footer will also include a navigation section which will allow the user to navigate between multiple pages of results and to define how many rows will appear on each page.
The page will also include a back button which will return the user to the parameter page.
Stock Selection Page
This page will display the single snapshot ID (i.e. as selected in the snapshot selection page or the only snapshot ID that matches the selection parameters) and a table of the stock codes for that snapshot ID which matches the specified parameters.
The data will initially be shown in warehouse, owner then stock code sequence but the user can sort the data by a specific column by clicking on the column heading (except for the quantity columns).
The quantity columns included in this table will depend on the system language configuration.
Clicking on a stock code will call the details page (see next section) for the selected snapshot ID and the stock code (and the warehouse ID and owner of the same row).
The page footer:
Will include an export section with an export level drop-down and an export button.
Clicking on the export button will run the stock inventory export process for the selected level and the snapshot ID data that is for the displayed snapshot ID and matches any selection parameters.
The page footer will also include a navigation section which will allow the user to navigate between multiple pages of results and to define how many rows will appear on each page.
The page will also include a back button which will return the user to the previous page.
Details Page
This page will display the stock inventory data for a specific snapshot ID, warehouse, owner and stock code.
The header section will display the selected snapshot ID (and its associated date), warehouse, owner and stock code/description.
The header section will also include a unit of measure (Container Type) selection drop-down. This will initially have the 'All' option selected and will include each of the units of measure that have been uploaded on the stock master for this warehouse, owner and stock code. Changing this drop-down will limit the data to records for the selected unit of measure only (or all units of measure if the 'All' option is selected.
The detail section of the page will show a table of the stock inventory data for the selected snapshot ID, warehouse, owner and stock code, including either all units of measure or a specific unit of measure based on the unit of measure selection drop-down value.
The data will initially be shown in the sequence it was uploaded. When displaying multiple units of measure for the same inventory line these will initially be sorted based on the unit of measure (smallest to largest). The user can sort the data by a specific column by clicking on the column heading (except for the quantity columns).
The columns included in this table and the column headings used will depend on the system language configuration.
The page footer:
Includes an export section with an export level drop-down and an export button. Clicking on the export button will run the stock inventory export process for the selected level and the snapshot ID data that is for the selected snapshot ID, warehouse, owner, stock code and unit of measure and which matches any selection parameters.
The page footer will also include a navigation section which will allow the user to navigate between multiple pages of results and to define how many rows will appear on each page.
The page will also include a back button which will return the user to the previous page.
Stock Transaction Enquiry
Parameter Page
The Parameter Selection page allows the user to enter search criteria to enquire on the stock movement data (i.e. as uploaded on the MOV message).
The parameters visible and the labels used will depend on the system language configuration, but the complete list will be as follows:
- Owner - The owner of the transaction record. A drop-down of available owners, as determined by the restrictions set against the users group
- Warehouse - This will be set from a drop-down of available warehouses, as determined by the restrictions set against the users group.
- Stock Code - Allows the entry of a stock code range.
- Transaction Date - Allows the entry of a transaction date range. Clicking on either field will pop-up a calendar to allow the user to select the date. The clear button can be used to reset the dates to blank.
- Transaction ID - This will accept a free text value up to 20 characters.
- Location ID - Allows the entry of a location Id
- Pallet ID 1 to 3 - Allows the entry of a Pallet Id's
- Batch ID 1 to 3 - Allows the entry of a batch Id's
The warehouse and owner selection will match stock transaction data where the owner/warehouse matches the selected value.
The transaction date range will match stock transaction data where the transaction date is within the specified date range (inclusive of the specified dates).
For all free text fields:
- A blank value will match all transaction data.
- Matches are not case sensitive.
- Pattern matching is not available.
The user must specify at least one of the following required parameters:
Stock Code Range, Transaction Date Range, Transaction ID, Batch Id, Pallet Id or Location Id
Clicking find button will retrieve any stock transaction data that matches the specified parameters.
If the data retrieved includes multiple stock codes the stock selection page (see section 5.3.2) will be called to display the stock codes.
If the data retrieved includes a single stock codes the detail page (see section 5.3.3) will be called to display the transaction data.
If no data is retrieved the stock selection page will be called to display the 'No Data' message.
Clicking the reset button will reload the page restoring all fields to their default/blank values.
Stock Selection Page
This page will display a table of the stock codes which match the specified parameters.
The data will initially be shown in warehouse, owner then stock code sequence but the user can sort the data by a specific column by clicking on the column heading.
Clicking on a stock code will call the details page (see section 5.3.3) for that stock code (and the warehouse and owner of the same row).
The page footer:
Will include an export button.Clicking on the export button will run the stock transaction export process for the transaction that matches any selection parameters.
The page footer will also include a navigation section which will allow the user to navigate between multiple pages of results and to define how many rows will appear on each page.
The page will also include a back button which will return the user to the parameter page.
Details Page
This page will display the stock transaction data for a specific warehouse, owner and stock code.
The header section will display the selected warehouse, owner and stock code.
The detail section of the page will show a table of the transactions for the selected warehouse, owner and stock code.
The data will initially be shown in the transaction date sequence. The user can sort the data by a specific column by clicking on the column heading (except for the quantity column).
The columns included in this table and the column headings used will depend on the system language configuration.
Each row will include a '+' button. Clicking on this will expand that row to show additional information.
With the additional information shown the '+' button will change to a '-' button, clicking this will collapse the row again.
The column heading for this last column will include a '+' and a '-' button. These will expand or collapse the additional information for all rows.
The page footer:
Will include an export button. Clicking on the export button will run the stock transaction export process for the transactions displayed.
The page footer will also include a navigation section which will allow the user to navigate between multiple pages of results and to define how many rows will appear on each page.
The page footer will also include a back button which will return the user to the previous page.
Journal Enquiries
Journal Transaction Enquiry
Parameter Page
The Parameter Selection page allows the user to enter search criteria to enquire on the stock movement data (i.e. as uploaded on the MOV message).
The parameters visible and the labels used will depend on the system language configuration, but the complete list will be as follows:
- Owner - The owner of the transaction record. A drop-down of available owners, as determined by the restrictions set against the users group
- Warehouse - This will be set from a drop-down of available warehouses, as determined by the restrictions set against the users group.
- Stock Code - Allows the entry of a stock code. Clicking on the '+' button allows the user to enter multiple stock codes.
- Batch ID - Allows the entry of a batch Id.
- Location - Allows the entry of a Location code (not displayed on screenshot).
- Pallet Id - Allows the entry of a Pallet Id (not displayed on screenshot).
- SSCC - Allows the entry of an SSCC code. Clicking on the '+' button allows the user to enter multiple SSCC codes.
- Transaction Type - Allows the entry of a transaction type e.g. REC, REL, DEL etc. from a list of the available transaction types.
- Stock Status - Allows the selection of the stock status e.g. Available, Held etc.
- Transaction Date Range - Clicking on either field will call a pop-up calendar to allow the user to select the date. The clear button can be used to reset the dates to blank.
- ID - The unique ID for the transaction
- Customer/Supplier - Allows the free-text entry of a Customer or Supplier.
The warehouse and owner selection will match stock transaction data where the owner/warehouse matches the selected value.
The transaction date range will match stock transaction data where the transaction date is within the specified date range (inclusive of the specified dates).
For all free text fields:
- A blank value will match all transaction data.
- Matches are not case sensitive.
- Pattern matching is not available.
The user must specify at least one of the following required parameters:
Stock Code Range, Transaction Date Range, Transaction ID, Location, Pallet IDs, Batch IDs.
Clicking find button will retrieve any stock transaction data that matches the specified parameters.
If no data is retrieved the stock selection page will be called to display the 'No Data' message.
Clicking the reset button will reload the page restoring all fields to their default/blank values.
Details Page
This page will display the stock transaction data for a specific warehouse, owner and stock code(s).
The data will initially be shown in transaction type sequence. The user can sort the data by a specific column by clicking on the column heading (except for the quantity columns).
The columns included in this table and the column headings used will depend on the system language configuration.
The page footer:
Will include an export button. Clicking on the export button will run the journal transaction export process for the transactions displayed.
The page footer will also include a navigation section which will allow the user to navigate between multiple pages of results and to define how many rows will appear on each page.
The page footer will also include a back button which will return the user to the previous page.
TTM gateway
A Customer Tracking gateway page is available for customers, the link to which will be provided in the email/SMS sent to the customer when the order is planned or en route by an <external> system. On clicking the link provided in the notification email, the customer will either be taken to the parameter page (where they will be asked to enter the consignment reference from the email and their postcode) or the results page, if both the reference and postcode are sent as part of the link.
Gateway Parameter Page
When the user clicks on the URL provided by the <external> system they will be taken to a page on the Calidus Portal system:
The user will enter the following information:
- Consignment Reference - The consignment/order number. Note that if passed on the URL, this will be pre-populated.
- Postcode - The Postcode for the consignment/order. This must match the postcode stored on the system against the order, but it does not need to match the case or spacing as these will be removed for the comparison.
Once the two fields have been entered, the user should click on the "Find Consignment" button to retrieve the details for the consignment/order.
The Calidus Portal will retrieve the current information from the <external> system then display the results page (see section 7.2)
Gateway Results Page
The results page will consist of a header section, a progress bar, delivery/collection information and any status related information.
The information shown in some of these will depend on the order type (i.e. a delivery order or a collection order) and the order status. The order status will be calculated for the order as follows:
- Ordered - The order exists and does not match any other status.
- Out For Delivery - The order is a delivery order and the delivery trip has been marked as started (i.e. has a start date).
- Out For Collection - The order is a collection order and the collection trip has been marked as started (i.e. has a start date).
- Delivered - The order is a delivery order and an arrival date is set for the orders "to" location.
- Collected - The order is a collection order and an arrival date is set for the orders "from" location.
- Cancelled - An order that has been marked as cancelled (i.e. has a status of "CANCELLED"). Failed - An order that has been marked as failed (i.e. has a status of "FAILED").
The header section will show the status of the order. If the order status is "Out For Delivery" or "Out For Collection" this will also include the last completed stop and the delivery/collection stop. The last completed stop will show the last completed stop on the delivery trip (for delivery orders) or the collection trip (for collection orders). The delivery/collection stop will show the stop for the delivery or collection of the order (depending on the order type).
If the order status is failed the final stage will be labelled as "Failed". In this case the final stage will be shown as "complete" but will use a red bar (instead of the usual green).
If the order status is not failed the final stage will delivered/collected (depending on the order type).
The ordered stage will show the ordered date.
The out for delivery and out for delivery stages will show the date the delivery or collection trip was started.
The delivered and failed stages will show the arrival date at the delivery or collection location.
The collection/delivery information section will show the order reference, the delivery or collection address (depending on the order type), the haulier name and the driver name.
Below the collection/delivery information section the page will show any status related information.
The contents of the status related information section will depend on the status of the order.
If the order status is 'ordered' this will be blank.
If the order status is 'out for delivery', 'out for collection', 'delivered' or 'collected' a map will be displayed.
The map will show a 'home' symbol for the delivery location of the order (for delivery orders) or the collection location of the order (for collection orders), and a 'truck' symbol for the last known location of the truck. This will equate to the last known GPS position of the truck (if available) or the last completed stop on the delivery trip (for delivery order) or the collection trip (for collection orders). If no stops on the trip have been completed and there is no GPS position, the truck icon will not be displayed.
If the status is 'delivered' or 'collected' only the 'home' symbol for the delivery/collection location of the order will be shown, but an additional section will show a signatory name and signature if this has been provided for the order.
Portal Configuration - TTM
The following tables document the configuration options for the TTM module on the Calidus Portal system.
| Section | Item | Admin* | Values | Description |
|---|---|---|---|---|
| CORE_CONFIG | ENQUIRY_WILDCARD | No, Yes | Allow Percent Wildcard in Order Enquiry? | |
| CORE_CONFIG | ORDER_BY_YEAR | Y | No, Yes | Key orders by year? |
| CORE_CONFIG | QTY_DP_D | 0, 1, 2, 3 | Decimal Places for Type D stock codes | |
| CORE_CONFIG | QTY_DP_S | 0, 1, 2, 3 | Decimal Places for Type S stock codes | |
| CORE_CONFIG | QTY_DP_T | 0, 1, 2, 3 | Decimal Places for stock code totals | |
| CORE_CONFIG | QTY_D_S | DU, Stock | System default to stock type S or D? | |
| CORE_CONFIG | USE_PARTNERS | No, Yes | Use Partner Config? | |
| CUST_VIS | DATA_REFRESH | Disabled, Auto, 2, 5, 10, 15 | Data refresh rate, in Minutes | |
| CUST_VIS | DEL_WIN_A | 5, 15, 30, 60, 90 | Delivery Window After, in Minutes | |
| CUST_VIS | DEL_WIN_B | 5, 15, 30, 60, 90 | Delivery Window Before, in Minutes | |
| CUST_VIS | ENABLED | No, Yes | Is Customer Visibility available? | |
| CUST_VIS | KEEP_DELAYED | Today, 1, 2, 4, 6, 8, 12 | How long to keep Delayed orders on the Page, in Hours | |
| CUST_VIS | ORD_EVENT_DEFAULT | Summary, Detail | Default Summary or Detail for Order Events? | |
| CUST_VIS | ORD_EVENT_DETAIL | ORD~Received, TRP~Planned, BOO~Booked, ALC~Allocated, PCK~Picked, LOA~Loaded, MAR~Marshalled, DEP~Despatched, OIT~In Transit, ARR~Arrived, DEL~Delivered, SCN~Scanned/POD, CAN~Cancelled | Event Types to display in Events Detail | |
| CUST_VIS | ORD_EVENT_SUMMARY | ORD~Received, ALC~Allocated, PCK~Picked, LOA~Loaded, MAR~Marshalled, DEP~Despatched, ARR~Arrived, DEL~Delivered | Event Types to display in Events Summary | |
| CUST_VIS | ORD_ITEM_DEFAULT | Summary, Detail | Default Summary or Detail for Items? | |
| CUST_VIS | PAGE_REFRESH | Disabled, 5, 10, 15, 30, 60, 120, 180 | Page refresh rate, in Seconds | |
| CUST_VIS | POD_EVENT | DEL, SCN | Use DEL or SCN event to trigger POD visibility? | |
| CUST_VIS | SHOW_ARRIVED | Today, 15 Mins, 30 Mins, 1 Hour, 2 Hrs, 4 Hrs, 6 Hrs, 8 Hrs, 12 Hrs, None | Time to keep Arrived Orders on the page | |
| CUST_VIS | SHOW_DEL_A | Today, 15 Mins, 30 Mins, 1 Hour, 2 Hrs, 4 Hrs, 6 Hrs, 8 Hrs, 12 Hrs, None | Time to keep Delivered Orders [Amber] on the page | |
| CUST_VIS | SHOW_DEL_C | Today, 15 Mins, 30 Mins, 1 Hour, 2 Hrs, 4 Hrs, 6 Hrs, 8 Hrs, 12 Hrs, None | Time to keep Cancelled Orders on the page | |
| CUST_VIS | SHOW_DEL_G | Today, 15 Mins, 30 Mins, 1 Hour, 2 Hrs, 4 Hrs, 6 Hrs, 8 Hrs, 12 Hrs, None | Time to keep Delivered Orders [Green] on the page | |
| CUST_VIS | SHOW_DEL_R | Today, 15 Mins, 30 Mins, 1 Hour, 2 Hrs, 4 Hrs, 6 Hrs, 8 Hrs, 12 Hrs, None | Time to keep Delivered Orders [Red] on the page | |
| CUST_VIS | SHOW_PLANNED | Today, 1, 2, 4, 6, 8, 12, None | No. Hours of planned orders to retrieve | |
| CUST_VIS | USE_ETA | No, Yes | Use Current ETA for selection if available | |
| CUST_VIS | USE_STOP_ONTIME | No, Yes | Always use the Stop time for On-Time calculations? | |
| CUST_VIS | VIEW_TYPE | Deliveries (Book Date), Deliveries (Planned Date), Collections, All | View Deliveries, Collections or Both? | |
| CUST_VIS | WINDOW | No, Yes | Display Planned Dates as Window? | |
| DROP_VIEW | SHOW_ADDRESS | No, Yes | Show Address Details of stops not owned/hauled? | |
| EMAIL_CONFIG | OWNER_EXCLUDE | Comma separated list of Owners to exclude from event email notifications [OLD] | ||
| ENQUIRY_CONFIG | RT_EXCLUDE | Comma separated list of Reason TYPES to exclude from display in Order Enquiry Detail | ||
| EVENT_CONFIG | LOC_EVENTS | No, Yes | Use additional Location based Events? | |
| ORD_AIRPORT | COL_DEL | Both, Collection, Delivery | Determines whether collections or deliveries are displayed on the page | |
| ORD_AIRPORT | DATA_REFRESH | Auto, 2, 5, 10, 15, 20 | The default time in minutes between data refreshes. Auto means that whenever the last page of data is reached, the system will refresh and start again. If only one page of data is displayed in Auto mode, then it will refresh every 2 minutes. | |
| ORD_AIRPORT | DEL_QTY_ERR | C~Cancelled, R~Reason Code, Q~Quantity | If any of these are selected, a delivered/collected order will be set to RED if there is an applicable exception | |
| ORD_AIRPORT | DEL_WIN_POST | 0, 5, 10, 15, 25, 30, 60 | The No. minutes after the PLANNED collection/delivery date/time. This will define the end of the arrival window in which any PLANNED orders are marked as AMBER | |
| ORD_AIRPORT | DEL_WIN_PRE | 0, 5, 10, 15, 25, 30, 60 | The No. minutes before the PLANNED collection/delivery date/time. This will define the start of the arrival window in which any PLANNED orders are marked as AMBER | |
| ORD_AIRPORT | ETA_CHANGE | No, Yes | Allow override/acceptance of RED status until later ETA received | |
| ORD_AIRPORT | NUM_REC | All, 10, 20, 30, 40, 50 | Default No. Records to display per page | |
| ORD_AIRPORT | PAGE_REFRESH | Off, 5, 10, 15, 30, 60, 120, 180 | The default time in seconds between switching page data. | |
| ORD_AIRPORT | TIME_LIMIT_GREEN | No Limit, 1, 5, 15, 30, 60, 120, 180, 720 | The number of minutes past the actual collection/delivery time that a CLEAN fully collected or delivered order (i.e. GREEN with a tick) will remain on the board after it has been collected/delivered. | |
| ORD_AIRPORT | TIME_LIMIT_LATE | No Limit, 1, 5, 15, 30, 60, 120, 180, 720 | The number of minutes past the actual collection/delivery time that a LATE collection or delivery (i.e. AMBER) will remain on the board | |
| ORD_AIRPORT | TIME_LIMIT_RED | No Limit, 1, 5, 15, 30, 60, 120, 180, 720 | The number of minutes past the collection/delivery time that an order with EXCEPTIONS (i.e. RED with a tick) will remain on the board after it has been collected/delivered. | |
| ORD_AIRPORT | TRACK_TIME | 1, 2, 4, 8, 12, Today | The No. Hours of collection/delivery data to display | |
| ORD_AIRPORT | TRIP_STOP_ORDER | Trip, Stop, Order | The default value for View By | |
| ORD_AIRPORT | USE_CURRENT | No, Yes | Always use current time instead of planned | |
| ORD_AIRPORT | WINDOW_TYPE | None, System, Customer, Other | Window Type - (N)one, (S)ystem Planned Window, (C)ustomer Planned Window or (X) Use Planned Window but display Planned Arrival | |
| ORD_AIRPORT | WIN_ARR_DEP | Arr-Dep, Arr, Dep | If Window Type = N - Use ARR-DEP, ARR only or DEP only | |
| POLLER | TEMPLATE_OWNER | Owner to clone on new owner creation | ||
| TRACKING | DEFAULT_STOP_TIME | None, 5, 10, 15, 20, 30, 60, 90, 120 | Stop Duration Time in minutes | |
| TRACKING | END_OF_DAY | 1:59, 2:59, 3:59, 4:59, 5:59, 6:59, 7:59, 8:59, 9:59, 10:59, 11:59, 12:59, 13:59, 14:59, 15:59, 16:59, 17:59, 18:59, 19:59, 20:59, 21:59, 22:59, 23:59 | Time for end of working day | |
| TRACKING | ETA_ADVANCE_TIME | 2, 4, 6, 8, 10, 12 | No. Hours in future to retrieve ETAs based on planned time | |
| TRACKING | ETA_EXPIRE_LIMIT | 30 Mins, 1 Hour, 2 Hours, 3 Hours, 4 Hours, 8 Hours | The amount of time to consider a last known position as out-of-date | |
| TRACKING | ETA_SORT_SEQ | Planned Date, Stop Sequence | Sort Stops for ETA by Planned Date or Stop Sequence | |
| TRACKING | EVENT_EMAIL_URL | Base URL for Tracking in Events emails | ||
| TRACKING | ID_OR_PC | ID, Postcode | Determine stops by ID or Postcode | |
| TRACKING | TRIP_HAULIER_INDEX | Trip, Haulier | Is Trip indexed by Trip or Trip/Haulier? | |
| WEB_SERVICE | GET_TRIP_SORT_SEQUENCE | Trip ID (Ascending), Trip Start Date (Ascending) | getTrip response Sort Sequence |
- Items marked "Admin" can only be changed by System Administrators
ARCHIVING
Archive Permissions
A setting will be available against the Users Group to define what Archiving actions the users within that group can perform.
Home Page
The Home page will allow the user to switch between the current data and a selected archive:
The default on login will always be the Live/Test system.
Note: If the users group is set to "No Actions" then this will not be available.
Archive Page
The Archive page on the Calidus Portal will allow the use to run an archive, view the ranges of data within each archive and enquire on an order or trip to find which archive contains the requested order/trip.
The page will contain a choice of "Find" "Archive" and "Audit"
The page will look at the User Group to determine whether to display the "Archive" or "Audit" Selections.
Find Section
This section will allow the user to find which archive a trip/order is located in from within the archives. The user can select by Trip, Order or Calidus TMS Reference:
The owner selection will use the restrictions that have been pre-set in the users group. If the data cannot be found in any of the archives, the message 'No Data' will be displayed. If the trip/order is found, then the archive will be displayed:
From this point, the user can go to the home page and select the appropriate archive then use the standard enquiries to find the detail for the order/trip.
Archive Section
This section will allow the user to perform the archive operations. The operations available will be determined by the setting held against the users group. For every option, the user will be offered a confirm prompt before any action is performed.
The second part of the Archive section will contain a list of the archives and information on the data contained within them, with the data sorted from newest to oldest.
Clicking on the Question mark against a detail line will retrieve/display details of the 'data blocks' i.e. Archive References within the archive.
The actions which can be performed in the archive section are detailed below.
Rename Archive Description
The user will select either Archive Description i.e. the description of the database schema or Archive Reference i.e. the name given to an archive within the archive database followed by the description/reference to rename then the new description which will be validated that it does not already exist.
No actual archived data will be affected by the rename.
Note: For Archive Description, only the description will change, the I.D. of the schema will be unchanged.
Archive Data
The user will select an 'Archive Data Up To' date from the date selector then an 'Into Archive' database followed by an 'Archive Reference' for the block of data being archived.
Move Archive
The user will select a 'From Archive' then an 'Archive Reference' and finally an 'Into Archive' to move data from one archive into another. The 'Into Archive' will also contain the option to move data back into the current live/test system dataset.
The 'Archive Reference' drop-down will be multi-select so that all references can be selected, a single reference or multiple references as required.
Delete Archive Data
The user will select a 'From Archive' then an 'Archive Reference' to delete data from an archive.
The 'Archive Reference' drop-down will be multi-select so that all references can be selected, a single reference or multiple references.
Delete Owner
The user will select an Owner then a 'From Archive' to remove all order data from an archive for the selected owner. The owner dropdown will use the restrictions against the users group.
Delete All Data
The user will select an 'Archive' to completely remove all data from an archive and delete the schema.
Note:
All Delete/Remove options will permanently remove data
with no recovery option
Note: For all the Delete/Remove options, there will be NO option to perform data deletion from the current live/test system dataset.
Audit Section
The Audit Section will display an audit of the archive operations performed on the system, sorted from newest to oldest.
Calidus Portal Web Service - TTM
A SOAP web service exists within the Calidus Portal application.
For the TTM module, the following methods are available:
| Method Name | Description |
| getInfo | Returns basic information for the system i.e. system name and version. This can be used to test access to the Web Service |
| getTrip | Returns Trip information (and additionally Stop, Order, Order Detail and Pallet information) * |
| getOrder | Returns Order information (and additionally Order Detail and Pallet information) * |
- These methods can be configured to include/exclude specific tags in the response.
Request Header
On all requests made to the Calidus Portal Web Service, a SOAP header will be required supplying a Username and Password.
The username and password used should correspond to a valid login account on the Calidus Portal system. The login information will be used to set the restrictions that the response will use to return the data i.e. the user's group will determine the restrictions setup against the user and these will be used (as they are in the actual TTM system) to restrict the data that the user can see. Any valid username/password can be used, including users where no restrictions have been added.
Response Header
The Response Header will be included on all responses from the Calidus Portal Web Service.
| Parameter | Data Type | Format | Description |
| <response_id> | xs:string | A35 | A unique ID for the web service response. This code (along with the response_datestamp) can be used to identify requests in the log files. |
| <response_datestamp> | xs:dateTime | XML Date/Time | A string date representing the time of the response as recorded on the logging table. |
| <response_code> | xs:int | 999 | The response code for the request. A return of 0 denotes a successful request/response and a return greater than 0 denotes an error. See section 10.1.6 for a complete list of codes and descriptions. |
| <response_code_desc> | xs:string | A50 | The description of the response. |
| <record_count> | xs:int | 99999 |
A count of the number of records contained in the response for the given method:
|
An example response header will be as follows:
<responseHdr>
<response_id>befc95d5-5a74-4ecb-a3c5-91242ede3619</response_id>
<response_datestamp>2015-12-31 00:00:00</response_datestamp>
<response_code>0</response_code>
<response_code_desc>OK</response_code_desc>
<record_count>1</record_count>
</responseHdr>
Response Field Configuration
The response returned from the web service will utilise the Calidus Portal Page Configuration to allow every field (with the exception of a few key fields where the show/hide and group types fields will be disabled) within the response to be returned or hidden.
The user can select 'Web Service' from the 'Search By' options, select the relevant module (TTM), the method they wish to configure (getTrip or getOrder) and then the section within the message e.g. TRIP, ORDER, REASON, ADDRESS etc. The page will then display all of the available fields in sequence within that section and the user can then choose whether to show (include) or hide (exclude) individual elements from the response.
Notes: The <detail_level> on the message will determine the detail level of the response, not the show/hide configuration.
Sections such as ORDER which can appear on both getTrip and getOrder may be configured separately for each method.Marking a whole section e.g. <pallet_details> as hidden will override any individual show settings within that section.
Method: getTrip
The getTrip method can be used to retrieve trip, stop and order information from the Calidus Portal.
Request Details
| Parameter | Data Type | Format | Description |
|---|---|---|---|
| <detail_level> | xs:string | A1 |
The detail level of the Response:
|
| <trip_id> | xs:string | A20 | A manifest no. that identifies a specific trip within the system |
| <trip_status> | xs:string | A12 |
A valid trip status:
|
| <trip_schedule> | xs:string | YYMMDD | |
| <owning_depot> | xs:string | A12 |
Note: A valid request header is required.
Validation - At least one of the parameters trip_id, trip_status or schedule must be supplied.
Additionally, if trip_status is "COMPLETED" then a schedule (or trip_id) must also be supplied. Owning depot is always optional.
Date limitation - If a schedule isn't supplied then a limit of 5000 trips will be imposed or 1000 if orders are requested. If a schedule is supplied all trips/orders on the schedule (dependent on other filter criteria) will be supplied. If the limit is exceeded a status of '2 - Record Limit Exceeded' will be returned with no trip records.
Response Details
<TRIP> Section
| Field Name | Data Type | Format | Description |
|---|---|---|---|
| <trip_id> | xs:string | A20 | A manifest no. that identifies a specific trip within the system |
| <haulier> | xs:string | A12 | The ID of the haulier assigned to the trip |
| <haulier_name> | xs:string | A50 | The name of the haulier assigned to the trip |
| <haulier_contact> | xs:string | A100 | The contact details for the haulier |
| <driver> | xs:string | A10 | The ID of the driver assigned to the trip |
| <driver_name> | xs:string | A50 | The name of the driver assigned to the trip |
| <driver_contact> | xs:string | A12 | The contact details for the driver |
| <tractor> | xs:string | A12 | The tractor assigned to the trip |
| <trip_trailer_id> | xs:string | A12 | The trailer assigned to the trip |
| <trip_trailer_type> | xs:string | A12 | The type of the trailer |
| <trip_status> | xs:string | A12 | Trip status - ABANDONED, ACCEPTED, COMPLETED, DELETED, EN-ROUTE, PLANNED |
| <trip_start_date> | xs:dateTime | XML Date/Time | The trip start date |
| <trip_lat> | xs:double | Signed Degrees | The Latitude for the current truck position |
| <trip_lon> | xs:double | Signed Degrees | The Longitude for the current truck position |
| <trip_ref> | xs:string | A20 | The reference for the trip |
| <owning_depot> | xs:string | A12 | The owning depot responsible for the trip |
| <gdp_trailer> | xs:string | A1 | Y/N denoting if a GDP trailer is required |
| <trip_schedule> | xs:string | YYMMDD | The Calidus TMS schedule for the trip |
| <last_updated> | xs:dateTime | XML Date/Time | The date/time of the last trip update on the Calidus Portal system |
| <trip_reasons> | tns:reasons | A section containing any TRIP level reasons held on the Calidus Portal. See <REASON> section. Note: Not currently used for Consumer. | |
| <stops> | tns:stops | A section containing the stops on the order. See <STOP> section. |
Note: Fields will only be sent on the response if they have been populated within the Calidus Portal.
<STOP> Section
| Field Name | Data Type | Format | Description |
|---|---|---|---|
| <stop_seq> | xs:int | 99 | |
| <stop_pid> | xs:string | A6 | The unique Trip/Stop PID as supplied by Calidus TMS |
| <stop_type> | xs:string | A2 | The stop type as supplied by Calidus TMS - SU,PK,DL,CL |
| <stop_address> | tns:address | Section containing the stop address. See <ADDRESS> section. | |
| <planned_arr_date> | xs:dateTime | XML Date/Time | |
| <current_arr_date> | xs:dateTime | XML Date/Time | |
| <actual_arr_date> | xs:dateTime | XML Date/Time | |
| <planned_dep_date> | xs:dateTime | XML Date/Time | |
| <actual_dep_date> | xs:dateTime | XML Date/Time | |
| <signed_by> | xs:string | A30 | |
| <signature> | xs:string | A20000 | A Base64 encoded string containing the image of the signature |
| <stop_reasons> | tns:reasons | A section containing any STOP level reasons held on the Calidus Portal. See <REASON> section. Note: Not currently used for Consumer | |
| <orders> | tns:orders |
Section containing the orders within the stop. See <ORDER> section within the getOrder method for details. |
Note: Fields will only be sent on the response if they have been populated within the Calidus Portal.
<ADDRESS> Section
| Field Name | Data Type | Format | Description |
|---|---|---|---|
| <address_type> | xs:string | A3 | The type of the address - COL/DEL |
| <address_id> | xs:string | A20 | The ID of the address |
| <name> | xs:string | A50 | The name associated with the address |
| <line1> | xs:string | A50 | The first line of the address |
| <line2> | xs:string | A50 | The second line of the address |
| <line3> | xs:string | A50 | The third line of the address |
| <line4> | xs:string | A50 | The fourth line of the address |
| <line5> | xs:string | A50 | The fifth line of the address |
| <post_code> | xs:string | A9 | The postcode |
| <country_code> | xs:string | A3 | The data held in the country code field of the address |
| <contact_name> | xs:string | A101 | The contact name |
| <contact_number> | xs:string | A50 | The contact phone number |
| <address_lat> | xs:double | Signed Degrees | The Latitude for the address |
| <address_lon> | xs:double | Signed Degrees | The Longitude for the address |
Note: Fields will only be sent on the response if they have been populated within the Calidus Portal.
<REASON> Section
| Field Name | Data Type | Format | Description |
|---|---|---|---|
| <reason_type> | xs:string | A5 | The type of the reason code |
| <reason_code> | xs:string | A12 | The reason code |
| <reason_desc> | xs:string | A50 | The description of the reason code |
| <reason_comment> | xs:string | A100 | The comment included with the reason |
| <reason_qty> | xs:int | -99999999 |
The quantity associated with the reason code. Note: This field is currently only supplied on ITEM (Order Detail) level reasons. |
Note: Fields will only be sent on the response if they have been populated within the Calidus Portal.
Method: getOrder
The getOrder method can be used to retrieve order information from the Calidus Portal.
Request Details
| Parameter | Data Type | Format | Description |
|---|---|---|---|
| <detail_level> | xs:string | A1 |
The detail level of the Response:
|
| <owner> | xs:string | A12 | A single owner code |
| <so_ref> | xs:string | A20 | A single system order number |
| <po_ref> | xs:string | A50 | A single PO Reference |
| <book_ref> | xs:string | A50 | A single Booking Reference |
| <tms_ref> | xs:string | A50 | A single Calidus TMS Reference |
| <warehouse_id> | xs:string | A6 | The warehouse id from which the order originates |
| <so_status> | xs:string | A3 | A single Order Status e.g. ORD, ALC, MAR, LOA, DEL, CAN |
| <order_date_from> | xs:dateTime | XML Date/Time | The start of a date range for the ordered date against orders. If supplied, then a 'book date to' must also be supplied. The ordered date is the date the order was placed. |
| <order_date_to> | xs:dateTime | XML Date/Time | The end of a date range for the ordered date against orders. If supplied, then a 'book date from' must also be supplied and the 'from date' must be less than the 'to date' |
| <book_date_from> | xs:dateTime | XML Date/Time | The start of a date range for the booked date against orders. If supplied, then a 'book date to' must also be supplied. The search will be against the latest booking dates. |
| <book_date_to> | xs:dateTime | XML Date/Time | The end of a date range for the booked date against orders. If supplied, then a 'book date from' must also be supplied and the 'from date' must be less than the 'to date' |
| <conf_date_from> | xs:dateTime | XML Date/Time | The start of a date range for the conf date against orders. If supplied, then a 'conf date to' must also be supplied. The conf date is the Delivery date of the order. |
| <conf_date_to> | xs:dateTime | XML Date/Time | The end of a date range for the conf date against orders. If supplied, then a 'conf date from' must also be supplied and the 'from date' must be less than the 'to date' |
Note: A valid request header is required.
Validation - One of the reference fields (so_ref, po_ref, tms_ref or book_ref) or one of the date ranges (order_date, book_date, conf_date) must be supplied. If supplied, the date ranges may be no more than 31 days.
Data Limitation - A limit of 10000 order records will be imposed. If the limit is exceeded a status of '2 - Record Limit Exceeded' will be returned with no order records.
Response Details
<ORDER> Section
| Field Name | Data Type | Format | Description |
|---|---|---|---|
| <owner> | xs:string | A12 | The owner code of the order |
| <so_ref> | xs:string | A20 | The ID of the haulier assigned to the trip |
| <addresses> | tns:addresses | Section containing the collection and delivery address of the order. See <ADDRESS> section. NOTE: It is recommended that the system is configured so that if the method is getTrip then this section will be excluded as the address will be against the stop. By default, it will appear. | |
| <so_status> | xs:string | A3 | The current status code of the order |
| <status_desc> | xs:string | A50 | The current status description of the order |
| <warehouse_id> | xs:string | A6 | The warehouse id from which the order originates |
| <po_ref> | xs:string | A50 | The PO ref of the order |
| <book_ref> | xs:string | A50 | The booking ref of the order |
| <tms_ref> | xs:string | A50 | The Calidus TMS ref of the order |
| <customer_id> | xs:string | A15 | The Customer Id of the order (if supplied - currently not for Consumer) |
| <customer_name> | xs:string | A50 | The name associated with the Customer ID |
| <collection_trip> | xs:string | A20 | The Trip ID for the collection of the order |
| <collection_stop> | xs:int | 99 | The Stop Sequence for the collection of the order |
| <delivery_trip> | xs:string | A20 | The Trip ID for the delivery of the order |
| <delivery_stop> | xs:int | 99 | The Stop Sequence for the delivery of the order |
| <book_date> | xs:dateTime | XML Date/Time | The latest booking date held against the order |
| <arrival_date> | xs:dateTime | XML Date/Time | The arrival date held against the order for the delivery stop |
| <departure_date> | xs:dateTime | XML Date/Time | The departure date held against the order for the delivery stop |
| <delivery_date> | xs:dateTime | XML Date/Time | The delivery (conf) date held against the order for the delivery stop |
| <delivery_user> | xs:string | A30 | The delivery (conf) user held against the order for the delivery stop |
| <special_instructions> | xs:string | A250 | Special instructions held against the order |
| <order_comments> | xs:string | A250 | Order comments held against the order |
| <gdp_trailer> | xs:string | A1 | Y/N denoting if a GDP trailer is required |
| <lift_count> | xs:decimal | 99999999.99 | A count of the total lifts on the order |
| <qty_count> | xs:int | 999999999 | A count of the total quantity ordered on the order |
| <pallet_count> | xs:int | 999999999 | A count of the total pallets on the order |
| <line_count> | xs:int | 999999999 | A count of the number of order detail lines |
| <order_reasons> | tns:reasons | A section for ORDER level reasons held on the Calidus Portal. See <REASON> section. Note: Not currently used for Consumer. | |
| <order_details> | tns:order_details | A section containing the orders stock details. See <ORDER_DETAIL> section. |
Note: Fields will only be sent on the response if they have been populated within the Calidus Portal.
<ORDER_DETAIL> Section
| Field Name | Data Type | Format | Description | Example |
|---|---|---|---|---|
| <item_id> | xs:string | A50 | The stock code | 8019008 |
| <item_description> | xs:string | A100 | The description of the stock code | VANSH 100ML NOR X50 |
| <qty_ordered> | xs:int | 999999999 | The ordered quantity against the order line | 123 |
| <qty_packed> | xs:int | 999999999 | The picked/packed quantity against the order line | 123 |
| <qty_to_deliver> | xs:int | 999999999 | The to deliver (despatched) quantity against the order line | 123 |
| <qty_delivered> | xs:int | 999999999 | The delivered quantity against the order line | 123 |
| <item_height> | xs:decimal | 999999999.9999 | The item height stored against the order line | 123.4567 |
| <item_width> | xs:decimal | 999999999.9999 | The item width stored against the order line | 123.4567 |
| <item_length> | xs:decimal | 999999999.9999 | The item length stored against the order line | 123.4567 |
| <item_weight> | xs:decimal | 999999999.99999 | The weight stored against the order line | 123.45678 |
| <item_volume> | xs:decimal | 999999999.99999 | The volume stored against the order line | 123.45678 |
| <item_factor> | xs:int | 999999999 | The unit of sale factor stored against the order line | 10 |
| <factor_1_2> | xs:int | 999999 | The 'unit to case' factor | 10 |
| <factor_1_3> | xs:int | 999999 | The 'unit to pallet' factor | 500 |
| <factor_2_3> | xs:int | 999999 | The 'case to pallet' factor | 50 |
| <case_layer> | xs:int | 999999 | The 'case per layer' factor | 10 |
| <product_type_desc> | xs:string | A12 | The description of the product type of the stock code | AMBIENT |
| <item_reasons> | tns:reasons | A section containing any ITEM level reasons held on the Calidus Portal. See <REASON> section. | ||
| <pallet_details> | tns:pallets | A section containing pallet details for the stock code, if available on the Calidus Portal. See <PALLET_DETAIL> section. |
Note: Fields will only be sent on the response if they have been populated within the Calidus Portal.
<PALLET_DETAIL> Section
| Field Name | Data Type | Format | Description |
|---|---|---|---|
| <order_line_no> | xs:int | 999 | |
| <pick_location> | xs:string | A20 | |
| <pick_pallet_id> | xs:int | 99999999 | |
| <rotation_no> | xs:string | A30 | |
| <cust_rotation_no> | xs:string | A30 | |
| <cust_pallet_id> | xs:string | A30 | |
| <sell_by_date> | xs:dateTime | XML Date/Time | |
| <manufacture_date> | xs:dateTime | XML Date/Time | |
| <qty_to_deliver> | xs:int | 999999999 | |
| <qty_despatched> | xs:int | 999999999 | |
| <picker> | xs:string | A4 | |
| <checker> | xs:string | A4 | |
| <pick_date> | xs:dateTime | XML Date/Time | |
| <picking_reason_code> | xs:string | A4 | |
| <despatch_date> | xs:dateTime | XML Date/Time | |
| <despatch_user> | xs:string | A4 | |
| <despatch_reason_code> | xs:string | A4 |
Note: Fields will only be sent on the response if they have been populated within the Calidus Portal.
Response Codes
| Code | Message |
|---|---|
| 0 | OK |
| 1 | Invalid or Missing Credentials |
| 2 | Record Limit Exceeded |
| 3 | Invalid Parameters |
| 999 | webService Error |

