Calidus Portal User Guide - WMS
![]()
Aptean
Calidus Portal User Guide - WMS
Calidus Portal - 11.1.x
2nd August 2024 - 11.1.x
Reference: TRAINING
Introduction
This document is the user guide for the WMS components of the Aptean Calidus Portal.
Please see the Calidus Portal User Guide - CORE for a description of core Calidus Portal functionality
(User maintenance, menu maintenance, configuration etc.)
Note: Dependent on the modules available and the users' access levels, not all of the following pages will be visible to the user.
See the Calidus Portal - CORE documentation for overall details of each of the maintenance pages. The details below relate only to the Calidus Portal WMS specific functionality of the pages.
WMS Maintenance
Home Page
The Home page will welcome the user into the system. In addition to the news items, for the WMS module a section will be available to select the users current Dataset (if more than one is available), Warehouse and Owner:
Changing these values will change the defaults in all of the other WMS pages.
WMS Group Maintenance
The Group/User maintenance page will allow the user to assign specific WMS options to the group.
Once the group has been selected a WMS Module Options button will be available on the page:
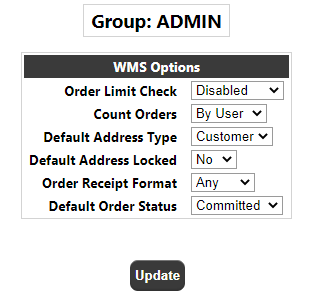
Clicking this button will take the user into the Group WMS Options page:
Order Limit Check - This field will allow the user to specify whether entered orders, copied orders or both should count towards a user's weekly/monthly order/cost limit. The drop-down has the following values:
Disabled - Neither, i.e. order/cost limits are disabled.
Order Entry - Count only entered orders against a user's limits.
Order Copy - Count only copied orders against a user's limits.
All Orders - Count both entered and copied orders against a user's limits.
Count orders - This field will make it possible to specify which user an order is to be counted against when calculating order/cost limits, either the user who created the order (i.e. the user who performed the order entry/copy) or the user the order was created for (i.e. the user the order was entered for or copied to). The drop-down has the following values:
By User - Count Orders against the user the order was created by.
For User - Count Orders against the user the order was created for.
Default Address Type - This option will allow the user to control which address is used as a default when placing orders.
The drop-down has the following values:
User - The users address will be used by default
Customer - The address of the selected customer will be used by default
Default Address Locked - This option will determine whether or not the default address selected above is locked on the order entry page i.e. may not be amended when placing the order. The drop-down has Yes/No values.
Order Receipt Format - Not currently used.
Default Order Status - This option will determine the status of the order when created on the Calidus WMS. The drop-down has the following values:
Committed - the Order will be created at committed status
Suspended - the Order will be created at suspended status
The Update button will save any changes which have been made whilst the Back button will return the user back to the Group Maintenance page.
Group/User Maintenance - Users
The Users button on the Group Maintenance page will take the user into the User Maintenance Page. From here, once a user is selected and found, a WMS specific options button will be available to specify WMS options for the user:
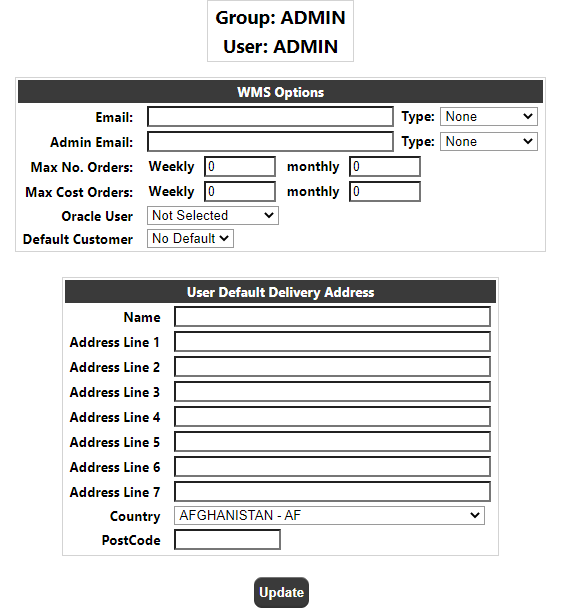
Clicking on this button will take the user into the User WMS Options page
Email - This is the users email address, used for sending alerts, order updates etc. There is no validation on this field.
Type - This field determines the type of emails received by the user. The drop-down values are:
- Non-Admin Only emails initiated by the user i.e. entered orders will be issued.
- Admin Emails such as placing orders on hold, or admin users placing orders on behalf of a user will be issued.
- Both Both of the above email types will be issued
- None No emails will be issued
Admin Email - This is the email address for the supervisor of the user, used for sending alerts, order updates etc. There is no validation on this field. This user will be cc'd on emails created for the users email setting above, but may also receive additional emails if the settings for admin differ from that of the user.
Type - As the users' type.
Max Number of Orders - The weekly & monthly limits for the user for placing orders. This field and the cost field below are linked to the 'Count Orders Against' field in the WMS Group Maintenance page.
Note. A limit of 0 in these fields mean that the user has No Limit, not that they cannot place orders.
Max Cost of Orders - The weekly & monthly cost limits for the user for placing orders. This will only be relevant if the unit cost is stored against the stock master items on the WMS, or entered in the Calidus Portal.
Oracle User - If applicable to the system, this is the user used to link to the oracle reporting suite on the Calidus WMS.
Default Customer - This is the customer used by default on the order entry page.
User Default Delivery Address - An address which can be used as the users default delivery address instead of the delivery address for the customer. Linked to the 'Default Address Type' of the group.
Group/User Maintenance - Restrictions
The Restrictions button on the Group Maintenance page will take the user into the Group Restrictions Page.
See the Calidus Portal CORE specification for detail of how to use this page.
The options available for the WMS are:
Warehouse Id
Owner
Customer
Supplier
Delivery Type
Catalogue
Delivery Type Maintenance
This page allows the user to maintain available delivery types on the system. To create a delivery type the user should enter a Delivery Type Code e.g. NEXD and a Description e.g. Next Day Delivery into the relevant boxes in the 'Create New Delivery Type' section of the page, and then click the 'Create Delivery Type' button.
Once this is done, the details for the delivery type can be maintained:
The Edit Delivery Type section allows the user to select/edit/delete a delivery type. The delivery type drop-down contains all of the available delivery types, and the availability drop-down can be used to make a delivery type available, restricted (not currently used) or unavailable on the system. The 'No Days' field will be described in the Delivery Type Calculation section below.
Day Type - This specifies whether the day is 'normal' i.e. non-delivery or 'delivery' i.e. deliveries can be made on this day.
Cut Off Day / Time - Only available for delivery days, this specifies if there is a cut-off day/time prior to this day for the end of the delivery e.g. a cut-off off for Wednesday set to Monday 4:00pm means that for delivery on Wednesday, an order must be placed before 4:00pm on Monday.
See the next section for details of the delivery type calculation.
Delivery Type Calculation
The delivery date will be calculated whenever an order is created or the delivery type is changed. The calculation below appears complex, but once understood gives great flexibility to setup any number of delivery/service levels.
The process will be as follows:
- Check the delivery type associated with the order. If a delivery type has not been set then set the delivery date can be selected from a calendar.
- Set the delivery date to the current date.
- Store the number of delivery days ('No Days' field) for this delivery type in a temporary value
- If the delivery date is a delivery day and it does not have an associated cut-off day, then reduce the No Days by one.
- If the delivery date is a delivery day and it does have an associated cut-off day then calculate the cut-off date/time for this particular delivery date (see below) and compare to the current date/time. If the current date/time is before the cut-off date/time then reduce the 'No Days' by one. Note: If the current date/time is not before the cut-off date/time then do nothing, i.e. ignore the fact that is a delivery day as the cut-off was missed.
- If the Num days is zero then quit, delivery date calculation is complete
- Add one day to the delivery date and go back to step 4.
If a delivery date represents a day of the week that is a delivery day with an associated cut-off day of the week and time then the following steps will be followed to determine the cut-off date/time for that particular delivery date.
- Set the cut-off date to the delivery date.
- Set the cut-off time to the cut-off time for the delivery day (i.e. from delivery type data).
- If the day of the week the cut-off date represents is the same as the cut-off day for the delivery date then quit, cut-off date calculation is complete.
- Reduce the cut-off date by one day and go back to step 3.
In this way the delivery date will start with the current date and then be moved forward until the specified number of delivery days has been met, ignoring any delivery day for which the cut-off has been missed, i.e. if number of delivery days is set to 3 the date will be moved forward to the third delivery day.
Stock/Catalogue Maintenance
This page allows the maintenance of Calidus Portal specific stock details and the creation/maintenance of stock catalogues. There are two options for this page, selection by product/description or selection by catalogue.
Product Selection
Selecting by Product or Description allows the maintenance of stock options. A list of available stock codes will be displayed:
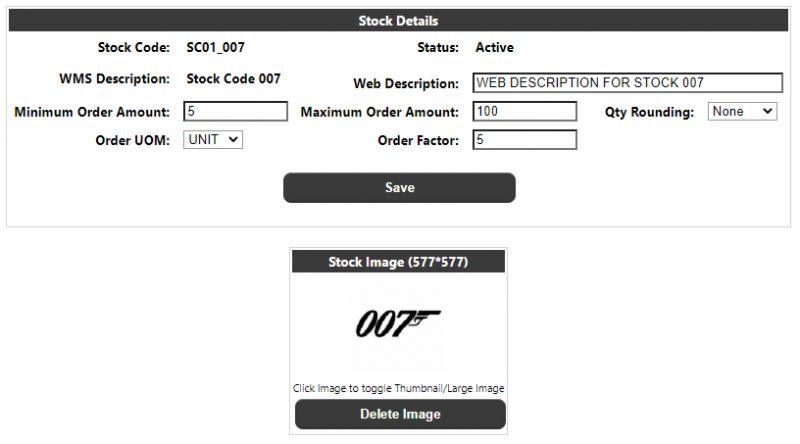
Selecting a stock code will take the user into the Stock Details page:
Stock Code / Description / Status - The stock code, description and status from the WMS (read only)
Web Description - A description which, if entered, will be used on the Calidus Portal system instead of the Calidus WMS Description. Note this will only be on the Calidus Portal pages and e-mails created from the Calidus Portal, not on any documentation called from the Calidus WMS system.
Minimum/Maximum Order Amt - The min/max amount that can be ordered on a single order line for the stock code. Note that a value of zero means no minimum/maximum, not that the stock cannot be ordered.
Qty Rounding / Order UOM / Order Factor - Determines the stock ordering UOM, factor and rounding e.g. if the stock is set to an order UOM of Case with an order factor of 10 and the user enters 15, a rounding set to 'down' would set the ordered qty to 10, if rounding was 'up' it would set it to 20, or if set to 'None' would leave the ordered qty at 15. Note that rounding may take the qty above/below the min/max ordering amounts, in which case an error would be issued.
Stock Image - Allows an image to be associated with the stock code and displayed on certain Calidus Portal pages.
Catalogue Selection
Selecting by Catalogue, the drop-down will display a list of the existing catalogues and an option for 'Not Catalogued' which will display stock codes which are not associated with a catalogue.
Clicking the find will show stock codes assigned to the selected catalogue, or stock not associated with any catalogue:
The user can click on a stock code to go into the stock details page as described above, or may select all the stock codes they wish to add/remove/copy to a catalogue.
The action button at the bottom of the page dictates what will be done with the selected stock codes. If 'Not Catalogued' has been selected, then the only option available will be
- 'Add To' a new catalogue - The new Catalogue and Description fields should be entered
- 'Add To' an existing catalogue - The existing catalogue should be selected from the second drop-down (and the Catalogue/Description fields will be hidden, as they would not be relevant).
Note: If a user creates a new catalogue, it will automatically be added as a restriction into the group to which they belong, but will need to be manually added into other user groups if required.
If an existing catalogue had been selected, the user would have the additional options:
- 'Delete From' the catalogue -The stock would reappear in the Not Catalogued list (assuming it is not in another catalogue). If all of the stock from a catalogue is deleted, then the Catalogue itself will also be deleted.
- 'Move To' another catalogue - The stock would be moved to the selected catalogue (which is different from the 'Add To' option which would keep the stock in the existing catalogue as well as the new one)
- 'Update Description' - Used to update the Catalogue description.
Note: The Select All / None buttons will select ALL records within the catalogue - any filters applied to the data will be removed before the selection is made.
WMS Enquiry
Stock Enquiry
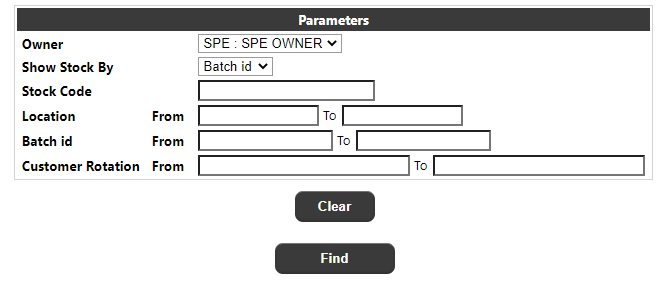
This page allows the user to look at the physical stock available in the warehouse. The page will initially display a parameter page:
The user may optionally enter a Stock Code and ranges for Location, Batch and Customer Batch for selection. The 'Show Stock By' drop-down will determine the sub-level detail displayed once a stock code has been selected. The values will be 'Location' or 'Rotation' (or 'Batch'). Once the user clicks the 'Find' button, a warehouse level detail will be displayed:
If the selection appears in multiple warehouses (as shown above) then there will be one detail line per
warehouse. Selecting a warehouse line will drill-down into a stock level detail for that warehouse:
From the stock level detail, either the Location level or Batch level details will be displayed, dependent on the value the users selected from the parameter page:
Location
Rotation
Clicking on a detail line from either the Location or Rotation page will take the user to the pallet level detail page:
And finally from the pallet level detail page, selecting a line will display Serial no (if available).
On all of the above pages, at the foot of the page will be:
Clicking on the 'Export' button will export the current level of data i.e. what is displayed on the page, to an XLS spreadsheet.
Clicking on the 'Show Qty' button will toggle the display of the quantities between cases/units and unit quantity:
Cases/Units
Qty
Clicking on the 'Back' button will take the user to the previous level, or back to the parameter page.
Journal/Transaction Enquiry
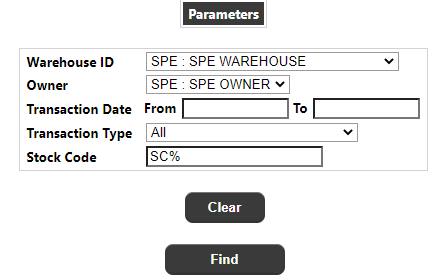
This page allows the user to look at the stock transactions on the system. The page will initially display a parameter page:
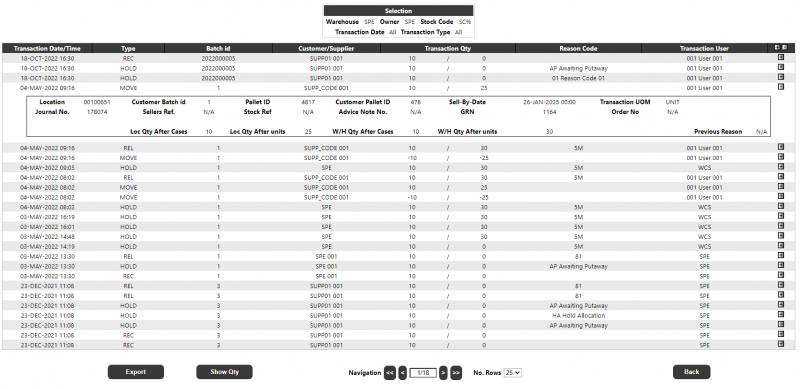
The user must select either a transaction date range or stock code. Once the user clicks the find button, the transactions for the seleced stock code and parameters will be displayed:
The details displayed will be as follows:
- Transaction Date/Time
- Type
- Stock Code (if not selecting by stock code - not shown above)
- Batch Id
- Customer/Supplier
- Transaction Qty
- Reason Code
- Transaction User
Clicking on the '+' button at the end of each detail line will display further information, as displayed above.
At the foot of the page, there will be an 'Export' button which will export the displayed data to an XLS spreadsheet. The 'Show Quantity' button will toggle between cases/units and quantity, and the navigation section will allow movement through the dataset.
Order Enquiry
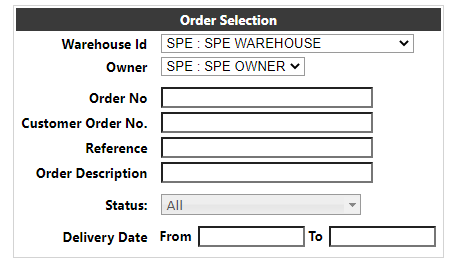
The order enquiry allows the user to find any orders placed on the Calidus WMS system, both through the Calidus WMS system itself and created through the Calidus Portal. The parameters page will be displayed as follows:
Once the user has entered the required selection, clicking find will show a list of the selected order(s):
Clicking on an individual order line will take the user into the Order Details:
WMS Inbound
Pre-Advice
The WMS Pre Advice page can be used to enter a receipt into the Calidus WMS system. The page will initially be displayed as follows:
User
If allowed to select a user, then this section may be allowed to change the user entering the receipt:
Supplier
If a default supplier is set against the user/group, then it will initially be selected, otherwise the user can select (or change) the supplier for the receipt:
Product
From this section, the user can enter the item details for the receipt.
The user can find stock by catalogue ID:
Or by product code or description:
Once the stock is selected they can enter the pre-advice quantities against the required stock lines along with the pallet type and number of pallets:
View/Submit
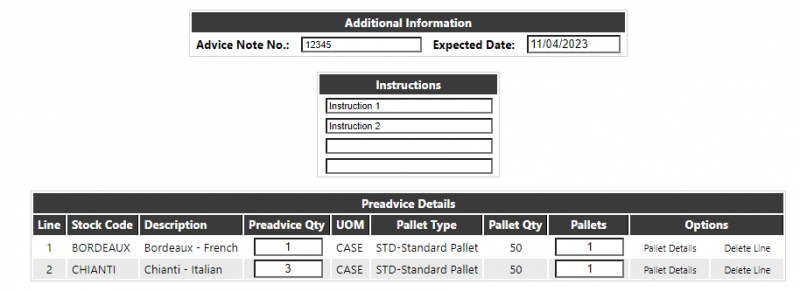
The view/submit section is used to enter additional information, instructions, and enter Pallet Details (if required) as well as specify an expected receipt date. It is also used to submit the or delete/cancel the pre-advice:
If the Pallet Details button appears against the options line, then Pallet details are required and must be entered before submitting the pre-advice. At this point the Submit button will be crossed out, as shown in the screenshot above.
Clicking on the Pallet Details text in the Options section will take the user into the pallet details page:
Dependent on the configuration of the Calidus WMS system, the user may need to enter a Customer Pallet, Customer Batch ID, manufacture and/or Sell-By-Date as well as the Pre-Advice quantity for that pallet. Once all the details have been entered, the user should click the 'Update' button to save the details, then click Back to go back to the View page to enter any remaining pallet details.
Dependent on the configuration of the Calidus WMS system, serial numbers may also be required.
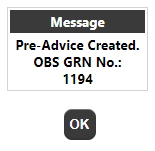
Once all pallet details (if required) have been entered, the user can click the 'Submit' button to submit the pre-advice. This will show the summary/confirmation page detailing the generated pre-advice number on the Calidus WMS system:
Inbound Processing
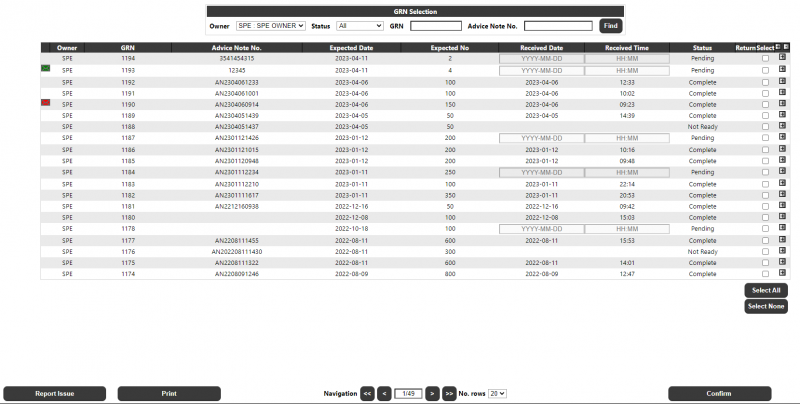
This page will display a list of all available orders for inbound processing. A number of filters will be available for the users to filter what is displayed:
NOTE: None, Either or Both of the GRN No. / Advice Note No. fields may be entered. If both are entered, then the search will try to match against both values.
Once the user has made their selection and clicks on the 'Find' button, a list of orders will be displayed which match the selected criteria. The screen will limit the number of Orders displayed with buttons to fetch the next/previous pages of data.
The data will initially be sorted by Status and GRN No. Clicking on any of the column headings will change the sort sequence. The details displayed for each GRN found will be:
- Msg - showing whether a problem has been reported. If there is an outstanding alert, the icon will be red; else if all the alert(s) have been cleared the icon will be green. Clicking the alert icon will take the user into the Alert/Issues page to display the alerts. NOTE: It will not be possible to select a GRN for processing which has an outstanding alert.
- Owner - the owner/study
- GRN No - the Calidus WMS GRN No
- Advice Note No - the Advice Note No
- Expected Date - the Expected Date in the format DD-MMM-YYYY
- Expected No - the Quantity expected
- Received Date/Time - for Pending GRN's, these fields can be used to capture the actual Received Date/Time when confirming the receipt.
- Return - a tick icon to denote if the GRN is marked as a return i.e. the GRN type is "R".
- Select - a radio button for the user to select a single GRN to be actioned. Note that if a GRN has an outstanding alert, then the radio button will not be available for selection.
- +/- Expansion - clicking on the +/- button at the end of each row will expand the rows details to show the following additional detail information:
- Stock Code - the Calidus WMS Stock Code
- Description - the description of the stock
- Rotation - the Calidus WMS System Rotation No
- Sell By Date - the Sell-By-Date against the line
- Qty - the total unit qty against the line
Note that the +/- icons in the heading will expand/collapse all of the row details.
At the foot of the page, a navigation section will allow the user to navigate between the pages of data and select the number of records to be displayed on the page.
In addition to the navigation section, a selection of buttons will be available, dependent on the order selections made, as described below:
- Report Issue - If this button is pressed clicking this button will display a confirmation dialogue, showing the GRN Number and user name. If the user confirms that they wish to continue reporting a problem, the system will display the Message Creation page passing the selected GRN information into the page. This page will allow the user to enter details of an email. The Email recipient and some of the details will be pre-set on the form. On clicking Send, the email will be sent directly through the client's email program. The details of the email will also be saved in Calidus WMS, and the message thread can be viewed on the Calidus Portal Message Processing page.
- Print - If the GRN status is 'Pending', clicking this button will create a GRN Putaway Note. Selecting a status other than 'Pending' will disable this button. The GRN Putaway Note produced will be a PDF document with a simple list of the GRN information, followed by each product and the Serial Numbers against each product. The list can be saved and printed by the user.
- Confirm - If the GRN status is 'Pending', clicking this button will display a confirmation dialogue, showing the GRN Number and user name. If the user confirms that they wish to continue with the confirmation, the system will create all pallets in their default putaway locations with all pre-advised serial numbers received as if 100%. The page will also mark the GRN as putaway confirmed. Standard processing (automatically holding the stock until the temperature has been confirmed) will remain in place. Once the confirmation has been processed, the data grid will be refreshed to display the changed GRN status.
WMS Outbound
Order Entry
The WMS Order Entry page can be used to enter sales orders on the Calidus WMS system. The page will initially be displayed as follows:
Customer
If a default customer is set against the user/group, then it will initially be selected, otherwise the user can select (or change) the customer for the order:
Product
From this section, the user can enter the item details for the order.
The user can find stock by catalogue, product code or description. Once the stock is selected they can enter the quantities against the required stock lines:
If a stock image is available, hovering over the Image will display a thumbnail. Clicking on the image will display the image in a new window.
Address
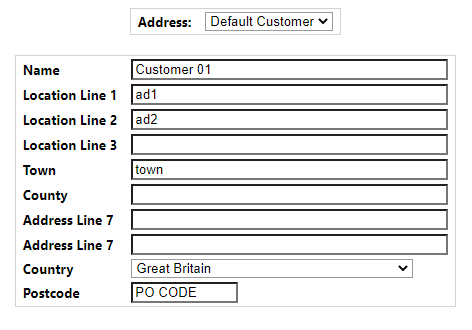
The user can use the default address for the selected customer, their own default address as stored against the user or a new address which will be written onto the Calidus WMS free type address file.
Overview
The overview section is used to enter order references, order text/instructions, select a delivery type (or specify a date if available) and submit the order or delete/cancel the order:
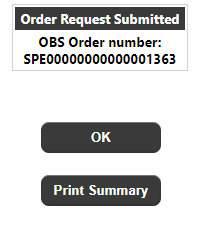
Submitting the order will show the order summary/confirmation page detailing the generated order number on the Calidus WMS system:
The user (if configured) will also receive an email with the order details:
Pick/Pack Processing
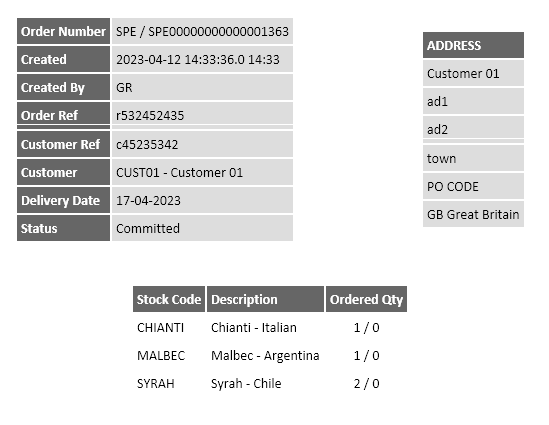
This page will allow pick/pack information to be entered for an order. The page will be called from the outbound processing page (see section 5.3). When the page is called it will display the owner, system order number, order reference, client order number, customer, priority and status of the order. This information will be display only. These fields will use the same values used on the Outbound Processing page. The page will also retrieve any packing setup for the order owner.
If the owner is setup to use packing (i.e. packing setup exists for the owner) then the page will include a packing data section. This section will appear below the displayed order information. This packing section will consist of an air way bill field, a carrier field and a table of any existing packing data for this order. If the packing list for this order has been closed then the air way bill field, carrier field and all of the fields in the packing data table will be display only, i.e. the user will not be able to alter this data. If the packing list for this order has not been closed then these fields will be maintainable and this section will also include an "Packing List" section, a 'Cancel' button and a 'Save' button.
Note: If the packing setup does not exist for the owner then this packing section will NOT be included. This means the page will only include the display of the order information and the 'Confirm Pick/Pack' button.
The airway bill field will both be a text input field which will accept any free text without any validation. Any value entered will be up-shifted to uppercase. This field will accept text up to a maximum of 20 characters. Dependent on system configuration, this field may be required.
The carrier field will show a drop-down list of carriers. The first entry in this list will be blank, there will be an additional entry for each carrier on the Calidus WMS system. For each carrier the list will show the carrier code and the associated carrier name. Dependent on system configuration, this field may be required.
The packing data table will include a row for the column headings and one row for each pack number. Each row will include a 'Pack No.' column and a 'Box Used' column and may (depending on the packing setup) include a 'TM Used' and 'TM Serial' column and an 'Extra TM Serials' box.
If the packing list has not been closed then each row will also include a column containing a 'Delete' check box. If the packing list has not been closed this table will also show an 'Add New Pack' row. This row will include the 'Box Used' column, may (depending on the packing setup) include a 'TM Used and a 'TM Serial' column and will include an 'Add New Pack' button. If the user clicks on the 'Add New Pack' button the system will check if the owner is setup to use packing details.
If the owner is set to use packing details and there is already a pack for this order (see note 4 below) the system will use a confirmation dialogue box to inform the user that Detail packing is required and cannot be performed for multiple packs. They will then be offered the choice of reporting an issue with the order. If the user clicks 'OK' to report an issue they will be taken to the order issue maintenance page to allow the user to enter a description of the issue and who should be informed/emailed about the issue. If the user clicks 'Cancel' then no action will be taken.
If the owner is not set to use detail packing or if there are no packs then when the 'Add New Pack' button is clicked the system will check that a value has been selected for each of the columns (i.e. the 'Box Used' column and if they are shown the 'TM Used' and 'TM Serial' columns). If any of these are still blank an error will be issued preventing the new pack being added until they have been set. If the required fields have been set a new pack will be added to the table of existing packing data with the selected values (the values in the 'Add New Pack' row will be reset to blank ready to add another pack if required). When adding new packs the system will also generate a new pack number for the new pack. These pack number's will be unique within the packing list for this order. If the user is set to use packing details then the validation (see above) will ensure that there is only one pack allowed for the packing list/order and the system will save all of the allocated stock details for this order against this pack. If the owner is not set to use packing details then no stock details will be saved for any pack.
The 'Pack No.' column will display the system generated pack number. These are system generated values which are unique within the packing list for this order. Note that this column will be blank on the 'Add New Pack' row.
The 'Box Used' column will contain a drop-down of possible box types. If the owner is set to use consumable containers then this list will consist of a list of box type stock codes (see note 1 below) from the associated packing consumables owner. For each of these stock codes the drop down list will show the stock code, the associated description and the available quantity (see note 3 below). This list will only include stock codes where the available quantity is greater than zero. If the owner is not set to use consumable containers then this list will consist of a list of pallet types as maintained in the Calidus WMS system. For each pallet type the drop down list will show the pallet type and the associated description. If this is a new row added from the 'Add New Pack' button then the first value in the list will initially be selected.
The 'TM Used' column will only be included if the owner is set to use consumable temperature monitors. When shown this column will contain a drop-down of possible temperature monitor types. This list will consist of list of temperature monitor type stock codes (see note 2 below) from the associated packing consumables owner. For each of these stock codes the drop down list will show the stock code, the associated description and the available quantity (see note 3 below). This list will only include stock codes where the available quantity is greater than zero. If this is a new row added from the 'Add New Pack' button then when this column is shown the first value in the list will initially be selected.
If the owner is set to use consumable temperature monitors then each row will also include a 'TM Serial' text box. This field will accept a 35 character text string with no validation (i.e. any free text will be accepted). Any value entered will be up-shifted to uppercase. If this is a new row added from the 'Add New Pack' button then when this column is shown the text box will initially be set to blank.
The column containing the 'Delete' check box will only be shown if the packing list for this order has not been closed. If the user checks this check box this will mark this row for deletion but will not delete any packing data from the Calidus WMS system until the user clicks on the 'Save' button (see below). When a row is marked for deletion the 'Box Used' field and any 'TM Used' and 'TM Serial' fields will be disabled.
In order to prevent issues with changing existing data and adding new data simultaneously whenever the user makes any changes to the existing packing data the 'Add New Pack' row will be disabled until the changes have been saved or cancelled. Similarly whenever the user changes any data in the 'Add New Pack' row the fields in the existing packing data section will be disabled until the new pack has been added or the changes cancelled.
If the user clicks the 'Cancel' button then the system will re-load this page without saving any changes, i.e. losing any changes made since the last time changes were saved. This will include losing any data in the 'Add New Pack' row that have been entered but not added to the existing data with the 'Add New Pack' button. When the page is first loaded or is re-loaded (e.g. by clicking this button) this button will be disabled until the user changes (including adding to) the packing data.
If the 'Save' button is shown then clicking on this button will save any changes made to the packing data to the Calidus WMS system. When the user clicks on this button the system will save the packing data to the Calidus WMS system. If a packing list already exists for this order then the packing data will be saved against the existing packing list. If a packing list does not already exist for this order then one will be created and the packing data will be saved against that packing list. When saving rows marked for deletion (i.e. where the delete check box is checked) this will delete the pack from the Calidus WMS data and, if using packing details, will delete any stock details associated with this pack. Note that saving the packing data will NOT mark the packing list as closed so changes can still be made to the data. When the page is first loaded or is re-loaded (e.g. by clicking this button) this button will be disabled until the user changes (including adding to) the packing data.
The page will always include a 'Confirm Pick/Pack' button. If the user clicks this button the system will first check if there have been any unsaved changes. If there are any unsaved changes the system will issue an error to the user indicating changes must be saved or cancelled before confirming. If there are no unsaved changes the system will use a confirmation dialogue box to inform the user that "This will pick confirm and pack the order" and allow the user to select 'OK' to continue with the confirmation or 'Cancel' to abort the confirmation. If the user selects the cancel option the dialogue box will close and no action will be taken. If the user selects the OK option the system will call the Calidus WMS system to process the pick confirmation.
The pick confirmation process will be pass the owner and system order number as well as the current Calidus Portal user as the pick confirmation user, the current date as the pick confirmation date, the current time minus 10 minutes as the pick confirmation start time and the current time minus 1 minute as the pick confirmation end time (see note 5 below). This pick confirmation process will perform all of the Calidus WMS pick confirmation processing including the updating of the order status and writing of audit data and will return a status to indicate if there were any errors/issues with the pick confirmation.
If the pick confirmation package returns an error status the user will be informed that an error was encountered during the pick confirmation processing. Once the user has confirmed any error message (by clicking OK) the user will be returned to the Outbound Processing page.
If the status returned from the pick confirmation process indicates that there were no errors and if there is some packing data for this order then the system will call the Calidus WMS pack closure process to close the packing list. The pack list closure package will be passed the packing list number of the packing list for this order and will return a status to indicate if there were any errors/issues with the packing list closure.
If the pack closure package returns an error status the user will be informed that an error was encountered during the pack closure processing. Once the user has confirmed any error message (by clicking OK) the user will be returned to the Outbound Processing page.
If no errors were encountered during the pick confirmation processing and any pack closure processing then the user will be returned to the Outbound Processing page.
Notes:
A stock code is identified as a box type if 'Box required' is set to Yes in the Calidus WMS system for the range/class/category/group of the stock code.
A stock code is identified as a temperature monitor if 'Temp Monitor Required' is set to Yes in the Calidus WMS system for the range/class/category/group of the stock code.
For the box type and temperature monitor stock codes the available quantity is calculated as the on-hand quantity minus the committed quantity for the only stock inventory record that exists for that stock code. This does not take into account any held, allocated or transfer quantities as this stock should never be held, allocated or moved.
This check will include any pack rows that have been marked for deletion (by checking the 'Delete' check-box) but which have not yet been saved / deleted. This means that if using detail packing and a pack exists the user will have to mark the existing pack for deletion and save this to delete the pack before adding a new pack.
As these two times need to be on the same date the minus 10 minutes will never use a time before midnight. For example if a confirmation was performed at 0:05 this would pass 0:04 as the pick end time and 0:00 as the pick start time (instead of 23:54).
Outbound Processing
This page will display a list of all available orders for outbound processing. A number of filters will be available for the users to filter what is displayed:
Once the user has made their selection and clicks on the 'Find' button, a list of orders will be displayed which match the selected criteria. The screen will limit the number of Orders displayed with buttons to fetch the next/previous pages of data.
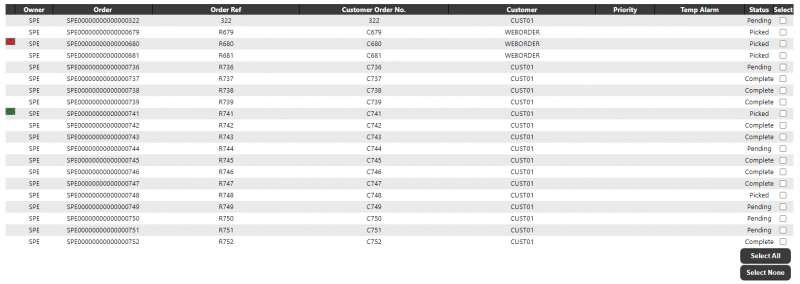
The data will initially be sorted by Status and Order. Clicking on any of the column headings will change the sort sequence. Note this will also reset any order selection. The details displayed for Orders found will be:
- Msg - showing whether a problem has been reported. If there is an outstanding alert, clicking the mail icon will take the user into the Alert/Issues page to display the alerts. NOTE: It will not be possible to select an order for processing which has an outstanding alert.
- Owner - the owner
- Order - the Calidus WMS order reference
- Order Ref - the alternate order reference
- Client Order No - the customer's order reference
- Customer - the Name of the customer
- Priority - the order priority
- Temp Alarm - an indicator to display if the order has been tagged with a temperature control
- Status - the status of the order. See the drop-down description above for details.
- Select - a check box for the user to select which orders are to be actioned. Buttons below this column will allow the user to select all/none of the orders displayed on the page. Note that if there are multiple pages of orders, only those displayed on the grid can be selected at the same time. If the order has an outstanding alert, then the check box will not be available for selection.
At the foot of the page, a navigation section will allow the user to navigate between the pages of data and select the number of records to be displayed on the page. Note that clicking on any of these buttons will reset any order selection.
In addition to the navigation section, a selection of buttons will be available, dependent on the order selections made, as described next.
- Report Problem - If this button is pressed clicking this button will display a confirmation dialogue, showing the Order Number and user name. If the user confirms that they wish to continue reporting a problem, the system will display the Alerts/Issues page passing with the selected order information into the page so that any existing issues for the order will be displayed. The page will allow the user to enter details of an email. The Email recipient and some of the details will be pre-set on the form. On clicking OK, the email will be sent directly through the client's email program. The details of the email will also be saved within Calidus WMS.
- Pick List - If the selected orders are at status 'Pending', this button will print a Pick List for all the orders selected. Multiple orders can be selected when clicking this button. On printing the pick list, this button will update the status of the selected orders to Pick Listed, if they are not already at Pick Listed status. Selecting any order with a status other than 'Pending' will disable this button. Once the pick list has been printed, the data grid will be refreshed to display any changed order status. The Pick List produced will be a PDF document with a simple list of the order information, followed by each product, then the Serial Numbers against each product. The Serial numbers will be displayed in the sequence in which they are held on Calidus WMS. At the footing of each page the text "For Internal Use Only" will be displayed. The list can be saved and printed by the user.
- View Order Request - this will be available if an Order Request document has been uploaded via the File upload functionality from within the Calidus Portal. Clicking the button will display the PDF.
- Despatch Note - If the orders selected are at 'Despatched' status, this button will print a Despatch note for all the orders selected. Multiple orders can be selected when clicking this button. Selecting any order with a status other than 'Despatched' will disable this button. The Despatch note produced will be a PDF document with a simple list of the order information, followed by each product, then the Serial Numbers against each product. The Serial numbers will be ordered ascending and displayed in this sequence. The note can be saved and printed by the user. NOTE: For the confirmation buttons below, only a single order may be selected. If multiple orders are selected, all of the confirmation buttons will be disabled.
Confirmation Section
- Pick/Pack Confirm - If the order selected is at status 'Pending', clicking this button will call a Pick/Pack page, described in section 5.2 .
- Despatch Confirm - If the order selected is at status 'Packed', clicking this button will display a confirmation dialogue, showing the Order Number and user name. If the user confirms that they wish to continue with the despatch, the system will update the order to Despatched within Calidus WMS. The Despatched date and time will be set to the current date and time, and the despatch user will be set to the logged-in user ID. Once completed, the Despatch note will be displayed (as with the Despatch Note button above). Once the confirmation has been processed, the data grid will be refreshed to display the changed order status.
- POD Confirm - If the order selected is at status 'Despatched', clicking this button will display a section on the page to enter the POD Confirmed Date and Time, as well as the contact who has signed for the parcels. If the user clicks on the 'Cancel Confirmation' button then no action will be performed.
If the user enters the required data and clicks on the 'POD Confirm' button, the system will display a confirmation dialogue, showing the Order Number and user name. If the user confirms that they wish to continue with the POD confirmation, the system will update the order to Pod Confirmed status within Calidus WMS. The POD Confirmed date and time will be set to the date and time entered, and the user will be set to the logged-in user ID. Once the confirmation has been processed, the data grid will be refreshed to display the changed order status.
Order Upload
The WMS Order Upload page can be used to upload orders on the Calidus WMS system and enquire on CSV Order files. The ORD_UPLOAD setup on the Calidus Portal will be used to store the required setup for this page:
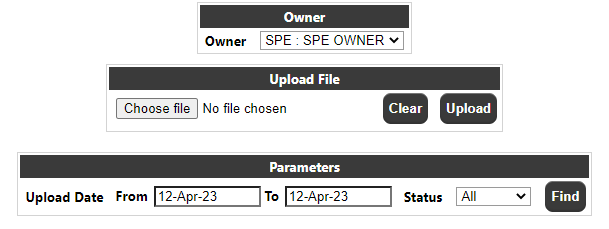
The header section on the Upload page will contain the following sections:
- Owner - A drop-down based on the users' visibility of owners. This will control the visibility of the CSV files in the main section.
- Upload File - this allows the user to upload a new CSV file through their browsers standard file selection box. Only files with an extension of 'csv' will be found in the file selection window. See the 'Uploading Files' section below for details.
- Parameters - a set of filters for finding existing file uploads:
Upload Date (Range) - the date the file was originally uploaded. The default for both the From/To will be the current date.
Status - either 'All', 'PENDING', 'SUCCESS' or 'FAILED'. The default status will be 'All'.
'Find' Button - to display the files for the above selection.
The main section will display the found orders based on the above selection criteria.
ID - the unique ID generated by the Calidus Portal during the file upload
Filename - the uploaded filename
Upload Date/Time - the date/time the file was uploaded onto the Calidus Portal
No. Orders / Success - the number of orders processed in the file (only visible if the status is not 'PENDING')
No. Orders / Failed - the number of orders processed in the file (again only visible if the status is not 'PENDING')
Status:
'PENDING' - File has been uploaded by the Calidus Portal but not yet processed on Calidus WMS
'SUCCESS' - File has been loaded into Calidus WMS with no errors
'FAILED' - At least one order was not successfully loaded into Calidus WMS.
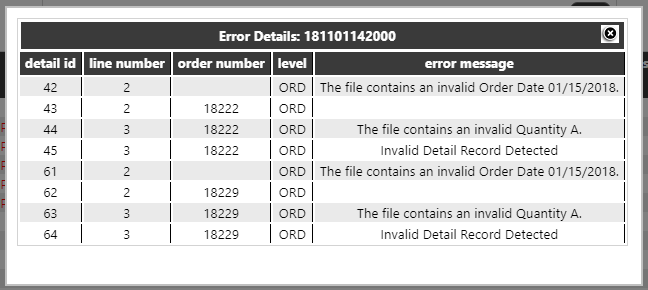
For 'FAILED' CSV files, clicking on the line will open a window with details of the error(s):
WMS Booking
The WMS Booking page can be used to upload orders on the Calidus WMS system and enquire on CSV Order files.
The BOOKING_CONFIG setup on the Calidus Portal will be used to store the required setup for this page:
The WMS Booking page will start with a prompt to select Carrier from a drop-down list.
This carrier list will be restricted by User Group settings.
When selected, 2 tabs will be displayed:
- New Booking
- Manage Existing Bookings
New Booking
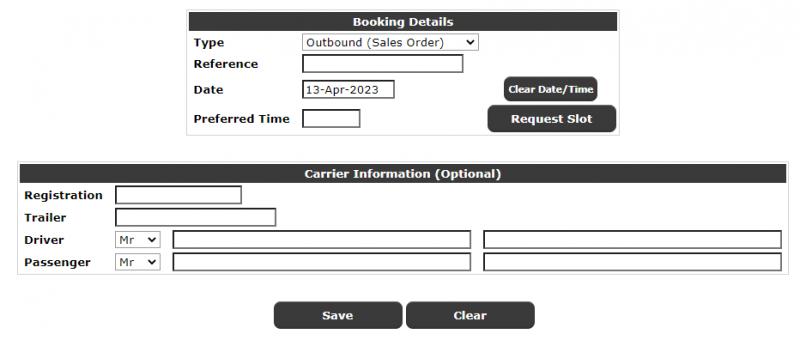
The new bookings tab detail will be displayed as follows:
The Booking details section contains:
- Booking Reference - when saved, the booking reference will be displayed here. This will also be displayed when editing existing bookings. Note: Not displayed in the screenshot.
- Type (Drop-Down List of all available booking types)
- Reference (Based on Type).
- Date - defaulted to tomorrow, allowed bookings for up to X days (parameter)
- Preferred time - the preferred time in 24-hour time format.
- Request Slot button.
Booking Types available are:
- Outbound (Sales Order)
- Inbound (Goods Receipt)
- Full Container Collection
- Empty Container Collection
- Full Container Delivery
Reference will be validated based on the booking type:
- Outbound (Sales Order) - Order Description (Customer's order reference)
- Inbound (Goods Receipt) - Advice Note No (Customer's Goods Receipt Reference)
- Full Container Collection - Order Description (Customer's order reference)
- Empty Container Collection - Container Type
- Full Container Delivery - Order Description (Customer's order reference)
Note: References for all bar empty containers may NOT be repeated - there may only be one active booking for the order reference. If it is found that this is not the case, the screen will not place the booking and display an error that the old booking is cancelled first, quoting the booking reference.
Preferred Time will be validated as between the global Bay opening hours.
The Request Slot button calls a procedure within Calidus WMS to suggest a slot - several time slots on that day will be returned and displayed in a row under the Request Slot button. The system will automatically select the one closest to the preferred time for that user. Note: One must be selected or the system will not save the booking.
The Carrier details section contains:
- Vehicle Registration
- Trailer ID
- Driver Contact Information
- Passenger Contact Information
Note: It is not essential that carrier information is entered.
The 'Save' button will save the booking - this may only be clicked when a Booking Slot has been selected.
The screen will then display a confirmation including:
- The booking reference (prominently displayed)
- Slot Date, Time and Length
- A Close button (to close this popup).
Note: It is possible for a slot to become unavailable between being suggested and the booking being saved. Should the booking not be saved for any reason, the reason for the problem will be displayed on the screen, informing the user of the reason and advising that they contact the relevant support team.
Once a booking is saved and the form is refreshed, the booking reference will be displayed, and the preferred time will be changed to the Booking time. Note: this time can still be changed and used to Request a slot through the Request Slot button.
When saving a new task, where applicable to the task, the Container Yard Task for this job will be created at that time if it does not already exist:
- Full Container Collection - Outbound Road specifying the container.
- Empty Container Collection - Outbound Road specifying the container type.
- Full Container Delivery - Inbound Road specifying the container.
Web Bookings will automatically email a booking confirmation email through to the carrier booking it whenever a booking is created or a booking slot is changed and the booking saved. This will be sent to the Carrier email alone.
Manage Existing Booking
The manage existing bookings tab will be displayed as follows:
All bookings for the chosen carrier from today forward that are not status Processed will be retrieved and displayed in a table in date/time order. The data displayed will be:
- Booking Reference
- Type
- Reference
- Date
- Slot
- Window (length in minutes)
- Carrier Information Provided (if at least Registration and Driver Surname have been identified).
- Amendable. Denotes whether the details can be amended.
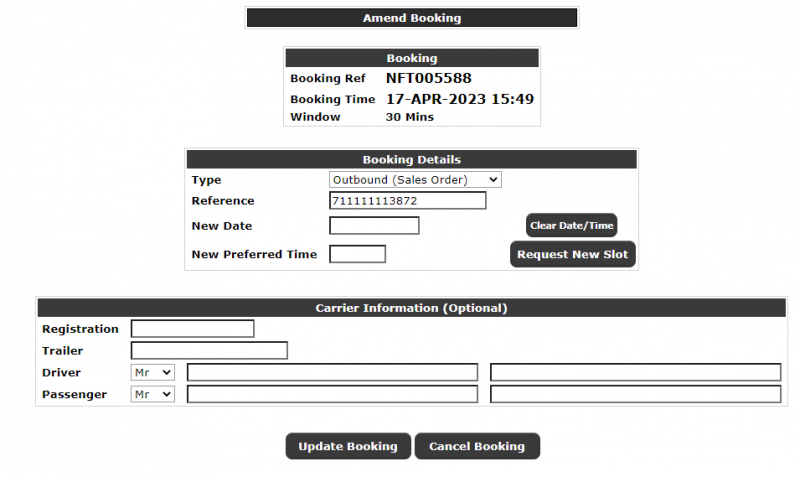
Clicking on a line will show the Amend Booking information, which is almost identical to the 'New'' panel, with the exception of an 'Update Booking' (if the line is amendable) and a button to 'Cancel Booking''. The screen will also display the Booking reference and the Booking Time rather than the preferred time.
- Update Booking will allow the user to change details and send the new details to the Calidus WMS.
When editing existing bookings, the screen will check the time being booked. If this is within a number of hours from the current time (configured as a parameter to this Calidus Portal screen), the system will not allow the Time Slot, Type or Reference to be changed. The booking can be cancelled and rebooked however.
When all changes are complete, clicking the Save button will validate and save the changes in the same way as adding a new task (above)
- Cancel Booking will request confirmation from the user then delete the booking in Calidus WMS. An email will also be sent when cancelling a booking.
To redisplay the existing bookings, the Manage Existing Bookings tab may be clicked again.
WMS Reporting Suite
This is only available on Oracle based Calidus WMS systems where the user has been assigned an Oracle User as detailed in section 2.2.1
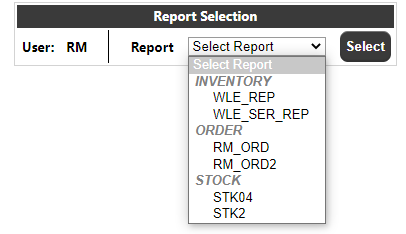
The page will initially display the Oracle user set against the User and a list of the reports assigned to that Oracle user:
Once a report has been selected, the parameters will be retrieved from the Calidus WMS system and displayed:
Note: Parameters which are displayed in italic are fixed from the Calidus WMS system and cannot be altered.
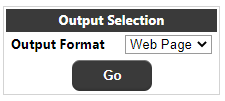
Once the user has entered any parameters, they can select the output format, which will be one of Web Page, XLS or PDF then click the Go button to execute the report.
For a web page, a new window will open with a table containing the results for the report, for example:
For an XLS, a spreadsheet will be created and downloaded to the users PC (assuming the application has access), for example:
For a PDF, a PDF will be created and downloaded to the users PC (again, assuming the application has access), for example:
NOTE: For the PDF output, the system will attempt to shrink the font to display all of the reports fields onto a single line. For reports where there are many fields, this may result in a PDF which does not display as desired.
Calidus Portal WMS Configuration
The following table documents the configuration options for the WMS module on the Calidus Portal system.
| Section | Item | Admin* | Values | Description |
|---|---|---|---|---|
| BOOKING_CONFIG | BOOK_DAYS | 1 Day, 2 Days, 3 Days, 4 Days, 5 Days, 6 Days, 1 Week, 10 Days, 2 Weeks, 30 Days | No. Days in advance to allow booking | |
| BOOKING_CONFIG | CLOSE_HR | 00, 01, 02, 03, 04, 05, 06, 07, 08, 09, 10, 11, 12, 13, 14, 15, 16, 17, 18, 19, 20, 21, 22, 23 | End of Day (Hour) | |
| BOOKING_CONFIG | CLOSE_MIN | 00, 05, 10, 15, 20, 25, 30, 35, 40, 45, 50, 55, 59 | End of Day (Minute) | |
| BOOKING_CONFIG | EDIT_HRS | None, 1 Hr, 2 Hrs, 4 Hrs, 12 Hrs, 24 Hrs, 48 Hrs | No. Hours to allow editing | |
| BOOKING_CONFIG | MIN_BLOCK | 15, 30, 45, 60 | Booking Block Size (Minutes) | |
| BOOKING_CONFIG | OPEN_HR | 00, 01, 02, 03, 04, 05, 06, 07, 08, 09, 10, 11, 12, 13, 14, 15, 16, 17, 18, 19, 20, 21, 22, 23 | Start of Day (Hour) | |
| BOOKING_CONFIG | OPEN_MIN | 00, 05, 10, 15, 20, 25, 30, 35, 40, 45, 50, 55, 59 | Start of Day (Minute) | |
| CORE_CONFIG | CASE_OR_QTY | Cases/Units, Quantity | Use Case/Unit or Quantity in the WMS Enquiries | |
| CORE_CONFIG | COMPANY | Y | Default Company Code | |
| CORE_CONFIG | STKFLG4 | No, Yes | Use Stock Flag 4 value in selections | |
| GRN | CCIS_REQ | No, Yes | Is CCIS check required before GRN? | |
| ORD_UPLOAD | DIR | Directory to put the files in | ||
| ORD_UPLOAD | IP | IP of WMS machine to put files | ||
| ORD_UPLOAD | PASS | Password for WMS Machine | ||
| ORD_UPLOAD | SECURE | FTP, SFTP | Is this FTP or SFTP? | |
| ORD_UPLOAD | USER | User for WMS Machine | ||
| PICKPACK | AIRWAY_REQ | No, Yes | Are airway bills required to complete pack? | |
| PICKPACK | CARRIER_REQ | No, Yes | Is a carrier required to complete pack? |
- Items marked "Admin" can only be changed by System Administrators
Calidus Portal Web Service
A SOAP web service exists within the Calidus Portal application.
For the WMS module, there is currently no Web Service Functionality
PAGE DETAILS
| Type | Description | Page Key | User Guide |
|---|---|---|---|
| Maintenance | WMS-Delivery Types | WMS.maint.delType | 2.3 |
| Maintenance | WMS-Stock | WMS.maint.stock | 2.4 |
| Enquiry | Stock | WMS.enq.enqStock | 3.1 |
| Enquiry | Journal | WMS.enq.enqJournal | 3.2 |
| Enquiry | Order | WMS.enq.orderEnquiry | 3.3 |
| Processing | Pre-Advice | WMS.pread.preadMain | 4.1 |
| Processing | Inbound Processing | WMS.proc.inboundProc | 4.2 |
| Processing | Order Maintenance | WMS.ord.ordMain | 5.1 |
| Processing | Outbound Processing | WMS.proc.outboundProc | 5.3 |
| Processing | Order Upload | WMS.ord.orderUpload | 5.4 |
| Processing | Bookings | WMS.ord.booking | 6 |
| Enquiry | Report Suite | WMS.rep.suite | 7 |


