Manifest Entry
This page will allow the creation of a collection manifest with the ability to add selected orders onto the manifest.
The page will initially display available suppliers (based on restrictions) and a collection date. The user will select a supplier (if only one supplier is available, it will already be selected) and if the supplier users a cross-dock location, that must also be selected before choosing a collection date from the calendar. Clicking on the 'Find' button will display a list of orders for the selected supplier and collection date:
Only orders which are not on a 'Closed' manifest will be displayed.
The data fields displayed can be seen in the above screenshot. The data will initially be sorted by Store Name, but clicking on any of the headings will sort by that column.
To add orders to a manifest, the user should tick the required Select boxes.
In the 'Assign To' section the user will have the option to create a new manifest, or they can select 'Existing Manifest' from the drop-down on the screenshot above. If this is selected, another drop-down will appear next to this with a list of 'Open' manifests for the current supplier.
To add/append orders to a manifest, the user should click the 'Create Manifest' button. Note, the text for this button will change to 'Append To Manifest' if an existing manifest is selected.
Once the user has selected to create/append a manifest, they will be taken onto the Manifest Details page where all of the orders on the manifest will be displayed:
For each order, the Despatch Units (DU's) setup against the supplier on the TMS system will be displayed. Initially the quantities will all be zero.
The user will enter the required DU quantities for each order and click the 'Save' button to store the information. Note that at this point only the DU level information will be stored on the TMS.
The user can either return to add more orders onto the manifest, or if the manifest is now complete, they can close the manifest by clicking on the 'Close Manifest' button. NOTE: This will 'Close' the manifest, and orders cannot be added or removed to/from the Manifest after this point.
The user does not have to close the manifest at this point - they can do it at a later date by using the Manifest Processing page.
Closing the manifest will update the Calidus TMS system and lines will be generated for each DU quantity entered on the orders e.g. entering 3 bags, 2 pallets will generate 5 line items. Once the manifest is closed, the order information will be confirmed back to the user:
Moving the mouse over these lines will highlight the individual orders. Clicking on one of the lines will take the user into the Manifest Order Detail page. See section Error! Reference source not found. below.
After closure, at the bottom of the manifest entry page, two buttons will be available:
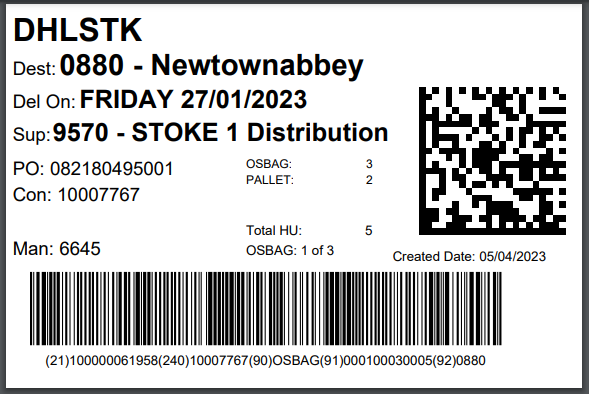
Print All Labels Clicking this button will produce a PDF file containing 'pallet' labels in the required format. A label will be produced for every line item for all orders on the manifest. Once produced the user will be given the option to Open or Save the file. The user can open the file and print using standard Windows functionality.
Example Label
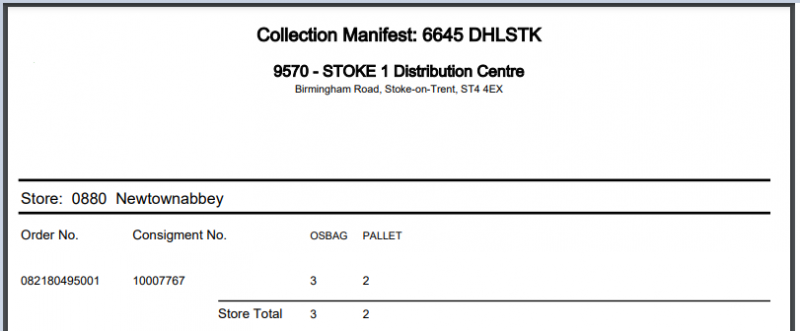
Print Manifest Clicking this button will produce a PDF Manifest sheet in the required format. As with the labels, this may be opened or saved.
Example Manifest


