RDT Functionality
![]()
Aptean
RDT Functionality Guide
WCS - 3.4
30th October 2025 - 11.02
Reference: UG 106181
INTRODUCTION
The purpose of this document is to introduce the clients to functionality available in the RDT system. An overview is included of the functionality required and flows are included to show how these processes work.
Note: Any flowcharts shown or referenced in this document are intended only as a guide to the functionality available in the WCS. The exact functionality is largely configurable and can differ substantially from that shown. However, an effort is made to ensure that the flow charts are updated after major developments.
Notes
If this document is being viewed electronically, all cross-references are in shaded blue and will take you to the reference by clicking on the item. If this document is printed in colour, the cross-references are in blue.
RDT Concept
The main Calidus 3PL system controls the overall data for the system.
Where warehouse movements and other truck-based tasks must be controlled, the manual system usually produces a paper-based instruction or set of instructions for the fork-list truck drivers to complete. When work is completed, the system has the data from the sheets entered in to it and the work is confirmed.
The RDT system replaces the paper-based system, by sending tasks to the RDT system, then allocating the tasks to trucks as and when they require them.
Where paper is used to issue instructions, the RDT will have instructions sent from WMS.
The system created for Calidus 3PL integrates to the main system seamlessly. The current Calidus 3PL update screens (that the RDT system replaces) can be used as backup processes, in the event of system failure. The paper-based system can also be run in parallel with the RDT system for further security. Messages can be resent both from Calidus 3PL and from the RDT system, allowing for recovery.
WCS Structure
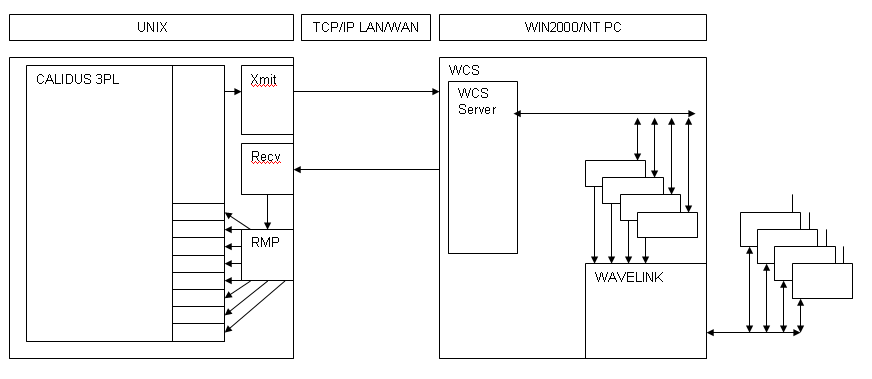
The OBS RDT system has been created using relatively simple programming methods. Where code is required, this is written in Visual Basic. Where connectivity is required (both wireless and wired), third party software has been bought as programming libraries for VB, for example Wavelink for the wireless LAN. These programming modules have allowed us to put together a relatively simple solution to the communications issues (#RDT Messages) As can be seen, Wavelink controls all the communication to the RDTs and each RDT has its own control program, which Wavelink starts, whenever an RDT attempts to communicate with it. This application is written by OBS and provides the screen layouts and validation that the RDT users meet during a session.
The WCS Server controls all communications to and from the WMS, receiving outstanding tasks and sending back completed ones. It also accesses its storage database on request from the RDT control applications, which request work. All messages pass through the server at some point.
From the WMS, the interface also has a generic sender and a receiver, which must be running. They and the WCS interface communicate via socket communication using TCP/IP or via Oracle Advanced Queues.
The transmitter picks up messages from the portion of the Calidus 3PL system that has been written to send messages. These messages are packaged and sent to the socket or queue. The WCS interface picks these messages up and stores them on its task database.
The receiver picks messages up from the socket, validates them to some degree and then passes the messages to a third program, the RMP, or Route Message Processor (In the Oracle system, this is handled by the queues). This is specific to our Calidus 3PL system (as opposed to the other two that can be used generically), as the messages are interrogated to find what type of message they are, then routed to the correct processing program. These processing programs then transfer the data to the main Calidus 3PL database, in the same way that the manual screens do.
PC Requirements
The WCS has been written to make the most of the available memory and processing power of the PC.
Hardware Requirements
- Best processor (normally single processor only)
- 256 Mb RAM min (512 Mb plus recommended)
- 6 Gb disk space min (20Gb over multiple disks recommended)
- Windows 2003/2000/XP/NT4 (Server preferred)
- CD-ROM
- 56K Modem and direct telephone line, or access to PC WAN via dial-up
Software Requirements
- PC Anywhere (latest version) or other Remote control software plus file transfer capabilities. OBS recommend Remote Desktop Connection with FTP Server capability.
- Wavelink StudioCOM (latest version 3.7) by Wavelink - plus licenses.
- Wavelink SNC24 (latest version 4) by Wavelink. (Only required if monitoring/administration of the wireless LAN is required).
- Wavelink Avalanche by Wavelink (Only required if the Wavelink client is to not already installed on the RDTs.
RDT Functionality
RDT Logon
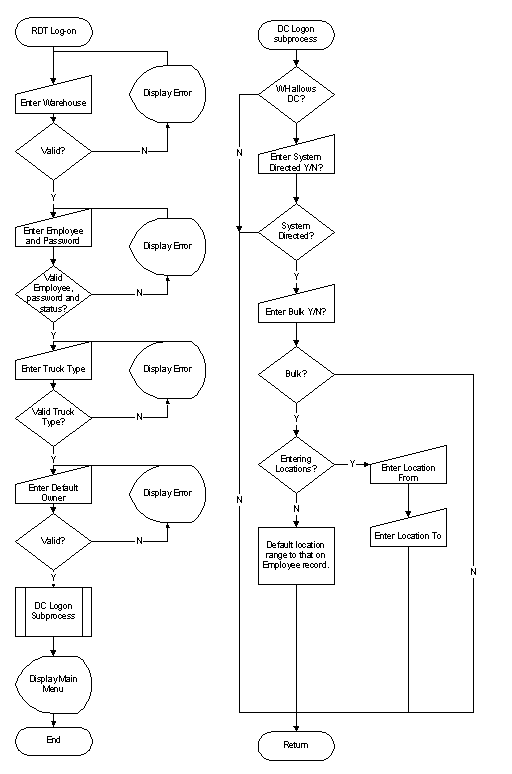
When users connect to the RDT system through their RDTs, they will be required to log in (see flow chart #RDT Log-on Procedure.). This login structure requires them to specify a Warehouse (a default company is assigned to them), a user ID, and a truck type. This information allows the WCS to decide on the information the RDT user is assigned during his working shift. The Employee code entered at log-on can only be used one at a time.
The RDT logon process may also check whether the truck type in intrinsically safe to use for that RDT.
Once the user has entered a truck type value, the logon process will retrieve the intrinsically safe values for the RDT being logged onto and the truck type entered by the user.
If the RDT is marked as intrinsically safe then the user will be able to log on as any truck type, i.e. both intrinsically safe and non-intrinsically safe truck types.
If the RDT is not marked as intrinsically safe, i.e. a standard RDT, then the user will not be able to log on as an intrinsically safe truck type and the RDT will display the error message “Logon as truck type X is not allowed on this device” where X is the truck type value entered.
The user may also choose to enter a default owner. This is used whenever the system prompts the user to enter an owner code. A description of what the owner is used for is provided in #Owner Restrictions.
Depending on the warehouse chosen, the user may be prompted to enter two flags; bulk and system-directed. The first relates to whether the user is working in a narrow aisle environment (Y), or wide area (N). The second flag, system-directed, controls whether the dual cycling menu options appear for a user (Y).
Once logged in to the system, the user will be shown a main menu of available functions. The available functions can be set up against each individual user in the WCS, as can be seen in #Parameter-controlled Functions.
Function keys
The user is provided with help, showing them any special key presses that have an effect in the current module. A key can be pressed in some modules to display additional information requires by the user. The information displayed is bespoke to the client.
Function keys are standardised throughout the RDT system, consisting of:
F1- Confirm Key - in most modules, this key is generally the key that you would press to confirm anything you have entered.F2- Amend KeyF3- Add Key - in some modules (for example, Goods Receipt, Stock Take), you use this key to start the process of adding a new record (pallet, product, etc). When complete, generally you use the F1 key above to confirm that you have finished.F4- Error Key - in most modules, you use this key to state that there has been an exception. You will either be take to the exception screen for this particular process, or you might be shown a menu of exceptions that you can choose from.F5- Special/Zero KeyF7- Enquiries menu - in some modules, you can press this key to open up a quick menu which has access to any enquiries that your user has access to. You can use them here to check/problem solve, and then back out to return to the task that you were in.F8- Additional Information Key - in some modules (for example picking), you can press this key to show additional information on the task. For example, in Picking, this might show you some order/address information at one point, or show you some stock information at a different point. The system keeps track of where you are up to and shows you the most pertinent information. This is so that the main screen is kept uncluttered (which is important on a limited screen display size).F9- Help Key - this will show you which function keys can be pressed at this time.F10- Return to Main Menu KeyCLEAR/ESC- Backup keyCRSRUP- Previous KeyCRSRDN- Next Key
This approach of standardised function keys gives the users familiarity with the operation of each module.
Multi-part movements
Whenever a movement task is raised in the system, if only certain truck types can access certain locations, the system must utilise P&D location. This type of operation leads to multi-part movements, consisting of several stages, numbered by the WCS for simplicity:
| 1 | Source | Destination | ||
| 2 | Source | Interim1 | ||
| 3 | Source | Interim2 | ||
| 4 | Interim1 | Interim2 | ||
| 5 | Interim1 | Destination | ||
| 6 | Interim2 | Destination |
Movements by Truck Type
Location types (and their associated truck types) are used in nearly every enquiry in the WCS. Every task, to move a pallet from one point to another, defines which location type the associated location is. The data received from the WMS defines which truck types are allowed access to that particular location. This, coupled with the truck type the RDT user enters at log-on, defines where exactly that user is allowed to operate.
The data stored on the WCS is the location type, with all associated truck types, along with which company and warehouse the types are associated.
For example, our warehouse contains five areas:
- Receipt Bays (REC)
- Marshalling/Despatch Bays (MAR)
- High Bay Narrow Aisle (NA)
- Low Bay bulk storage (BLK)
- Pick Faces (PIC)
- P&D locations (PND)
We have four truck types:
| Truck Type (Code) | Tasks to be done |
|---|---|
| Reach Truck (RT) | Moving pallets around in Low Bay; Replenishing pick faces; picking full pallets from low bay; put away pallets to Low Bay |
| Counter-balance (CB) | Taking pallets from P&D locations to Marshalling; put pallets on to P&D for High Bay putaway |
| Picker hand cart (PK) | Picking from pick faces and taking to marshalling |
| Narrow Aisle truck (NA) | Moving full pallets around in High Bay |
Therefore, we set up location types as follows:
| Loc Type | Trucks Allowed |
|---|---|
| REC | RT, CB |
| MAR | RT, CB, PK |
| NA | NA |
| BLK | RT |
| PIC | RT, PK |
| PND | CB, NA |
This set-up allows all trucks access to the location types required to do their jobs.
The set-up can be modified to allow for drivers who only have to do one job (e.g. a variant of RT that can only pick pallets to marshalling - it can't put them away, or a truck that can only do replenishments). It can also be modified to take into account certain restrictions on truck height (for example, reach trucks that can only reach 5, 6 or 7 levels high).
Location Efficiency
Location efficiency in the RF system applies in many modules (listed below) when the Move Efficient rule is set to 'By Location'. Some other flags also determine whether this functionality is enabled.
When Move Efficient rule is set to 'By Location'
- Wide Area Dual Cycling
- Narrow Aisle Dual Cycling
- Pallet Moves
- Pallet Replens
- Stock Replens (both when collecting items from bulk then delivering items to the pick faces)
When Pick Allocation is not set to 'By Order Page':
- Part Picking
When the Move Efficient rule is set to 'By Priority', the tasks are provided to the user in priority and time sequence.
Set-up
In order for RF Location Efficiency to operate, several setup items must be completed first.
The warehouse parameters for Aisle, Bay and Level length must be set up for the WCS to know how to extract and examine the different portions of the tasks' location code.
The Aisles must be set up in Calidus 3PL-Mobile.
The aisles must be configured with the following information:
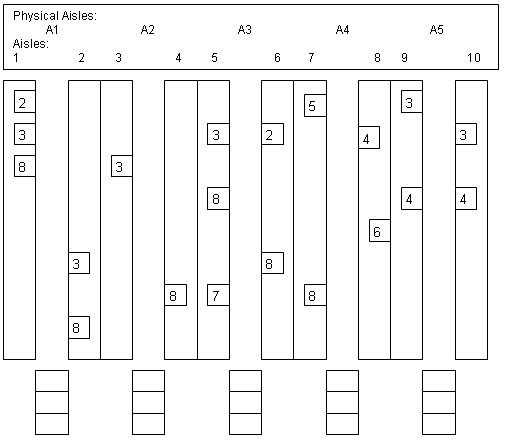
- Aisle Sequence - this must be set to indicate how close one aisle is to another. If the aisle sequences of two aisles are the same, the tasks will be mixed in together.
- Linked Aisle - in addition to aisles having the same sequence, marking the aisles as linked to another aisle ensures that the tasks are mixed together. Additionally, for Narrow Aisle Dual Cycling, both of the aisles will be marked as occupied by the RDT, if the aisles are configured as Narrow Aisles here.
- Split Faces - if this flag is set, the odd and even bays are sorted separately, ensuring that tasks on the same face are seen as closer than tasks on the opposite face.
- High End Access - if the this flag is enabled, the bay sequence within the aisle will be reversed, in that the tasks will be delivered to RDT users from high bay sequences to low bay sequences, rather than the normal default, which is low to high.
Process
Location efficiency is always subservient to Priority. If all tasks are at the same priority, the tasks will be completed in location efficient manner.
The last location the RDT user moved to is used to define where the user is for the next selection.
Aisle Sequences are chosen based on the last aisle the user was at. The aisle is chosen by calculating how close the aisle is to the current aisle. This is achieved by taking the absolute result of sequence of the current aisle from the sequence of the tasks' aisle.
So:
| Aisle | Sequence |
|---|---|
| A | 10 |
| B | 20 |
| C | 45 |
| D | 40 |
| E | 50 |
If we have the following tasks available:
| Task | From | To |
|---|---|---|
| 1 | A/01/01 | C/01/01 |
| 2 | B/01/01 | E/01/01 |
| 3 | D/01/01 | D/99/01 |
| 4 | C/01/01 | D/01/01 |
| 5 | E/01/01 | A/01/01 |
| 6 | C/02/01 | C/99/01 |
If the user's current location is C/01/01, the relative nearness of each task (by aisle) is:
| Task | From | To | Nearness |
|---|---|---|---|
| 1 | A/01/01 | C/01/01 | 35 |
| 2 | B/01/01 | E/01/01 | 25 |
| 3 | D/01/01 | D/99/01 | 5 |
| 4 | C/01/01 | D/01/01 | 0 |
| 5 | E/01/01 | A/01/01 | 5 |
| 6 | C/02/01 | C/99/01 | 0 |
Therefore, the closest task is either 4 or 6.
The algorithm then checks how close the bay is to the current location, if the task is in the same aisle, by converting the bay into base 36, then taking this bay sequence away from the current location bay sequence.
If the tasks are not in the same aisle, the tasks are simply sorted on bay sequence ascending.
So, in our example above:
| Task | From | To | Aisle Nearness | Bay Nearness |
|---|---|---|---|---|
| 4 | C/01/01 | D/01/01 | 0 | 0 |
| 6 | C/02/01 | C/99/01 | 0 | 1 |
| 3 | D/01/01 | D/99/01 | 5 | - |
| 5 | E/01/01 | A/01/01 | 5 | - |
| 2 | B/01/01 | E/01/01 | 25 | - |
| 1 | A/01/01 | C/01/01 | 35 | - |
So task 4 is closest.
The level nearness is decided in the same way.
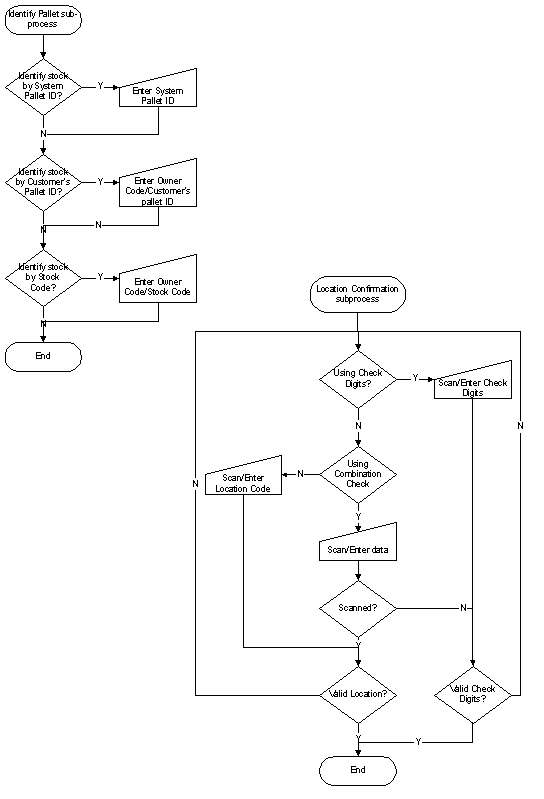
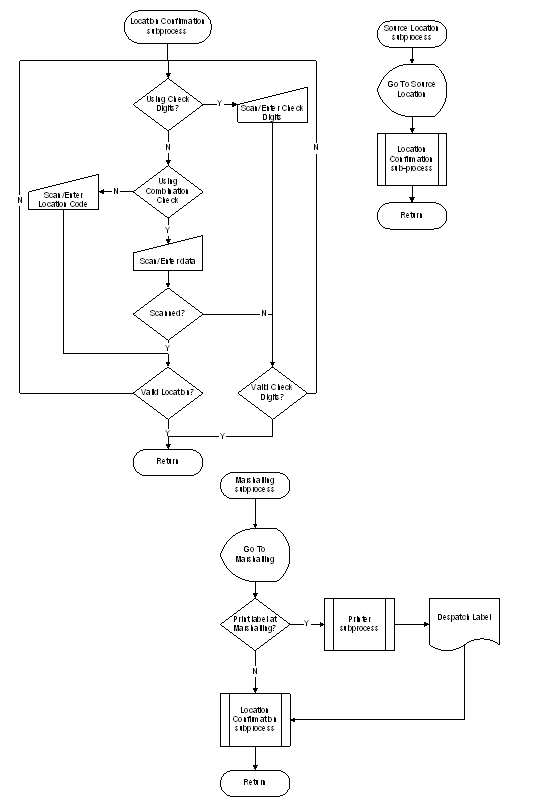
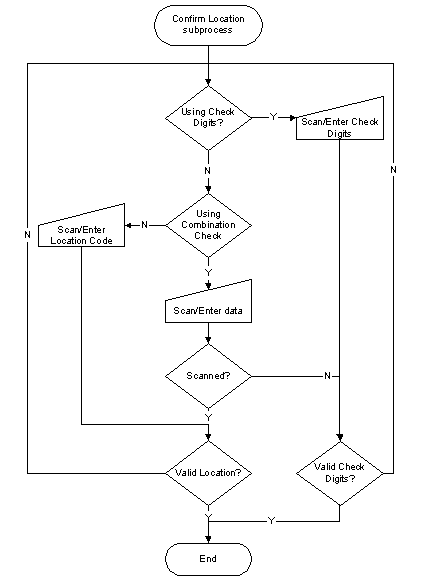
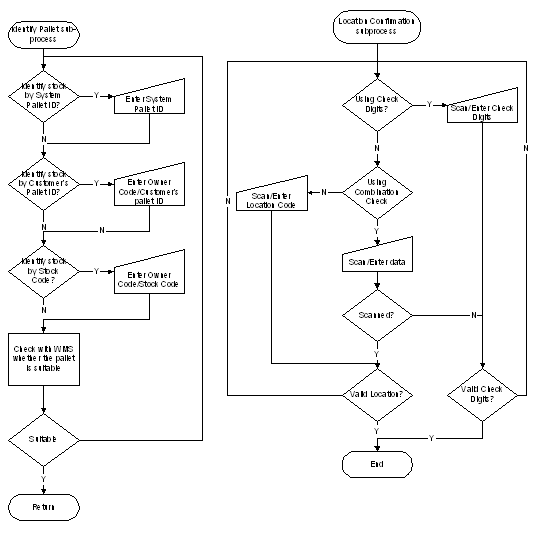
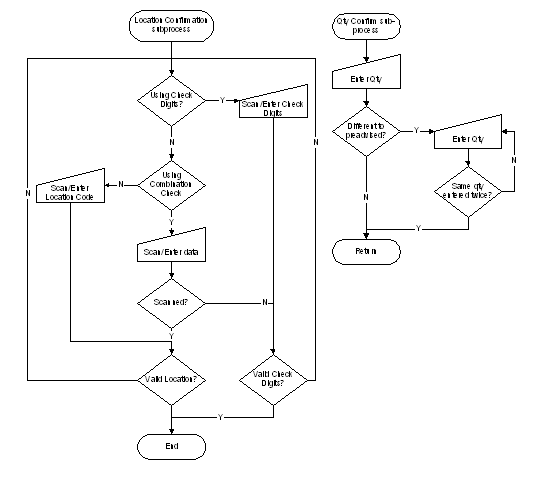
Locations and Check Digits Options
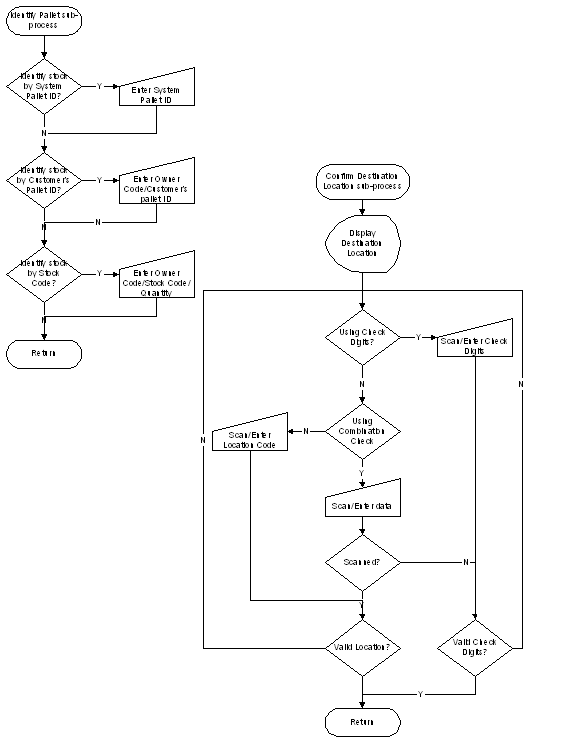
Check digits can be enabled or disabled from the WCS Maintenance program. This gives the functionality that the WCS can be used in warehouses without the expenditure of new location labels, but with a slight loss of accuracy.
The options available are:
- Location - the user is prompted to scan or enter the location again.
- Check Digit - the user is prompted to scan or enter the check digits associated with the location.
- Combo - the user is prompted to scan a barcode at confirmation. If the barcode is scanned, the program expects the barcode to contain the location code. If data is keyed in, the program expects that the data keyed will be the check digits of the location.
Combo check gives the most functionality, as the barcodes can be used to scan locations for when location entry is required (for example, in Ad Hoc Pallet Moves, and repositioning pallet moves).
All validation types described above depend on the location labels the warehouse has - if no barcodes are available to be scanned, then the program will still prompt, but manual entry of the check digits is accepted instead.
The check digits prompted for depend on the data set up in the WMS - if check digits are enabled on some locations but not others, locations without check digits are still prompted, but the program will accept a blank entry (keying RETURN over the field). Additionally, if check digits are entered for locations in the WMS, but Check Digit validation is not enabled in the WMS, the WCS can still check entry of check digits, but the WMS will not require the users to enter them at manual confirmation.
Pallet Identification
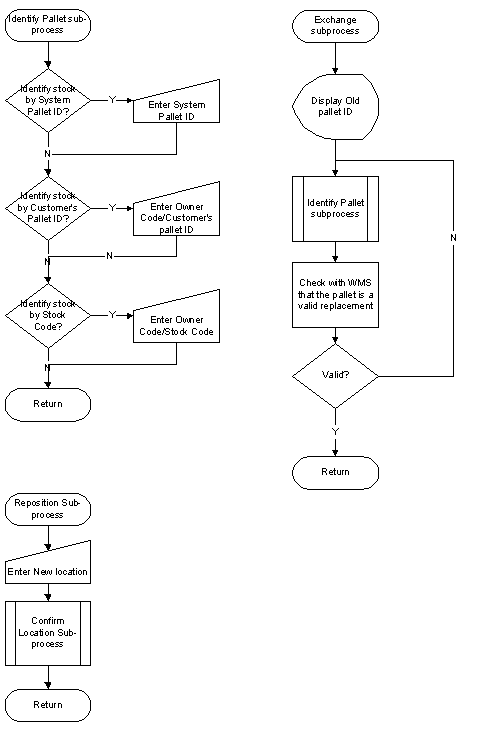
In order to identify that the user has found the correct pallet, most of the RDT modules will prompt for a pallet ID. This is normally a unique identifier for the pallet within the warehouse. The WMS can support two types of pallet identifier, the system pallet ID and a customer's pallet ID (the pallet ID of the pallet in any previous computer systems).
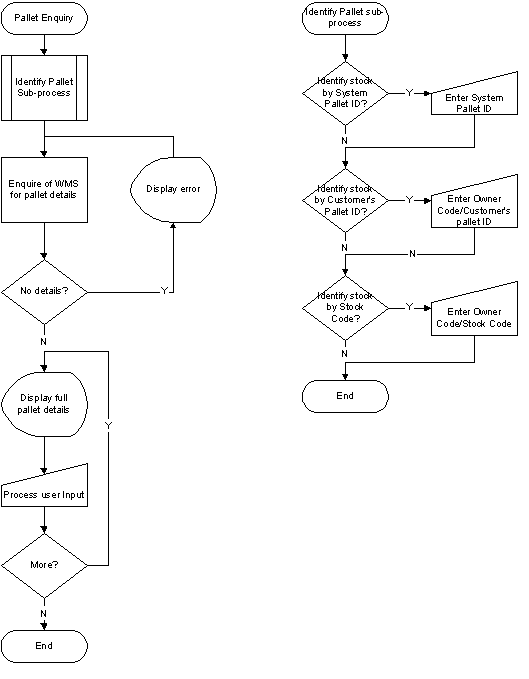
The WCS supports the use of either of these pallet Ids to identify a pallet. The WCS can also support identifying pallets by neither of these, but simply by location and stock code.
P&D processing
The WCS controls P&D locations for multi-part moves (#Multi-part movements) in several ways.
P&D locations can be assigned to inbound and outbound movements within an aisle in the WMS and the WCS.
There are several different types of P&D location used by the WCS:
- Sequential - FIFO and LIFO P&Ds
- Random - where each pallet is accessible at any time
The P&D locations can also be listed as having limited or unlimited storage space for pallets.
The system can cope with the same P&D location used for both in and out, for any of the above types.
In order to cope with multiple face opportunities, there are two further parameters on the aisle:
- OPP AISLE - if this is populated, the aisle (and the opposite aisle) are treated as faces of the same aisle. When location efficiency is being used, all moves for this aisle and the opposite aisle are treated as from the same aisle.
- SPLIT FACES? - If this flag is set, and there is no OPP AISLE, the faces are split ODD and EVEN. If the OPP AISLE flag is set, it should be split AISLE and OPP AISLE.
Moves on P&Ds acquire the priority of any tasks behind them. This means that any high-priority pallet arriving on a P&D will bump the priority of any pallets before it, allowing the high priority move to get out of the racking quicker.
When moving pallets out of NA areas, the system allows for limited P&D space. E.g. when there are 7 high priority outbound moves from an aisle, and only room for 3 pallets at P&D out, only 3 can be done before the P&D must be cleared.
If, during Narrow Aisle Dual Cycling, a pallet is found on an inbound P&D for which there are no movements to the P&D's aisle, the system will ask the operator to confirm the pallet number by re-scanning it.
If the pallet is number is confirmed, the system will check to see if there are any other tasks for that pallet from any other locations in the warehouse that aren't currently being performed by another user. If there are, the system will generate a task to move the pallet from the current location to the location from which the existing task will take the pallet from. If the move generated is to a P&D that is not blocked and the operator's truck is allowed access to, the movement is shown on the RDT. If not, an error message is shown on the RDT.
An exception will be logged with the comment 'Pallet P&D Error' when this occurs.
Barcode support
The WCS supports as standard the following barcode types to be scanned for fields:
- EAN-13
- EAN-8
- CODE-128
- CODE-39
- CODE I25
- UCC/EAN-128
Further barcode types can be supported, but are sometimes limited by the barcode scanner and software.
The UCC/EAN-128 standard is applied in a generic fashion for the most common data items.
Additionally, the RDT Receipt module allows the user to scan UCC/EAN-128 barcodes with multiple data items in a single scan.
The WCS holds an optional table of stock codes, against which it can hold alternative barcodes for the stock. If this table is populated, the WCS will recognise all barcodes associated to the stock code, whenever a stock code entry is required. An example of this means that EAN barcodes for sales, distribution or consumer units may be scanned for each stock code in place of entering the system stock code.
The WCS Stock Barcodes table is maintained from the WMS.
Multiple UOM Processing
If enabled (in the WMS and WCS), the WCS is capable of entering either a simple Cases value, or Cases and Units. In this document, the entry of either of these values is referenced as Quantity entry.
If enabled and the UOM factor between cases and units is greater than 1, the WCS will prompt the user to enter both a cases and units value. These two values are delimited by a forward slash ("/"), for ease of recognition. The user will be prompted first for the case count, then the unit count. The only exception here is when the user is picking units only from a unit pick face. The user will then only be prompted for a unit value, the case value defaulting to zero.
If the systems are not enabled for multiple UOM entry, or the stock being actioned has a UOM factor of 1 (i.e. 1 case = 1 unit), the WCS will only prompt for a case count.
Whatever the values entered on the RDT, the quantities sent back to the WMS will be the conglomerated values (cases, multiplied by the UOM factor, plus the number of units).
Owner Restrictions
When logging on to the RDT, the user is prompted to enter an Owner Code. This owner can control the work that a user is allowed to perform in the warehouse. If a user is set that way, they are known as a restrictive owner.
The owner entered at log-on is part of the selection criteria for the WCS task retrieval. (E.g. if the user logs on as 174, they can only do tasks for owner 174).
If the owner selected has no restrictions, the user entering the owner will only be restricted to those owners without the flag.
For example:
| Owner | Restricted Flag |
|---|---|
| AAA | N |
| BBB | Y |
| CCC | Y |
| DDD | N |
| EEE | N |
If the user logs in as BBB, they will only get tasks for BBB
If the user logs in as CCC, they will only get tasks for CCC.
If the user logs in as AAA, they can get tasks for AAA, DDD or EEE
The tasks restricted in this way will be:
- Goods Receipt
- Putaway
- Pallet Movements/Replenishments
- Picks (Full- and Part pallet)
- Truck Moves/Dual cycling (a combination of all full-pallet movements in the WCS)
If the user is restrictive, it can have settings against it in the WCS. This means that restrictive owners (i.e. owners with their own workforce) can operate in a different way to those that are not restrictive. These owners use the warehouse defaults.
Movement Exceptions
During the processing of some tasks - Putaway, Pallet Moves and Ad Hoc Pallet Moves - the RDT may give some options to the user, to allow them to reflect actions that they took, if they were not what the WCS expected them to do. These are called Movement Exceptions.
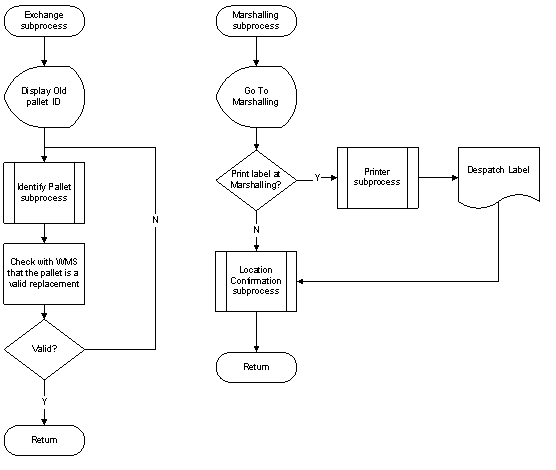
Note: If the warehouse is marked as a Block Stack warehouse within WCS, there is another exception called Exchange Pallet. This is covered in great detail in #Multi-Pallet Locations.
Reposition
In standard pallet movements and putaways, the user can be optionally offered the ability to reposition the pallet to a new destination. This will reflect the new destination in the WMS when completed.
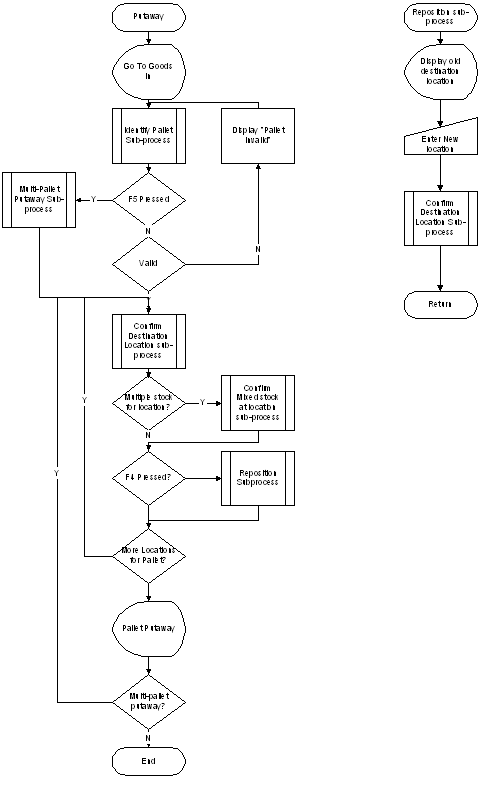
If the user is unable to position the pallet in the suggested location because the aisle is blocked or the location is otherwise inaccessible, the user will have the ability to choose a new location for the pallet, by pressing F4 to reposition the pallet. This option can be password-protected for those users who are given the option. It is intended that this password would be known only to the shift supervisors and as such the user will have to ask the supervisors to authorise the reposition. The RDT will request the user to find a new empty location for the pallet. They will also be asked to confirm the check-digits of the location, if required. Should the location be available, the user will be allowed to use this location. When the task is completed, this information is sent back to the WMS, where the putaway will be confirmed into the new location. The WCS will also create an exception (visible in WCS Maintenance) showing the location the pallet was originally intended for, for information purposes.
Extended Reposition Validation
When repositioning pallets, the WCS can check that the locations are valid in two ways.
The standard way is for the WCS to check only that the location exists and validate the check digits entered by the user.
This can be modified so that the WCS validates in exactly the same way as the WMS, in that it checks that the location availability, the pallet type, number of pallets, bonded status, multi-pallet validation, etc.
If the 'Extended Reposition Validation' rule is set to enabled on the WCS then when a user tries to reposition a pallet, the system will perform extra validation with the WMS.
The following checks are made:
- Check that the pallet exists.
- Check that the location exists.
- Check that the pallet type of the pallet being repositioned is allowed in the location.
- Check the bonded flags of the pallet and location.
- If the pallet is bonded, check that the location is also bonded.
- If stock already exists in the location, check that the bonded flags match the bonded flag of the pallet being repositioned.
- Check that the location is available for the pallet type.
- If the location is a multi-deep location then check whether there are other pallets in the location and that they match the location validation flag setting.
- Check that the location is either a bulk location (Loc Use Type '1'), receipt location ('3'), returns location ('4'), damaged stock location ('5') or a multi-pallet location ('M') and there are no pallets which do not satisfy the location validation (Use) flag setting.
- 4 - Valid pallets contain the same stock, batch number and owner batch
- 5 - Valid pallets contain the same stock.
- 6 - Valid pallets contain the same stock and sell-by date.
- 7 - Check the last receipt location for pallets containing the same GRN and stock.
- 8 - Valid pallets contain the same stock and manufacturing date
Cancellation
For some types of pallet movements, the user can be optionally offered the ability to cancel the movement. This returns the pallet to the original source location on the WMS. This is only offered at the source location.
Multi-Pallet Locations
The WMS contains functionality relating to multi-deep locations, which can be used to handle normal multi-deep locations, block stack locations, drive-in locations, etc - any location where pallets are stored where it is sometimes difficult to locate the exact pallet you want.
The WMS controls pallets moving in these locations during putaway, and can ensure than only pallets of similar properties are held in each location, by a combination of some or all of the following criteria:
- Product Code
- Batch
- Manufacture Date
- Sell-by date
- GRN number
- Quantity
Should pallets be received with different criteria than those marked for validation against the multi-deep location, they will not be located within that location.
The WMS can also manage that the locations be left marked as full, until all of the pallets within a particular location have been moved out, ensuring that newer stock is not positioned in the location before the old stock.
Moving pallets into the multi-deep locations pose no problems for the WCS, as the movements are identical to moves into other, fully-accessible locations. The problems occur whenever pallets are removed from the location.
Whenever the WMS says that something should be done (for example, picking), the pallets being moved are 'hard allocated' to the task. This doesn't change. What does happen is that the user is given the opportunity to exchange the pallet for another one, as long as it matches some criteria.
When a user is given a task to complete from a multi-pallet location, they are sent to the location by the normal manner and asked to confirm the location. Once confirmed, the RDT will ask them to confirm the pallet being picked. At this point, the user is able to press a function key to exchange the pallet for another in that location.
This exchange is done by two methods:
- Task Exchange
- Pallet Exchange
Task Exchange
The first thing that the WCS does is check to see if there is an outstanding task available within the WCS for the pallet that you have scanned. If there is, the WCS seamlessly instructs the user to complete this task first. So, if this was for another order, the RDT would instruct the user to pick this pallet for the other order first, and then send them back to the same location to try to pick their pallet again. The option for exchange pallet is available again at this point.
Pallet Exchange
Should there be no task available for the user to exchange to, the WCS will ask the WMS to validate the pallet scanned as the replacement pallet, to ensure that the pallet can be exchanged. This checks various details such as whether the pallet is:
Allocated to another order
Already moving to another location
Under stock take.
If this is the case, the pallet is not exchanged.
The location must be marked as a multi-deep location. If not, no exchange is allowed.
The process also validates the sell-by date and manufacture date, depending on the set-up of the stock within the WMS. However, it is assumed that the validation against the location has ensured that the pallets within the location are already compatible for exchange, as the location will have validated this when the pallets were put in the location.
If the pallet passes the validation, the RDT user is allowed to continue the task, taking the pallet requested instead. The WMS will hold the new pallet during this exchange manoeuvre. When the task is completed, the WMS will complete the task and formalise the exchange:
The original pallet will be released for further allocation to tasks
The new pallet will have been actioned as if it was the original pallet
The audit trail (and all supporting files) will be maintained.
Enhanced Pick Exchange
The rule 'Enhanced Pick Exchange' controls whether part pick tasks can be exchanged and also whether pick tasks can be exchanged for pallets from different locations. This also affects full-pallet picking pallet exchange.
If the user selects the option to exchange the pallet then the RDT will prompt the user to identify the new pallet. If the ‘Enhanced Pick Exchange’ rule is set to ‘Disabled’ then the RDT will not prompt the user to enter the location of the new pallet and a ‘651’ pallet exchange enquiry message will be sent to the Calidus 3pl system in the present format after the new pallet has been entered.
During full-pallet picking, if the ‘Enhanced Pick Exchange’ rule is set to ‘Enabled’, then the RDT will prompt the user to enter the location of the new pallet after entering a pallet value. This will validate the exchanged pallet with the existing one and may display errors depending on WMS validation configuration.
During part-pallet picking, if the user selects the option to exchange the pallet then the RDT will prompt the user to identify the new pallet. After identifying the new pallet, the RDT will prompt the user to enter the location of the new pallet as the 'Enhanced Pick Exchange' rule must be set to 'Enabled' for part pallet pick tasks to be exchanged. This will validate the exchanged pallet in the same way.
The validation errors that may be displayed are:
- unknown pallet.
- pallet under stock take.
- unable to exchange replen.
- location is not a multi pallet location.
- exchanged pallet unknown.
- pallet is unavailable.
- bonded flags do not match.
- stock codes do not match.
- customer batch values do not match.
Options Available
It is also possible to allow replenishment movements of Pick Faces to be exchanged for another pallet. The checking on the pallet is more stringent than before, checking such things as total available quantity as well as others. In this instance, the exchange is reflected not only on the replenishment movement itself, but on all the orders picking from that pallet. So, the WMS changes the pallet, and re-sends all the pick tasks associated to that pallet at the point of exchange - all the old picks are cancelled.
Labelling
In certain modules (e.g. Goods Receipt, Picking), the WCS can be set up to print labels. This is done by merging the information of the task being processed (e.g. the current pick task) with a defined format. The items that can be merged are being expanded all the time and are referenced by defined field names in the modules.
For example, in picking, there is a defined field called 'MarshLoc'. This is the defined marshalling location for the current pick task. A plain text label template for the despatch label may look like the following:
<TEMPLATE>
ABC Pick Label

Marshalling Location:

{MarshLoc}

</TEMPLATE>
If the task in question has a marshalling location of 'MAR01A', the WCS would merge the template and the data to produce a single label similar to the following:
ABC Pick Label

Marshalling Location:

MAR01A
The templates can be as complex or simple as required. So, if templates are created in ZPL2 label printer formatting, the WCS will still merge the data at the point requested i.e. the field name in curly brackets.
Each RDT modules allowing label printing have a section showing the fields currently allowable on labels printed.
A full discussion around the setting up of printers for use with the WCS can be found in the WCS Setup Guide
GENERIC RDT Modules
Goods Receipt
This module replaces the Goods Receipt Confirmation screen on the manual system, or can be used to complement manual (paper-based) receiving.
Preadvices are entered manually in the WMS Goods Receipt Preadvice screen or received through EDI.
Messages are sent to WCS either from the GR Preadvice screen at the request of a user or automatically from the incoming EDI.
The preadvice to RDTs can be to a stock level, or to a pallet level, depending on how much detail was entered on the WMS.
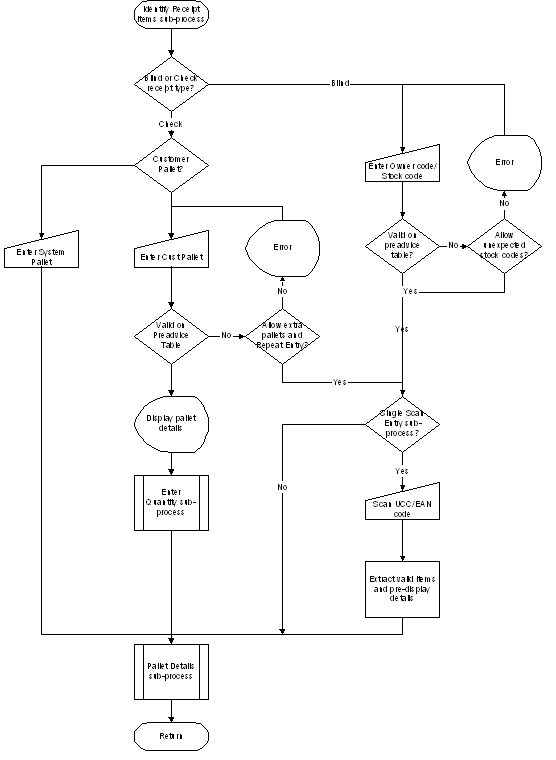
See flow-charts #Receipts.
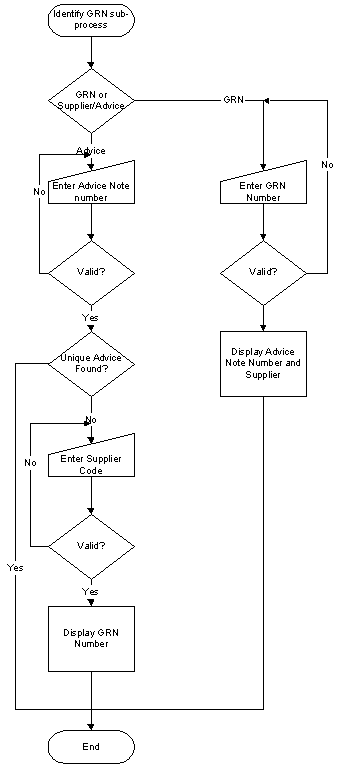
The user is prompted to enter the GRN number from the manual system. This matches to a Preadvice on the WCS. A flag controls whether the user can identify receipts from the Advice Note number.
The user can then conditionally be prompted for:
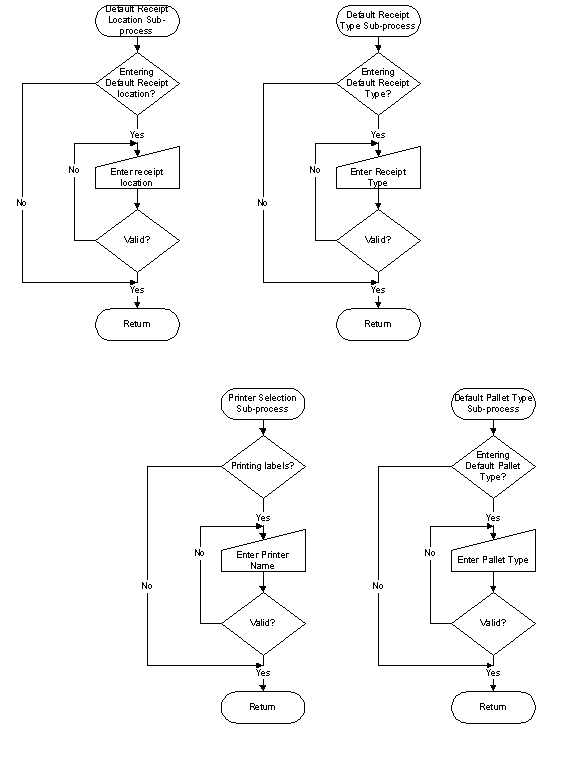
- A default pallet type used for all pallets during that receipt session
- A receiving location
- A receipt type (reflected on the WMS)
- Whether the user wishes to see the ultimate destination location when each pallet is received
- Printer information, if the WCS is printing labels to wireless printers.
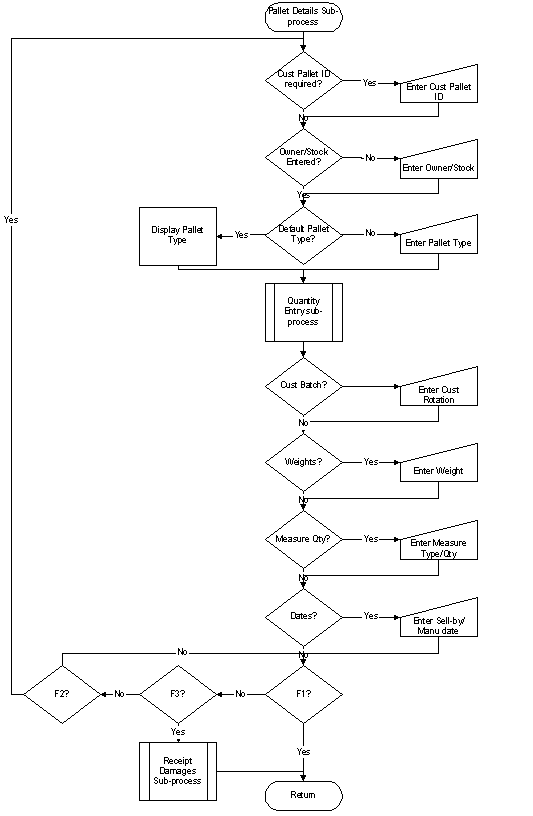
The user then enters all the required information per pallet received. This information varies on the set-up of the WCS, but can include:
- Pallet ID (can by system-generated)
- Customer's pallet ID
- Stockist code
- Stock code
- Batch
- Manufacture and sell-by dates
- Quantities (Including Measure Quantity functionality)
- Weights
The majority of this information could be barcoded on the label, and therefore the WCS allows the user to scan barcodes for each item.
Additionally, if the label contains a barcode with multiple items of information in it (in this case, UCC/EAN-128 barcodes), the WCS can optionally prompt the user to scan these barcodes first.
The items extracted from the barcode can be set up against the warehouse or owner. Only those items actually required by the stock code will be extracted.
Pallets being received can be identified via system pallet ID, customer pallet ID or stock code. For the Blind goods receipt module, Stock code is the identifying key and will be scanned first. For Check goods receipts, the Customer Pallet ID is the identifying key. If the data is preadvised to a pallet level, all of the items above can be defaulted from the preadvice.
The level of validation performed by the WCS on the received stock can be modified extensively, and can include checks on additional stock items, total stock quantity and standard pallet quantities, with four levels of validation (Ignore, Informational message, Supervisor Override, Error).
- Ignore - No check is made.
- Informational message - a check is made and a warning is issued. The user is allowed to continue receiving the pallet.
- Error - a check is made and a warning is issued. The user is not allowed to continue receiving the pallet.
- Supervisor Override - a check is made and a warning is issued. The user must obtain authorisation from a supervisor before they are allowed to continue. The supervisor must enter their employee code and password on the terminal as this authorisation. This authorisation is logged on WCS's Exception table, for auditing purposes.
Each pallet entered generates a putaway message to the RDT and updates the system with the required information, in the form required by the WMS.
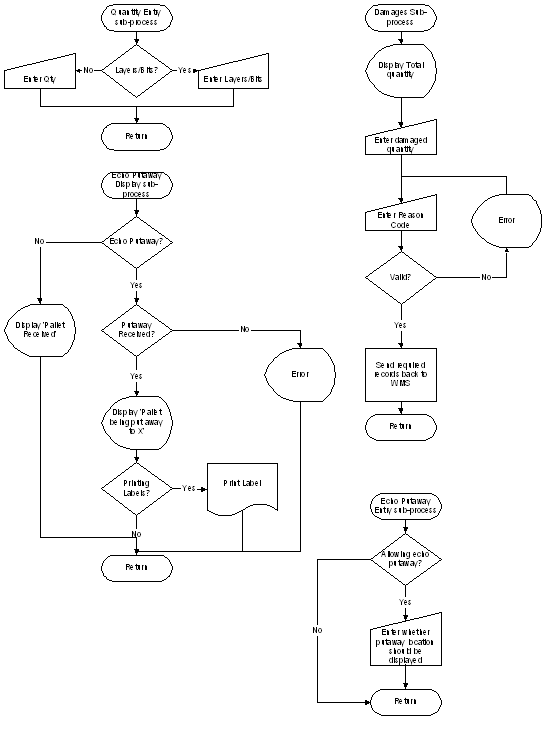
A damaged quantity and reason can also be entered against a pallet. This will create a separate pallet for the damaged stock, and can optionally suggest a damages location for the stock.
It should be noted that RDT Goods Receipt might be slower than manual entry. This is because of the keying of data required on the RDT. If the pallets are labelled with barcodes before receipt and preadvised data is correct, this can speed up. The WCS can be set up in such a way that goods receipts are controlled via the normal WMS screens, with putaways controlled via the WCS.
Pallet Identification and Labelling
A problem within most warehouses is the ability to label pallets effectively - if the receipt process is perfect, but the labelling process is manual, errors will occur.
Standard WMS processing requires the user to print out the pallet labels after the pallets have been entered into the system, then requiring the user to match the label to the pallet received.
Below are some processes which can be used to help the issue.
Use Customer's Pallet Labels
Sometimes the pallets received by the warehouse do not require re-configuration and are already labelled from the customer's systems. The WCS can be configured to capture this Customer's Pallet ID at receipt stage. This can then be used as the WCS task identifier when moving pallets around the warehouse or picking them.
WCS Receipt Label
The WCS can print pallet labels to a wireless printer. The label is printed directly as the pallet is received and the label placed onto the pallet before the user moves on to receiving the next pallet. This reduces the danger of pallets being incorrectly labelled. Standard formats exist for receipt labelling.
Note: Wireless label printers may require a different pallet label to be programmed, as the programming languages of the different types of label printer vary.
Note: Wireless label printers are expensive and may constitute a reason for not printing from the WCS. However, this process could be used in conjunction with fixed printers in the receiving area, although the benefit of staying with the pallet whilst labelling is lost.
If labelling pallets through the WCS, the following items can currently be used on the produced pallet label:
| Field | Description |
| StockCode | Received stock on pallet |
| CustBatch | Received Batch |
| SysDate | Date Received |
| Qty | Received quantity of stock on pallet |
| SPID | System Pallet ID |
| SellByDate | Received Sell-by Date |
| ManuDate | Received Manufacture Date |
| WMSRot | WMS Rotation |
WMS Receipt Label
Automatically produce label to defined printer, using a version of the format that already exists within WMS. The user would then immediately go to the printer upon receiving the pallet, and pick up their label. They would then take it back to the pallet they had just received, and label it. Note: A version of the WMS label print may need to be created, to be run automatically from the WMS RF update program.
Note: There is some room for error in this process, as the user must get the label from a common printer and leave the pallet behind. The defined printer would be made common for the owner, meaning that several people could be printing to the same printer at the same time.
Pre-label
A pre-printed roll of labels could be used, showing a unique identifier on each small label. Whenever a user receives a pallet, the first actions they take are to place one of these small unique labels on the pallet and scan that into the RDT during receipt. This will be held as the Customer's Pallet ID.
If the ID is being used solely for the WCS identifier, and no further pallet label is required, the process can stop here. Should a more detailed label be required, labels can then be produced either automatically from WCS or produced at the end of receiving for all the pallets, directly from the normal WMS goods receipt screens.
It may then be necessary to have WMS label prints that show the Customer's pallet ID (the place the WMS stores the data) as a barcode.
The user would then use the Customer's pallet ID on the labels retrieved to match against the pre-labelled pallets. This would reduce the checking required in labelling pallets.
Note: The normal system pallet ID or the customer's pallet ID could be used to identify the stock in the warehouse in the WCS.
Note: There would be a cost overhead in using the pre-printed roll of unique labels, plus the risk of using an identifier that has been used before - the system would not then allow receipt of the pallet.
Note: The benefit of a pallet being immediately available for putaway may be compromised using this method, depending on how it is implemented.
Putaway
If the system uses RDT Goods Receipt, the putaway messages are sent automatically to the WCS as each pallet is updated.
If RDT Goods Receipt is not in use (or the receipt has not been completed via the WCS at all), the system will send putaway messages to the WCS when CONF is entered in the Goods Receipt Confirmation screen.
See flow chart #Putaways.
The RDT user scans the pallet to be put away. This can be via system pallet ID, customer pallet ID or stock code and quantity. The WCS checks that there is a putaway for this pallet. If there is, the user is prompted to take the pallet to the assigned destination location. When at the destination, the user is asked to confirm their location in the standard fashion. Once the location is confirmed, the pallet is confirmed put away by the system.
If user is unable to position the pallet in the suggested location, they can be optionally given the option to reposition the pallet to a new location. See section #Movement Exceptions for details.
The user can display further information about the pallet by pressing the additional information key. This will currently display the Owner and Stock codes on the pallet.
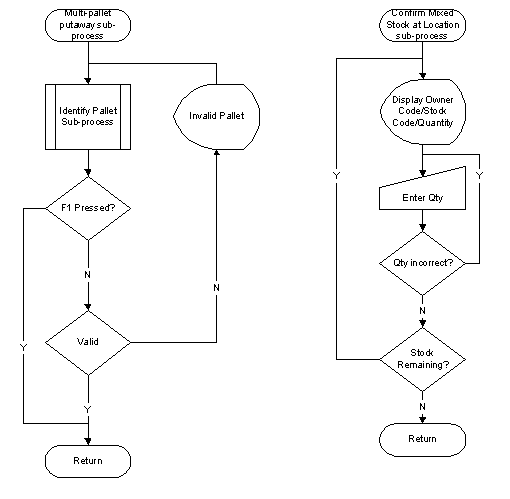
If the pallet being put away has several stock codes on it, the RDT user will be prompted to confirm the stock and quantity for each item, as a check when the pallet is being positioned.
If the stock on the pallet is being positioned to several locations (i.e. multiple stock codes being put in their respective pick faces), the RDT will direct the users to each required location in order, confirming the stock and quantity when there for each item.
If required (and enabled) the RDT user can pick up several pallets on the truck at once and the user will be taken to each pallet's destination in order.
Pallet Enquiry
See flow chart #Pallet Enquiry.
By entering this module and scanning the pallet ID, the user is provided information about the pallet, consisting of the main elements from the WMS:
- Pallet ID
- Customer pallet ID
- Rotation
- Customer's Batch
- Owner code
- Stock code
- Description of the stock
- Pallet quantity in location
- Manufacture and sell-by dates
If there are multiple pallets in the warehouse with this identifier, or the pallet is of mixed stock, all the information is displayed, allowing the user to page through the available information in any order they choose.
In the event of a movement on the pallet, the records to be displayed are decided upon by the use of the following table:
| Reason | ||||
|---|---|---|---|---|
| Stock move in and out | ||||
| P&D pallet | ||||
| Pallet moving out | ||||
| NOT POSSIBLE IN SYSTEM | ||||
| Stock Replenishment | ||||
| Record to - shown above | ||||
| Normal Pallet | ||||
| Error situation which users may want to see |
This enquiry is also available from the Enquiries sub-menu from any other task.
Pallet labels can be printed from this module. This is configurable and uses a label format defined on WCS. Standard formats are available.
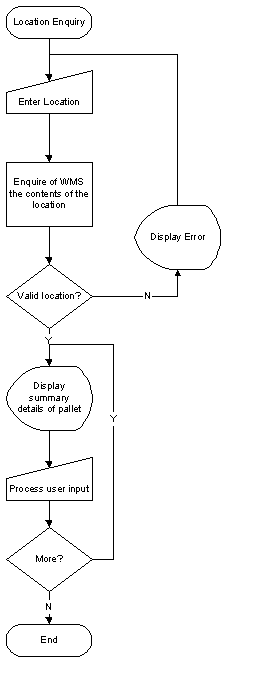
Location Enquiry
See flow chart #Location Enquiry.
By entering this module and scanning the location code, the user is provided information about the pallet, consisting of the main elements from the WMS:
- Pallet ID
- Customer pallet ID
- Owner code
- Stock code
- Description of the stock
- Location quantity
If there are multiple pallets in the location, or the pallets are of mixed stock, all the information for these pallets is displayed, allowing the user to page through the available information in any order they choose.
In the event of a movement on the pallet, the pallets will be displayed showing the on-hand quantity. This means that if a pallet is moving out of the location, it will be shown with the full quantity. If the pallet is moving into the location, it will be shown with zero quantity.
This enquiry is also available from the Enquiries sub-menu from any other task.
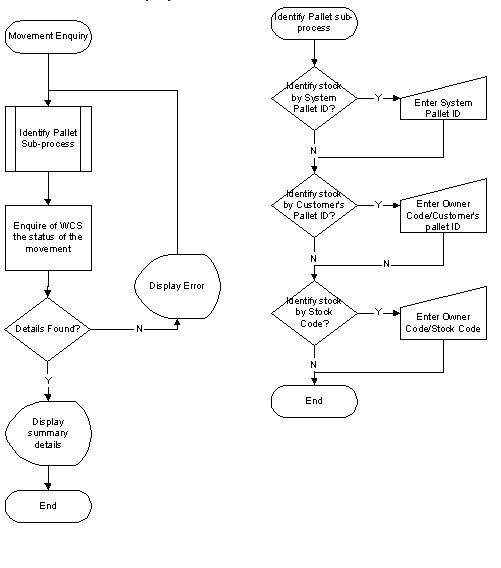
Movement Enquiry
See flow chart #Movement Enquiry.
The two previous sections contain references to pallets mid-movement. The enquiries show the data to the best of the WMS's ability. This enquiry shows any outstanding tasks on the WCS's database, showing the source and destination of the pallet. This allows users to decide what must be done when a rogue pallet is found.
This enquiry is also available from the Enquiries sub-menu from any other task.
Stock Enquiry
The module requests the user to enter an Owner (defaulted from the logon) and a stock code. For the stock code, the user can scan any barcode that has been set up for the stock code in CALIDUS WMS (for example, an EAN Code). CALIDUS Mobile will retrieve the details of the stock code and display them. The details are:
- Owner Code
- Stock Code
- Description
- Standard Pallet Quantity
- Case Quantity
- Defined Pick Face
- Measure Quantity details, if present.
Picking
Full Pallet Picking
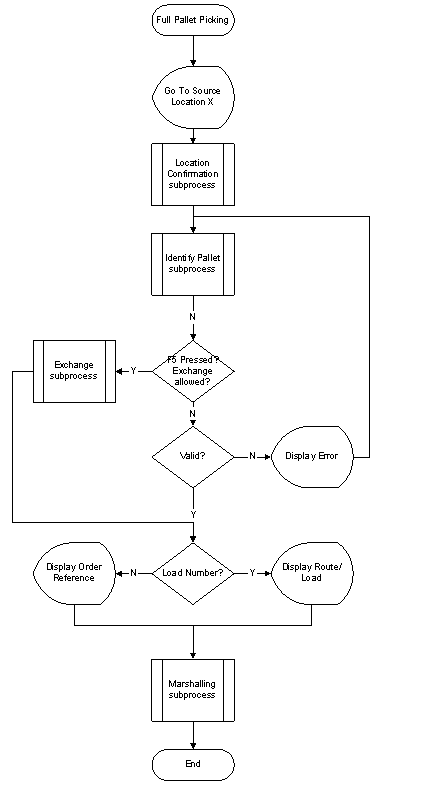
See flow chart #Full Pallet Picking.
On entry to the picking module, the WCS will provide the user with a pick request to fulfil. If this is a full pallet bulk pick, the user will be prompted to go to the location of the pallet, and pick it. If the location is unavailable, the user can change the pallet to be picked.
If the user wishes to change the pallet to pick, they can press the error key and choose 'Pallet change'. If the pallet is changed in this way, the user will be forced to enter the quantity picked and the quantity remaining, in case the new pallet has a different quantity available on it than the first pallet. Enhanced pick exchange may also be enabled - see the section above for details.
When taking the pallet to marshalling, the RDT displays either the order or the route/load of which the stock is part. If the order is on a load, the order reference can be found by using the Information function key.
Note that, if Sky Pick is enabled, sky picks at P&D locations can be picked up, moved and completed using this module in the wide areas.
When this module is used in the Narrow Aisle areas when Sky Picking is enabled "At PND", then these sky picks will also be completed here. the process is:
- Narrow aisle truck driver retrieves the pallet from the narrow aisle bulk location and takes the pallet to the PND out location.
- Narrow aisle truck driver removed the required amount of stock from the pallet onto another pallet, entering a unique id for the new pallet so that it can be identified, and leaves this new pallet at the PND out location.
- Narrow aisle truck driver returns the remaining original pallet back to the narrow aisle source location.
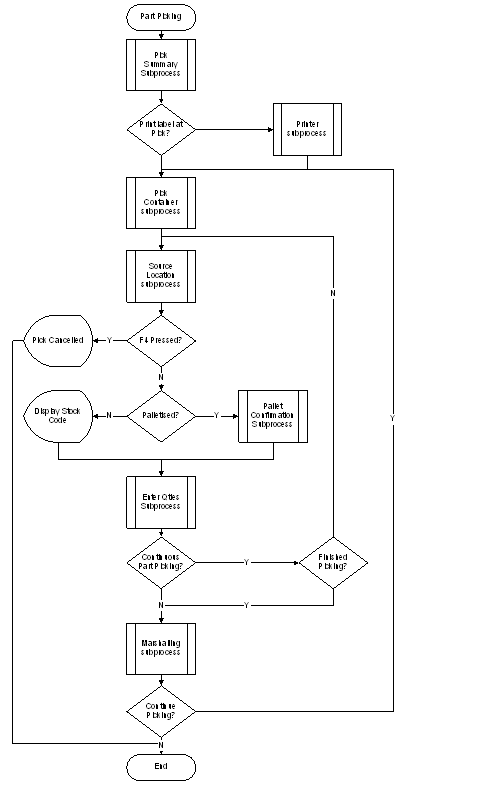
Part-pallet Picking
Part Picking covers both Case picking and Unit picking, if both the WCS and WMS are enabled for this. See section #Multiple UOM Processing for details of multiple UOM processing.
See flow chart #Part-pallet Picking.
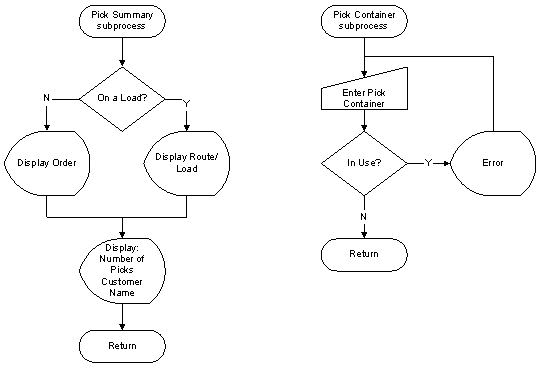
On entry to the part-picking module, the WCS will provide the user with a pick request to fulfil. The user will first have a summary screen displayed, showing the order or route/load given to the user and the number of tasks for the user to complete. The customer name is also included, from the first pick task.
The user will be prompted to go to the location of the pallet, and pick it. (The user has the option of choosing where to start picking, i.e. they can choose a start location at this point.)
Checks can be made on the pick pallet to ensure that the required replenishment has been completed to the pick location before the pick is released to the pickers.
If the location is unavailable, the user can cancel the pick.
The user will be prompted to confirm either the stock code or the pallet, depending on whether the stock is palletised. There is also the option to identify the pallet by the stock code only, by stock and batch or by pallet and stock, with a visual confirmation of batch.
The user also optionally has the ability to show the exact details of the pallet, to identify the pallet if the pallet label is missing.
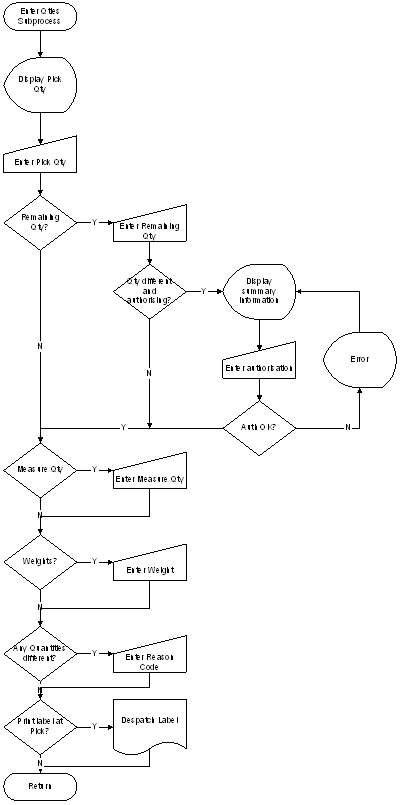
The user will then be prompted to enter the picked quantity.
The pick quantity can be entered as a quantity (or cases/units), or the RDT can prompt the user to scan the stock code of the case being picked once for each carton removed from the location (carton picking). At this point, the RDT can print a carton label for each carton removed. If entered as a quantity, the RDT can optionally allow over-picking (for variable carton quantities).
The WCS can also be set up to consolidate quantities on orders allocate to route/loads, so that only one pick per pallet in a location need be completed in order to fulfil all the stock required by all the orders.
After entering the picked quantity, the user can be optionally prompted to enter the remaining quantity. This is to ensure that the pick faces have an accurate amount on the pallet.
The WCS can also be set up so that the module will require the supervisor to enter a system password to allow the user to continue with their task, should they change any quantity. This validation is performed on-line, from the data held on the WMS at the point of picking. If the quantities are different to the values sent, the user will be prompted to enter a reason code, which will be passed on to the WMS.
The process also includes Despatch Pallet building, when part picks are consolidated on to one pallet. This functionality is flagged in the WCS.
In this case the RDT will, at the point of completing a single case pick, ask the user if they want to continue picking, or take the pallet to the marshalling location. If the user chooses to continue picking, the RDT will prompt the user for the next pick in the list. If the user chooses that they have finished picking on to their pallet, they will be told to take the pallet to the marshalling location.
The user can, when building despatch pallets, give them a unique identifier called a picking container. This is prompted for when picking starts, and after each trip to marshalling. This identifier is held on the WMS and is used in the deconsolidation process
When taking the pallet to marshalling, the RDT displays either the order or the route/load of which the stock is part. If the order is on a load, the order reference can be found by using the Information function key. This pop-up will also display the customer name and address.
When the pallet has been confirmed picked, a message is sent to the WMS.
If the quantities involved are valid (i.e. they add up the quantity available on the pallet), the line will be confirmed. If not, the line will not be confirmed, and the WMS will request that a user confirm the line manually, and make any necessary changes to the data on the WMS.
Should all lines be automatically confirmed on an order or route/load, the WMS can automatically print a despatch note in the required format to a defined printer. This is configurable and, if printed, will print in the format defined for the owner.
During picking, it may be that a pallet to pick has problems, or may not yet be available for picking. In this instance, the client wishes to put this pick to the back of their 'queue', and process any other picks for the order. The module provides a function key press to accommodate this.
Despatch or Pick label printing is supported in the WCS. The printing can take place either at the point of picking or taking to marshalling, to deal with several types of printer. Any wireless or networked printer may be supported.
Sky-picking and split-down picks are also accommodated in the WCS.
When the quantities and the pallet have been confirmed, the user will be prompted to go to the destination location, which will be a marshalling location. When confirmed, the data is updated on the WMS.
Pick Locking
The normal processing of picks in the WCS includes the ability to lock several picks together, to ensure that the user completes all tasks together.
This functionality is standard, as the locking record is based around the 'pages' functionality in the WMS. This is where sort sequences, pick sequences and page totals define a Page Number for a number of picks records (WARE_DESPATCH_DETAILS). An order would most commonly be broken down into pages as follows:
- Type (Pick, Bulk, etc)
- Area
- Aisle
Each time these items change, another page would be produced.
In standard, when the WCS receives these picks from the WMS, it creates the pick details record (Picking) and the task to control the pick (the Truck Move and Pending Truck Moves records). It also creates locking record (Picking Header) for each Order Number/Page combination. If picks for that page already exist, it associates the picking record arriving with the already existing Picking Header record.
When a user enters the Picking or Part Picking modules on the RDT, they are assigned the first pick that they are capable of doing (following the rules about location efficiency and priority). The WCS locks this picking task to the user, and also locks the appropriate header record as well, thereby preventing any other user accessing picks on that order/page.
When the user completes a pick, the task is deleted, and the picking record deleted if appropriate (there could be further stages to the move - from P&D to marshalling, for example)
When the user completes all the picks for the page, the picking header is also deleted.
If the user does not complete all picking tasks on the page, but backs out of the tasks, the current pick is released, and the Picking Header is also released, to allow someone else to continue with the picks.
It is also possible to create locking headers in different ways, depending on the set-up of the WCS and the data received from the WMS. In all cases, however, there must be a Picking Header record created, and the Picking and Part Picking options on the RDT will always lock this record.
Aisle locking can be enabled on the WCS, for Order or Route/Load combinations. The result is that, when the WCS receives the picks, it ignores the Page Number against the Order, and creates Picking Header records solely against the Order/aisle. If the Load Number is populated on the inbound pick, the Picking Header is created against the Route/Load/Aisle.
The WCS can also force an Order or Route/Load to be completely assigned to pickers before allowing any other pick to be completed. This forces all picks to be sent to the marshalling lane for one Order or Route/Load before any other is begun, and can aid in Marshalling.
The WCS can force the entire order or route/load to be assigned to one user, depending on type (e.g. full pallet picks will be given to one user, part-pallet picks will be given to another, different product types will be given to yet another, etc).
It should be noted that this type of locking is ignored in certain modules on the WCS, resulting in the ability to complete picks without locking out any other users. Examples of such modules are:
- Dual Cycling (NADC, WADC)
- Truck Moves
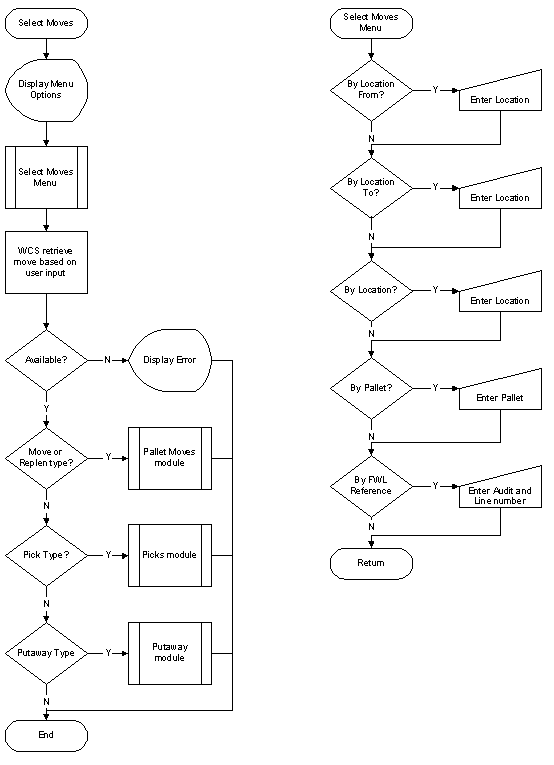
- Select Move
Allocating Picking Tasks to Users
Pick moves on the WCS are created on receipt of messages sent from the WMS. The move details are set up in the light of the group/owner/warehouse/system flag settings current at that time. The picks are allocated to pick groups (Picking Headers) so that allocation of picks to RDTs can be controlled. Any combining of picks together, if not been done by WMS, (consolidated picks) is also done at this time.
When an RDT requests pick tasks, the request is actioned in two phases:
- All suitable picks are selected from the available moves. The significant flags referred to are "Enable Pick Dependencies", "Concurrent Picking", "Pick Page Allocation", "Enable Hold Priority", "Pick In Sequence", "Pick Consolidate Group", "Pick By Carton". The selection is made on the basis of:
-
- Move is associated with a Picking Header (i.e. is a pick),
- Company of move matches Logon Company,
- Warehouse of move matches Logon Warehouse,
- Owner of move matches Logon Owner is this is restricted; otherwise Owner of move is a non-restricted Owner,
- The From-Location-Type of move permits the Logon Truck Type,
- The To-Location-Type of move permits the Logon Truck Type,
- Move has not already reached Destination Location, i.e. is not returning the pallet to Source Location after picking from it,
- Status Flag of move is PENDING,
- Priority of move is not HELD,
- Type of move is not a Stock Move,
- When requesting Part Picks, Type of move is a PART PICK; When requesting Full Pallet Picks, Type of move is not a PART PICK,
- Picking Header associated with the move is already assigned to the RDT or is not assigned to any RDT,
- Picking Header associated with the move is already assigned to the Employee or is not assigned to any Employee,
- Either- Stage of move is beyond first, i.e. moved out of Source Location, Or- No replenishment move on the same pallet is yet to deliver to the Source Location,
- If next stage of move is to a PND, that there is room for another pallet (i.e. max number of pallets in the PND will not be exceeded),
- If Full Pick and next stage of move is from a PND- if Type of PND is FIFO that there is not another pallet at the PND which had been moved there earlier; If LIFO that there is not another pallet at the PND which had been moved there later,
- If move is for a Route/Load, that the move is on the order which has highest Drop No in that Route/Load (new development)
- The list of suitable picks is ordered on the criteria (highest priority first):
-
- Pick Header of move already has moves assigned to an RDT,
- Pick Header already assigned to Employee,
- Priority of move,
- If Employee specified Start Location, sequence number of move (which designates sequence of locations from Start Location),
- Order Number,
- Page Number,
- Sequence Number (on page).
Note: As described above, the allocation of picks is dependent on decisions made not only at picking time but also when the pick details first sent to WCS from WMS. If changes are made on the WMS to location definitions or on the WCS to certain flag settings, any pending picks which are dependent on these definitions/settings should be removed and re-sent.
Labelling
If labelling pallets through the WCS, the following items can currently be used on the produced pallet label:
| Field | Description |
|---|---|
| RouteCode | Route/Load to which the order is assigned |
| LoadNo | " |
| EXELOrdNo | Order Reference (first 15 characters) |
| OrderRef1 | Alternative Order References |
| OrderRef2 | " |
| OrderDescription | " |
| DateTime | Dates and Times |
| SysDate | " |
| SysTime | " |
| OwnerCode | Owner of the stock picked |
| Picker/Picker ID | The ID of the picker |
| MarshLoc | The Marshalling location of the order |
| PickText | The instructions sent out on the last pick task completed. |
| StockCode | Received stock on pallet |
| PalletID | System Pallet ID of the stock last picked. |
| TotalQtyPicked | Qty Picked of the last stock Picked |
| TotalQtyAlloc | Qty originally allocated of the last stock picked |
| Prio | Priority of the last task completed in WCS |
| Name | Customer's name and address |
| AddrLine1 | " |
| AddrLine2 | " |
| Town | " |
| County | " |
| Country | " |
| PostCode | " |
Pallet Moves/Replenishment
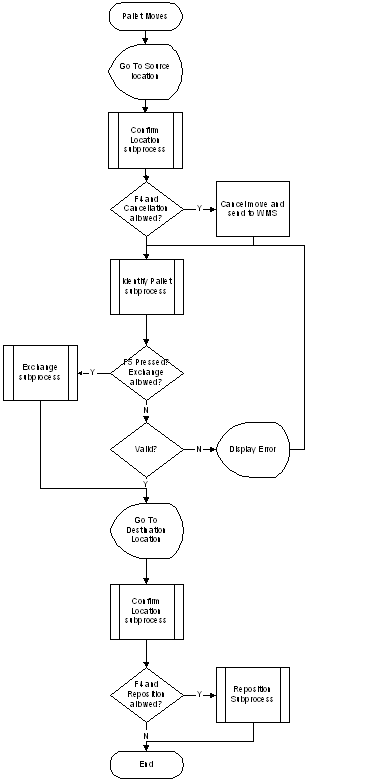
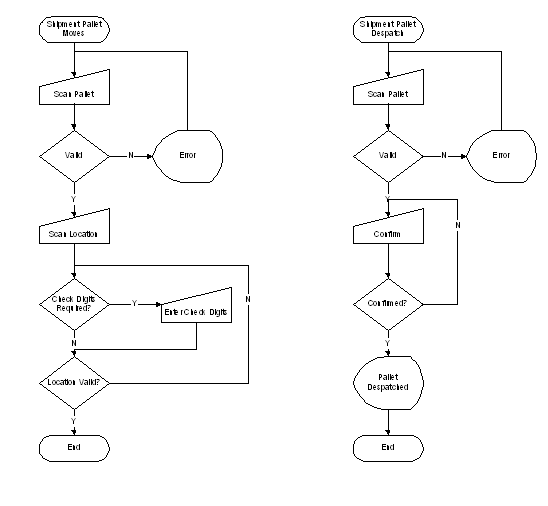
See flow chart #Pallet Moves.
The user is prompted to go to a location. Once they have confirmed their position, they are told to scan the correct pallet. Once this is confirmed, they are required to move the pallet to the correct destination location.
This process is the basis for any RDT system. As such, it requires the ability to correct any inconsistencies between the main database and the physical stock. The user is given several processes to accomplish this, most of which can be enabled or disabled:
- Reposition pallet at destination
- Cancel movement at source
- Change pallet (in block stack or multi-deep warehouses)
- Display further information about the pallet
See section #Movement Exceptions for details of Movement Exceptions.
Note that, if Sky Pick is enabled "At PND", sky picks at P&D locations can be picked up, moved and completed using this module.
Mixed Stock moves
The system allows for pallets of several stock codes to be moved.
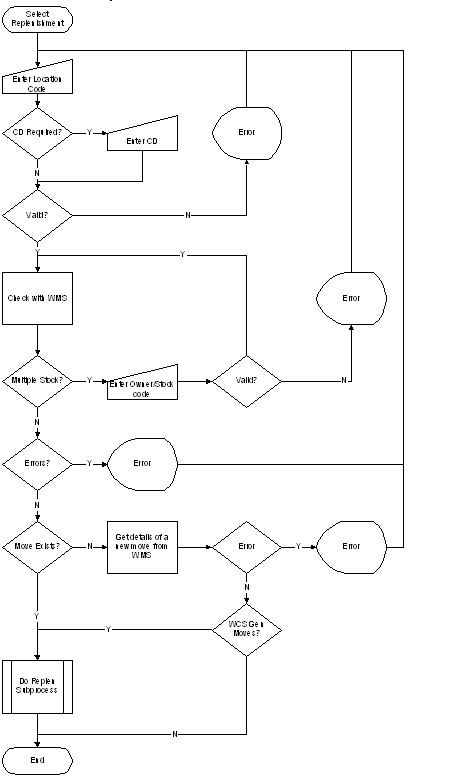
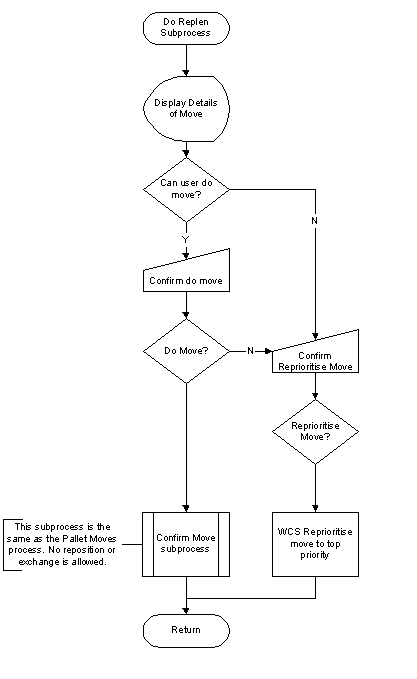
Replenishments
Replenishments are dealt with in the same way as pallet moves, but obviously have a greater effect if exceptional events occur. Therefore, a replenishment move may not be repositioned, although it may be cancelled. See section #Movement Exceptions for details. Replenishments can be those generated from the WMS from Allocation (Dynamic replenishments) or requested Bulk-to-Pick replenishments. The system also supports the user of Replenishment locations above the pick face.
The WCS can reduce the number of replenishments available to a pick face to one, by the use of a flag, to avoid overloading a pick face.
Replenishment Strategy
The WCS contains several mechanisms of controlling replenishment moves to a pick face:
- Picker Replens, which allow the picker the ability to reprioritise the required replenishment to the pick face, or even do it themselves;
- Pick Dependencies, which stop the user being sent for a specific pick if the replenishment associated to that pick has not been completed;
- Replenishment Dependencies, which prevent the moving of more than one replenishment move to a pick face at a time.
Another area that can be seen as 'replenishment' is the split-down functionality.
Split-down Functionality
When picking from high-bay, defined as racking (non-pick) areas with P&D locations defined against the aisles, the WCS will plan those moves out to a defined Split-down area. They become 3-stage moves:
- Move from bulk location to P&D location
- Move from P&D location to defined split-down area
- Pick from pallet in split-down area to defined marshalling location for the order or route/load.
The WCS will not allow the user to be sent for the pick before the split-down move has been completed.
The pallet will stay in the defined split-down area until all picks designed to take stock from the pallet have been completed.
When all have been completed, the pallet will then be planned back into the racking, back to its original bulk location, through a 2-stage move:
- Move from defined split-down location to P&D location
- Move from P&D location back to racking.
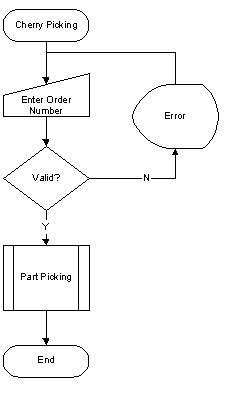
Cherry Picking
See flow chart #Cherry Picking.
The Cherry Picking module allows a user to pick the first available pick task for an entered order. The users do not lock tasks - other users are allowed to pick on the same order. Users are allowed to complete as many tasks as are available and valid for them on the order, if continuous part picking is allowed.
If there are no more picks available on the selected order, the user is returned to the prompt for Order number.
In all other ways, the pick acts exactly as the part picking module.
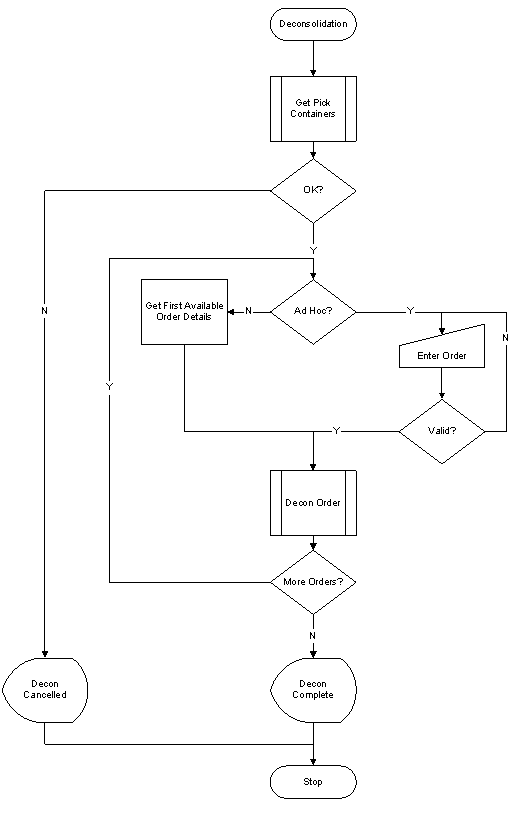
Deconsolidation
In order for this module to be used, the system must have enabled Picking Containers for the picking function.
See flowchart #Deconsolidation.
When orders are pick confirmed, either automatically through the RDT confirmation of picks, or manually, if required, a message will be sent to the WCS to allow the orders to be deconsolidated. Note: Route/loads can't be deconsolidated until all orders on the route/load have been confirmed as picked by the WMS.
The RDT user will enter the new deconsolidation module and will be prompted to scan a container number in any marshalling location.
The WCS will first confirm that this route/load is available for deconsolidation and packing (i.e. the route/load has been pick confirmed in the WMS). If this is not the case, an error will be displayed.
If available, the WCS will then check that the picks require deconsolidation. The rules for this are:
The order must have been allocated to a route/load within the WMS.
If on a route/load, there must be multiple customers for the orders on the route/load.
If the picking container scanned does not conform to these rules, the user will simply be prompted to confirm that the stock is ready to be despatch confirmed. If the user responds that this is the case, a message will be sent to the WMS to confirm the order(s) as despatch confirmed.
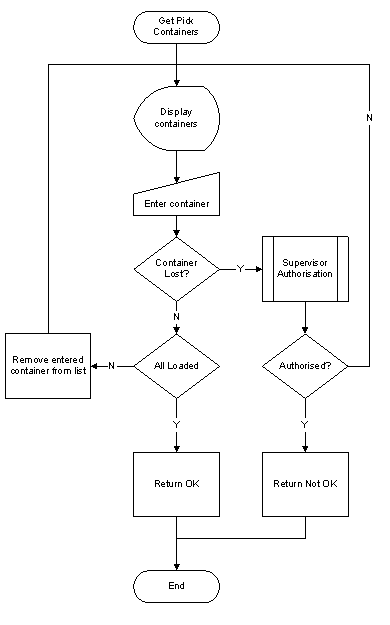
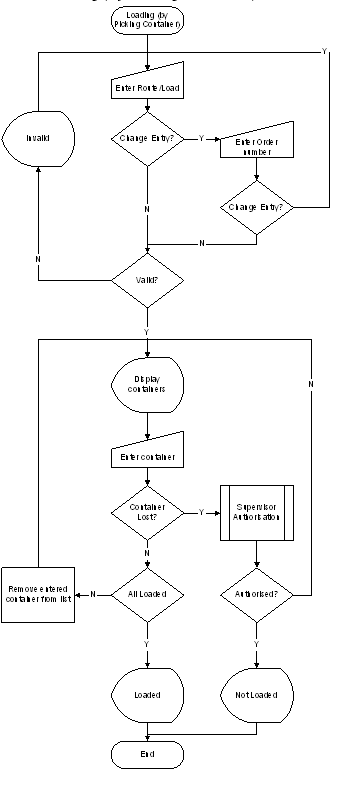
If the stock is available for deconsolidation, the RDT will prompt the user to collect all the other containers for the route/load, displaying them as a list, with the user scanning each container number required.
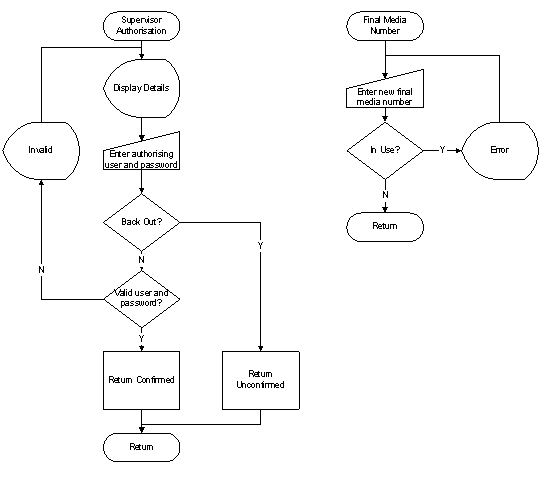
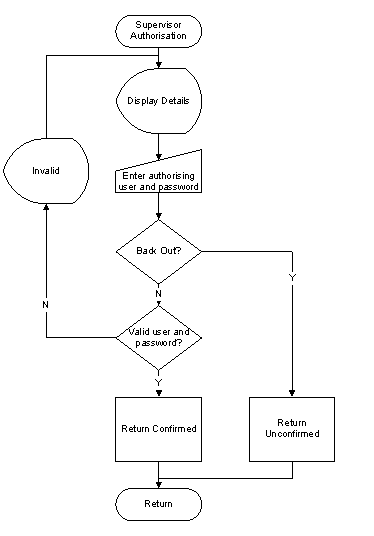
Should a container not be found, the user will have an error function at this point, which should be supervisor controlled. If they press the error key, the unit will prompt them to get authorisation from a supervisor. Once authorised, the packing tasks will be set to an error status, awaiting manual confirmation within the WMS.
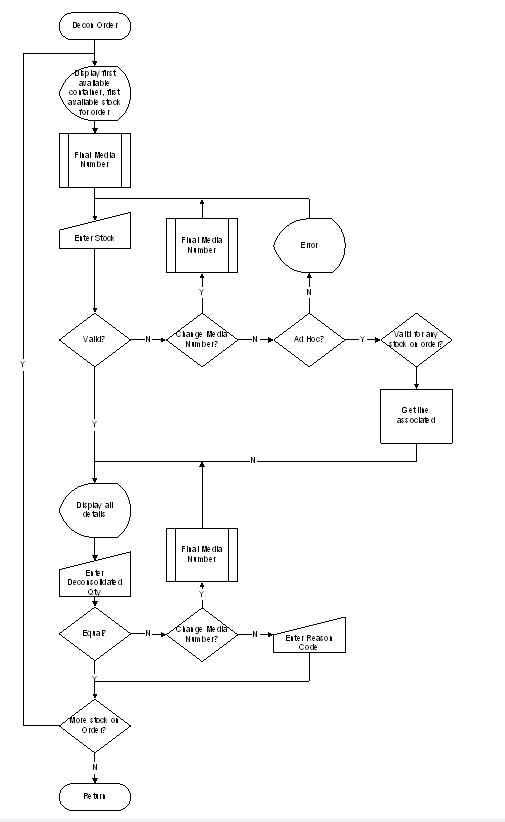
When all picking containers have been confirmed as found, the RDT will display a summary screen, showing the first order to be packed, displaying the customer on the order, the order number and the total number of cases to be packed.
The user can optionally enter a final media container number at this point. This will not be validated in the WCS as the maintenance of these final media container numbers is expected to be controlled by external systems.
This final media number will be sent back and stored on the WMS.
There will be an option on the RDT screen (via a function key press) to change the final media being packed into. This is so that orders which spread over multiple packs can be accommodated.
The RDT will then prompt for the first stock code to be packed on the order and the picking container in which this stock can be found and require the user to confirm the stock by scanning the barcode on the stock code.
When the barcode is scanned, the RDT checks that the EAN barcode scanned is not duplicated on another stock code. If it is, the RDT displays a warning for the user that this is the case.
The RDT will then display the first batch for that stock code on that order and the total quantity to be found in the picking container for that stock, batch and order. The user will be asked to confirm the amount found in the container for that stock, batch and order.
If the amount entered by the user does not match the amount expected in the container, the user will be asked to confirm the amount found again. The RDT will continue to prompt for the quantity found until the user enters the same quantity twice in a row. Once the quantities entered match, the RDT will request a supervisor's username and password to unlock the terminal.
The supervisor should confirm the problem that the user is having and, should a shortage still be found, they will be asked to confirm the actual quantity found.
The user should remove the stock from the picking container and pack the stock in the final media at this point.
Once the quantity is confirmed, either by correctly entering it on the first attempt or by supervisor override, and the final picking container is identified, the figure will be reflected back on to the WMS immediately.
The user will then be asked to confirm the quantity of all other batches for that stock and all other stock items for that order, until all lines are packed.
The user will be prompted to pack all items for all orders on the route/load, until all orders are confirmed packed.
Once all orders have been deconsolidated, the RDT will display that all tasks are deconsolidated, and the orders will be made ready to despatch on the WCS.
There is a rule-controlled variant of Deconsolidation called Ad Hoc Deconsolidation.
If this rule is set, the user has the ability to choose the sequence of the orders deconsolidated, rather than being told which orders to deconsolidate.
Additionally, if this rule is set, the user has the ability to choose which stock on the order is to be deconsolidated first.
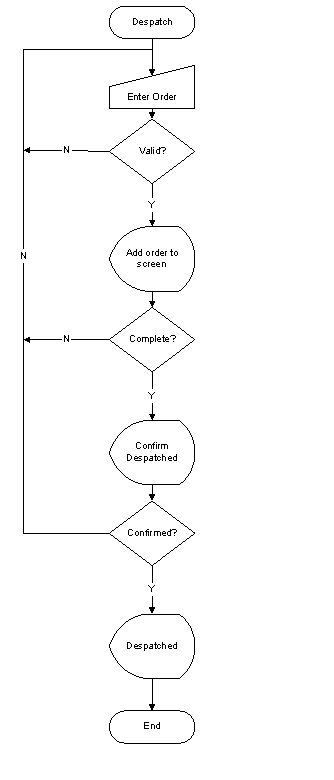
Despatch by Order
In order to use this module, the system must have Picking Containers and Deconsolidation enabled.
See flowchart #Despatch by Order.
When entered, the RDT module will prompt for an order to be despatched. The user will scan the order number from the despatch note, or will key in the order number. The order number scanned will be displayed on the screen. Any number of orders can be scanned at this point, the list below the scanned item showing all orders scanned, latest at the top.
Once the user has scanned all the orders required, they can confirm that the orders are to be despatched by pressing F1. The RDT will display a confirmation box. Should the user cancel, they will be returned to the order prompt. Should they confirm that the orders are to be despatched, the WCS will send a message to the WMS for each order entered, confirming that the orders are to be despatch confirmed.
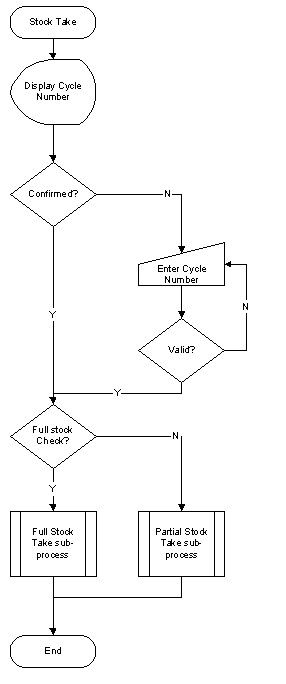
Stock Check
There are two types of stock taking procedure:
- Full Stock Check - This is where the user enters what is counted without recourse to the current stock levels (blind stock check).
- Partial Stock Check - This is where the user checks stock against the current stock levels.
On the WMS, a range of locations, stock codes etc. to stock check should be chosen, described more fully in the client-generated operations document. The user will be prompted to confirm his selections, and this will submit the stock take cycle to be processed. It is at this point that the messages will be sent to the WCS, if the interface is turned on.
Enter the Stock take module, and the RDT will display a cycle to be processed. The cycle is chosen based on its priority and age. If the user does not wish to process this cycle, he can enter another, valid cycle here.
Once the required cycle is chosen, the user confirms their selection. The user will now be taken into the stock take module proper.
If the user has selected a 'partial' stock take, they will be taken into the partial-processing module. If they have chosen a 'full' (blind) stock take, they will be taken into the full processing module.
See flow chart 7.16.
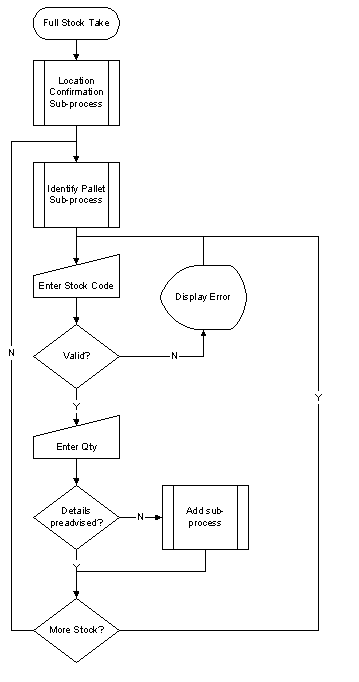
'Full' Stock Check
The RDT will prompt the user to go to a location and confirm that they are there. The user should then enter the pallet ID. If there are no pallets in the location, the user should press confirm and move on.
If the pallet ID is entered, the user should then enter the stock code.
The user should then enter the quantity. Once this has been entered, the user will be prompted to confirm the quantity entered.
Once the data is entered and confirmed, the WCS compare the data against the pre-advised levels. If the pallet ID and stock code entered were part of the cycle, the quantities are checked. If the quantities are the same, a message is sent that the pallet was found successfully. If the quantities are different, the WMS will be informed that the pallet was there, but modified. If the pallet was not advised, the user will be taken into the add sub-process, to enter the rest of the pallet details (such as the manufactured date etc.)
At this point, the WCS will decide if this was a mixed pallet, by trying to find any other advised pallets in that location of the same pallet ID. If any are found, the user will be taken to the product prompt again. The user should confirm whether the remaining stock on the pallet is present in the same way as above.
Once all pallets in the location have been counted, the user confirms this and they will be taken to a new location to count.
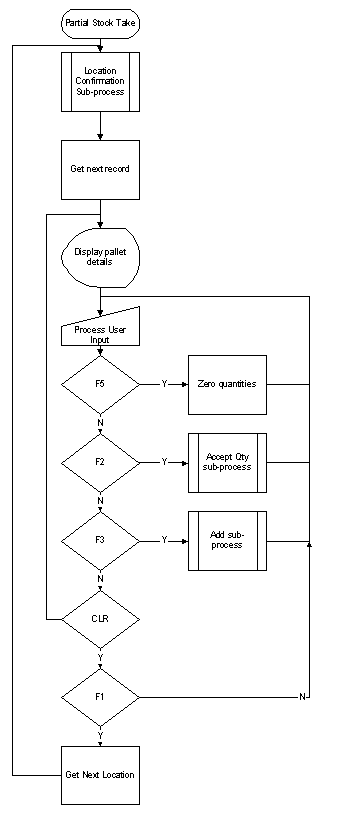
'Partial' Stock Take
The RDT will process the first record in the stock check. This will be ordered by the method chosen in the cycle generation screen, either location within product, or product within location, the latter being the more common choice for RDTs.
The user will be prompted to go to a location and confirm that they are there. If these are valid, then the user will be shown the first pallet for this location, and the quantity details for this pallet. At this point, there are several actions available to the user:
- If the quantities are correct, the user can confirm.
- If the quantities are incorrect, the user can amend the quantities. The RDT will then display the correct quantities, and the user will then confirm this amendment.
- If the Pallet does not exist on the location, the user should zero the quantities. The RDT will then display the pallet, with zero quantities, and the user will confirm this.
If there are no more pallets to display in this location, the RDT will display a message as such, and allow the user to confirm this. If there is another pallet in this location, the user can add one by pressing the add key. The user will be taken into the add sub-process.
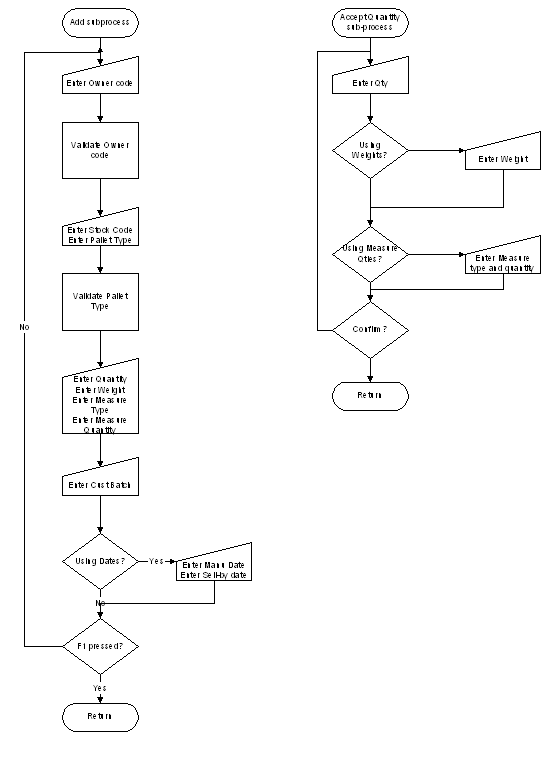
Add sub-process
The 'add' sub-process will prompt the user for all essential information about the pallet, such as the location, pallet ID, stock code, manufactured date etc. When the user has finished input of the pallet's details, they will be taken through the cycle again to check the details entered. When the user is happy with the entered details, they will confirm it.
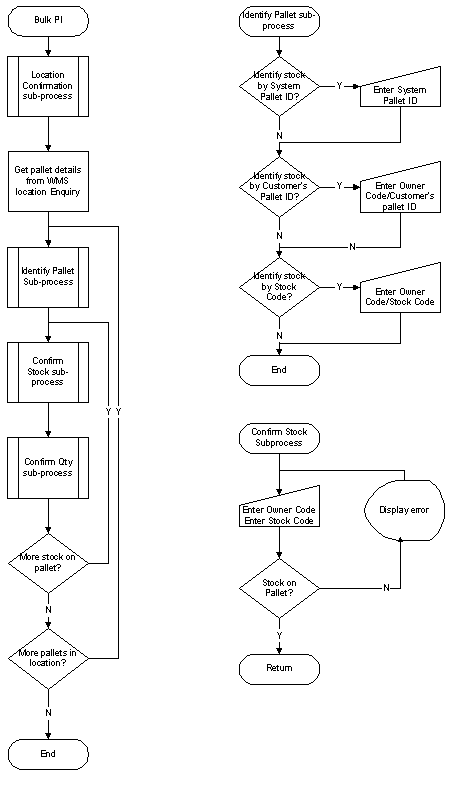
Bulk PI
See flowchart #Bulk PI.
This function allows the user to check the contents of any location in the warehouse at any time. The function is only available when an on-line link to the WMS is available.
The user is prompted to go to a location. The user will scan the location to be checked. The WCS will then check what is in that location with the WMS.
The user will then be prompted to enter the pallet(s) found in the location. Once the pallet has been identified, the user will be prompted to blind enter the quantity on the pallet. Should the user enter the quantity as expected, the check will be confirmed and the RDT will request if there are any more pallets in the location. The checks continue in similar fashion until all pallets are checked.
Should the quantity entered not be the same as on the WMS, the user will be required to re-confirm the amount counted. Only when the user has confirmed two identical counts in a row will the value be accepted.
On confirming a pallet, a message will be sent to the WMS with the count details. The WMS will not perform any required adjustments, although this is configurable.
Any discrepancies discovered by the process are fully documented on the WMS, accessible through an Ad Hoc Stock Take report. This report can show, by date, owner and /or stock, the pallets checked and discrepancies discovered.
Daily Cycle Checking
High-value stock codes are defined as those stock codes which belong to the defined high-value Product Range/Class/Category/Group combination.
High-value locations are defined as locations which are present on the Location Class information for the defined high-value Product Range/Class/Category/Group combination or locations with high-value stock in them.
Normal locations are defined as any locations that are not high-value locations, or locations without high-value stock in them.
The high-value locations are maintained on the existing Location Class maintenance screen, for the defined high-value Product Range/Class/Category/Group combination. This combination is defined on the Daily Cycle Check parameters screen, following.
The Daily Cycle Check Parameters allows the users to enter the period over which the stock will be checked. So, the user will be able to enter:
- A number of days over which the standard stock in the warehouse must be checked, and;
- A number of days over which the high-value stock must be checked.
Additionally, this screen allows the users to define:
- The maximum number of tasks which can be allocated to a single user to check in one 'batch'.
- The combination of Product Range/Class/Category/Group that defines high-value stock.
The Daily Cycle Check screen allows the users to generate location checks for the WCS, by letting the user select whether to run the generation for a normal daily location check and/or a high-value location check (by entering 'Y' at the requested prompts).
The screen generates the tasks for the stock to be checked by first building a list of all the stock that has been checked over the preceding period (from the parameters) for the requested stock type. All of the locations checked over this period will then be excluded from a list of all locations of the selected type in the warehouse. Only Pick and Bulk locations will be included in this task list, as any other location types are either transient locations (for example Marshalling or Receipt) or due to be checked by other processes (for example Damages or Returns).
The number of tasks to be generated will be the total number of records on this location list, divided by the number of days in the period requested, rounded up.
For example:
In a warehouse where there are 20,000 locations, 15,000 for normal stock and 5,000 for high-value stock.
The users have checked 3,000 normal locations and 1,000 high-value locations in the previous periods.
When checking normal locations over a period of 90 days:
The number of normal location check tasks generated will be 12,000/90 = 134.
When checking high-value locations over a period of 60 days:
The number of high-value location check tasks generated will be 4,000/60 = 67
The process produces tasks for these checks and sends them to WCS. The tasks are split into groups, the number of tasks in each group not to exceed the parameter of the maximum number of checking tasks per group. These tasks are sorted by the WMS into a location-efficient sequence (using the putaway sequence of the location).
WCS will receive these tasks and save them to the database. These tasks will be organised in the groups specified by the WMS for ease of checking.
WCS will delete any outstanding checks on the system which have not yet been completed by the users, before adding the new checking tasks. If any individual tasks are in progress by users, these will not be deleted by this process, although tasks in the same group which have not yet been completed will be removed. This is because the WMS will send through new checking tasks for those locations where a check has not yet been completed.
The Daily Cycle Check module on the RDT will check for outstanding available checking tasks in the system. If no check tasks are found, the user will be informed and the module will exit.
When check tasks are found, the system allocates all the tasks in this group to this user, so that only one checker is allocated to each group of tasks being checked. The user is directed to the location first in the list (as ordered by the sequence of the task set by WMS when generating the tasks).
Once the user has confirmed the location in the normal way (by scanning or keyboard entry of check digits or the location code, as configured in the WCS), the RDT will direct the user to check the location in exactly the same way as the current RDT Module Bulk PI.
As each location is checked, WCS sends back check confirmation messages to the WMS, which will keep an audit of all locations checked, along with any discrepancies noted by the users. No automatic adjustments or holds of the discrepancies are made in the WMS. The task to check this location is also removed from the WCS.
To see locations which have been checked, the user can run the Ad Hoc Stock Take report, specifying a period to produce
Once a location has been checked, the RDT user will be directed to check the next location in sequence on the group of tasks being checked.
Should the user back out of these checking tasks, any tasks remaining to be checked on this group of tasks will be de-allocated from that user, so that the next checker asking for tasks can be allocated the checks.
Select Replenishment
See flow chart #Select Replenishment.
This function allows an RDT user to scan a pick face, check whether there are any outstanding replenishment moves for the pick face, and complete the moves if required. The process will also generate replenishments if none are available on the WMS.
The process prompts the user to enter and confirm a location. The location is validated for several criteria:
- Pick Face
- Unknown location
- Multiple Stock codes assigned to pick face.
If multiple stock codes are assigned to the pick face, the RDT prompts the user to enter/select their owner and stock code.
Once the stock and location are confirmed, the WCS searches for any move available to replenish the pick face.
If a move is found, the user is offered the choice of completing the move as per normal pallet moves (if they are able to complete the move), or to reprioritise the move to the highest priority, ensuring it is delivered to the pick face as quickly as possible.
If no moves are available on the WCS, it checks with the WMS to see if any are available. At this point, further checks are made:
- Move exists on WMS not WCS
- Problem generating move
- No pallet of required type available
Should a pallet be found, the user is asked to complete the move in the same way as before
Select Moves
See flow chart #Select Moves.
A function exists to select an individual movement task by a range of criteria. The criteria are:
- By location (Current location, source location, destination location)
- By Pallet ID (System or Customer)
- By WMS Movement reference (Movement Audit number and Line number)
Once the task is identified, the user is allowed to complete the movement task in the same way as in the normal modules.
Ad Hoc Pallet Moves
See flow chart #Ad Hoc Movements.
Ad Hoc Pallet Moves in WCS are used to process movements that originate with the RDT users, rather than originating with WMS. This is to allow users to resolve problems quickly, without having to key tasks into WMS first.
Like all WCS modules, this can be disabled or password protected on users' menus.
These moves will be validated by the WCS and the WMS in combination. The user will be prompted to enter a reason code, which must be valid. They will then be prompted to enter the location from which to move a pallet. This will be validated on the WMS and the user will be required to confirm the location in the standard fashion. The user will then be prompted to enter the pallet to move, which must be present in the WMS. If this is valid, the user will be prompted for the destination location and confirmation.
When all these steps are complete, the user will be returned to the main menu, the pallet will have been moved and an audit trail maintained in WMS and WCS.
Dual Cycling
The WCS also allows dual cycling in several forms: Narrow Aisle dual cycling (and the subsets allowing only moves in or out), and Wide Area dual cycling. The menu options are controlled by the log-on process, as described earlier.
Each dual cycling process supports the same functionality as any of the tasks it is performing, obeying all the same rules.
All full-pallet tasks in the WCS are available for RDT users utilising Dual Cycling.
Several parameters in the WCS control the exact performance of the Dual Cycling algorithm, including:
- Nearest Location
- Aisle Locking
- Priority thresholds
- User Aisle access, limiting individual users to certain aisles
- User's Truck Type
Narrow Aisle Dual Cycling
The WCS allows the user to select an aisle range in which they work. This range of aisles can be preset against the use using the WCS Maintenance utility. The range controls the aisles the user can work in.
There are several types of dual cycling options. All of these options can be used in conjunction with each other. So, if there is a requirement to have one truck in bulk doing all putaways and one truck in bulk doing all outbound moves, this is allowed by the WCS.
NADC IN
This option allows the users to perform the tasks which are going into the aisles. For this operation, that will be putaways. There is a possibility that this will also be housekeeping moves into the narrow aisle locations, but these are minimal.
NADC OUT
This option allows the users to perform the tasks which are going out of the aisles. For this operation, that will be full-pallet picks and replenishment moves. There is a possibility that this will also be housekeeping moves out the narrow aisle locations, but these are minimal.
Sky Picking is supported in this module, when Sky Picking is configured to be 'At PND'. In this case, the RDT user will then complete the part pick task using the DC Out module in the same manner as using the Picking module, i.e. scan source location, scan pallet id, scan PND location, enter picking container id, enter quantity, return pallet to the original location and scan source location again.
NADC
Full dual cycling, mixing full pallet tasks both in and out of the warehouse. This does all of the tasks specified in the above two configurations. The tasks and the order in which they are completed depend on the configuration below.
Sky Picking is supported in this module, when Sky Picking is configured to be 'At PND'. In this case, the RDT user will then complete the part pick task using the DC Out module in the same manner as using the Picking module, i.e. scan source location, scan pallet id, scan PND location, enter picking container id, enter quantity, return pallet to the original location and scan source location again.
NADC Configuration
The NADC options can be configured in several ways:
Manual:
The WCS shows a list of aisles that the user is working in (chosen at log on). This also shows the number of pallets planned to come out of the aisles, the number planned in, and whether the P&D locations are full. For this configuration, this will not cause an issue, as the P&D locations are effectively unlimited.
The user chooses an aisle from the list. They are then assigned a task from that aisle. The aisle is locked to that user and no other NADC user can access (or indeed) that aisle.
The user completed tasks in that aisle until there are no more tasks in the aisle, or they choose to move to a different aisle. When this happens, the aisle list is shown again.
The tasks completed depend on the type chosen (NADC IN, NADC OUT or NADC). The user completed as many of the tasks in the aisle as they can until there are no more tasks or they leave the aisle to go to another.
Threshold:
A parameter is set in WCS, showing a threshold priority. This priority controls what the NADC process sees as high priority tasks, or just tasks that can be mixed together.
Any tasks which are below the threshold priority are grouped together and dealt with in strict location efficient order. The user will work in the aisle they are in, until no more tasks are available. The user will then be prompted to move to a nearby aisle with tasks in to complete until all outstanding tasks are completed in that aisle. The truck will move between aisles until all tasks are completed.
When tasks are received which are above the threshold priority, the tasks are allocated immediately to the next available truck that has access to those aisles.
All the high priority tasks must be completed first before any of the tasks below the threshold are completed.
When all the high priority tasks are completed, the user carries on completing the lower priority tasks until all are completed.
In Threshold setup, the priorities of the outbound tasks are the driving force, not the inbound tasks. In NADC IN, all the inbound tasks are completed in location efficient manner. In NADC OUT the high priority outbound tasks are completed first in a location efficient manner, and then the low priority tasks are completed, also in a location efficient manner.
In NADC, the high priority outbound tasks are completed first in a location efficient manner. After each outbound task is completed, the WCS will ask the user to complete a putaway in that aisle, if one is available. When all outbound tasks are completed within an aisle, the user will move to another aisle with outbound tasks, regardless of the number of inbound tasks remaining in the aisle.
When there are no more high priority picking tasks available, the low priority tasks are completed, also in a location efficient manner. As above, after each outbound task is completed, the WCS will ask the user to complete a putaway in that aisle, if one is available. When all outbound tasks are completed within an aisle, the user will move to another aisle with outbound tasks, regardless of the number of inbound tasks remaining in the aisle.
When there are no more outbound tasks available to be completed within the aisles, the user will be prompted to complete the putaways in the aisles, in a location efficient manner.
Wide Area Dual Cycling (WADC)
Wide Area dual cycling will interleave any tasks in the wide area in the most efficient manner, attempting to ensure that the trucks operating in this area have pallets on the tines for as long as possible.
WA dual cycling needs to account for movements of the following types:
- FPP- P&D to MARSH
- Replen- P&D to PICK
- Sky Pick
- P&D to SPLIT
- SPLIT to P&D
- Move - P&D to P&D
- Putaway- REC to P&D
WA racking areas would be controlled via a different truck type. (Truck types limit the moves a user is able to do by the standard location type functionality in WMS). In WA racking, the tasks would be:
- FPP- BULK to MARSH
- Replen- BULK to PICK
- Sky Pick- none required - only in NA
- Move - BULK to BULK
- Putaway- REC to BULK
Putaways should not be allowed to be picked up from receiving location if the P&D it is to be placed to is currently full (in a limited P&D environment). This should only occur if the number of pallets allowed at the P&D is set higher in WMS than WCS. This is a reasonably valid set-up, to allow for the time taken to take a pallet from receiving to P&D, and then to be put away by a NA truck.
The sequence of actions would be:
- Start WA DC
- Check for putaways or cross-docks available.
- If none, display message, go to 5.18.2below.
- If some, get task (user scans PID)
- If cross-dock, take to marshalling, go to 5.18.2below
- If putaway, take to P&D or BULK
- Get next task (if location efficient, nearest; if priority efficient, next in sequence)
- If none, display message, go to 5.18.2below.
- If task is move (P&D to P&D, P&D to BULK, BULK to P&D or BULK to BULK), complete task, go to 5.18.2above.
- If task is sky pick (P&D to SPLIT)
- Complete task
- Look for sky pick (SPLIT to P&D). If found, complete task, go to 5.18.2above.
- If task is FPP (P&D to MARSH or BULK to MARSH) or Replen (P&D to PICK or BULK to PICK),
- Complete task
- Look for sky pick (SPLIT to P&D). If found, complete task, go to 5.18.2above.
- If no tasks found at all in loop, display message and exit else go to 5.18.2above.
DC Examples
In this example, we have 5 physical aisles (denoted by an 'A' before the number), made up of 10 aisles in the system. The threshold priority for this example is 4. Each aisle has its input P&D shown, and it is assumed that these P&Ds will have 'abundant' moves on them. The numbered boxes in the aisles (e.g. 4) are the tasks to be moved to the output P&Ds. For the purposes of this example, it is assumed that the P&Ds will be emptied immediately. Tasks will be identified in this example by the aisle and priority e.g. 5-7 denotes the priority 7 move in aisle 5 (physical aisle A3).
So, a driver logs on to an RDT, operating NA DC in the aisle range 1 to 10.
The WCS will direct them to the highest priority task in the range. In this case, this is either 1-2 or 6-2. It is assumed for this example that the driver will be sent to 1-2.
All tasks in the physical aisle A1 above the threshold priority will then be completed, in priority/location sequence. In our example, this is 1-2, then 1-3, then 2-3. In between each of these tasks a putaway will be interleaved, if possible.
When all of the outbound tasks above the threshold priority have been completed in the physical aisle, the WCS will direct the driver to the nearest, highest-priority task (above the threshold value) to their current location, within the aisle range. This is task 6-2 in A3.
All tasks in the physical aisle A3 above the threshold priority will then be completed, in priority/location sequence. In our example, this is 6-2, then 5-3. Again, each task will be interleaved with a putaway if possible.
When all of the outbound tasks above the threshold priority have been completed in the physical aisle, the WCS will direct the driver to the nearest, highest-priority task (above the threshold value) to their current location, within the aisle range. This is task 3-3, rather than 9-3, as it is closer.
All tasks in the physical aisle A3 above the threshold priority will then be completed, in priority/location sequence. In our example, this is only the task 3-3, then a putaway.
The next task is 9-3, as this is the closest task above the threshold value. The user will then complete tasks 9-3, followed by 10-3.
At this point, all tasks with priorities above the threshold, within the user's aisle range have been completed. The WCS will now direct the user to the closest task within the range, regardless of priority. (Note: If a higher-priority task becomes available during this next stage, the user will be directed to it).
The next closest task is 10-4, then 9-4, both being in the same physical aisle in which the user is currently. Next, the user would be directed to physical aisle A4, to complete the tasks there, i.e. 7-5, 8-4, 8-6 then 7-8.
The remaining tasks would be processed in the following order:
Move to A3. Do tasks 5-8, 6-8, 5-7.
Move to A2. Do task 4-8.
Move to A1. Do tasks 1-8, 2-8.
As has already been noted, all tasks will be interleaved with putaways if they are available.
In our example, we have now completed all tasks out of all aisles in the range. We still have 5 input P&D locations, with 3 pallets on each, to be placed into the racking. These will then be completed by the WCS. Note: If more pulling tasks of whatever priority become available during this phase, the user will be directed to it.
The inbound tasks will be allocated to the driver in much the same way as the outbound (pulling) tasks were allocated to him, as can be seen in the following example.

At the end of our last example, the driver was in physical aisle A1. We will begin again at this point.
The WCS would suggest the user to go to PD1, as there is a task above the threshold priority waiting to be put away. The RDT would request the driver to scan the pallet being put into the racking. The tasks would be completed in the order in which they are on the P&D, regardless of the order of the tasks. In our example, they are in the correct order.
Once all tasks on this P&D are completed, the WCS directs the user to the next P&D, within their aisle range, with the highest-priority task on it. In this case, that is PD2, for aisle A2. The P&D does have a task on it at priority 2, even though it is second on the P&D.
The driver would then complete the first task, at priority 3, before completing the second task at priority 2. Once this second task is completed, however, the WCS will direct the driver to the next aisle with a high-priority task on it, as there are no more tasks on PD2 to be completed.
The aisle the driver would be directed to in our example would be A3, and PD3 has a priority 2 task on it. The driver would then put all three pallets away, in order to clear the priority 2 task on the P&D.
Once completed, the WCS would then direct the driver to PD5, to complete the high priority tasks on the P&D.
The user would then be directed to complete the tasks remaining on the P&Ds in the following order: The three tasks on PD4 would be next, as they are closest the driver's previous location (PD5), then the remaining task on PD2.
Stock Replenishments
At the point of part replenishments being generated by CALIDUS WMS, tasks will be sent to CALIDUS Mobile to complete them via the RF units.
To control whether these tasks are sent from this process, a new Owner rule must be set up. This allows the users to specify, per owner, whether part replenishment tasks are being sent to CALIDUS Mobile to be completed.
These tasks show the source (bulk), destination (pick face), pallet ID from, pallet ID to (the newly-created pallet ID in the pick face) and various other details of the stock, to aid in printing labels for the stock items.
These stock replenishment tasks are generated from the standard CALIDUS WMS screens (Bulk to Pick Replenishment, and dynamically from the Allocation process). The rules defining whether full pallets or part pallet replenishments are generated are standard.
The RF application has a Part Replenishment module and follows the flow below:
- The RDT user enters the Part Replenishment module.
- The user will be prompted to enter a Printer at this point.
- (1) The user will be directed to the first available high-priority part-pallet replen, in a location-efficient manner.
- (2) The RDT will prompt the user to go to the source location (i.e. the bulk location of the replenishment). They will confirm the location by scanning the barcode or entering the check digits.
- The RDT will tell the user which pallet to get and the user will confirm by scanning or keying the pallet id.
- The RDT will inform the user of the number of boxes required to be collected for the replenishment. The RDT will also display the pack size and total impressions quantity being collected (if the stock is impressions-controlled). The user will confirm by entering the quantity taken from the pallet. The user will have the ability to change the quantity being replenished (by entering a different value or entering 0 if no stock can be picked. In this case, the user will be prompted to enter a reason code.
- Once the user has confirmed the quantity of stock being picked, the RDT will request the user how many pallet labels are required for this replenishment. The user should enter the number of labels required to label each box. The RDT will print that number of labels in the required format. If there is an issue with the printer or the labels do not appear, the user will have the option of reprinting the labels or changing the printer at this point, before confirming that the labels are printed OK.
- Once this is completed, the RDT will display a dialogue confirming that this stock has been collected. The user will be asked if they want to continue collecting stock or take what has been collected so far to the respective pick faces. If the user chooses to continue picking, the RDT will request the next available high-priority part-pallet replen, in a location-efficient manner and then return the user to (2) above.
- Should the user choose to take the stock to the pick faces (or there are no more replenishments available at this time), (3) the user will be prompted which ‘pallet’ of stock to deliver first. The user will scan the pallet id on one of the cartons collected.
- The RDT will direct the user to the pick face being replenished with this pallet. It will display the total qty, impressions and pack size (as relevant). It will request the user to confirm the pick face by scanning the barcode or keying the check digits. At this point the user will take all the stock off the pallet for that pallet and replenish the pick face. The labels on the boxes (printed at pick) will be used to identify the pallets in the pick face. The user will have the option of re-printing the pallet labels at this point (via a function key press) in case the labels on the boxes are unusable or discarded. If the user choose this option, they will be asked how many pallet labels are required for this replenishment. The user should enter the number of labels required to label each box in the pick face (i.e. the tote). The RDT will print that number of labels in the required format. If there is an issue with the printer or the labels do not appear, the user will have the option of reprinting the labels or changing the printer at this point, before confirming that the labels are printed OK.
- Once all the stock is in the location and labelled, the user will confirm the replen completed by scanning the barcode or keying the check digits. If there are more pick faces to replenish from the stock collected, the RDT will then direct the user to scan the next pallet and continue from (3) above. If there are no more pick faces to replenish in this run (i.e. all the stock has been replenished), the RDT will display a completion dialogue and ask the user if they want to continue replenishing stock. If the user chooses to continue replenishing, the user will be returned to (1) above. If not, the RDT will exit to the main menu.
CALIDUS Mobile sends a completion message back to CALIDUS WMS for each replenishment move completed in this manner.
Bespoke RDT Modules
Other modules developed in the past, but not part of the standard product, are:
- Serial number Capture at Receipt and Despatch
- Loading and despatch confirmation by carton
- Shipment Pallet building (from Packing)
- Housekeeping moves of Shipment Pallets
- Despatch by Shipment Pallet ID
- Links to automated systems (MHE, camera scanners, conveyors, P&D systems, etc)
- Uploading of batch files to WMS
- Stock Moves (Combined Split)
- Ad Hoc Putaway
Some these modules are covered in more detail in the following sections.
Serial Number Capture at Receipt and Despatch
This functionality does not link into the generic receipt module, or into any despatch modules.
The nature of serial number scanning is such that the Serial Number processing and validation is dependent entirely upon the barcodes received and the format of the information contained therein.
Flowcharts for these processes can be found in appendices.
Serial Number Capture at Receipt
The RDT will prompt the user for the GRN being received against, which is validated.
The user then enters the pallet the serial numbers are being received against, which is also validated against the preadvice sent from the WMS.
The preadvice contains details of how serial numbers are to be entered for each stock code. These types are Range or Random.
If the type is Range, the user is prompted to enter a first and last serial number for the range. The RDT examines this to ensure it fulfils the quantity required for the receipt line, by extracting the data from the serial numbers.
If the type is Random, the user is prompted to enter a Lot number for the subsequent serial numbers. The RDT will then prompt for a batch of serial numbers, up to the amount required in one lot. The RDT will then continue to prompt for the required number of Lots until the pallet is completed.
The user can then continue entering serial numbers for all other pallets on the receipt, until all are completed.
Serial Number Capture at Despatch
The RDT prompts the user for the Order Number being despatched, which is validated.
The RDT then retrieves the details of the first stock to be despatched, and displays the details of the line, plus the details of the pallet to be found in the despatch bay.
The user can then choose a scanning method:
By Batch - The user confirms that all serial numbers for a specific customer's batch have been despatched.
By Lot - The user confirms that entire Lots of serial numbers have been despatched.
By Serial - The user confirms each serial number despatched individually.
When the order line has been completely fulfilled, the user is prompted to move on to the next order line, until all required serials for all lines have been scanned.
Loading by Carton
In order to use this process, carton picking must be used (a variant of Part Picking, where all cartons are labelled with unique carton references as they are picked).
When WCS sends message to WMS regarding completion of the picking task, the system should create carton records for each carton picked.
See flow chart #Loading by Carton.
RDT logs in to Loading process.
Scan / Enter Store number(s) or Route/Load.
Scan / Enter Vehicle number
Then scan Carton barcode for the items to put them on the truck.
If an item is found where the barcode is unreadable or the barcode is missing, there is a function key - No ID. When pressed, the user should be prompted to enter the order number and the item number. This should be enough to identify the item.
Function keys available:
F1 - Truck Full - Show user summary screen of what is on that truck. User confirms.
F4 - Finished (no more stock for order/route/load) - Show user screen of what is missing for the route/load. User told to find shortages. If the user confirms that they are finished again (by pressing the same function key), the unit should prompt for a supervisor username and password.
When completed, the WCS marks all cartons scanned as loaded and then creates a flat-file EDI message for sending back to the WMS.
When the EDI message is received, the WMS updates its carton records with the cartons loaded, the prints a despatch note for the stock.
Loading (by Picking Container)
This process can be used in place of the Despatch process above. It can be used either directly from Pick Confirmation, or from Deconsolidation and Pack (using the final media number).
See flowchart #Loading (by Picking Container).
In order to use this module, the system must have Picking Containers enabled.
The user is prompted to enter a route/load or order to be loaded. Once confirmed, the RDT displays a list of all the containers that must be found for the stock to be considered loaded. The user must scan the picking container of the pallets loaded.
If containers are lost, the user is given the ability to reflect this through an error function key.
As each container is entered, they are removed from the RDT screen.
Once all containers are loaded, the WMS is updated showing that the order or load is despatched.
Shipment Pallet Processes
These functions should only be used if Packaging functions are in use and are RF enabled (currently only in Oracle FSCE).
All shipment pallet and location information is held against the order and pack list, and is not replicated in the normal WMS pallet tables.
Flowcharts for these processes can be found in appendix #Shipment Pallet processes.
Shipment Pallet Building
This module is used to take completed packages and place them on a shipment pallet, ready for loading and despatch.
The user is prompted to enter a valid package, which is then validated.
The user then scans a shipment pallet ID, usually from a list of pre-printed unique barcode labels.
If the pallet already exists, the RDT checks the validity of placing the package on the shipment pallet. The criteria used to check this varies based on the data that is sent through to the WCS for this purpose, but commonly consists of carrier, priority and a 'Share Pallet' flag, which controls whether packages of different priorities can be shipped together.
If the pallet does not exist, one is created, with the criteria of the package being placed on it.
When placed on a pallet, the package is updated on WMS to show the pallet on which it is to be despatched.
Shipment Pallet Move
This module is used to move completed shipment pallets to storage locations, prior to them being loaded and despatched.
The user is prompted to enter a valid shipment pallet. This pallet must be fully built and closed. Closing of shipment pallets is achieved on the WMS, which then updates the WCS.
The RDT then prompts for the storage location of the shipment pallet, which is validated.
The WMS is updated with the new storage location of the pallet.
A pallet may be moved several times before it is loaded.
Shipment Pallet Despatch
This module is used to confirm that a shipment pallet has been loaded and despatched.
The user is prompted to enter a shipment pallet, which is validated as ready for despatch.
The user is then asked to confirm that this pallet is loaded.
When confirmed, the WMS is informed that the pallet is despatched.
Combined Split
This is a module written for another WMS and is currently unavailable in the normal WCS/WMS combination, either Oracle or C-ISAM.
The combined split module allows stock to be moved from one pallet to another on an ad-hoc basis.
See flowchart #Combined Split.
The user scans or enters the pallet of the stock to be moved.
The Owner of the stock is prompted for. A default value will be displayed if one was entered when the user logged on.
The stock to be moved is then prompted for. Once the code has been scanned or entered, it is checked against the WMS to validate it. If details of the stock for the source pallet cannot be found, an error is displayed - 'Stock xxx not found on Pallet yyy'
The quantity to be moved is prompted for. If the user has entered more than there is expected to be on the pallet, an error is displayed showing the amount entered and the amount the system expects to be present on the pallet.
At the next prompt, the ID of the destination pallet is scanned or entered. If the user enters '0', they are given the opportunity to enter a destination location instead. This location is validated as normal
When all details have been entered, stock update messages are sent to WMS.
Ad Hoc Putaway
This module is for use in a shelving environment, where stock on a pallet is taken to individual shelves, and as much of it is located in that location as possible.
See flowchart #Ad Hoc Putaway.
The user is prompted to fetch a pallet and find a location in which some of the stock can be located. Once confirmed at this location, the user is prompted to enter the amount of the stock they intend to put away in that location, and then scan the stock code on each carton once for each carton put away.
Once all the stock has been put away, the user can then move onto other locations, until the pallet is empty.
If they reach the end of the aisle with stock left on the pallet, the user can press F1 to indicate that the pallet still has stock on it. They are then prompted to return the half-full pallet to the receiving location.
If all the stock on the pallet can fit in one location, the user can press the F5 key when prompted for the putaway quantity, to indicate that all remaining stock is to be placed in the location.
If the pallet has less stock on it than the user was informed of, the user can indicate that the pallet is empty by pressing the F4 key. They must obtain authorisation from a supervisor to continue.
WCS Functionality
A priority of the development team has been to make the WCS system front-end as user-definable and friendly as possible. This means that most of the screens described below have customisable toolbars, customisable table structures, and hot-menus. Help is also provided. The menu system has been tailored to place most frequently used functions in reasonable order for speed. Hot key combinations have also been used, staying as close to Microsoft â„¢ standards as possible for familiarity.
A full description of how to use the maintenance utility is available in C3PL-M Maintenance User Guide.
User Logon
Employee codes are used to log on to the WCS Maintenance system, in the same way that the RDT users are required to log in. This allows for the logging of actions taken by administrative users. The system will not allow the user to log on to the system if they are logged on somewhere else, depending on the way the user has been set up in the WCS.
Reprioritisation of Pallet Moves and Picks
These screens allow the users to manually modify the priority of existing movements and picks (full pallet and case picks) within the system. Standard and advanced selection criteria are provided and these selection values can be saved as templates for quick recall.
Tasks can be set to error status, held, recalled to available tasks and even deleted from the WCS (with logging), if the user has sufficient privilege.
Pick Summary
To aid in identifying the current picking work-load, this screen displays the tasks grouped by route and load, showing the total number of tasks per load and a general status of the load (error, in progress, pending, held). Double-clicking on a line displays all the picking tasks in the screen shown above.
Logging
All incoming messages, outgoing messages, completed tasks and exceptions are logged to the database, so that they can be reported on. It is also possible to have all of these logging messages sent to a separate database, for easier archiving later.
Employee Activity
This screen displays all employees logged on to RDTs in the specified company and warehouse. The screen is automatically refreshed every few seconds to keep the screen as current as possible. When an employee is engaged in RDT activity, details of this activity can be seen by double clicking on the relevant employee - a pop-up screen will display the details of the job.
Any user that has had communication problems with the WCS (an unlikely occurrence, normally due to RDT hardware damage) can be freed from the WCS, allowing any tasks they were involved in to be completed by other available RDT users.
Any activity by a WCS user is logged (see #Logging) and can be recalled on a fully configurable enquiry screen, with complete selection criteria.
Exceptions
Exceptions are pre-defined events that occur in RDT processing of tasks. Examples of exceptions are: changing the quantity of a pick; cancelling a pick; cancelling a move; repositioning a move; changing a pallet on a move; changing a pallet on a pick or; adding a pallet at stock take. These may need to be observed and acted on by administrative staff and need to be viewable. This screen displays all exceptions that occur in the specified company and warehouse. The screen is automatically refreshed every few seconds to keep the screen as current as possible. When an exception has been logged, details of this activity can be seen by double clicking on the relevant line - a screen will display the details of the job.
Any Exception activity (e.g. modifying pick quantities, supervisor overrides, administration functions, repositioning and cancellation of movements, etc) by a WCS user is logged (see #Logging above) and can be recalled on a fully configurable enquiry screen, with complete selection criteria.
Enquiries
Enquiries are provided for:
- Goods Receipts
- Stock Takes
- Shipment Pallets and Packages
- Pick Containers
- Deconsolidation and Despatches
- Movements
- Picks
- Historical Activities
- Historical Exceptions
- Location Types
- Trucks
- Pallet Types
- Reason Codes
- Receipt Types
Standing Data Maintenance
The WCS provides the ability to maintain the standing data required by the system, including:
- System Parameters
- Warehouses
- Users (employees)
- Owners
- Groups
- Aisles
- RDTs
Held Priority
This allows the lowest level of priority (9) to be processed as a held task. The task will then not be actionable by RDT users until the task is released. This feature can be turned off.
Deleted records
It is possible to change the WCS system to not delete completed tasks from the database when they have been completed. They are instead marked for deletion. These are then cleared out by a scheduled event (see later). This method has the advantage that logging of events has greater detail, but has the disadvantage of taking more space in the database. This system of not deleting records also allows re-submissions and reprocessing of tasks on the RDT.
Parameter-controlled communication
System administrators have the ability to access additional set-up screens. These screens allow the WCS to be customised to communicate with any networked machine, via TCP/IP.
Parameter-controlled Functions
Each RDT module can be enabled, disabled or password protected by system administrators. This can be done for an individual user, or for a warehouse as a default. This means that the system can be tailored for specific use for a warehouse, or even a specific user in a warehouse.
WCS Administration functions can also be tailored for each user in the WCS, so that certain functions can be limited to certain users.
Total database control
System administrators have access to generic database maintenance functions. These include:
- Repairing and compacting the RDB
- Clearing log files
- Complete file maintenance, via a separate utility
- Clear-down parameters
Reports (user-definable)
Generic reports are available to the user, showing statistical analysis of employee activity, problems encountered, etc. Some data list reports are included for auditing.
Reports are viewed through the standard Windows functions i.e. notepad or Word, and can be exported for external printing or directly for emailing.
Reports are available as standard using the MS report designer component. Users can write their own reports utilising any ODBC-compliant report-writing tool at their disposal.
Scheduler
A scheduler is included as part of the package to allow the user to place some small system maintenance programs onto the PC to run at regular intervals. These automatic maintenance programs are listed below.
Clear-down
This program clears out old data and log files and tidies them up in a folder, specified by a system administrator. The number of days that the data stays on the system is user-definable, as is which data is cleared out.
Compactor
The compactor repairs and compacts the RDB on a regular basis. This is not strictly necessary on well-managed systems, but will aid those users who wish the run the WCS in a very automated way.
RDT Messages
The WCS has a facility to send messages to RDT users who are on the Wireless LAN. These messages can be controlled in this way by logging the administrative user on to the Wireless LAN through the WCS Server. Messages are typed in, a user or user is chosen and the message is delivered to the RDT user the next time they request work. Warehouses that require communications to remote RDT users can now do so without further expense.
Appendices
WCS-WMS Communication
Flowcharts
RDT Log-on Procedure.
Receipts.
Putaways.
Full Pallet Picking.
Part-pallet Picking.
Pallet Moves.
Stock Take.
Pallet Enquiry.
Location Enquiry.
Movement Enquiry.
Ad Hoc Movements.
Bulk PI.
Select Moves.
Loading by Carton.
Shipment Pallet processes.
Select Replenishment.
Serial Number Capture at Goods Receipt.
Serial Number Capture at Despatch.
Combined Split.
Ad Hoc Putaway.
Cherry Picking.
Deconsolidation.
Despatch by Order.
