Bay Diary Configuration
The Bay Diary system allows configuration of the basic settings itself. This is achieved by clicking the Settings (Cog) icon from the main Bay Diary screen.
The opening hours for all bays of all types is configured here. This also controls the number of bays available in the system of all types.
A button bar at the top controls saving the changes on this screen.
Changes will be saved using the Save Changes button provided. If the changes are not to be saved, click the Exit button instead. ![]() Note: This will discard ALL changes on this screen.
Note: This will discard ALL changes on this screen.
General Settings
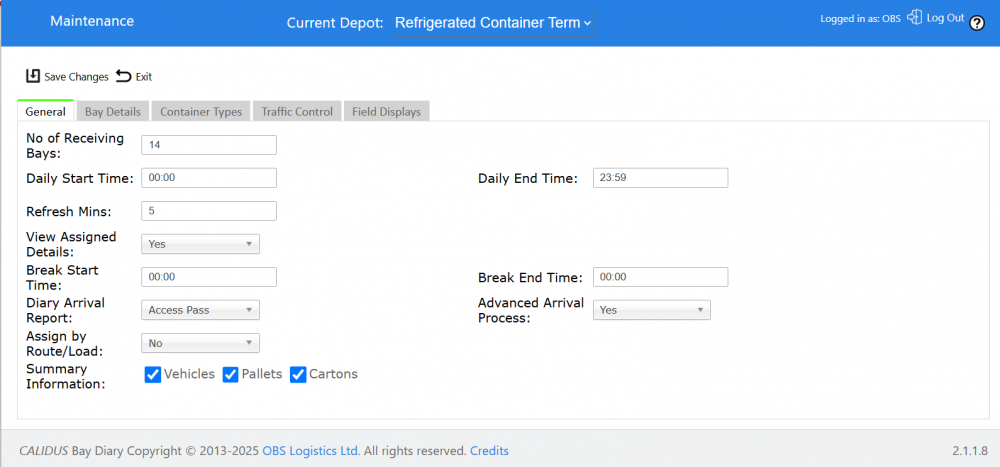
Settings:
- No of Receiving Bays - the total number of bays displayed in the Bay Details section of this page, and the bays available to book against in the main Diary screen.
- Daily Start Time - the start available time per day for a bay. Bookings may only be made between this and the End Time below.
- Daily End Time - the end available time per day for a bay.
- Refresh Mins - the number of minutes after which the Diary screen will refresh to show any bookings made by other users.
- View Assigned Details - a drop-down list controlling whether the booking details per bay are shown under the bay in the Bay Slot table on the Front screen.
- Break Start Time - A start time during the day when all slots are unavailable.
- Break End Time - An end time during the day when all slots are unavailable.
- Diary Arrival Report: Select whether and what report is printed on Arrival status. Select from the drop-down list options: No Print, Access Pass, Arrival Print (ZPL)
- Advanced Arrival Process - Whether to use the Advanced Arrival process. Select from the drop-own list options Yes or No.
- Assign by Route/Load - Select from the drop-own list options Yes or No.
- Summary Information - You may select what summary information is displayed in the main screen summary bar. Select from Vehicles, Pallets or Cartons with the supplied check boxes.
Bay Details
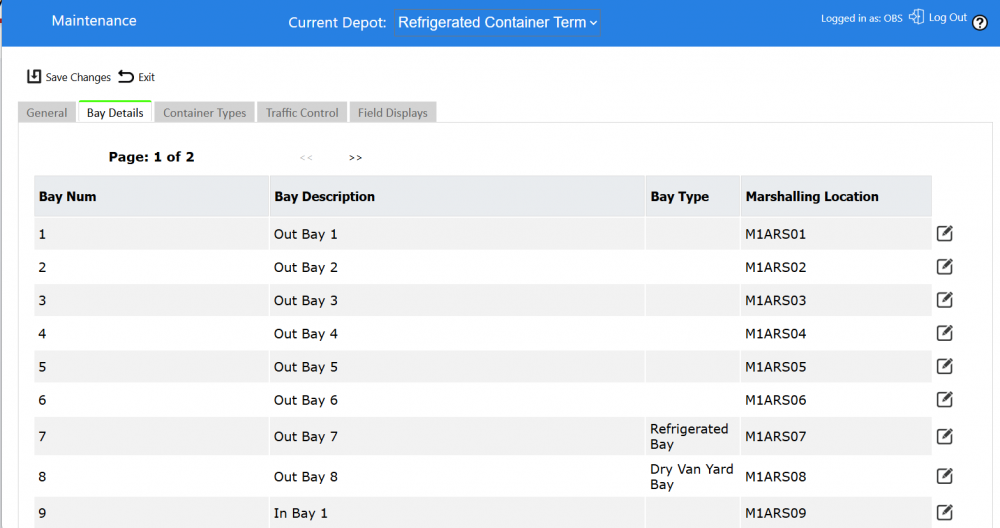
The number of bays are created as specified in the General Settings and are displayed in a paginated table in pages of 10. If there are more than 10 bays, the <<< and >>> buttons provided may be used to page through the bays.
Each bay has:
- Bay Num - Generated sequence
- Bay Description - this is displayed in the main Bay Diary screen.
- Marshalling Location - the WMS marshalling location associated with this bay.
An Edit button is provided against each line. Clicking it will show a popup window to edit the bay details.

Clicking the Save button will save the changes. Closing the pop-up window will discard any changes.
Container Types
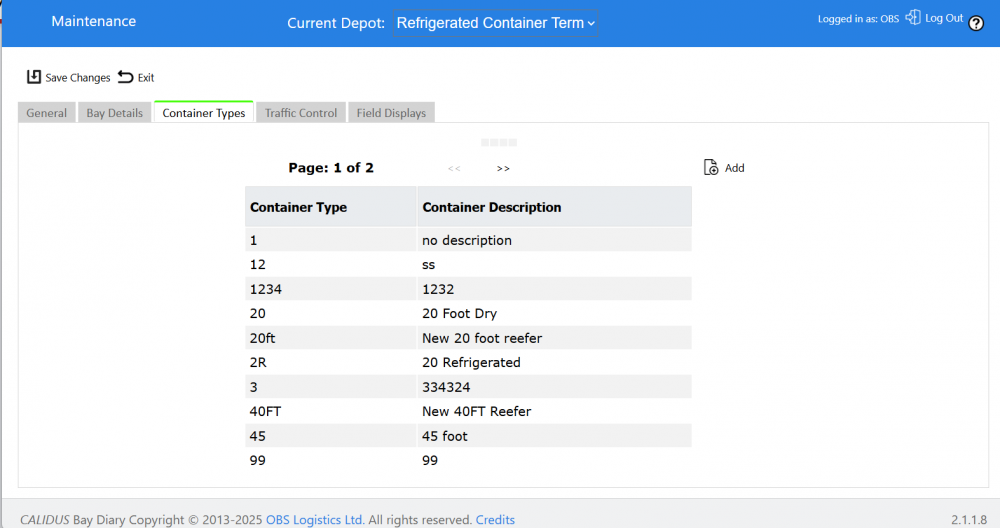
These are the container types available to the system when creating a booking. These are shown in a drop-down list on the Booking ((Detail) view.
Each container type has:
- Container Type – the type
- Container Description – the description of the type
New container types may be added using the Add button provided. A panel will be shown:
The Container Type and Description may be entered here, and saved with the provided Save button.
Existing container types may be deleted using the Delete button against each line.
Traffic Control
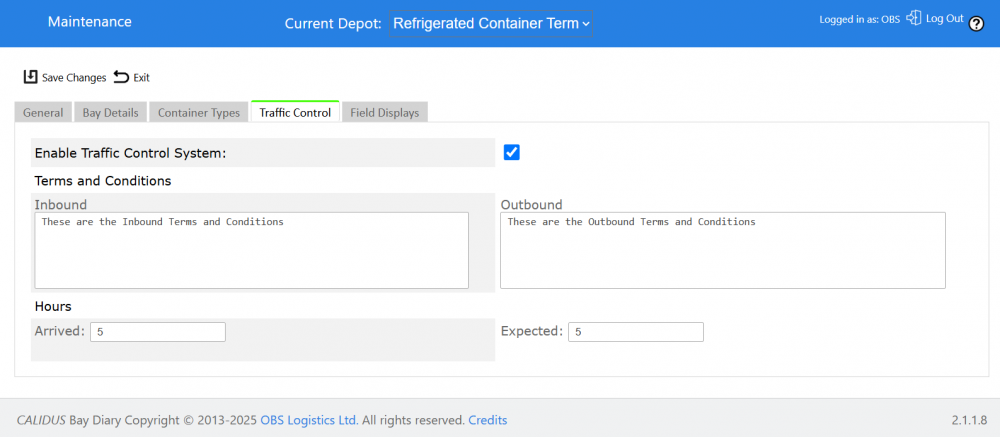
Here you can enable the traffic control system and configure the way that it works.
- Enable Traffic Control System - Enable the check box to enable the traffic control system TOC.
- Terms and Conditions - enter your terms and conditions to be displayed on signature capture during transfer of custody.
- Inbound
- Outbound
- Hours - enter the number of hours before to display arrival and expected deliveries and collections.
- Arrived
- Expected
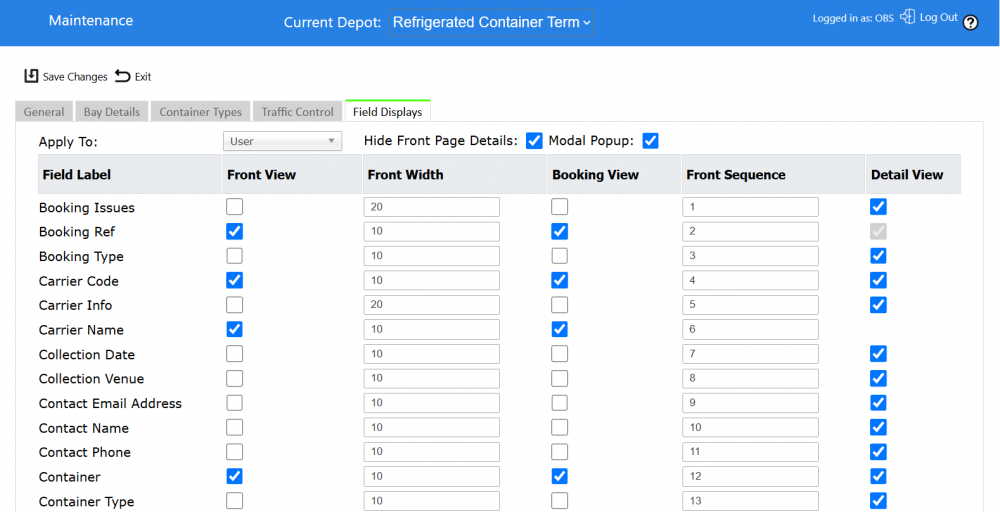
Field Displays
This section controls what elements are displayed in the Diary screen, when:
- Showing a list of bookings on a bay in the Diary screen
- Making a new booking or Showing or editing an existing booking on the Booking screen.
The available fields are shown in a list on the screen.
Each field is displayed in a row:
- Label - the label of the field. This is currently non-maintainable and is displayed on the Booking Detail screen.
- Front View - a check box controlling whether this field is to be displayed on the Diary screen
- Detail View - a check box controlling whether this field is to be displayed on the Booking Details screen. If there is no check box, the field is always shown.
- Front Width - if on the front view, the percentage width of the line this field takes.
- Front Sequence - if on the front view, the order in which the fields appear.
![]() Note: If fields are selected for the front view, it is recommended that the widths of the fields selected are less than or equal to 100% (the full available width of the line). Creating cumulative widths greater than 100% will display unpredictably.
Note: If fields are selected for the front view, it is recommended that the widths of the fields selected are less than or equal to 100% (the full available width of the line). Creating cumulative widths greater than 100% will display unpredictably.
The fields that may be configured are:
- Time Slot
- Grn No
- Container
- Booking Ref
- Owner
- Carrier Name
- Special Instructions
- Load Information
- Expected Num Pallets
- Expected Qty
- Supplier
- Supplier Info
- Carrier Info
- Booking Issues
- Release PIN
- Collection Date
- Collection Venue
- Restitution Venue
- Restitution Free Text
- Container Type
- Last Free Date
- Contact Name
- Contact Phone
- Contact Email Address
- Supplier Name
- Carrier Code
- Owner Name
- Booking Type
- Route Code
- Load Number
The configuration may apply to the logged on user (the default level) or as a default for the entire warehouse. This is selectable through the Apply To drop-down list.
