UG 352167-2 C-WMS Company Set-up Guide
![]()
Aptean
C-WMS Company Set-up Guide
CALIDUS WMS - 810
1st July 2025 - 2.01
Reference: FS UG 352167-2
Company Set-up
This document describes the process and the required screens to be used in setting up the information for the Company running the warehouse. Other guides describe the set up of the warehouse, owners, etc.
This is a generic guide based on the version of the CALIDUS WMS system at the time of writing.
Note that fields marked '**' are mandatory and are needed to ensure correct set up of the system.
SYSTEM REGISTRY (ULF0030)
In order to create a company, you must be given the authority to do so.
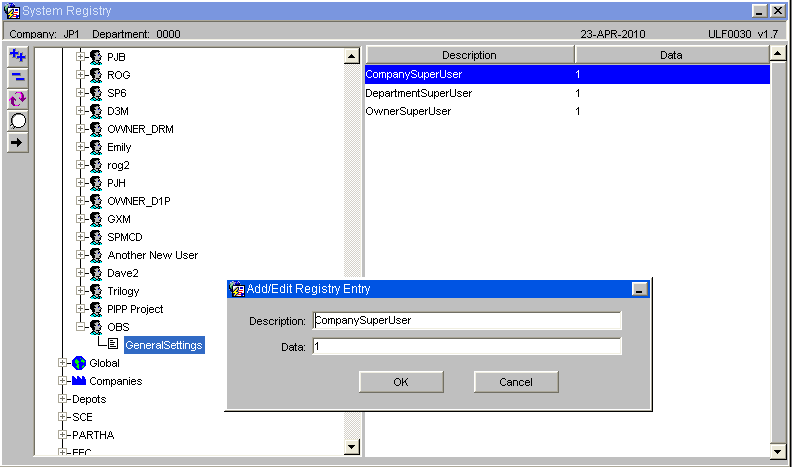
In system registry, against your user id, move the cursor to the right hand side of the browser and click on the '+' icon. This will show you the box below. Enter the text exactly as shown (without spaces.)
In order to create a department (required) you also need to take the same steps, but entering a description of DepartmentSuperUser and a data value of 1.
In addition to setting up the user account to allow the company to be created, a system registry setting must be set for units of measure.
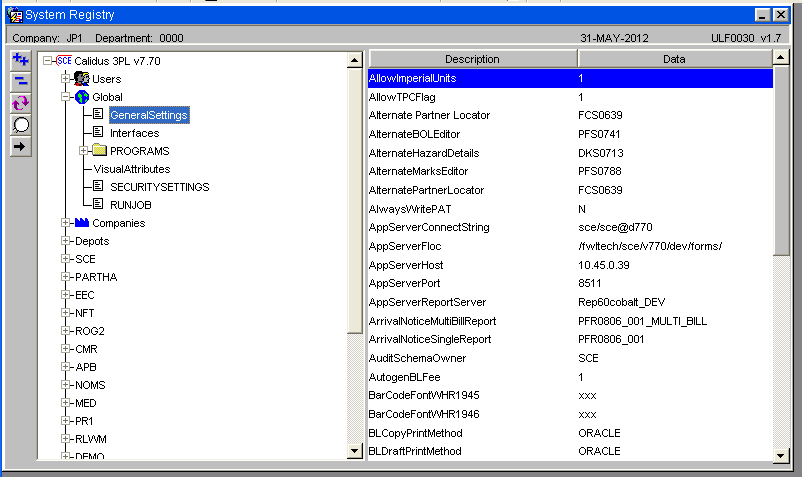
Ensure that the system registry value 'AllowImperialUnits' with a data value of '1' is set at either Company level (this may require a new Company data node to be added to the menu or enter at the Global level.
![]() Note: If the value is not set then there is the possibility that inbound EDI messages mail fail to upload.
Note: If the value is not set then there is the possibility that inbound EDI messages mail fail to upload.
COMPANY MAINTENANCE (CASN5010)
Main Tab
![]() Note: Ensure the three character Company Code does not start with a number
Note: Ensure the three character Company Code does not start with a number
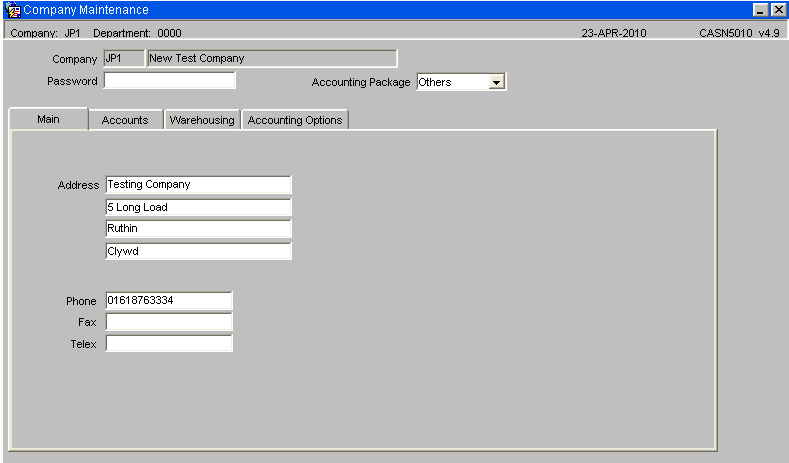
Ensure that the company code and name are entered, the company address is entered and the tel/fax/telex numbers if required are entered with no spaces in between the numbers.
If a password is entered then this must be also entered if ever enquiring on or updating the company before the execute enquiry is selected.
| Field Name | Description | Options | Generic Value |
|---|---|---|---|
| Company Code ** | This is the 3ch code used to define the company all warehouses and owners will be under | Any 3 character code, that does not start with a number | Defined by the client |
| Password | Used to restrict users from accessing the company maintenance screen | 30 character field or left blank | Blank |
| Accounting Package ** | Used to defined ledger and accountancy information | Agresso, Coda, SCE, Other | Other |
| Address ** | The address of the company | 4 x 30 character free text fields or left blank | Defined by the client |
| Phone | Phone number of the company | 15 character free text field or left blank | Defined by the client |
| Fax | Fax number of the company | 14 character free text field or left blank | Defined by the client |
| Telex | Telex number of the company | 14 character free text field or left blank | Defined by the client |
Accounts Tab
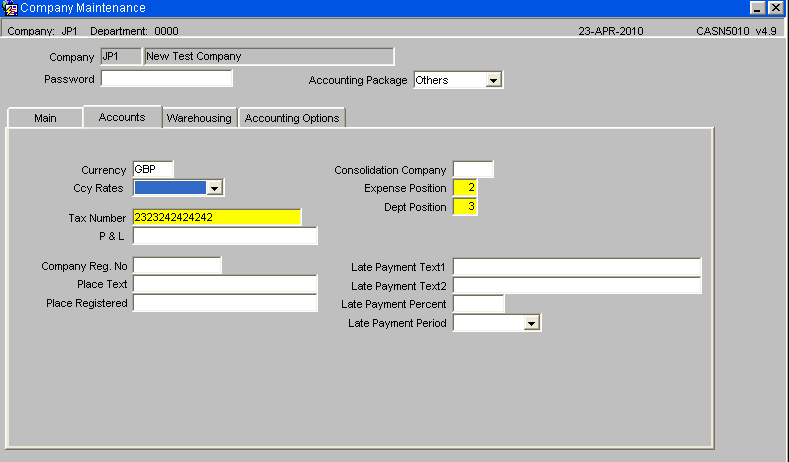
Ensure that the currency is entered, even though no currencies exist for this new company yet, then enter a tax number for the company.
The expense position must be before the debt position although without financial integration these numbers do nothing.
An information message will be generated by the system 'FWL-04534' "Enter the year and period, N/L processing is to begin." Click OK.
The Nominal Ledger start period will automatically be put to the current year followed by 01. (A)
| Field Name | Description | Options | Generic Value |
|---|---|---|---|
| Currency ** | Base currency of the company | Pre defined in currency maintenance normally ISO standard - LOV available | EUR |
| Ccy Rates ** | Determines the method of updating currency codes - will default to 'Stand Alone' | Master, Update, Stand Alone | Stand Alone |
| Tax Number ** | Unique Tax reference number for the company | 20 character free text field | Defined |
| P&L | Purchase and Ledger reference number | 30 character free text field or left blank | Blank |
| Consolidation Company | If the client has multiple company codes, the consolidated or master company code is entered here | Must have been created in company codes maintenance or left blank | Blank |
| Expense Position ** | The expense code's numerical position within the nominal ledger code - used for accounts | 01-Oct | 1 |
| Dept Position ** | The dept code's numerical position within the nominal ledger code - used for accounts | 01-Oct | 3 |
| NL Start Position ** | The year and month the company's accounts will start from | YYYYMM | Defined by the client |
| Late Payment Text 1 | A text box to dictate what should appear on the invoice | 40 character free text field or left blank | Blank |
| Late Payment Text 2 | An additional text box to dictate what should appear on the invoice | 40 character free text field or left blank | Blank |
| Late Payment Percent | The percentage at which the company can accept late payment | 0 - 100.00 | Blank |
| Late Payment Period | The period in which late payment is allowed | Per month, Per year | Blank |
For Owner Invoicing, the following summarises the details that are required:
- Company Registration number
- VAT number
- Name and Address details for Head Office (HQ)
- ‘Registered in city/town’ fixed text details for invoice
- Late Payment rule – percentage and associated fixed text etc
This information relates to the ‘Head Office’ details for the Company. The code and details used for the Company Accounts and the details that will be printed on each invoice that will be sent to Stock Owners.
The ‘Late payment’ text etc. These lines and figures will be printed at the top of the invoice. See invoice details and example below.
Warehousing Tab
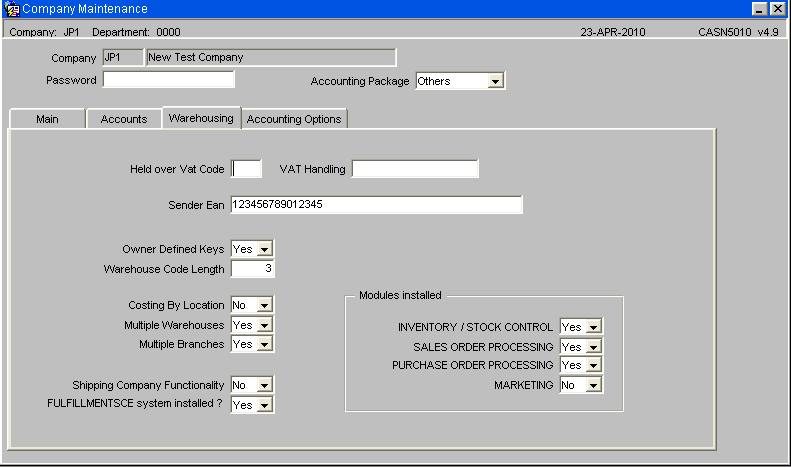
If the owner defined keys are set to 'Y' then all customers/suppliers will only be available for the owner that they are set up with. If set to 'N' then the customers/suppliers will have '+' placed in their owner fields and will be be seen and available by all owners.
![]() Note: Ensure the warehouse code length is set to 3.
Note: Ensure the warehouse code length is set to 3.
Ensure Multiple Warehouses , Multiple Branches are set to Yes.
Ensure FulfillmentSystemSCE installed is set to yes.
Ensure that the top 3 modules installed are set to yes.
| Field Name | Description | Options | Generic Value |
|---|---|---|---|
| Held Over VAT code | Zero rated vat rate of the company | Predefined in Vat Rates maintenance or left blank | Blank |
| Sender Ean | The European EAN number of the edi owner | Defined by the client or left blank | Blank |
| Owner Defined Keys ** | Used to specify if the owners within the company are allowed to see/use each others' suppliers anc customers | Y or N | N |
| Warehouse Code Length ** | The length of the warehouse code to be set up | Numerical value between 1 and 9 - but if using RDT, has to be no longer than 3 | 3 |
| Costing by Location ** | Used for accounting if charging by location | Y or N | N |
| Multiple Warehouses ** | Defines whether there will be more than one warehouse under the company | Y or N | N |
| Multiple Branches ** | Defines whether there will be more than one warehouse under the company | Y or N | Y |
| Shipping Company Functionality ** | Determines whether the company will use shipping functionality as well as WMS | Y or N | N |
| Fulfillment SCE system installed? ** | Determines whether the company will be using the freight functionality | Y or N | N |
| Modules Installed (all) ** | Defines which parts of the WMS functionality the company will be utilising | Y or N for all options | Y for all |
Accounting Options Tab
Not relevant for the implementation of WMS
OFFICE/DEPARTMENT SET UP (PFS1025)
Note that only a few defined fields are required for warehousing. These are detailed below. All other fields can be ignored.
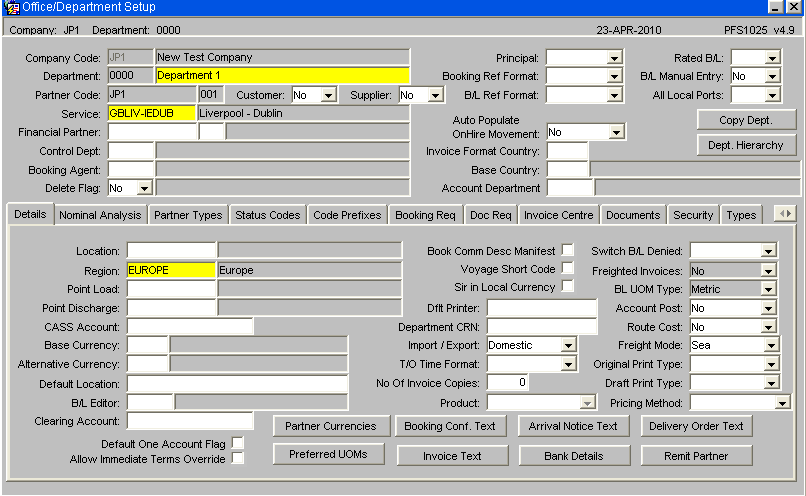
Before attempting to create a department ensure the user being used has the registry setting DepartmentSuperUser is set to 1. (See above - System Registry)
The screen requires the entry of a new department, enter a new department and description that will be used for warehousing with this company.
Next enter the company code that you have just created.
Next enter a partner code this does not have to already exist.
Choose a service, these can be set up in service maintenance but are irrelevant to warehousing.
The only other field to enter is Region, an LOV is available so just enter the nearest region to the company main office, once again this is irrelevant to warehousing.
| Field Name | Description | Options | Generic Value |
|---|---|---|---|
| Company Code ** | The company code you have created which you wish to assign a department to | 3 character free text field | Defined by the client |
| Department ** | The department code and department description that will be assigned to the company | 3 character free text field | Defined by the client |
| Partner Code ** | The partner code to be associated with this department | 10 character free text field (no validation) | Defined by the client |
| Region ** | The region the country is situated in | Must have been set up in region maintenance | Defined by the client |
USER MAINTENANCE (FXMUSER)
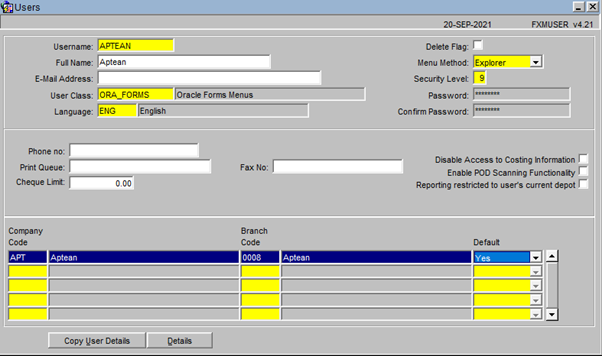
Add the new company code and department code to your current user.
User records are setup in FXMUSER (Maintenance User Maint WMS Admin Users)
The key items that determine the level of access that a user has are:
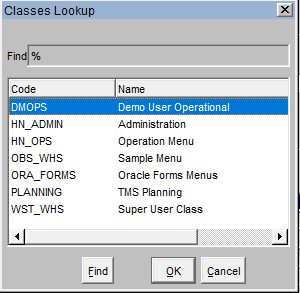
User Class -
This determines the menus that a user can see when they log into WMS
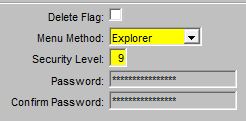
Security Level - Each screen and submenu is graded with a security level. Users can only see the screens and submenus that are at or below their assigned level. The level can be set at 1 through to 9
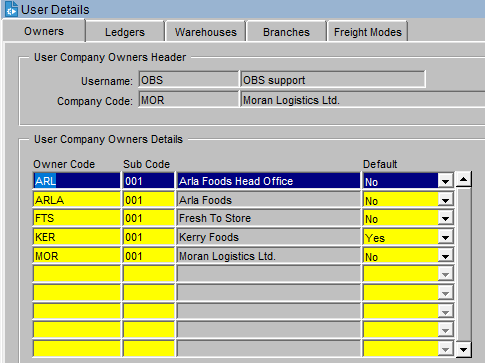
Company Details (highlight line and press Details)
Details - This determines which Owners, Ledgers (PL1/SL1), and Warehouses the user can access
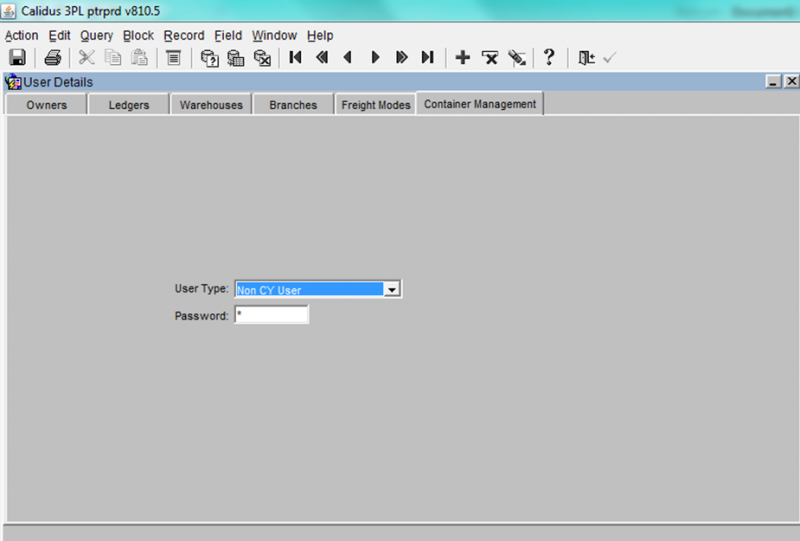
Container Yard Management
Note that the Owner under which you are configuring the user must be configure for Container Yard Management, through Owner Rules (CTMG).
Users are of a specific type
- Non Container management user (no access at all)
- Admin (access to all container management functions)
- PDA (access to device screens only)
- Customer (access to customer screens only)
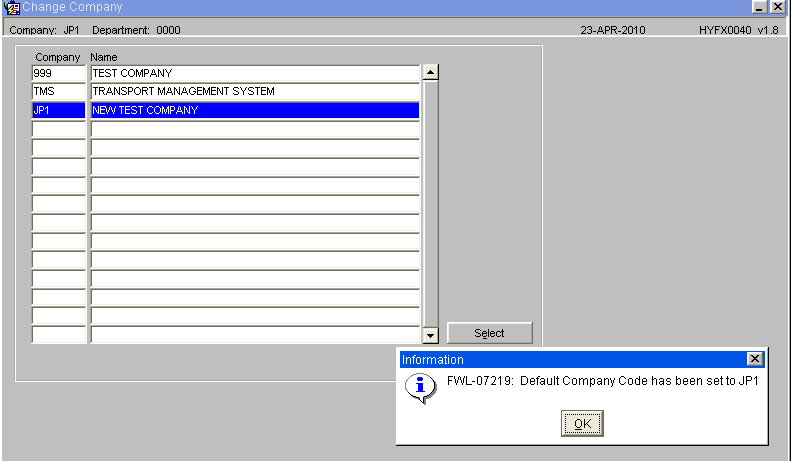
Change Company (HYFX0040)
Select the company you have just created and added to you user and click Select.
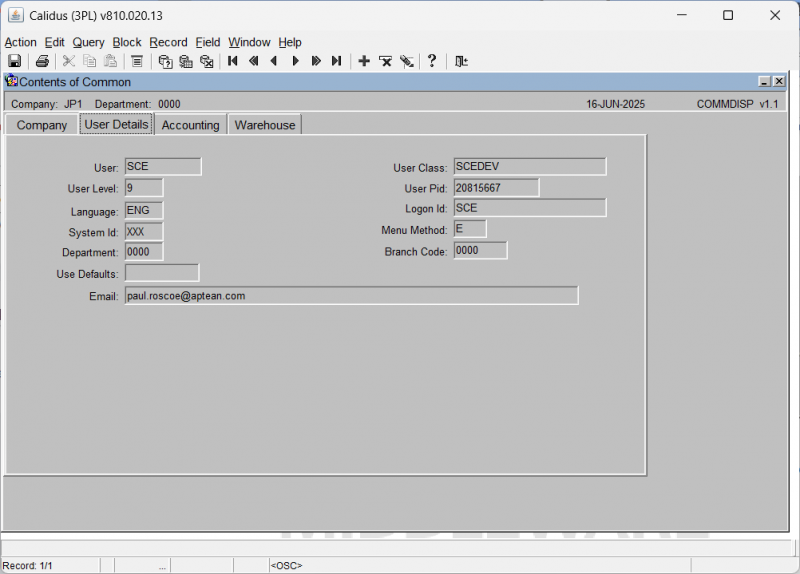
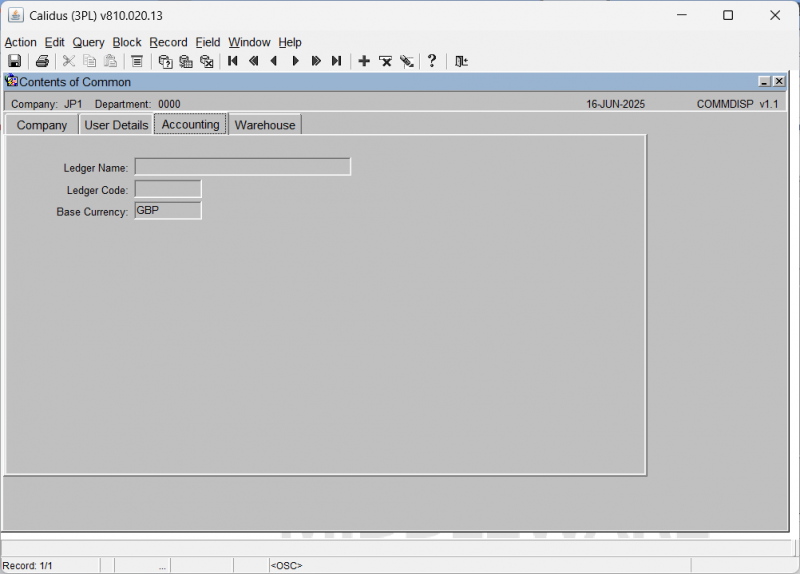
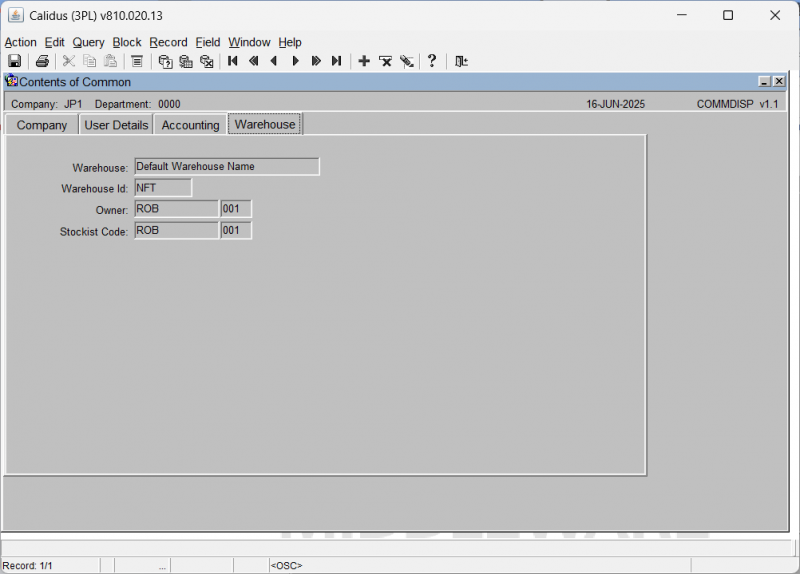
Common Values (COMMDISP)
To call the screen - Select Help / Display Common from the toolbar.
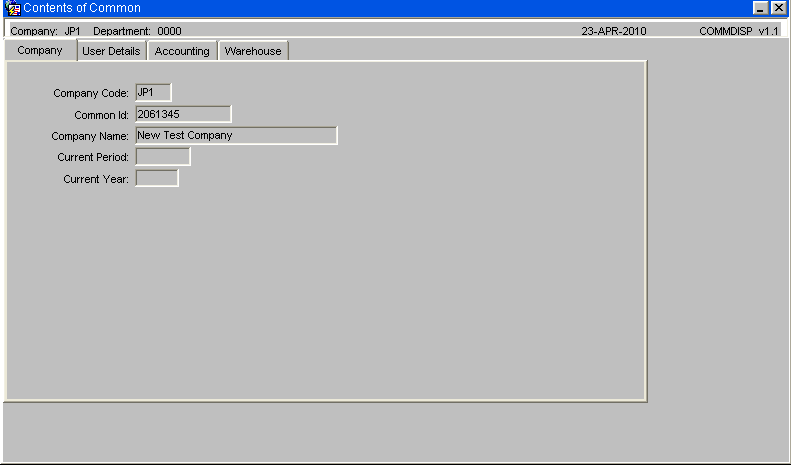
When you change company (using HYFX0040), you can use this to ensure that the company has actually changed. If not, set the new company as the default in the User Maintenance screen and log out and back in again to re-set the company.
Here you can also view
User Details
Accounting
Warehouse
CODE TYPES MAINTENANCE (CASN5150)
Although the following screens are not used by the WMS, they still need to be created in order to use the company code. The following steps are needed in order to create the nominal master.
To set up the nominal master you need to create a minimum of 4 records in code types maintenance - codes 1 to 4 all with length 1.
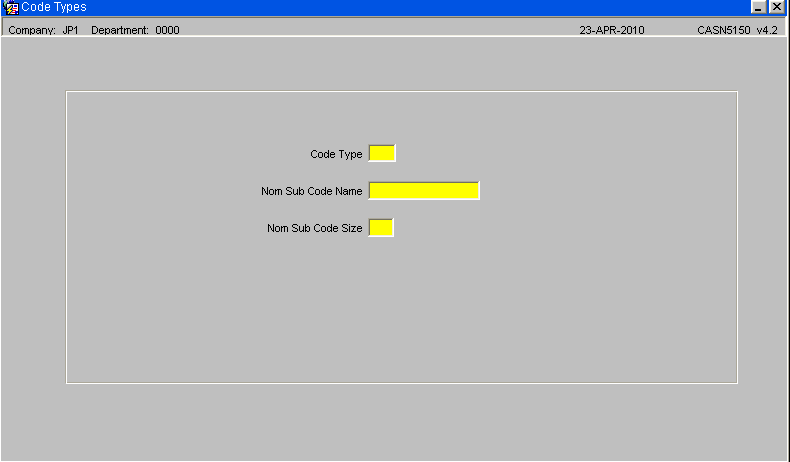
Four different code types need to be set up. The Code Type (A) needs to run from 1 to 4. The Nom Sub Code Description (B) can be Type * where * is the number. The Nom Sub Code Size (C) must always be 1.
| Field Name | Description | Options | Generic Value |
|---|---|---|---|
| Code Type ** | The numerical code given in order to create the code | 1 digit field | Defined by the client 1 |
| Nom Sub Code Name ** | The name given to the code type | 15 character free text field | Defined by the client ?? |
| Nom Sub Code Size ** | The size of the code type | 1 digit field Defined by the client | 1 |
CODES MAINTENANCE (CASN5040)
For each code type you just created go into codes maintenance - the code in the 2nd block will make up part of the nominal code in the following way:-
- Code type 1 code = 1
- Code type 2 code = 2
- Code type 3 code = 3
- Code type 4 code = 4
The nominal code will now be 1234
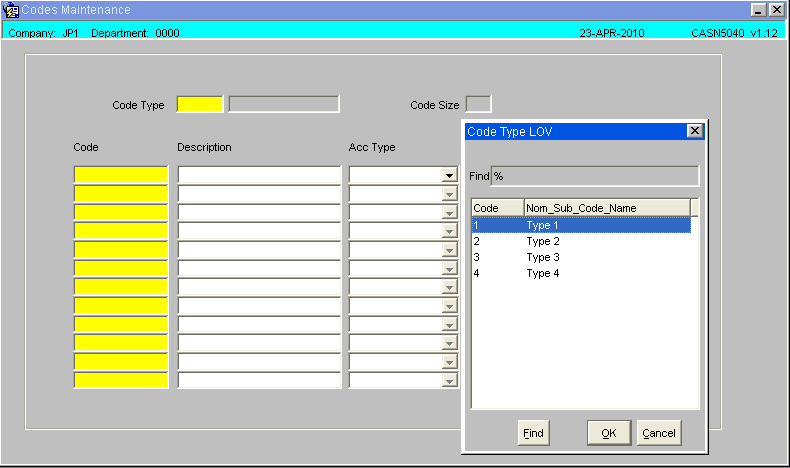
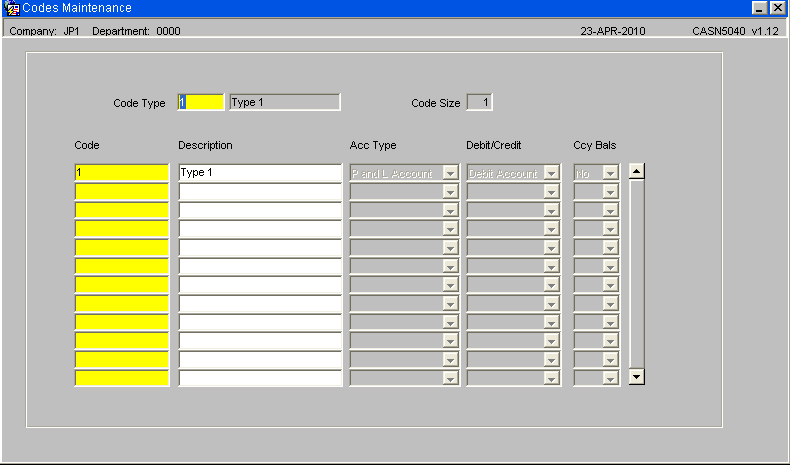
For types 2 - 4 only the code information and description need entering.
| Field Name | Description | Options | Generic Value |
|---|---|---|---|
| Code Type ** | The code type the code will be set up against | Must have been created in code types maintenance - LOV available | Defined by the client |
| Code Size ** | The size of the code type | Will default to the size entered in code types maintenance | Defined by the client |
| Code ** | The code to be created | Defined by the required setup (you will need to repeat this for numbers 1,2,3 and 4) | 1 |
| Description ** | The description for the code to be created | 25 character free text field | Defined by the client |
| Acc Type ** | The type of account this code relates to | P & L Account | P&L Account |
| Debit/Credit ** | Determines whether the code is to be used for credit or debit purposes (not used by the wms) | Credit | Credit |
| Ccy Bals ** | Are currency balances to be recorded? | Y or N - will default to Y | Y |
NOMINAL ACCOUNT MAINTENANCE (CASN5120)
Nominal code maintenance create record 1234
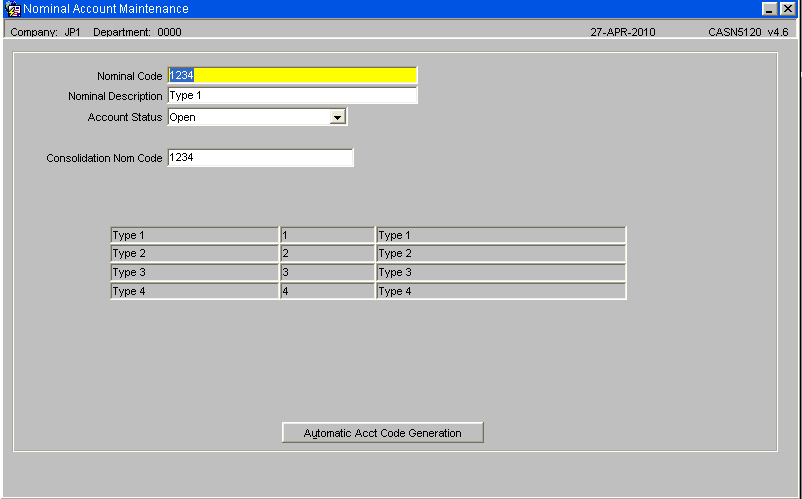
Enter a nominal code (A) of '1234', the rest of the information should default in, and save.
| Field Name | Description | Options | Generic Value |
|---|---|---|---|
| Nominal Code ** | The nominal code for the company | 1234 | 1234 |
| Nominal Description ** | The description for the nominal code | 35 character free text field | Defined by the client |
| Account Status ** | The status of the account | Open | Open |
| Closed | |||
| Closed by Segment Close | |||
| Consolidation Nom Code ** | The nominal code used when consolidating accounts | 1234 | 1234 |
| Alt Currency Code | The alternative currency code for this nominal master | Display only - will default to blank | Blank |
| Reconciliation Tick ** | Determines whether this nominal code will be used for accounting reconciliation (not migrated) | Y or N - display only | N/A |
| The remaining fields are display only and will default to those previously setup | |||
LEDGER MAINTENANCE (CASN5020)
Possible Error 1
From this point on most of the screens set up need to have the user set up fully to enter more information. This is mainly the ledger information under the new company but it will shortly include the owner and warehouse information as well. The following error screen will show that the user now needs to be completed fully.
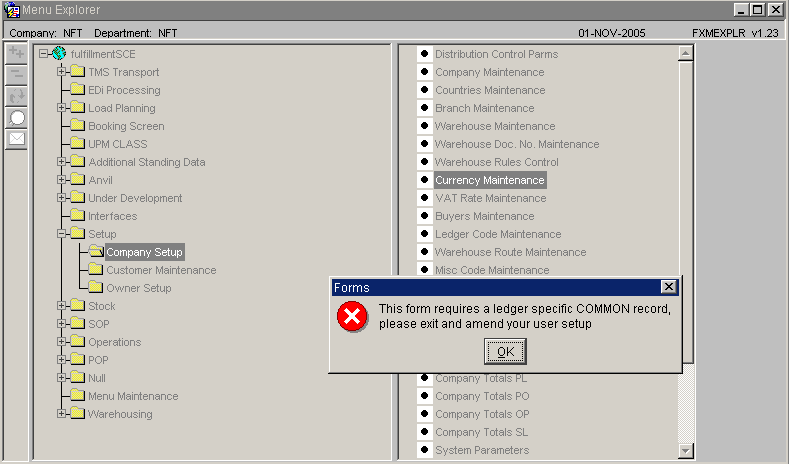
Before this can be completed to ledgers PL1 and SL1 may need to be added.
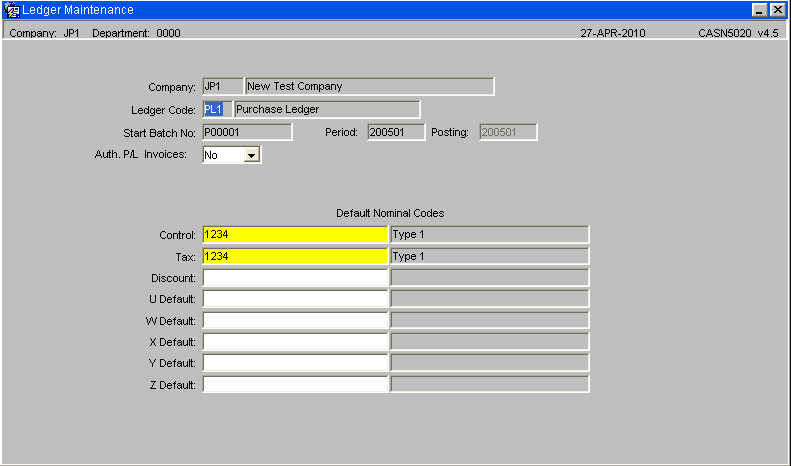
Enter the purchase ledgers PL1 and SL1 as above and save.
| Field Name | Description | Options | Generic Value |
|---|---|---|---|
| Company ** | The company code you need to assign the ledger codes against | Must have been created in company codes maintenance - LOV available | Defined by the client |
| Ledger Code ** | The ledger codes to be assigned to the company (note, you will need to set one record up for each of the following ledger codes) | PL1, SL1, SYS, ACC, REV | PL1, SL1, SYS, ACC, REV |
| Start Batch No | The starting control number for this ledger code | P00001, S00001, S00001, A00001, R00001 | P00001, S00001, S00001, A00001, R00001 |
| Period | The period the ledger code will run from | YYYYMM format | Defined by the client |
| Cleardown Period | The period a cleardown will run for (not used by the wms) | 0 | 0 |
| Auth Invoices | Does this ledger code need authorisation during invoicing? | Y or N - will default to N | N |
The remaining fields are not required by the WMS.
CURRENCY MAINTENANCE (CASN5060)
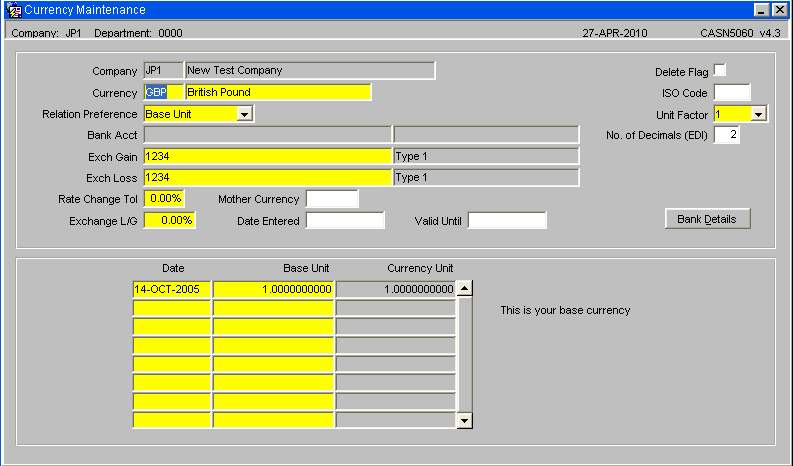
This is the currency maintenance screen.
Ensure that the first currency that you enter for the new company is to be the base currency as this is the way that it will be saved becoming the default currency for the company.
Enter the company
Ensure the Relation position is Base Unit
Currency and description
Nominal account
Then tab through the rest of the fields until the record is created
| Field Name | Description | Options | Generic Value |
|---|---|---|---|
| Company ** | Company code the currency will apply to | Predefined in company maintenance | Predefined 3 ch code |
| Currency ** | Currency code and name denoting specific currencies | 3 ch text field followed by 30 character currency description | Various |
| Relation Preference ** | Denotes whether the currency code will be a base unit or currency unit | Base Unit or Currency Unit | Currency Unit |
| Bank Acct | Pulled in from company maintenance if setup | Prepopulated | Defined by client |
| Exch Gain ** | Based on the nominal ledger setup - the nominal code entered here will define the exhange and gain rate | Predefined in nominal master maintenance | 1234 |
| Exch Loss ** | Based on the nominal ledger setup - the nominal code entered here will define the exhange and gain loss | Predefined in nominal master maintenance | 1234 |
| Rate Change Tol ** | The tolerance at which an exchange rate can be changed | 0 - 100 | Defined by the client |
| Exchange L/G | The loss and gain rate that can be applied to the exchange rate | 0 - 100 | Defined by the client |
| Mother Currency | The parent currency code for this currency | Blank | Blank |
| Date Entered | The date the currency code was created | Must be a valid date or left blank | Blank |
| Valid Until | The date the currency code will be valid til | Must be a valid date or left blank | Blank |
| Delete Flag | Is this currency code marked for deletion? (If checked, this currency code can no longer be used) | Checked or left blank | Blank |
| ISO Code | The standard ISO code for this currency | 3 character free text field or left blank | Defined by the client |
| Unit Factor ** | The factor by which the currency will be divided by (not used by the wms) | 1, 10, 100, 1000, 10000 | 1 |
| No. of Decimals (EDI) | The number of decimal places the exchange rate for the currency code will be displayed in within the edi message (not used by the wms) | 2 digit numerical field or left blank | Blank |
| Date | The date of the exchange rate | Must be a valid date - once entered, cannot be amended | Defined by the client |
| Base Unit | The base exchange rate for the currency | Will default to the exchange rate set up against the company | Display only |
| Currency Unit | The rate by which the exchange rate will be multiplied for each unit | 0 - 99999999.9999999999 | Defined by the client |
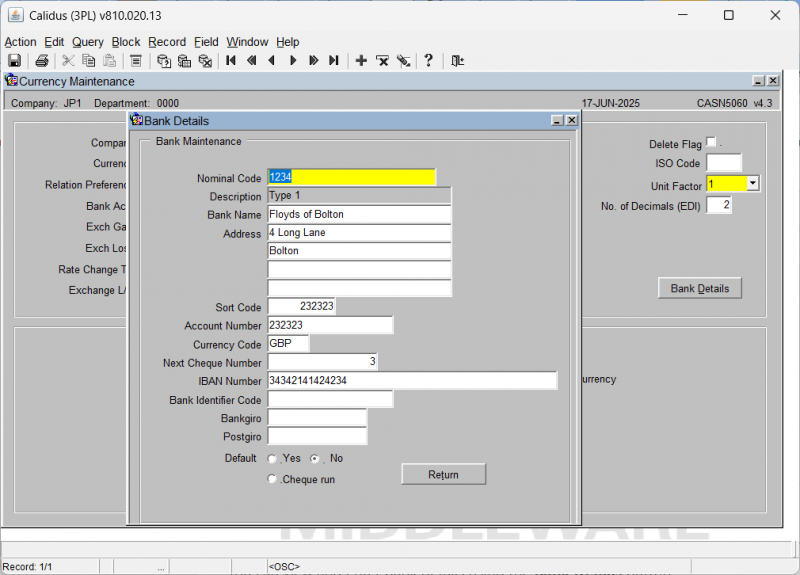
You can view and enter bank details using the Bank Details button.
A new pop-up window titled "Bank Details" (BNKDETAILS v1.3) appears.
This window displays the following fields:
- Currency
- Bank Code
- Bank Name
- Account No
- SWIFT
- IBAN
- Bank Key
- Branch Code
- Branch Name
- Account Type
- Description
- Beneficiary
- Country Code
The window may instead display Bank Maintenance fields as follows:
- Nominal Code
- Description
- Bank Name
- Address 1
- Address 2
- Address 3
- Address 4
- Postcode
- Bank Tel No
- Bank Fax No
- Sort Code
- Branch Code
- Branch Name
- Account Type
- Beneficiary
- Country Code
The window is populated with data for the selected currency.
The following summarises the details that are required for Owner Invoicing:
Note that the following BANK information can be held for any / all currencies used by the company.
- Bank Name
- Bank Account number
- Payment address
- Bank Giro number
- Postgiro number
- IBAN (International Bank Account Number)
- SWIFT code
Similarly, this detail relates to the Company Bank details and the various account codes utilised. Separate details are expected for each Currency code that the Company will utilise.
These details will be printed at the bottom of each invoice produced.
You then click the Return button to close the "Bank Details" window.
ISO COUNTRIES MAINTENANCE (PFS1004)
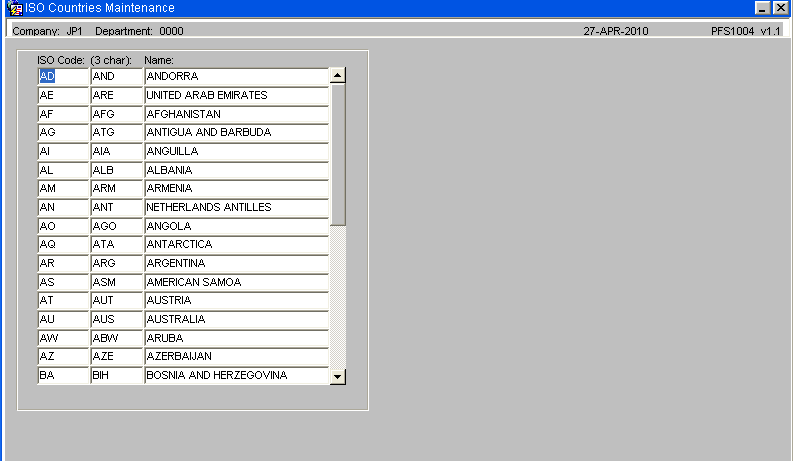
Ensure all required countries are set up on the ISO countries file, if one you require is missing then add it.
| Field Name | Description | Options | Generic Value |
|---|---|---|---|
| ISO Code | Two-letter country code as defined in ISO 3166 Standard alpha-2 | Can be manually maintained, though the original file will be created as part of the system delivery | As specified in the ISO 3166 Standards |
| Three-letter country code | Which allow a better visual association between the codes and the country names than the alpha-2 codes | Can be manually maintained, though the original file will be created as part of the system delivery | As specified in the ISO 3166 Standards |
| Name | Name of the country associated to the code | Can be manually maintained, though the original file will be created as part of the system delivery | As specified in the ISO 3166 Standards |
COUNTRIES MAINTENANCE (PFS1002)
Once the country has been entered in to the ISO countries code, it is necessary to create a country maintenance record.
This is done as below.
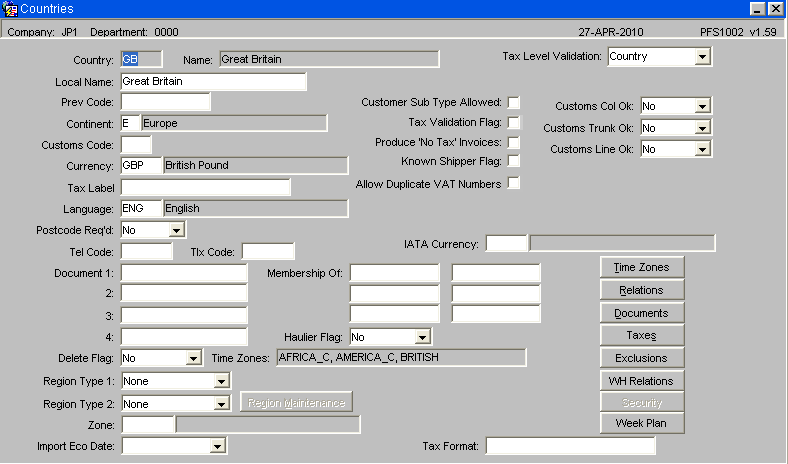
| Field Name | Description | Options | Generic Value |
|---|---|---|---|
| Country Code ** | ISO country code - normally 2 chs in length - allows up to 3 | Predefined by the client as to which countries they need to set up - must have been created as an ISO country code | Defined by the client |
| Local Name ** | Country name | Max 30ch country description | Defined by the client |
| Currency ** | Currency code of the country | Predefined in currency codes maintenance | Defined by the client |
| Region Type 1 ** | The region type for this country (not used by the WMS) | None, State, County, Province | None |
| Region Type 2 ** | The 2nd region type for this country (not used by the WMS) | None, State, County, Province | None |
| Tax Level Validation ** | The base level at which tax is applied | Country, Department | Country |
| Customs Col OK ** | Is customs consolidation allowed? | Y or N | No |
| Buttons | |||
| Time Zones | Takes the user to an additional screen to assign a time zone to the country (see below) | ||
| WH Relations | Takes the user to an additional screen to enter client specific invoicing and export information (see below) | ||
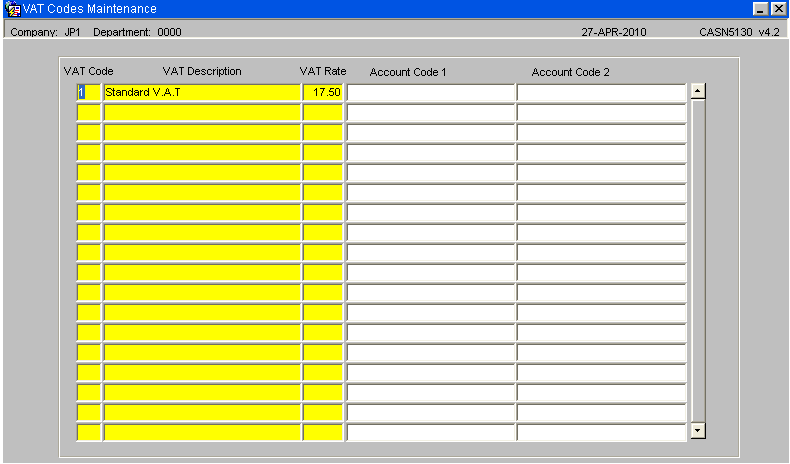
VAT CODES MAINTENANCE (CASN5130)
This is the VAT Codes Maintenance screen.
| Field Name | Description | Options | Generic Value |
|---|---|---|---|
| Vat Code ** | The code used to determine what VAT rate will be applied | 2 character free text field | Defined by the client |
| Vat Description | The description of the vat code | 25 character free text field or left blank | Defined by the client |
| Vat Rate ** | The percentage to be applied against this vat code | 0 - 999.99 | Defined by the client |
NEXT STEP
Once the above set up has been completed it will be possible to create the required warehouse, customers, suppers, owners, stock, users etc for the company.
Appendix A: Document History
A.1 References
| Ref No | Document Title & ID | Version | Date |
|---|---|---|---|
| 1 | UG 352167 C-WMS Standing Data Set-up Guide | v2.0 | 13/11/2018 |
| 2 | |||
| 3 |
A.2 Glossary
| Term or Acronym | Meaning |
|---|---|
| Ad Hoc (WCS) | A task instigated on the device (spec. Ad Hoc Pallet Move), rather than a task instigated from the WMS and Stock Control. |
| Advice Note Number | An external reference linked to a Goods Receipt. |
| Aisle (WMS) | A component of a location; usually a space through rows of racking or storage locations; a collection of locations; |
| Allocation (order) | The systemic act of identifying and ring-fencing product matching the order requirements, following proscribed warehouse rules. |
| Anchor Point (WMS) | A starting location for a search for a suitable storage location; auto-putaway location suggestion start point. |
| Area (WMS) | A collection of aisles; an area in the warehouse for a particular purpose. |
| Batch (WMS) | A production batch of a product; a quantity of product that is considered to have the same characteristics; |
| Bay (Warehouse) | A physical loading or unloading point for the warehouse. |
| Bay (WMS) | A component of a location; usually a space between uprights in racking, comprising several levels (horizontal beams). |
| Bay Diary | The mechanism for booking hauliers inbound/outbound and assigning bays. The OBS Logistics system is CALIDUS Bay Diary. |
| Block Stack | A stable stack of pallets. |
| Booking | A time slot for a bay, booked with a Carrier/Haulier. |
| Bulk (WMS) | Bulk storage; Usually full-pallet storage areas, racked or stacked. |
| Cancellation (WCS) | The facility to cancel a task due to some problem, identified by the user when performing the task. |
| Carrier; Haulier | The transport company (by road or sea). |
| Check Digit (WMS) | A short code, usually randomly generated and stored against a location, used to help identify that a user is at the right location before they proceed with a warehouse task. |
| Container | The actual physical container, identified uniquely by the Container Number. The Container will be identified as a Container Type. |
| Container Type | Descriptive of the use and capability and physical characteristics of a container. Container types are 40ft End Loader, Reefer, etc. |
| Container Yard | The storage areas for full and empty locations in the facility. The OBS Logistics system to manage this area is CALIDUS Container Yard. |
| CSV | Character-separated values; a text file with multiple rows and values, usually separated with commas. |
| C-WCS | CALIDUS WCS, the name of the OBS Logistics Warehouse Control system |
| C-WMS | CALIDUS WMS, the name of the OBS Logistics Warehouse Management system |
| Dead Leg (WCS) | A movement of a truck without a pallet; wasted resource. |
| Despatch | The final physical stage of an order; handover of goods to the haulier. |
| De-stuffing | The act of emptying a container and storing the contents in the warehouse. |
| Drive-In | A drive-in location, typically multi-level, multi-deep location. |
| Dry Van | Any type of non-refrigerated container. |
| Dual Cycling | Processes utilizing P&D locations for interleaving tasks in and out of specific areas, reducing dead leg movements. |
| EDI | Electronic Data Interchange; any form of automatically or semi-automatically uploading or downloading information from a computer system without manually re-keying the information. |
| ERP | Enterprise Resource Planning; a system for this. |
| Exchange (WCS) | Specifically Pick Exchange or Task Exchange. The process of allowing a user to select a different pallet in a multi-pallet location and exchanging the expected pallet for this one. If the pallet is planned for another task, task exchange will complete this task instead of the expected one first. If the pallet is not planned, pallet exchange will swap the pallet (if suitable). |
| GR; GRN | Goods Receipt; Goods Receipt Number or Note |
| High Bay | Typically tall (greater than 5 level) racking, usually full pallet storage, usually Narrow Aisle. |
| Inbound (Booking) | A booking linked to a Goods Receipt. |
| JIT | Just In Time; processes designed to trigger at the last instant. |
| KPI | Key Performance Indicator. |
| Level (WMS) | A component of a location; usually the vertical compartments of an area, delineated by horizontal beams. |
| Loading | The act of loading pallets onto a vehicle. |
| Location (WMS) | A uniquely identified space in the warehouse for storage of product. There are many types, most commonly Floor locations (for example, Marshalling, Inbound), Racking or Bulk Storage Locations and Pick faces. |
| Manifest | The contents of a vehicle or container. |
| Marshalling | The act of bringing pallets for an order or load together; an area to do so. |
| Multi-deep | A location with 2 or more pallets stored sequentially i.e. only one can be accessed at a time. |
| NA (WCS) | Narrow Aisle; usually any area in the warehouse that is restricted access due to space limitations, Narrow Aisles have associate P&D locations. |
| Outbound (Booking) | A booking linked to a Sales Order. |
| P&D | Pick-up and Drop-off locations; locations used to control the handover of pallets between distinct areas, for example between chambers and the wider area of the warehouse. |
| PI; Perpetual Inventory | The act of continuously checking locations in a warehouse, identifying and correcting product quantity issues. Usually used in Bulk environments rather than Pick Faces. In pick faces, this process is called is called Residual Stock Balance and usually takes place after picking from a pick face. |
| Pick Face | A location designed for picking part of a pallet of stock. Usually a low- or ground-level location. |
| Pick List (order) | The instructions to pick pallets or cases from locations; the paper report associated to this; the stage of preparing these instructions; the sending of these instructions to WCS. |
| PO | Purchase Order. |
| Pre-advice; Goods Receipt Pre-advice | An advanced notification of what is being received. Part of a manifest. Pre-advices can be stock and quantity, or individual pallet level. |
| Putaway | The physical move of a pallet to a storage location as a result of receiving it into the warehouse. |
| RAG | Acronym for Red/Amber/Green, a traffic light colouration system depicting (in sequence) Errors, Warnings or Informational messages. Usually used in operational monitoring to effectively display when certain processes are not working as expected. |
| RDT | Radio Data Terminal. |
| Reefers | Refrigerated Containers. |
| Replen; Replenishment | The act of moving product (usually a pallet) from bulk storage to a pick face. |
| Reposition (WCS) | The facility to change the location of a movement or putaway when at the final destination, sue to some issue discovered when performing the task. |
| RF | Radio Frequency; An RF device is an RDT, typically used by CALIDUS WCS for executing warehouse tasks. |
| SCR; CR | Software Change Request. |
| Short Allocate | The process of not fulfilling an order due to failure to identify sufficient product at Allocation. |
| Short Pick | The process of not fulfilling an order due to failure to identify sufficient product when picking. May also be used as a term to indicate Short Allocation. |
| SO | Sales Order. |
| Truck Types | Plants, Mechanical Handling Equipment. For example, Reach trucks, Counter-balance trucks, pallet riders, etc. |
| UOM | Unit of Measure. |
| WA (WCS) | Wide Area; usually any area in the warehouse that is not restricted access due to space limitations, for example, floor areas, not Narrow Aisle. |
| WCS | Warehouse Control System |
| WMS | Warehouse Management System |
Oracle App Terms
| Term or Acronym | Description |
|---|---|
| DDL | Drop-down list of values, usually denoted by a down-arrow to the right of the field. |
| LOV; Lookup | List of Values. A Lookup of values from data maintained in the system (rather than fixed data that a DDL may be used for), |
| Form; Window; Screen | Alternative terms for each displayed window within the application. |
| Tab | A tab on a form, which contains its own panel of data to be viewed or entered. Denoted in this guide as italics. |
| Panel | A panel on a form contains data to be viewed or entered. |
| Button | A clickable button. Denoted in this guide as bold. |
| Field | Data that can be displayed or entered is referred to as a field. This is the core of where you will view or enter information within Forms. Fields are described by Labels and usually come as a pair. These (and labels) are denoted in this guide as italics. |
| Table | When there are multiple data to be shown in a group, those records are usually displayed in a table. Tables allow showing multiple fields in columns, are scrollable vertically and sometimes horizontally, will have buttons for title labels if the columns are sortable and may allow configuration, usually through a Configure button, which will take you to WHS0909. |
| Label | A label is the annotation of the field being displayed and typically tells you what it is. CWMS supports multi-lingual labels in a lot of forms. |
| Click; Select | Clicking the left mouse mutton on a field, table or button using your mouse. |
| Right-click | Clicking the right mouse mutton on a field, table or button using your mouse. |
| Viewport | The viewport is the means by which you are viewing the forms within the application. Within a browser, this may be the size of the browser window, or just a fixed portion. When running the app browserless, this is the size of the window displayed on your desktop. |
| DPI | Dots per Inch. This may be used to adjust the resolution of the application within the viewport. |
| Menu | The menu where all forms are selected, as opposed to the Oracle standard query menu. In CWMS, this is the Explorer window. (FXMEXPLR). Menu items are sometimes denoted in this guide in bold/italics. Slashes typically indicate a sub-menu. for example, Warehousing/Goods Receipt/Goods Received Advice denotes the top-level Warehousing menu, then the Goods Receipt sub-menu, and then the Goods Received Advice screen. As menus in CWMS are pretty much completely user configurable, this may have less meaning than you would like in your system, and we generally refer to these on what we call the standard menu structure. |
| Control Bar; Format bar | The control bar for searching, inserting and pretty much doing anything within the selected Oracle form. See System_Navigation_Guide#Format_Toolbar for more information. |
| Key; Function Key; Shortcut Key | Alternative terms for a keypress on your keyboard. In this guide, these are denoted with fixed width text in a box e.g. F4
|
| Multi-Modal | A term denoting whether the forms can be open and active at the same time. CWMS is not multi-modal. |
| Scroll | The act of moving a fixed window vertically or horizontally to show more information. Typically you will see and use these on tables. |
| Check box | A simple notation of whether something is enabled or disabled (or Yes or No, True or False, etc) is typically displayed as a checkbox. If the box is checked, then this means Yes/True/Enabled, the functionality depending on the label of the checkbox. |
| Option Select; Radio Buttons | When a field has a limited number of options, sometimes this is displayed with bulleted options, all visible n the screen. This is called an Option Select or Radio button. The option that is selected will have the button filled in. |
A.3 Document History
| Version | Date | Status | Reason | By |
|---|---|---|---|---|
| 1.0 | 08/03/2011 | Issue | Initial Version | LBW |
| 2.0 | 13/11/2018 | Issue | Updated version for formatting | ANW |
| 2.01 | 1/7/2025 | Issue | Updated to latest versions | ANW |
A.4 Authorised By
Matt Tipping | Aptean Project Manager | _____________________________ |
Tony Walker | Aptean Consultant | _____________________________ |
