UG 352167 C-WMS Financials Set Up Guide
![]()
Aptean
Financials Set Up Guide
CALIDUS WMS
2nd July 2025 - 1.01
Reference: UG 352167
Financials Set Up
Pre-requisites
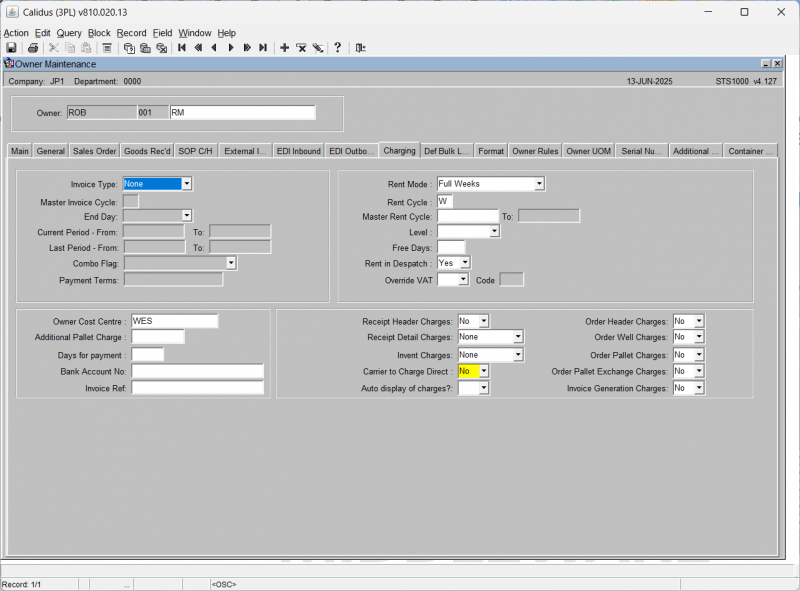
Owner Maintenance Charging
This is split into 4 distinct sections:
Invoice Details – for Standard Invoice processing
| Field Name | Description | Options | Generic Value |
|---|---|---|---|
| Invoice Type | Flag to identify if Invoicing is applicable to this owner | NORMAL or
NONE |
|
| Master Invoice Cycle | Unique single character identifier for this owners cycle | Must be valid code from table INVOICE_CYCLE which will define it as Daily, Weekly, Half Monthly etc… | |
| End Day | If appropriate – defines that actual day that a period will end on | User defined | |
| Current Period From/To | The dates of the current Invoice Period for the Owner as defined by the running of the Invoice Production Process | Display only | |
| Last Period From/To | The dates of the last Invoice Period for the Owner as defined by the running of the Invoice Production Process | Display only | |
| Combo Flag | Identify whether Invoice and Credits should be produced as individual documents or combined onto one document | Drop down – COMBINED INDIVIDUAL | |
| Payment Terms | Free text for owner specific payment terms to be printed on Invoices | User input |
Rent Details – applicable to Rent Charge processing only
| Field Name | Description | Options | Generic Value |
|---|---|---|---|
| Rent Mode | Fixed definition of the type of Rent applicable for the owner | None / Advance / Average / Fixed Advance / Maximum | |
| Rent Cycle | Daily / Weekly / Monthly / Half-Monthly etc (as described above). Note that although the same table is used to define the CYCLE, the Rent and Invoice Cycle are separate processes. | As for Invoice cycle above | |
| Master Rent Cycle/To | Start and End date for the current Rent Cycle for the Owner | User sets up start date and system defines the end date based on the Rent Cycle and the regular (daily) update of rent processing. | |
| Level | The standard charge level for rent | Stock / Pallet / Rotation | |
| Free Days | Numeric value to represent the number of days that Stock can remain in the warehouse Free of Charge for rent | User input | |
| Rent in Despatch | Note this and WHOLE/PART, which is set by the MODE, determines if charges are for full periods, and whether or not Credits are to be generated when stock despatched (and the level of the credit). Also utilises the FREE DAYS to determine the generation of credits for rent already charged. | Yes / No flag | |
| Override VAT | Whether to override the VAT code | ||
| Code | The VAT code to use when overriding. |
Additional Information
| Field Name | Description | Options | Generic Value |
|---|---|---|---|
| Owner Cost Centre | An owner cost centre can be entered if required | Free Text | |
| Associated Pallet Charge | Legacy | N/A | |
| Days for payment | The number of days allowed for payment – between Invoice Date and Due Date printed on the invoice | N/A | |
| Back Account No | Legacy | N/A | |
| Invoice Ref | Free text reference for printing on the invoice | Free Text |
Charge Level Details – for control of individual ‘Charge Processing’
‘Auto charges’ (Charge codes with type of ‘Auto’) will be generated automatically within the individual processes if the appropriate flag is set to Yes. All are Yes / No flags (unless otherwise stated). These flags simply allow the user to ‘switch on/off’ charge generation for specific processing as required.
| Field Name | Description | Options | Generic Value |
|---|---|---|---|
| Receipt Header Charges | Receipt Header level | ||
| Receipt Details Charges | Receipt detail level | ||
| Invent Charges | Inventory Movements (inc. Freeze/Chill process) | ||
| Carrier to Charge Direct ** | Carrier charges (not UPM) – not used any more | ||
| Auto Display of Charges | Owner level check for display of auto generated charge codes (pre confirmation within individual processes) | ||
| Order Header Charges | Sales Order handling - Order header level | ||
| Order Well Charges | Sales Orders - Product type level | ||
| Order Pallet Charges | Sales Orders - Despatch pallet level | ||
| Order Pallet Exchange Charges | Special Pallet exchange code processing.
This checks if a specific charge is to be raised against the Stock Owner for the use of Pallets, due to the fact that neither the Stock Owner or their Customer has an account code for the Pallet Exchange system. |
||
| Invoice Generation Charges | Invoice generation process
Do we raise a charge each type we produice an Invoice for this owner? |
Invoice Period Maintenance
This screen is used to define type and length of invoicing periods (used for both Rent and Invoice cycles individually).
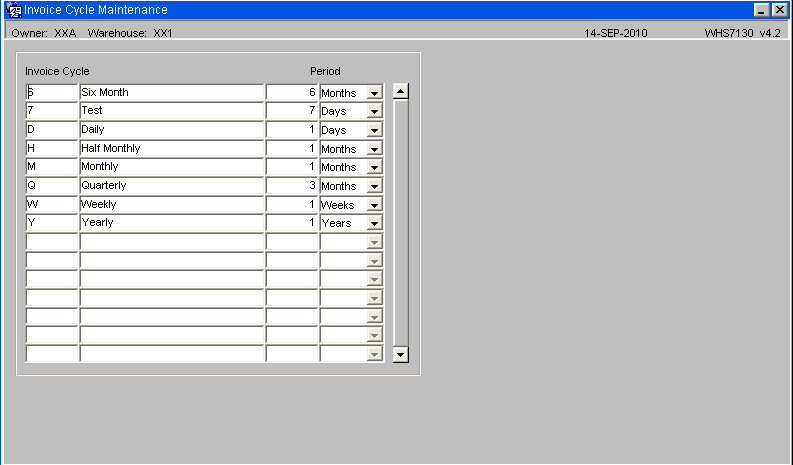
| Field Name | Description | Options | Generic Value |
|---|---|---|---|
| INVOICE CYCLE | Single character Unique Identifier | User input but following codes expected as a minimum: | ‘D’ – Daily,
‘W’ – Weekly, ‘M’ – Monthly, ‘H’ – Half Monthly ‘Y’ - Yearly |
| DESCRIPTION | Free text description | ||
| PERIOD – Numeric | Number of PERIOD TYPES in a CYCLE. The length of the period type described in the following column. | User input | The number of ….. in a period, UNLESS, the value in this column is 14, 15, or 16 and the following column is Days. This is how the system identifies Half Monthly periods and the 14/15/16 relates to the date of the end of the first half-month. |
| PERIOD - Type | Description of the type | Drop down selection | Days / Weeks / Months / Years |
Rent Cycles
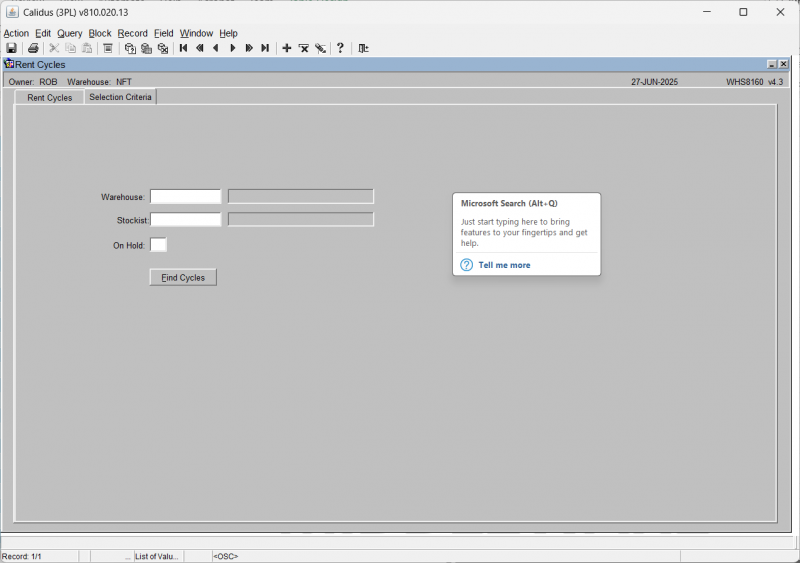
The rent cycle screen allows the user to setup the start and end rent cycle for each warehouse and owner. The account and cycle information will be imported from the charging tab in the owner maintenance screen.
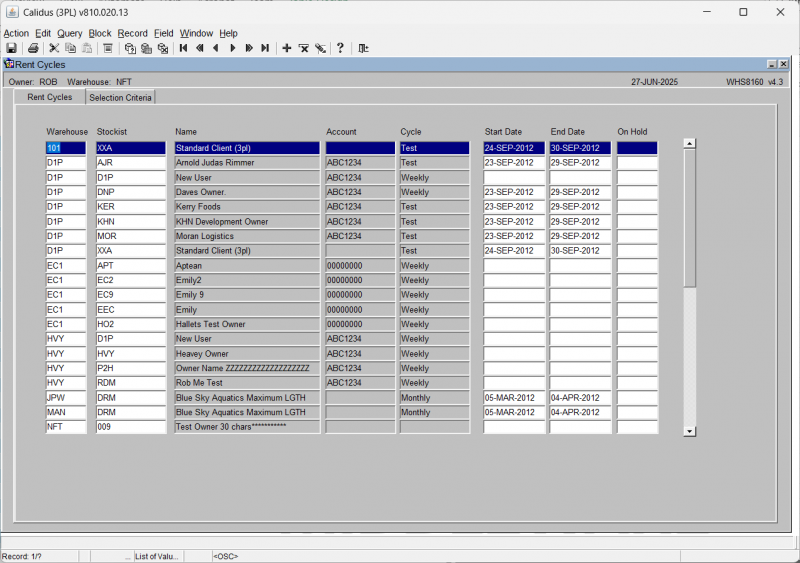
You start on the Selection Criteria tab, where you may find rent cycles by first optionally entering a warehouse, Stockist Code and On Hold indicator. When you click Find Cycles the screen will display the results on the Rent Cycles tab.
The screen displays the following, which you may amend or enter:
- Warehouse - an LOV is provided
- Stockist - the owner. An LOV is provided.
- Name - name of stockist
- Account - display only
- Cycle - display only
- Start Date - the start of the rent cycle
- End Date - the end of the rent cycle
- On Hold - whether this cycle is on hold.
Rate Table Maintenance
RATES can be set to define the price to be applied to any Invoice transactions.
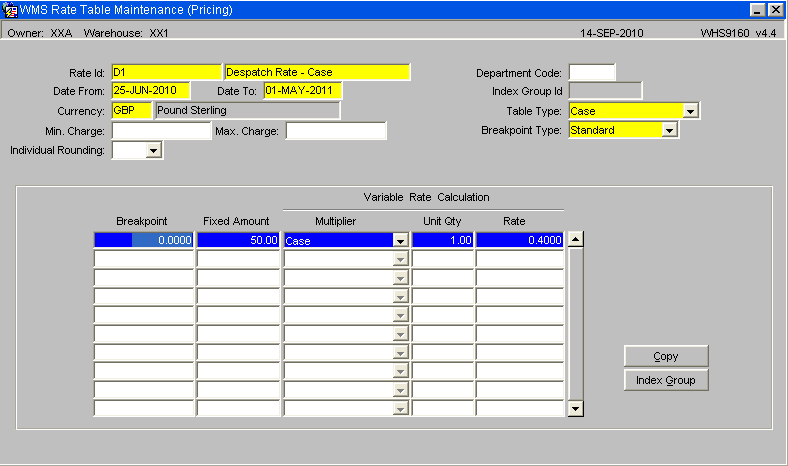
| Field Name | Description | Options | Generic Value |
|---|---|---|---|
| RATE ID + DESCRIPTION | Unique identifier and descriptive text | User input | |
| DATE FROM | Date rate becomes effective | The EFFECTIVE DATES for the rate | |
| DATE TO | Date rate ends | The EFFECTIVE DATES for the rate | |
| CURRENCY | The currency to be charged | Any valid currency code | |
| MIN CHARGE | Allows for the setting of MINIMUM charge value for an INDIVIDUAL CHARGE | User input | |
| MAX CHARGE | Allows for the setting of MAXIMUM charge values for an INDIVIDUAL CHARGE | User input | |
| INDIVIDUAL ROUNDING | Instructs the processing to round all transactions to 2 decimal places or not | Yes / No | |
| INDEX GROUP ID | The index rate group that the charge belongs. | Display only to show rate can be uplifted by regular ‘ Indexation processing’. It is not possible to assign more than one Index Group /Index combination | |
| TABLE TYPE | Defined the QUANTITY TYPE that the BREAKPOINTS will be based on. | QUANTITY – no. of Units ,br/> CASE – no. of cases
PALLET – no. of pallets WEIGHT – no of weight UoM CHARGE VALUE – currency value (for Invoice Level charges) Note that Area and other values not utilised at present |
|
| BREAKPOINT TYPE | Defines the TYPE of Breakpoints | STANDARD –
Allow for multiple breakpoint details to establish the highest detail found for the quantity to be charged for. MINIMUM – Only raise charge if quantity to be charged for is LOWER than the first (and only) breakpoint detail MAXIMUM – Only raise charge if quantity to be charged for is HIGHER than the first (and only) breakpoint detail PERCENTAGE – For use with CHARGE VALUE when defining the rate for Invoice Group . Level charges. Uses specific values in the first (and only) breakpoint details row found | |
| BREAKPOINT | Defines the breakpoint to be used when generating charges | Only one allowed unless it is a STANDARD TYPE setting. All ID’s must have at least one detail to define either a fixed amount or a rate to be applied for a quantity |
Variable Rate Calculation information is also displayed:
| Field Name | Description | Options | Generic Value |
|---|---|---|---|
| FIXED AMOUNT | The actual currency amount to be charged | User must enter either Fixed amount or the equivalent MULTIPLIER / QTY / RATE for variable amounts, UNLESS It is a percentage type breakpoint, in which case this will be the percentage value applied to the quantity / value to charge when using the variable rate data that will also be entered | |
| MULTIPLIER | Normally the same as the Table Type defined above, but may be different if required | ||
| UNIT QTY | The unit quantity that the rate is applicable to | ||
| RATE | The actual rate that will be applied to the calculation. I.e. CHARGE VALUE will be calculated as - ‘QTY to be charged for’ divided by ‘UNIT QTY’ multiplied by ‘RATE’ |
| Buttons | |
| COPY | Allows a new rate to be set up based on an existing rate. |
| INDEX GROUP | When pressed the process will check if the rate code has already been assigned to an index group. If this is the case, the user will be presented with a form to display the details of the index. See below |
The Rate Table Copy screen WHS0162 will appear when selecting the COPY button on Screen WHS9160.
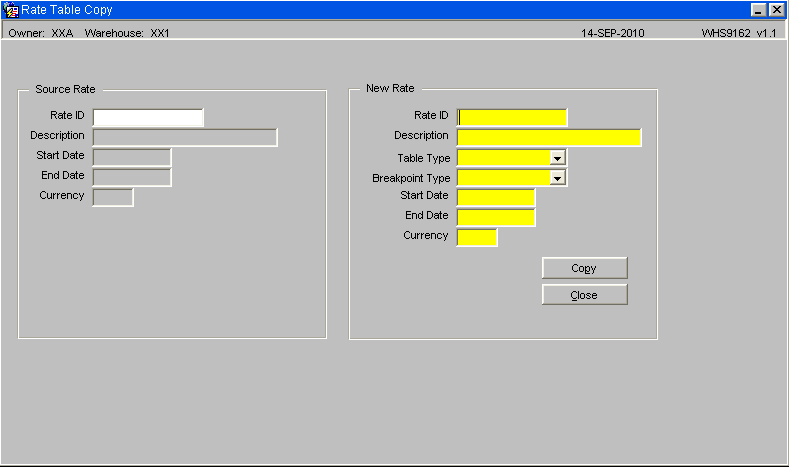
| Field Name | Description |
|---|---|
| SOURCE RATE | Shows the details of the RATE_ID being copied from |
| NEW RATE | Requires input of
NEW ID and DESCRIPTION TABLE TYPE and BREAKPOINT TYPE START DATE / END DATE CURRENCY – defaults to the same as the original |
All inputs will be validated in the same way as the original inputs as described above
On selecting the COPY BUTTON on this screen the NEW RATE details are presented in the original RATE MAINTENANCE screen for amendment / update.
The Index Group Information screen WHS0339 will appear when selecting the Index Group button on Screen WHS9160. It will not be possible to view this screen from the menu system.
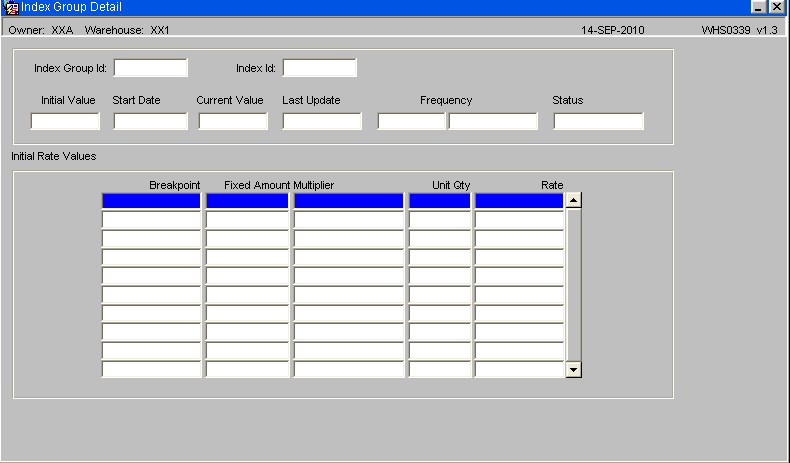
Note that the initial value of the Index displayed here will be the value of the index when it was assigned to the group and rate code in question. The initial rate values will display the approximate rate value for each Breakpoint, as they were when the index was assigned to the rate. These values are calculated by reducing the current rate values by the percentage change that has occurred in the index.
Rate Set Up Examples
'Example 1
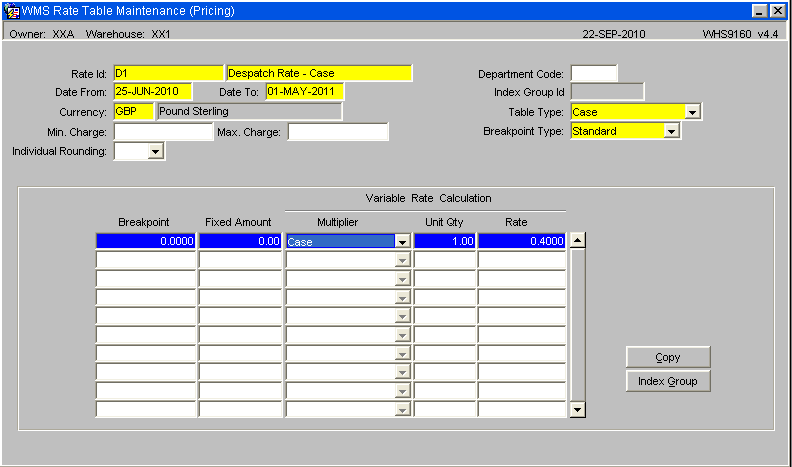
'Example 2
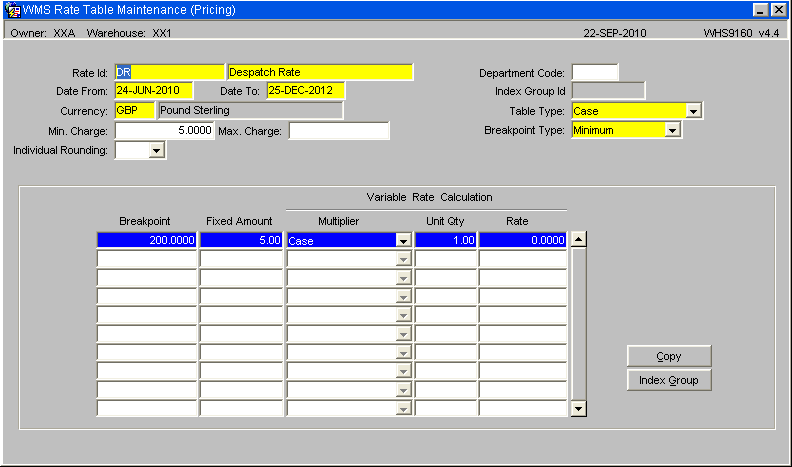
'Example 3
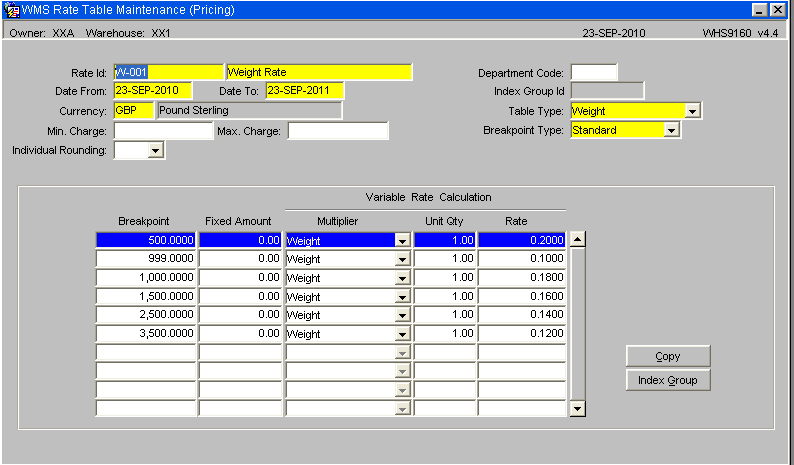
RATE DETAIL EXAMPLE
Charge 5.99 if the total Cases on an order is less than 100 Cases, otherwise no charge
Note that if the BREAKPOINT TYPE was MAX instead of MIN then the charge would be raised only if the quantity was greater than 100 Cases.
Also – Rather than the Fixed Amount of 5.99, the Variable Rate settings could be set to nn.nn per Case, or per 10 Cases, etc.
Also - Weight can be used as the Breakpoint instead of Case – simply change the ‘type’ from Case to Weight and the procedures will work on Kgs or Lbs.
Charge Code Table Maintenance
CHARGE CODES will be defined to enable the production of charges.
Each can have an associated RATE ID for the calculation of the CHARGE VALUE, or can use an 'ad-hoc rate' when entered manually.
Each can be applicable to a particular BUSINESS TYPE, or for general use.
Each can be applicable to a 'specific level' within the Invoicing processes – namely COMPANY / WAREHOUSE / STOCKIST / STOCK or PRODUCT TYPE.
Charge Code Maintenance – Main Tab
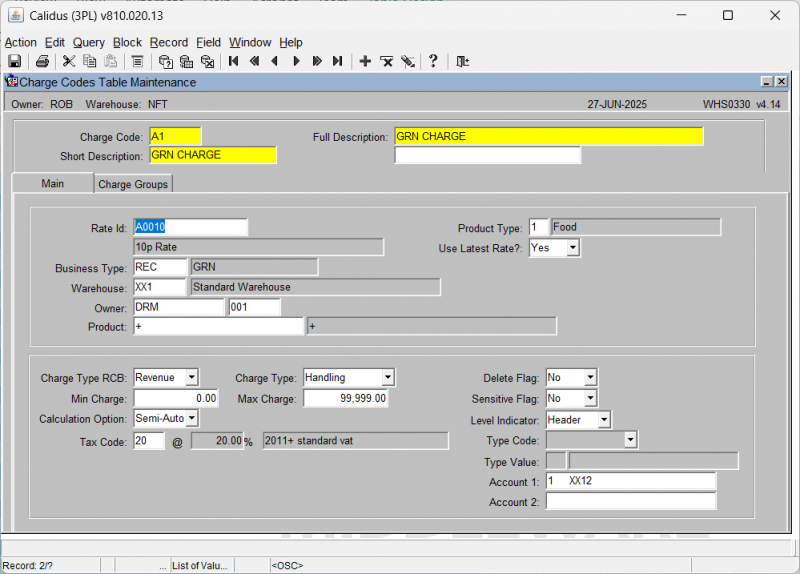
| Field Name | Description | Options |
|---|---|---|
| CHARGE CODE | Unique identifier | User input |
| SHORT DESCRIPTION | Free text | User input |
| FULL DESCRIPTION | Free text | User input |
| RATE ID | If entered, must be a valid ID else it will default to '+' to enable use for entry of an 'ad-hoc rate | User input |
| BUSINESS TYPE | Enable charge generation within specific WMS processes – referred to as 'in Process charges'. | Can be left as '+' to enable use as an 'ad-hoc' code, otherwise it must relate to a valid code from the GENERAL CODES table for type BUSN records |
| WAREHOUSE, OWNER, PRODUCT, PRODUCT TYPE | These elements, and all of the above, form the unique identifier for the charge code table. See below for full description relating to the entry of these four elements. | User input – all codes must be valid for the type of entry –
Ie, Valid WAREHOUSE_ID, STOCKIST_CODE, STOCK_CODE, PRODUCT_TYPE |
| USE LATEST RATE | Flag used to enable the recalculation of any charges not yet invoiced if new rates / charges are introduced | User input from drop down box – Options are Yes / No / Blank. Must select Yes if previously generated charges are to be updated. |
| CHARGE TYPE RCB | Descriptive flag relating to whether the code is Cost / Revenue or Both | User input |
| CHARGE TYPE | Descriptive flag relating to the type of charge. | Allowable values are – Ancillary, Cyclical, Handling, Landing, Miscellaneous, Processing, Rent, Sales and Special Forces |
| MIN / MAX CHARGE | The Minimum / Maximum charge value to be applied to the charge code on an invoice. Note that all charges on an invoice are 'subtotalled at charge code level' so this will allow for the application of a MIN/MAX charge for Invoice Level charges for a specific charge code. | |
| DELETE FLAG | System use only | |
| SENSITIVE FLAG | System use only | |
| CALCULATION OPTION | Defines how the system generates charges | AUTO SEMI-AUTO MANUAL |
| LEVEL INDICATOR | Define the level that the charge is to be applied to. | DETAIL – each detail on the process in question
PALLET – each pallet on the detail in question |
| TAX CODE | The VAT code and related descriptions | User input |
| TYPE CODE | For use within the Special Order Handling processing | Type codes will be checked against specific codes on an Order, to define if the charge is applicable. |
| TYPE VALUE | Value for comparison with TYPE CODE | See below |
| ACCOUNT CODE 1 and 2 | The 'SAP Account codes' for the Charge. Details are included for EDI interface to SAP Account system. | User input |
The following elements are grouped, to enable the definition of the 'Level of charge' to be applicable.
- WAREHOUSE The Warehouse id
- OWNER The Stock Owner
- PRODUCT The Stock
- PRODUCT TYPE the Type of Stock (eg, Chilled, Frozen)
No values means that it is a Company Level charge, Warehouse only means it is Warehouse level, Warehouse and Owner means Owner Level for specific Warehouse Owner only means Owner level (applicable to all warehouses) Owner and Stock means it is a Product Level charge Owner and Product type means it is Product type charge for a specific Owner Product type only means Product type level across all owners / warehouses Product Type and Warehouse means Product type within warehouse
TYPE CODE should be set to the type of code to be checked against, e.g. Order Priority (Express Order), Request Type (Collection Order), Order Type (EDI or COD)
TYPE VALUE should be set to the actual value defined to identify the type specified (as defined by individual users) – e.g. Order Priority of '1' to identify 'top priority / express orders.
Charge Codes Maintenance – Charge Group Tab
There two possible uses for this tab –
1. BUSINESS TYPE = INV
Defines the CHARGE GROUP DETAILS, including any MIN/MAX values, for the production of Invoice Level Charges during Invoice Production processing. Note the INV type codes can only define ONE GROUP. It is this charge code that identifies the fact that a specific charge is to be raised and holds the relevant VAT and Account codes.
2. BUSINESS TYPE NOT = INV
Defines the CHARGE CODE as INCLUDED in the GROUP for all GROUP CODES listed. Note that non-INV codes can belong to multiple groups.
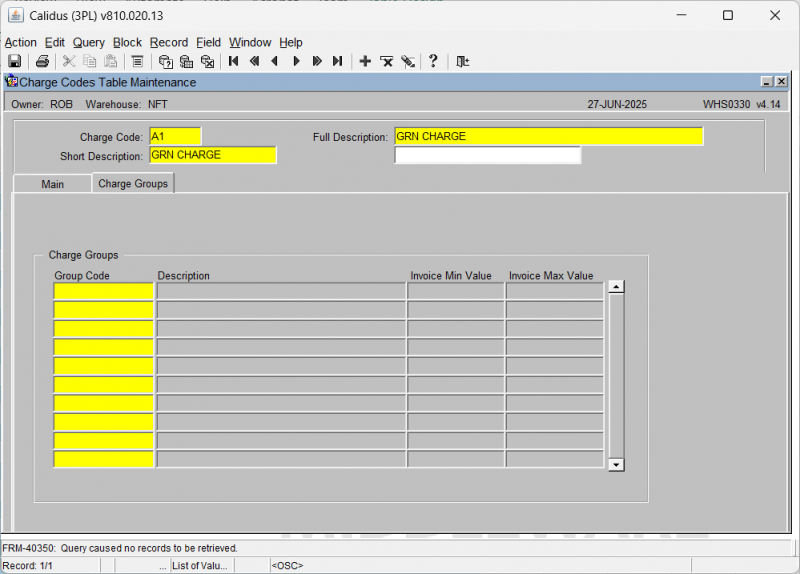
| Field Name | Description | Options |
|---|---|---|
| CHARGE GROUP | The Unique identifier for the CHARGE GROUP that the CHARGE CODE is a member. If it is 'INV' type Charge code, then it can only be a single group, otherwise a code can be a member of many groups | User input |
| DESCRIPTION | Free text description | User input |
| INVOICE MIN / MAX Value | The min / max value applicable to the calculated charge value for the group. | Define the Min / Max value for 'Invoice Level' charges Use for Min Rent / Max Insurance etc… |
CHARGE CODES USED FOR SPECIAL PROCESSING
Charge Codes with a Business Type of 'INV' (Invoice Process) Codes with-
Zero value for Max / Min value, and NO Charge Group
This is an 'In Process type' charge that will be raised within the Invoice Production process, e.g. a charge for actually raising an invoice. They will normally be set to use a RATE with a Fixed Amount charge.
Codes with-
Zero value for Max / Min value, and Includes Charge Group
This is an 'Invoice Level charge' that will be raised within the Invoice Production process based on the values generated for for a GROUP of Charges, e.g. additional Charge for Energy / Insurance etc.
Charge will normally be based on the overall value of the charges within the group, or a percentage of the value / quantity.
Codes with-
Non-Zero Minimum charge value
This is charge that will be raised within the Invoice Production process if the total value of the charges for the same Charge Code (non-INV type) is less than the Minimum value stated, e.g. if Rent charges do not reach a minimum value then the INV charge will raise an additional charge for the difference
Business Type ORD Codes (Order Handling)
| Field Name | Description | Options |
|---|---|---|
| 'OHPEX' | Charge required as Pallet Exchange accounts missing | Charge for the number of pallets that are not covered by pallet exchange account codes, but only when both Consignor and Consignee do not have codes available. Charge will be raised against the Stock Owner (Consignor) |
| 'ORDH' | Charge for handling the Order | Always a single unit charge to be raised simply for raising an order, regardless of quantity involved |
| 'ORDL' | Charge for the Order Lines handled | Charge for number of order lines. AS above but based on the number of lines on the order |
| 'ORDP' | Charge for pallets handled | Charge for the number of pallets. As above but based on the number of pallets on the order |
| 'WAYB' | Charge for waybill prints | Charge to be raised for each Waybill raised. Will need to check for the production of additional waybill for Trunk orders, or consolidated orders onto a single waybill |
| 'DHPT1' | Charge for Full Pallet picks | Charge to be raised for each Full pallet of stock picked |
| 'DHPT2' | Charge for Part pallet picks from Pick locations | Charge for stock picked in case quantity (rather than pallet) from a Pick location |
| 'DHPT3' | Charge for Part pallet picks from Non-Pick locations | Charge for stock picked in case quantity (rather than pallet) from a location other than a Pick location – eg. from bulk / block stack etc. |
Business Type DES Codes (Despatch Process)
If Owner Level Charges found with the first three characters of the Charge Code = 'DHH', and Type Code is not blank/null, then a charge will be raised according to the following checks:
- If Order Code Type = 'P'
- Then the ORDER PRIORITY must match the TYPE CODE
- If Order Code Type = 'R'
- Then the REQUEST TYPE must match the TYPE CODE
- If Order Code Type = 'C'
- Then the COD FLAG must match the TYPE CODE
- If Order Code Type = 'E'
- Then the EDI CREATED must match the TYPE CODE
- If Order Code Type = 'O'
- Then the ORDER TYPE must match the TYPE CODE
In all of the above cases the quantity value must always be 1 thus generating an additional charge depending on the type of order being despatched.
Special Rent Processing Charges
Special Charge processing is required within the Cyclical Rent charge generation processing to cater for the 'Reserved Pallet Location' processing.
Charge Codes with the first 3 characters of
'RPLxx' – will be used for Reserved Pallet Locations
'RULxx' – will be used for Reserved Unused Locations.
Controlled by the use of an Owner level Warehouse Rule, 'OWRL', the Rule Flag will be set to 'RUL' with the number of locations that the Owner has Reserved in total being stored in the breakpoint value of the Rate details record that holds the rate to be charged for unused locations.
The 'RPL' and 'RUL' Charge Code details will be set 'in pairs' to reflect the rate to be charged for the quantity of Used and Unused locations.
In Normal circumstances, each rent cycle / period will generate two charges for this processing - One Charge will be raised for the Total Pallets in the Warehouse for the 'RPL' Used value – and A second charge will be raised for the Total Reserved – minus - Total Used for the 'RUL' Unused value.
If the total pallet count is greater than the total reserved, then no charge will be raised for the Unused locations.
Charge Profiles
The Charge Profile Code is 2 characters. Someone will need to decide which codes to use. The best option is probably a meaningful code, e.g. A code of WT for the products charged by weight. A code of HV- for high value products.
If meaningful codes are not to be used then a generic code could be assigned e.g. P1 – Profile 1, P2 – Profile 2.
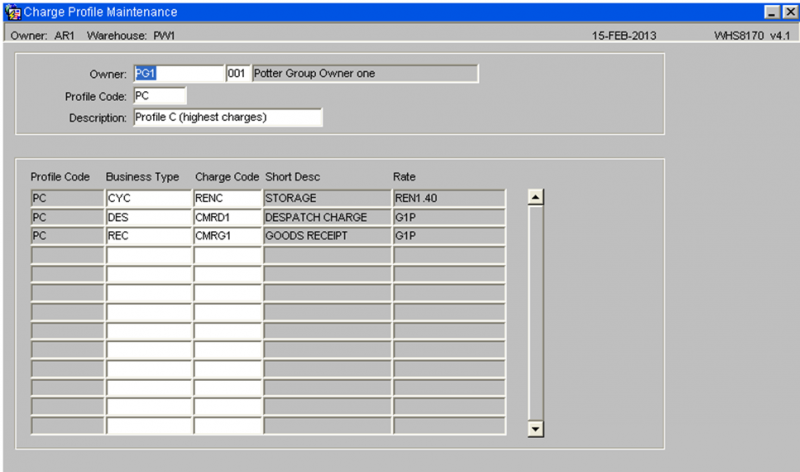
The “Charge profile” maintenance screen (WHS8170) is used to setup the charge profiles for each owner, as shown below:-
The same profile code can be used for different owners. In this situation each owner would need to be setup for each profile code.
If there is a similar concept on the old system then if may be desirable to use a similar code.
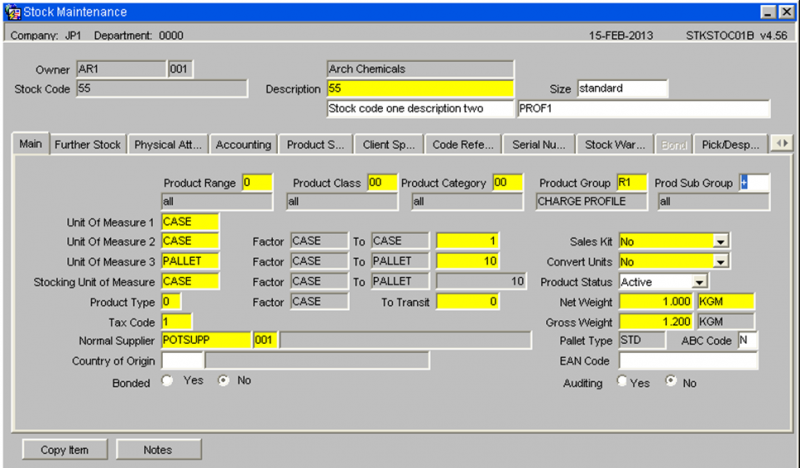
The Charge profile code for each stock code, will be stored in the product group.
The product group field is included in the Oracle Reporting Suite stock report as a selectable field. This means, it will be possible to produce a spreadsheet of stock codes assigned to a particular charge profile.
Product Groups
For each charge profile code used, a new product group will need to be created for each owner.
The product class maintenance screen is used to create new product groups.
Product Range, Class, Category and Group combinations are created in order to segregate stock within the warehouse. They can also be used to distinguish one type of product from another. You can use these combinations to specify putaway routines and for stocktaking purposes. Note, although you see all four here, when you set them up you have to create the range first, go through the rest of the fields and save the record. When you come to create the class field, you have to enter the range you just created and then go through the same process. In this way, you can have multiple combinations of all four criteria.
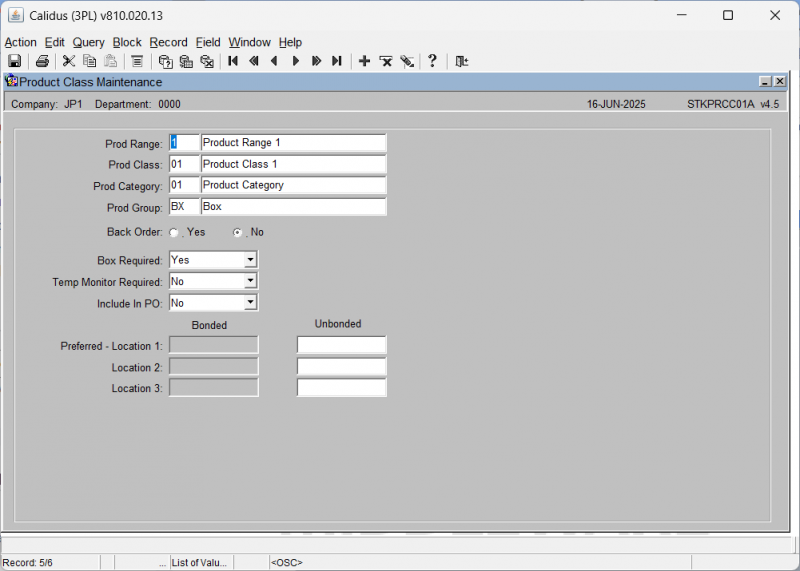
| Field Name | Description | Options | Generic Values |
|---|---|---|---|
| Prod Range ** | Used to denote a specific range for multiple products in conjunction with class, category and group | 1 character free text field | Defined by the client |
| Prod Class ** | Used to denote a specific class for multiple products in conjunction with range, category and group | 2 character free text field | Defined by the client |
| Prod Category ** | Used to denote a specific category for multiple products in conjunction with range, class and group | 2 character free text field | Defined by the client |
| Prod Group ** | Used to denote a specific group for multiple products | 2 character free text field | Defined by the client |
| Back Order ** | Used in union with other flags throughout the system to determine whether back ordering will be utilised Y or N | Defaults to No | N - Functionality not yet migrated |
| Preferred Location Bonded/Unbonded | Specifies putaway anchor points for the range,class,category,group combination | Must be valid locations or left blank - LOV available | Defined by the client |
| Box Required | Yes, No | ||
| Temp Monitor Required | Yes, No | ||
| Include in PO | Yes, No |
Owner Rule
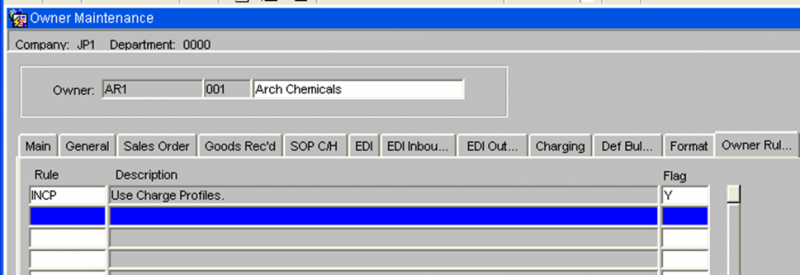
The owner rule INCP can be used to switch the “Charge Profile” functionality on by setting the flag to Y.
STOCK CODE AND CHARGE SET-UP
Stock Master
For owners using charge profiles, each stock code will need to have the product group set to the correct charge profile code. NB. The product group field is included in the stock upload.
Charge Code Set-up
Charges can be setup at owner level by setting the Product to + to indicate all stock codes for this owner. This functionality will not change.
For charge codes using the new “Charge profile” functionality,
The Product should be set to +XX where XX is the 2 character charge profile code. This set-up identifies the charge code as a charge that applies to all stock codes with a matching charge profile code.
When charges are applied automatically, the system will work as it currently does, applying owner level and stock code level charges. The Charge profile charges will be applied as well as the current charges.
Charges can be setup at owner level by setting the Product to + to indicate all stock codes for this owner. This functionality will not change.
Copy Owner
If the INCP rule is set to Y for the owner being copied from, then the system will create the charge profiles and charge codes for the new owner, if the copy charges option is selected in the copy owner screen.
The assumption is made that all existing charge codes will have the format SSSAA, where SSS is the stockist code and AA a 2 character identifier. If the charge codes are in a different format then the copy of the charge codes will not occur.
When the system creates the new charge codes for the new owner, this charge code format will be followed.
For example, If the owner is AR1 there with charge codes AR1RH, AR1AD. The charge codes created for a new owner, DA2 will be DA2RH, DA2AD.
Conversion of Existing Owners
For owners with charges setup at stock code level.
- Set up the charge profile records.
- Create the product group records.
- Switch the owner rule INCP to Y
- Choose a sample stock code. Find the charge codes for this stock code and change the Product to +XX where XX is the charge profile code.
- Find the stock details in stock maintenance and set the product group to the charge profile code.
- Do a receipt and pick confirm an order for the sample stock code.
- Run the quicks (expected revenue) report and ensure the generated charges are correct.
- Repeat with a sample stock code for each of the charge profiles for the owner.
Once the sample stock codes are verified as producing the correct automatic charges, the remaining stock codes can be converted. To convert the remaining stock codes the product group, on stock maintenance, must be set to the correct charge profile code. The charge codes set up at stock code level can now be deleted.
Rent Creation and Invoice Production
The following document describes the process in order to create rent and produce invoices.
Step 1 – Rent Creation
Go to the Rent Creation screen (WHS9030)
Here you can generate the rent for owners.
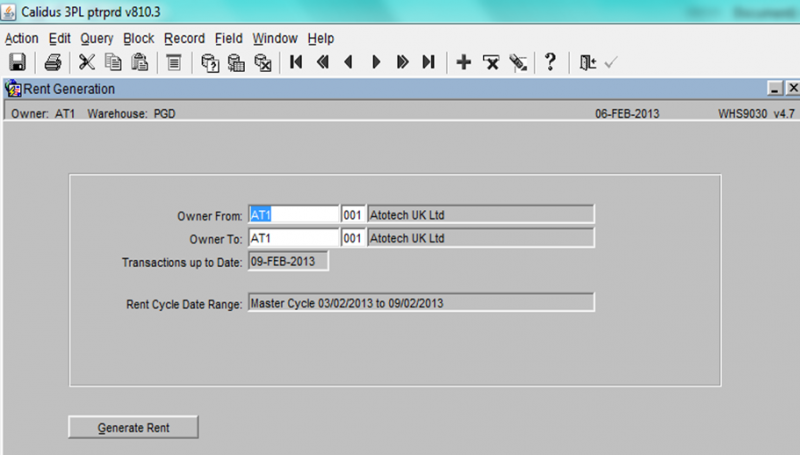
- Enter the Owners that you wish to produce the rent for.
- Enter the Transaction up to date.
- Press the Generate Rent button
Step 2 – Owner Invoice Production
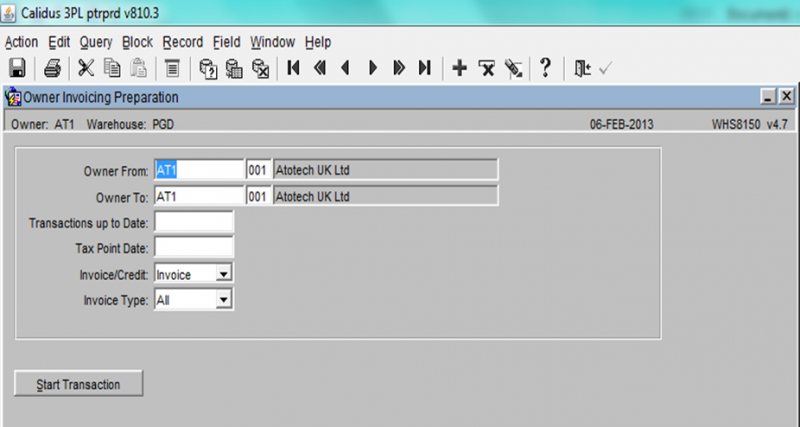
Go to the Owner Invoice Production screen (WHS8150).
Here you can generate owner invoices and credits.
- Enter the Owner From and To.
- Enter the Transactions up to Date.
- Enter the Tax Point Date.
- Select whether you wish to produce an invoice or credit.
- Select what Invoice Type you wish to produce (All, Rent, others e.g. REC and DES).
- Press the Start Transaction button to create the invoices/credits.
Step 3 – Invoice Printing and Emailing
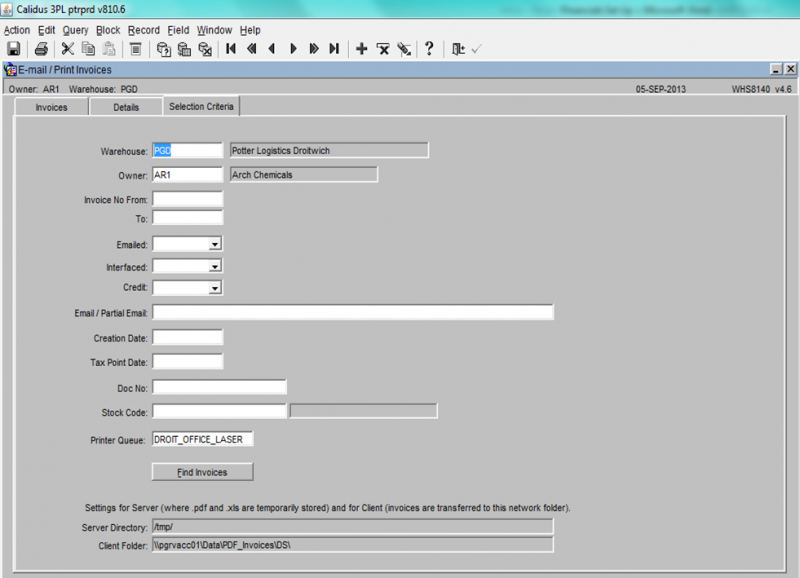
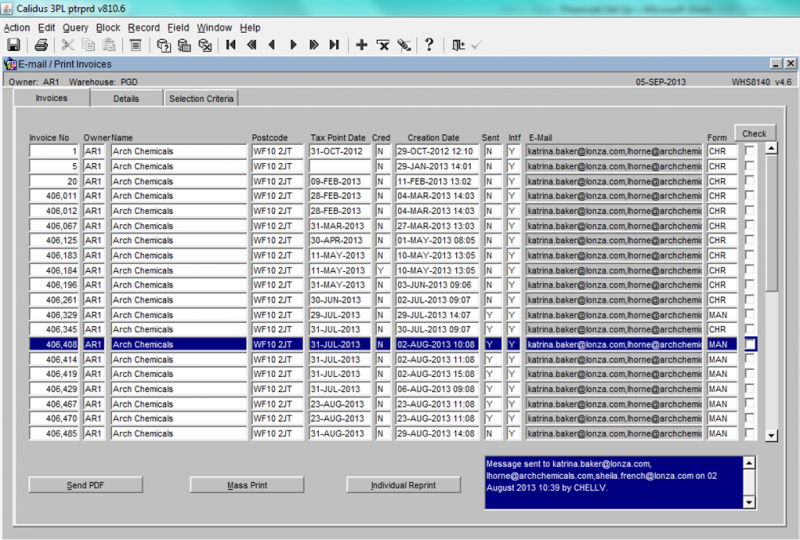
Go to the E-Mail / Print Invoices screen (WHS8140)
Here you can email or print invoices that have been generated.
- The warehouse will default to the current warehouse, but it is possible to enter any valid warehouse.
- Enter any relevant data in the selection criteria fields you require
- Press the Find Invoices button to retrieve the invoices
- As you can see above, the system has retrieved all invoices that match the selection criteria. Note: The email address is defaulted from the Owner Maintenance screen (Main tab)
- You have can now send a PDF of the invoice/credit note, carry out a mass print of all invoices or produce an individual reprint. First you must select the invoice/credit notes you wish to action by using the check box against specific lines. Once selected press one of the 3 buttons.
Manual Invoice / Credit Screen
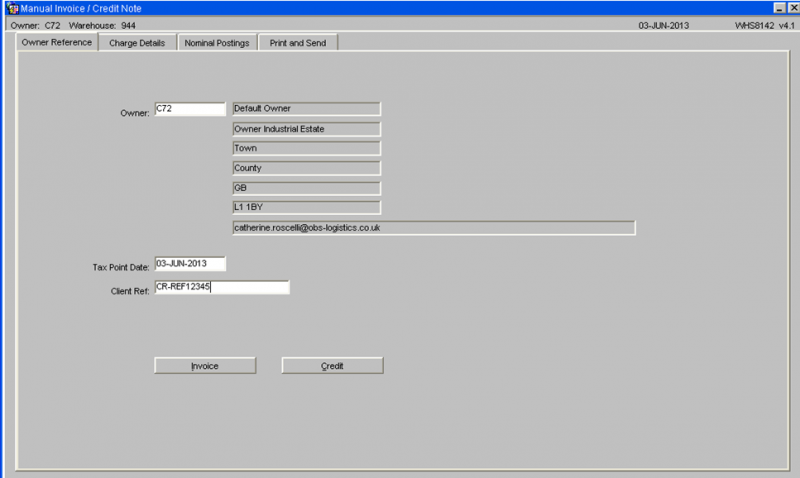
The header section includes the following fields:-
- Owner Code – This will default to the current owner. A list of values will be available which will show all the owners the user has access to.
- The owner name, address and email address will be displayed.
- Tax Point Date – A past or future date can be entered.
- Client Reference.
- Invoice Button – This button is used to create a manual invoice.
- Credit Button – This button is used to create a manual credit note.
Manual Invoice / Credit – Charge Details Section
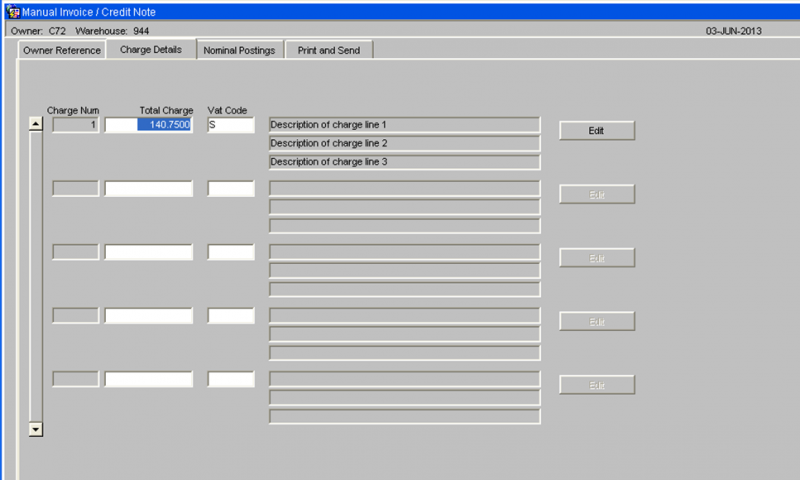
The Charge Details tab screen will include the following fields. This screen will display the first 3 lines of the description. The Edit button can be used / amend view any additional description:-
Each charge line comprises of:-
- Charge Number - this is a system generated sequential number.
- Charge Amount
- Vat code - this will be validated to ensure the vat code exists.
- Charge description - This will be free text.
The charge amount and the VAT code will be entered. Upon leaving the VAT code field, the user will be taken to the Charge Description sub-screen.
Charge Description Sub-Screen
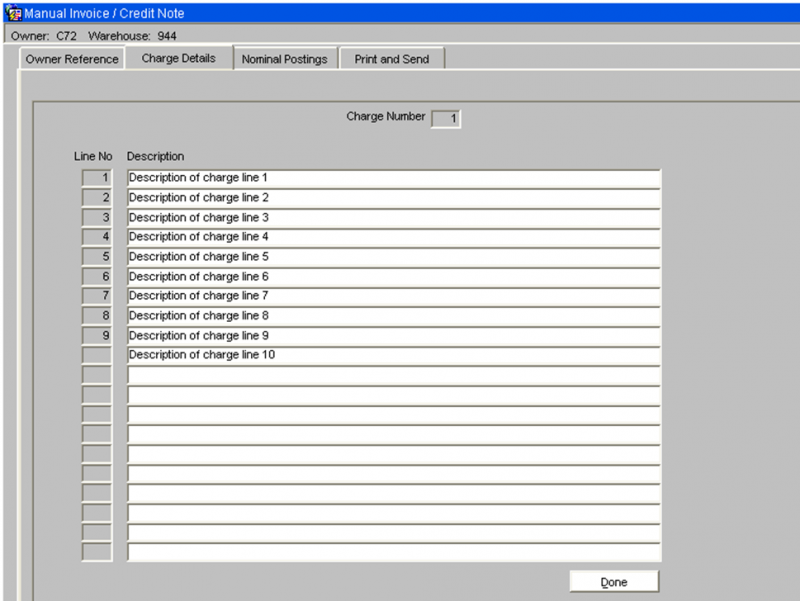
This sub-screen will allow all the required text to be entered, as shown below:-
When the Done button is clicked, the sub-screen will be closed and the first three lines of the description will be displayed on the main Charge Details screen.
As many charge lines can be added as required.
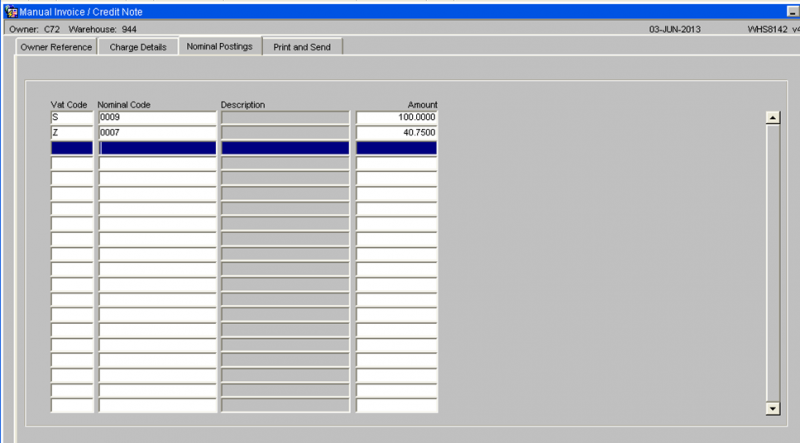
Nominal Posting Section
The Nominal Postings section must be completed for each Vat code. This section includes the following fields:
- Vat Code
- Nominal Code
- Description of Nominal Code
- Amount
The table of nominal codes will be used to provide a list of values and to retrieve the description of the nominal code. An amount will be entered against each nominal code.
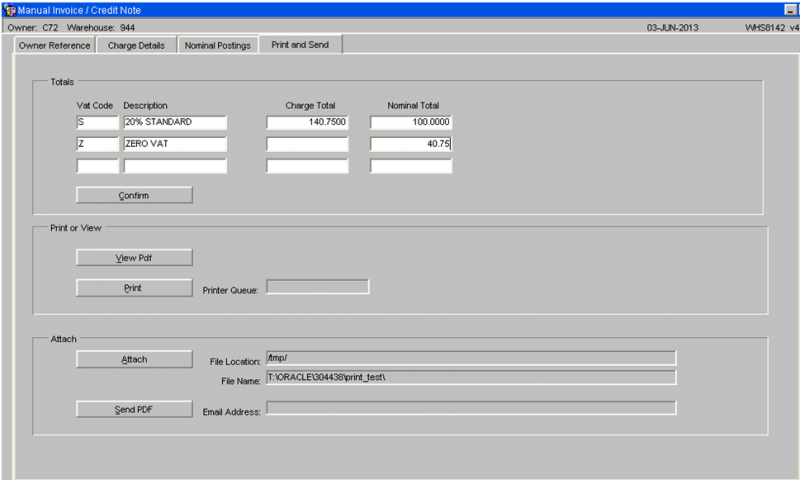
Print and Send Section
The totals section will show each VAT code used on this document with the total entered for this Vat code in the Charge Details section and the total entered for this VAT code in the Nominal Postings section.
The totals must match before the Confirm button is used to complete the entry of the invoice / credit note.
View PDF
Press the View PDF button to allow the PDF invoice / credit note to be produced and either displayed on the screen or sent to a printer.
Press the Print button when this button and the PDF invoice / credit note will be produced and sent to the default printer queue, as displayed.
Attach
The Attach Documents section is optional.
The user may have scanned a document which now exists on the hard disc of their PC. This document needs to be attached to the e-mail sent out to the client.
This section will include the following fields:-
- Pathname – the location of the file.
- File name – the name of the file.
- Attach button
The system will verify that a document exists in the selected location with the entered filename.
Appendix A: Document History
A.1 References
| Ref No | Document Title & ID | Version | Date |
|---|---|---|---|
| 1 | UG 352167 C-WMS Owner Charging and Invoice Setup and Processing Guide | 2.01 | 1st July 2025 |
| 2 | UG 352167 C-WMS Owner Invoicing Setup and Processing Guide | 2.01 | 1st July 2025 |
| 3 |
A.2 Glossary
| Term or Acronym | Meaning |
|---|---|
| Ad Hoc (WCS) | A task instigated on the device (spec. Ad Hoc Pallet Move), rather than a task instigated from the WMS and Stock Control. |
| Advice Note Number | An external reference linked to a Goods Receipt. |
| Aisle (WMS) | A component of a location; usually a space through rows of racking or storage locations; a collection of locations; |
| Allocation (order) | The systemic act of identifying and ring-fencing product matching the order requirements, following proscribed warehouse rules. |
| Anchor Point (WMS) | A starting location for a search for a suitable storage location; auto-putaway location suggestion start point. |
| Area (WMS) | A collection of aisles; an area in the warehouse for a particular purpose. |
| Batch (WMS) | A production batch of a product; a quantity of product that is considered to have the same characteristics; |
| Bay (Warehouse) | A physical loading or unloading point for the warehouse. |
| Bay (WMS) | A component of a location; usually a space between uprights in racking, comprising several levels (horizontal beams). |
| Bay Diary | The mechanism for booking hauliers inbound/outbound and assigning bays. The OBS Logistics system is CALIDUS Bay Diary. |
| Block Stack | A stable stack of pallets. |
| Booking | A time slot for a bay, booked with a Carrier/Haulier. |
| Bulk (WMS) | Bulk storage; Usually full-pallet storage areas, racked or stacked. |
| Cancellation (WCS) | The facility to cancel a task due to some problem, identified by the user when performing the task. |
| Carrier; Haulier | The transport company (by road or sea). |
| Check Digit (WMS) | A short code, usually randomly generated and stored against a location, used to help identify that a user is at the right location before they proceed with a warehouse task. |
| Container | The actual physical container, identified uniquely by the Container Number. The Container will be identified as a Container Type. |
| Container Type | Descriptive of the use and capability and physical characteristics of a container. Container types are 40ft End Loader, Reefer, etc. |
| Container Yard | The storage areas for full and empty locations in the facility. The OBS Logistics system to manage this area is CALIDUS Container Yard. |
| CSV | Character-separated values; a text file with multiple rows and values, usually separated with commas. |
| C-WCS | CALIDUS WCS, the name of the OBS Logistics Warehouse Control system |
| C-WMS | CALIDUS WMS, the name of the OBS Logistics Warehouse Management system |
| Dead Leg (WCS) | A movement of a truck without a pallet; wasted resource. |
| Despatch | The final physical stage of an order; handover of goods to the haulier. |
| De-stuffing | The act of emptying a container and storing the contents in the warehouse. |
| Drive-In | A drive-in location, typically multi-level, multi-deep location. |
| Dry Van | Any type of non-refrigerated container. |
| Dual Cycling | Processes utilizing P&D locations for interleaving tasks in and out of specific areas, reducing dead leg movements. |
| EDI | Electronic Data Interchange; any form of automatically or semi-automatically uploading or downloading information from a computer system without manually re-keying the information. |
| ERP | Enterprise Resource Planning; a system for this. |
| Exchange (WCS) | Specifically Pick Exchange or Task Exchange. The process of allowing a user to select a different pallet in a multi-pallet location and exchanging the expected pallet for this one. If the pallet is planned for another task, task exchange will complete this task instead of the expected one first. If the pallet is not planned, pallet exchange will swap the pallet (if suitable). |
| GR; GRN | Goods Receipt; Goods Receipt Number or Note |
| High Bay | Typically tall (greater than 5 level) racking, usually full pallet storage, usually Narrow Aisle. |
| Inbound (Booking) | A booking linked to a Goods Receipt. |
| JIT | Just In Time; processes designed to trigger at the last instant. |
| KPI | Key Performance Indicator. |
| Level (WMS) | A component of a location; usually the vertical compartments of an area, delineated by horizontal beams. |
| Loading | The act of loading pallets onto a vehicle. |
| Location (WMS) | A uniquely identified space in the warehouse for storage of product. There are many types, most commonly Floor locations (for example, Marshalling, Inbound), Racking or Bulk Storage Locations and Pick faces. |
| Manifest | The contents of a vehicle or container. |
| Marshalling | The act of bringing pallets for an order or load together; an area to do so. |
| Multi-deep | A location with 2 or more pallets stored sequentially i.e. only one can be accessed at a time. |
| NA (WCS) | Narrow Aisle; usually any area in the warehouse that is restricted access due to space limitations, Narrow Aisles have associate P&D locations. |
| Outbound (Booking) | A booking linked to a Sales Order. |
| P&D | Pick-up and Drop-off locations; locations used to control the handover of pallets between distinct areas, for example between chambers and the wider area of the warehouse. |
| PI; Perpetual Inventory | The act of continuously checking locations in a warehouse, identifying and correcting product quantity issues. Usually used in Bulk environments rather than Pick Faces. In pick faces, this process is called is called Residual Stock Balance and usually takes place after picking from a pick face. |
| Pick Face | A location designed for picking part of a pallet of stock. Usually a low- or ground-level location. |
| Pick List (order) | The instructions to pick pallets or cases from locations; the paper report associated to this; the stage of preparing these instructions; the sending of these instructions to WCS. |
| PO | Purchase Order. |
| Pre-advice; Goods Receipt Pre-advice | An advanced notification of what is being received. Part of a manifest. Pre-advices can be stock and quantity, or individual pallet level. |
| Putaway | The physical move of a pallet to a storage location as a result of receiving it into the warehouse. |
| RAG | Acronym for Red/Amber/Green, a traffic light colouration system depicting (in sequence) Errors, Warnings or Informational messages. Usually used in operational monitoring to effectively display when certain processes are not working as expected. |
| RDT | Radio Data Terminal. |
| Reefers | Refrigerated Containers. |
| Replen; Replenishment | The act of moving product (usually a pallet) from bulk storage to a pick face. |
| Reposition (WCS) | The facility to change the location of a movement or putaway when at the final destination, sue to some issue discovered when performing the task. |
| RF | Radio Frequency; An RF device is an RDT, typically used by CALIDUS WCS for executing warehouse tasks. |
| SCR; CR | Software Change Request. |
| Short Allocate | The process of not fulfilling an order due to failure to identify sufficient product at Allocation. |
| Short Pick | The process of not fulfilling an order due to failure to identify sufficient product when picking. May also be used as a term to indicate Short Allocation. |
| SO | Sales Order. |
| Truck Types | Plants, Mechanical Handling Equipment. For example, Reach trucks, Counter-balance trucks, pallet riders, etc. |
| UOM | Unit of Measure. |
| WA (WCS) | Wide Area; usually any area in the warehouse that is not restricted access due to space limitations, for example, floor areas, not Narrow Aisle. |
| WCS | Warehouse Control System |
| WMS | Warehouse Management System |
Oracle App Terms
| Term or Acronym | Description |
|---|---|
| DDL | Drop-down list of values, usually denoted by a down-arrow to the right of the field. |
| LOV; Lookup | List of Values. A Lookup of values from data maintained in the system (rather than fixed data that a DDL may be used for), |
| Form; Window; Screen | Alternative terms for each displayed window within the application. |
| Tab | A tab on a form, which contains its own panel of data to be viewed or entered. Denoted in this guide as italics. |
| Panel | A panel on a form contains data to be viewed or entered. |
| Button | A clickable button. Denoted in this guide as bold. |
| Field | Data that can be displayed or entered is referred to as a field. This is the core of where you will view or enter information within Forms. Fields are described by Labels and usually come as a pair. These (and labels) are denoted in this guide as italics. |
| Table | When there are multiple data to be shown in a group, those records are usually displayed in a table. Tables allow showing multiple fields in columns, are scrollable vertically and sometimes horizontally, will have buttons for title labels if the columns are sortable and may allow configuration, usually through a Configure button, which will take you to WHS0909. |
| Label | A label is the annotation of the field being displayed and typically tells you what it is. CWMS supports multi-lingual labels in a lot of forms. |
| Click; Select | Clicking the left mouse mutton on a field, table or button using your mouse. |
| Right-click | Clicking the right mouse mutton on a field, table or button using your mouse. |
| Viewport | The viewport is the means by which you are viewing the forms within the application. Within a browser, this may be the size of the browser window, or just a fixed portion. When running the app browserless, this is the size of the window displayed on your desktop. |
| DPI | Dots per Inch. This may be used to adjust the resolution of the application within the viewport. |
| Menu | The menu where all forms are selected, as opposed to the Oracle standard query menu. In CWMS, this is the Explorer window. (FXMEXPLR). Menu items are sometimes denoted in this guide in bold/italics. Slashes typically indicate a sub-menu. for example, Warehousing/Goods Receipt/Goods Received Advice denotes the top-level Warehousing menu, then the Goods Receipt sub-menu, and then the Goods Received Advice screen. As menus in CWMS are pretty much completely user configurable, this may have less meaning than you would like in your system, and we generally refer to these on what we call the standard menu structure. |
| Control Bar; Format bar | The control bar for searching, inserting and pretty much doing anything within the selected Oracle form. See System_Navigation_Guide#Format_Toolbar for more information. |
| Key; Function Key; Shortcut Key | Alternative terms for a keypress on your keyboard. In this guide, these are denoted with fixed width text in a box e.g. F4
|
| Multi-Modal | A term denoting whether the forms can be open and active at the same time. CWMS is not multi-modal. |
| Scroll | The act of moving a fixed window vertically or horizontally to show more information. Typically you will see and use these on tables. |
| Check box | A simple notation of whether something is enabled or disabled (or Yes or No, True or False, etc) is typically displayed as a checkbox. If the box is checked, then this means Yes/True/Enabled, the functionality depending on the label of the checkbox. |
| Option Select; Radio Buttons | When a field has a limited number of options, sometimes this is displayed with bulleted options, all visible n the screen. This is called an Option Select or Radio button. The option that is selected will have the button filled in. |
A.3 Document History
| Version | Date | Status | Reason | By |
|---|---|---|---|---|
| - | 08/03/2025 | Draft | Initial Version | LBW |
| 1.0 | 1/05/2025 | Issue | Updated version for formatting | ANW |
| 1.01 | 1/07/2025 | Draft | Updated to latest versions | ANW |
A.4 Authorised By
Matt Tipping | Aptean Project Manager | _____________________________ |
Tony Walker | Aptean Consultant | _____________________________ |
