Warehouse Set Up
INTRODUCTION
This section describes the required screens to be used in setting up the information concerned with the actual physical warehouse. Other guides describe the set up of company, user, stock, owners etc.
This is a generic guide based on the version of the CALIDUS WMS system at the time of writing.
It can also be used by clients to specify their specific data values to aid initial system set up as well as for future reference.
![]() Note: Fields marked '**' are mandatory and are needed to ensure correct set up of the system.
Note: Fields marked '**' are mandatory and are needed to ensure correct set up of the system.
Warehouse Setup Steps
In order to create a warehouse, the user must set the standing data up in a pre-defined order. As most of the screens are co-dependant, any missed step may cause the setup of a following screen to fail.
![]() Note: All screens shown in this user guide will display a default generic set up.
Note: All screens shown in this user guide will display a default generic set up.
- Warehouse Maintenance (STKWHSE01A)
- System Parameters (WHS0010)
- Area Codes Maintenance (WHS0035)
- Aisle Codes Maintenance (WHS0050)
- Aisle Sequence Maintenance (WHS0060)
- Aisle Status Maintenance (WHS8231)
- Pallet Types Maintenance (WHS0045)
- Location Types Maintenance (WHS0070)
- Location Maintenance (WHS0090)
- Automatic Location Maintenance (WHS0470)
- Reason Codes Maintenance (WHS0080)
- Employee Maintenance (WHS0020)
- System Reason Codes Maintenance (WHS0085)
- Transaction Types Maintenance (CTLTRAN01A)
- Receipt Types Maintenance (WHS4000)
- Truck Type Maintenance (WHS7020)
WAREHOUSE MAINTENANCE (STKWHSE01A)
Warehouse Maintenance (STKWHSE01A)
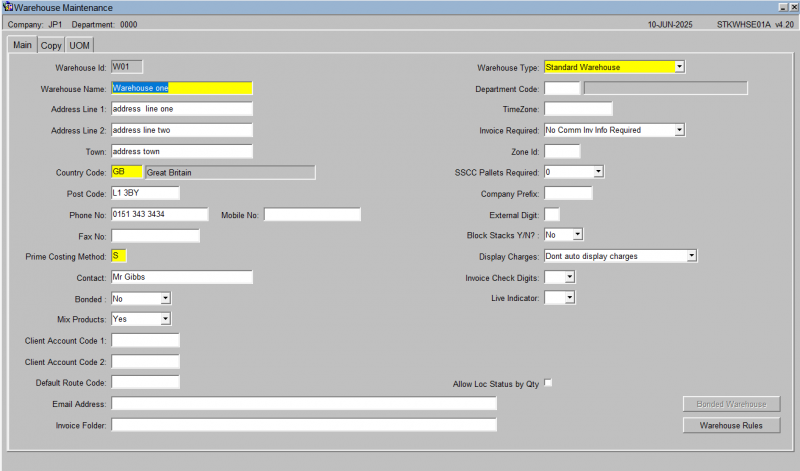
This is the main screen where the warehouse id is set up. Note, in order to allow changes within this screen, the user must have logged in as this warehouse.
Warehouse specific information is maintained in this screen. The above set up is the generic set up for a basic warehouse. Please see information at the end of this user guide for more details on the client specific flags
Note:
- Greyed-out fields means no entry in that field is allowed
- A yellow field means this field is mandatory – something has to be entered before the record can be saved
- A field with an arrow against it allows the user to choose from a number of options. A drop down box appears when the arrow is clicked on
- The ‘Warehouse ID’ field is greyed out. This field will display the warehouse id entered. No amendment is allowed
- The country codes are maintained in country codes maintenance. See the Company Maintenance user Guide for details
- Copy Warehouse enables the user to copy the set-up in this warehouse to another existing warehouse
- The Warehouse Rules button takes the user to another screen. Note. Warehouse rules are maintained within the Company Maintenance User Guide
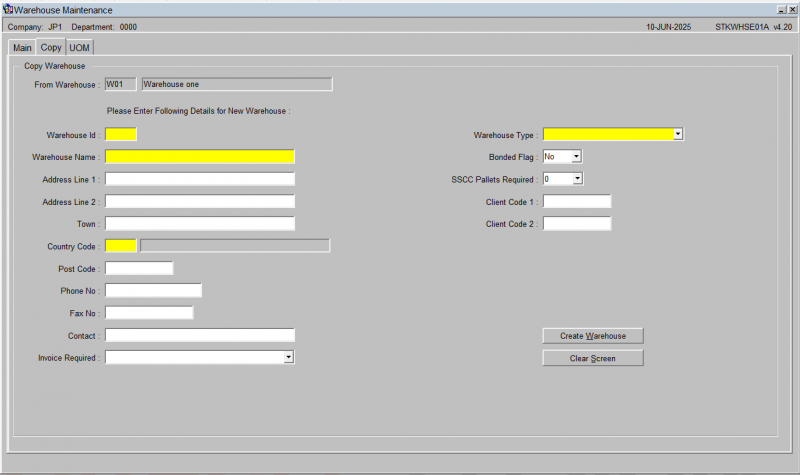
Copy Warehouse (STKWHSE01A)
Enables the user to copy the set-up in this warehouse to another existing warehouse id.
Note:
- From Warehouse: Display Only and is pulled from the Main Warehouse Maintenance Screen
- Warehouse ID: Maximum of 3 Characters
- When all the required information has been entered, the ‘Create Warehouse’ Button needs to be pressed in order for the New Warehouse to be Created
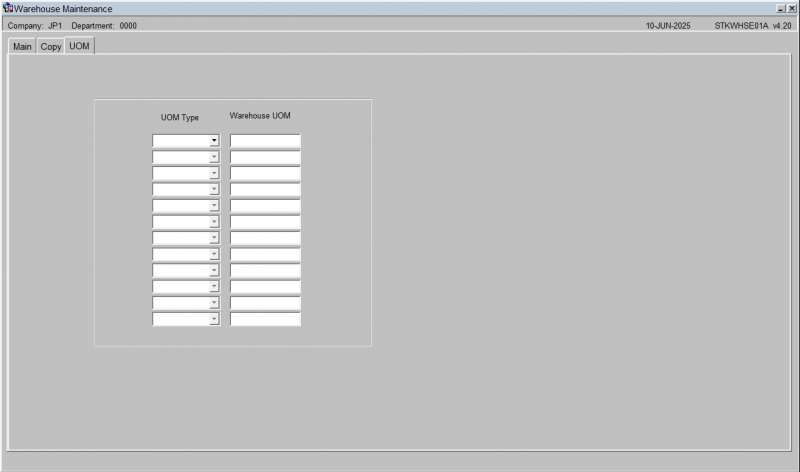
Warehouse UOMs (STKWHSE01A)
You can maintain the UOMs for Area, Length, Volume and Weight here.
This enables the different types of measure and their associated unit. If volumetric information is not required all values can be left blank.
![]() Note: It is advisable to not use the values 'MM'(millimetres) and 'GRM'(grammes)as it very easy to exceed the system maximums for these values. Areas affected include Allocation and EDI.
Note: It is advisable to not use the values 'MM'(millimetres) and 'GRM'(grammes)as it very easy to exceed the system maximums for these values. Areas affected include Allocation and EDI.
Warehouse Rules (WHS0078)
Warehouse rules are established as part of the development of the system functionality. The ability to specify which specific functionality is to be enabled in the warehouse and give any specific values is given in this screen.
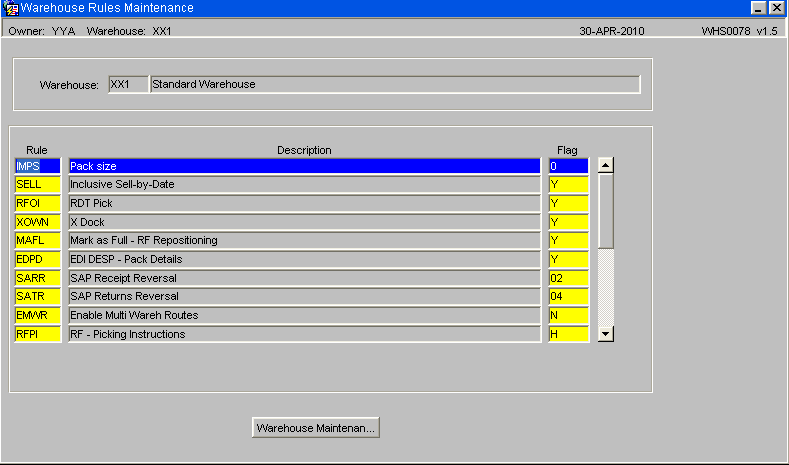
| Field Name | Description | Options |
|---|---|---|
| Four Character Code as Held in Warehouse Rules Control | Description of rule controlled functionality | Value to enable functionality |
SYSTEM PARAMETERS (WHS0010)
System Parameters (WHS0010)
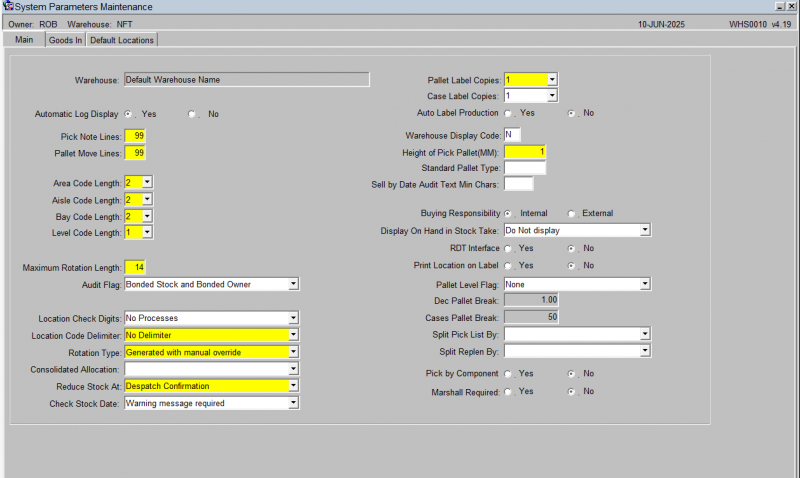
This screen maintains all the static formats that will be used to set up the warehouse. There are three tabs in all. This page will detail the setup required within the MAIN tab.
Warehouse specific information is maintained in this screen. The above set up is the generic set up for a basic warehouse. Please see information at the end of this user guide for more details on the client specific flags
Used to specify a number of parameters that will govern the way the system will operate and how various items of information will be formatted in this warehouse.
Note, again, the user must be logged in as the correct warehouse in order to make changes
Note:
- Auto Log Display determines whether the user wishes to see the allocation log once a set of orders has been allocated
- Pick Note and Pal Move Lines specifies the number of lines allowed on a printed pick or move note
- The Area, Aisle, Bay and Level lengths are used to determine the format of the location codes. I.E. A location code of AA-01-1A would have an aisle, bay and level length of 2 each (the area code is not included)
- Max. Rotation Length is the length of the system generated rotation number
- Loc Delimiter is the symbol used to separate the aisle, bay and level within the location code (for our example, the delimiter would be ‘-’
- The Rotation Type is how the system generates the rotation number, or whether it is to be manually entered by the user.
- Reduce Stk At will determine when stock is downdated during the order cycle. Note, this is extremely important, if you choose ‘Pick Confirmation’ Despatch will not be feasible .
GOODS IN TAB
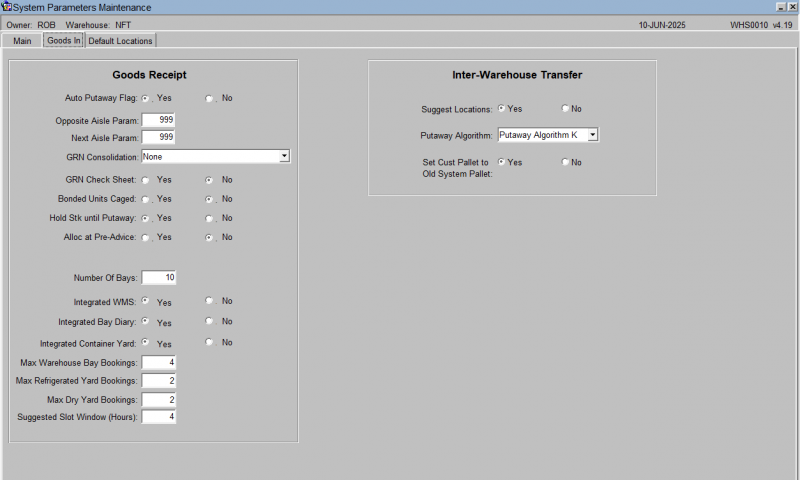
The Goods In tab of the System Parameters screen specifies what functionality during goods receipt you wish to use.
Note:
- The Auto Putaway flag must only be set to ‘Y’ if you wish the system to dictate where stock is located during the goods receipt process
- The Opposite and Next Aisle Param fields are to determine how many locations you wish the system to search before moving to the next, or opposite aisle during Auto Putaway
- The Hold Stk until Putaway flag should always be set to ‘Y’ If this is not set, stock received on a goods receipt could be ordered before it has been physically located within the warehouse
DEFAULT LOCATIONS TAB
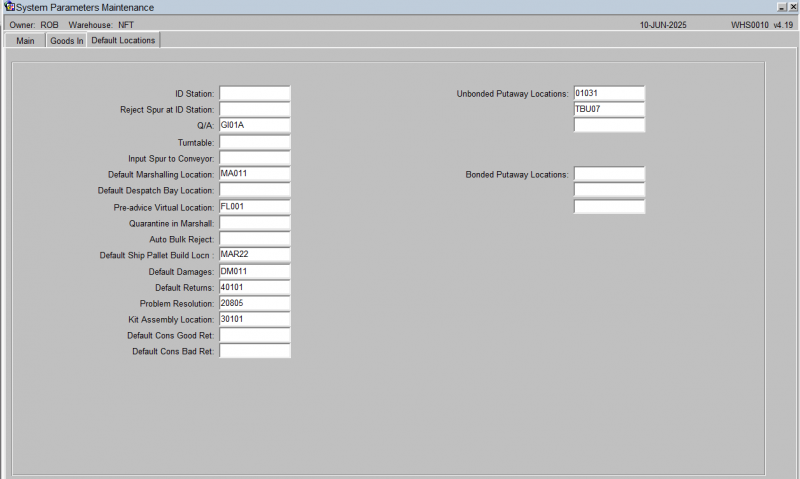
The Default Locations tab is used to determine which locations are to be used during certain automatic processes throughout the system.
Note, this screen cannot be set up until the location codes have been created. The user normally saves the first two tabs of System Parameters, then returns to complete this tab once the necessary locations have been created
Note:
- Only the Default Marshalling Location is used within generic basic warehouse set-up. Any other locations required will be determined by the client specific processes
- Note, failure to enter a marshalling location here will mean that it will be required to be manually entered for each allocation run.
AREA CODES MAINTENANCE (WHS0035)
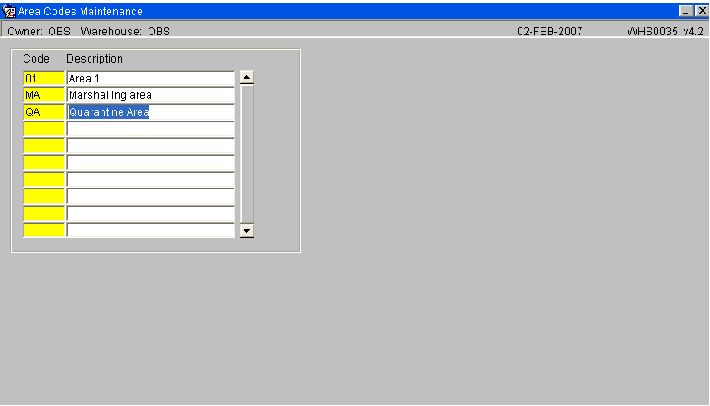
The creation of an area code is to enable the user to assign locations to a specific physical area within the warehouse. Note, bigger warehouse will have more clearly defined areas than that of a smaller operation.
These codes are used as part of the location identifier as well as in sorting pick lists, structuring stock take etc..
Note:
- The code specified must be within the area code length defined in system parameters main tab
- The description is used to enable the user to clearly see where the area is within the warehouse
AISLE CODES MAINTENANCE (WHS0050)
Aisle Codes Maintenance enables the user to create aisles within the warehouse.
The aisles can then be configured using the opposite and next aisle fields to specify where they are physically located in relation to each other.
These codes are used as part of the location identifier as well as in sorting pick lists, structuring stock take etc..
Note:
- The Aisle Code entered must be within the defined length as set up in system parameters
- The Opp and Next Aisles can only be created once the original aisle code is set up
- The Aisle Max Sequence is used to determine the number of locations within that aisle.
AISLE SEQUENCE MAINTENANCE (WHS0060)
In this screen the user can configure the sequence in which the aisles will be used. For Bulk aisles such as Marshalling and Quarantine the maximum sequence is used as these do not follow any algorithm.
This screen needs to be maintained if using the auto-putaway at receipt. It will determine the priority and order of aisles to be received into.
![]() Note:
Note:
- Link an aisle to an area code, and assign a unique sequence.
- All aisles created within Aisle Codes Maintenance must be entered in this screen.
AISLE STATUS MAINTENANCE (WHS8231)
In order to make the aisle available to the system, all aisle codes to be used must be set to available. Note, the default on entry within the screen is No.
Used to indicate if a given aisle is actually currently in use or is available. Used in the event of physical access problems etc. The screen is used with the RF system.
Note:
- The system will automatically default in all aisle codes previously set up. The user then simply has to change the Available Flag from N to Y for each one.
PALLET TYPES MAINTENANCE (WHS0045)
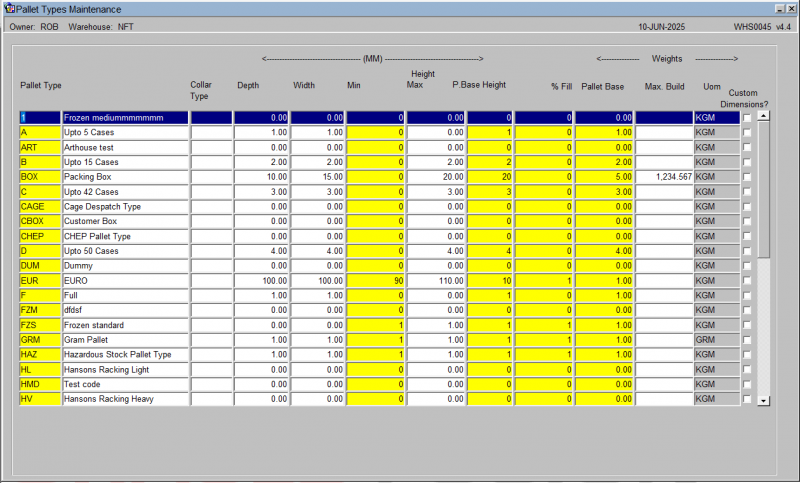
All pallet types used within the warehouse are to be maintained in this screen. Pallet type by definition is the media used to store goods within each location. Media can include such things as wooden pallets, plastic storage boxes or cartons.
Note:
- Pallet Type is a free text field that can hold up to four characters. The user should ensure that the abbreviation used can be easily understood by the operational staff.
- The mandatory height, weight and %fill fields must be populated with the correct values in order to ensure the accuracy of auto-putaway
TRUCK TYPES MAINTENANCE (WHS7020)
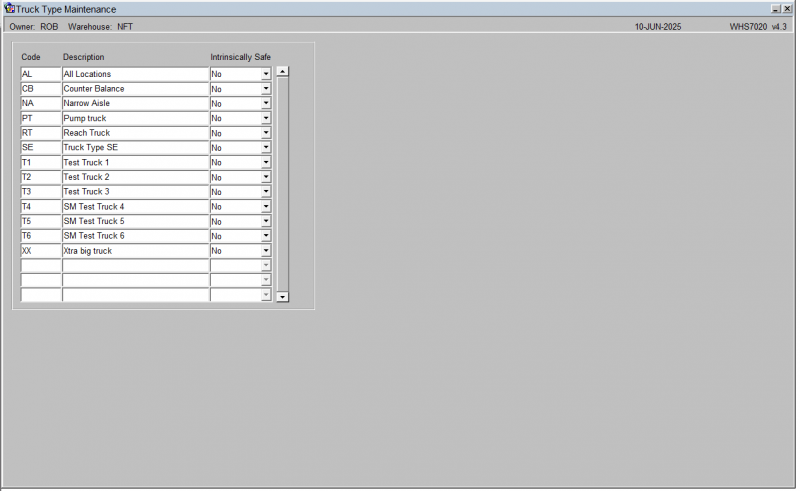
Mainly used for RF enabled warehouses, this screen determines what kind of truck can be used around the warehouse. The truck types entered here can then either be added into location types maintenance, or entered onto a handheld RDT when processing.
![]() Note:
Note:
- The Truck Type entered must be 2 characters long
- Intrinsically Safe identifies whether the truck is considered safe for use with Flammable goods stored in flammable aisles.
- The Send button will refresh the WCS with all truck types, their description and the intrinsically safe information.
LOCATION TYPES MAINTENANCE (WHS0070)
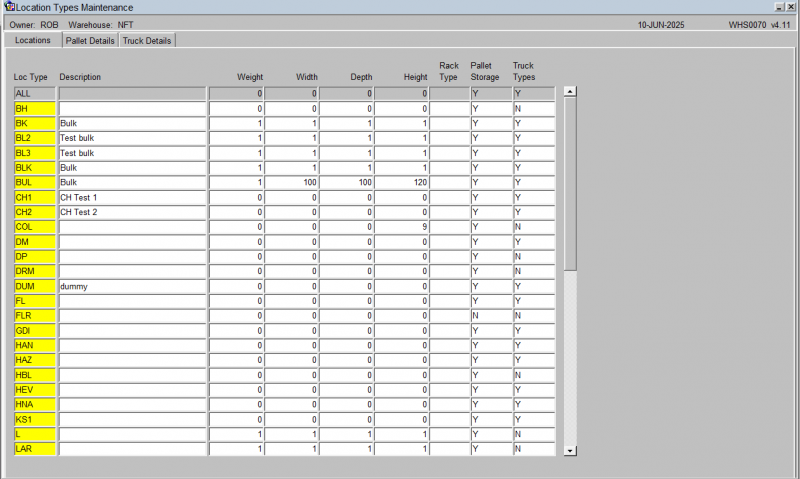
The Location Types screen is used to build the locations within the system.
Location Types - Locations Tab
Here the user specifies what kind of location is in each aisle.
For example, some racking maybe narrower in certain sections, meaning the number of pallets allowed in each bay is reduced.
To make this clear, a different location type would be assigned to each location.
For each location type, the maximum number of pallets and the type of pallet allowed is then given to each location type.
The user can then assign a priority to when using auto-putaway, the system uses priority 1, then 2 etc.
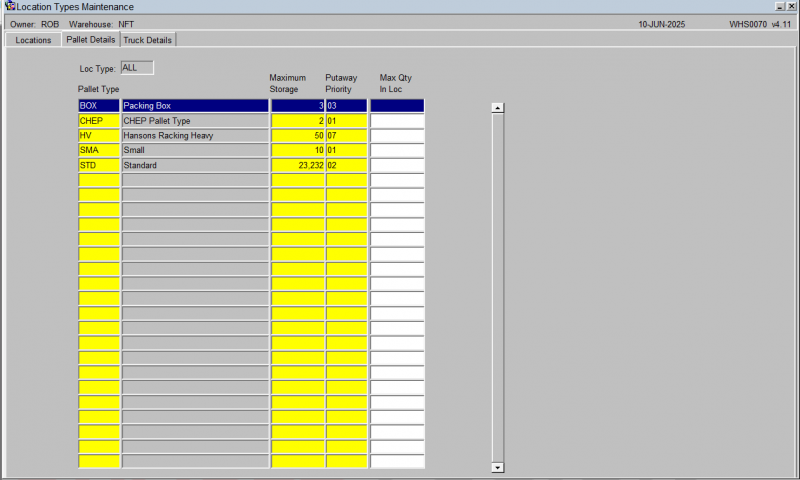
Location Types - Pallet Details Tab
Used to specify what pallet types can be used in a given location type.
![]() Note:
Note:
- In order to use the pallet details tab, the user must enter 'Y' in the Pallet Storage field. Entering 'N' will cause the location type to be seen as non-palletised and therefore not use-able for any stock stored on a pallet.
- The maximum storage is the number of pallets allowed in that location. For auto-putaway, the system will stop using that location once this maximum storage quantity has been exceeded.
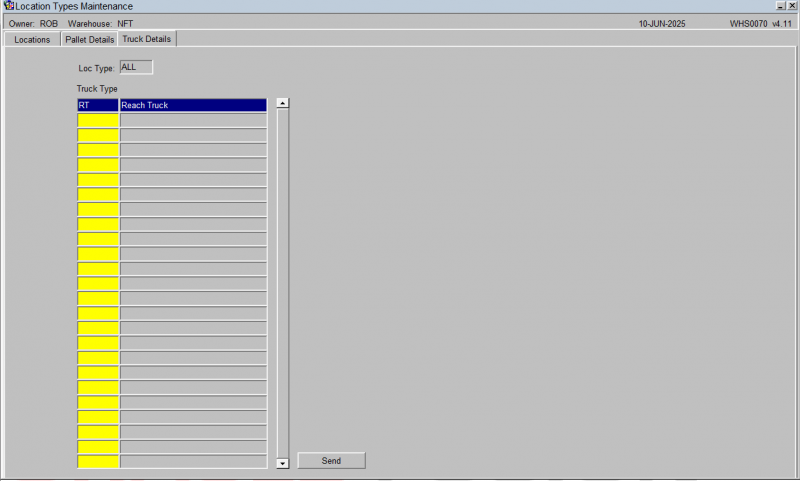
Location Types - Truck Details Tab
The Location Truck types are required to define the access of trucks to this location type, for use within the WCS.
![]() Note:
Note:
- In order to use the truck details tab, the user must enter 'Y' in the Truck Types field.
- The Send button will refresh the RF system with all Location/Pallet Details/Truck Type information. Any additions or changes are automatically sent to the RF system on saving changes or a adding a new record.
LOCATION CLASS MAINTENANCE (WHS8056)
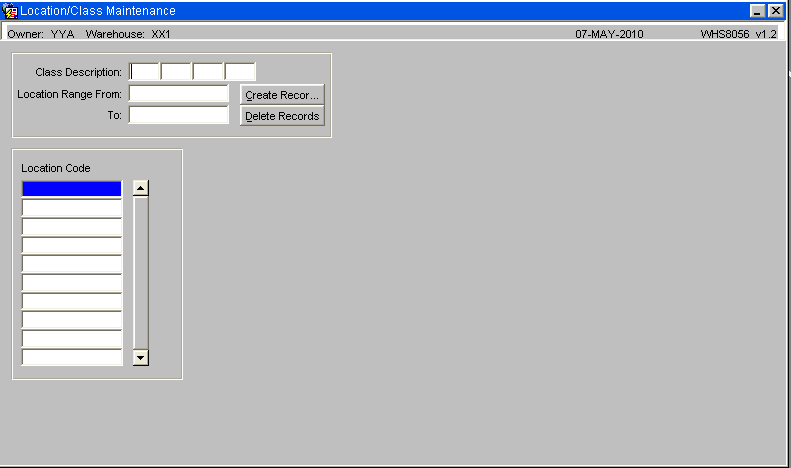
Used to assign a particular product classification to ranges of locations. Used by putaway to store products in relevant areas of the warehouse especially where segregation may be required.
![]() Note:
Note:
- Product classification is maintained with Stock Maintenance.
- It is possible to assign either a range of locations or to add and remove on a location by location basis.
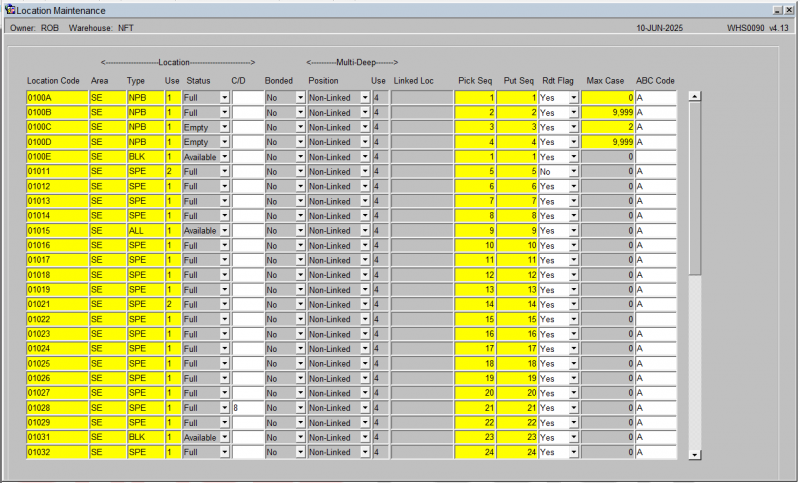
LOCATION CODES MAINTENANCE (WHS0090)
This is the manual screen that allows the user to create each location code within the warehouse. The non-mandatory fields (not yellow) will be defaulted with the values shown in the figure below.
If using the Automatic Location Maintenance screen, the Marshalling location must be created in order to enter this into the Default locations of System Parameters.
Note:
- The location code specified must be the total length of the aisle, bay and level code lengths defined in system parameters, main tab
- The area code must be one predefined in area codes maintenance
- The use determines what the location will be used for.
Standard values are:
- 0 - Preadvice Location
- 1 - Bulk Location
- 2 - Pick Location
- 3 - Receipt Location
- 4 - Returns Location
- 5 - Damaged Stock Location
- 6 - Marshalling Location
- 7 - Goods In/Out Bay Location
- 8 - Quarantine Location
- 9 - Replenishment Location
- D - Dynamic Pick Face
- M - Multi-Pallet Storage Location
- P - P&D (Pick and Drop) Location
- U - Units Pick Location
The Multi-Deep values specify how an M type location is used and validates:
- Position - one of
- Front
- Back
- Non-Linked
- Use - one of:
- 4 - Valid pallets contain the same stock, batch number and owner batch
- 5 - Valid pallets contain the same stock.
- 6 - Valid pallets contain the same stock and sell-by date.
- 7 - Check the last receipt location for pallets containing the same GRN and stock.
- 8 - Valid pallets contain the same stock and manufacturing date
- Linked Loc - if front or back, which location is this location linked to.
AUTOMATIC LOCATION MAINTENANCE (WHS0470)
This screen allows the user to create large quantities of locations in one screen.
It is easier and quicker than using the manual location codes maintenance.
Used to automatically create contiguous ranges of locations. This screen allows the user to automatically create large quantities of locations in one continuous range. It is easier and quicker than using the manual location codes maintenance.
![]() Note: To prevent unexpected locations being created, deleted or amended it is advisable to restrict the selection parameters to an aisle as a time.
Note: To prevent unexpected locations being created, deleted or amended it is advisable to restrict the selection parameters to an aisle as a time.
Fields:
- The Run Type field has four options, Create, Delete, Release and Suspend. Suspend and Release only hold and release locations respectively, they do not delete them.
- The Area for Aisle must be one predefined in Area Codes maintenance
- The Location Type must be one predefined in Location Type maintenance
- Location Usage is the use type of the location (1,2,6 or 8 as explained in the Location Codes Maintenance page)
- Bonded, default is always N
- RDT. This flag is only to be used if the locations are to be RF enabled. Default is N
- Start and End Location. This is the range of locations to be created. Note, care must be taken when entering the range, especially if using different types/uses.
Once entered, you can click the Generate button to generate locations according to the template parameters provided.
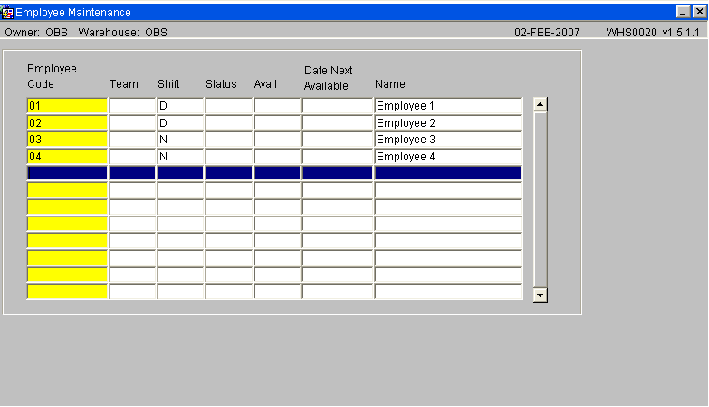
EMPLOYEE MAINTENANCE (WHS0020)
This is where the employee codes are set up. Each person using the system or working in the warehouse need to be assigned an employee code.
Note:
- Employee Code: Although the field allows up to 10 characters, only a maximum of three can be used if the system is RF enabled
- All fields other than Employee Code can be left blank. However, the Name should always be populated for cross referencing in the future.
- The Send button will refresh the RF system with all employee detail information. Any additions or changes are automatically sent to the RF system on saving changes or adding a new record.
REASON CODES MAINTENANCE (WHS0080)
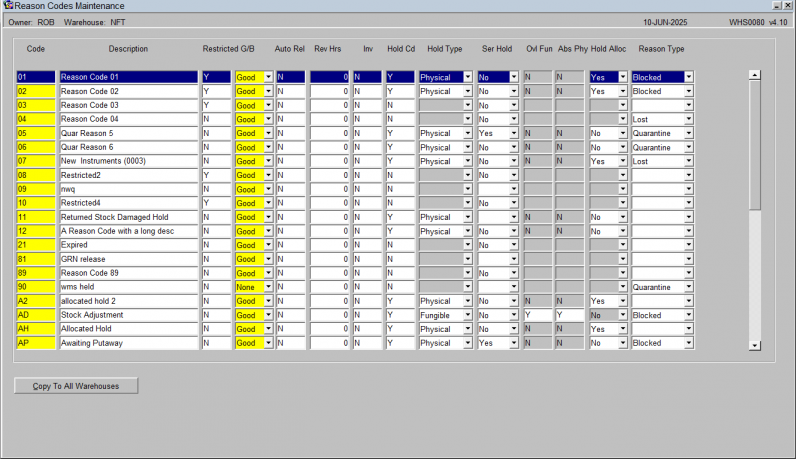
This is used to establish all of the Reason Codes that may be selected when performing a stock management transaction within the warehouse.
Reason Codes are two character abbreviations used to describe why a particular action within the system has been taken.
For example, reason codes needs to be entered for every stock adjustment, hold and pick adjustment.
Whether a reason code is to be used to hold stock or not, determines whether the hold code flags are set to Y or N.
![]() Note:
Note:
- The codes used to describe an adjustment must be clearly understood by the operational staff as the Description entered here is not shown throughout all of the screens during processing.
- The G/B field determines whether a reason code is good or bad. This functionality is mainly used within Sales Order Processing (Proof of Delivery) to determine whether stock should be written off or not.
- The user may see a different layout to this screen than the one shown here. This is based on a Program level registry setting 'WHS Layout Visible' under WHS0080. The versions shown here is the generic screen.
- The Send button will refresh the RF system with all employee detail information. Any additions or changes are automatically sent to the RF system on saving changes or adding a new record.
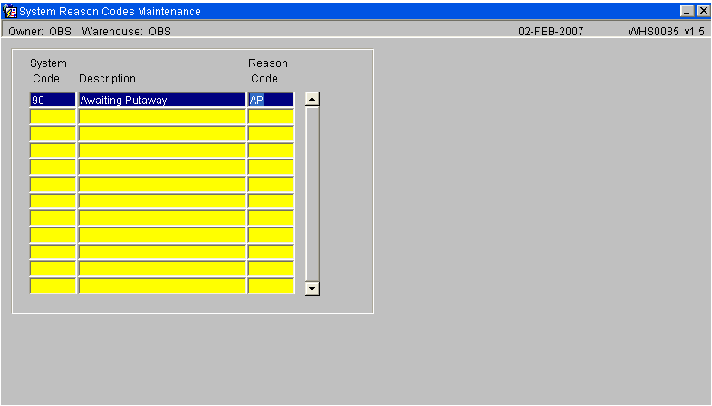
SYSTEM REASON CODE MAINTENANCE (WHS0085)
This screen does not have to be set up.
However, during various processes, the system dictates its own hard-coded reason codes.
As there is no table to specify what these codes mean, this table can be used to ‘translate’ a system generated reason code.
For example, after Receipt Confirmation has been completed, the system automatically puts stock on hold with a reason code of ’90’.
When querying the product, all the user will see is an unknown number.
‘AP’ is created in reason codes maintenance and assigned to System Code ’90’
For all future queries, the user will then see a more recognizable ‘AP’.
Note:
- The System Code is the one generated by Calidus 3pl. For a full list, please see your representative from Aptean.
- The Reason Code must have been previously set up in Reason Codes Maintenance.
Below is the current list of System Reason Codes from the time of writing, these will be added to as the system is developed.
| Reason Code | Description |
|---|---|
| 5M | RF Ad hoc stock move |
| 6A | Allocation shortage |
| 73 | Rework |
| 74 | Allocation Hold Code |
| 75 | EDI serial (approve/reject) |
| 81 | Goods putaway confirmation |
| 82 | Pallet movement confirm - from |
| 83 | Subcontracting order |
| 84 | Stock movement confirm - from |
| 85 | Stock movement confirm - to |
| 86 | Awaiting review |
| 87 | Quality inspection hold |
| 88 | GRN reversals |
| 90 | Received awaiting putaway |
| 92 | Auto quarantine of stock |
| 93 | Pallet movement request - from |
| 94 | Pallet movement request - to |
| 95 | Held in damaged location |
| 96 | Under delivery |
| 97 | Damaged prior to receipt |
| 98 | Over delivery |
| RT | Held in returns location |
The user reason codes are configurable but MUST have reason codes that match the link items in the system reason code table, reference the example data below.
| Reason Code | Description |
|---|---|
| DA | Damaged Stock |
| 90 | Awaiting Putaway |
| 6A | Scrap item |
| QA | Quality - Assurance |
| QH | Quality - Hold Stock |
| RT | Rerurned Stock - Auto Hold |
| 81 | Stock Putaway |
| ** | Stock Take Adjustment |
| 19 | Stock Take - Decrease |
| 20 | Stock Take – Increase |
| R1 | Reserved Stock |
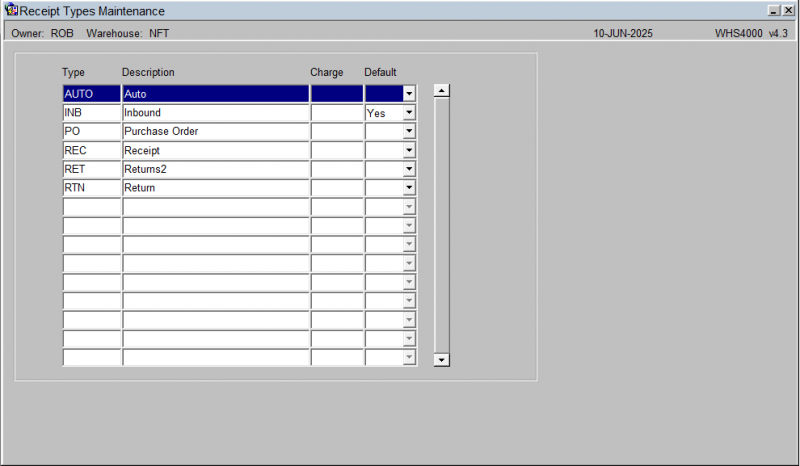
RECEIPT TYPES MAINTENANCE (WHS4000)
When processing a goods receipt, or requesting reports regarding receipts, a Receipt Type is requested. This is used to separate different kinds of receipts for ease in future queries.
Note:
- The Receipt Type entered must be 3 characters long.
- Generic types are REC (Receipt), RET (Return), and PUR (Purchase Order).
TRANSACTION TYPES MAINTENANCE (CTLTRAN01A)
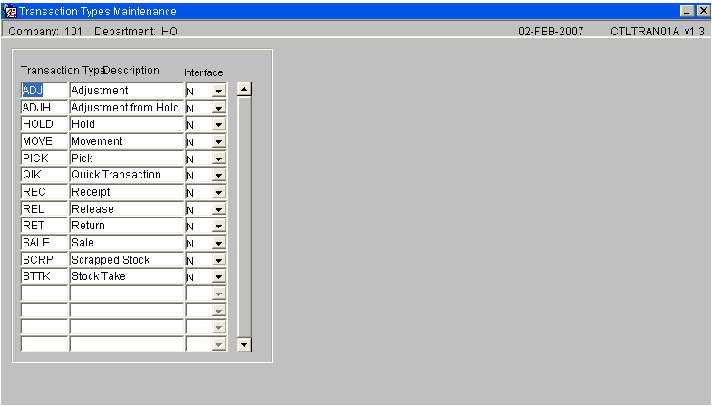
This screen only has to be amended/created if wanting to use the Transactions Report. The system will automatically generate the Transaction Types when processing. Note, some of the Transaction Types are already created when opening this screen. The values below are the default types.
![]() Note:
Note:
- The Transaction denotes each system or user generated transaction type during all processes
- The Interface flag is used is client specific EDI Processing
