WHS1910: Difference between revisions
No edit summary |
(Updated to latest version) |
||
| (2 intermediate revisions by 2 users not shown) | |||
| Line 1: | Line 1: | ||
The despatch confirmation screen allows the user to despatch the order from the warehouse. In system terms, the stock will be removed from the marshalling location and warehouse. A negative stock transaction will take place with a type of 'SALE'. | |||
{{Incomplete}} | |||
The screen is located in Warehousing | The screen is located in '''''Warehousing/Sales Allocation & Picking/Despatch by Route/Load''''' | ||
The standard screen is shown below: | The standard screen is shown below:<center> | ||
[[File:WHS1910.png|800x800px]] | |||
</center> | |||
The screen will begin by showing the ''Orders'' tab. | |||
To despatch a route or order you must first select either ''Carrier'', ''Route/Load'' or ''Order Number'' from the ''Choose By'' drop down box. | |||
* If you select ''Route/Load,'' you will be prompted to enter the route and load. A lookup is provided that allows you to select unconfirmed or confirmed loads, | |||
* If you select ''Order Number'', you will be prompted for ''Owner'' and ''Order''. | |||
** The ''Owner'' will default, but you can change this to another owner if you want to - an LOV is provided. | |||
** The ''Order'' provides an LOV to help you find the order you are after. | |||
* If you select ''Carrier'', you will be prompted to enter the carrier code. An LOV is provided. | |||
Enter the carrier, route/load or order number you wish to despatch and press the '''Execute Query''' button. The screen will display matching records in the table below, as in the screenshot above, where this was selected by ''Route/Load''. | |||
The fields displayed are: | |||
* ''Order'' (always displayed) | |||
* ''Route/Load'' | |||
* ''Page Num'' | |||
* ''Pick Date'' | |||
* ''Marshall Locn'' | |||
* ''Qty to Despatch'' | |||
* ''Conf'' | |||
* ''Route Code'' | |||
* ''Load No'' | |||
* ''Order Num'' | |||
* ''Booked Date'' | |||
Note that you can change the fields in this table using the '''Layout''' button provided. You will be taken to the Program Layout Configuration screen [[WHS0909]] to select the fields, widths, order, etc. | |||
You can view, enter or amend handling charges using the '''Charges''' button - you will be taken to the Detail Handling Charges screen [[WHS0168]], where you can automatically apply charges, produce a miscellaneous invoice or enter charges. | |||
Further optional are available to you using the '''Options''' button, which will display a new panel of options: | |||
* '''Deassign Order''' - this will deassign the selected order from this load. {{Warning}}There is no confirmation when you press this - be sure this is what you want to do. | |||
* '''Delivery Refs''' | |||
* '''Commercial Invoice Input''' | |||
You can close this panel with the '''Exit Options''' button provided. | |||
To despatch the order, press the '''Confirm''' button. | |||
The system will now require a date and time (these can be in the past). If you press the <code>TAB</code> key over each of the fields, the date and time will default to the current system date/time.<center> | |||
[[File:WHS1910-Confirm.png|800x800px]] | |||
</center> | |||
Press the '''Confirm''' button to confirm the despatch (you can cancel the despatch using the '''Cancel''' button). The screen will confirm that despatch confirmation is complete. | |||
The | The order has now been despatched and will have a system status of 9. | ||
Latest revision as of 11:11, 25 June 2025
The despatch confirmation screen allows the user to despatch the order from the warehouse. In system terms, the stock will be removed from the marshalling location and warehouse. A negative stock transaction will take place with a type of 'SALE'.
![]() Warning: This is an incomplete guide.
Warning: This is an incomplete guide.
The screen is located in Warehousing/Sales Allocation & Picking/Despatch by Route/Load
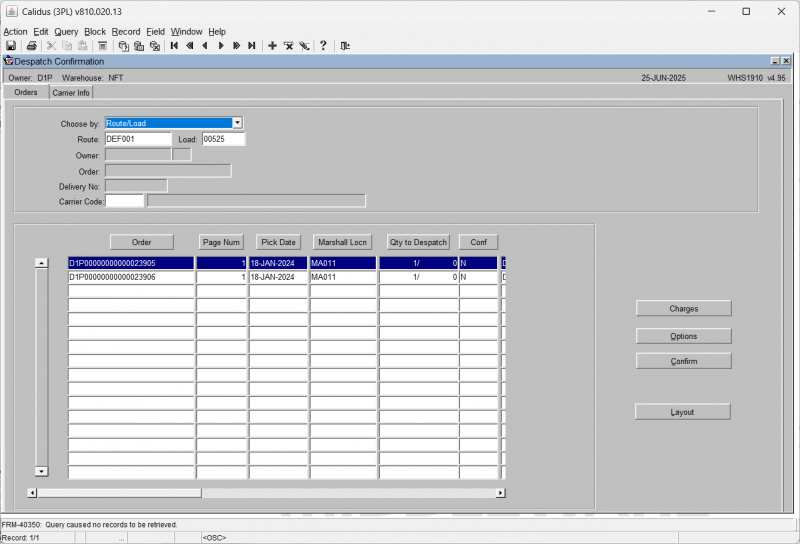
The standard screen is shown below:
The screen will begin by showing the Orders tab.
To despatch a route or order you must first select either Carrier, Route/Load or Order Number from the Choose By drop down box.
- If you select Route/Load, you will be prompted to enter the route and load. A lookup is provided that allows you to select unconfirmed or confirmed loads,
- If you select Order Number, you will be prompted for Owner and Order.
- The Owner will default, but you can change this to another owner if you want to - an LOV is provided.
- The Order provides an LOV to help you find the order you are after.
- If you select Carrier, you will be prompted to enter the carrier code. An LOV is provided.
Enter the carrier, route/load or order number you wish to despatch and press the Execute Query button. The screen will display matching records in the table below, as in the screenshot above, where this was selected by Route/Load.
The fields displayed are:
- Order (always displayed)
- Route/Load
- Page Num
- Pick Date
- Marshall Locn
- Qty to Despatch
- Conf
- Route Code
- Load No
- Order Num
- Booked Date
Note that you can change the fields in this table using the Layout button provided. You will be taken to the Program Layout Configuration screen WHS0909 to select the fields, widths, order, etc.
You can view, enter or amend handling charges using the Charges button - you will be taken to the Detail Handling Charges screen WHS0168, where you can automatically apply charges, produce a miscellaneous invoice or enter charges.
Further optional are available to you using the Options button, which will display a new panel of options:
- Deassign Order - this will deassign the selected order from this load.
 Warning: There is no confirmation when you press this - be sure this is what you want to do.
 - Delivery Refs
- Commercial Invoice Input
You can close this panel with the Exit Options button provided.
To despatch the order, press the Confirm button.
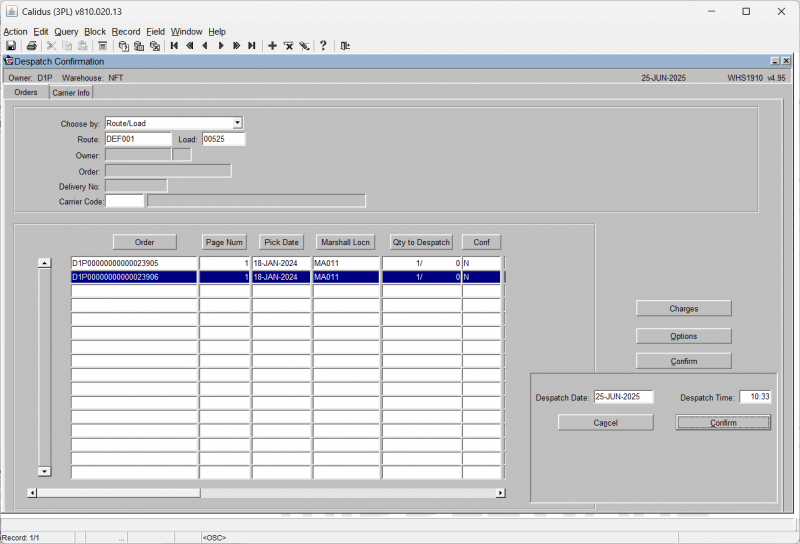
The system will now require a date and time (these can be in the past). If you press the TAB key over each of the fields, the date and time will default to the current system date/time.
Press the Confirm button to confirm the despatch (you can cancel the despatch using the Cancel button). The screen will confirm that despatch confirmation is complete.
The order has now been despatched and will have a system status of 9.

