System Navigation Guide: Difference between revisions
Lwinchester (talk | contribs) |
(Updated to latest version) |
||
| (38 intermediate revisions by 2 users not shown) | |||
| Line 1: | Line 1: | ||
<noinclude> | |||
The purpose of this document is to provide the user with knowledge of how to navigate throughout the | ==INTRODUCTION== | ||
</noinclude> | |||
The purpose of this document is to provide the user with knowledge of how to navigate throughout the ''CALIDUS'' system. This document includes basic navigation of the screen, functionality of Icons and screen layouts. | |||
== | === Logging on === | ||
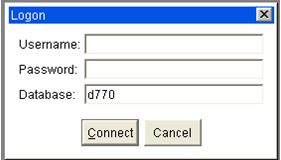
A unique username and password should be set up for logging on. This username can be established by Department, Office and User. This gives the user access to specific data that is required in order to fulfil their role. Enter the username and password at the prompt.<center> | |||
[[File:WMS-Logon.png]] | |||
</center> | |||
==OUTLINE== | |||
The main menu screen is the first screen displayed when the user has logged into the system. The toolbars around the perimeter of the screen are generic throughout the system and provide the user with various options to update, insert, query and display information. | The main menu screen is the first screen displayed when the user has logged into the system. The toolbars around the perimeter of the screen are generic throughout the system and provide the user with various options to update, insert, query and display information. | ||
<center>[[ | <center>[[File:NAV-001a.PNG]]</center> | ||
===Function toolbar === | |||
The purpose of the function toolbar is to allow the user to query, insert, delete and update information. The main applications used are shown as icons on the formatting toolbar. | The purpose of the function toolbar is to allow the user to query, insert, delete and update information. The main applications used are shown as icons on the formatting toolbar. | ||
<center>[[ | <center>[[File:NAV-003.PNG]]</center> | ||
Each function has a list of associated functions attached to it, these can be can be accessed by clicking on them using the mouse or pressing the underlined letter on the keyboard. | Each function has a list of associated functions attached to it, these can be can be accessed by clicking on them using the mouse or pressing the underlined letter on the keyboard. | ||
When the user clicks on a function, a drop-down list of items will show, as below. | |||
*''Action'' | |||
**''Save'' - saves changed data (see below for important information on saving) <code>[CTRL-S]</code> | |||
**''Clear All'' - clears all existing data | |||
**''Print'' - prints the screen | |||
**''Exit'' - exits the screen (however use the exit icon - see below) | |||
*''Edit'' | |||
** ''Cut'' - cuts selected information to be moved elsewhere* | |||
**''Copy'' - makes a copy of selected information* | |||
**''Paste'' - pastes either the cut or copied information to the selected new location* | |||
** ''Edit'' - find and replace function for text | |||
**''Display list'' - produces a list of values for the field that can be selected for the field | |||
*''Query'' | |||
**''Enter'' - used to find existing data using specific parameters (<code>[F11]</code>) | |||
**''Execute'' - asks the system to find data within selected parameters (<code>[CTRL-F11]</code>) | |||
**''Cancel'' - cancels any query that was set up | |||
**''Last criteria'' - retrieves last query | |||
**''Count hits'' - displays quantity of records to search | |||
**''Fetch next set'' - retrieves next set of data | |||
*''Block'' | |||
**''Previous'' - moves cursor to previous block of data | |||
**''Next'' - moves cursor to next block of data | |||
**''Clear'' - clears information in the block of data the cursor is in | |||
*''Record'' | |||
**''Previous'' - displays previous record | |||
**''Next'' - displays next record | |||
**''Page up'' - moves scroll bar up | |||
**''Page down'' - moves scroll bar down | |||
**''First'' - displays first record | |||
**''Last'' - display last record | |||
**''Insert'' - clears data for new record to be inserted | |||
**''Remove'' - deletes data permanently | |||
** ''Duplicate'' - duplicate previous record data in next record for updating purposes | |||
**''Clear'' - clear the record | |||
*''Field'' | |||
**''Previous'' - moves to previous field | |||
** ''Next'' - moves to next field | |||
** ''Clear'' - clears the selected field | |||
**''Duplicate'' - duplicates previous field data in next detail line | |||
*''Help'' | |||
**''Screen Help'' - prompts a help page for the screen | |||
**''Contents and Index'' - N/A | |||
**''Properties'' - displays the properties of the selected field | |||
**''Keys'' - lists the functions keys to use instead of a mouse (<code>[CTRL-K]</code>) | |||
**''Display error'' - display error details on the information bar | |||
**''Display common'' - displays common details about the user and system setting | |||
**''About...'' - web page | |||
===Format Toolbar=== | |||
The formatting toolbar is made up of the most regular functions used in navigating through the system. Icon buttons are displayed for quick access, all the functions are as detailed in the previous section. | |||
<center>[[File:NAV-004.PNG]]</center> | |||
''' | '''From left to right:''' | ||
*'''Save''' - To ensure that any change to data input is saved, even to a single field, you must move out of the last field that you have changed before you exit the screen. If you do not then the system will not recognise the change, even if you hit save. You can move out of the last changed field by either using the enter key, the tab key or by using your mouse to click onto another field. (<code>[CTRL-S]</code>) | |||
*'''Print''' | |||
*'''Cut''' * | |||
*'''Copy''' * | |||
*'''Paste''' * | |||
*'''List of Values (LOV)''' - displays a list of values if there is one (this will be indicated in the status bar). (<code>[CTRL-L]</code>) | |||
* '''Enter a query''' - used to find existing data using specific parameters (<code>[F11]</code>). Note that the colour of the title bar changes to turquoise, denoting that the screen is now in query mode. | |||
*'''Execute a query''' - asks the system to find data within selected parameters (<code>[CTRL-F11]</code>) | |||
*'''Cancel a query''' - cancels any query that was set up. | |||
*'''First record''' - This [First Record] button displays the first record of the database. | |||
*'''Previous page''' - This [Previous Page] button displays the previous page. | |||
* '''Previous record''' - By clicking on this [Previous Record] button you can view the previous record. For example if you are in Order no. PIP00000000000000337 and you click the [Previous record] button then you can view the booking done prior to this Order - in this example, PIP00000000000000336 | |||
*'''Next record''' - This [Next Record] button takes you to the next record. | |||
*'''Next page''' - This [Next Page] button displays the next page. | |||
*'''Last record''' - This [Last Record] button displays the last record of the database. | |||
* '''Insert''' - The purpose of the [Insert Record] button is to help you to insert new record in the system. If you want to add new record then by clicking this [Insert Record] button you can add a new record. | |||
* '''Remove''' - This [Remove Record] button help you to delete a particular record. By clicking on this you can delete the record from the database. | |||
* '''Clear''' - This purpose of this [Clear Record] button is to clear the record from that particular screen. The difference between clear record and the delete record is that delete record will completely delete the record from the database but clear record just clear that record from that particular screen. Clear records can again be retrieved from the database. | |||
*'''Help''' - This [Help] button prompts a help page. | |||
* '''Exit''' - This [Exit] button helps the user to come out of the particular screen (<code>[F4]</code>). Always use the exit door to come out of a screen as opposed to the ‘x’ in the top right hand corner. Using the ‘x’ can cause problems with saving any changes or may even throw you out of the system. | |||
* | {{Note}} Items marked with an asterisk (*) are mainly used in Notepad screens. | ||
''' | ====TO SAVE CHANGES/AMENDMENTS==== | ||
{{Note}} '''To ensure that any change to data input is saved, even to a single field, you must move out of the last field that you have changed before you exit the screen. If you do not then the system will not recognise the change, even if you hit save.''' | |||
You can move out of the last changed field by either using the enter key, the tab key or by using your mouse to click onto another field. | |||
=== Mandatory Fields === | |||
Certain fields within the System are highlighted in yellow. | |||
[[File:WMS-MandatoryField.png]] | |||
These are mandatory fields in which user has to input the details in order to save any new/updated records successfully. | |||
=== Shortcut Keys === | |||
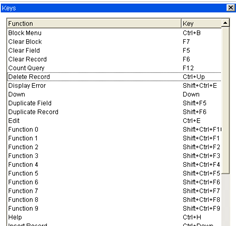
You can access a list of valid keyboard shortcuts can be accessed on-screen by pressing <code>[CTRL-K]</code>.<center> | |||
[[File:WMS-Shortcuts.png]] | |||
</center> | |||
===Title Bar=== | |||
The purpose of the title bar is to tell the user the system parameters that they are working within. | The purpose of the title bar is to tell the user the system parameters that they are working within. | ||
<center>[[File:NAV-007.PNG]]</center> | |||
===Navigation Toolbar=== | |||
=== | |||
The purpose of this toolbar is to help the user navigate through the menu tree options. | The purpose of this toolbar is to help the user navigate through the menu tree options. | ||
<center>[[File:NAV-008.PNG]]</center> | |||
==== Menu Search==== | |||
The purpose of the menu search (screen locator) is to find a screen if you are unsure about where is it located in the menu tree. | |||
When you click on the '''Search''' button, a screen appears which enables you to enter either the screen number or the screen title. The system searches for the screen when the 'execute query' button is pressed and displays the screen details in the information bar underneath. When you click on the detail line you are taken into the screen. | |||
{{Note}}Menu Search will only 'find' screens that are included in the menu trees. It will not 'find' screens that are called from within another screen. | |||
<center>[[File:NAV-009.PNG]]</center> | |||
====Messages==== | |||
The purpose of the message icon is functionally the same as normal e-mail; the screen displays messages received and clicking on the details line or clicking the details button will open up the message. It is not an e-mail function. It will only send mail to other ''CALIDUS'' system users who are included in a valid e-mail list. | |||
The purpose of the message icon is functionally the same as normal e-mail; the screen displays messages received and clicking on the details line or clicking the details button will open up the message. It is not an e-mail function. It will only send mail to other | |||
The filter is used to specify what the user wants to do; | The filter is used to specify what the user wants to do; | ||
* To compile a message, select new from the filter or click on the new button | * To compile a message, select new from the filter or click on the new button | ||
* To read received mail, select received from the filter (a message is received when the message button is yellow instead of white). | *To read received mail, select received from the filter (a message is received when the message button is yellow instead of white). | ||
* To view deleted messages, select deleted from the filter | * To view deleted messages, select deleted from the filter | ||
* To check if a message has been read, select outgoing from the filter | *To check if a message has been read, select outgoing from the filter | ||
<center>[[File:NAV-010.PNG]]</center> | |||
The purpose of the main menu screen is to allow the user access to the required screen. The tree menu structure | ===Tree Structures=== | ||
The purpose of the main menu screen is to allow the user access to the required screen. The tree menu structure is designed to allow the user to access the screens logically and quickly. The menus are configurable and can be customised as required. See [[Menu Maintenance]] for more details. | |||
All information is stored in yellow file folders to the left of the screen, if the folder has a plus sign to the left of it, then there are more folders associated with it. | All information is stored in yellow file folders to the left of the screen, if the folder has a plus sign to the left of it, then there are more folders associated with it. | ||
When the folder is selected the icon shows that it is open, all the screens associated with the folder header are detailed on the right of the screen and can be accessed by clicking on the screen title. | When the folder is selected the icon shows that it is open, all the screens associated with the folder header are detailed on the right of the screen and can be accessed by clicking on the screen title. | ||
*Click on the plus sign or the yellow folder to expand the tree and show the associated folders. | |||
*Click on the minus sign to collapse the tree back to the main folder. | |||
Instead of using the mouse the user can use ‘hot keys’ to navigate the menu by using the <code>TAB</code> key and then the <code>[UP]</code>/<code>[DOWN]</code> arrows to navigate the left and right screen panels. He can then hit the <code>[ENTER]</code> key to access a particular screen. | |||
<center>[[File:NAV-011.PNG]]</center> | |||
===Information Bar=== | |||
The purpose of the information bar is to provide details to the user of what the status of the screen is, i.e. executing a query, loading a new screen, or, what functions are available for the selected field. | The purpose of the information bar is to provide details to the user of what the status of the screen is, i.e. executing a query, loading a new screen, or, what functions are available for the selected field. | ||
'''Status of the screen''' | |||
<center>[[File:NAV-012.PNG]]</center> | |||
===Querying Records === | |||
The purpose of querying records is to search, locate and display information quickly rather than paging through information. | |||
To enter a query the user can either clicks on the [Enter Query] button on the formatting toolbar or press <code>[F11]</code> on the keyboard. The user will know that they are in ‘enter query’ mode when the title bar will change colour and the information bar will have a query message displayed on it. | |||
The user then enters the information they wish to query i.e. a booking reference and clicks on the [Execute Query] button on the formatting toolbar or <code>[CTRL-F11]</code> on the keyboard. The system will then display the relevant record and the title bar and information bar will return back to normal. | |||
The [Cancel Query] button will clear any query information that is on the screen to allow the user to enter new query details. User can also press <code>[F4]</code> to cancel query. | |||
<center>[[File:NAV-013.PNG]]</center> | |||
===List of Values (LOV)=== | |||
The purpose of a list of values is to provide the user with associated information attached to a specific field. The mandatory or main information fields will usually have a LOV attached to it. This is shown in the information bar at the bottom of the screen. <code>[CTRL-L]</code> | |||
For example, Currency Code will have a LOV of existing Currency Codes | |||
<center>[[File:NAV-014.PNG]]</center> | |||
==== Partial LOV ==== | |||
The purpose of a partial LOV is to be specific about the data the user wishes to retrieve, | |||
For example, a user wishes to enter a warehouse code for Liverpool | |||
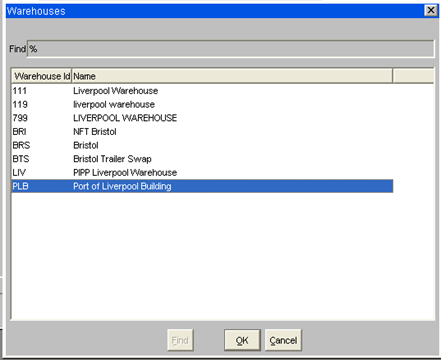
The user enters the first 2 letter of the code then clicks on the LOV icon on the formatting toolbar or keys <code>[CTRL-L].</code> This action pulls up the LOV but is filtered straight to warehouse code beginning with LI. <center> | |||
[[File:WMS-PartialLOV.png]] | |||
</center>The user can select the required data from the list displayed by highlighting the detail line and clicking on the '''OK''' button. | |||
The scroll bar on the right of the LOV allows the user to look throughout the list of information. | |||
The find field at the top of the LOV can be entered into and more specific data can be added and filtered using the '''Find''' button. | |||
{{Note}}The percentage sign <code>%</code> is a programming key that tells the system to find all information containing text within the parameters. This key can be entered either in the field before the LOV is displayed to go to specific information direct or entry can be made after the LOV is displayed i.e. %OL will display all codes ending in OL. | |||
===Screen Buttons === | |||
The purpose of screen buttons are to access additional relevant screens from the screen the user is currently working in. This saves the user from having to exit back to the main menu screen to enter more details. | |||
For example, the Pick Confirmation screen has various buttons to help the user to enter direct information about the order, - Details, Order Notes etc | |||
When a button is pressed the called screen is displayed on top of the existing screen. When exiting the called screen, the user will be returned to the calling screen. | |||
<center>[[File:WHS1714-AddOptions.png |800px]]</center> | |||
=== Tabs === | |||
Tabs are another way of grouping information. | |||
Different groups of data can be accessed from one single screen with the help of tabs. | |||
Like on this Stock Maintenance screen.<center>[[File:st-005.PNG |800px| Stock Maintenance ]]</center> | |||
=== Multiple Screen Access === | |||
User can toggle between the two or more screens with the help of <code>[CTRL-TAB]</code> buttons on the keyboard, or using the Window option on the top toolbar.<center> | |||
[[File:WMS-Windows.png]] | |||
</center> | |||
===Right Click Function=== | |||
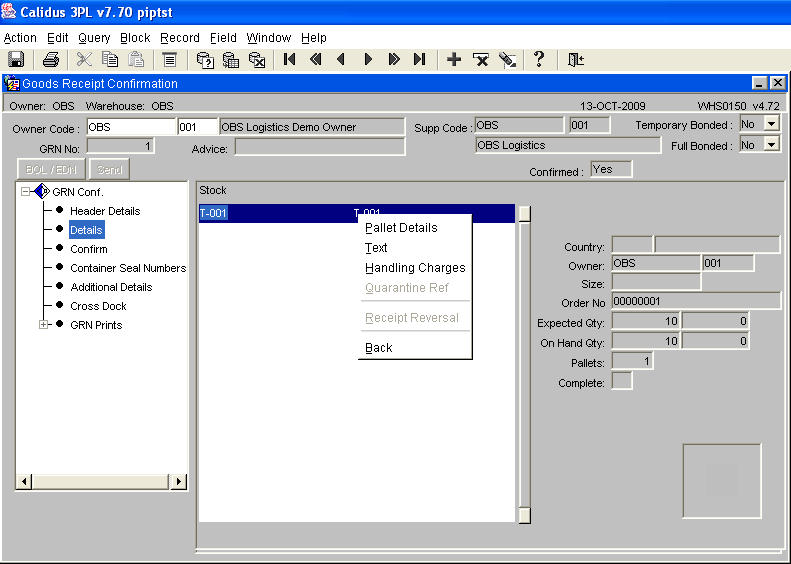
On certain screens it is possible to use a right mouse click (or the right click/list key on the keyboard) to call a panel of options. For example, on the Goods Receipt Confirmation screen (WHS01501), the right click function is used on the stock code line to call a panel of options. | |||
<center>[[File:NAV-0016.PNG]]</center> | |||
Latest revision as of 13:04, 4 July 2025
INTRODUCTION
The purpose of this document is to provide the user with knowledge of how to navigate throughout the CALIDUS system. This document includes basic navigation of the screen, functionality of Icons and screen layouts.
Logging on
A unique username and password should be set up for logging on. This username can be established by Department, Office and User. This gives the user access to specific data that is required in order to fulfil their role. Enter the username and password at the prompt.
OUTLINE
The main menu screen is the first screen displayed when the user has logged into the system. The toolbars around the perimeter of the screen are generic throughout the system and provide the user with various options to update, insert, query and display information.
Function toolbar
The purpose of the function toolbar is to allow the user to query, insert, delete and update information. The main applications used are shown as icons on the formatting toolbar.
Each function has a list of associated functions attached to it, these can be can be accessed by clicking on them using the mouse or pressing the underlined letter on the keyboard.
When the user clicks on a function, a drop-down list of items will show, as below.
- Action
- Save - saves changed data (see below for important information on saving)
[CTRL-S] - Clear All - clears all existing data
- Print - prints the screen
- Exit - exits the screen (however use the exit icon - see below)
- Save - saves changed data (see below for important information on saving)
- Edit
- Cut - cuts selected information to be moved elsewhere*
- Copy - makes a copy of selected information*
- Paste - pastes either the cut or copied information to the selected new location*
- Edit - find and replace function for text
- Display list - produces a list of values for the field that can be selected for the field
- Query
- Enter - used to find existing data using specific parameters (
[F11]) - Execute - asks the system to find data within selected parameters (
[CTRL-F11]) - Cancel - cancels any query that was set up
- Last criteria - retrieves last query
- Count hits - displays quantity of records to search
- Fetch next set - retrieves next set of data
- Enter - used to find existing data using specific parameters (
- Block
- Previous - moves cursor to previous block of data
- Next - moves cursor to next block of data
- Clear - clears information in the block of data the cursor is in
- Record
- Previous - displays previous record
- Next - displays next record
- Page up - moves scroll bar up
- Page down - moves scroll bar down
- First - displays first record
- Last - display last record
- Insert - clears data for new record to be inserted
- Remove - deletes data permanently
- Duplicate - duplicate previous record data in next record for updating purposes
- Clear - clear the record
- Field
- Previous - moves to previous field
- Next - moves to next field
- Clear - clears the selected field
- Duplicate - duplicates previous field data in next detail line
- Help
- Screen Help - prompts a help page for the screen
- Contents and Index - N/A
- Properties - displays the properties of the selected field
- Keys - lists the functions keys to use instead of a mouse (
[CTRL-K]) - Display error - display error details on the information bar
- Display common - displays common details about the user and system setting
- About... - web page
Format Toolbar
The formatting toolbar is made up of the most regular functions used in navigating through the system. Icon buttons are displayed for quick access, all the functions are as detailed in the previous section.
From left to right:
- Save - To ensure that any change to data input is saved, even to a single field, you must move out of the last field that you have changed before you exit the screen. If you do not then the system will not recognise the change, even if you hit save. You can move out of the last changed field by either using the enter key, the tab key or by using your mouse to click onto another field. (
[CTRL-S]) - Cut *
- Copy *
- Paste *
- List of Values (LOV) - displays a list of values if there is one (this will be indicated in the status bar). (
[CTRL-L]) - Enter a query - used to find existing data using specific parameters (
[F11]). Note that the colour of the title bar changes to turquoise, denoting that the screen is now in query mode. - Execute a query - asks the system to find data within selected parameters (
[CTRL-F11]) - Cancel a query - cancels any query that was set up.
- First record - This [First Record] button displays the first record of the database.
- Previous page - This [Previous Page] button displays the previous page.
- Previous record - By clicking on this [Previous Record] button you can view the previous record. For example if you are in Order no. PIP00000000000000337 and you click the [Previous record] button then you can view the booking done prior to this Order - in this example, PIP00000000000000336
- Next record - This [Next Record] button takes you to the next record.
- Next page - This [Next Page] button displays the next page.
- Last record - This [Last Record] button displays the last record of the database.
- Insert - The purpose of the [Insert Record] button is to help you to insert new record in the system. If you want to add new record then by clicking this [Insert Record] button you can add a new record.
- Remove - This [Remove Record] button help you to delete a particular record. By clicking on this you can delete the record from the database.
- Clear - This purpose of this [Clear Record] button is to clear the record from that particular screen. The difference between clear record and the delete record is that delete record will completely delete the record from the database but clear record just clear that record from that particular screen. Clear records can again be retrieved from the database.
- Help - This [Help] button prompts a help page.
- Exit - This [Exit] button helps the user to come out of the particular screen (
[F4]). Always use the exit door to come out of a screen as opposed to the ‘x’ in the top right hand corner. Using the ‘x’ can cause problems with saving any changes or may even throw you out of the system.
![]() Note: Items marked with an asterisk (*) are mainly used in Notepad screens.
Note: Items marked with an asterisk (*) are mainly used in Notepad screens.
TO SAVE CHANGES/AMENDMENTS
![]() Note: To ensure that any change to data input is saved, even to a single field, you must move out of the last field that you have changed before you exit the screen. If you do not then the system will not recognise the change, even if you hit save.
Note: To ensure that any change to data input is saved, even to a single field, you must move out of the last field that you have changed before you exit the screen. If you do not then the system will not recognise the change, even if you hit save.
You can move out of the last changed field by either using the enter key, the tab key or by using your mouse to click onto another field.
Mandatory Fields
Certain fields within the System are highlighted in yellow.
These are mandatory fields in which user has to input the details in order to save any new/updated records successfully.
Shortcut Keys
You can access a list of valid keyboard shortcuts can be accessed on-screen by pressing [CTRL-K].
Title Bar
The purpose of the title bar is to tell the user the system parameters that they are working within.

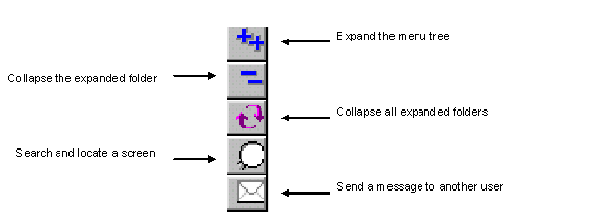
The purpose of this toolbar is to help the user navigate through the menu tree options.
Menu Search
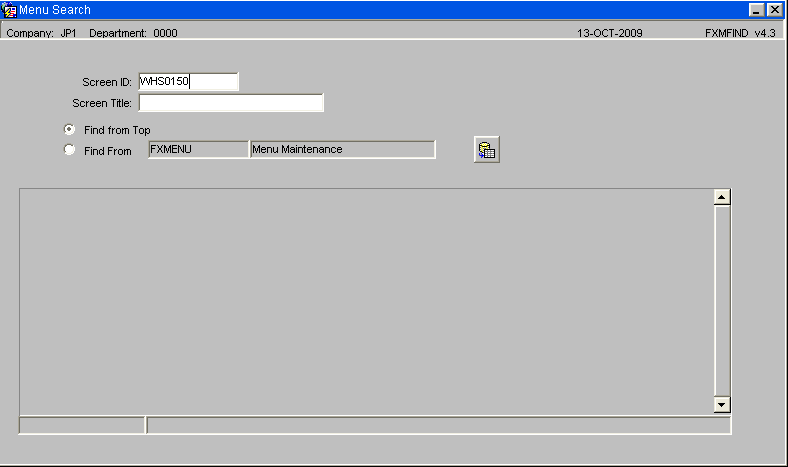
The purpose of the menu search (screen locator) is to find a screen if you are unsure about where is it located in the menu tree.
When you click on the Search button, a screen appears which enables you to enter either the screen number or the screen title. The system searches for the screen when the 'execute query' button is pressed and displays the screen details in the information bar underneath. When you click on the detail line you are taken into the screen.
![]() Note: Menu Search will only 'find' screens that are included in the menu trees. It will not 'find' screens that are called from within another screen.
Note: Menu Search will only 'find' screens that are included in the menu trees. It will not 'find' screens that are called from within another screen.
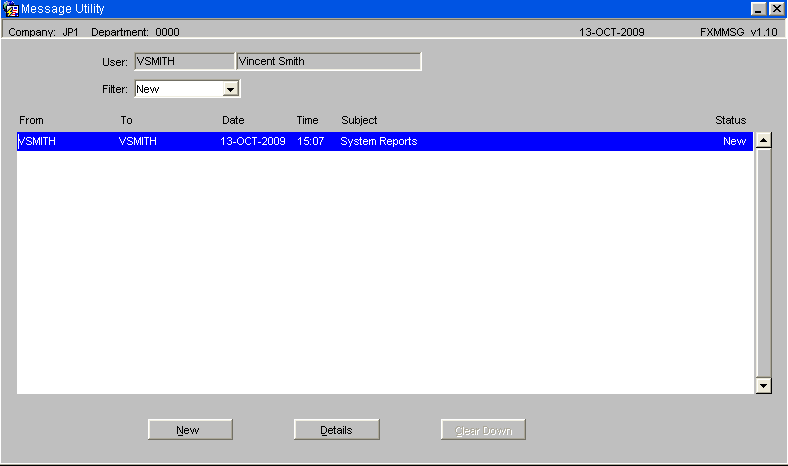
Messages
The purpose of the message icon is functionally the same as normal e-mail; the screen displays messages received and clicking on the details line or clicking the details button will open up the message. It is not an e-mail function. It will only send mail to other CALIDUS system users who are included in a valid e-mail list.
The filter is used to specify what the user wants to do;
- To compile a message, select new from the filter or click on the new button
- To read received mail, select received from the filter (a message is received when the message button is yellow instead of white).
- To view deleted messages, select deleted from the filter
- To check if a message has been read, select outgoing from the filter
Tree Structures
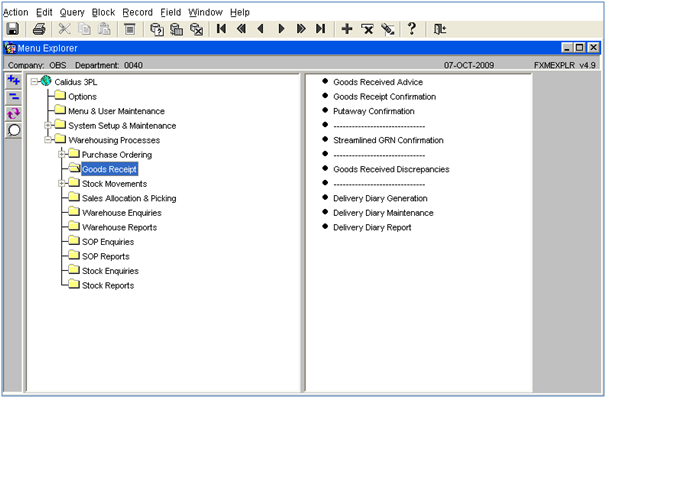
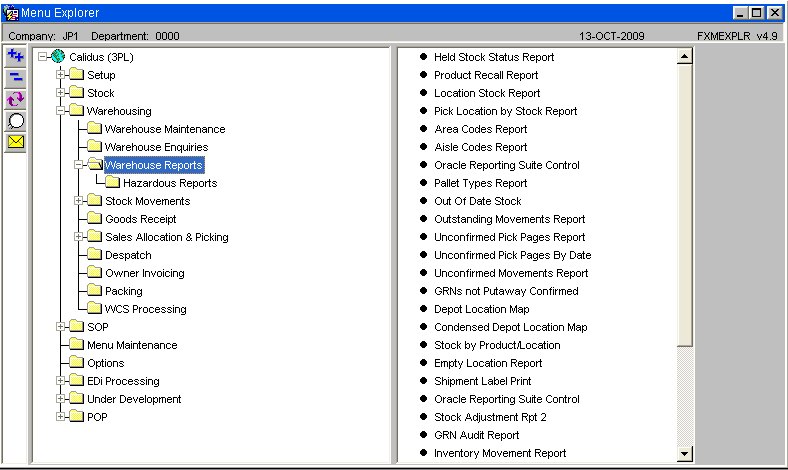
The purpose of the main menu screen is to allow the user access to the required screen. The tree menu structure is designed to allow the user to access the screens logically and quickly. The menus are configurable and can be customised as required. See Menu Maintenance for more details.
All information is stored in yellow file folders to the left of the screen, if the folder has a plus sign to the left of it, then there are more folders associated with it.
When the folder is selected the icon shows that it is open, all the screens associated with the folder header are detailed on the right of the screen and can be accessed by clicking on the screen title.
- Click on the plus sign or the yellow folder to expand the tree and show the associated folders.
- Click on the minus sign to collapse the tree back to the main folder.
Instead of using the mouse the user can use ‘hot keys’ to navigate the menu by using the TAB key and then the [UP]/[DOWN] arrows to navigate the left and right screen panels. He can then hit the [ENTER] key to access a particular screen.
Information Bar
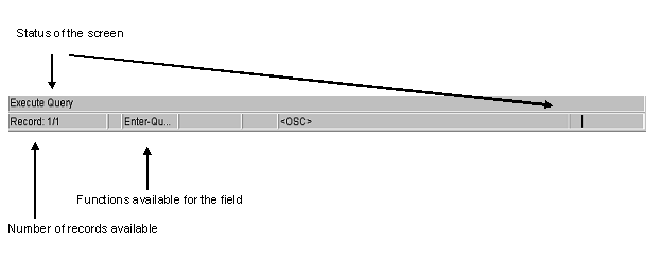
The purpose of the information bar is to provide details to the user of what the status of the screen is, i.e. executing a query, loading a new screen, or, what functions are available for the selected field.
Status of the screen
Querying Records
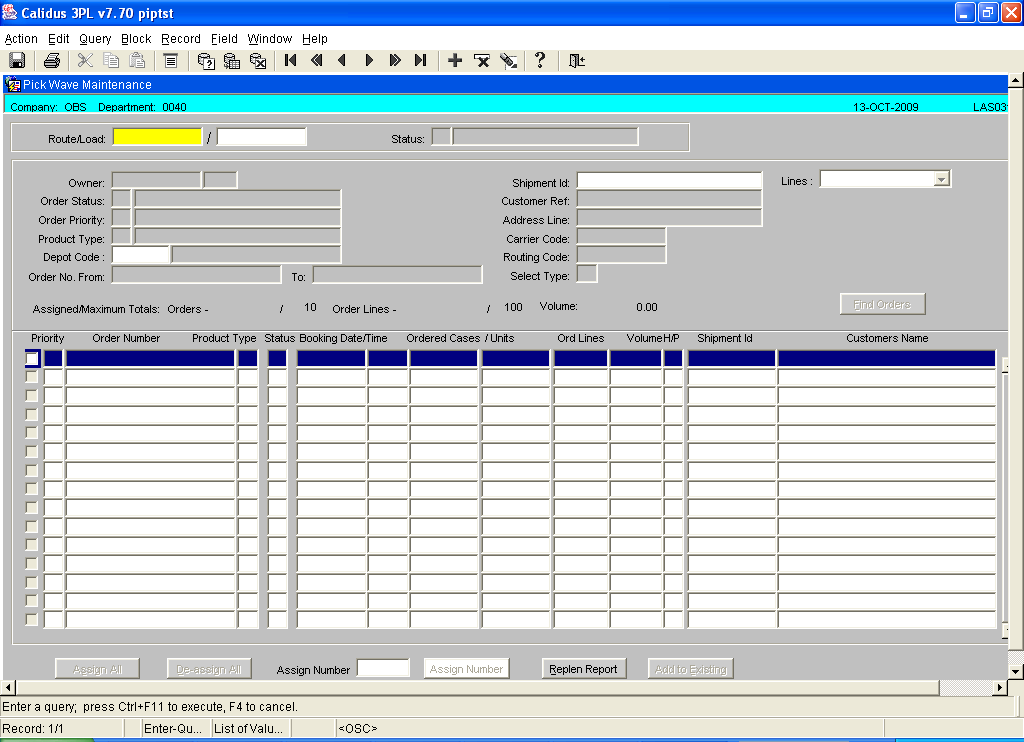
The purpose of querying records is to search, locate and display information quickly rather than paging through information.
To enter a query the user can either clicks on the [Enter Query] button on the formatting toolbar or press [F11] on the keyboard. The user will know that they are in ‘enter query’ mode when the title bar will change colour and the information bar will have a query message displayed on it.
The user then enters the information they wish to query i.e. a booking reference and clicks on the [Execute Query] button on the formatting toolbar or [CTRL-F11] on the keyboard. The system will then display the relevant record and the title bar and information bar will return back to normal.
The [Cancel Query] button will clear any query information that is on the screen to allow the user to enter new query details. User can also press [F4] to cancel query.
List of Values (LOV)
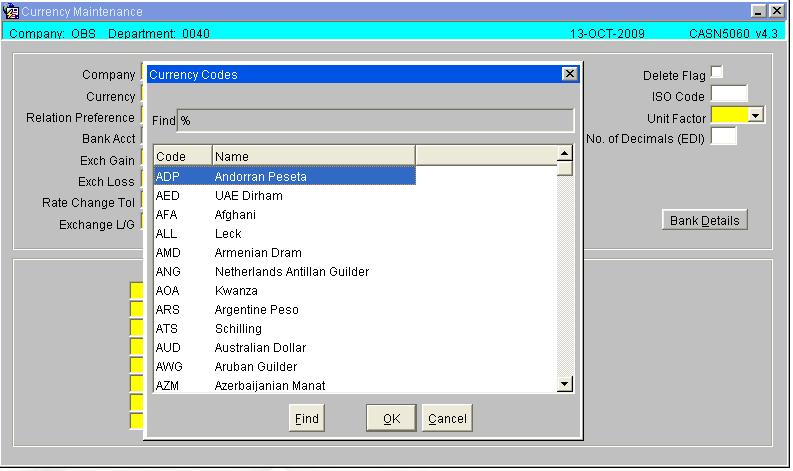
The purpose of a list of values is to provide the user with associated information attached to a specific field. The mandatory or main information fields will usually have a LOV attached to it. This is shown in the information bar at the bottom of the screen. [CTRL-L]
For example, Currency Code will have a LOV of existing Currency Codes
Partial LOV
The purpose of a partial LOV is to be specific about the data the user wishes to retrieve,
For example, a user wishes to enter a warehouse code for Liverpool
The user enters the first 2 letter of the code then clicks on the LOV icon on the formatting toolbar or keys [CTRL-L]. This action pulls up the LOV but is filtered straight to warehouse code beginning with LI.
The user can select the required data from the list displayed by highlighting the detail line and clicking on the OK button.
The scroll bar on the right of the LOV allows the user to look throughout the list of information.
The find field at the top of the LOV can be entered into and more specific data can be added and filtered using the Find button.
![]() Note: The percentage sign
Note: The percentage sign % is a programming key that tells the system to find all information containing text within the parameters. This key can be entered either in the field before the LOV is displayed to go to specific information direct or entry can be made after the LOV is displayed i.e. %OL will display all codes ending in OL.
Screen Buttons
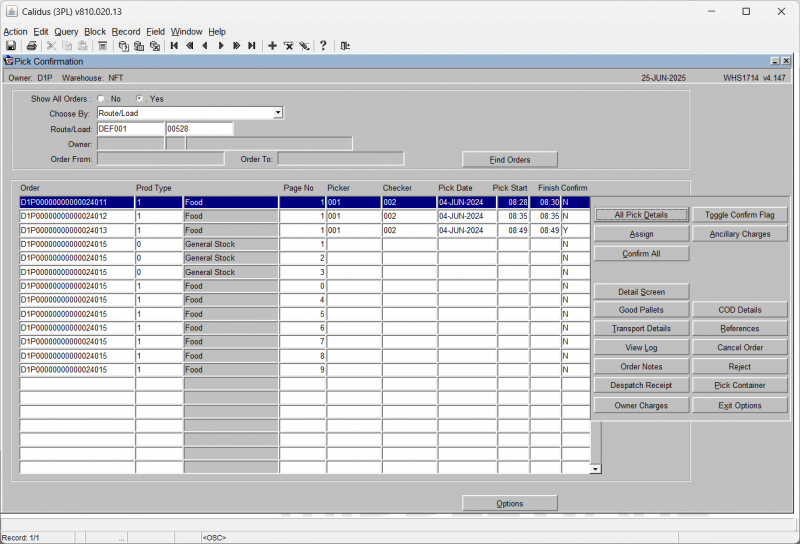
The purpose of screen buttons are to access additional relevant screens from the screen the user is currently working in. This saves the user from having to exit back to the main menu screen to enter more details.
For example, the Pick Confirmation screen has various buttons to help the user to enter direct information about the order, - Details, Order Notes etc
When a button is pressed the called screen is displayed on top of the existing screen. When exiting the called screen, the user will be returned to the calling screen.
Tabs
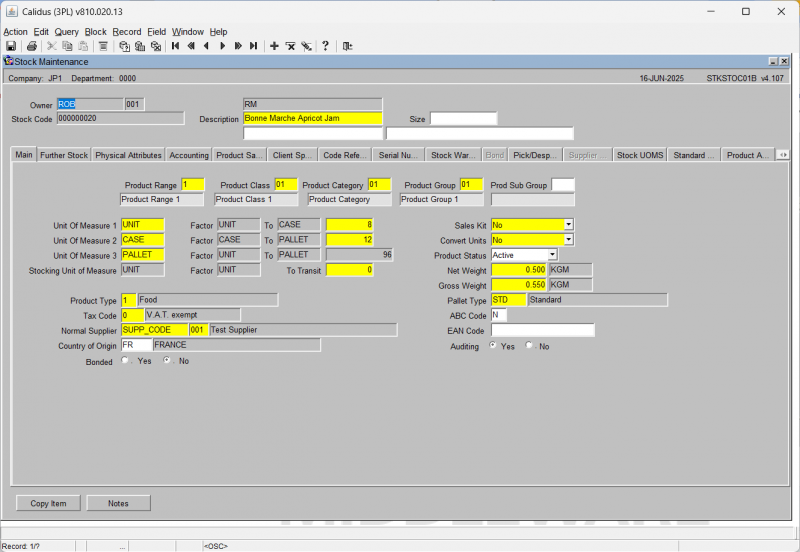
Tabs are another way of grouping information.
Different groups of data can be accessed from one single screen with the help of tabs.
Like on this Stock Maintenance screen.
Multiple Screen Access
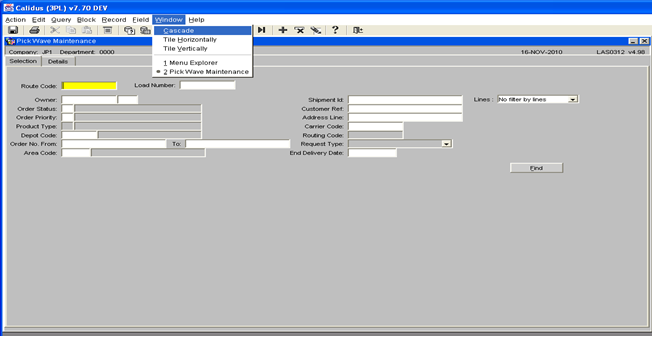
User can toggle between the two or more screens with the help of [CTRL-TAB] buttons on the keyboard, or using the Window option on the top toolbar.
Right Click Function
On certain screens it is possible to use a right mouse click (or the right click/list key on the keyboard) to call a panel of options. For example, on the Goods Receipt Confirmation screen (WHS01501), the right click function is used on the stock code line to call a panel of options.
