WHSORA010: Difference between revisions
From WMS
(Updated to latest version) |
m (Minor formatting change) |
||
| Line 11: | Line 11: | ||
[[Image:sop_alloc.png]] | [[Image:sop_alloc.png|800px]] | ||
{| class="wikitable" align="center" border="1" | {| class="wikitable" align="center" border="1" | ||
Revision as of 13:14, 24 June 2025
To enable an order to be processed through the warehouse, the first step is to allocate stock to the order placed.
Allocation can be organised by a route/load number, by a specific order number or, by a range of order numbers.
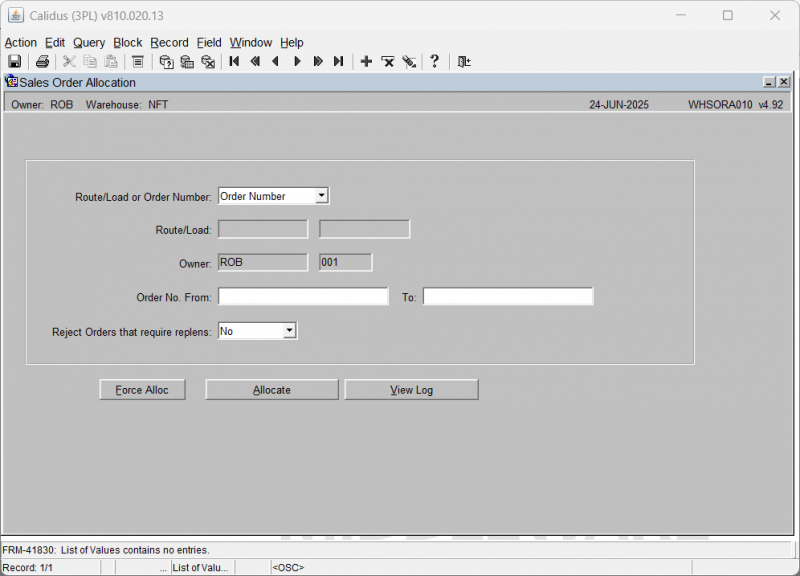
The following screen details the information required to enable the allocation process to begin. You may also generate a pick list from here.
![]() Note: The sequence in which stock is allocated is governed by the allocation rules as set up in Owner Maintenance.
Note: The sequence in which stock is allocated is governed by the allocation rules as set up in Owner Maintenance.
| Field Name | Description | Options |
|---|---|---|
| Route/Load or Order Number | Selection method dependent on how orders are allocated. | Note, as pick wave has the ability to allocate from its own screen, allocation will very rarely happen from here for a route/load. |
| Route/Load | If Route/Load is the selected method, enter the route and load number here. This option will disable Order Number From / To entry. | LOVs are available. |
| Owner | If Order Number is the selected method, enter the owner code. This option will disable Route / Load entry. | May default according to user profile; otherwise select. |
| Order Number From / To | Enter either a range of orders or a single order | LOV available |
| Reject Orders that require Replens | Whether orders that require replenishment moves will not be allocated in this run. | DDL, Options No (the default) or Yes |
| Buttons | ||
| Allocate | Starts the Allocation process | |
| View Log | Allows the user to view a log file of the allocation process. The log file can be automatically sent to screen or called via the button. The options are controlled in Warehouse Set Up and Owner Ware Parameters | |
| Force Alloc | ||
