Medical/Serial Numbers
Medical Numbers & Temperature Monitoring
INTRODUCTION
This document describes the required screens to be used in the Medical numbers configuration and processes. Other guides describe the set up of company, user, warehouse, stock etc.
This is a generic guide based on the version of the SCE system at the time of writing.
It can also be used by clients to specify their specific data values to aid initial system set up as well as for future reference.
Note that fields marked ‘**’ are mandatory and are needed to ensure correct set up of the system.
SET-UP
Note – Within the contents of this document both Serial and Medical Numbers are one and the same.
Pre-requisites (Owner Maintenance Setup)
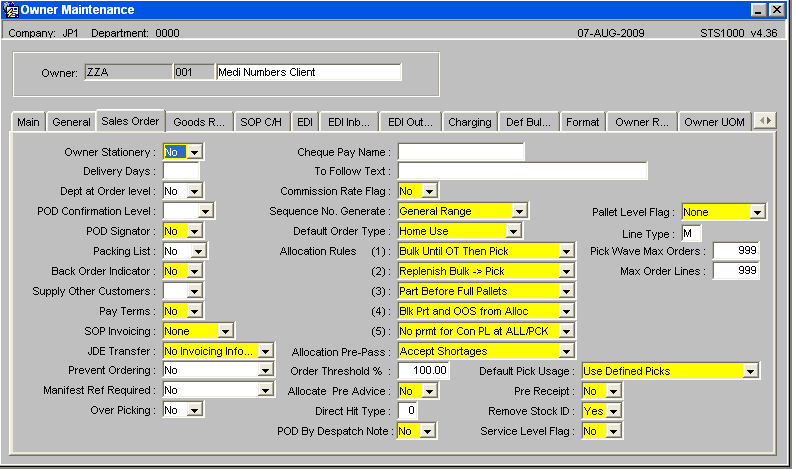
Set Line Type to equal ‘M’ this will force the entry of medical numbers at order entry, Note that the user has the ability to override the default order line type at order entry if entry by batch / expiry is required. If this is done, med number entry will not be forced and the user will be forced to enter the batch / expiry.
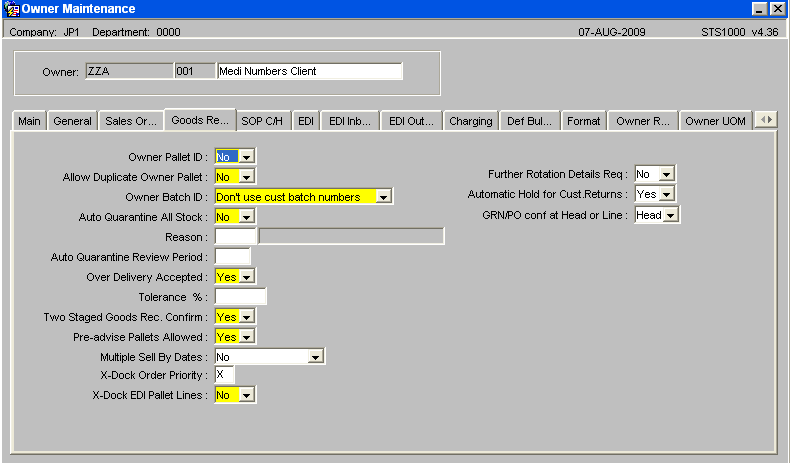
Set Pre-Advise Pallets Allowed field to ‘Yes’ this will allow the entry of serial numbers at the pre-advice stage.
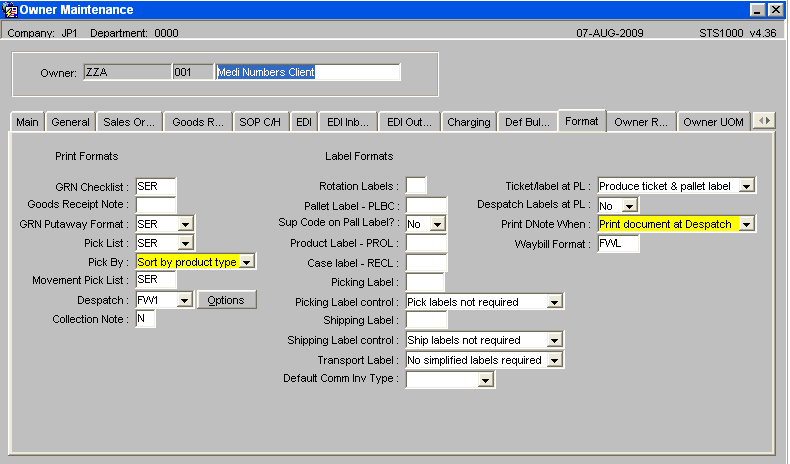
For medical numbers to be either displayed or entered on to WMS documentation the associated formats require updating with a value of SER.
Documents include – GRN Checklist, GRN Putaway Note, Pick Note and Movement Note
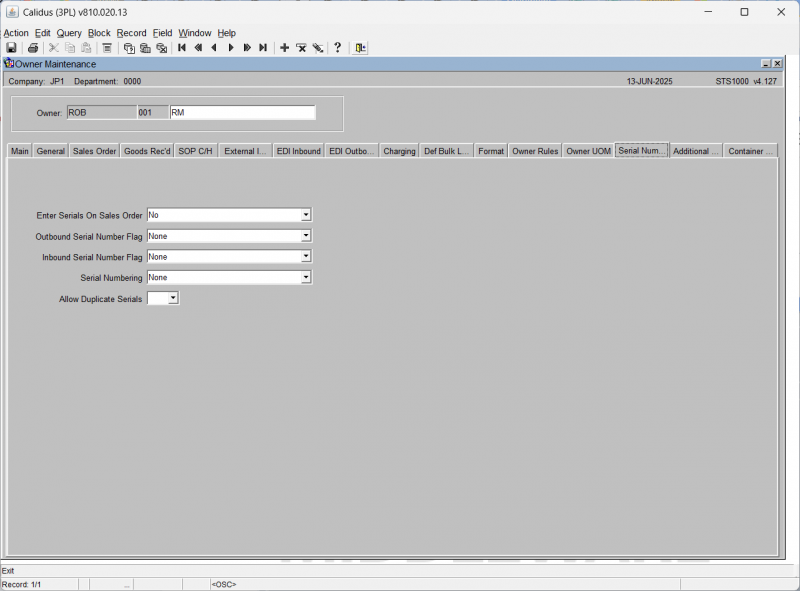
Values
Enter Serials on Sales Order
| No | (0) | Serial numbers not required at order entry |
| Optional allow held serials | (1) | Entry of serial numbers at order entry is optional (Free and held serial numbers can be entered) |
| Mandatory allow held serials | (2) | Entry of serial numbers at order entry is mandatory (Free and held serial numbers can be entered ) |
| Optional allow free serials | (3) | Entry of serial numbers at order entry is optional (Only free serial numbers can be entered) |
| Mandatory allow free serials | (4) | Entry of serial numbers at order entry is mandatory (Only free serial numbers can be entered) |
Ordering of held stock is currently done by using a line type R. For Medical Number functionality all ordering - both for free and held stock - will now be done through line type M functionality
Outbound Serial Number Flag
| None | (0) |
| Capture at Pick | (1) |
| Capture Latest at Pack | (2) |
| Capture Latest at Despatch | (3) |
| Capture Latest at POD | (4) |
Inbound Serial Number Flag
| Not required | Serial numbers are not required at Goods Receipt |
| Optional at Pre advice | This option should be used if serial numbers are to be entered at either pre advice or receipt confirm stage. |
| Mandatory at Pre advice | This option will be used if serial numbers are mandatory at the pre advice stage, and only displayed in the goods receipt confirmation screen. |
Serial Numbering
| None | Serial numbering is not required for this Owner / Stock code. |
| Case | Serial numbering is required for this stock code. 1 serial number is expected for every case. |
| Unit | Serial numbering is required for this stock code. 1 serial number is expected for every unit |
Owner Rules
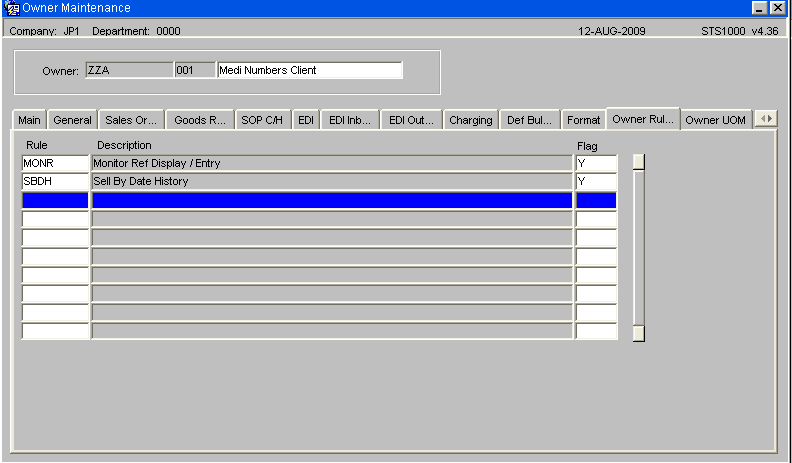
| MONR | Monitor Reference Display and Entry Y - Monitor references can be entered at both goods receipt and packing G- Monitor references can be entered at goods receipt only P- Monitor references can be entered at packing only |
| SBDH | Sell by Date History Y- To write a transactional record |
System Registry Settings
For any discrepancies between serial numbers entered at Pre-Advice and Goods Receipt Confirmation require a password to authorise any changes.
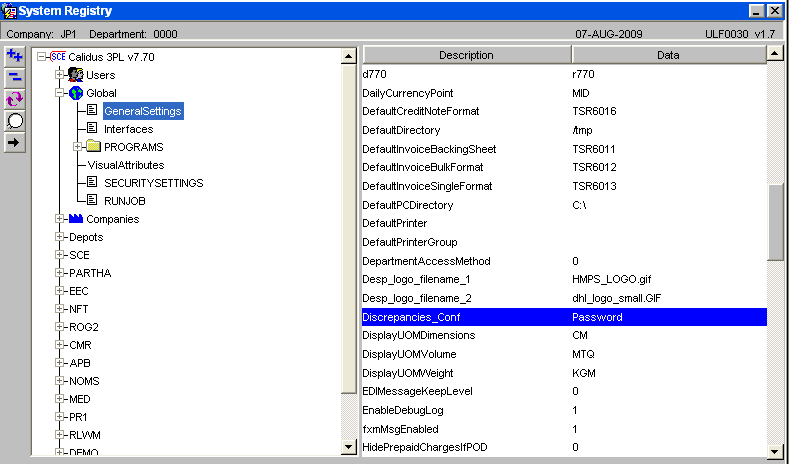
Stock Codes
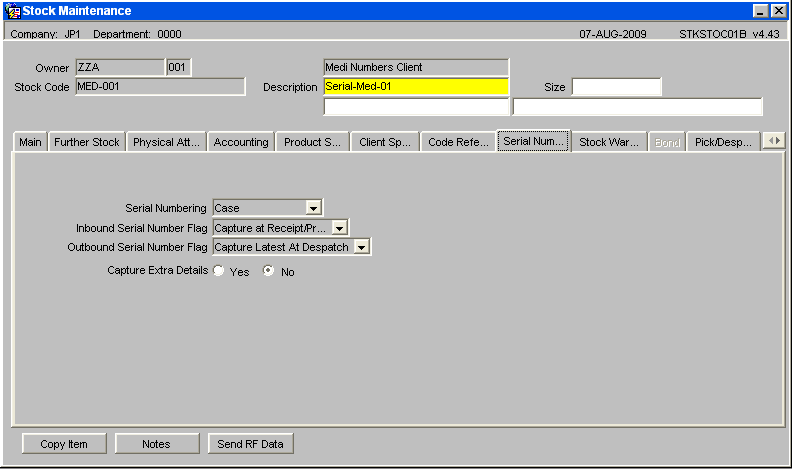
Serial Numbering
| None | Serial numbering is not required for this Owner / Stock code. |
| Case | Serial numbering is required for this stock code. 1 serial number is expected for every case. |
| Unit | Serial numbering is required for this stock code. 1 serial number is expected for every unit |
Inbound Serial Number Flag
| Not required | Serial numbers are not required at Goods Receipt |
| Capture at Receipt | This option will be used if serial numbers are mandatory at the goods receipt confirmation screen. |
| Capture at Receipt/Pre advice | This option should be used if serial numbers are to be entered at either pre advice or receipt confirms stage. |
Outbound Serial Number Flag
| None | (0) |
| Capture at Pick | (1) |
| Capture Latest at Pack | (2) |
| Capture Latest at Despatch | (3) |
| Capture Latest at POD | (4) |
Note – Capture Extra Details is not required for this process
Pack Parameter Maintenance – WHS1944
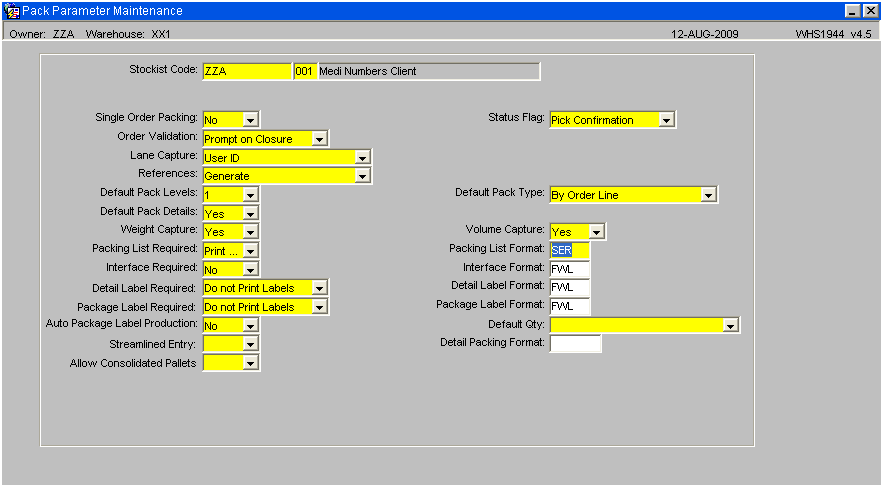
To print serial/medical numbers on the pack list – set the format to SER
Transaction Type
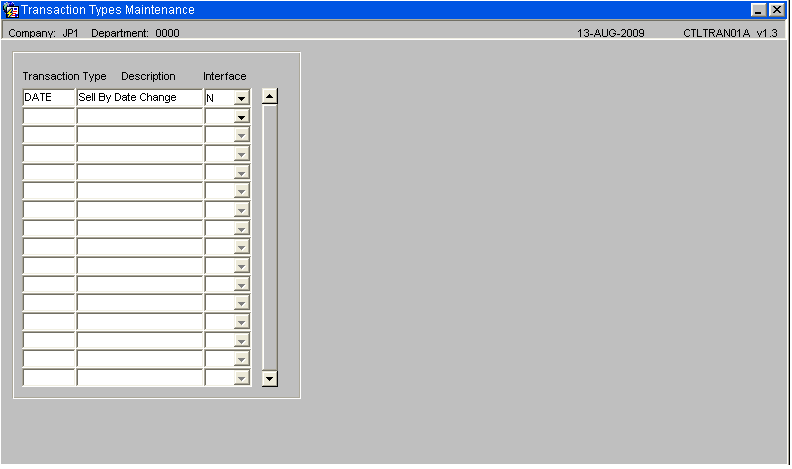
For tracking rework items and the change of sell by date, the new transaction type, ‘DATE’, for the ‘Sell by Date’ history transactions, will need to be entered on the transaction type’s maintenance screen.
PROCESSES
Goods In
Goods Receipt Pre Advice
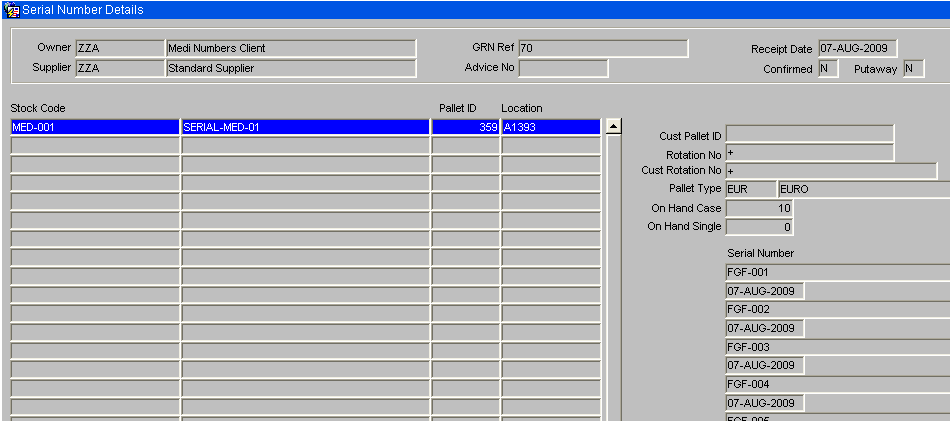
The Goods receipt pre-advice detail screen has a tab button to allow entry of pallet details at the pre-advice stage. When pallet details are entered, if the owner/ stock code is set for inbound serial number entry at pre-advice, then the serial number entry screen will be automatically called. Serial numbers can then be entered at this stage, if required. If serial numbers are not available, at this time, then the serial number entry can be skipped and entered at receipt confirmation.
A new tab button will be included ‘Serials’ on the screen below, which will re-call the serial number entry screen to allow corrections to be done to the entered serial numbers.
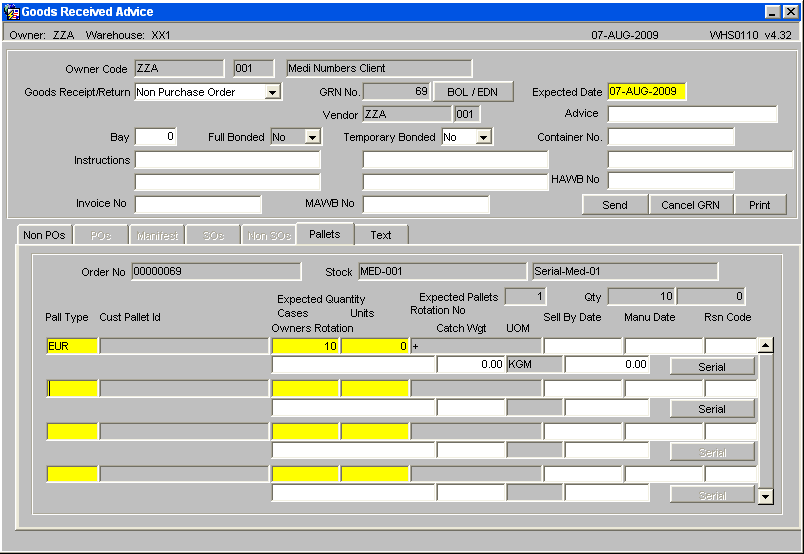
After entering the relevant pallet details select the Serial button which will call form WHS0200 where serial numbers can be generated or entered.
WHS0200 – Medical Number Entry
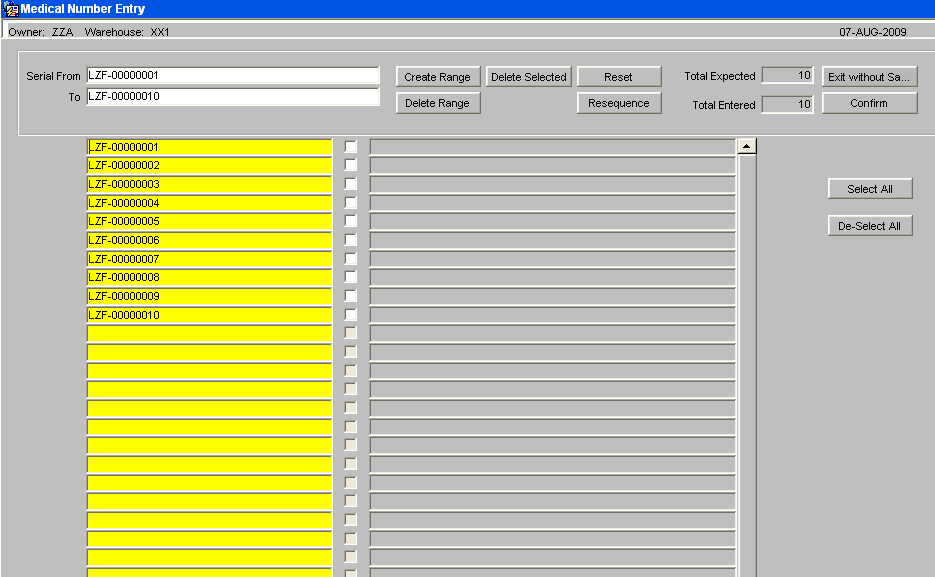
The serial numbers can be entered by entering a range of serial numbers and then using the ‘Create Range’ button or by entering individual serial numbers.
The Tick boxes can be used to select serial numbers. A total expected and a total entered will display the total serial numbers entered.
This screen will include a scrollbar and display a single column of serial numbers. This will allow us to display error messages next to any serial numbers that fail validation. The new screen layout is displayed above.
Button functionality
| Create Range | To create a range of serial numbers. |
| Delete Range | To delete a range of serial number. |
| Delete Selected | To delete any selected serial numbers. |
| Re-sequence | To re-sequence the serial numbers into numeric sequence. |
| Reset | To restore the original set of serial numbers. |
| Confirm | To confirm all serial numbers have been entered and return to the calling screen. |
WHR0110_SER Blind Check Sheet
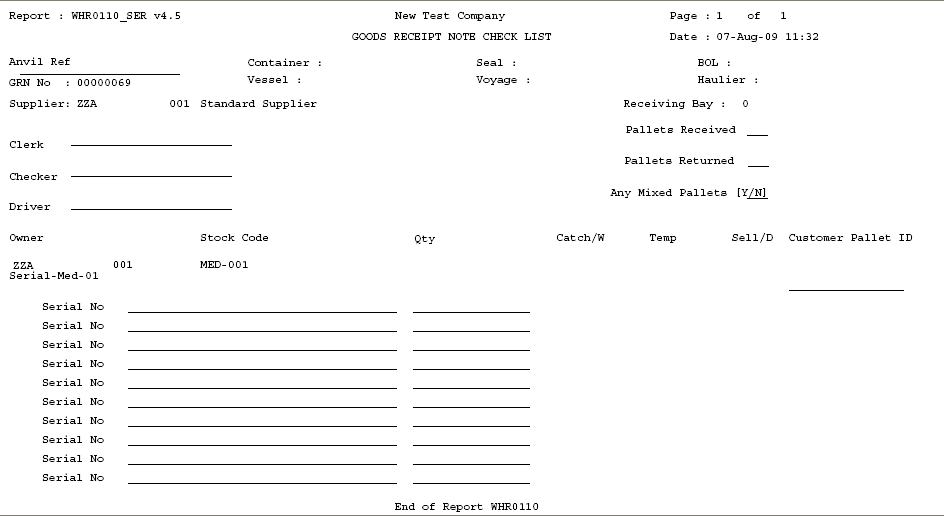
The number of expected serial numbers will be either the number of units or the number of cases depending upon the owner/stock code set-up.
A line of dashes, ‘_____________________’, will be printed for each expected serial number.
Goods Receipt Confirmation – Pallet Details
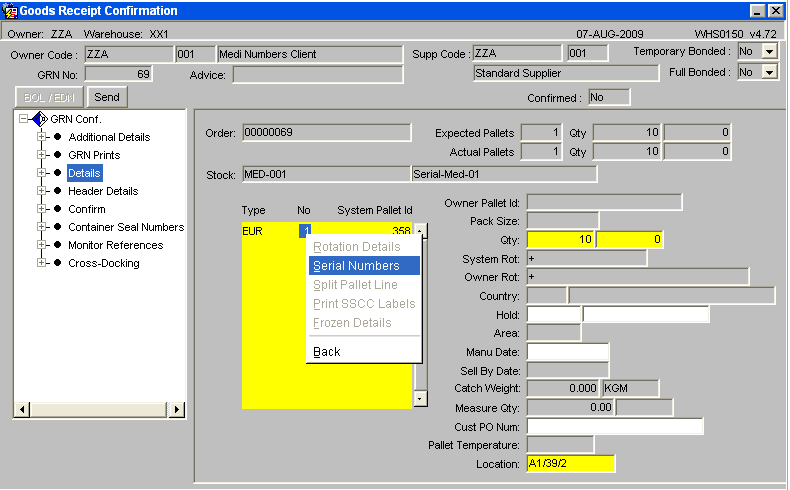
To call the Serial number option, right click in to the field as above and a drop down menu will be displayed to enter the new serial numbers.
If serial numbers have been entered at the pre-advice stage then the serial numbers screen will be used to capture a second set of serial numbers. The new serials will be cross-checked against the original entered serial numbers at pre-advice for any discrepancies.
Goods Receipt Confirmation – Pallet Details (Discrepancies)
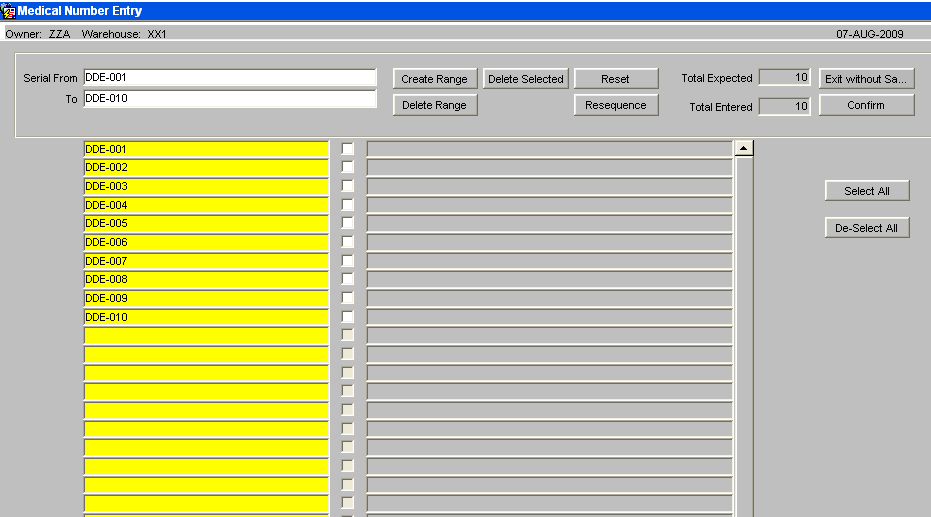
If there are no differences, then receipt confirmation can continue, otherwise confirmation will not be allowed. As Below.
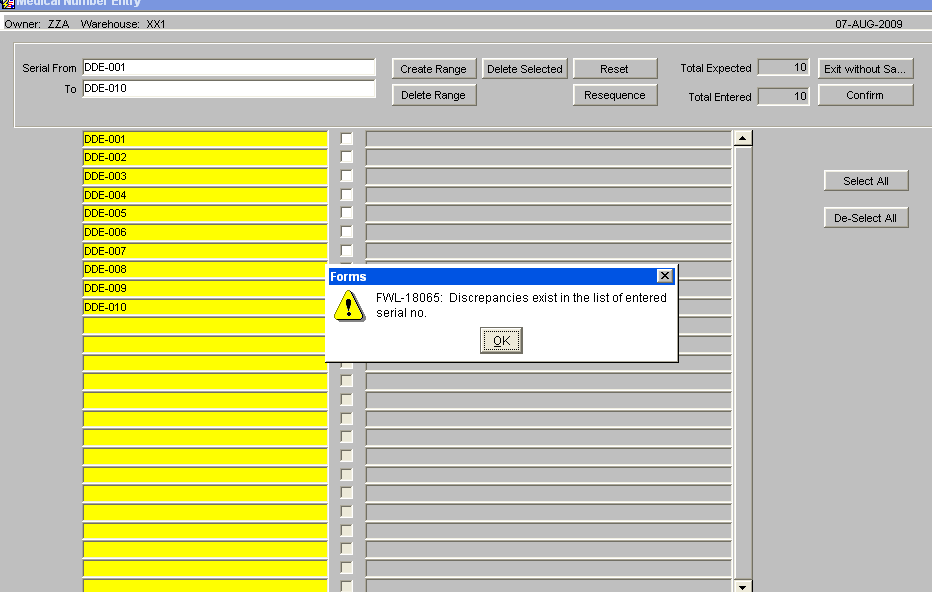
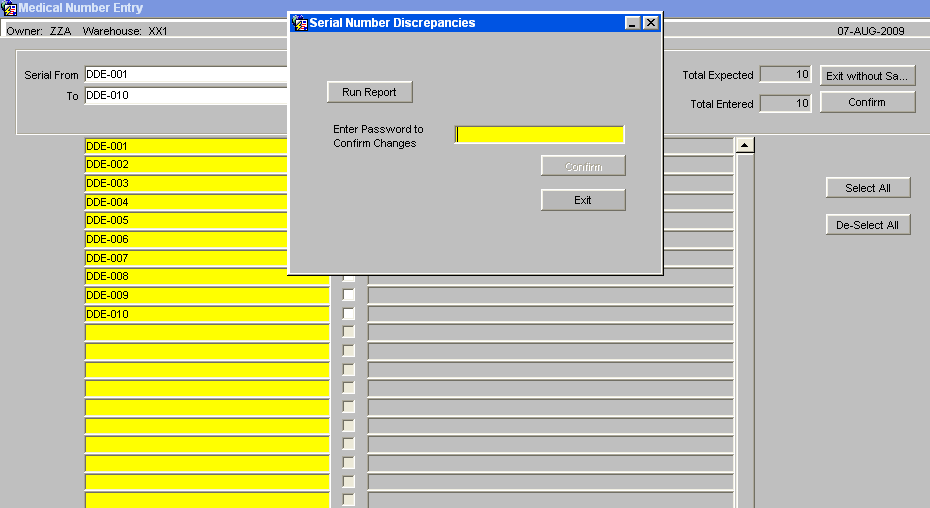
If a difference exists, then the user will be presented with the options to produce a discrepancy report or confirm the differences.
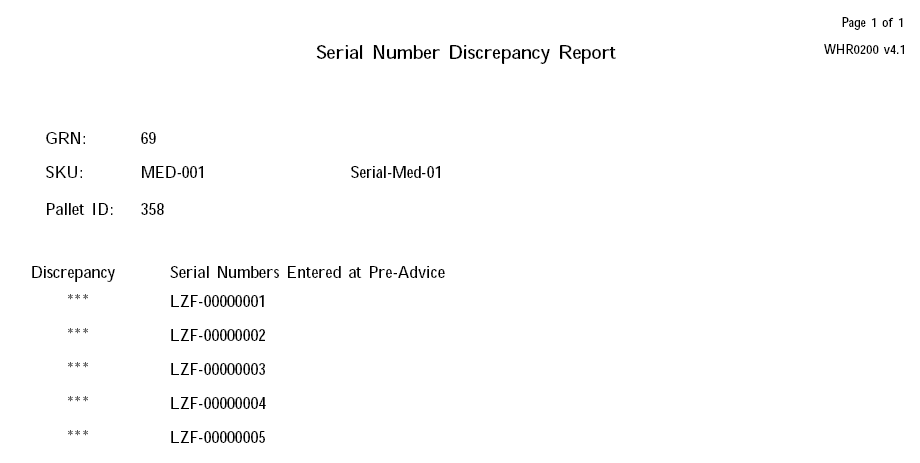
The discrepancy report will list receipt header details along with pallet/stock details and a list of the discrepancies between the serial numbers.
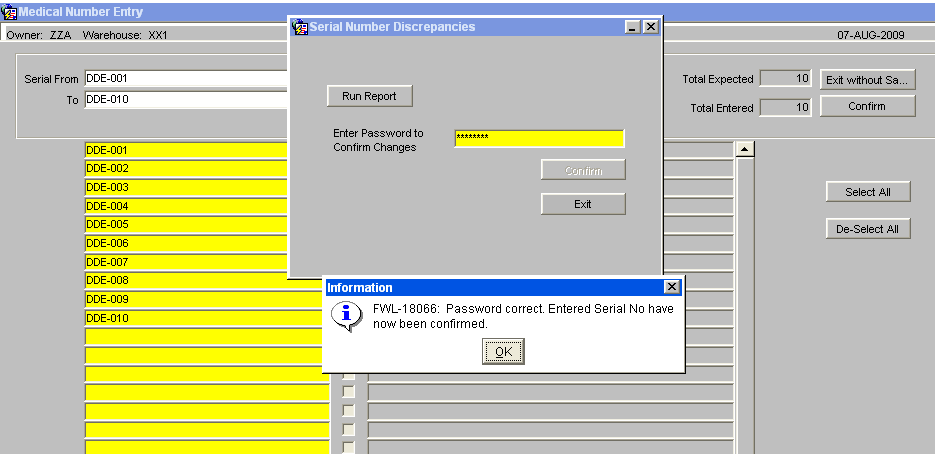
If the user tries to confirm the differences, they will be prompted for a password, and if entered correctly, the pre-advised serial numbers will be completely removed and the new set of serial numbers will be stored in their place. The confirmation process can then continue.
When an owner / stock code is set-up to enter serial numbers at receipt, checks will be included to prevent receipt confirmation if any of the stock codes on the receipt require serial numbers which have not been entered. An error message will be displayed, ‘There is an incorrect number of serial numbers for line 001, detail line 001’
On Receipt Confirmation, the system writes the REC history records and HOLD records, if stock is held during putaway. At this point serial number ‘REC’ and “HOLD’ history records will be written for every serial number on the GRN.
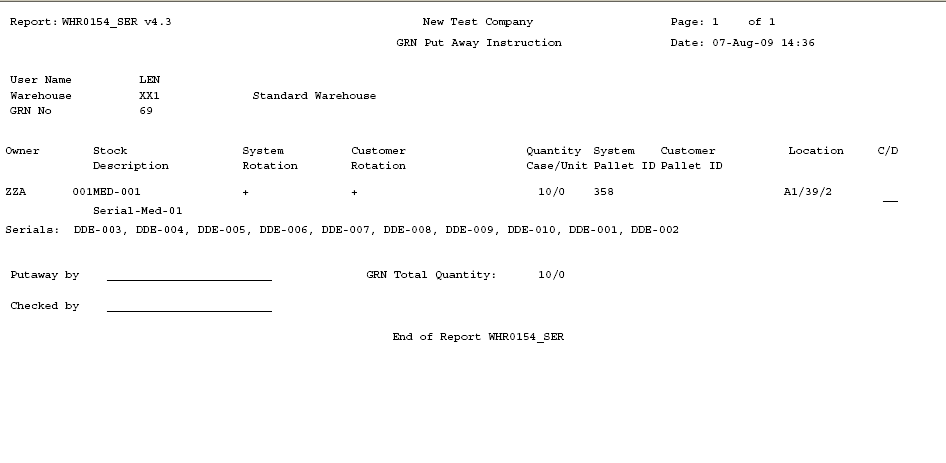
Putaway note displaying entered serial numbers
Monitor References
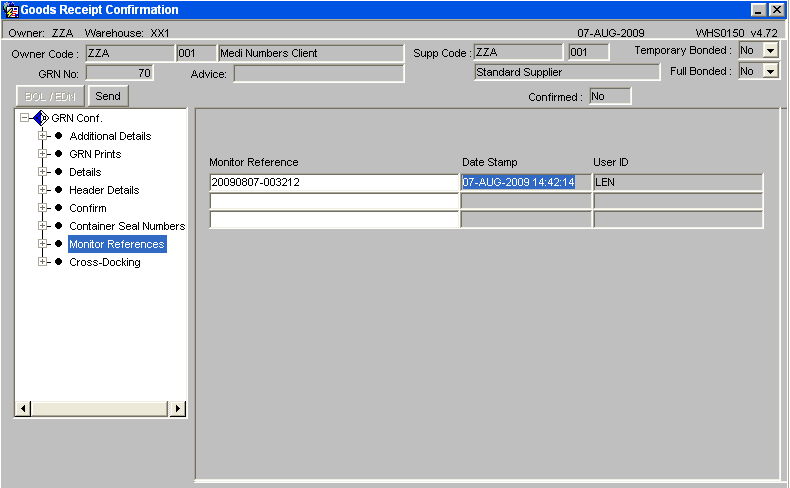
This form will be included on the options tree as shown on the screen above.
The temperature monitor reference numbers will be entered and the current system date, time and user id will be captured.
Inventory Managements
Stock Movements
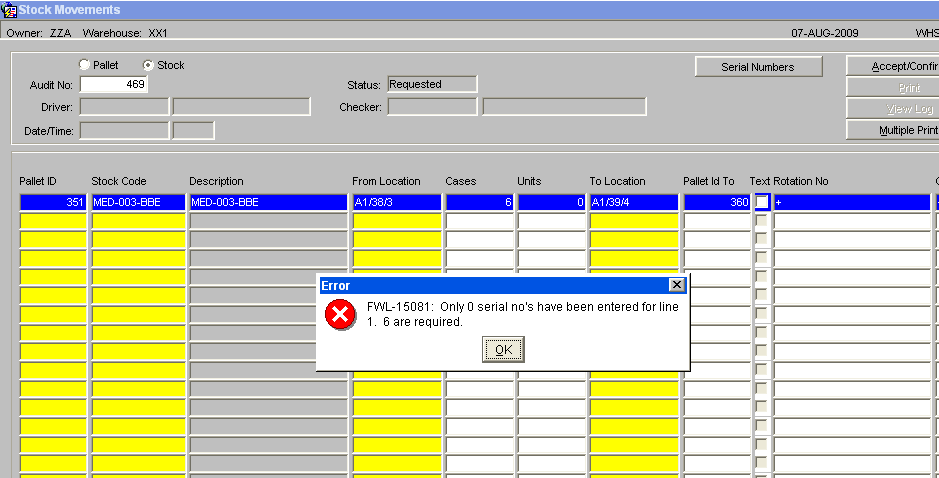
When a stock movement request is entered onto the system, for a serial number stock code, the serial number entry screen will be called to allow the entry of the serial numbers that are being moved.
When the confirm button is pressed, an extra check will be included to ensure the correct quantity of serial numbers has been entered. If an incorrect quantity of serial numbers has been entered then an error message will be given and the user must correct the serial numbers. An extra button will be included on the screen, “Serial Numbers” to allow the serial number entry screen to be called.
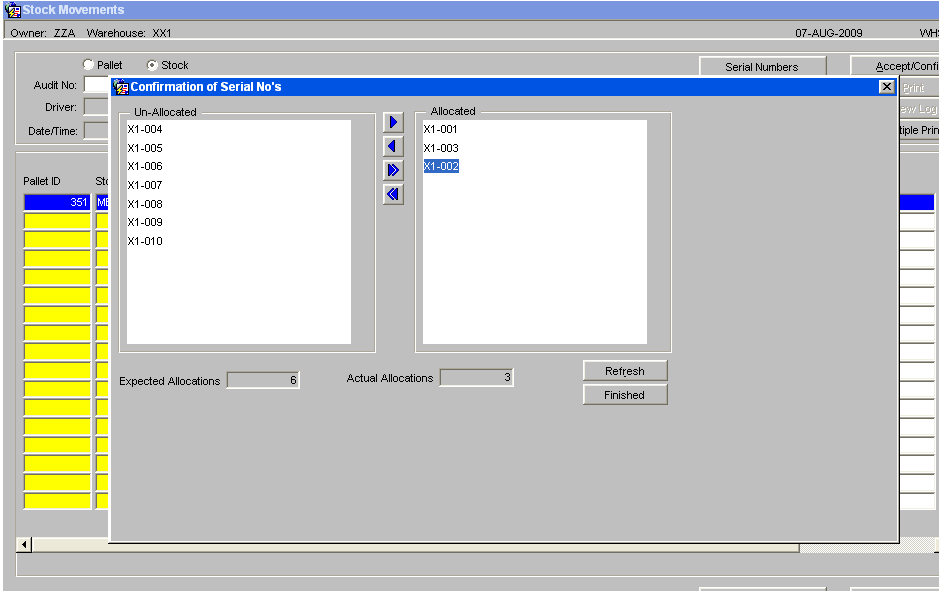
The serial numbers can be highlighted and then allocated using the arrow buttons. To un-allocate a serial number again highlight and use the arrow button.
A total expected allocations and a total actual allocations will be displayed. The new screen layout is displayed above.
Button functionality
| Arrow Buttons | To allocate or un-allocate selected serials |
| Refresh | To re-sequence the serial numbers |
| Finished | To save changes and close the screen |
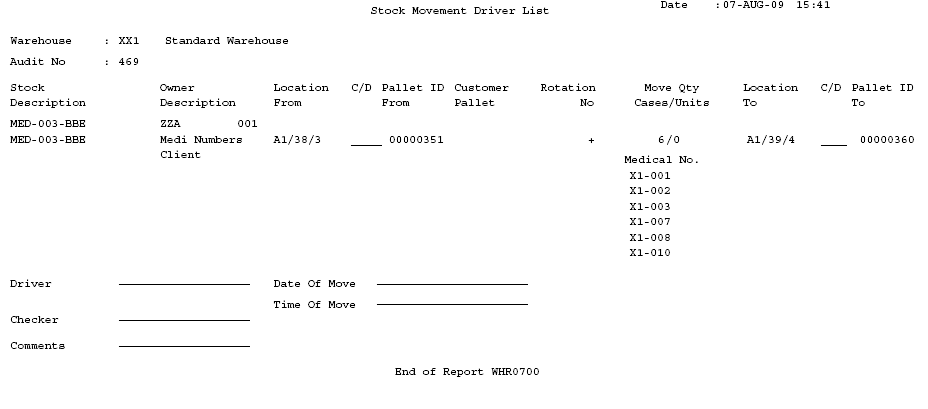
Movement Driver note displaying the Medical Numbers to be moved on to the new pallet and into a new location.
Pallet Movements
There will be no need to enter the serial numbers, as ALL the serial numbers on the pallet will be moved to the new location.
Hold / Release
It will NOT be possible to hold / release individual serial numbers on a pallet. For serial number stock ALL the stock on the pallet must be held / released.
If not all the serial numbers on a pallet are to be held then the required serials will need to be moved to a new pallet by using stock movements. Likewise, if not all the held serial numbers on a pallet are to be released, then the required serial numbers can be moved, with their held status, onto a new pallet. Once on the new pallet, the serial numbers can be released.
The hold / release screen will be changed, for serial number stock, to set the number of cases & units automatically to all the cases and units on the pallet and to prevent the user changing the quantity.
Adjustments
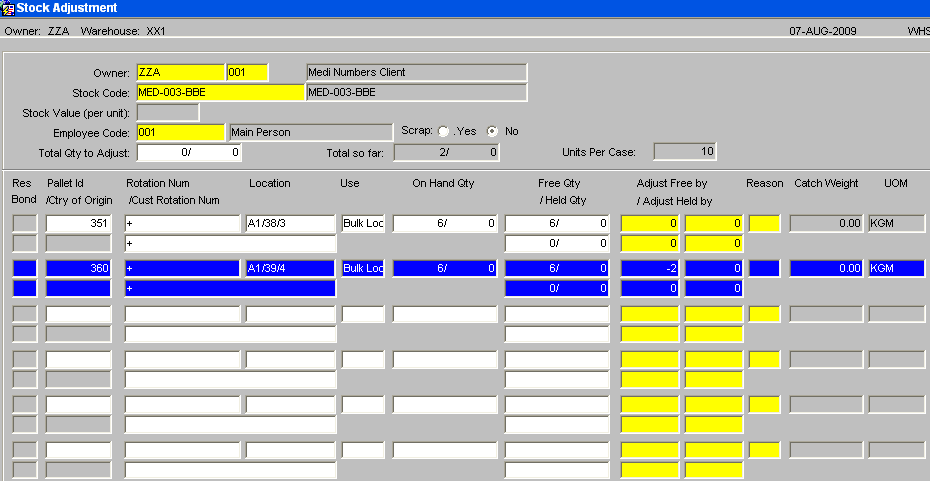
When a stock adjustment is done either positive or negative, the system will need to check the owner / stock code set up to decide if the stock requires serial number entry.
For serial number stock codes, the serial number entry screen will be called to allow the serial numbers being adjusted to be entered.
Extra checks will be included for negative adjustments; if the serial number is assigned to a sales order then it cannot be adjusted off the system. It will be possible to adjust off serial numbers that are held.
Negative Adjustments
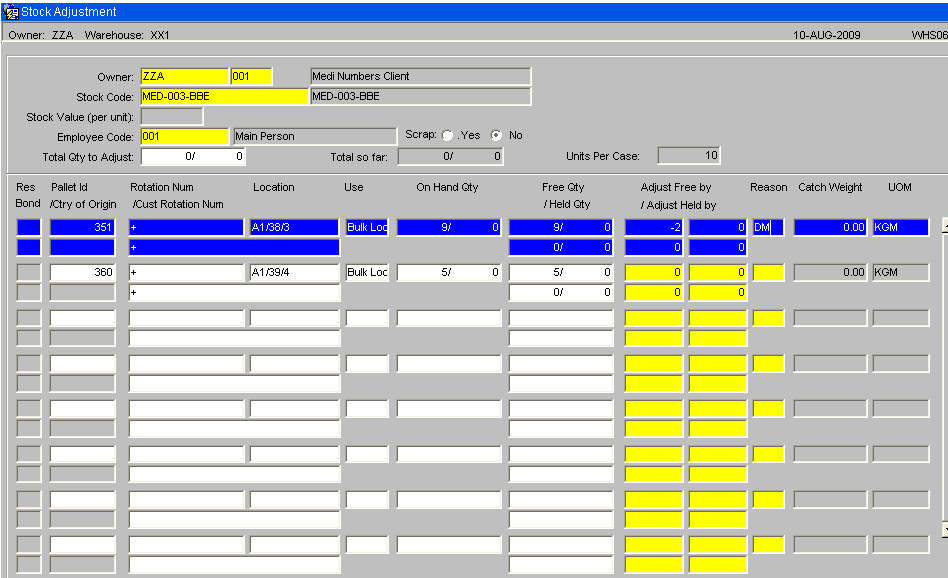
Make a negative adjustment against the pallet line entering the negative quantity and the reason code.
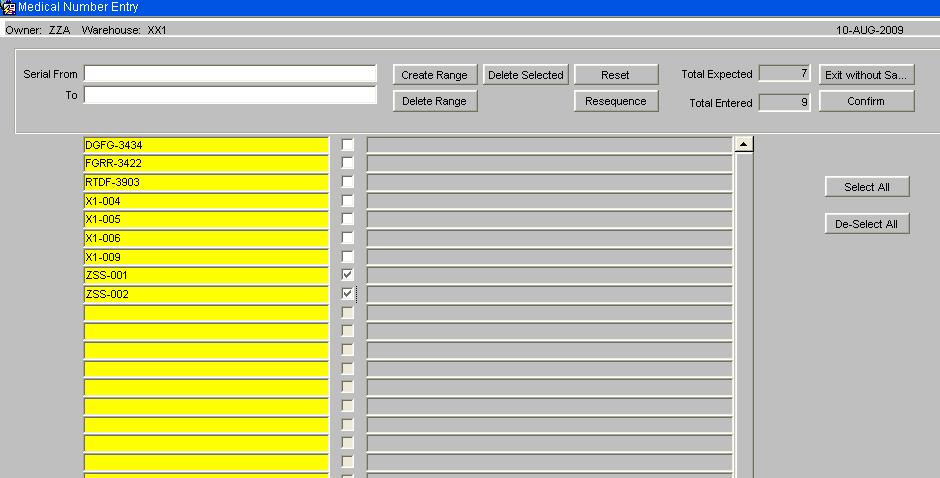
The medical number screen will be called, select the serials to be adjusted and then delete them. By pressing the Confirm button the user will then return to the standard Adjustment screen.
Positive Adjustments
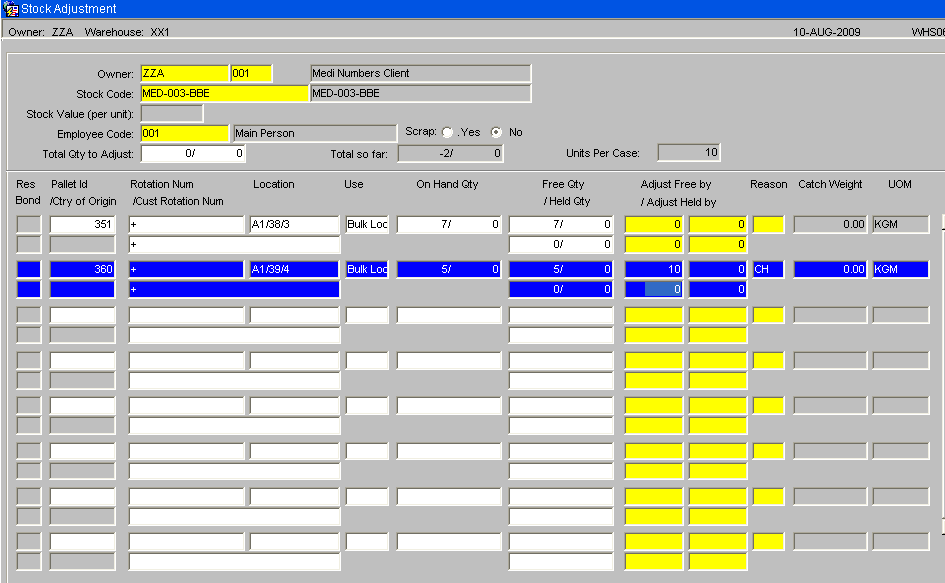
The serial number entry screen will be called where it is possible to enter the new serial numbers for a positive adjustment.
Add Pallets
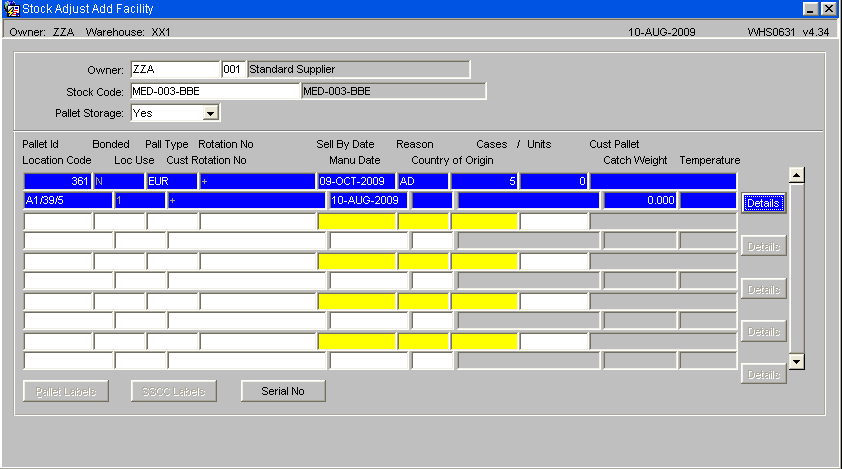
To enter a new pallet onto the system, use the Add facility as standard, once the line is completed then enter the serial No button to call the Medical Number Entry screen.
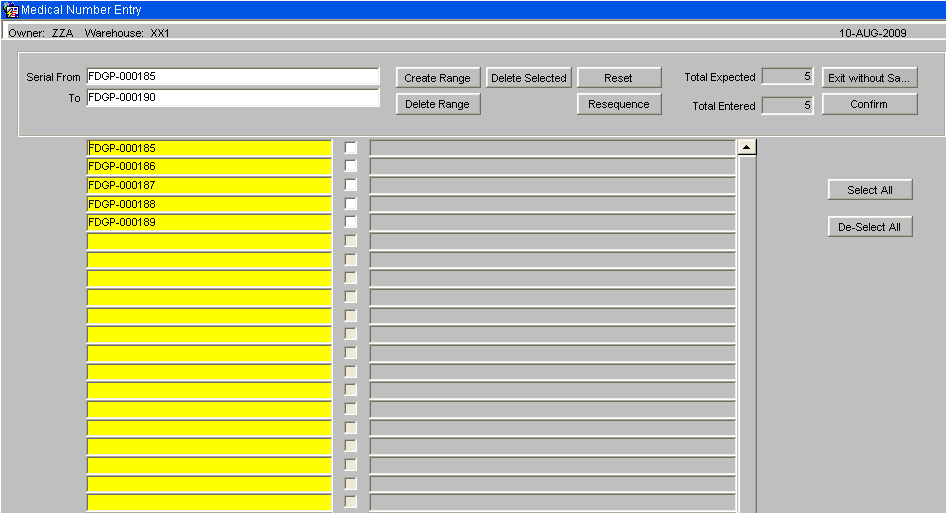
Enter the Medical Numbers as required using either the Create Range option or by manually entering each line separately. Confirming the entry will then return the user to the Add Pallet screen.
Goods Out
Sales Order Entry – Detail
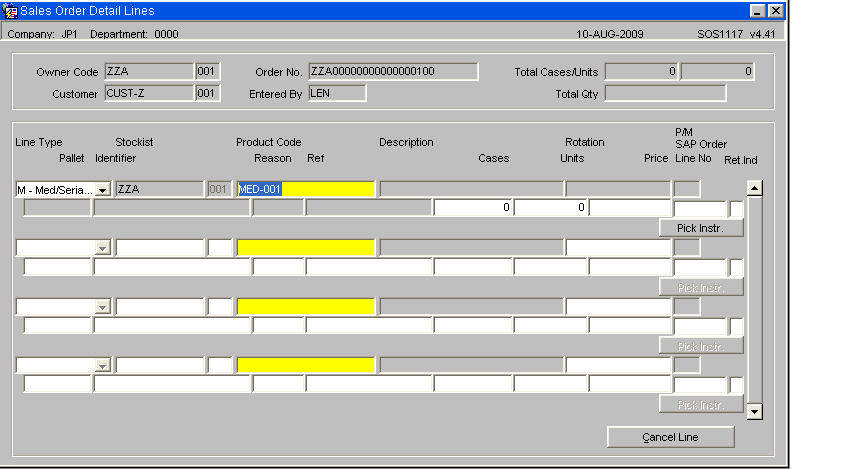
The order header will be entered as normal, when the user enters the Sales Order Detail Lines screen; the line type will default to ‘M’ for Medical/Serial Number entry. If the owner uses mainly serial number stock and requires serial numbers to be entered at order entry.
Note – It is possible to override the line type and select an alternative from the drop down list.
When this order line type M is used then the system will call the serial number entry screen after entry of each stock code on the order line. The serial numbers can be entered using the new serial number entry screen and the confirm button pressed. On return to the sales order entry screen, the number of cases & units ordered will be set based upon the number of serial numbers entered. If the stock code is set up to expect serial numbers at case level, then the ordered cases will be set to the number of serial numbers entered. If the stock code is set up to expect serial numbers at unit level, then the ordered cases will be set to 0 and the ordered units set to the number of serial numbers entered.
The serial number entry will not be allowed against an order if the serial number is already committed or the serial number is allocated to another order.
The owner / stock code set-up will be checked to decide whether it is possible to enter held serial numbers against an order.
If order line type M is entered for a stock code with ‘Serial Numbering’ set to ‘None’ then the line type will automatically be reset to 1 and the serial number entry screen will not be called.
Medical Number Entry
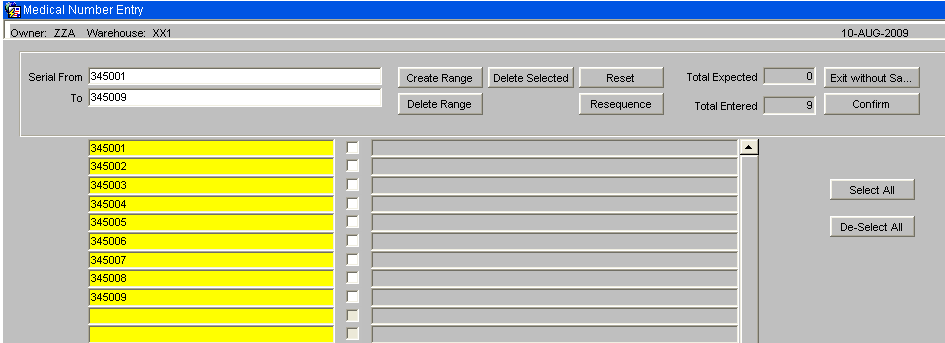
The number of serials entered will equate to the number of units or cases dependent on owner/stock setup that are to be allocated to the order.
Serial or Medical numbers can be entered in the standard manner.
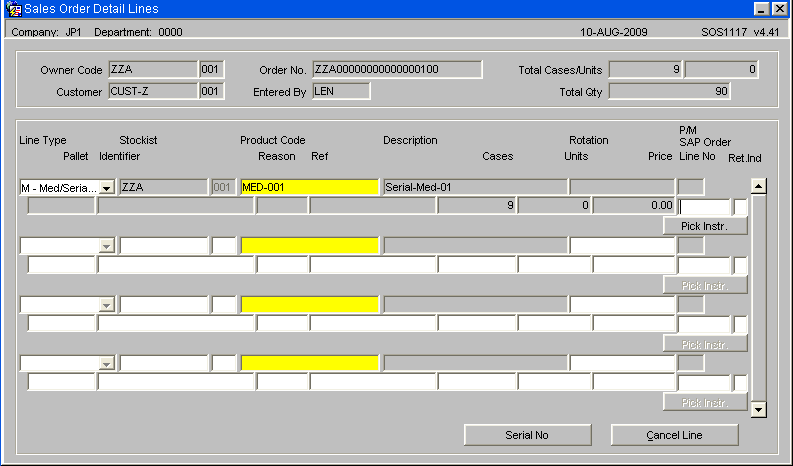
The ordered case quantity field has now been updated with the total number of cases for the order, it is also possible to amend the quantity or the serials committed to the order by selecting the Serial No button.
Allocation and Pick Note
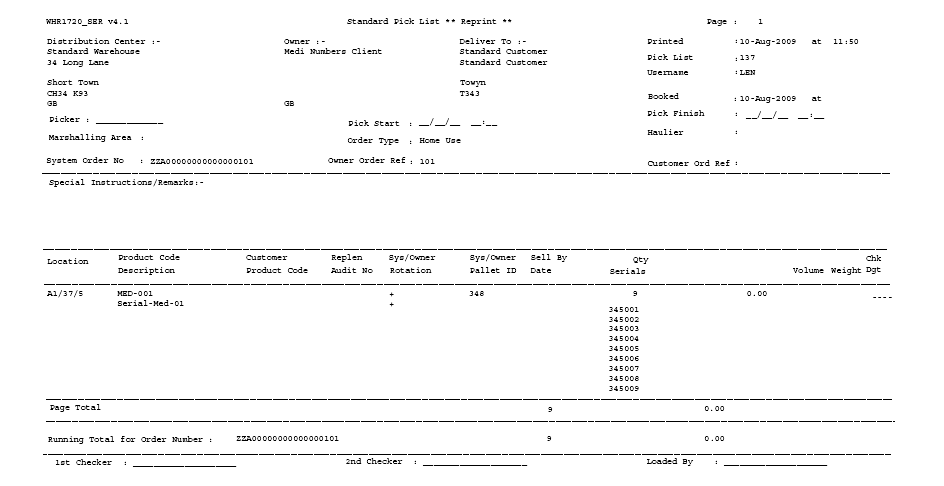
Additional Checker Signature
Serial/Medical Numbers
Allocation will be as per standard functionality using either the Order Allocation screen or the Pick Wave Maintenance screen.
A new format Pick list will be provided. This new format will display the serial numbers to be picked. The new format will include space for three signatories on the sheet to allow for a picker and two checkers to be recorded.
Pick Confirmation
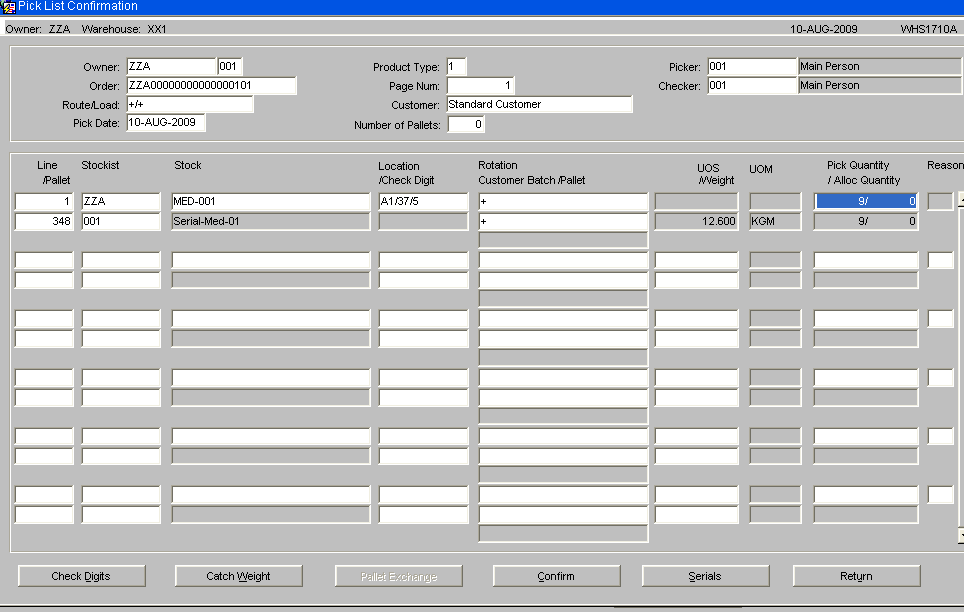
The serial number button from the pick confirmation detail screen will call the new serial/medical number entry screen, if the owner/ stock code is set-up to capture outbound serial numbers.
If serial numbers were entered during order entry then the serial numbers screen will be pre-populated by these serial numbers, provided they were at the correct status when allocated.
If the stock code is set up for ‘Mandatory serial numbers’ at order entry or ‘Outbound serial numbers’ is set to ‘Capture at Pick’, then pick confirmation will be prevented if the number of serials entered does not match the number of serials expected.
De-allocation of Serial/Medical numbers
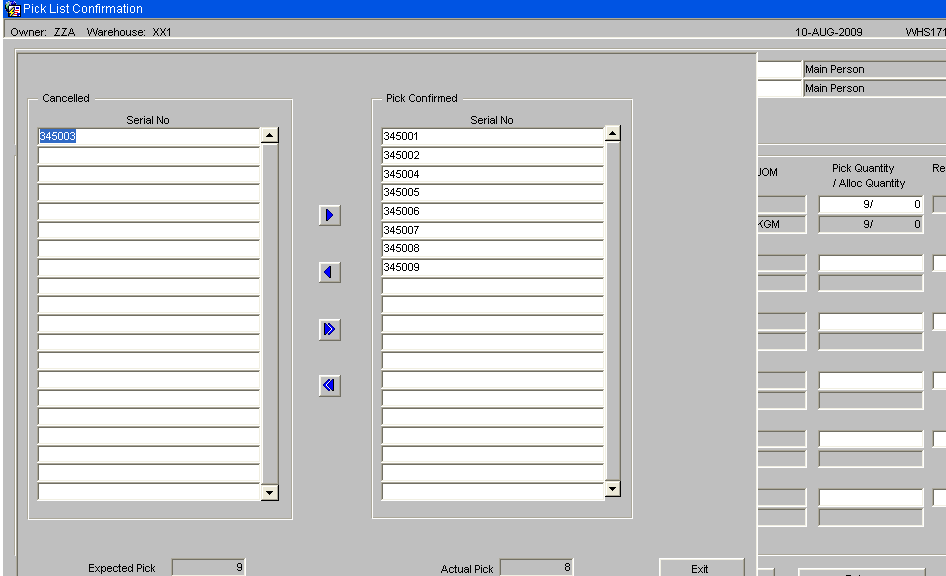
If the number of cases / units picked is reduced to a non-zero quantity, then the serial number entry screen will be called automatically and will display the serial numbers allocated to the pick line. The user will need to select which serial numbers are to be removed from the order. The serials can be selected individually or all serials can be selected and set to Cancelled.
This screen is only called in the event of any exceptions or discrepancies’, the arrow buttons are used to remove the serial numbers from the order. Once the number of serials matches the numbers of units on the order it will then be possible to pick confirm. At this point no further amendments will be allowed in this screen.
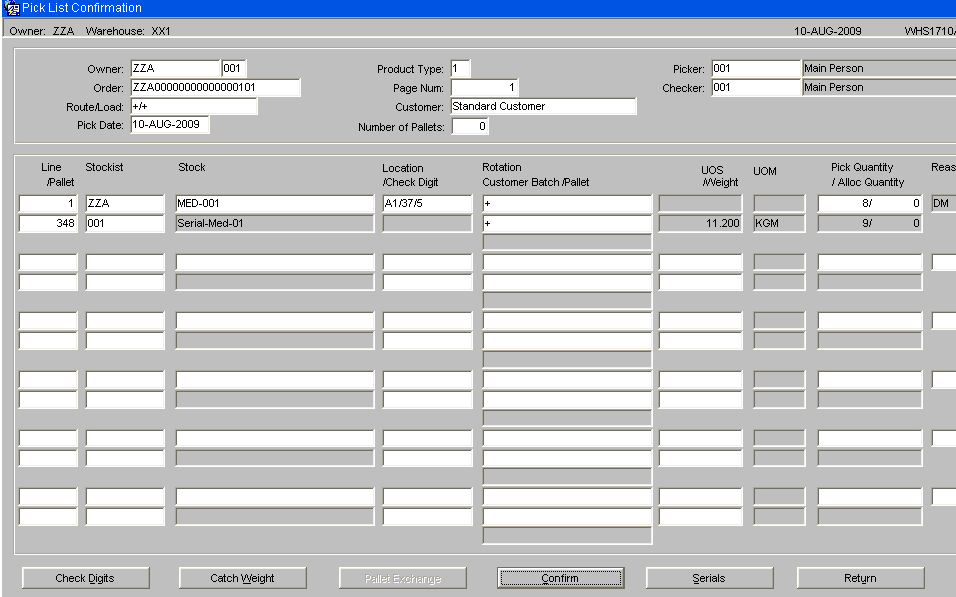
The pick quantity must match the actual pick quantity of the serial numbers for the order to be confirmed. It is not possible to adjust an alternative serial numbered item onto an order once the order has been allocated. If there are any issues with the stock then it will either be sent out short picked or cancelled.
Packing
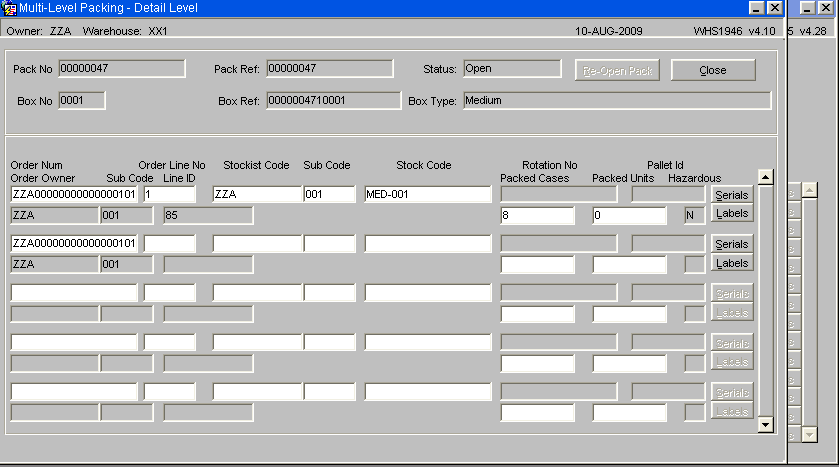
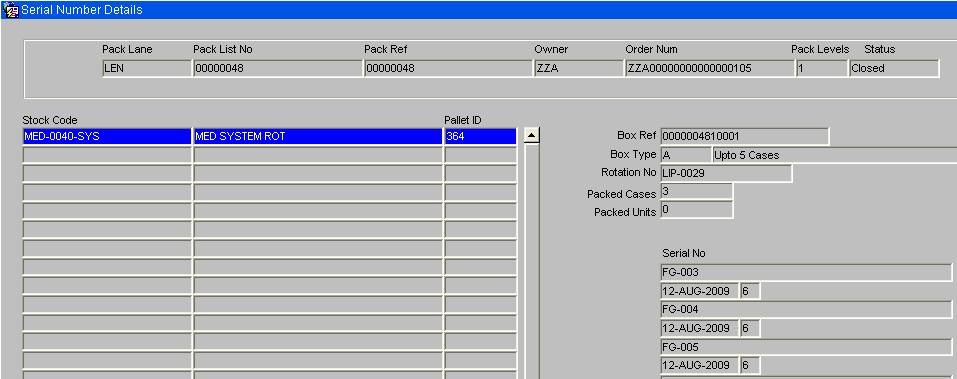
There will be an option to capture the serial/medical numbers during the packing process which capture the serial number and the pack number.
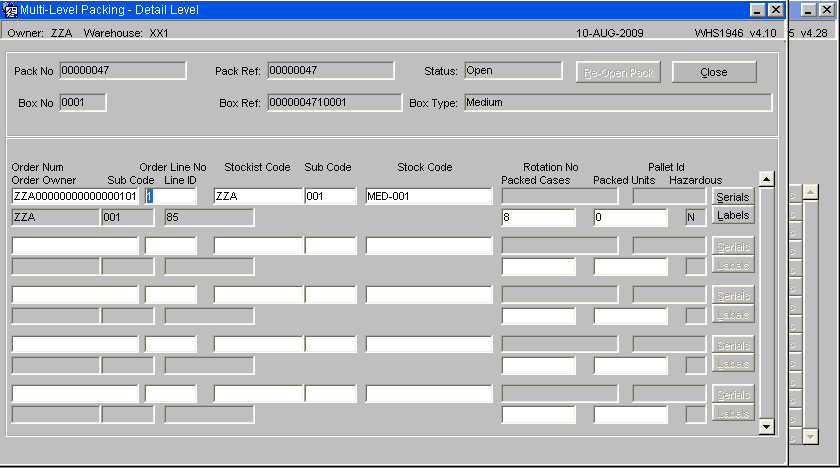
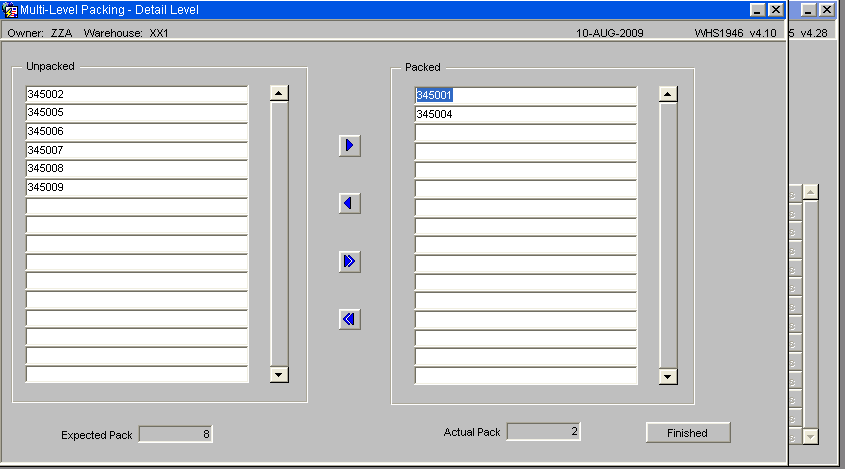
As each container is packed, the details will be entered onto the system. For serial number stock, the serial number entry screen will be called to enter the serials packed into each container.
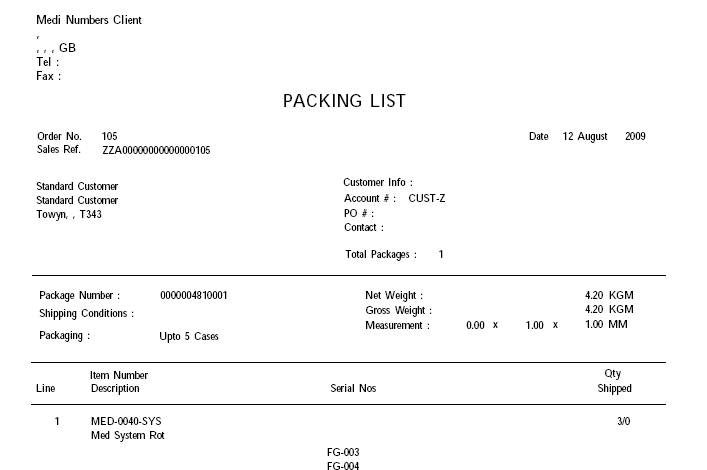
If the SER format Packing List is set then serial numbers allocated to the order will be displayed on the packing list.
Packing – Monitor References
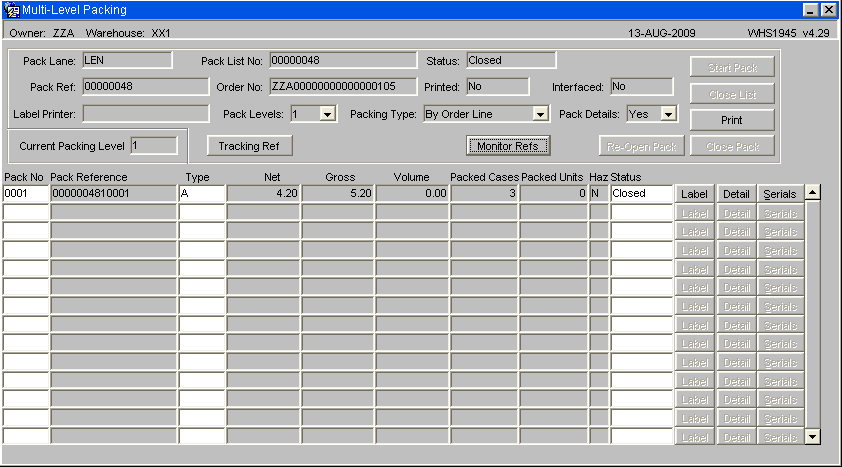
The Order Packing screen will be changed to allow entry of three temperature monitor reference numbers, if the new warehouse rule, MONR, is set to P or Y.
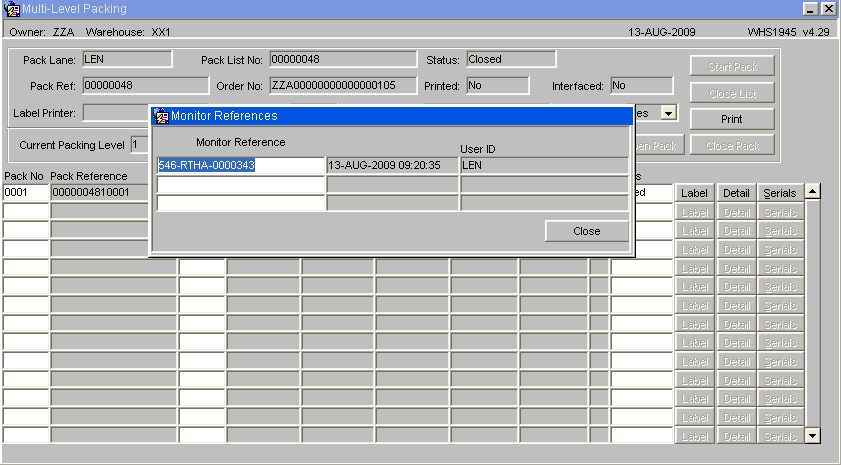
Entry of the Monitor Reference details.
Despatch Confirmation
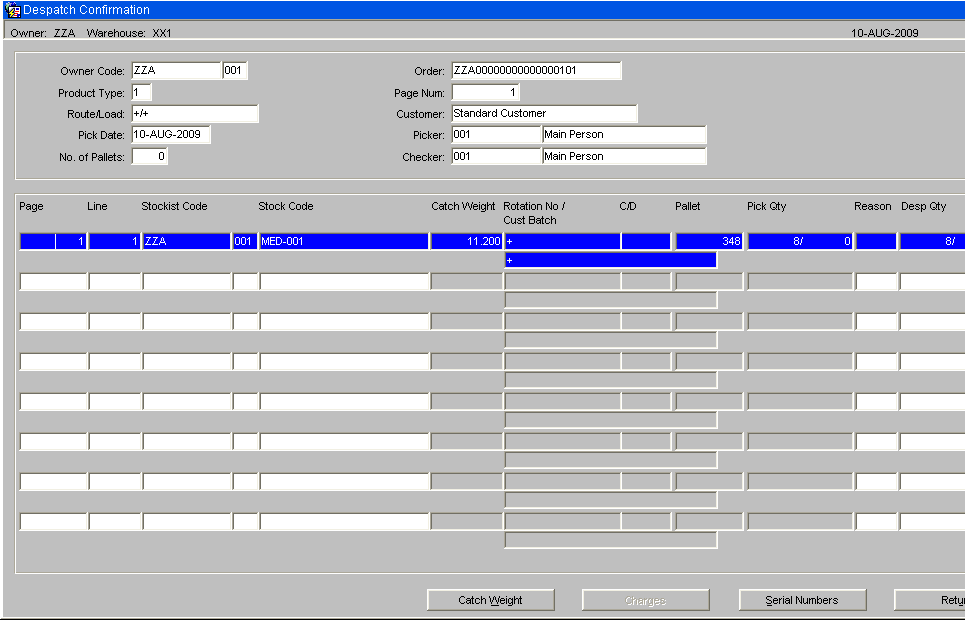
The despatch confirmation process will be changed to do a final check that none of the serial numbers have been placed on hold. If any of the serial numbers have been held then an error will be given and despatch confirmation will not be allowed.
Similarly if there are any exceptions during despatch it is possible to down date the stock and remove the serials from the order. It is not possible to substitute stock serials at this point; instead a new order will need to be raised.
Expected Despatch against the Actual Despatch
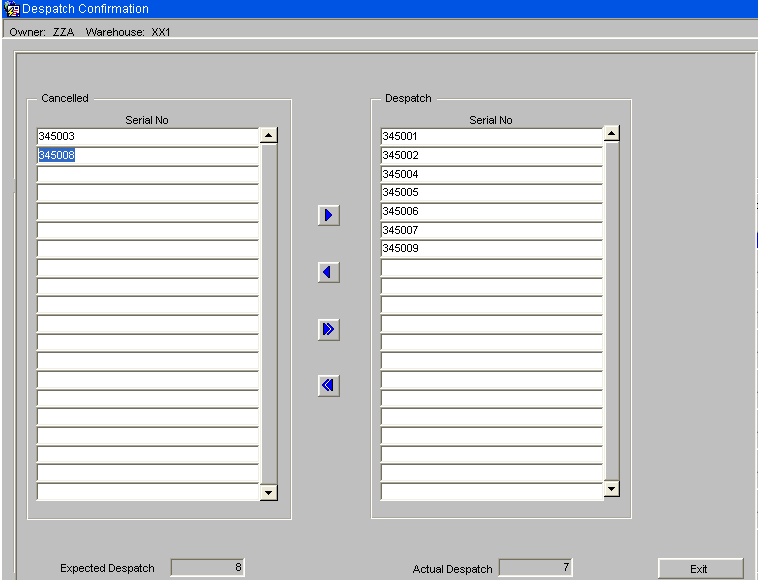
If the number of cases / units picked is down-dated to a non-zero quantity, then the serial number entry screen will be called and will display the serial numbers allocated to the pick line. The user will need to select which serial numbers are to be removed from the order. The serials can be selected individually or all serials can be selected and set to Cancelled.
This screen is only called in the event of any exceptions or discrepancies’, the arrow buttons are used to remove the serial numbers from the order. Once the number of serials matches the numbers of units on the order it will then be possible to Despatch confirm. At this point no further amendments will be allowed in this screen, as the order will be set to status 9 complete.
Despatch Print – WHS1910
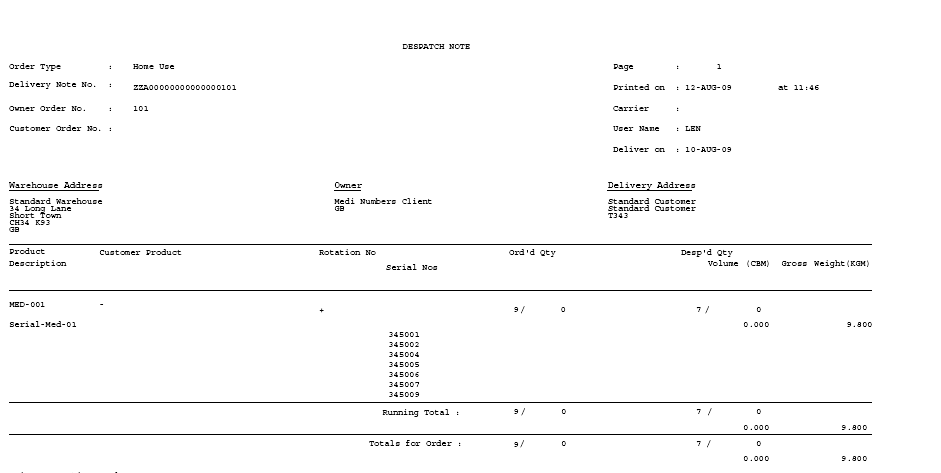
The standard FW1 despatch note print will also be amended to include Serial Numbers if allocated to an order.
RETURNS
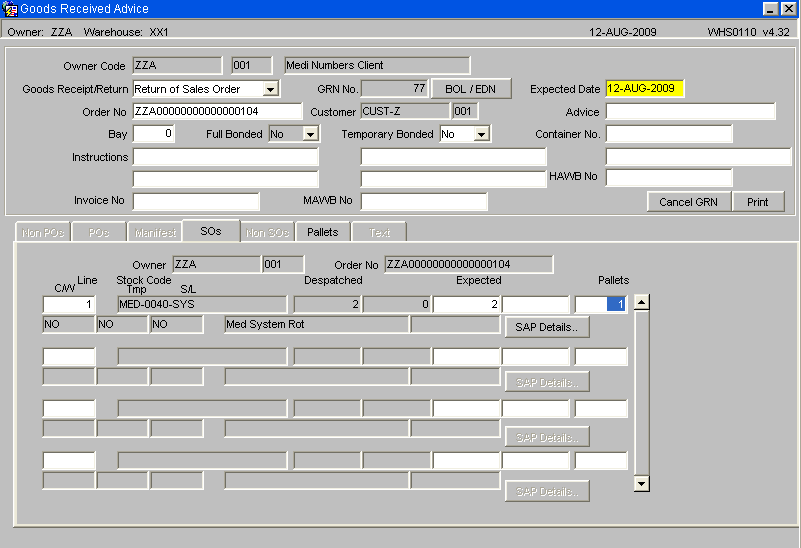
When a goods receipt pre-advice is entered onto the system with the type ‘Return of Sales Order’, the return will be processed as any other receipt with the exception that when returned serial numbers are entered into the system they will be validated to ensure that they were despatched on that sales order.
INTER WAREHOUSE TRANSFERS
Stock for inter warehouse transfers will be placed on the system in the standard manner using the Inter Warehouse Transfer screen SOS1110.
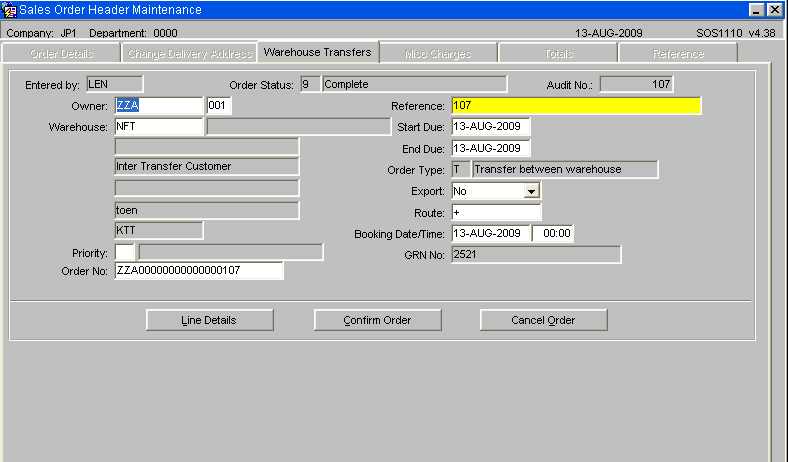
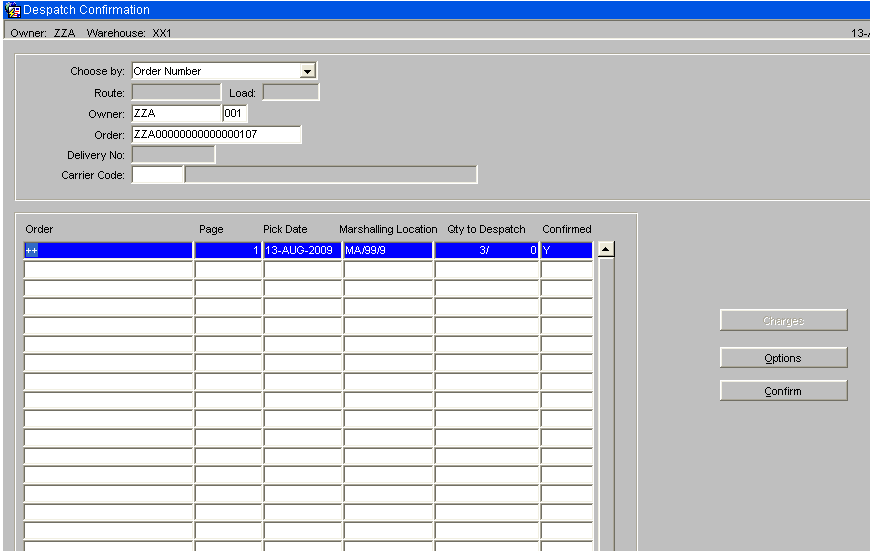
The order will then be allocated and picked as standard, but despatch will ran from the standard despatch screen WHS1910.
Goods Received Advice
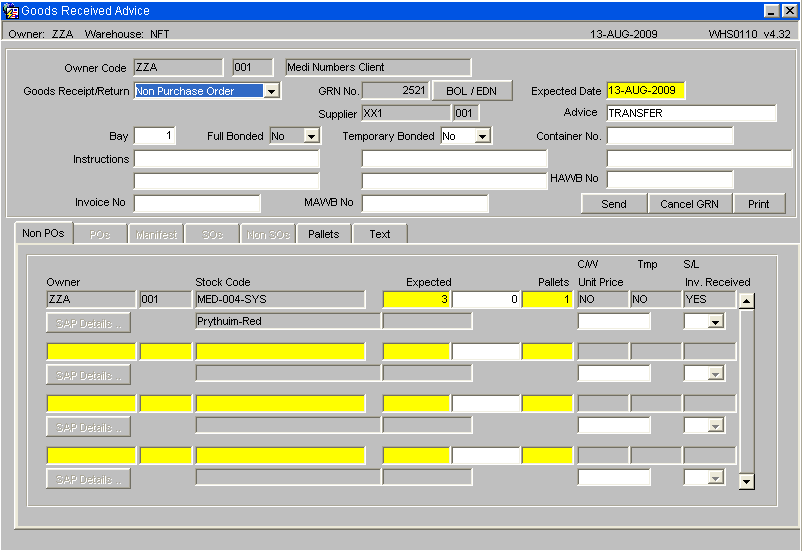
As with the Inter Warehouse Transfer process, the receipt header will be created with a receipt type of ‘Non purchase order’ and the supplier code will be set as the original warehouse id for the stock.
The temperature monitor reference numbers stored against the stock will also be transferred to the new receipt.
The process will also create receipt detail lines for each stock code on the order with the receipt quantity being set as the total amount being despatched for the order line in question.
Unlike the Inter Warehouse Transfer process, the process will create goods receipt pallet level information based on the pallets being despatched. The process will set the manufacture and sell by dates based on the pallet details being despatched.
The location codes, system rotation numbers and catch weights will not be transferred by the process. The user will be expected to enter these details at the goods receipt confirmation stage.
Finally, the process will create med number receipt records for the med numbers being despatched.
REWORK ITEMS
Sell by Date Entry
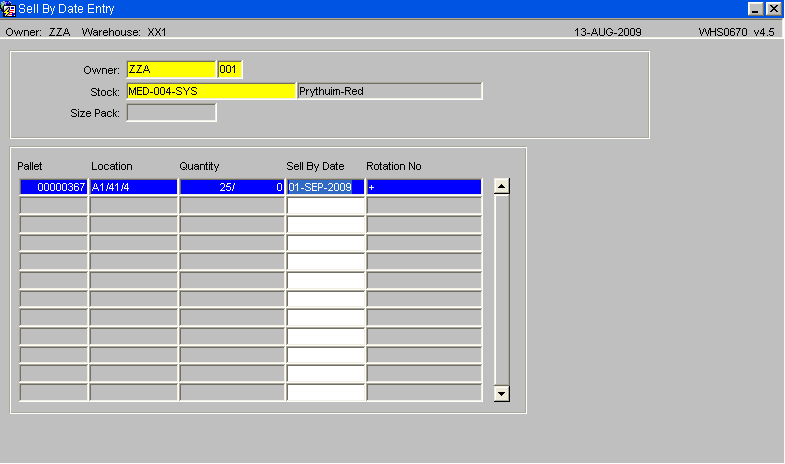
The sell by date entry screen will be changed to check the new owner rule, “Sell by Date History”, “SBDH”. If this rule is set to “Y” then any changes to the sell by date will cause the system to write a history record, which can then be viewed through the stock movement enquiries. This new history record will have a transaction type of ‘DATE’.
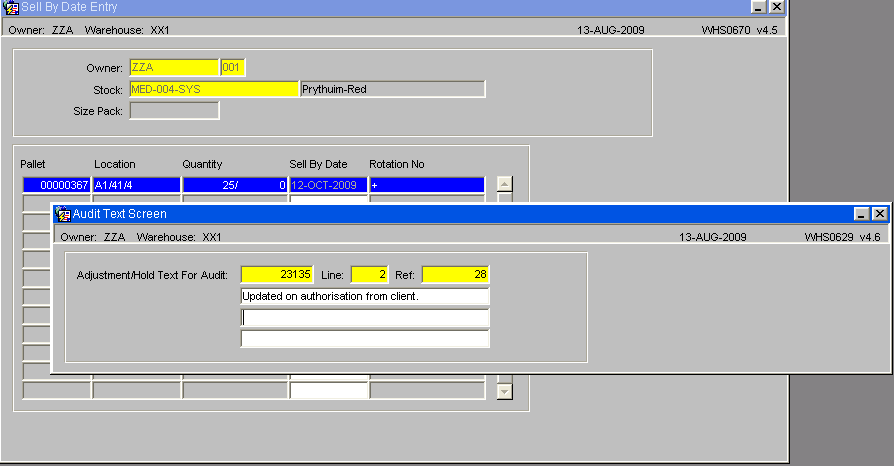
As each line is updated, the audit text screen (WHS0629) will be called to allow a description for the change to be entered.
The owner / stock code set up will be checked to find if the pallet is for serial number stock. These records will be viewed through the new ‘Serial Number History’ enquiry screen. (See below)
ENQUIRIES AND REPORTS (ORACLE DATA EXTRACT)
Serial Number Enquiry – WHS0955
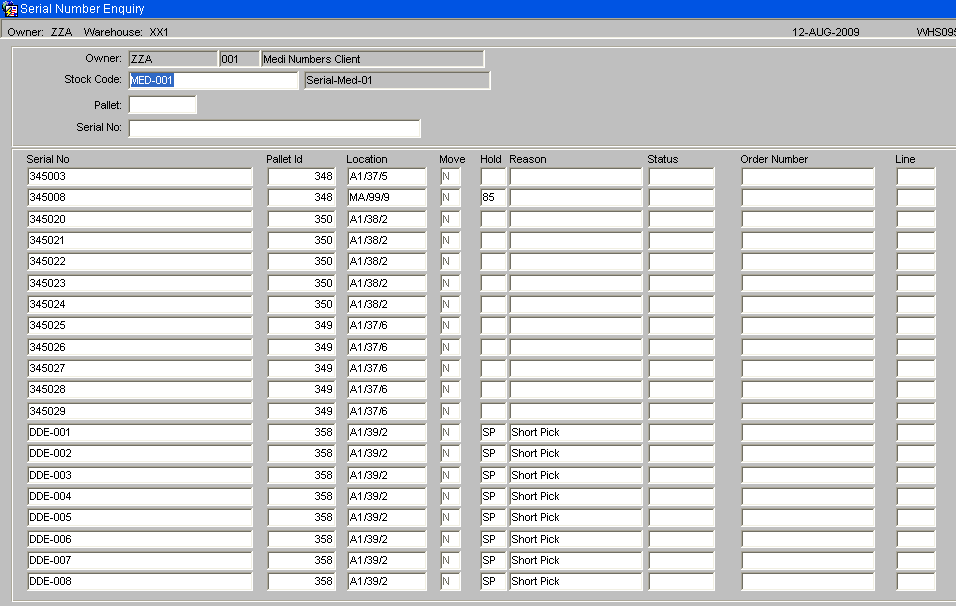
The serial number enquiry shows the status of each serial number and any orders numbers that the serial number may be committed or allocated to.
A stockist code and stock code may be entered to find all the serial numbers currently on the system for that stock code. There is an option to refine the search down to pallet or serial number level.
Serial Number History Enquiry – WHS0956
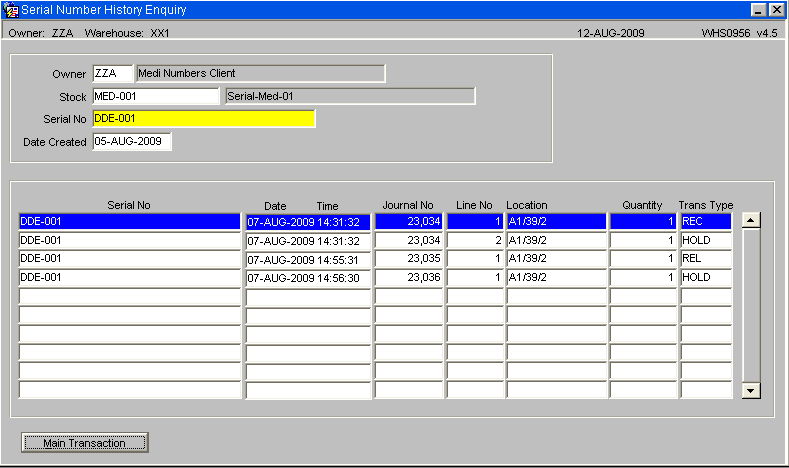
The serial number history enquiry screen displays the history of a certain serial number.
A stockist code, stock code, serial number and date from may be entered. If the serial number does not exist for the entered stock code then an error message will be given.
The history of the serial number will be found and displayed sorted by date and time.
Stock Movement Enquiry – STS3001
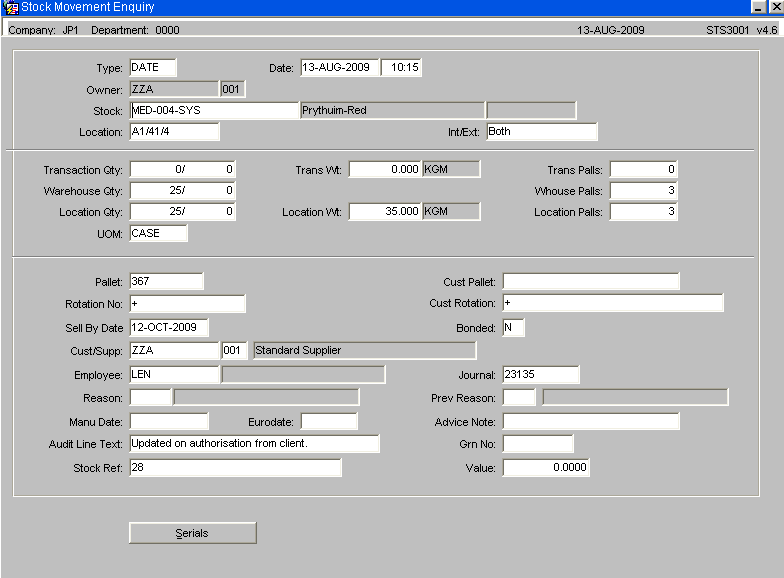
It will then be possible to drill down into the selected line for additional transactional and stock data.
In addition the screen will display the GRN number the Sell by Date and the Audit Line Text if entered for any transactional change. (I.e. Hold, Release, Adjustment change of Sell by Date etc)
By selecting the Serials button the Serial Number Transaction Enquiry screen will be called.
Serial Number Transaction Enquiry – WHS0959
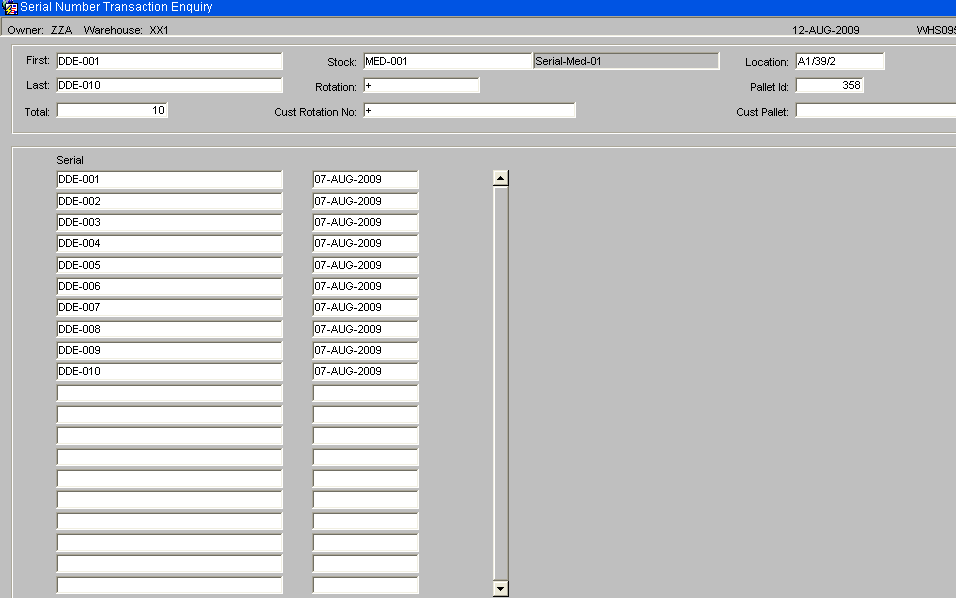
The enquiry screen will display all associated serial numbers for that transaction.
Pallet Enquiry – WHS0915
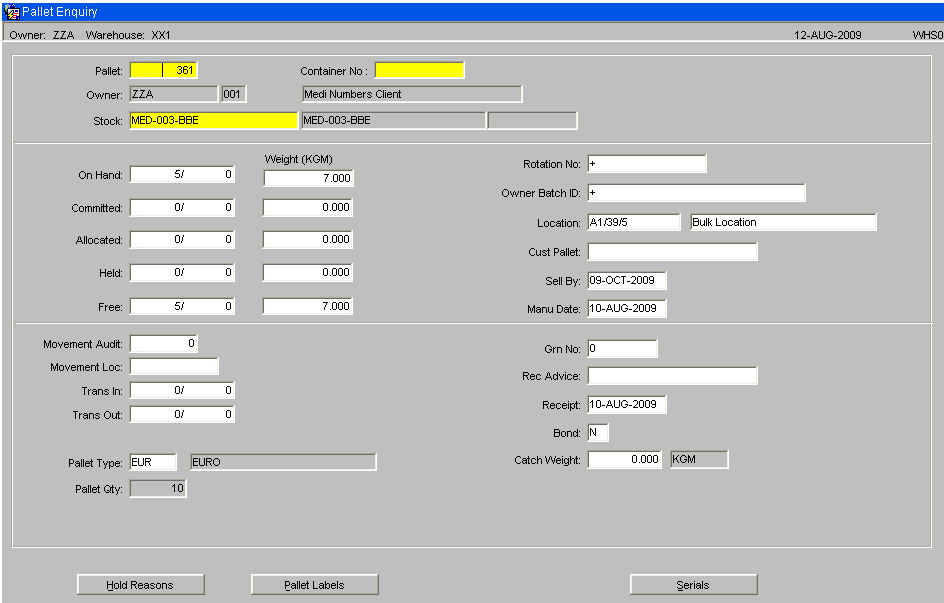
The main stock enquiries will be changed to include a button to display serial numbers if the owner / stock code is set-up for serial numbering, as in the example above.
| WHS0902 | Stock Location enquiry |
| WHS0915 | Pallet Enquiry |
| STS2010 | Rotation Number Enquiry |
| STS3020 | Allocated Stock by Batch/Location |
| STS3001 | Stock Movement Enquiry |
Monitor Reference Enquiry – WHS1930
Temperature monitor references can be found for a GRN number or a packing number. Alternatively, a monitor reference can be entered to find all related GRN numbers and packing numbers.
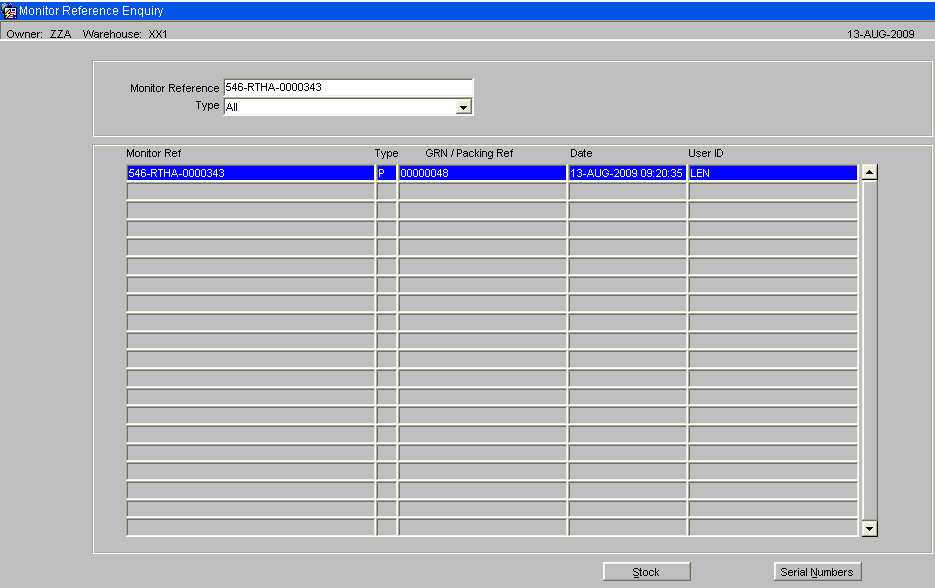
The Stock Button will display details of the stock codes entered on the GRN / packing list.
The Serial Numbers button will display a list of any associated serial numbers.
Oracle Data Extract
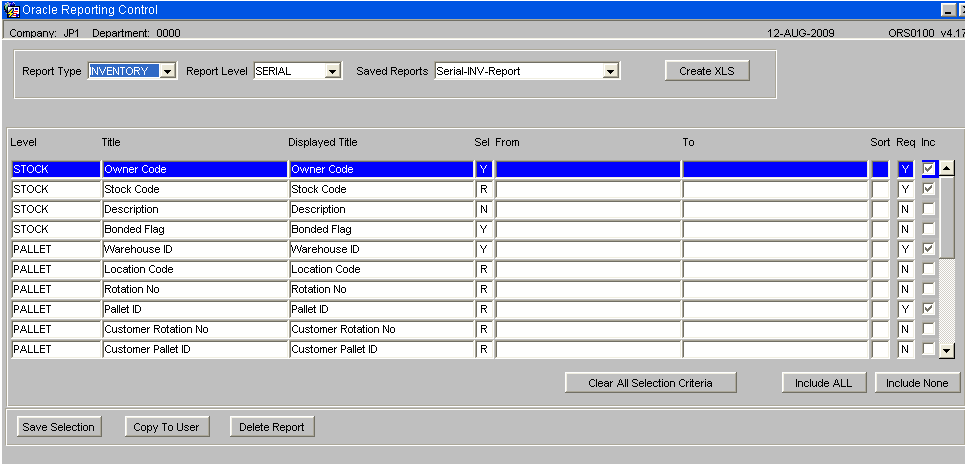
The Oracle Data extra has been amended to run reports at serial level; these include the Inventory and Journal type reports.
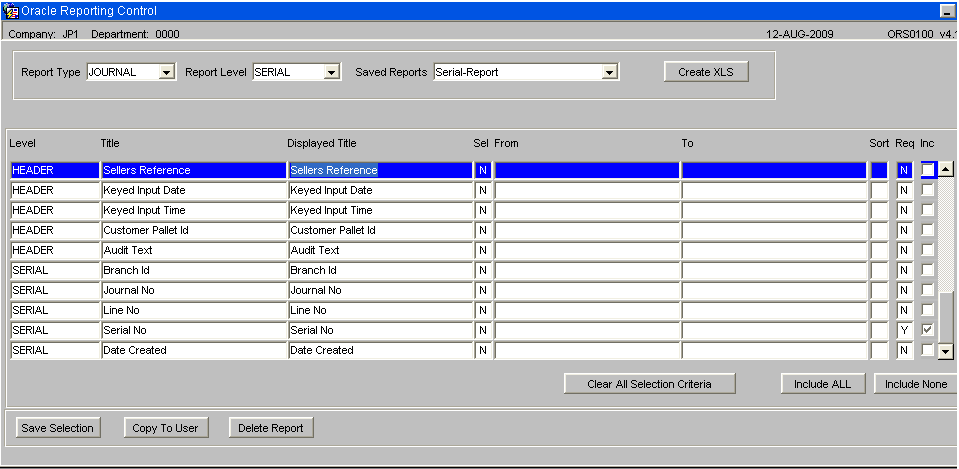
Monitor Reference Report – WHS1935
A new monitor reference report will be provided. A drop down box will be used to select the report type with the following options:
- Serial Number
- Temperature Monitor
- GRN
- Packing Number
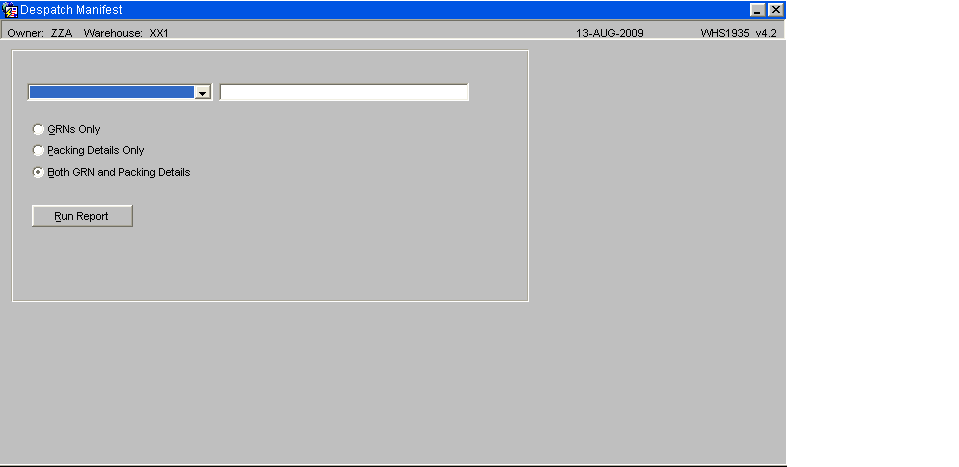
Once selected, the user will enter a single parameter for their selection e.g. a single GRN reference or single Serial number.
If the report type is GRN or Packing Number only the respective types will be displayed on the report. If Serial number or Temperature Monitor is entered, the user will be prompted to enter the transaction types to display with the following options:
- GRN’s Only
- Packing Details Only
- Both GRN and Packing Details
On production, if a GRN or Pack Number is entered, the system will retrieve all of the Temperature Monitors associated with the GRN/Pack and details of all of the stock codes entered against that GRN/Pack
If a serial number or monitor is entered, then the GRN or Pack Number associated with the serial/monitor number will be retrieved, and then ALL of the details for the GRN/Pack will be displayed, as per the above. This may display more than the monitor selected if the GRN/Pack has multiple monitors associated with it.

Example of a report ran by Monitor Reference and reporting associated GRN details.

