WHS1714
Pick List Confirmation (WHS1714)
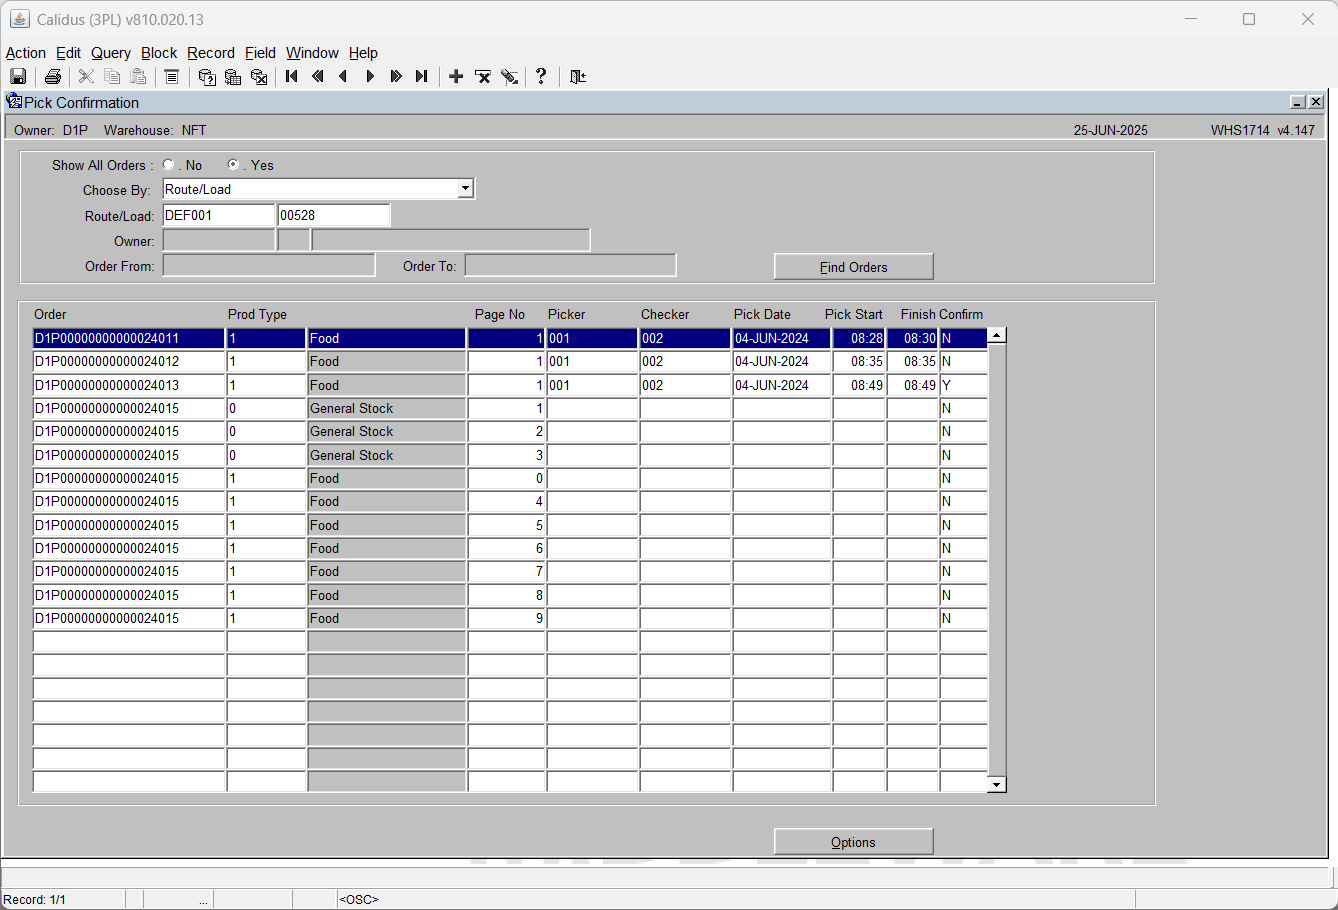
Once the picker has completed picking, this screen enables the warehouse supervisor to
confirm the pick details. Select Route/Load or Order Number to pick confirm a range of
Orders or an individual order. Once completed, the order will move onto status ‘6’ and the stock will move from its original picking location to a marshalling location.
Field Information:
- Show All Orders: Allows the user to select orders at status ‘5’ only or all orders at status ‘5’ and above.
Y = status 5 and over
N – status 5 only
- Choose By: Enables the selection of orders to confirm by route/load or by order number. Route load will enable the route/load field, order number will enable the order from/to fields.
- Owner: The owner code of the orders you wish to confirm. Will default to the current owner
- The Find Orders button will trigger the population of orders based on the selection criteria entered
- Order: Display only, the order number of the order to be confirmed
- Prod Type: the product type of the order line. Display only
- Page No. The pick list page number. Note, if a page number ‘0’ is seen, this is a zero allocation. Display only.
- Picker: The employee code of the person who picked the order. Must have been setup in employee codes maintenance.
- Checker: The employee code of the person who verified the picked order. Must have been setup in employee codes maintenance.
- Pick Date: The date the order was physically picked
- Pick Start: The time the order started to be picked
- Finish: The time the order pick was completed
Note:
- Confirm: Displays the current confirmation status of the order – note it is possible to ‘toggle’ this status between assigned and unconfirmed if the user wishes to only assign certain lines.
- When the user clicks the ‘Options’ button the screen as shown is displayed. This gives the user additional options during pick confirmation. Options are:-
All Pick Details: Allows the user to enter picker/checker details for all lines
Assign: Flags the orders ready for confirmation
Confirm All: Completes confirmation of all assigned orders
Pack & Despatch:: Volume and weight (Gross), Volume and Weigh (Net) or None.
Detail Screen: Takes the user into the order line level information to make amendments (see next page).
Good Pallets: Produces a pop up box to allow the user to enter how many good and bad pallets are on the orders/route load. This information will be produced on the outbound documentation.
- When the user clicks the ‘Options’ button the screen as shown is displayed. This gives the user additional options during pick confirmation. Options are:-
Transport Details: Allows the user to enter trailer no, container seal no, freight reference, freight charge terms and the load ref for the selected orders.
View Log: Produces a log of all the confirmation details that have been processed.
Order Notes: An additional place to be able to enter picker/despatch and carrier instructions.
Reprint Label: Allows the user to reprint picking labels.
Toggle Confirm Flag: Changes individual lines from ‘C’ to ‘N’ and vice versa allowing the user to confirm specific order lines.
Ancillary Charges: Allows the user to enter additional charge information for the order's).
Single Pack & Despatch: Takes the user to the quick pick/pack/despatch for a single order.
COD Details: Enables the user to add/amend COD information entered at order entry.
References: Takes the user to a popup screen to enter the container number for the selected orders.
- When the user clicks the ‘Options’ button the screen as shown is displayed. This gives the user additional options during pick confirmation. Options are:-
Cancel Order: Cancels the order – note, if Edi PICK messages are to be used, this will trigger a zero quantity cancellation pick message.
Reject: As per the ‘Toggle Confirm Flag’ sets the status of all orders at status ‘C’ back to ‘N’
Exit Options: Takes the user back to the main screen.
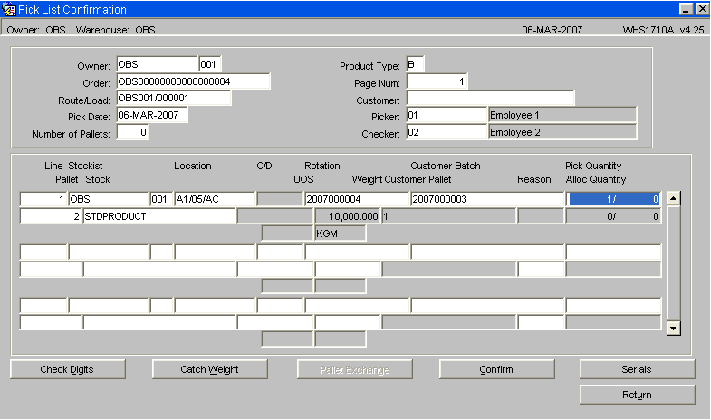
Pick List Confirmation Details (WHS1710A)
In this screen users can make changes to the quantities picked. Note, this screen can also be used to append an order line. This means that if an employee has gone to the location but there is no stock, but has found alternative stock, they can zero off the original line and append a new pallet on. This will zero the picked quantity n the original location and increase the amount in the new location. NOTE, this will free the original stock. If there is no stock there, or it is damaged, Stock Control should put this pallet on hold or adjust the pallet until an investigation can be carried out. Otherwise the stock will be once more available for future orders. In order to append a line, you need to click the ‘+’ icon. The cursor will then move to the next line for entry. The Line numbers must be sequential. The header information will be defaulted from the previous screen.
Field Information:
- Line: The line number of the order for this product / pallet combination. Display only unless appending a new line.
- Stockist: The owner code and sub code of the stock line to be confirmed / amended. Display only unless appending a new line.
- Location: The location code of the stock line to be confirmed / amended. Display only unless appending a new line.
- CD: Allows the user to enter check digits. Only enabled if check digits are turned on in System Parameters.
- Rotation: The system rotation of the stock line to be confirmed / amended. Display only unless appending a new line.
- Customer Batch: The customer rotation (batch) of the stock line to be confirmed / amended. Display only unless appending a new line.
- Pick Quantity: The quantity to be pick confirmed. Note, this cam be amended to a value equal or less that the amount shown i.e. for a short pick of 1, the quantity above would be taken to 1.
- Pallet: The system pallet id of the stock line to be confirmed / amended. Display only unless appending a new line.
- Reason: A reason code for the amendment of the pick quantity – the field will only be enabled if the pick quantity has been changed or if a new line is being appended.
- Alloc Qty: The quantity of stock allocated to the order. Any amendments can only be made up to this quantity. Display only.
Note:
- The Check digits button will take the user to the C/D field in order to enter check digits.
- Catch Weight: Allows the user to enter the catch weights of each pallet (or carton) if required. Determined by the catch weight flag of the product in stock maintenance.
- Pallet Exchange: Allows the user to ‘substitute’ one pallet for another (similar to substitution at pick conf.)
- Confirm: Pick Confirms the specific page.
- Serials: Determined by the serial numbering flags on stock maintenance, this button will take the user either to a serial number selection or entry screen. For more details on serial entry, see the Goods receipt user guide.
- Return: takes the user back to the main pick confirmation page.

