Order Templates
This screen allows you to enter order templates.
![]() Note: In practically all ways, this screen works in the same way as the Orders screen.
Note: In practically all ways, this screen works in the same way as the Orders screen.
The screen has a more complex query filter than normal, due to the amount of data available to be entered for orders.
In this case, you select the field to be filtered from a drop-down list of all fields, then the operator, and then the value.
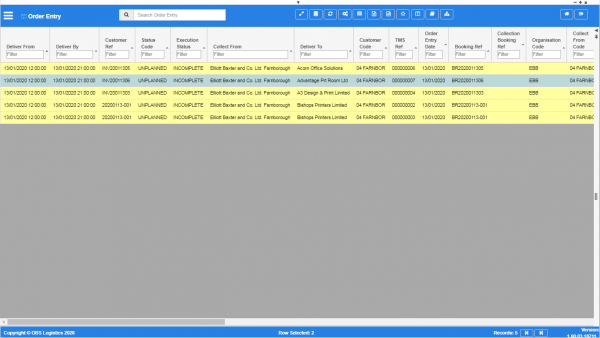
Orders - list
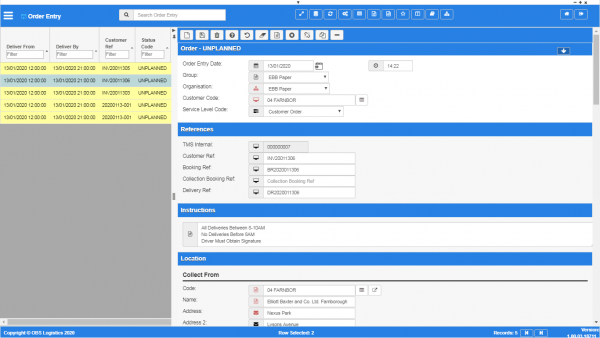
Orders - status, references, type, instructions
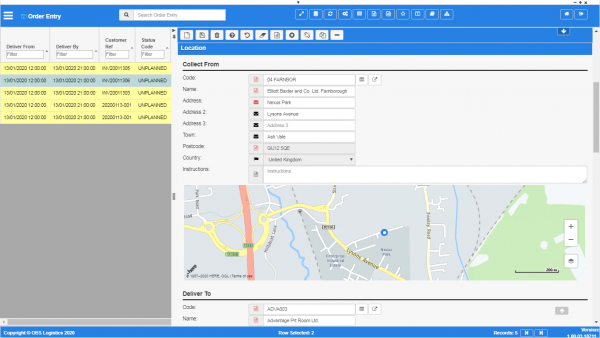
Orders - locations
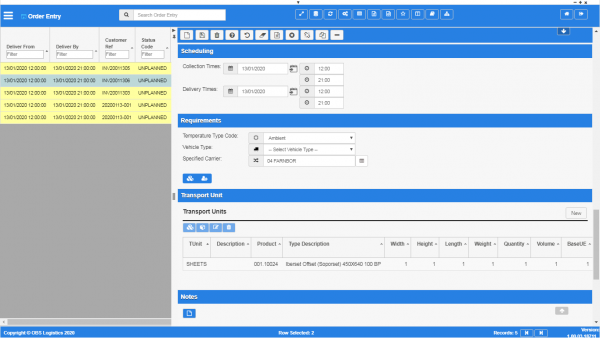
Orders - scheduling, requirements, transport units
Orders - parameters, audit


The list of fields are:
- Deliver From.
- Deliver By.
- Customer Ref.
- Status Code.
- Execution Status.
- Collect From.
- Deliver To.
- Customer Code.
- TMS Ref.
- Order Entry Date.
- Booking Ref.
- Collection Booking Ref.
- Organisation Code.
- Collect From Code.
- Collect Address Line 1.
- Collect Address Line 2.
- Collect Address Line 3.
- Collect Town.
- Collect Country Code.
- Collect PostCode.
- Collect Postal Region.
- Deliver To Code.
- Deliver Address Line 1.
- Deliver Address Line 2.
- Deliver Address Line 3.
- Deliver Town.
- Deliver Country Code.
- Deliver PostCode.
- Deliver Postal Region.
- Collect From.
- Collect By.
- Owner Location Name.
- Owner Address Line 1.
- Owner Address Line 2.
- Owner Address Line 3.
- Owner PostCode.
- Owner Postal Region.
- Total Quantity.
- Total Volume (m³).
- Total Weight (KG).
- Total BaseUE.
- Revenue.
- Cost.
- Margin.
- Active.
- Created By.
- Created Date.
- Last Updated By.
- Last Updated Date.
- Last Active Change By.
- Last Active Change Date.
- Last Process Id.
- Update Counter.
The operators are:
- Is Equal To - the orders' data must match your entered criteria exactly.
- Is Not Equal To - the orders' data must not match your entered criteria exactly.
- Is Greater Than - the orders' data must be greater, alphabetically or numerically, that your entered criteria. Note that symbols and a space are considered "less than" alphabetic or numeric data.
- Is Less Than - the orders' data must be less than, alphabetically or numerically, that your entered criteria. Note that symbols and a space are considered "less than" alphabetic or numeric data.
- Is Greater or Equal To - the orders' data must be greater than or exactly equal to, alphabetically or numerically, that your entered criteria. Note that symbols and a space are considered "less than" alphabetic or numeric data.
- Is Less Than or Equal To - the orders' data must be less than or exactly equal to, alphabetically or numerically, that your entered criteria. Note that symbols and a space are considered "less than" alphabetic or numeric data.
- Is In - the orders' data must be one of the values you listed in your criteria.
- Is Not In - the orders' data must be one of the values you listed in your criteria.
- Is Like - the orders' data must be similar to your entered criteria. Note that you must use a percentage symbol as a wildcard e.g. to find anything with the word "PLAN" anywhere, enter %PLAN%, but find only things that start with "PLAN", enter PLAN%.
- Is Not Like - the orders' data must be similar to your entered criteria. The percentage wildcard can also used here.
When you have entered your query criteria, you can run the query using the Submit button.
You can clear the criteria entered by clicking the Reset button. This will display the Results Table, as seen below.
The pop-up can be closed with the Cancel button or by closing the pop-up window.
You can choose to display data as follows:
- Deliver From.
- Deliver By.
- Customer Ref.
- Status Code.
- Execution Status.
- Collect From.
- Deliver To.
- Customer Code.
- TMS Ref.
- Order Entry Date.
- Booking Ref.
- Collection Booking Ref.
- Organisation Code.
- Collect From Code.
- Collect Address Line 1.
- Collect Address Line 2.
- Collect Address Line 3.
- Collect Town.
- Collect Country Code.
- Collect PostCode.
- Collect Postal Region.
- Deliver To Code.
- Deliver Address Line 1.
- Deliver Address Line 2.
- Deliver Address Line 3.
- Deliver Town.
- Deliver Country Code.
- Deliver PostCode.
- Deliver Postal Region.
- Collect From.
- Collect By.
- Owner Location Name.
- Owner Address Line 1.
- Owner Address Line 2.
- Owner Address Line 3.
- Owner PostCode.
- Owner Postal Region.
- Total Quantity.
- Total Volume (m³).
- Total Weight (KG).
- Total BaseUE.
- Revenue.
- Cost.
- Margin.
- Active.
- Created By.
- Created Date.
- Last Updated By.
- Last Updated Date.
- Last Active Change By.
- Last Active Change Date.
- Last Process Id.
- Update Counter.
The results table will colour the rows based on the order status. You can control the colours of each order status displayed using the Order Status screen.
The screen has the following additional actions on the screen header:
 Booking - you can enter booking information once you have selected an order.
 Consolidate - you can choose to consolidate multiple orders together by selecting multiple orders and then clicking this button.
Consolidating Orders
You can select multiple orders by clicking when using the shift and/or control keys.
![]() Note: The orders you select must be UNPLANNED and have the same delivery and collect locations.
Note: The orders you select must be UNPLANNED and have the same delivery and collect locations.
Once you have selected multiple orders, you can click the ![]() Consolidate button in the screen header. The screen will display a pop-up window showing a summary of all of the orders.
Consolidate button in the screen header. The screen will display a pop-up window showing a summary of all of the orders.
You can confirm the consolidation by clicking the Consolidate Records button, or cancel the consolidation by closing the window.
Booking an Order
When you click this button, the screen will display a pop-up window to enter booking information.
You can enter the following:
- Collect/Deliver - a option to select whether the booking information applies to the collection or the delivery of the order.
- Booking Ref - a booking reference as provided to you.
- Booking Date - the date of the booking. You can enter the date directly or use the
 Calendar button provided.
 - Booking From - the start time of the booking window.
- Booking To - the end time of the booking window.
You can save the booking information by clicking the Book In button, or cancel entry using the Cancel button or closing the pop-up window.
Adding or Editing an Order
The following actions are available on the Details panel:
 New - create a new record.
 Save - save a new record or changes to an existing record.
 Delete - delete an existing record.
 Help - help on this screen.
 Undo - undo change made since last save.
 Clear - clear all fields.
 Template - create an order from a template.
 Cancel - cancel an order.
 Split - Split an order.
 Copy - Copy an existing order.
 Toggle - toggle display of all accordion headers.
Order Template
You can create an order from a saved order template. You can create these in the Order Templates screen.
When you click this button, the screen will display a list of all order templates created in the system:
- Organisation Code.
- Customer Code.
- Collect From Name.
- Deliver To Name.
To create a new order, select the template from the list and click the Submit button. a new order will be created, with the fields populated from the template, ready for you to amend and save like normal. Note that all details are copied, including lines and items.
Cancel an Order
You can cancel an order by clicking the ![]() Cancel button. The order's status will be set to cancelled and the order re-displayed with this status.
Cancel button. The order's status will be set to cancelled and the order re-displayed with this status.
Split an Order
You can split an order into multiple additional orders.
When you find the order you want to copy, click the ![]() Split button. The screen will display a list of all the order lines.
Split button. The screen will display a list of all the order lines.
- TUnit - Transport Unit Code.
- Product - Product Type Code.
- Type Description.
- Width.
- Height.
- Length.
- Weight.
- Quantity.
- Volume.
- BaseUE - Base Unit Equivalent.
- Haz.
- Stackable.
- Include - a tick box to indicate that this order line is included in the split.
You can then indicate how many orders to split this into - the default is 2. You can split the order lines selected into new orders using the Split button, or cancel the split with the Cancel button or by closing the window.
Copy an Order
You can copy an existing order to create a new order.
When you find the order you want to copy, click the ![]() Copy button. This will create a copy of the order with a new reference, ready for you to amend and save like normal. Note that all details are copied, including lines and items.
Copy button. This will create a copy of the order with a new reference, ready for you to amend and save like normal. Note that all details are copied, including lines and items.
Order section
The header will display the status of the order. This includes:
- The TMS reference number.
- The order status.
- The execution status.
- Totals:
- Weight.
- Volume.
- BUE.
The section includes the following core order fields:
- Order Entry Date and time.
- Group - a drop-down list of all customer groups created in the system. You can maintain these in the Customer Groups screen.
- Organisation - a drop-down list of all organisations created in the system. You can maintain these in the Organisation screen.
- Customer Code - the customer code for the order. You can maintain these in the Customer screen. You can look up the available customer codes using the
 Lookup button to the right of the value entry. The screen will display a pop-up window listing the available values. You can filter the values on the list by typing in the provided filter box and clicking the Filter button. You can select a value from the list, or cancel the look up by closing the window.
 - Service Level Code - a drop-down list of the service levels for the order. You can maintain these in the Service Level screen.
References section
- TMS Internal - this is displayed for reference.
- Customer Ref.
- Booking Ref.
- Collection Booking Ref.
- Delivery Ref.
Instructions section
You can enter general order instructions for the execution of the order here.
Location section
You can enter the details of the order addresses here.
The section allows you to enter:
- Collect From - the address from which you will pick up the goods on the order.
- Deliver To - the address to which you will deliver the goods on the order.
Each address section allows you to enter the following information:
- Code - the location code. You can maintain locations in the Locations screen, or you can use the View Details button provided if you have entered a location, which will open a new tab showing the location information. You can enter a location code directly or use the Lookup button to the right of the value entry. The screen will display a pop-up window showing all locations configured in the system. You can select a location by clicking on the row or cancel entry by closing the window. You can refresh the order location details from the location code by pressing the
 Refresh button.
 - Name.
- Address.
- Address 2.
- Address 3.
- Town.
- Postcode.
- Country.
- Instructions - specific instructions for execution when at this address.
The screen will display the location on a map beneath the address. As the address is entered or modified, the Latitude and Longitude of the address will be calculated and displayed.
When both addresses are entered, the screen will display the following information below the delivery address:
- Distance (KM).
- Expected Driving Time.
Contacts section
You can add any number of contacts here.
You can add a contact by clicking the ![]() New button in the section.
New button in the section.
You can edit an existing contact by selecting the contact row in the table and then clicking the ![]() Edit button in the section header.
Edit button in the section header.
The screen will display a pop-up window to enter the following:
- Title.
- Forename.
- Surname.
- Job Title.
- Contact Mediums - a list of all contact media for the customer.
- Primary Phone.
- Primary Email.
- Primary Mobile.
You can add additional contact media by selecting the media type from the drop-down list. The screen will add the medium to the Contact Mediums list above. Additional contact media:
- Email.
- Fax.
- Mobile.
- Skype.
- Facebook.
- Twitter.
You can delete an existing contact by selecting the contact row in the table and then clicking the ![]() Delete button in the section header.
Delete button in the section header.
Scheduling section
- Collection Times - you can enter the collection window using the date and times provided. You can enter the date directly or use the Calendar button provided.
- Delivery Times - you can enter the collection window using the date and times provided. You can enter the date directly or use the Calendar button provided.
If the system has any schedule rules configured, the screen will use the organisation, service level and/or customer and zones of the from and to locations to find a compatible schedule rule. If one is found, the system will automatically default the collection and delivery windows for the order based on the rule.
Requirements section
- Temperature Type Code - a drop-down list of all temperature types configured in the system. You can maintain these in the Temperature Type screen.
- Vehicle Type - a drop-down list of all vehicle types configured in the system. You can maintain these in the Vehicle Types screen.
- Specified Carrier - the specific carrier that is required for this order. You can maintain these in the Carriers screen. You can look up the available carrier codes using the Lookup button to the right of the value entry. The screen will display a pop-up window listing the available values. You can filter the values on the list by typing in the provided filter box and clicking the Filter button. You can select a value from the list, or cancel the look up by closing the window.
Here you can also indicate any special requirements that have been configured for orders in the system. You can configure Order Requirements in the Requirements screen.
The following are currently available:
- Ambient Temp only.
- Banksman.
- Dangerous.
- Detention.
- Abnormal Load Escort.
- Moffet.
- Extra Man Power.
- Installation at Delivery Location.
- Two Man Delivery.
You can enabled a special requirement by clicking it, and disable it by un-clicking it.
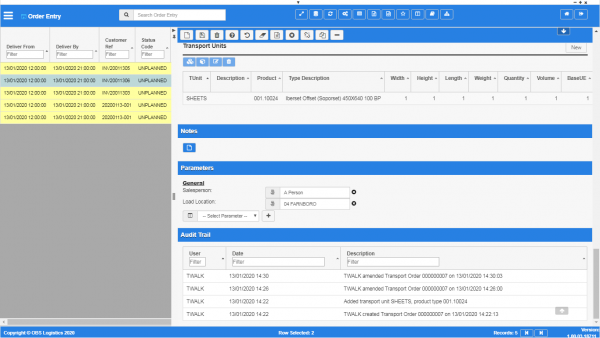
Transport Unit section
You can enter the transport units, products or individual items transported on this order in this section.
You can add a quantity of transport units by clicking the ![]() New button in the section header.
New button in the section header.
You can edit an existing transport unit by selecting the row in the table and then clicking the ![]() Edit button in the section header.
Edit button in the section header.
Note that, when you select an existing transport unit, if there are any products or items to deliver, these will be shown in a number of tables below the transport units table:
- Products For Selected Transport Unit.
- Assets For Selected Transport Unit.
- Products For Selected Asset.
The screen will display a pop-up window to allow you to identify the following information:
- Customer Order Reference - an optional references against the ordered line.
- Transport Unit Code - a drop-down list of the transport unit types configured in the system. You can maintain these in the Transport Units screen.
- Product Type - The product type contained by the transport unit. You can maintain these in the Product Types screen. You can look up the available product types using the Lookup button under the value entry. The screen will display a pop-up window listing the available values. You can filter the values on the list by typing in the provided filter box and clicking the Filter button. You can select a value from the list, or cancel the look up by closing the window.
- Description 1.
- Description 2.
- Pack Quantity - the pack quantity of the product.
- Quantity.
- Width - defaulted from the transport unit type after you enter the quantity. You can change this here if required.
- Height - defaulted from the transport unit type after you enter the quantity. You can change this here if required.
- Length - defaulted from the transport unit type after you enter the quantity. You can change this here if required.
- Weight - defaulted from the transport unit type after you enter the quantity. You can change this here if required.
- Volume - defaulted from the transport unit type after you enter the quantity. You can change this here if required.
- BaseUE - defaulted from the transport unit type after you enter the quantity. You can change this here if required.
- Hazardous - a check box indicating whether this contacts hazardous product.
- Stackable - a check box indicating whether these transport units are stackable.
You can save the transport unit quantity by clicking the Save button or cancel entry by closing the window.
You can delete an existing transport unit by selecting the row in the table and then clicking the ![]() Delete button in the section header.
Delete button in the section header.
You can add specific products to a transport unit by selecting the row in the table and then clicking the New Product button in the section header.
You can edit an existing product by selecting the row in the table and then clicking the ![]() Edit button above the "Products For Selected Transport Unit" table.
Edit button above the "Products For Selected Transport Unit" table.
The screen will display a pop-up window to allow you to identify the following information:
- Product.
- Description.
- Quantity.
- Unit Weight.
- Height.
- Width.
- Length.
- Volume.
- Unit Factor.
You can save the product by clicking the Save button or cancel entry by closing the window.
You can delete an existing product by selecting the row in the table and then clicking the ![]() Delete button above the "Products For Selected Transport Unit" table.
Delete button above the "Products For Selected Transport Unit" table.
You can add specific assets/identified items to a transport unit by selecting the row in the table and then clicking the New Asset button in the section header.
You can edit an existing asset by selecting the row in the table and then clicking the ![]() Edit button above the "Assets For Selected Transport Unit" table.
Edit button above the "Assets For Selected Transport Unit" table.
The screen will display a pop-up window to allow you to identify the following information:
- Asset ID.
- Description.
- Reference.
You can save the asset by clicking the Save button or cancel entry by closing the window.
You can delete an existing asset by selecting the row in the table and then clicking the ![]() Delete button above the "Assets For Selected Transport Unit" table.
Delete button above the "Assets For Selected Transport Unit" table.
You can add specific products to an asset by selecting the row in the table and then clicking the New Product above the "Assets For Selected Transport Unit" table.
You can edit an existing product by selecting the row in the table and then clicking the ![]() Edit button above the "Assets For Selected Transport Unit" table.
Edit button above the "Assets For Selected Transport Unit" table.
The screen will display a pop-up window to allow you to identify the following information:
- Product.
- Description.
- Quantity.
- Unit Weight.
- Height.
- Width.
- Length.
- Volume.
- Unit Factor.
You can save the product by clicking the Save button or cancel entry by closing the window.
You can delete an existing product by selecting the row in the table and then clicking the ![]() Delete button above the "Assets For Selected Transport Unit" table.
Delete button above the "Assets For Selected Transport Unit" table.
Finance section
This sections shows a summary of the revenue, cost and margin for the order. This section also allows you to maintain additional order charges associated to the order, which will generate revenue to the order.
You can add an order charge by clicking the ![]() New button in the section header.
New button in the section header.
You can edit an existing order charge by selecting the row in the table and then clicking the ![]() Edit button in the section header.
Edit button in the section header.
The screen will display a pop-up window to allow you to identify the following information:
- Description - the description of the charge or service.
- Quantity - the quantity of this chargeable item or service.
- Price - the price of this chargeable item or service.
- Value - the screen calculates this from the quantity and price.
You can save the charge quantity by clicking the Save button or cancel entry by closing the window.
You can delete an order charge by selecting the row in the table and then clicking the ![]() Delete button in the section header.
Delete button in the section header.
Trips section
If this order is planned onto any trips, the screen will display the trips onto which it has been planned here.
The screen will display:
- Trip Ref - the trip reference.
- Trip Name - the trip name. This may also be the route code, if the trip was generated from a fixed route template.
- Trunk Trip - a check-box, indicating whether the trip is a trunk trip.
- Trip Status - the trip status.
- Trip Start - the location at which the trip starts.
- Load - the location at which the order is loaded.
- Unload - the location at which the order is unloaded.
Notes section
You can add notes through the Notes section.
You can click the ![]() New button in the Notes section to create a new note. This will be tagged with your user name and date/time.
New button in the Notes section to create a new note. This will be tagged with your user name and date/time.
Any notes may be removed by clicking the x in the corner of the note.
Parameters section
You can set parameters here to control additional functionality.
You can select a parameter to add using the provided Select Parameter drop-down list and clicking the ![]() Add button.
Add button.
The available parameters are configurable in the Order Parameters screen.
Once you have selected the parameter, the screen will display it in this section. Parameters are displayed in the sequence which your system administrators have configured them to be displayed. Once the parameter is added, you can enter the value - in general, the screen will validate the value or will provide a list of values to select, depending on the parameter settings.
You can remove a parameter by clicking the ![]() Cancel button next to the parameter value.
Cancel button next to the parameter value.
The following parameters are currently available:
| Label | Description | Long Description | Type | Values | |
|---|---|---|---|---|---|
| Load Location | Load Location | Load Location | TextBox | String | |
| Order Comment ID | Order Comment ID | Order Comment ID | TextBox | String | |
| Order Creation Date | Order Creation Date | Order Creation Date | TextBox | String | |
| Route | Route | Route | TextBox | String | |
| Salesperson | Salesperson | Salesperson | TextBox | String | |
| Transport Unit Colour | Transport Unit Colour | Transport Unit Colour | DropDownList | Red,Blue,Green,Yellow |
Audit Trail section
Each time you make a change to any element of the data and save it, the system keep an audit trail of changes. The screen displays these in a table here. By default, the screen keeps this section closed.
The table displays:
- User - the user ID that made the change.
- Date - the date and time that the change was made.
- Description - a detailed description of what was changed.