PDA Job Details: Difference between revisions
No edit summary |
(Added Service Tyres link) |
||
| (8 intermediate revisions by 2 users not shown) | |||
| Line 1: | Line 1: | ||
__NOTOC__ | |||
Selecting a job from the Job List will show the user the job, incstructions and customer contact details (on a Job | |||
Details screen). The user can back out of the selected Job and view any Job on the list. | |||
This screen displays full details of the job being undertaken. | This screen displays full details of the job being undertaken. | ||
This screen | This screen is displayed regardless of job type. The job type is displayed on the top of the screen along with the Job Reference, as configured for the system. The status of the job will also be displayed. | ||
<gallery widths= | <gallery widths=300px heights=450px perrow=3> | ||
File: | File:ePOD_Job_Details.PNG|''Job Details'' | ||
File:ePOD_Job_Details2.PNG|''Instructions'' | |||
File: | |||
</gallery> | </gallery> | ||
Clicking on the Job Reference will display a pop-up showing all references for the job. | |||
The screen has several tabs, each showing: | |||
* ''Address & Contact'' tab | |||
** The Job Type (Collection, Delivery, Service) | |||
** The customer details (Customer Code, Name, Address and Postcode) | |||
** The contact information (Contact name and number) | |||
** Planned Start and End Time of the job. | |||
* ''Instructions'' tab | |||
** The Instructions for the job. The user will be forced to view the job instructions before starting the Job. | |||
** Total Weight/Unique Product counts, if configured for your device. | |||
** {{Note}} If this is a consolidated job (for collections or deliveries), there will be instructions and product counts for each job separated into sections, showing the job as a title for each section. | |||
** Service details, for service jobs, containing | |||
*** Service Type | |||
*** Vehicle information - either the specified vehicle for the service, or a count of vehicles on the service if there are several. | |||
* ''Expenses'' tab - this is configurable whether the device shows any expenses information on this screen, and is covered below in more detail. | |||
{{Note}} All information displayed on these screens is subject to styling, and can be removed as part of that service. | |||
Clicking on or swiping between the tabs will display the information. | |||
From these tabs, the user can: | |||
* Call the customer by clicking on the '''Call''' button, if a phone number has been provided, and the device has telephony capability. In this case, the device will display the dialler with the Phone number already entered. | |||
* Navigate to the customer's address by clicking on the '''Navigate''' button. Navigation is only available after the Job is marked as In Progress, or if Job Arrival Times are not being entered. | |||
* SMS message the customer. The device will display the SMS message, with the phone number and job details already entered. | |||
If the jobs are consolidated, the '''<''' and '''>''' buttons can be used to move between the all the consolidated jobs, to see and specific details. The Instructions tab will show all instructions for all the jobs, as well as any additional information passed through for the job (for example, the total number of boxes and box types required, if there are any special packing materials needed, etc). {{Note}} This additional information may only be available on jobs created from other systems. | |||
If '''Cancel Job''' or '''Cancel Jobs''' is pressed, this job will be cancelled. The application will display an [[PDA Exception|Exception]] screen and prompt for entry of a reason code indicating why this job was cancelled. | |||
== Job Expenses == | |||
If Time and Expenses are enabled in the system, these may be entered against a job in this screen, at any time before submitting the job as complete. | |||
<gallery widths=300px heights=450px perrow=3> | |||
File:ePOD_Job_Details3.PNG|''Job Expenses list'' | |||
File:ePOD_Job_Details4.PNG|''New time or expense'' | |||
</gallery> | |||
The user will be | Expenses may be added through the provided '''Add''' button. The user may enter: | ||
* The time or expense category. This is selected from a drop-down list, which are maintainable in the Admin system. Categories can be either Time or Expense types. | |||
* Description - a free-text description of the time or expense | |||
* Date - the date of the time or expense may be added | |||
* Currency - for Expense types only, a currency is requested. This is free text entry. | |||
* Value - the time (for Time categories) or amount (for Expense categories). | |||
All elements are required entry - attempting to add the expense by clicking the provided '''Add''' button before all element have been entered will result in a pop-up showing the validation error to the user. | |||
Once added, the expense will be added to the list and displayed. | |||
Entries can be edited, viewed or deleted by selecting the row and selecting the action from the pop-up actions list. | |||
== Starting a Job == | |||
When the user has selected their Job, they can choose the Job with the '''Start Job''' button. | |||
{{Note}} If Job Arrival is not configured for the system, it is recommended that the user navigates to the destination location first using the map button, which will be immediately available in this configuration. | |||
Delivery instructions are provided from several sources (specific instructions against the job and/or standing | |||
instructions for the customer e.g. "Ring 1hr before arrival"). If there have been instructions provided on the Job and the | |||
user has not already switched to this tab to view the instructions, the application will switch to the ''Instructions'' | |||
tab, to force the user to see the instructions before starting. | |||
When starting a job, the system may be configured to check that the jobs are being completed in sequence. The system may be configured to: | |||
* Refuse to allow jobs to be re-sequenced. In this case, when attempting to start the job, if this is not the lowest sequence job still available, the application will display an alert informing the user that this job is not the lowest sequence job and may not be started. The user must select the lowest sequence job to start. | |||
* Allow re-sequencing with a warning. In this case, when attempting to start the job, if this is not the lowest sequence job still available, the application will display an alert informing the user that this job is not the lowest sequence job. The user is offered a choice of starting the job anyway or returning to the job selection. | |||
* Allow at all times. No check is performed and the job may be started. | |||
{{Note}} The re-sequencing configuration affects ''only'' sequenced jobs. So, if there are several jobs with with the same sequence, these jobs may be completed in any order, as long as they are the lowest sequence jobs. Jobs without a sequence at all (zero or blank) may be started at any time, before or after sequenced jobs. | |||
When clicking this button to start or arrive at the job, the application normally performs a check whether the | |||
job has been changed since it was loaded on the device. This can be disabled through configuration, but is recommended to be left to ensure that the job is as up-to-date as possible before starting. If there are changes to the job, the user will be informed and the screen will refresh. | |||
== Using Navigation == | |||
When a Job is successfully started, this will take the Job to 'In Progress' status, at this point the 'Start Job' button will change to an 'Arrive Job' button and the navigation icon is shown. | |||
The navigation on the device depends on the navigation software installed on the device and the configuration of the system. | |||
For TomTom WEBFLEET-enabled systems, being executed on TomTom PRO devices with WEBFLEET, the application will simply display the TomTom Nav App, which will have a list of orders to be completed. The navigation to the location will be completed by following the WEBFLEET order process configured in the WEBFLEET application. | |||
In the event where this order list has been removed from the WEBFLEET application, navigation is still possible - long-pressing on the Map icon will present options allowing the user to directly navigate straight to the customer's address. It is also possible to make this the default while processing this work-load. | |||
Direct navigation will use the information against the job within the ''CALIDUS'' ePOD/eServ application to issue an instruction to the installed navigation software. This will be through the TomTom navigation application for TomTom devices and Google navigation for any other device. Any other navigation software that supports this method (for example CoPilot Truck) will also obey this instruction to directly navigate. The destination address will be entered in the device and will allow immediate navigation to the address. | |||
{{Note}} If provided on the job, the direct navigation function will use the GPS co-ordinates of the address. If not provided, the instruction will send the address lines and postcode to the navigation software. In that way, if specific locations are provided, they will be used in preference to attempting to geo-locate through the address and postcode only. | |||
== Arriving at a Job == | |||
Once arrived at the destination, the user should switch back to the ''CALIDUS'' ePOD/eServ mobile | |||
application. This can be through the 'All apps' icon on the home screen or through a configured short-cut on | |||
the task bar, or simply backing out of the navigation software to return to the mobile device application. | |||
The user can then indicate arrival and start processing the Job by clicking the '' Arrive Job'' button (or ''Start Job'' if job arrival is not configured). When the job is confirmed as Arrived, if no post-arrival tasks are configured, the device will move on to the appropriate job processing screen, depending on the job type: | |||
* [[PDA Collection|Collection]] | * [[PDA Collection|Collection]] | ||
* [[PDA Delivery|Delivery]] | * [[PDA Delivery|Delivery]] | ||
* [[PDA Service|Service]] | * [[PDA Service|Service]] | ||
* [[PDA Service Tyres|Service Tyres]] - if the system type is Fleet Management (Tyre) then the Service Tyres process is shown instead. | |||
Post-arrival tasks that may be configured are: | |||
* Pre-work Checks | |||
* Pre-job Signature | |||
Additionally, some job types (for example, vehicle swaps) do not require further processing. | |||
Each of these processes in covered in detail below. | |||
== Pre-work Checks == | |||
After arrival (or starting a job is Job Arrival is not enabled), the application may be configured for some post-arrival checks. For example, scanning of a location barcode to confirm arrival at the correct location. | |||
These checks are configured through user-defined fields in the Admin system and, as such, could contain any information at all. The screen will only be shown if some pre-work checks have been configured for the job or jobs. | |||
Typically, these checks will include confirmation or cancellation buttons and validation, to ensure that the pre-work checks have been entered correctly. | |||
The following screens show an example of location barcode scanning after arrival to a site. | |||
<gallery widths=300px heights=450px perrow=3> | |||
File:ePOD_Job_Prework1.PNG|''Pre-work - location barcode'' | |||
File:ePOD_Job_Prework2.PNG|''Pre-work - Validation'' | |||
</gallery> | |||
== Pre-job Signature == | |||
The system may be configured to capture a pre-job signature, for example, to capture a Waiver document signed by the gatehouse staff on the way into a site. | |||
If configured, the application will display a signature screen after arrival to the job. | |||
<gallery widths=300px heights=450px perrow=3> | |||
File:ePOD_Job_PrejobSign1.PNG|''Pre-job Signature'' | |||
</gallery> | |||
The Terms and Conditions displayed here may be configured in the Admin system to display and capture essential information at this stage. | |||
== Change/Swap Vehicle == | |||
If the jobs being actioned require a change of vehicle, the device will display the vehicle you are swapping to, and you will be asked to confirm this when starting the job. | |||
If swapping vehicles with another driver at this location (a cross-dock, or round-robin), the user will not be required to scan all the items onto or off the vehicle (using the collection and delivery processes. Instead, the application will simply display '''Complete Job''' - when pressed, this will move on to [[PDA Job Confirmation|Job Confirmation]]. | |||
If | If swapping vehicle, the application will prompt to complete the Vehicle Checks for the new vehicle, if the system if configured for them and they are required. | ||
[[Category:UG 291097 EPOD Client User Guide|310]] | [[Category:UG 291097 EPOD Client User Guide|310]] | ||
Latest revision as of 13:39, 6 August 2024
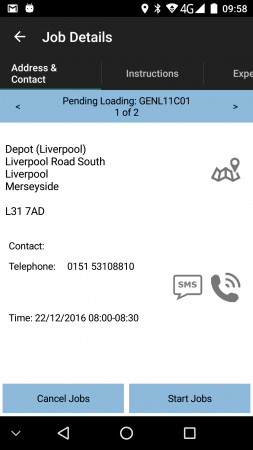
Selecting a job from the Job List will show the user the job, incstructions and customer contact details (on a Job Details screen). The user can back out of the selected Job and view any Job on the list.
This screen displays full details of the job being undertaken.
This screen is displayed regardless of job type. The job type is displayed on the top of the screen along with the Job Reference, as configured for the system. The status of the job will also be displayed.
Job Details
Instructions


Clicking on the Job Reference will display a pop-up showing all references for the job.
The screen has several tabs, each showing:
- Address & Contact tab
- The Job Type (Collection, Delivery, Service)
- The customer details (Customer Code, Name, Address and Postcode)
- The contact information (Contact name and number)
- Planned Start and End Time of the job.
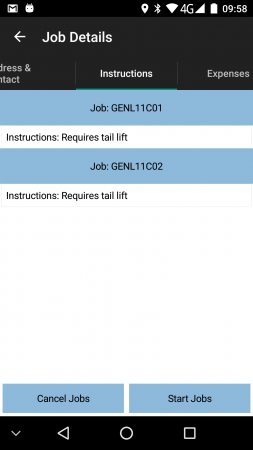
- Instructions tab
- The Instructions for the job. The user will be forced to view the job instructions before starting the Job.
- Total Weight/Unique Product counts, if configured for your device.
 Note: If this is a consolidated job (for collections or deliveries), there will be instructions and product counts for each job separated into sections, showing the job as a title for each section.
- Service details, for service jobs, containing
- Service Type
- Vehicle information - either the specified vehicle for the service, or a count of vehicles on the service if there are several.
- Expenses tab - this is configurable whether the device shows any expenses information on this screen, and is covered below in more detail.
![]() Note: All information displayed on these screens is subject to styling, and can be removed as part of that service.
Note: All information displayed on these screens is subject to styling, and can be removed as part of that service.
Clicking on or swiping between the tabs will display the information.
From these tabs, the user can:
- Call the customer by clicking on the Call button, if a phone number has been provided, and the device has telephony capability. In this case, the device will display the dialler with the Phone number already entered.
- Navigate to the customer's address by clicking on the Navigate button. Navigation is only available after the Job is marked as In Progress, or if Job Arrival Times are not being entered.
- SMS message the customer. The device will display the SMS message, with the phone number and job details already entered.
If the jobs are consolidated, the < and > buttons can be used to move between the all the consolidated jobs, to see and specific details. The Instructions tab will show all instructions for all the jobs, as well as any additional information passed through for the job (for example, the total number of boxes and box types required, if there are any special packing materials needed, etc). ![]() Note: This additional information may only be available on jobs created from other systems.
Note: This additional information may only be available on jobs created from other systems.
If Cancel Job or Cancel Jobs is pressed, this job will be cancelled. The application will display an Exception screen and prompt for entry of a reason code indicating why this job was cancelled.
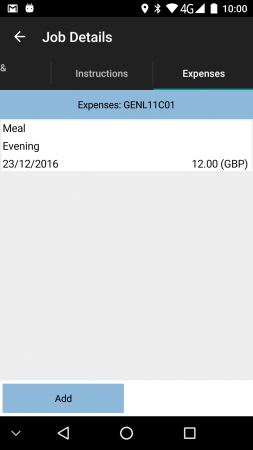
Job Expenses
If Time and Expenses are enabled in the system, these may be entered against a job in this screen, at any time before submitting the job as complete.
Job Expenses list

New time or expense


Expenses may be added through the provided Add button. The user may enter:
- The time or expense category. This is selected from a drop-down list, which are maintainable in the Admin system. Categories can be either Time or Expense types.
- Description - a free-text description of the time or expense
- Date - the date of the time or expense may be added
- Currency - for Expense types only, a currency is requested. This is free text entry.
- Value - the time (for Time categories) or amount (for Expense categories).
All elements are required entry - attempting to add the expense by clicking the provided Add button before all element have been entered will result in a pop-up showing the validation error to the user.
Once added, the expense will be added to the list and displayed.
Entries can be edited, viewed or deleted by selecting the row and selecting the action from the pop-up actions list.
Starting a Job
When the user has selected their Job, they can choose the Job with the Start Job button.
![]() Note: If Job Arrival is not configured for the system, it is recommended that the user navigates to the destination location first using the map button, which will be immediately available in this configuration.
Note: If Job Arrival is not configured for the system, it is recommended that the user navigates to the destination location first using the map button, which will be immediately available in this configuration.
Delivery instructions are provided from several sources (specific instructions against the job and/or standing instructions for the customer e.g. "Ring 1hr before arrival"). If there have been instructions provided on the Job and the user has not already switched to this tab to view the instructions, the application will switch to the Instructions tab, to force the user to see the instructions before starting.
When starting a job, the system may be configured to check that the jobs are being completed in sequence. The system may be configured to:
- Refuse to allow jobs to be re-sequenced. In this case, when attempting to start the job, if this is not the lowest sequence job still available, the application will display an alert informing the user that this job is not the lowest sequence job and may not be started. The user must select the lowest sequence job to start.
- Allow re-sequencing with a warning. In this case, when attempting to start the job, if this is not the lowest sequence job still available, the application will display an alert informing the user that this job is not the lowest sequence job. The user is offered a choice of starting the job anyway or returning to the job selection.
- Allow at all times. No check is performed and the job may be started.
![]() Note: The re-sequencing configuration affects only sequenced jobs. So, if there are several jobs with with the same sequence, these jobs may be completed in any order, as long as they are the lowest sequence jobs. Jobs without a sequence at all (zero or blank) may be started at any time, before or after sequenced jobs.
Note: The re-sequencing configuration affects only sequenced jobs. So, if there are several jobs with with the same sequence, these jobs may be completed in any order, as long as they are the lowest sequence jobs. Jobs without a sequence at all (zero or blank) may be started at any time, before or after sequenced jobs.
When clicking this button to start or arrive at the job, the application normally performs a check whether the
job has been changed since it was loaded on the device. This can be disabled through configuration, but is recommended to be left to ensure that the job is as up-to-date as possible before starting. If there are changes to the job, the user will be informed and the screen will refresh.
When a Job is successfully started, this will take the Job to 'In Progress' status, at this point the 'Start Job' button will change to an 'Arrive Job' button and the navigation icon is shown.
The navigation on the device depends on the navigation software installed on the device and the configuration of the system.
For TomTom WEBFLEET-enabled systems, being executed on TomTom PRO devices with WEBFLEET, the application will simply display the TomTom Nav App, which will have a list of orders to be completed. The navigation to the location will be completed by following the WEBFLEET order process configured in the WEBFLEET application.
In the event where this order list has been removed from the WEBFLEET application, navigation is still possible - long-pressing on the Map icon will present options allowing the user to directly navigate straight to the customer's address. It is also possible to make this the default while processing this work-load.
Direct navigation will use the information against the job within the CALIDUS ePOD/eServ application to issue an instruction to the installed navigation software. This will be through the TomTom navigation application for TomTom devices and Google navigation for any other device. Any other navigation software that supports this method (for example CoPilot Truck) will also obey this instruction to directly navigate. The destination address will be entered in the device and will allow immediate navigation to the address.
![]() Note: If provided on the job, the direct navigation function will use the GPS co-ordinates of the address. If not provided, the instruction will send the address lines and postcode to the navigation software. In that way, if specific locations are provided, they will be used in preference to attempting to geo-locate through the address and postcode only.
Note: If provided on the job, the direct navigation function will use the GPS co-ordinates of the address. If not provided, the instruction will send the address lines and postcode to the navigation software. In that way, if specific locations are provided, they will be used in preference to attempting to geo-locate through the address and postcode only.
Arriving at a Job
Once arrived at the destination, the user should switch back to the CALIDUS ePOD/eServ mobile application. This can be through the 'All apps' icon on the home screen or through a configured short-cut on the task bar, or simply backing out of the navigation software to return to the mobile device application.
The user can then indicate arrival and start processing the Job by clicking the Arrive Job button (or Start Job if job arrival is not configured). When the job is confirmed as Arrived, if no post-arrival tasks are configured, the device will move on to the appropriate job processing screen, depending on the job type:
- Collection
- Delivery
- Service
- Service Tyres - if the system type is Fleet Management (Tyre) then the Service Tyres process is shown instead.
Post-arrival tasks that may be configured are:
- Pre-work Checks
- Pre-job Signature
Additionally, some job types (for example, vehicle swaps) do not require further processing.
Each of these processes in covered in detail below.
Pre-work Checks
After arrival (or starting a job is Job Arrival is not enabled), the application may be configured for some post-arrival checks. For example, scanning of a location barcode to confirm arrival at the correct location.
These checks are configured through user-defined fields in the Admin system and, as such, could contain any information at all. The screen will only be shown if some pre-work checks have been configured for the job or jobs.
Typically, these checks will include confirmation or cancellation buttons and validation, to ensure that the pre-work checks have been entered correctly.
The following screens show an example of location barcode scanning after arrival to a site.
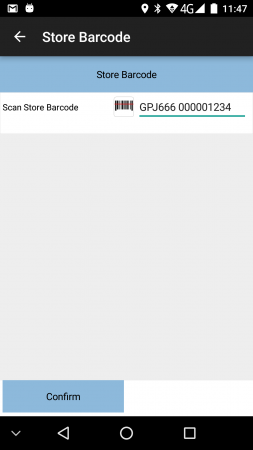
Pre-work - location barcode
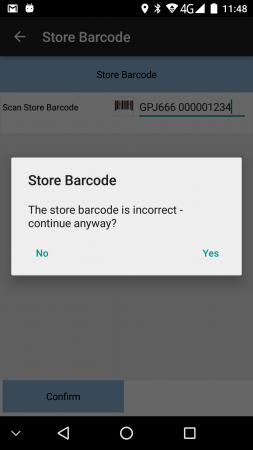
Pre-work - Validation


Pre-job Signature
The system may be configured to capture a pre-job signature, for example, to capture a Waiver document signed by the gatehouse staff on the way into a site.
If configured, the application will display a signature screen after arrival to the job.
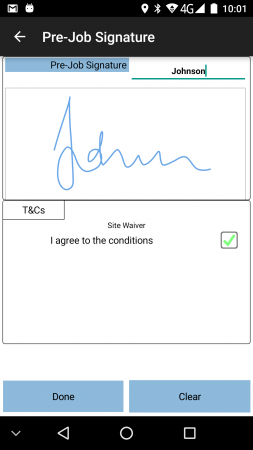
Pre-job Signature

The Terms and Conditions displayed here may be configured in the Admin system to display and capture essential information at this stage.
Change/Swap Vehicle
If the jobs being actioned require a change of vehicle, the device will display the vehicle you are swapping to, and you will be asked to confirm this when starting the job.
If swapping vehicles with another driver at this location (a cross-dock, or round-robin), the user will not be required to scan all the items onto or off the vehicle (using the collection and delivery processes. Instead, the application will simply display Complete Job - when pressed, this will move on to Job Confirmation.
If swapping vehicle, the application will prompt to complete the Vehicle Checks for the new vehicle, if the system if configured for them and they are required.